
An easy-to-use, highly customizable, and open source syringe pump and microscope system.
Documentation: https://pachterlab.github.io/poseidon/
Design principles for open source bioinstrumentation: the poseidon syringe pump system as an example.
The poseidon syringe pump and microscope system is an open source alternative to commercial systems. It costs less than $400 and can be assembled in an hour. It uses 3D printed parts and common components that can be easily purchased either from Amazon or other retailers. The microscope and pumps can be used together in microfluidics experiments, or independently for other applications. The pumps and microscope can be run from a Windows, Mac, Linux, or Raspberry Pi computer with an easy to use GUI.

- Computer Aided Design (CAD) files of the 3D printed components.
- Controller software (Python) and a graphical user interface (GUI) to control the pumps.
- Arduino firmware to send commands to the motors and receive commands from the GUI.
- Bill of materials for sourcing and purchasing materials.
- Detailed assembly instructions of hardware compnents.
- Single click executable files for Mac, Windows, Linux, and Raspberry Pi systems.

The 3D printed components can be fabricated on any desktop fused filament fabrication (FFF) 3D printer. They were designed using Autodesk Fusion 360, a proprietary CAD software that offers free academic licenses.
- Fusion360 interactive view of poseidon microscope CAD.
- Fusion360 interactive view of poseidon pump.
- STL, STEP, IGES, Fusion 360 archive files, and bill of materials are available in the
HARDWARE/folder. - Bill of materials with prices and vendor links on a Google Spreadheet.
Syringe Pump: https://www.youtube.com/watch?v=7YSiO6usR1M
Microscope : https://www.youtube.com/watch?v=Szg-vjukonA
Arduino : https://www.youtube.com/watch?v=Xl02fsRCJ7U
Raspberry Pi: https://www.youtube.com/watch?v=g3pXNY8snOg
Running poseidon: https://youtu.be/Szg-vjukonA
We use the Arduino CNC shield to allow for up to three pumps can be controlled from a computer or from the Rapsberry Pi microscope.
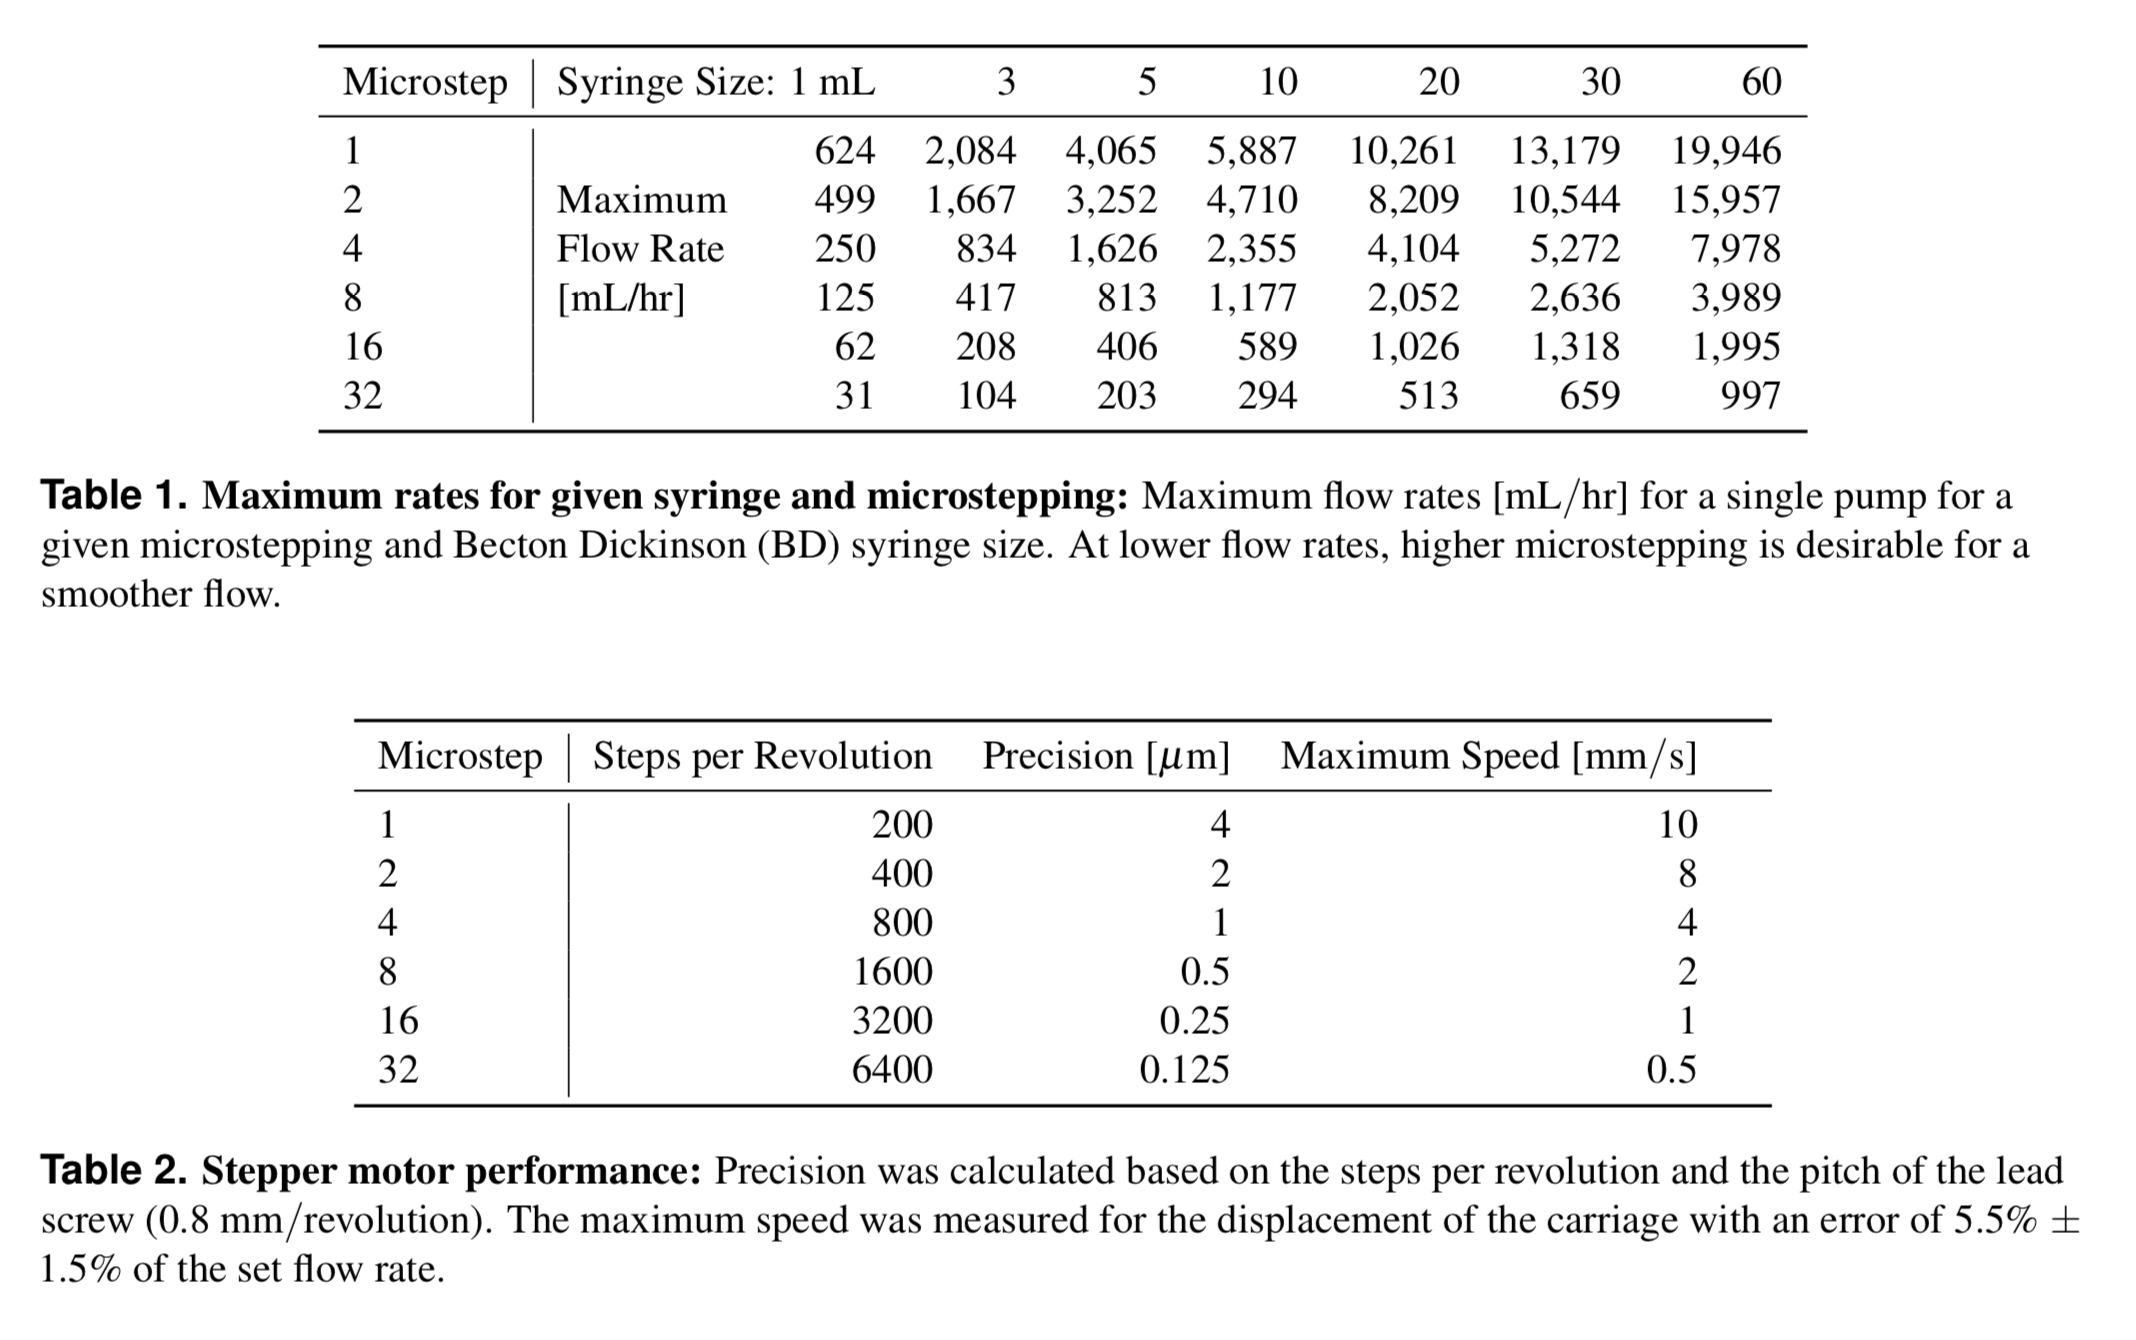
The software is configured to run the stepper motors with 200 steps per revolution at 1/32 microstepping, which translates to 6400 steps per rotation. To configure this, it is necessary to add 3 jumpers between the M0, M1 and M2 pins of the Arduino CNC shield. More information about microstepping can be found in the product page for the DRV8825 Stepper Motor Driver, which is used by the CNC shield. See the build videos for more detail.
The Arduino should be flashed with the arduino_serialCOM_v0.1.ino sketch, available in the SOFTWARE/ folder.
Make sure to download and install the AccelStepper library. To install, unzip the zip file to the libraries sub-folder of your sketchbook, if you get stuck here is a how-to.
The pumps are driven by an Arduino board that interprets commands sent via USB and sends the signals to control the stepper motor movement. For directions on how to flash an arduino please refer to the official guide: https://www.arduino.cc/en/Guide/HomePage
The Python scripts are available in the SOFTWARE/ folder. The GUI was created using Qt designer, a drag and drop application for organizing buttons that allows the used to easily make modifications. This GUI is used to interface with a Python script that controls both the microscope and Arduino via USB.
The software you will need to run on your computer in order to control the Arduino is the poseidon_main.py script located in the SOFTWARE/ folder (also included is poseidon_controller_gui.py which is needed).
You have the option of either (1) running from the source code in Python or (2) choosing the appropriate binary file below for your operating system and executing it. Before you run the controller code, MAKE SURE YOU HAVE INSTALLED THE ARDUINO FIRMWARE!!
Before starting the Python controller, make sure
- The Arduino has the firmware uploaded to it
- The Arduino is connected via USB to the computer or Rapsberry Pi microscope
- You have appropriately placed jumpers on the CNC Sheild to allow for microstepping and hardware enabling (discussed in build video).
- The CNC shield is powered, and that all motors are plugged in to the CNC sheild
There are two ways to run the controller. The easiest way is to just double click the executable available below. Simply download the executable, double click it, and begin using it.
Note 1: Basic tests indicate that pressures up to 4 MPa can be acheived with 1 microstep and a 1 mL syringe.
Note 2: The speeds and flow rates of the system are limited by the microstepping and the syringe size used.
If you want to run the system from the source code then follow the instructions below.
First make sure you have Python 3 installed on your machine. Then install PyQt5. To install PyQt5 use brew install pyqt5 or conda install pyqt if you are using anaconda. If you are on Linux you can do sudo apt-get install python3-pyqt5. Now we need to add a few packages:
pip3 install --upgrade -pip
pip3 install pyserial
pip3 install opencv-python
On Linux opencv requires extra binaries
sudo apt-get install libatlas-base-dev
sudo apt-get install libjasper-dev
sudo apt-get install libqtgui4
sudo apt-get install libqt4-qt3support
sudo apt-get install libqt4-test
Now you can run
# now the script can be called
python3.5 poseidon_main.py
To run poseidon_main.py on a Raspberry Pi with a fresh install of Raspbian, Python 3 with pyqt5 need to be installed, together with a few packages.
sudo apt-get install python3-pyqt5

# now need to use python3.5 gui.py to invoke the python3 that has pyqt5!
pip3 install --upgrade -pip
pip3 install pyserial
pip3 install opencv-python

# opencv requires a some extra binaries
sudo apt-get install libatlas-base-dev
sudo apt-get install libjasper-dev
sudo apt-get install libqtgui4
sudo apt-get install libqt4-qt3support
sudo apt-get install libqt4-test

# now the script can be called
python3.5 poseidon_main.py
(1) Select the port that your Arduino is plugged into. If you don't see the right port, press update port.
(2) Set your microstepping
(3) Input appropriate settings
(4) Select connect to controller
(5) Select Send all settings to controller
(6) Go to the controller tab, select all three checkboxes and press Jog +
If the sleds are not moving in the right direction simply rotate the relevant stepper motor plug (that connects to the CNC shield) 180 degrees and plug it back in.
The poseidon system was designed to be customizable. It uses the Raspberry Pi and Arduino electronics boards, which are supported by a strong ecosystem of open source hardware and software, facilitating the implementation of new functionalities.
The pump driver uses an Arduino with a CNC shield to run up to three pumps. Each pump has a stepper motor that drives lead screw which in turn moves a sled that is mounted on linear bearings. The displacement of the sled moves the syringe forward or backward allowing the user to dispel or intake liquid.
The controller station uses a Raspberry Pi with a touchscreen to connect to the Arduino and microscope via USB. Because the microscope and Arduino use USB connections, they can alternatively be connected to a computer instead of a Raspberry Pi.
To modify the 3D models, users can either use Fusion 360 or any other CAD software. Simply open up the components, located in the HARDWARE folder, and get editing! Once you're done, go ahead and print out the parts and assemble them.
Most of the modifications to the code will be done in poseidon_main.py and to the GUI. If you want to edit the GUI, first make sure you have installed PyQt Designer (which should have been installed when you downloaded and installed PyQt5, so you can search for it on your computer Designer.exe (Windows) or Designer in your applications folder (Mac). Open up the poseidon_controller_gui.ui in Designer and make whatever modifications you'd like. Then when you are done, you need to convert the modified .ui file to a .py file. Go to the terminal, navigate to the folder where you have poseidon_controller_gui.ui and run the command pyuic5 poseidon_controller_gui.ui > poseidon_controller_gui.py.
When you are done editing the poseidon_main.py you can recreate the single click executable files by following the instructions below.
Using Python 3.7 (installing pyqt5 form pip) or 3.4 (installing pyqt5 from executable) on Windows 10 did not work. Python 3.7 yields terrible dependency errors from pyinstaller and with Python 3.4 after making the executable pyqt complains apparently because of windows 10. The solution was to use a machine with Windows 7.
After installing Python 3.5.4 (https://www.python.org/downloads/release/python-354/), using the Windows x86-64 executable installer, these dependencies should install without problems:
python -m pip install pyqt5
python -m pip install pyserial
python -m pip install opencv-python
To compile a binary you should write PyInstaller, instead of pyinstaller...
python -m PyInstaller --version
python -m PyInstaller poseidon_main.py
Just doing python -m PyInstaller gui.py with Python 3.5 on windows 7 threw up some errors, the following line solved the issue.
Described here: https://stackoverflow.com/questions/51324754/python-3-6-x-pyinstaller-gives-error-no-module-named-pyqt5-sip
python -m PyInstaller -F poseidon_main.py --hidden-import PyQt5.sip
The poseidon system was developed by the Pachter Lab at Caltech by:
The poseidon project is based on a number of other open source projects and papers.
The pump design was based on the open source syringe pumps published by the Pearce Research Group:
With subsequent refinements published on http://www.appropedia.org/Open-source_syringe_pump
The microscope was based on a design published by the Satija Lab:
All necessary files are available on Metafluidics


