ref: http://www.liaoxuefeng.com/wiki/0013739516305929606dd18361248578c67b8067c8c017b000
airzen Learn git notes
https://github.com/github/gitignore/
在git中如果想忽略掉某个文件,不让这个文件提交到版本库中,可以使用修改根目录中 .gitignore 文件的方法(如无,则需自己手工建立此文件)。
这个文件每一行保存了一个匹配的规则例如:

# 此为注释 – 将被 Git 忽略

*.cs       # 忽略所有 .cs 结尾的文件
!ABC.cs    # 但 ABC.cs 除外
/BLL       # 仅仅忽略项目根目录下的 BLL 文件,不包括 subdir/BLL
build/     # 忽略 build/ 目录下的所有文件
doc/*.txt  # 会忽略 doc/notes.txt 但不包括 doc/server/arch.txt
规则很简单,不做过多解释,但是有时候在项目开发过程中,突然心血来潮想把某些目录或文件加入忽略规则,按照上述方法定义后发现并未生效,原因是.gitignore只能忽略那些原来没有被track的文件,如果某些文件已经被纳入了版本管理中,则修改.gitignore是无效的。那么解决方法就是先把本地缓存删除(改变成未track状态),然后再提交:

git rm -r --cached .
git add .
git commit -m 'update .gitignore'
====
####安装,或者MAC装有command tools后已经集成
sudo apt-get install git
git config --global user.name "airzen"
git config --global user.email "[email protected]"
#####比如,让Git显示颜色,会让命令输出看起来更醒目:
git config --global color.ui true
mkdir learngit
cd learngit
git --version
git init
echo hello git > readme.txt
git add readme.txt
git commit -m "this is a read me file"
git status
echo hello 2 >> readme.txt
git add readme.txt
git commit -m “add 1 line txt of readme.txt”
git log
git log --pretty=oneline
git checkout -- readme.txt
!! git checkout -- file命令中的“--”很重要,没有“--”,就变成了“创建一个新分支”的命令,我们在后面的分支管理中会再次遇到git checkout命令
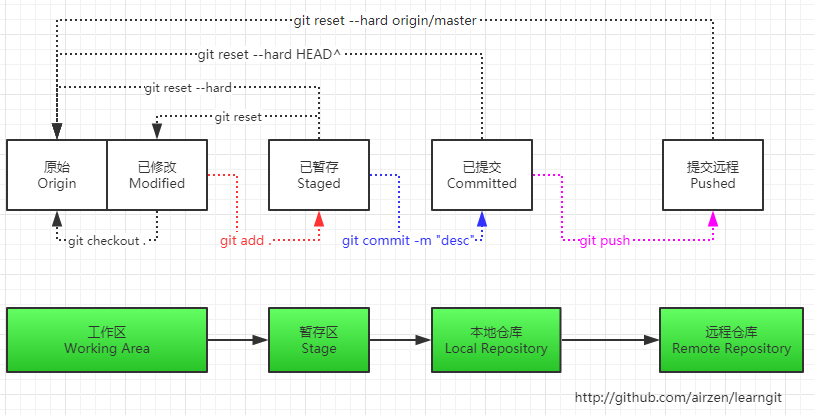
#####已经提交的话,想回到某个版本 revert to ..
3628164...882e1e0”(注意我的提交ID和你的肯定不一样), 上一个版本就是HEAD^, 上上一个版本就是HEAD^^, 当然往上100个版本写100个^比较容易数不过来,所以写成HEAD~100。
git reset --hard HEAD^
// 如果是直接回到某个版本 log 中的md5 // 版本号没必要写全,前几位就可以了,Git会自动去找。当然也不能只写前一两位,因为Git可能会找到多个版本号,就无法确定是哪一个了。
git reset --hard <commit_id>
git reflog
####小结 又到了小结时间。
场景1:当你改乱了工作区某个文件的内容,想直接丢弃工作区的修改时,用命令git checkout -- file。
场景2:当你不但改乱了工作区某个文件的内容,还添加到了暂存区时,想丢弃修改,分两步,第一步用命令git reset HEAD file,就回到了场景1,第二步按场景1操作。
场景3:已经提交了不合适的修改到版本库时,想要撤销本次提交,参考版本回退一节,不过前提是没有推送到远程库。
场景4:当你已经改动了工作区,不管暂存区内有没有东西,想抛弃掉所有已经更改和新增的东西,需要执行两步。第一步git add -A 第二步git checkout -f 此时工作区变回到什么都没有做的状态了。
####查看工作区和版本库区别 用“git diff HEAD -- readme.txt”命令可以查看工作区和版本库里面最新版本的区别:
git diff HEAD -- readme.txt
#####丢弃工作区修改
你可以发现,Git会告诉你,git checkout -- file可以丢弃工作区的修改:
#####有三种情况 ######1、当readme.txt 已经修改, 但是没有添加到暂存区时, 执行 git checkout -- readme.txt 则回到未修改前状态
git checkout -- readme.txt
######2、当readme.txt 已经修改【修改1】,并且 git add readme.txt 到暂存区,然后又做了修改【修改2】, 这时执行 git checkout -- readme.txt 会回到 【修改1状态】,无论执行多少次 git checkout -- readme.txt 如果想回到【修改1】之前的状态,需要执行 git reset HEAD readme.txt
######3、当readme.txt 已经修改【修改1】,并且 git add readme.txt 到暂存区,然后又做了修改【修改2】, 这时执行 git reset HEAD readme.txt 会回到 未加入暂存区状态,但是文件本身的内容并没有还原,还是 【修改2】时的状态,这时再执行 git checkout -- readme.txt 会回到 原始状态
提交到暂存区的文件 如果再进行修改后提交,那么仅把提交到暂存区时的拷贝提交,之后的修改仍然在工作区,需要再次 add  -> commit

你看,我们前面讲了,Git管理的是修改,当你用“git add”命令后,在工作区的第一次修改被放入暂存区,准备提交,但是,在工作区的第二次修改并没有放入暂存区,所以,“git commit”只负责把暂存区的修改提交了,也就是第一次的修改被提交了,第二次的修改不会被提交。

提交后,用“git diff HEAD -- readme.txt”命令可以查看工作区和版本库里面最新版本的区别:
####=====remote 远程git repository===== 把一个已有的本地仓库与之关联,然后,
git remote add origin [email protected]:airzen/xxx.git
把本地仓库的内容推送到GitHub仓库
git push -u origin master
Either specify the URL from the command-line or configure a remote repository using

    git remote add <name> <url>

and then push using the remote name

    git push <name>
现在起,只要本地作了提交,就可以通过命令:
git push origin master
小结 Git鼓励大量使用分支:
查看分支:git branch

创建分支:git branch name

切换分支:git checkout name

创建+切换分支:git checkout -b name

合并某分支到当前分支:git merge name

删除分支:git branch -d name
———————————————— 分支策略 在实际开发中,我们应该按照几个基本原则进行分支管理:
首先,master分支应该是非常稳定的,也就是仅用来发布新版本,平时不能在上面干活;
那在哪干活呢?干活都在dev分支上,也就是说,dev分支是不稳定的,到某个时候,比如1.0版本发布时,再把dev分支合并到master上,在master分支发布1.0版本;
你和你的小伙伴们每个人都在dev分支上干活,每个人都有自己的分支,时不时地往dev分支上合并就可以了。
所以,团队合作的分支看起来就像这样:
git checkout master
Switched to branch 'master'
准备合并dev分支,请注意--no-ff参数,表示禁用“Fast forward”:
git merge --no-ff -m "merge with no-ff" dev
Merge made by the 'recursive' strategy.
 readme.txt |    1 +
 1 file changed, 1 insertion(+)
——————————Bug分支—————————
幸好,Git还提供了一个stash功能,可以把当前工作现场“储藏”起来,等以后恢复现场后继续工作:
git stash
Saved working directory and index state WIP on dev: 6224937 add merge
HEAD is now at 6224937 add merge
现在,用git status查看工作区,就是干净的(除非有没有被Git管理的文件),因此可以放心地创建分支来修复bug。
首先确定要在哪个分支上修复bug,假定需要在master分支上修复,就从master创建临时分支:
git checkout master
Switched to branch 'master'
Your branch is ahead of 'origin/master' by 6 commits.
git checkout -b issue-101
Switched to a new branch 'issue-101'
现在修复bug,需要把“Git is free software ...”改为“Git is a free software ...”,然后提交:
git add readme.txt
git commit -m "fix bug 101"
[issue-101 cc17032] fix bug 101
1 file changed, 1 insertion(+), 1 deletion(-)
修复完成后,切换到master分支,并完成合并,最后删除issue-101分支:
git checkout master
Switched to branch 'master'
Your branch is ahead of 'origin/master' by 2 commits.
git merge --no-ff -m "merged bug fix 101" issue-101
Merge made by the 'recursive' strategy.
readme.txt |    2 +-
1 file changed, 1 insertion(+), 1 deletion(-)
git branch -d issue-101
Deleted branch issue-101 (was cc17032).
太棒了,原计划两个小时的bug修复只花了5分钟!现在,是时候接着回到dev分支干活了!
git checkout dev
Switched to branch 'dev'
git status
# On branch dev
nothing to commit (working directory clean)
工作区是干净的,刚才的工作现场存到哪去了?用git stash list命令看看:
git stash list
stash@{0}: WIP on dev: 6224937 add merge
工作现场还在,Git把stash内容存在某个地方了,但是需要恢复一下,有两个办法:
一是用git stash apply恢复,但是恢复后,stash内容并不删除,你需要用git stash drop来删除;
另一种方式是用git stash pop,恢复的同时把stash内容也删了:
git stash pop
# On branch dev
# Changes to be committed:
#   (use "git reset HEAD <file>..." to unstage)
#
#       new file:   hello.py
#
# Changes not staged for commit:
#   (use "git add <file>..." to update what will be committed)
#   (use "git checkout -- <file>..." to discard changes in working directory)
#
#       modified:   readme.txt
#
Dropped refs/stash@{0} (f624f8e5f082f2df2bed8a4e09c12fd2943bdd40)
再用git stash list查看,就看不到任何stash内容了:
git stash list
你可以多次stash,恢复的时候,先用git stash list查看,然后恢复指定的stash,用命令:
git stash apply stash@{0}
命令git tag name用于新建一个标签,默认为HEAD,也可以指定一个commit id;
-a tagname -m "blablabla..."可以指定标签信息;
-s tagname -m "blablabla..."可以用PGP签名标签;
命令git tag可以查看所有标签;
用git show tagname查看标签信息:
git show v0.1
如果标签打错了,也可以删除:
git tag -d v0.1
因为创建的标签都只存储在本地,不会自动推送到远程。所以,打错的标签可以在本地安全删除。
如果要推送某个标签到远程,使用命令git push origin tagname:
git push origin v1.0
或者,一次性推送全部尚未推送到远程的本地标签:
git push origin --tags
——— 如果标签已经推送到远程,要删除远程标签就麻烦一点,先从本地删除:
git tag -d v0.9
Deleted tag 'v0.9' (was 6224937)
然后,从远程删除。删除命令也是push,但是格式如下:
git push origin :refs/tags/v0.9
小结
命令git push origin tagname可以推送一个本地标签;

命令git push origin --tags可以推送全部未推送过的本地标签;

命令git tag -d tagname可以删除一个本地标签;

命令git push origin :refs/tags/tagname可以删除一个远程标签。
有些时候,你必须把某些文件放到Git工作目录中,但又不能提交它们,比如保存了数据库密码的配置文件啦,等等,每次git status都会显示“Untracked files ...”,有强迫症的童鞋心里肯定不爽。

好在Git考虑到了大家的感受,这个问题解决起来也很简单,在Git工作区的根目录下创建一个特殊的.gitignore文件,然后把要忽略的文件名填进去,Git就会自动忽略这些文件。

不需要从头写.gitignore文件,GitHub已经为我们准备了各种配置文件,只需要组合一下就可以使用了。所有配置文件可以直接在线浏览:https://github.com/github/gitignore

小结
忽略某些文件时,需要编写.gitignore。
.gitignore文件本身要放到版本库里,并且可以对.gitignore做版本管理!
git rm -r --cached .
git add .
git commit -m 'update .gitignore'
果敲git st就表示git status那就简单多了,当然这种偷懒的办法我们是极力赞成的。

我们只需要敲一行命令,告诉Git,以后st就表示status:
git config --global alias.st status
好了,现在敲git st看看效果。
当然还有别的命令可以简写,很多人都用co表示checkout,ci表示commit,br表示branch:
git config --global alias.co checkout git config --global alias.ci commit git config --global alias.br branch
以后提交就可以简写成:
git ci -m "bala bala bala..."
--global参数是全局参数,也就是这些命令在这台电脑的所有Git仓库下都有用。·
git archive -v --format=zip v1.19 > v1.19.zip
git archive -o /savetopath/v1.19.zip HEAD
包含 已修改未添加到暂存,以及未进行tracke 的新文件进行打包
upgrade.sh
rm -f upgrade.tar.gz
tar -zcvf upgrade.tar.gz `git status -s|cut -c4-`git diff 61d2112 f3c0f99 --name-only | xargs zip update.zip
git archive --format=zip HEAD `git diff --name-only 61d2112 f3c0f99` > a.zip
tar -zcvf patch.tgz `git diff --name-only 61d2112 f3c0f99`

