Giter VIP home page Giter VIP logo

alloycrop's Introduction

AlloyCrop 1.0 发布

AlloyCrop 这个项目是8个月前发布的,作为AlloyFinger 的典型案例,发布之后被BAT等其他公司广泛使用。但是发布之后,有两个问题一直没有抽出时间去解决:

  • 裁剪图像的分辨率太小,是否可配?
  • pinch双指放大的时候,放大的中心不是双指中心,是否可以优化?

现在很高兴地告诉大家,AlloyCrop 已经完全搞定了上面两个问题,本文将解释新版本的变化和AlloyCrop背后的原理。当然AlloyFinger的原理这里就不再阐述,以前有分享过 超小Web手势库AlloyFinger原理

先看全新的API变化。

API

new AlloyCrop({
    image_src: "img src",
    className: 'crop-box',
    circle: true, // optional parameters , the default value is false
    width: 200, // crop width
    height: 100, // crop height
    output: 2, // output resolution --> 400*200
    ok: function (base64, canvas) { },
    cancel: function () { },
    ok_text: "yes", // optional parameters , the default value is ok
    cancel_text: "no" // optional parameters , the default value is cancel
});
参数 是否必填 意义
image_src 必须 需要裁剪图片的src地址
className 不必须 裁剪 DOM 容器的 class
circle 不必须,默认是false 代表选取的是否是圆形还是矩形,默认是矩形,注意:圆形选取裁剪出来的也是正方形图片
width 必须 选区的宽
height 必须 选区的高
output 必须 输出的倍率。比如如果output为2,选区的宽300,选区的高100,输出的图像的分辨率为 (2×300,2×100)
ok 必须 点击ok按钮的回调
cancel 必须 点击cancel按钮的回调
ok_text 不必须,默认是ok ok按钮的文本
cancel_text 不必须,默认是cancel cancel按钮的文本

与之前版本最主要的变化就是新增了 output 支持自定义倍率分辨率的图像输出。

output原理

crop: function () {
    this.calculateRect();
    this.ctx.drawImage(this.img, this.crop_rect[0], this.crop_rect[1], this.crop_rect[2], this.crop_rect[3], 0, 0, this.canvas.width, this.canvas.height);

},

其中 this.calculateRect() 是计算选取和图片重叠在一起的矩形区域,drawImage 是把裁剪的区域绘制到 canvas 上。注意 canvas 的宽高是多少?且看:

this.canvas.width = option.width * this.output;
this.canvas.height = option.height * this.output;

所以就达到了自定义倍率分辨率的目的。当然这里图片的失真又或者超分辨,都取决于 drawImage 插值过程。关于插值,以前特意对比过,使用三次卷积插值完爆了其他几个,但是三次卷积插值速度也是最慢,所以浏览器内核要权衡效率和插值结果去实现 drawImage。

img

calculateRect计算裁剪区域

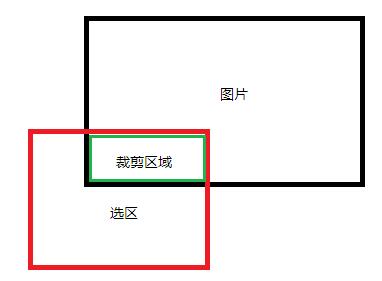
因为我们需要把图片的某个区域绘制到整个canvas上。所以drawImage的后四个参数为(0, 0, this.canvas.width, this.canvas.height),然后我们需要去计算图片裁剪的区域。

pv

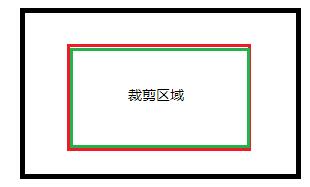
大概就分上面两种情况,一种是完全包含,一种部分相交。

因为图片会被放大或者缩小(scale),所以情况会变得稍微复杂一点点。求出相交的矩形区域后,要对图片scale进行校正,校正回到1的比例,才能用于drawImage。具体代码参见 https://github.com/AlloyTeam/AlloyCrop/blob/master/alloy-crop.js#L227-L255

pinch 缩放优化

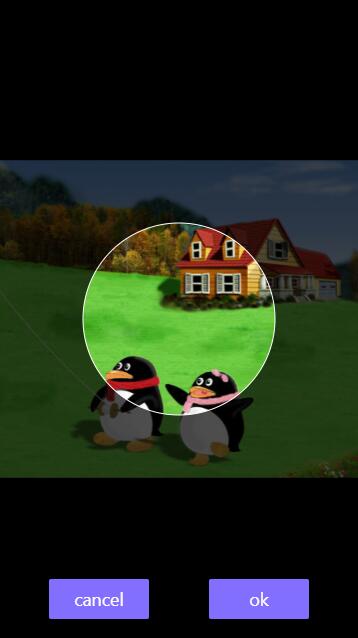
使用AlloyCrop是可以放大或者缩小再进行裁剪,怎么基于 pinch 的两个手指的中间进行放大呢?所以的秘密都在这个multipointStart里。

  • multipointStart是AlloyFinger抛出的多手指开始碰到屏幕的回调函数,通过evt.touches拿到前两个手指的坐标去计算中心坐标
  • 重置 originX 和 originY 到两手指的中心
  • 再重置 translateX 和 translateY 去抹平 originX和originY变更带来的位移
 new AlloyFinger(this.croppingBox, {
	multipointStart: function (evt) {
	    //reset origin x and y
	    var centerX = (evt.touches[0].pageX + evt.touches[1].pageX) / 2;
	    var centerY = (evt.touches[0].pageY + evt.touches[1].pageY) / 2;
	    var cr = self.img.getBoundingClientRect();
	    var img_centerX = cr.left + cr.width / 2;
	    var img_centerY = cr.top + cr.height / 2;
	    var offX = centerX - img_centerX;
	    var offY = centerY - img_centerY;
	    var preOriginX = self.img.originX
	    var preOriginY = self.img.originY
	    self.img.originX = offX / self.img.scaleX;
	    self.img.originY = offY / self.img.scaleY;
	    //reset translateX and translateY
	    self.img.translateX += offX - preOriginX * self.img.scaleX;
	    self.img.translateY += offY - preOriginY * self.img.scaleX;
	    self.initScale = self.img.scaleX;
	},
	pinch: function (evt) {
	    self.img.scaleX = self.img.scaleY = self.initScale * evt.zoom;
	},
	pressMove: function (evt) {
	    self.img.translateX += evt.deltaX;
	    self.img.translateY += evt.deltaY;
	    evt.preventDefault();
	}
});
  • 注意,translateX, translateY, translateZ, scaleX, scaleY, scaleZ, rotateX, rotateY, rotateZ, skewX, skewY, originX, originY, originZ 都是 css3transform 类库 注入到DOM元素上的属性。

Preview

Preview

Install

You can install it via npm:

npm install alloycrop

Or get it from CDN:

https://unpkg.com/[email protected]/alloy-crop.js

Demo

./asset/alloycrop.png

Dependencies

License

This content is released under the MIT License.

alloycrop's People

Contributors

eachmawzw avatar ggvswild avatar jianggle avatar muxing92 avatar whichname avatar youyeyuki avatar

Stargazers

 avatar  avatar  avatar  avatar  avatar  avatar  avatar  avatar  avatar  avatar  avatar  avatar  avatar  avatar  avatar  avatar  avatar  avatar  avatar  avatar  avatar  avatar  avatar  avatar  avatar  avatar  avatar  avatar  avatar  avatar  avatar  avatar  avatar  avatar  avatar  avatar  avatar  avatar  avatar  avatar  avatar  avatar  avatar  avatar  avatar  avatar  avatar  avatar  avatar  avatar  avatar  avatar  avatar  avatar  avatar  avatar  avatar  avatar  avatar  avatar  avatar  avatar  avatar  avatar  avatar  avatar  avatar  avatar  avatar  avatar  avatar  avatar  avatar  avatar  avatar  avatar  avatar  avatar  avatar  avatar  avatar  avatar  avatar  avatar  avatar  avatar  avatar  avatar  avatar  avatar  avatar  avatar  avatar  avatar  avatar  avatar  avatar  avatar  avatar  avatar

Watchers

 avatar  avatar  avatar  avatar  avatar  avatar  avatar  avatar  avatar  avatar  avatar  avatar  avatar  avatar  avatar  avatar  avatar  avatar  avatar  avatar  avatar  avatar  avatar  avatar  avatar  avatar  avatar  avatar  avatar  avatar  avatar  avatar  avatar  avatar  avatar  avatar  avatar  avatar  avatar  avatar  avatar  avatar  avatar  avatar  avatar

alloycrop's Issues

关于图片的宽高问题

cropjs中有代码如下
this.img_width = this.img.width; this.img_height = this.img.height;
ionic3环境(angluar和typescript)下 这里的图片宽高获取的是屏幕的宽高
而普通网页(用您的demo修改的,添加了input手动选择图片下这里获取的图片宽高是图片高的实际宽高

不知道为什么 help

AlloyCrop 小小反馈

最大的体验问题

  1. 当缩小到一定程度的时候缩小程度,操作就失效,导致某些特殊情况没法复原到初始值。(应该留点缓冲空间,然后缩放结束,纠正回正确值)
  2. 当缩放到某些特殊的情况,无法位移(需要自动纠正回正确状态)。

定制弹出的两个按钮的样式

视觉上需要对两个标签进行样式定制,但是目前生成的两个标签没有class标识,不易后续指定样式。

希望能够提供一个定义容器 croppingBox 的 class 的配置项,便于开发者指定容器的类名。

在iframe中 失效

iframe.html 测试样例 在pc端显示正常 但是移动手机端 ios android 不正常 图片位置不正确 和按钮不见
index.html 是 原来例子

<title>AlloyCrop ifrmae test</title> <style> * { padding: 0; margin: 0; } body { width: 100%; height: 100%; } .sf-container { position: absolute; left: 0; top: 0; z-index: 100000; height: 100%; width: 100%; background-color: #f5f5f5; color: #fff; -webkit-backface-visibility: hidden; } .sf-frame { display: block; position: relative; z-index: 1; -webkit-tap-highlight-color: rgba(0,0,0,0); width: 100%; height: 100%; background-color: #f5f5f5; -webkit-transform: translateZ(0); -moz-transform: translateZ(0); -ms-transform: translateZ(0); -o-transform: translateZ(0); transform: translateZ(0); -webkit-touch-callout: none; -webkit-user-select: none; -moz-user-select: none; -ms-user-select: none; user-select: none; -webkit-text-size-adjust: none; -moz-text-size-adjust: none; -ms-text-size-adjust: none; -o-text-size-adjust: none; text-size-adjust: none; } .sf-frame iframe { background-color: #f5f5f5; border: 0; display: block; width: 100%; height: 100%; -webkit-overflow-scrolling: touch; overflow: visible; overflow-y: scroll; } </style>
<iframe id="mp-f" name="mp-f" src="index.html" scrolling="yes" style="height: 100%; display: block;">"</iframe>

选区可以随意拖动

选区可以随意拖动,甚至可以拖动到图片外面。并没有限制只能在图片大小的范围的进行拖动。希望能修复。

bug太多了,希望能够修复

1、图片不能无限缩放,图片最小缩放应该是剪裁区域大小,现在只能缩小到屏幕大小;放大只能放大一点,放大后缩小操作很费劲
2、剪裁后图片模糊有毛边
3、我设置output=2,宽高是350时,剪裁后的图片会显示在左上角,周边是透明背景,output=1时也有这个问题,不明显

在ios上图片旋转

如果我使用拍照获得的图片作为image_src,预览的时候是正常的,但是裁剪出来的图片旋转了90度。

iphoneX 上加载特定尺寸图片会导致页面无限刷新

<!DOCTYPE html>
<html>

<head>
    <meta charset="UTF-8">
    <meta name="viewport" content="width=device-width,minimum-scale=1.0,maximum-scale=1.0,user-scalable=no" />
    <style>
        body {
            font-family: -apple-system, BlinkMacSystemFont, "Segoe UI", Helvetica, Arial, sans-serif, "Apple Color Emoji", "Segoe UI Emoji", "Segoe UI Symbol";
            background-color: black;
            text-align: center;
        }
    </style>
</head>

<body>
    <script src="./asset/transform.js"></script>
    <script src="./asset/alloy-finger.js"></script>
    <script src="alloy-crop.js"></script>
    <script>
        (function () {
            var mAlloyCrop = new AlloyCrop({
                image_src: "http://pf8xhw02u.bkt.clouddn.com/static/test-crop.jpg",
                width: 375,
                height: 210,
                output: 1,
                ok: function (base64, canvas) {
                    mAlloyCrop.destroy();
                },
                cancel: function () {
                    mAlloyCrop.destroy();
                }
            });
        })();
    </script>

</body>

</html>

直接下载,使用index.html,裁剪图片出现Tainted canvases may not be exported.错误

错误如下:
Uncaught DOMException: Failed to execute 'toDataURL' on 'HTMLCanvasElement': Tainted canvases may not be exported.
at AlloyCrop._ok (file:///Users/pengll/Downloads/AlloyCrop-master/alloy-crop.js:177:33)
at HandlerAdmin.dispatch (file:///Users/pengll/Downloads/AlloyCrop-master/asset/alloy-finger.js:57:55)
at file:///Users/pengll/Downloads/AlloyCrop-master/asset/alloy-finger.js:203:30

不知道是否影响使用

确定/取消按钮点击穿透的问题

点透问题建议统一使用touch事件吧,还有希望给最外层的div加个样式名(好改样式),也希望能限制滑动区域(不超过图片范围)或者给一个参数来开关这个限制

如何像QQ那样截图???

如何像QQ那样图片宽高小于截图区域就把图片宽高小于的那个放大到截图区域的大小呢? 放大之后不能缩小到原始大小了..而且缩小也是非常的卡

关于canvas的宽高设置

源码中有这样一段
this.cover.width = window.innerWidth;
this.cover.height = window.innerHeight;
一般情况下没有问题,但是在ios9、iphone6及以上有个bug,会导致获取的宽高不正确。
虽然这个bug,可以通过在‘viewport’中添加‘shrink-to-fit=no’来避免,但是免不了一顿查找bug的过程。。。
可以考虑换成document.documentElement.clientXXXX

截屏界面的定位问题

为什么图片和canvas是absolute定位,长页面的时候很尴尬。
改了css以后还有缩放时缩放中心错误的问题,原因是touch事件的xy坐标取的是pageX,pageY,改成clientX,clientY就好了

multipointStart: function (evt) {
    //reset origin x and y
    // var centerX = (evt.touches[0].pageX + evt.touches[1].pageX) / 2;
    // var centerY = (evt.touches[0].pageY + evt.touches[1].pageY) / 2;
    var centerX = (evt.touches[0].clientX + evt.touches[1].clientX) / 2;
    var centerY = (evt.touches[0].clientY + evt.touches[1].clientY) / 2;
    ...
}

节点没有class我怎么修改样式?

我在vue里面用了AlloyCrop,功能上很好用,非常喜欢,但是我想修改按钮的颜色,发现“取消”和“确定”两个按钮是a标签,而且么有class,那么请问我怎么修改

为啥 在 pressMove 方法中 没有做 横向范围判断?

pressMove 方法

if((cr.left + evt.deltaX <= 0) && (cr.right + evt.deltaX >= self.width)){ self.img.translateX += evt.deltaX; }

->

var boxOffX = (document.documentElement.clientWidth - self.width)/2;
if((boxOffX - cr.left - evt.deltaX >= 0) && (cr.right + evt.deltaX - boxOffX>= self.width)){ self.img.translateX += evt.deltaX; }

销毁实例

我发现每次新建实例都是通过new 来实现,下次再创建的时候仍然是new一个新实例,但是实例从没有销毁过,导致每new一次都会生成一次节点,会造成很多垃圾dom。是不是可以添加一个destroy的方法,如果每次打开都是new的话,在cancel和ok的回调函数中,可以将刚刚生成的所有dom全部删除。

如何设置让图片的短边充满整个选取?

1

如图,我想在初始化的就让短边充满整个选取,缩放的时候短边不能小于选区的大小。要不然选区内空白的地方会将下层的内容显示出来,很不美观。

想要达到这种效果,我要怎么做呢?

可以啊

我用的ionic3 image-picker插件 从手机获取图片 得到base64,传给image_src 不管用

Recommend Projects

  • React photo React

    A declarative, efficient, and flexible JavaScript library for building user interfaces.

  • Vue.js photo Vue.js

    🖖 Vue.js is a progressive, incrementally-adoptable JavaScript framework for building UI on the web.

  • Typescript photo Typescript

    TypeScript is a superset of JavaScript that compiles to clean JavaScript output.

  • TensorFlow photo TensorFlow

    An Open Source Machine Learning Framework for Everyone

  • Django photo Django

    The Web framework for perfectionists with deadlines.

  • D3 photo D3

    Bring data to life with SVG, Canvas and HTML. 📊📈🎉

Recommend Topics

  • javascript

    JavaScript (JS) is a lightweight interpreted programming language with first-class functions.

  • web

    Some thing interesting about web. New door for the world.

  • server

    A server is a program made to process requests and deliver data to clients.

  • Machine learning

    Machine learning is a way of modeling and interpreting data that allows a piece of software to respond intelligently.

  • Game

    Some thing interesting about game, make everyone happy.

Recommend Org

  • Facebook photo Facebook

    We are working to build community through open source technology. NB: members must have two-factor auth.

  • Microsoft photo Microsoft

    Open source projects and samples from Microsoft.

  • Google photo Google

    Google ❤️ Open Source for everyone.

  • D3 photo D3

    Data-Driven Documents codes.