Build, Run and Deploy your containerized Web Application using Docker, AWS App Runner and Elastic Container Registry
AWS App Runner is an AWS service that provides a fast, simple, and cost-effective way to deploy from source code or a container image directly to a scalable and secure web application in the AWS Cloud. There are no orchestrators to configure, build pipelines to set up, load balancers to optimize, or TLS certificates to rotate. And of course, there are no servers to manage. App Runner benefits developers and teams who do not have any container expertise to run their web applications and services.
The AWS Cloud Development Kit AWS CDK is an open-source software development framework to define your cloud application resources using familiar programming languages. One of the benefits of the AWS CDK is that you can leverage your favorite development environments and have a rich experience when exploring the hundreds of different services and features of AWS.
As a developer, you can easily deploy your applications without the need to worry about infrastructure with these two. As of this writing, App Runner supports Python, Node.js and Java. In this lab, this lab will show you how you can utilize the services to deploy applications written in other languages potentially.
In this lab, you will learn 2 different options to deploy a containerized web application in any language (Flutter as example in this lab) with AWS App Runner. You will also learn how to provision necessary resources and permissions with Infrastructure as a Code using AWS CDK. The docker image will be stored in Amazon Elastic Containers Registry - a fully managed container registry offering high-performance hosting, so you can reliably deploy application images and artifacts anywhere.

Sample Flutter app reference: https://docs.flutter.dev/get-started/install
Estimated time: 15 minutes
(Additional optional part) 30 minutes
Lab level: 200
Learning Outcomes:
- Learn how App Runner can help developers to deploy applications easily hosted on cloud.
- Learn how App Runner can automatically trigger deployment for new update pushed to their application code.
- Learn multiple approaches you can use to deploy a containerized application
- Learn about infrastructure as a code with AWS CDK
Before we start, prerequisites
NOTE: If you are at an AWS event, there might be some initial resources already provisioned for you. Otherwise, use the CloudFormation template in this repository (apprunnercfn.json) and create the required resources in us-west-2 before you start.
Before we begin, we will need to login into AWS Cloud9. Cloud9 is a cloud-based integrated development environment (IDE) that lets you write and run code with just a browser. All code required to setup the lab is prepared, participants are only required to run the scripts in Cloud9.
To access Cloud9 search for Cloud9 in the AWS Console and click on Cloud9.

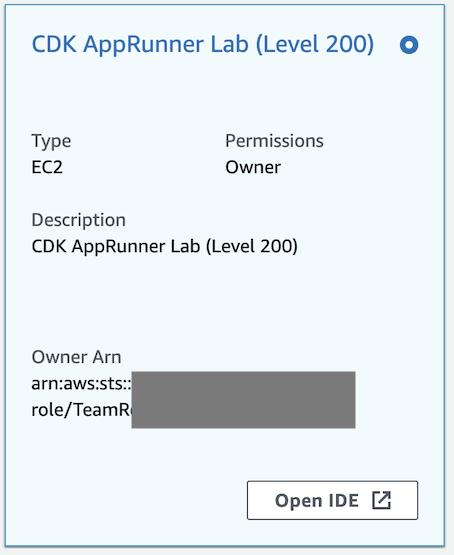
Under Your environments, open the CDK AppRunner Lab (Level 200) Cloud9 instance by clicking on Open IDE
- Clean up any residual activities to return to a clean state.
cd ~/environment/cdk-apprunner-ecr/cdk-apprunner-existing-repo
npm install
cdk destroy -f
cd ~/environment/cdk-apprunner-ecr/cdk-apprunner-asset
npm install
cdk destroy -f
- Check if the correct IAM role has been attached to your Cloud9 instance
- Click the grey circle button (in top right corner) and select Manage EC2 Instance.
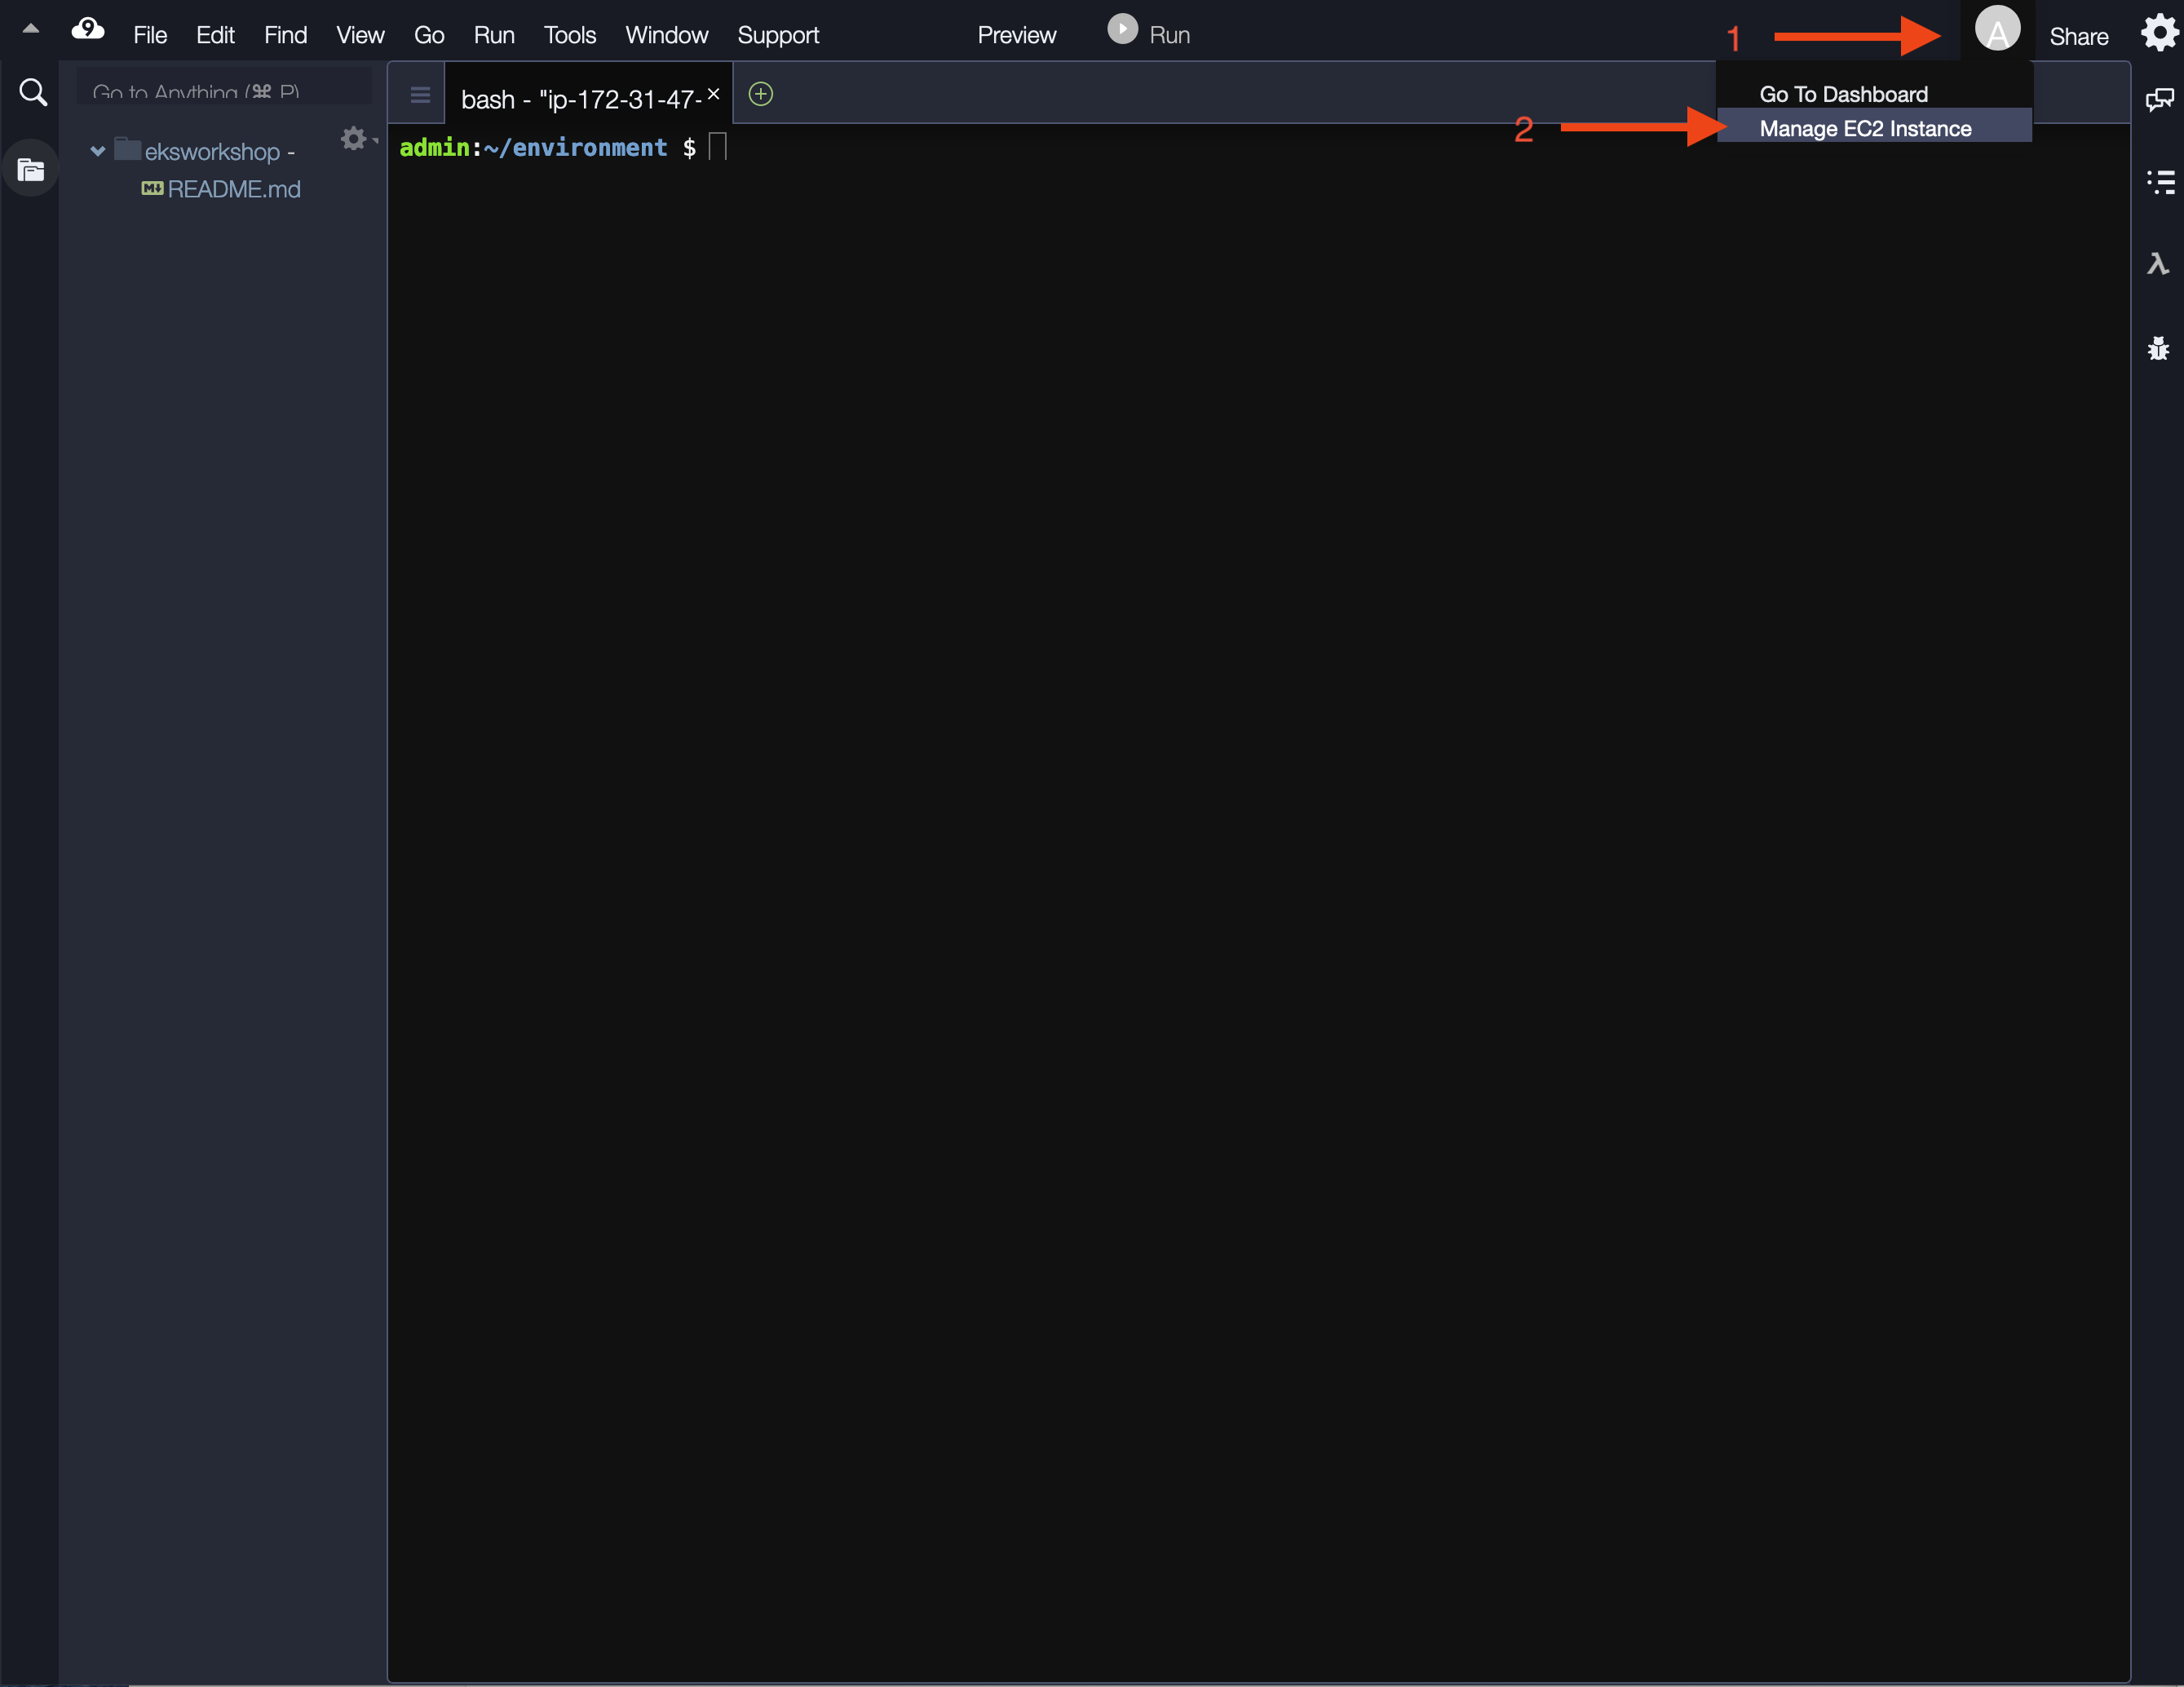
Click on the instance, check under ‘IAM Role’ to make sure the role shows as apprunnerworkshop-admin or {yourStackName}-AppRunnerInstanceProfile-{randomstrings}.

- (If it is not
apprunnerworkshop-admin) Select the instance, then choose Actions / Security / Modify IAM Role

- Choose
{yourStackName}-AppRunnerInstanceProfile-{randomstrings}from the IAM Role drop down, and select Save. We are using the instance profile to pass theapprunnerworkshop-adminIAM role to an EC2 instance.

- Increase the disk size on the Cloud9 instance
pip3 install --user --upgrade boto3
export instance_id=$(curl -s http://169.254.169.254/latest/meta-data/instance-id)
python3 -c "import boto3
import os
from botocore.exceptions import ClientError
ec2 = boto3.client('ec2')
volume_info = ec2.describe_volumes(
    Filters=[
        {
            'Name': 'attachment.instance-id',
            'Values': [
                os.getenv('instance_id')
            ]
        }
    ]
)
volume_id = volume_info['Volumes'][0]['VolumeId']
try:
    resize = ec2.modify_volume(
            VolumeId=volume_id,
            Size=30
    )
    print(resize)
except ClientError as e:
    if e.response['Error']['Code'] == 'InvalidParameterValue':
        print('ERROR MESSAGE: {}'.format(e))"
if [ $? -eq 0 ]; then
    sudo reboot
fi
- Install relevant packages
cd ~/environment/cdk-apprunner-ecr/cdk-apprunner-asset
npm install
npm upgrade
cd ~/environment/cdk-apprunner-ecr/cdk-apprunner-existing-repo
npm install
npm upgrade

# Install prerequisite packages
sudo yum -y install jq gettext
jqis a tool that can be used to extract and transform data held in JSON files.- The
gettextpackage includes the envsubst utility, which can be used to substitute the values of environment variables into an input stream. - We will use these tools, along with the Linux utility
sed, to insert or replace attribute values in various files throughout the workshop. This avoids the need for manual text editing wherever possible.
- Setting environment variables required to communicate with AWS API's via the cli tools
echo "export AWS_DEFAULT_REGION=$(curl -s 169.254.169.254/latest/dynamic/instance-identity/document | jq -r .region)" >> ~/.bashrc
echo "export AWS_REGION=\$AWS_DEFAULT_REGION" >> ~/.bashrc
echo "export AWS_ACCOUNT_ID=$(aws sts get-caller-identity --query Account --output text)" >> ~/.bashrc
source ~/.bashrc
- Your account might already have the Toolkit installed. If it is not, run the following before you are able to use CDK:
cdk bootstrap
-
Deploying AWS CDK apps into an AWS environment (a combination of an AWS account and region) may require that you provision resources the AWS CDK needs to perform the deployment. These resources include an Amazon S3 bucket for storing files and IAM roles that grant permissions needed to perform deployments. The process of provisioning these initial resources is called bootstrapping.
-
The required resources are defined in a AWS CloudFormation stack, called the bootstrap stack, which is usually named CDKToolkit. Like any AWS CloudFormation stack, it appears in the AWS CloudFormation console once it has been deployed. More details here (https://docs.aws.amazon.com/cdk/v2/guide/bootstrapping.html).
Now that we have everything ready, Let's get started!
Full deployment via AWS CDK - CDK Deploy
- Confirm that the cdk can synthesize the assembly CloudFormation templates
cd ~/environment/cdk-apprunner-ecr/cdk-apprunner-asset
cdk synth
- View proposed changes to the environment
cdk diff
- Deploy the changes to the environment
cdk deploy --require-approval never
It could take up to 10 minutes for the deployment to complete. Proceed to the next segment to understand the code in the meantime.
CDK Code Review
Deployment might take up to 10 minutes to complete. Let’s review what is happening in the meantime.
You may notice that everything defined in the stack is 100% written as TypeScript code. We also benefit from the opinionated nature of cdk by letting it build out components based on well architected practices. This also means that we don’t have to think about all of the underlying components to create and connect resources (ie, subnets, nat gateways, etc). Once we deploy the cdk code, the cdk will generate the underlying Cloudformation templates and deploy it.
For more information about how you can get started with CDK to build your own app, you can refer here.
With this approach, we are provisioning required resources with AWS CDK - App Runner service Elastic Container Registry repository, followed by building the images automatically and pushing them to the ECR repository. The App Runner will pull the image from the repository and automatically deploy the service.
You can view the source code under the repo cdk-apprunner-ecr/cdk-apprunner-existing-repo/lib/cdk-apprunner-stack.ts
Below are for code explanation only
## Images are built from a local Docker context directory (with a Dockerfile),
## uploaded to Amazon Elastic Container Registry (ECR) by the CDK toolkit and/or your app's CI/CD pipeline,
## and can be naturally referenced in your CDK app.
## https://docs.aws.amazon.com/cdk/api/v2/docs/aws-cdk-lib.aws_ecr_assets-readme.html#images-from-dockerfile
## The directory 'fluttersampleapp' includes a Dockerfile.

    const imageAsset = new assets.DockerImageAsset(this, 'ImageAssets', {
      directory: path.join(__dirname, '../fluttersampleapp'),
    });
Below shows that we configure App Runner service on port 8080. We use apprunner.Source.fromAsset to create a service from a local Docker image asset directory built and pushed to Amazon ECR.
## To create a Service from local docker image asset directory built and pushed to Amazon ECR
## https://docs.aws.amazon.com/cdk/api/v2/docs/aws-apprunner-alpha-readme.html#ecr
    const service = new apprunner.Service(this, 'AppRunnerService', {
      source: apprunner.Source.fromAsset({
        imageConfiguration: { port: 8080 },
        asset: imageAsset,
      }),
    });
Observation during deployment
During CDK deployment, you will notice the process includes image building, pushing them to the ECR repository, as well as resource provisioning.
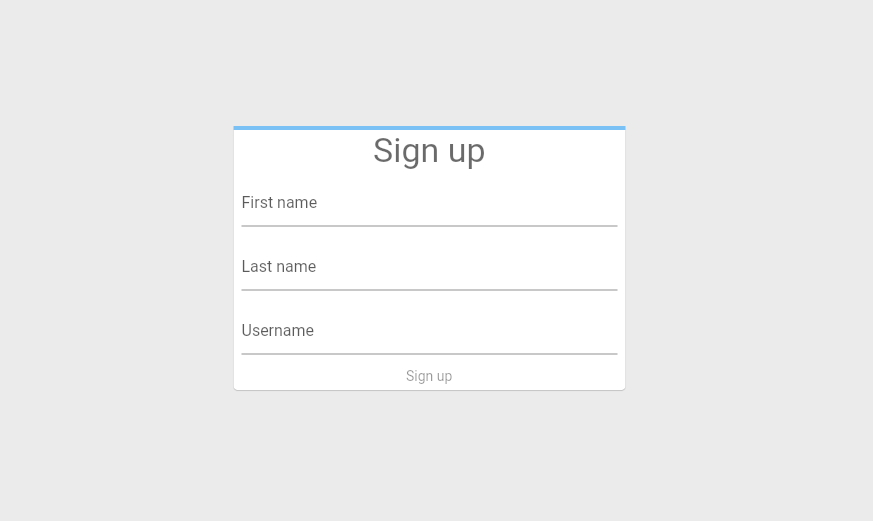
Upon completion, you will find the deployed app URL as ‘Outputs’ in the terminal. Click the URL to open in browser, you will see the sample Flutter app with sign up form is now deployed!
Outputs:
CdkApprunnerEcrStack.url = https://xxxxxx123x.us-west-2.awsapprunner.com
The app is a basic sign up page without much functionality. The sign up button is not functional.
Updating sample app and redeploy updates
In the next section, we will update 2 components below and push the updates again with CDK commands.
- Enable the sign button to display the welcome screen only when the form is completely filled in.
- Add animation for sign in progress as the user fills in the form fields.
Let's start!
- Enable the sign button to display the welcome screen only when the form is completely filled in.
- Open the file under
/cdk-apprunner-ecr/cdk-apprunner-asset/fluttersampleapp/lib/main.dart - Search for the keyword
_SignUpFormState, in that class, find theTextButton’sonPressed: nullto:
onPressed: _formProgress == 1 ? _showWelcomeScreen : null

It should show something like this after you have updated:
...truncated code...
TextButton(
  style: ButtonStyle(
    foregroundColor: MaterialStateProperty.resolveWith((Set<MaterialState> states) {
      return states.contains(MaterialState.disabled) ? null : Colors.white;
    }),
    backgroundColor: MaterialStateProperty.resolveWith((Set<MaterialState> states) {
      return states.contains(MaterialState.disabled) ? null : Colors.blue;
    }),
  ),
  onPressed: _formProgress == 1 ? _showWelcomeScreen : null, // UPDATED
  child: Text('Sign up'),
),
...truncated code...
- Add animation for sign in progress as user fills in the form fields.
We have prepared an AnimatedProgressIndicator widget for you. In the same /cdk-apprunner-ecr/cdk-apprunner-asset/fluttersampleapp/lib/main.dart file, find and replace the LinearProgressIndicator in the Form with this new AnimatedProgressIndicator. (Note: only update the LinearProgressIndicator in the build widget within the _SignUpFormState class.

It should show something like this after you have updated:
...truncated code...
      child: Column(
        mainAxisSize: MainAxisSize.min,
        children: [
          AnimatedProgressIndicator(value: _formProgress), // NEW
          Text('Sign up', style: Theme.of(context).textTheme.headline4),
          Padding(
...truncated code...
Remember to SAVE the main.dart file after editing (CMD + s or CTRL + s depending on MacBook or Windows laptop that you are using)
Deploy the changes
- View proposed changes to the environment
cdk diff
- Deploy the changes to the environment
cdk deploy --require-approval never
Observe the deployment
- Go to the ECR repository and click on the new repository automatically created by CDK when you first deploy this Option 2 stack. You will notice a second version of Docker image is being pushed to the repository automatically during the CDK deployment
- Go to the App Runner service. You will notice the App Runner start to update its service, wait for the deployment to complete and refresh your deployed app (or click the URL output from the Cloud9 IDE after the CDK deployment is completed).
- *** If you notice the changes are not reflecting in the new deployment, please wait a few minutes as there might be some delay for the updates to propagate. Refresh again after a few minutes.
Result

Voila! You have just used CDK to complete all resource management as well as code updates to deploy your applications.
Notice the changes in the final app version:
As you fill out the fields, a progress bar animates along the top of the sign in the area. When all three fields are filled in, the progress bar displays in green along the full width of the sign in area, and the Sign up button becomes enabled. Clicking the Sign up button causes a welcome screen to animate in from the bottom of the screen.
Clean up
cd ~/environment/cdk-apprunner-asset
cdk destroy -f
Optional: Deploy using existing ECR repository
With CDK, you can also choose to push your image to an existing ECR repository for App Runner to deploy. In this lab, an empty ECR repository has been provisioned for you before we proceed to deploy the App Runner service which will pull from the repository. Now we will go to the existing repository to find out how we can build the docker image and push to the ECR repository.
Build Docker image and push to ECR repository
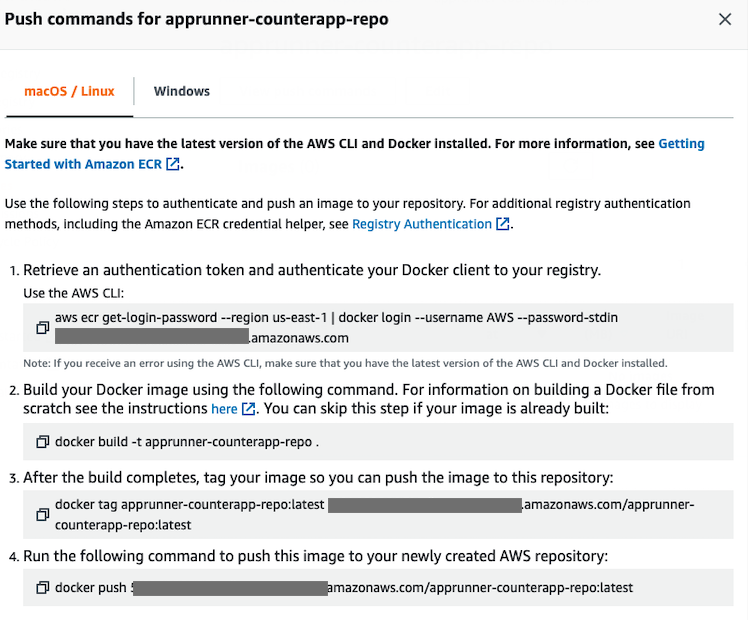
Click this link to go to ECR repository list in the us-west-2 region. You will find the created repo named apprunner-counterapp-repo, click the repo name and then View push commands button.

Go to your Cloud9 IDE and switch to the Flutter app directory with Dockerfile.
cd ~/environment/cdk-apprunner-ecr/cdk-apprunner-existing-repo/fluttercounterapp/
Then follow the commands listed in ECR.
After you have successfully pushed the image to the ECR repository, you will find the image appearing in the console. ECR has the capability to auto scan the pushed image for vulnerabilities. You will see the scanning of the images here:

Next, we will use CDK to deploy an App Runner service that pulls the images that we have just pushed to the ECR repository and deploy the web application.
Go back to your Cloud9 instance and run the CDK deploy steps below.
CDK Deploy
Confirm that the cdk can synthesize the assembly CloudFormation templates.
cd ~/environment/cdk-apprunner-ecr/cdk-apprunner-existing-repo
npm install
cdk synth
View proposed changes to the environment.
cdk diff
Deploy the changes to the environment
cdk deploy --require-approval never
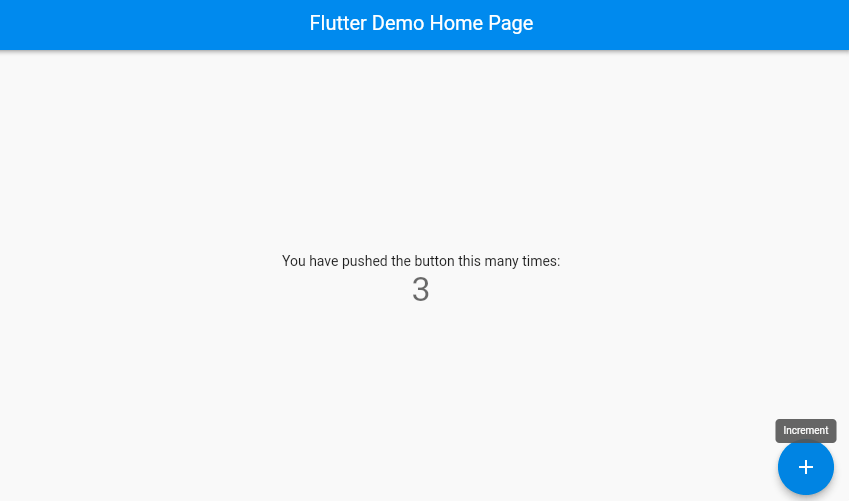
Upon completion, you will find the deployed app URL as ‘Outputs’ in the terminal. Click the URL to open in browser, you will see the sample Flutter counter app is now deployed!
Outputs:
CdkApprunnerEcrStack.url = https://xxxxxx123x.us-west-2.awsapprunner.com
CDK Code Review
You may notice that everything defined in the stack is 100% written as TypeScript code. We also benefit from the opinionated nature of CDK by letting it build out components based on well architected practices. This also means that we don’t have to think about all of the underlying components to create and connect resources (ie, subnets, nat gateways, etc). Once we deploy the CDK code, the CDK will generate the underlying Cloudformation templates and deploy it.
With this approach, we are provisioning required resources with AWS CDK. There are 2 simple components needed to build to serve it up as a web service - App Runner service Elastic Container Registry repository.
You can view the source code under the repo cdk-apprunner-existing-repo/lib/cdk-apprunner-ecr-stack.ts
service using the image retrieved from an existing repository named AppRunnerCounterAppRepo. We will explore another approach in option 2 later.
Let’s check out the App Runner service created by CDK:
For more information about how you can get started with CDK to build your own app, you can refer here.
## To create a Service from an existing ECR repository.
## An ECR repository 'apprunner-counterapp-repo' has been created from the CloudFormation template 'apprunnercfn.json' for the lab usage.

    const service = new apprunner.Service(this, 'CounterAppService', {
      source: apprunner.Source.fromEcr({
        imageConfiguration: { port: 8080 },
        repository: ecr.Repository.fromRepositoryName(this, 'AppRunnerCounterAppRepo', 'apprunner-counterapp-repo'),
        tag: 'latest',
      }),
    });

(
(Optional) Updating code and redeploy
You can choose to trigger a manual deployment or let App Runner to automatically deploy once it detects a new ECR image version in the repository. To do so, go to App Runner in the Console > Select the deployed CounterAppServicexxxx > Go to Configuration, under Deployment > Select automatic deployment and update. After enabling this, whenever you make changes to your code and push a new version of image following the step listed here, App Runner will automatically detect a new version of image is being pushed to the repo and trigger a new deployment.
Alternatively you can stay with manual deployment and trigger it whenever you make changes to your code, update and push the images to ECR as per step listed in this segment.
Security
See CONTRIBUTING for more information.
Please help us improve by providing your feedback
Thanks for completing a lab, hope you had fun! We really appreciate your feedback and would love to hear about what you loved and what we can improve. Please take a few seconds to give us feedback so we can improve these labs. Alternatively, you can scan the QR code below:

License
This library is licensed under the MIT-0 License. See the LICENSE file.

![dependabot[bot] avatar](https://avatars.githubusercontent.com/in/29110?v=4 "dependabot[bot]")


