ch1oechao / code Goto Github PK
View Code? Open in Web Editor NEWCode notes, update posts in issues
Home Page: https://github.com/zchen9/code/issues
Code notes, update posts in issues
Home Page: https://github.com/zchen9/code/issues


用 webpack 的 loader 对 zepto 库进行改造
1.安装 script-loader exports-loader
npm i -D script-loader exports-loader
2.Webpack 配置
module: {
  rules: [{
    test: require.resolve('zepto'),
    use: ['exports-loader?window.Zepto','script-loader']
  }]
}
原理
script-loader
可以在我们 import/require 模块时,在全局上下文环境中运行一遍模块 JS 文件(不管 require 几次,模块仅运行一次)。script-loader 把我们指定的模块 JS 文件转成纯字符串,并用 eval.call(null, string) 执行,这样执行的作用域就为全局作用域了。
exports-loader
exports-loader 可以导出我们指定的对象: require('exports?window.Zepto!./zepto.js') ,它的作用就是在模块闭包最后加一句 module.exports = window.Zepto 来导出我们需要的对象,这样就可以愉快地 import $ from 'zepto' 了。
详情查看: https://sebastianblade.com/how-to-import-unmodular-library-like-zepto/
16 JavaScript Podcasts to Listen to in 2020 - Snipcart
Building a CRUD App with React Hooks & the Context API ← Alligator.io
Implementing Infinite Scroll And Image Lazy Loading In React — Smashing Magazine
Intersection Observer API - Web APIs | MDN
5 Recommended Tools for Optimizing Performance in ReactJS
Article
Video
MDN
Code
Data
Book
Practice
Article
MDN
Video
Article
Article
Article
JavaScript 面试中可能被问到的一些知识点收集:
如果你不能简单说清楚,就是你没完全明白。
If you can't explain it simply, you don't understand it well enough.-- 爱因斯坦
我一直把这句话奉为真正掌握知识的标杆,那么在面试中简明扼要地回答问题是检验是否真的明白某项技术的标准。
所以 js-interview-review 是一篇非常好的文章,列出几项精简概念来检测开发者是否真的了解 JavaScript,并提供相关学习资料。
内容比较多,所以会慢慢看,然后做一些笔记 🎐
Functional programming in JavaScript 简单明了地介绍函数式编程
笔记:
简单来说,JavaScript的函数其实可以转化为变量使用,即:
    function hello(){ ... }
    // =>
    var hello = function() { ... }
那么函数式编程的意义在于把逻辑抽丝剥茧后转化为一个个小函数,用变量的形式存储和调用。
这样的话每个小逻辑可以更好的复用,而描述整个大逻辑的时候,只需要把小逻辑进行组装。
这样,整个函数结构清晰明了,而且利于 debug。
笔记:
浏览器中会提供一个专门的 JavaScript 处理引擎,比如 Chrome 的 V8 处理引擎。
然而 JavaScript 引擎并不是所有代码都处理,比如 setTimeout / addEventListener 等 Web API 其实是由浏览器专门处理而不是 V8。
V8 的处理机制为单线程,所以一次只处理一件事情,事件以栈的形式执行,那么首先入栈的为 main 函数,接着依次按照函数执行顺序将事件入栈,然后从栈顶开始一项一项事件执行完后出栈,直到最后的 main 函数出栈,整个函数执行完毕。
碰到使用 Web API 的函数时,栈接收后发现自身处理不了,便会将这些函数依次传给浏览器进行特别“照顾”。
浏览器处理完这些“特殊”函数后,依次传入一个任务队列里。
如果此时的 V8 处理栈空闲,那么任务队列里的函数依次进入栈内执行。
这就是为什么 setTimeout 函数总是最后才执行...
Example:
console.log(1);

setTimeout(function() {
    console.log(3);
}, 0);

function two() {
    console.log(2);
}

two();
打印结果依次为 1,2,3
根据项目开发经验整理的一些笔记。
@babel/preset-env 而不是 babel-preset-env最新的 babel/preset-env 换仓库了:@babel/preset-env Github Repo
用法稍有不同,具体看 .babelrc 配置。
npm install @babel/preset-env --save-devNPM 安装后,使用版本为 7.0.0-beta.x
.babelrc{
"presets": [
["@babel/preset-env", {
"targets": {
"browsers": ["Android >= 4.0", "ios >= 7"]
},
"useBuiltIns": "entry",
"debug": true,
}],
],
"plugins": [...],
}env 换成了 @babel/preset-env,配置目标使用 target 字段配置,包含 ES Modules、Node、Browsers 等。其中浏览器配置支持 Browserslist 配置,即配置 .browserslistrc 文件。还可以在 package.json 里配置,不过建议单独创建 .browserslistrc,因为一些编译工具如 autoprefixer 也会用到。
useBuiltIns 配置也有考究,默认为 false,可以使用的值有 usage 和 entry。usage 表示明确使用到的 polyfill 引用。在一些 ES2015+ 语法不支持的环境下,每个需要用到 polyfill 的引用时,会自动加上。
原始文件:
// a.js
var a = new Promise();

// b.js
var b = new Map();
根据当前环境是否支持后,编译成:
import "core-js/modules/es6.promise";
var a = new Promise();

import "core-js/modules/es6.map";
var b = new Map();
entry 表示替换 import "@babel/polyfill"; 的全局声明,转换成当前文件下需要使用到的对应 polyfill 语法工具。
原始状态:
import "@babel/polyfill";根据当前不同环境编译成:
import "core-js/modules/es7.string.pad-start";
import "core-js/modules/es7.string.pad-end";
同样适用于 core-js 的直接引用 (import "core-js"; or require('core-js’);)。
Polyfill 官网介绍如下:
Babel includes a polyfill that includes a custom regenerator runtime and core-js.
This will emulate a full ES2015+ environment and is intended to be used in an application rather than a library/tool. This polyfill is automatically loaded when using babel-node.
This means you can use new built-ins like Promise or WeakMap, static methods like Array.from or Object.assign, instance methods like Array.prototype.includes, and generator functions (provided you use the regenerator plugin). The polyfill adds to the global scope as well as native prototypes like String in order to do this.
翻译一下:
一些 ES3015+ 的新语法,如 Iterator、Generator、Set、Maps、Proxy、Reflect、Symbol、Promise 等全局对象,以及一些定义在全局对象上的方法(比如 Object.assign、Array.from)都需要用 babel-polyfill 进行转译,为当前 [应用开发] 环境铺好路,而不是库或是工具。
Runtime transform 官网介绍如下:
This plugin is recommended in a library/tool.
Babel uses very small helpers for common functions such as _extend. By default this will be added to every file that requires it. This duplication is sometimes unnecessary, especially when your application is spread out over multiple files.
This is where the transform-runtime plugin comes in: all of the helpers will reference the module babel-runtime to avoid duplication across your compiled output. The runtime will be compiled into your build.
Another purpose of this transformer is to create a sandboxed environment for your code. If you use babel-polyfill and the built-ins it provides such as Promise, Set and Map, those will pollute the global scope. While this might be ok for an app or a command line tool, it becomes a problem if your code is a library which you intend to publish for others to use or if you can’t exactly control the environment in which your code will run.
The transformer will alias these built-ins to core-js so you can use them seamlessly without having to require the polyfill.
简单翻译一下:
Runtime transform 更适用于 库/脚本 开发,它提供编译模块复用工具函数,将不同文件中用到的辅助函数如 _extend 统一打包在一块,避免重复出现导致的体积变大。另外一个目的是,在 库/脚本工具开发中不需要直接引用 polyfill,因为会造成实际应用开发中,一些全局变量名污染,比如 Promise、Map 等。Runtime 会自动应用 Polyfill,而不需要再单独引用。
当然也可以配置 Runtime 不自动应用 Polyfill,参看自 transform-runtime 会自动应用 polyfill,即便没有使用 babel-polyfill
{
  "plugins": [
    ["transform-runtime", {
      "polyfill": false,
      "regenerator": true
    }]
  ]
}关于两者的区别更细致的解释可以查看:javascript - babel的polyfill和runtime的区别 - SegmentFault 思否
Browserslist 的目的是在不同的前端工具中,统一浏览器的支持程度,比如 autoprefixer、ESLint、 @babel/preset-env 等等。
GitHub - browserslist/browserslist
.browserslistrc 配置示例如下,可支持不同环境下的配置:
# Browsers that we support

[production staging]
> 1%
last 4 version
Android >= 4.0
iOS >= 7

[development]
> 1%
last 4 version
babel-eslint 是一款语法验证工具,可以在 ESLint 配置中允许所有有效的 Babel 支持的语法。比如 Decorator 的语法使用,普通的 ESLint 配置验证不会通过,加上 babel-eslint 配置后即可。
.eslintrc 配置如下,可以支持一些实验性质的 ES2015+ 语法:
{
  "parser": "babel-eslint",
  "rules": {
    "strict": 0,
    "no-undef": 0,
    "no-unused-vars": 0
  }
}想要在应用中使用 Decorator,需要使用到 Babel 插件:babel-plugin-transform-decorators-legacy,安装后,在 .babelrc 中配置即可。PS. 如果项目中使用了 ESLint 还要加上 babel-eslint 配置,才能编译通过。
{
  "presets": [...],
  "plugins": [
    "transform-decorators-legacy",
  ]
}尝试过 Babel 自带的 Runtime-Transform 进行编译,不过编译后的问题体积巨大,打包了很多不需要的代码。最终找到了 Facebook 出的 regenerator-runtime 工具。
文档介绍说
Standalone runtime for Regenerator-compiled generator and async functions.
也就是这个工具专门为转义 Async funtion 语法而生,大大减少了编译后的体积,很赞~ 另外引用也非常简单,只要在应用的入口文件中加入引用即可:
import 'regenerator-runtime/runtime';modules: true 开启 CSS Modules.browserslistrcWebpack 的样式配置举例如下:
{
  test: /\.(sass|scss)$/,
  use: ExtractTextPlugin.extract({
    fallback: 'style-loader',
    use: [{
        loader: 'css-loader',
        options: {
          camelCase: true,
          modules: true,
        },
      },
      {
        loader: 'postcss-loader',
        options: {
          sourceMap: true,
          plugins: () => [autoprefixer()],
        },
      },
      {
        loader: 'sass-loader',
      }
    ],
  }),
},在项目升级中,遇到的明显的两个变化是:
其余的变化因为项目配置需要有限,因此没有太多体验。更详细的升级指南可以查看 Webpack 4 不完全迁移指北
—
END.
Critical CSS and Webpack: Automatically Minimize Render-Blocking CSS
提取关键渲染 CSS
module.exports = {
  module: {
    rules: [
      {
        test: /\.scss$/,
        use: ExtractTextPlugin.extract({
          fallback: 'style-loader',
          use: ['css-loader', 'sass-loader']
        })
      },
      ...
    ]
  },
  ...
  plugins: [
    new ExtractTextPlugin({ filename: 'style.css' }),
    new HtmlWebpackPlugin({
      filename: 'index.html',
      template: 'index.html',
      inject: true
    })
  ]
};critical 工具提取关键 CSSconst critical = require("critical");
critical.generate({
/* The path of the Webpack bundle */
base: path.join(path.resolve(__dirname), 'dist/'),
src: 'index.html',
dest: 'index.html',
inline: true,
extract: true,
/* iPhone 6 dimensions, use whatever you like*/
width: 375,
height: 565,
/* Ensure that bundled JS file is called */
penthouse: {
blockJSRequests: false,
}
});抽取结果如下:
rel="preload" 加载,当页面 onLoad 完毕后渲染<style type="text/css">
/* Critical CSS is inlined into the document head, abbreviated here. */
body {
font-family: Helvetica Neue,Helvetica,Arial,sans-serif;
font-size: 14px;
line-height: 1.42857;
color: #333;
background-color: #fff;
}
...
</style>
<link href="/style.96106fab.css" rel="preload" as="style" onload="this.rel='stylesheet'">
<noscript>
<link href="/style.96106fab.css" rel="stylesheet">
</noscript>
<script>
/*A script for loading the non-critical CSS goes here, omitted for brevity.*/
</script>critical 工具集成进 Webpack使用 html-critical-webpack-plugin 插件
const HtmlCriticalPlugin = require("html-critical-webpack-plugin");

module.export = {
  ...
  plugins: [
    new HtmlWebpackPlugin({ ... }),
    new ExtractTextPlugin({ ... }),
    new HtmlCriticalPlugin({
      base: path.join(path.resolve(__dirname), 'dist/'),
      src: 'index.html',
      dest: 'index.html',
      inline: true,
      minify: true,
      extract: true,
      width: 375,
      height: 565,
      penthouse: {
        blockJSRequests: false,
      }
    })
  ]
};
ES modules: A cartoon deep-dive – Mozilla Hacks – the Web developer blog
For ES modules, this happens in three steps.
People talk about ES modules being asynchronous. You can think about it as asynchronous because the work is split into these three different phases — loading, instantiating, and evaluating — and those phases can be done separately. But in CJS a module and the dependencies below it are loaded, instantiated, and evaluated all at once, without any breaks in between.
Google publishes a JavaScript style guide. Here are some key lessons.
Check out these useful ECMAScript 2015 (ES6) tips and tricks
You can build a neural network in JavaScript even if you don’t really understand neural networks
React Tutorial: A Comprehensive Guide to learning React.js in 2018
JSX — Allows us to write HTML like syntax which gets transformed
to lightweight JavaScript objects.

Virtual DOM — A JavaScript representation of the actual
DOM.

React.Component — The way in which you create a new component.

render (method) — Describes what the UI will look like for
the particular component.

ReactDOM.render — Renders a React component to a DOM node.

state — The internal data store (object) of a component.

constructor (this.state) - The way in which you establish
the initial state of a component.

setState — A helper method used for updating the state of a
component and re-rendering the UI

props — The data which is passed to the child component
from the parent component.

prop-types — Allows you to control the presence, or types of
certain props passed to the child component.

defaultProps — Allows you to set default props for your component.

Component LifeCycle
  - componentDidMount — Fired after the component mounted
  - componentWillUnmount — Fired before the component will unmount
  - getDerivedStateFromProps - Fired when the component mounts and
whenever the props change. Used to update the state of a
component when its props change

Events
  - onClick
  - onSubmit
  - onChange
How to make responsiveness super simple with CSS Variables
@media all and (max-width: 450px) {
  :root {
    --columns: 200px;
    --base-margin: 15px;
    --base-font-size: 20px;
	}
}
Animate a Container on Mouse Over Using Perspective and Transform | CSS-Tricks
Understanding 16 types of camera shots and angles (with GIFs!) | Boords
Good to great UI animation tips – UX Collective
12 Mobile UX Design Trends For 2018
Silky smooth Piechart transitions with React and D3.js - A geek with a hat
D3 Graph Theory
Aborting a signal: How to cancel an asynchronous task in JavaScript
hapijs/hapi: The Simple, Secure Framework Developers Trust
gcanti/io-ts: Runtime type system for IO decoding/encoding
What is a Higher-Order Function? | TypeOfNaN
How to animate scrolling to anchor links with one line of CSS | Go Make Things
Merrick Christensen - Headless User Interface Components
Should I useState or useReducer?
4 Best Practices to Write Quality JavaScript Modules
7 Types of Native Errors in JavaScript You Should Know
How To Make A Drag-and-Drop File Uploader With Vanilla JavaScript — Smashing Magazine
How To Use The HTML Drag-And-Drop API In React — Smashing Magazine
When CSS Blocks - Web Performance Consulting | TimKadlec.com
Redux offers a tradeoff. It asks you to:
  var funEmoji = [
    '😘',
    '🐱',
    '🙋🏻',
    '📚',
    '💻',
    '🙈',
    '🎐',
    '🎨'
  ];
  if (navigator.userAgent.indexOf('Mac OS X') !== -1) {
    window.location.hash = funEmoji[Math.floor(Math.random() * (funEmoji.length - 1))];
  }
修改 location 对象属性(如 search, pathname, post 等等)会重新加载当前页面, hash 除外。
Animating Elements Along SVG Paths: Introducing PathSlider ― Scotch
https://codepen.io/lmgonzalves/full/dmbmpQ/
Here are examples of everything new in ECMAScript 2016, 2017, and 2018
The Options for Programmatically Documenting CSS | CSS-Tricks
React Code Style Guide | CSS-Tricks
Working with the new CSS Typed Object Model | Web | Google Developers
支付宝前端应用架构的发展和选择 · Issue #6 · sorrycc/blog · GitHub
理解 Redux
Redux 本身是一个很轻的库,解决 component -> action -> reducer -> state 的单向数据流转问题。
按我理解,他有两个非常突出的特点是:
- predictable,可预测性
- 可扩展性
可预测性是由于他大量使用 pure function 和 plain object 等概念(reducer 和 action creator 是 pure function,state 和 action 是 plain object),并且 state 是 immutable 的。这对于项目的稳定性会是非常好的保证。
可扩展性则让我们可以通过 middleware 定制 action 的处理,通过 reducer enhancer 扩展 reducer 等等。从而有了丰富的社区扩展和支持,比如异步处理、Form、router 同步、redu/undo、性能问题(selector)、工具支持。
React + Redux 最佳实践 · Issue #1 · sorrycc/blog
前端变化虽快,但其实一直都围绕这几个概念在转:
URL - 访问什么页面
Data - 显示什么信息
View - 页面长成什么样
Action - 对页面做了什么操作
API Server - Data 数据的来源
dva/GettingStarted.md at master · dvajs/dva
12 步 30 分钟,完成用户管理的 CURD 应用 (react+dva+antd) · Issue #18 · sorrycc/blog
Sass 是一款 CSS 预处理器,它被许多开发者接受的主要原因在于提供了许多可编程的语法去编写 CSS,比如自定义变量、嵌套、Mixin、Function 等等。而 CSS4 目前也推出了新语法 CSS Variables 支持自定义变量。
Sass 编写变量
$color-white-1: #FFF;

.container {
  background-color: $color-white-1;
}
CSS Variables 编写变量
:root {
  --color-white-1: #FFF;
}

.container {
  background-color: var(--color-white-1);
}
两种方式最终都可以让容器的背景色为白色,但对于开发角度来说,原生的 CSS Variables 的优势会更明显。
局部覆盖可以在 .container 里重新定义 --color-blue-1 的值,那么最终容器展现的颜色为 .container 里定义的变量值,而不是 :root ,因为局部变量做了覆盖。
:root {
  --color-blue-1: #78A9FF;
}
.container {
  --color-blue-1: #99DDFF;
  background-color: var(--color-blue-1);
}
而使用 Sass 编写变量也是大多数开发者的选择,因为当前浏览器的兼容程度不一,网站最终依赖的样式脚本应该更具有兼容性。
怎么巧妙的将两者结合在一起写样式呢,我们可以借助 Sass 提供的多样函数语法,去完成 CSS Variables 的定义。
$colors: (
  white-1: #FFF,
  black-1: #000,
);
$sizes: (
  radius-md: 12px,
  font-md: 14px,
);
遍历 Sass Maps
:root {
  @each $name, $color in $colors {
    --color-#{$name}: #{$color};
  }
  @each $name, $size in $sizes {
    --size-#{$name}: #{$size};
  }
}
编译后的结果为:
:root {
  --color-white-1: #FFF;
  --color-black-1: #000;
  --size-radius-md: 12px;
  --size-font-md: 14px;
}@function --color($color-name) {
@return var(--color-#{$color-name});
}
@function --size($size-name) {
@return var(--size-#{$size-name});
}
.container {
color: --color(white-1);
background-color: --color(black-1);
border-radius: --size(radius-md);
font-size: --size(font-md);
}编译后的结果为:
.container {
  color: var(--color-white-1);
  background-color: var(--color-black-1);
  border-radius: var(--size-radius-md);
  font-size: var(--size-font-md);
}
最终的实现效果可以查看 Codepen
使用 Sass 中的 #{} 辅助编译成浏览器可识别的 CSS,最终用 CSS 的 calc 计算函数处理。
$size (
  interval-md: 8px;
);
// ...
$fixed-block-width: 300px;
.container {
  margin-left: calc(#{$fixed-block-width} + #{--size(interval-md)});
}@supports (display: var(--)) {
// do something with CSS Variables
:root {
--color-pink-1: #FF99AA;
}
}具体例子可查看 Codepen Supports CSS Variables)
// 判断是否支持 window.CSS.supports
const isSupported = window.CSS && window.CSS.supports &&  window.CSS.supports('--a', 0);
// 在不支持的情况下,加载兼容版 CSS
if(!isSupported){
  removeCss('css-custom-properties.css');
  loadCss('without-css-custom-properties.css');
}利用 CSS Variables 局部变量的属性,可以快速的切换主题
theme-pink 与 theme-green 两款颜色主题。.main-container {
--color-brand-1: #78A9FF;
--color-brand-2: #80C3FF;
&.theme-pink {
--color-brand-1: #FF3377;
--color-brand-2: #FF6680;
}
&.theme-green {
--color-brand-1: #15D1D1;
--color-brand-2: #45E6CB;
}
}classname 快速更改主题,以下示例代码简单地描述容器的主题 classname 切换。setTheme(name) {
const $themeContainer = $('.main-container');
const themeName = `theme-${name}`;
const themeExp = new RegExp('^theme-\w?\s?', 'ig');
const className = $themeContainer.attr('class') || '';
const newClassName = className.split(' ').filter(n => !themeExp.test(n));
$themeContainer.attr('class', `${themeName} ${newClassName.join(' ')}`);
}END.
Lazy Loading Images and Video | Web Fundamentals | Google Developers
IntersectionObserver API 使用教程 - 阮一峰的网络日志
<img class="lazy" src="placeholder-image.jpg" data-src="image-to-lazy-load-1x.jpg" data-srcset="image-to-lazy-load-2x.jpg 2x, image-to-lazy-load-1x.jpg 1x" alt="I'm an image!">IntersectionObserver.IntersectionObserver() - Web API 接口 | MDN
document.addEventListener("DOMContentLoaded", function() {
  var lazyImages = [].slice.call(document.querySelectorAll("img.lazy"));

  if ("IntersectionObserver" in window) {
    let lazyImageObserver = new IntersectionObserver(function(entries, observer) {
      entries.forEach(function(entry) {
        if (entry.isIntersecting) {
          let lazyImage = entry.target;
          lazyImage.src = lazyImage.dataset.src;
          lazyImage.srcset = lazyImage.dataset.srcset;
          lazyImage.classList.remove("lazy");
          lazyImageObserver.unobserve(lazyImage);
        }
      });
    });

    lazyImages.forEach(function(lazyImage) {
      lazyImageObserver.observe(lazyImage);
    });
  } else {
    // Possibly fall back to a more compatible method here
  }
});
Lazy Loading with Intersection Observer Example
Element.getBoundingClientRect() - Web API 接口 | MDN
document.addEventListener("DOMContentLoaded", function() {
  let lazyImages = [].slice.call(document.querySelectorAll("img.lazy"));
  let active = false;

  const lazyLoad = function() {
    if (active === false) {
      active = true;

      setTimeout(function() {
        lazyImages.forEach(function(lazyImage) {
          if ((lazyImage.getBoundingClientRect().top <= window.innerHeight && lazyImage.getBoundingClientRect().bottom >= 0) && getComputedStyle(lazyImage).display !== "none") {
            lazyImage.src = lazyImage.dataset.src;
            lazyImage.srcset = lazyImage.dataset.srcset;
            lazyImage.classList.remove("lazy");

            lazyImages = lazyImages.filter(function(image) {
              return image !== lazyImage;
            });

            if (lazyImages.length === 0) {
              document.removeEventListener("scroll", lazyLoad);
              window.removeEventListener("resize", lazyLoad);
              window.removeEventListener("orientationchange", lazyLoad);
            }
          }
        });

        active = false;
      }, 200);
    }
  };

  document.addEventListener("scroll", lazyLoad);
  window.addEventListener("resize", lazyLoad);
  window.addEventListener("orientationchange", lazyLoad);
});
Lazy Loading CSS Background Images with Intersection Observer
.lazy-background {
  background-image: url("hero-placeholder.jpg"); /* Placeholder image */
}

.lazy-background.visible {
  background-image: url("hero.jpg"); /* The final image */
}document.addEventListener("DOMContentLoaded", function() {
var lazyBackgrounds = [].slice.call(document.querySelectorAll(".lazy-background"));
if ("IntersectionObserver" in window) {
let lazyBackgroundObserver = new IntersectionObserver(function(entries, observer) {
entries.forEach(function(entry) {
if (entry.isIntersecting) {
entry.target.classList.add("visible");
lazyBackgroundObserver.unobserve(entry.target);
}
});
});
lazyBackgrounds.forEach(function(lazyBackground) {
lazyBackgroundObserver.observe(lazyBackground);
});
}
});<video autoplay muted loop playsinline width="610" height="254" poster="one-does-not-simply.jpg">
<source data-src="one-does-not-simply.webm" type="video/webm">
<source data-src="one-does-not-simply.mp4" type="video/mp4">
</video>document.addEventListener("DOMContentLoaded", function() {
var lazyVideos = [].slice.call(document.querySelectorAll("video.lazy"));
if ("IntersectionObserver" in window) {
var lazyVideoObserver = new IntersectionObserver(function(entries, observer) {
entries.forEach(function(video) {
if (video.isIntersecting) {
for (var source in video.target.children) {
var videoSource = video.target.children[source];
if (typeof videoSource.tagName === "string" && videoSource.tagName === "SOURCE") {
videoSource.src = videoSource.dataset.src;
}
}
video.target.load();
video.target.classList.remove("lazy");
lazyVideoObserver.unobserve(video.target);
}
});
});
lazyVideos.forEach(function(lazyVideo) {
lazyVideoObserver.observe(lazyVideo);
});
}
});Fast Playback with Video Preload | Web Fundamentals | Google Developers
metadataSetting the preload attribute to metadata indicates that the user is not expected to need the video, but that fetching its metadata (dimensions, track list, duration, and so on) is desirable.
autoSetting the preload attribute to auto indicates that the browser may cache enough data that complete playback is possible without requiring a stop for further buffering.
Resources loaded via <link rel="preload"> are stored locally in the browser, and are effectively inert until they're explicitly referenced in the DOM, JavaScript, or CSS.
Preload is different from prefetch in that it focuses on current navigation and fetches resources with priority based on their type (script, style, font, video, audio, etc.). It should be used to warm up the browser cache for current sessions.
<link rel="preload" as="video" href="https://cdn.com/small-file.mp4">

<video id="video" controls></video>

<script>
  // Later on, after some condition has been met, set video source to the
  // preloaded video URL.
  video.src = 'https://cdn.com/small-file.mp4';
  video.play().then(_ => {
    // If preloaded video URL was already cached, playback started immediately.
  });
</script>原文:Gentle explanation of 'this' keyword in JavaScript
this对于刚开始进行 JavaScript 编程的开发者来说,this 具有强大的魔力,它像谜团一样需要工程师们花大量的精力去真正理解它。
在后端的一些编程语言中,例如 Java、PHP,this仅仅是类方法中当前对象的一个实例,它不能在方法外部被调用,这样一个简单的法则并不会造成任何疑惑。
在 JavaScript 中,this 是指当前函数中正在执行的上下文环境,因为这门语言拥有四种不同的函数调用类型:
alert('Hello World!')console.log('Hello World!')new RegExp('\\d')alert.call(undefined, 'Hello World')在以上每一项调用中,它都拥有各自独立的上下文环境,就会造成 this 所指意义有所差别。此外,严格模式也会对执行环境造成影响。
理解 this 关键字的关键在于理解各种不同的函数调用以及它是如何影响上下文环境的。
这篇文章旨在解释不同情况下的函数调用会怎样影响 this 以及判断上下文环境时会产生的一些常见陷阱。
在开始讲述之前,先熟悉以下一些术语:
parseInt 函数的调用为 parseInt(15)this 所代表的值函数调用 代表了该函数接收以成对的引号包含,用逗号分隔的不同参数组成的表达式。举例:parseInt('18')。这个表达式不能是属性访问如 myObject.myFunction 这样会造成方法调用。[1, 5].join(',') 同样也不是一个函数调用而是方法调用。
函数调用的一个简单例子:
    function hello(name) {
      return 'Hello' + name + '!';
    }
    // 函数调用
    var message = hello('World');
    console.log(message); // => 'Hello World!'
hello('World') 是一个函数调用:hello表达式代表了一个函数对象,接受了用成对引号包含的 World 参数。
高级一点的例子,立即执行函数 IIFE (immediately-invoked function expression):
    var message = (function(name) {
      return 'Hello ' + name + '!';
    })('World');
console.log(message) // => 'Hello World!' this
thisis the global object in a function invocation
全局对象取决于当前执行环境,在浏览器中,全局对象即 window。
在函数调用中,上下文执行环境是全局对象,可以在以下函数中验证上下文:
    function sum(a, b) {
      console.log(this === window); // => true
      this.myNumber = 20; // 在全局对象中添加 'myNumber' 属性
      return a + b;
    }
    // sum() 为函数调用
    // this 在 sum() 中是全局对象 (window)
    sum(15, 16);     // => 31
    window.myNumber; // => 20
当 sum(15, 16) 被调用时,JavaScript 自动将 this 设置为全局对象,即 window。
当 this 在任何函数作用域以外调用时(最外层作用域:全局执行上下文环境),也会涉及到全局对象。
    console.log(this === window); // => true
    this.myString = 'Hello World!';
    console.log(window.myString); // => 'Hello World!'
<!-- 在 HTML 文件里 -->
<script type="text/javascript">
console.log(this === window); // => true
</script> this
thisis undefined in a function invocation in strict mode
严格模式由 ECMAScript 5.1 引进,用来限制 JavaScript 的一些异常处理,提供更好的安全性和更强壮的错误检查机制。使用严格模式,只需要将 'use strict' 置于函数体的顶部。这样就可以将上下文环境中的 this 转为 undefined。这样执行上下文环境不再是全局对象,与非严格模式刚好相反。
在严格模式下执行函数的一个例子:
    function multiply(a, b) {
      'use strict'; // 开启严格模式
      console.log(this === undefined); // => true
      return a * b;
    }
    // 严格模式下的函数调用 multiply()
    // this 在 multiply() 中为 undefined
    multiply(2, 5); // => 10
当 multiply(2, 5) 执行时,这个函数中的 this 是 undefined。
严格模式不仅在当前作用域起到作用,它还会影响内部作用域,即内部声明的一切内部函数的作用域。
    function execute() {
      'use strict'; // 开启严格模式
      function concat(str1, str2) {
        // 内部函数也是严格模式
        console.log(this === undefined); // => true
        return str1 + str2;
      }
      // 在严格模式下调用 concat()
      // this 在 concat() 下是 undefined
      concat('Hello', ' World!'); // => "Hello World!"
    }
    execute();
use strict 被插入函数执行主体的顶部,使严格模式可以控制到整个作用域。因为 concat 在执行作用域内部声明,因此它继承了严格模式。此外,concat('Hello', ' World!') 的调用中,this 也会成为 undefined。
一个简单的 JavaScript 文件可能同时包含严格模式和非严格模式,所以在同一种类型调用中,可能也会有不同的上下文行为差异。
    function nonStrictSum(a, b) {
      // 非严格模式
      console.log(this === window); // => true
      return a + b;
    }
    function strictSum(a, b) {
      'use strict';
      // 严格模式
      console.log(this === undefined); // => true
      return a + b;
    }
    // nonStrictSum() 在非严格模式下被调用
    // this 在 nonStrictSum() 中是 window 对象
    nonStrictSum(5, 6); // => 11
    // strictSum() 在严格模式下被调用
    // this 在 strictSum() 中是 undefined
strictSum(8, 12); // => 20 this 在内部函数中一个常见的陷阱是理所应当的认为函数调用中的,内部函数中 this 等同于它的外部函数中的 this。
正确的理解是内部函数的上下文环境取决于调用环境,而不是外部函数的上下文环境。
为了获取到所期望的 this,应该利用间接调用修改内部函数的上下文环境,如使用 .call() 或者 .apply 或者创建一个绑定函数 .bind()。
下面的例子表示计算两个数之和:
    var numbers = {
      numberA: 5,
      numberB: 10,
      sum: function() {
        console.log(this === numbers); // => true
        function calculate() {
          // 严格模式下, this 是 window or undefined
          console.log(this === numbers); // => false
          return this.numberA + this.numberB;
        }
        return calculate();
      }
    };
    numbers.sum(); // => 严格模式下,结果为 NaN 或者 throws TypeError
numbers.sum() 是对象内的一个方法调用,因此 sum 的上下文是 numbers 对象,而 calculate 函数定义在 sum 函数内,所以会误以为在 calculate 内 this 也指向的是 numbers。
然而 calculate() 在函数调用(而不是作为方法调用)时,此时的 this 指向的是全局对象 window 或者在严格模式下指向 undefined ,即使外部函数 sum 拥有 numbers对象作上下文环境,它也没有办法影响到内部的 this。
numbers.sum() 调用的结果是 NaN 或者在严格模式下直接抛出错误 TypeError: Cannot read property 'numberA' of undefined,而绝非期待的结果 5 + 10 = 15,造成这样的原因是 calculate 并没有正确的被调用。
为了解决这个问题,正确的方法是使 calculate 函数被调用时的上下文同 sum 调用时一样,为了得到属性 numberA 和 numberB,其中一种办法是使用 .call() 方法。
    var numbers = {
       numberA: 5,
       numberB: 10,
       sum: function() {
         console.log(this === numbers); // => true
         function calculate() {
           console.log(this === numbers); // => true
           return this.numberA + this.numberB;
         }
         // 使用 .call() 方法修改上下文环境
         return calculate.call(this);
       }
    };
    numbers.sum(); // => 15
calculate.call(this) 同样执行 calculate 函数,但是格外的添加了 this作为第一个参数,修改了上下文执行环境。此时的 this.numberA + this.numberB 等同于 numbers.numberA + numbers.numberB,其最终的结果就会如期盼的一样为 result 5 + 10 = 15。
方法是作为一个对象属性存储的函数,举个例子:
    var myObject = {
      // helloFunction 是对象中的方法
      helloFunction: function() {
        return 'Hello World!';
      }
    };
    var message = myObject.helloFunction();
helloFunction 是属于 myObject 的一个方法,调用这个方法可以使用属性访问的方式 myObject.helloFunction。
方法调用表现为对象属性访问的形式,支持传入用成对引号包裹起来的一系列参数。上个例子中,myObject.helloFunction() 其实就是对象 myObject 上对属性 helloFunction 的方法调用。同样,[1, 2].join(',') 和 /\s/.test('beautiful world') 都是方法调用。
区分函数调用和方法调用是非常重要的,它们是不同类型的调用方式。主要的差别在于方法调用为访问属性的形式,如:<expression>.functionProperty() 或者 <expression>['functionProperty'](),而函数调用为 <expression>()。
    ['Hello', 'World'].join(', '); // 方法调用
    ({ ten: function() { return 10; } }).ten(); // 方法调用
    var obj = {};
    obj.myFunction = function() {
      return new Date().toString();
    };
    obj.myFunction(); // 方法调用

    var otherFunction = obj.myFunction;
    otherFunction();     // 函数调用
    parseFloat('16.60'); // 函数调用
isNaN(0); // 函数调用 this
thisis the object that owns the method in a method invocation
当在一个对象里调用方法时,this 代表的是对象它自身。让我们创建一个对象,其包含一个可以递增属性的方法。
    var calc = {
      num: 0,
      increment: function() {
        console.log(this === calc); // => true
        this.num += 1;
        return this.num;
      }
    };
    // 方法调用,this 指向 calc
    calc.increment(); // => 1
    calc.increment(); // => 2
calc.increment() 调用意味着上下文执行环境在 calc 对象里,因此使用 this.sum 递增 num 这个属性是可行的。
一个 JavaScript 对象继承方法来自于它自身的属性。当一个被继承方法在对象中调用时,上下文执行环境同样是对象本身。
    var myDog = Object.create({
      sayName: function() {
        console.log(this === myDog); // => true
        return this.name;
      }
    });
    myDog.name = 'Milo';
    // 方法调用, this 指向 myDog
    myDog.sayName(); // => 'Milo'
Object.create() 创建了一个新的对象 myDog 并且设置了属性,myDog 对象继承了 myName方法。当 myDog.sayName() 被执行时,上下文执行环境指向 myDog。
在 ECMAScript 2015 的 class 语法中, 方法调用指的是实例本身。
    class Planet {
      constructor(name) {
        this.name = name;
      }
      getName() {
        console.log(this === earth); // => true
        return this.name;
      }
    }
    var earth = new Planet('Earth');
    // 方法调用,上下文为 earth
earth.getName(); // => 'Earth' 一个对象中的方法可能会被提取抽离成一个变量。当使用这个变量调用方法时,开发者可能会误认为 this 指向的还是定义该方法时的对象。
如果方法调用不依靠对象,那么就是一个函数调用,即 this 指向全局对象 object 或者在严格模式下为 undefined。创建函数绑定可以修复上下文,使该方法被正确对象调用。
下面的例子创建了构造器函数 Animal 并且创建了一个实例 myCat,在 setTimeout() 定时器 1s 后打印 myCat 对象信息。
    function Animal(type, legs) {
      this.type = type;
      this.legs = legs;
      this.logInfo = function() {
        console.log(this === myCat); // => false
        console.log('The ' + this.type + ' has ' + this.legs + ' legs');
      }
    }
    var myCat = new Animal('Cat', 4);
    // 打印出 "The undefined has undefined legs"
    // 或者在严格模式下抛出错误 TypeError
    setTimeout(myCat.logInfo, 1000);
开发者可能认为在 setTimeout 下调用 myCat.logInfo() 会打印出 myCat 对象的信息。但实际上这个方法被分离了出来作为了参数传入函数内 setTimeout(myCat.logInfo),然后 1s 后会发生函数调用。当 logInfo 被作为函数调用时,this 指向全局对象 window 或者在严格模式下为 undefined,因此对象信息没有正确地被打印。
方法绑定可以使用 .bind() 方法。如果被分离的方法绑定了 myCat 对象,那么上下文问题就可以被解决了:
    function Animal(type, legs) {
      this.type = type;
      this.legs = legs;
      this.logInfo = function() {
        console.log(this === myCat); // => true
        console.log('The ' + this.type + ' has ' + this.legs + ' legs');
      };
    }
    var myCat = new Animal('Cat', 4);
    // 打印 "The Cat has 4 legs"
setTimeout(myCat.logInfo.bind(myCat), 1000); 此时,myCat.logInfo.bind(myCat) 返回的新函数调用里的 this 指向了 myCat。
构造函数调用使用 new 关键词,后面跟随可带参数的对象表达式,例:new RegExp('\\d')。
以下的例子声明了一个构造函数 Country,并调用。
    function Country(name, traveled) {
      this.name = name ? this.name : 'United Kingdom';
      this.traveled = Boolean(traveled); // 转换为 boolean 值
    }
    Country.prototype.travel = function() {
      this.traveled = true;
    };
    // 构造函数调用
    var france = new Country('France', false);
    // 构造函数调用
    var unitedKingdom = new Country;

    france.travel(); // Travel to France
new City('Paris') 是一个构造器调用,这个对象初始化使用了类中特殊的方法 constructor,其中的 this 指向的是新创建的对象。
构造器调用创建了一个空的新对象,从构造器的原型中继承属性。这个构造器函数的意义在于初始化对象,因此这个类型的函数调用创建实例。
当一个属性访问 myObject.myFunction 前拥有 new 关键词,那么 JavaScript 会执行构造器调用而不是方法调用。举个例子:new myObject.myFunction() 意味着首先这个函数会解析为一个属性访问函数 extractedFunction = myObject.myFunction,然后用构造器创建一个新对象 new extractedFunction。
this
thisis the newly created object in a constructor invocation
构造器调用的环境是新创建的对象。通过传递构造函数参数来初始化新建的对象,添加属性初始化值以及事件处理器。
让我们来验证以下这个例子的上下文环境:
    function Foo () {
      console.log(this instanceof Foo); // => true
      this.property = 'Default Value';
    }
    // 构造函数调用
    var fooInstance = new Foo();
    fooInstance.property; // => 'Default Value'
new Foo() 建立构造器调用,它的上下文环境为 fooInstance,在 Foo 对象中初始化了 this.property 这个属性并赋予初始值。
在使用 class 语法时也是同样的情况(在 ES6 中),初始化只发生在它的 constructor 方法中。
    class Bar {
      constructor() {
        console.log(this instanceof Bar); // => true
        this.property = 'Default Value';
      }
    }
    // 构造函数调用
    var barInstance = new Bar();
    barInstance.property; // => 'Default Value'
当执行 new Bar() 时,JavaScript 创建了一个空对象并且它的上下文环境为 constructor 方法,因此添加属性的办法是使用 this 关键词:this.property = 'Default Value'。
new 关键词一些 JavaScript 函数创建实例,不仅仅可以使用构造器的形式调用也可以利用函数调用,下面是一个 RegExp 的例子:
    var reg1 = new RegExp('\\w+');
    var reg2 = RegExp('\\w+');

    reg1 instanceof RegExp;      // => true
    reg2 instanceof RegExp;      // => true
    reg1.source === reg2.source; // => true
当执行 new RegExp('\\w+') 和 RegExp('\\w+') 时,JavaScript 创建了两个相等的普通表达式对象。
但是使用函数调用创建对象会产生潜在的问题(包括工厂模式),当失去了 new 关键词,一些构造器会取消初始化对象。
以下例子描述了这个问题:
    function Vehicle(type, wheelsCount) {
      this.type = type;
      this.wheelsCount = wheelsCount;
      return this;
    }
    // 函数调用
    var car = Vehicle('Car', 4);
    car.type;              // => 'Car'
    car.wheelsCount // => 4
    car === window  // => true
Vehicle 是一个在对象上设置了 type 和 wheelsCount 属性的函数。
当执行了 Vehicle('Car', 4) 时,会返回对象 car,它拥有正确的属性值:car.type 指向 Car,car.wheelsCount 指向 4,开发者会误以为这样创建初始化对象没有什么问题。
然而,当前执行的是函数调用,因此 this 指向的是 window 对象,所以它设置的属性其实是挂在 window 对象上的,这样是完全错误的,它并没有创建一个新对象。
应该正确的执行方式是使用 new 关键词来保证构造器被正确调用:
    function Vehicle(type, wheelsCount) {
      if (!(this instanceof Vehicle)) {
        throw Error('Error: Incorrect invocation');
      }
      this.type = type;
      this.wheelsCount = wheelsCount;
      return this;
    }
    // 构造函数调用
    var car = new Vehicle('Car', 4);
    car.type                      // => 'Car'
    car.wheelsCount        // => 4
    car instanceof Vehicle // => true

    // 函数调用,会报错。
    var brokenCat = Vehicle('Broken Car', 3);
new Vehicle('Car', 4) 可以正确运行:一个新的对象被创建和初始化,因为 new 关键词代表了当前为构造器调用。
在构造器函数中添加验证:this instanceof Vehicle,可以保证当前的执行上下文是正确的对象类型。如果 this 不是指向 Vehicle,那么就存在错误。 如果 Vehicle('Broken Car', 3) 表达式没有 new 关键词而被执行,就会抛出错误:Error: Incorrect invocation。
间接调用表现为当一个函数使用了 .call() 或者 .apply() 方法。
在 JavaScript 中,函数为一等对象,这意味着函数是一个对象,对象类型即为 Function。
在函数的一系列方法中,.call() 和 .apply() 被用来配置当前调用的上下文环境。
方法 .call(thisArg[, arg1[, arg2[, ...]]]) 接收第一个参数 thisArg 作为执行的上下文环境,以及一系列参数 arg1, arg2, ...作为函数的传参被调用。
并且,方法 .apply(thisArg, [args]) 接收 thisArg作为上下文环境,剩下的参数可以用类数组对象 [args] 传递。
间接调用的例子:
    function increment(number) {
      return ++number;
    }
    increment.call(undefined, 10);    // => 11
    increment.apply(undefined, [10]); // => 11
increment.call() 和 increment.apply() 同时传递了参数 10 调用 increment 函数。
两个方法最主要的区别为 .call() 接收一组参数,如 myFunction.call(thisValue, 'value1', 'value2'),而 .apply() 接收一串参数作为类数组对象传递,如 myFunction.apply(thisValue, ['value1', 'value2'])。
this
thisis the first argument of.call()or.apply()in an indirect invocation
很明显,在间接调用中,this 指向的是 .call() 和 .apply()传递的第一个参数。
    var rabbit = { name: 'White Rabbit' };
    function concatName(string) {
      console.log(this === rabbit); // => true
      return string + this.name;
    }
    // 间接调用
    concatName.call(rabbit, 'Hello ');  // => 'Hello White Rabbit'
concatName.apply(rabbit, ['Bye ']); // => 'Bye White Rabbit' 当函数执行需要特别指定上下文时,间接调用非常有用,它可以解决函数调用中的上下文问题(this 指向 window 或者严格模式下指向 undefined),同时也可以用来模拟方法调用对象。
另一个实践例子为,在 ES5 中的类继承中,调用父级构造器。
    function Runner(name) {
      console.log(this instanceof Rabbit); // => true
      this.name = name;
    }
    function Rabbit(name, countLegs) {
      console.log(this instanceof Rabbit); // => true
      // 间接调用,调用了父级构造器
      Runner.call(this, name);
      this.countLegs = countLegs;
    }
    var myRabbit = new Rabbit('White Rabbit', 4);
    myRabbit; // { name: 'White Rabbit', countLegs: 4 }
Runner.call(this, name) 在 Rabbit 里间接调用了父级方法初始化对象。
绑定函数调用是将函数绑定一个对象,它是一个原始函数使用了 .bind() 方法。原始绑定函数共享相同的代码和作用域,但是在执行时拥有不同的上下文环境。
方法 .bind(thisArg[, arg1[, arg2[, ...]]]) 接收第一个参数 thisArg 作为绑定函数在执行时的上下文环境,以及一组参数 arg1, arg2, ... 作为传参传入函数中。 它返回一个新的函数,绑定了 thisArg。
下列代码创建了一个绑定函数并在之后被调用:
    function multiply(number) {
      'use strict';
      return this * number;
    }
    // 创建绑定函数,绑定上下文2
    var double = multiply.bind(2);
    // 调用间接调用
    double(3);  // => 6
    double(10); // => 20
multiply.bind(2) 返回一个新的函数对象 double,它绑定了数字 2。multiply 和 double 函数拥有相同的代码和作用域。
对比方法 .apply() 和 .call(),它俩都立即执行了函数,而 .bind() 函数返回了一个新方法,绑定了预先指定好的 this ,并可以延后调用。
this
thisis the first argument of.bind()when invoking a bound function
.bind() 方法的作用是创建一个新的函数,执行时的上下文环境为 .bind() 传递的第一个参数,它允许创建预先设置好 this 的函数。
让我们来看看在绑定函数中如何设置 this :
    var numbers = {
      array: [3, 5, 10],
      getNumbers: function() {
        return this.array;
      }
    };
    // 创建一个绑定函数
    var boundGetNumbers = numbers.getNumbers.bind(numbers);
    boundGetNumbers(); // => [3, 5, 10]
    // 从对象中抽取方法
    var simpleGetNumbers = numbers.getNumbers;
    simpleGetNumbers(); // => undefined 或者严格模式下抛出错误
numbers.countNumbers.bind(numbers) 返回了绑定 numbers 对象的函数 boundGetNumbers,它在调用时的 this 指向的是 numbers 并且返回正确的数组对象。
.bind() 创建了一个永恒的上下文链并不可修改。一个绑定函数即使使用 .call() 或者 .apply()传入其他不同的上下文环境,也不会更改它之前连接的上下文环境,重新绑定也不会起任何作用。
只有在构造器调用时,绑定函数可以改变上下文,然而这并不是特别推荐的做法。
下面这个例子声明了一个绑定函数,然后试图更改其预定上下文的情况:
    function getThis() {
      'use strict';
      return this;
    }
    var one = getThis.bind(1);
    // 绑定函数调用
    one(); // => 1
    // 使用 .apply() 和 .call() 绑定函数
    one.call(2);  // => 1
    one.apply(2); // => 1
    // 重新绑定
    one.bind(2)(); // => 1
    // 利用构造器方式调用绑定函数
    new one(); // => Object
只有 new one() 时可以改变绑定函数的上下文环境,其他类型的调用结果是 this 永远指向 1。
箭头函数的设计意图是以精简的方式创建函数,并绑定定义时的上下文环境。
    var hello = (name) => {
      return 'Hello ' + name;
    };
    hello('World'); // => 'Hello World'
    // 保留偶数
    [1, 2, 5, 6].filter(item => item % 2 === 0); // => [2, 6]
箭头函数使用了轻便的语法,去除了关键词 function 的书写,甚至当函数只有一个句子时,可以省去 return 不写。
箭头函数是匿名的,意味着函数的属性 name 是一个空字符串 '',它没有一个词汇式的函数名,意味着不利于使用递归或者解除事件处理。
同时它不同于普通函数,它不提供 arguments 对象,在 ES6 中可以用另外的参数代替:
    var sumArguments = (...args) => {
      console.log(typeof arguments); // => 'undefined'
      return args.reduce((result, item) => result + item);
    };
    sumArguments.name      // => ''
sumArguments(5, 5, 6); // => 16 this
thisis the enclosing context where the arrow function is defined
箭头函数并不创建它自身执行的上下文,使得 this 取决于它在定义时的外部函数。
下面的例子表示了上下文的透明属性:
    class Point {
      constructor(x, y) {
        this.x = x;
        this.y = y;
      }
      log() {
        console.log(this === myPoint); // => true
        setTimeout(()=> {
          console.log(this === myPoint);      // => true
          console.log(this.x + ':' + this.y); // => '95:165'
        }, 1000);
      }
    }
    var myPoint = new Point(95, 165);
    myPoint.log();
setTimeout 调用了箭头函数,它的上下文和 log()方法一样都是 myPoint 对象。
可以看出来,箭头函数“继承”了它在定义时的函数上下文。
如果尝试在上述例子中使用正常函数,那么它会创建自身的作用域(window 或者严格模式下 undefined)。因此,要使同样的代码可以正确运行就必须人工绑定上下文,即 setTimeout(function() {...}.bind(this))。使用箭头函数就可以省略这么详细的函数绑定,用更加干净简短的代码绑定函数。
如果箭头函数在最外层作用域定义,那么上下文环境将永远是全局对象,一般来说在浏览器中即为 window。
    var getContext = () => {
      console.log(this === window); // => true
      return this;
    };
    console.log(getContext() === window); // => true
箭头函数一次绑定上下文后便不可更改,即使使用了上下文更改的方法:
    var numbers = [1, 2];
    (function() {
      var get = () => {
        console.log(this === numbers); // => true
        return this;
      };
      console.log(this === numbers); // => true
      get(); // => [1, 2]
      // 箭头函数使用 .apply() 和 .call()
      get.call([0]);  // => [1, 2]
      get.apply([0]); // => [1, 2]
      // Bind
      get.bind([0])(); // => [1, 2]
    }).call(numbers);
函数表达式可以间接调用 .call(numbers) 让 this 指向 numbers,然而 get 箭头函数的 this 也是指向 numbers 的, 因为它绑定了定义时的外部函数。
无论怎么调用 get 函数,它的初始化上下文始终是 numbers,间接地调用其他上下文(使用 .call() 或者 .apply()),或者重新绑定上下文(使用 .bind())都没有任何作用。
箭头函数不可以用作构造器,如果使用 new get() 作构造器调用,JavaScript 会抛出错误:TypeError: get is not a constructor。
开发者可能会想使用箭头函数在对象中声明方法,箭头函数的声明((param) => {...})要比函数表达式的声明(function(param) {...})简短的多。
下面的例子在类 Period 中 使用箭头函数定义了方法 format():
    function Period (hours, minutes) {
      this.hours = hours;
      this.minutes = minutes;
    }
    Period.prototype.format = () => {
      console.log(this === window); // => true
      return this.hours + ' hours and ' + this.minutes + ' minutes';
    };
    var walkPeriod = new Period(2, 30);
    walkPeriod.format(); // => 'undefined hours and undefined minutes'
当 format 是一个箭头函数, 且被定义在全局环境下,它的 this 指向的是 window 对象。
即使 format 执行的时候挂载在对象上 walkPeriod.format(),window 对象依旧存在在调用的上下文环境中。这是因为箭头函数拥有静态的上下文环境,不会因为不同的调用而改变。
this 指向的是 window,因此 this.hour 和 this.minutes 都是 undefined。方法返回的结果为:'undefined hours and undefined minutes'。
正确的函数表达式可以解决这个问题,因为普通函数可以改变调用时的上下文环境:
    function Period (hours, minutes) {
      this.hours = hours;
      this.minutes = minutes;
    }
    Period.prototype.format = function() {
      console.log(this === walkPeriod); // => true
      return this.hours + ' hours and ' + this.minutes + ' minutes';
    };
    var walkPeriod = new Period(2, 30);
    walkPeriod.format(); // => '2 hours and 30 minutes'
walkPeriod.format() 是一个在对象中的方法调用,它的上下文环境为 walkPeriod,this.hours 指向 2,this.minutes 指向 30,因此可以返回正确的结果:'2 hours and 30 minutes'。
因为函数调用会极大地影响到 this,所以从现在开始不要直接问自己:
this是从哪里来的?
而是要开始思考:
当前函数是怎么被调用的?
遇到箭头函数时,考虑:
当箭头函数被定义时,
this是指向什么?
以上思路可以帮助开发者减少判断 this 带来的烦恼。
如果你有关于上下文陷阱更加有趣的案例或者遇到一些棘手的情况欢迎评论,一起讨论!
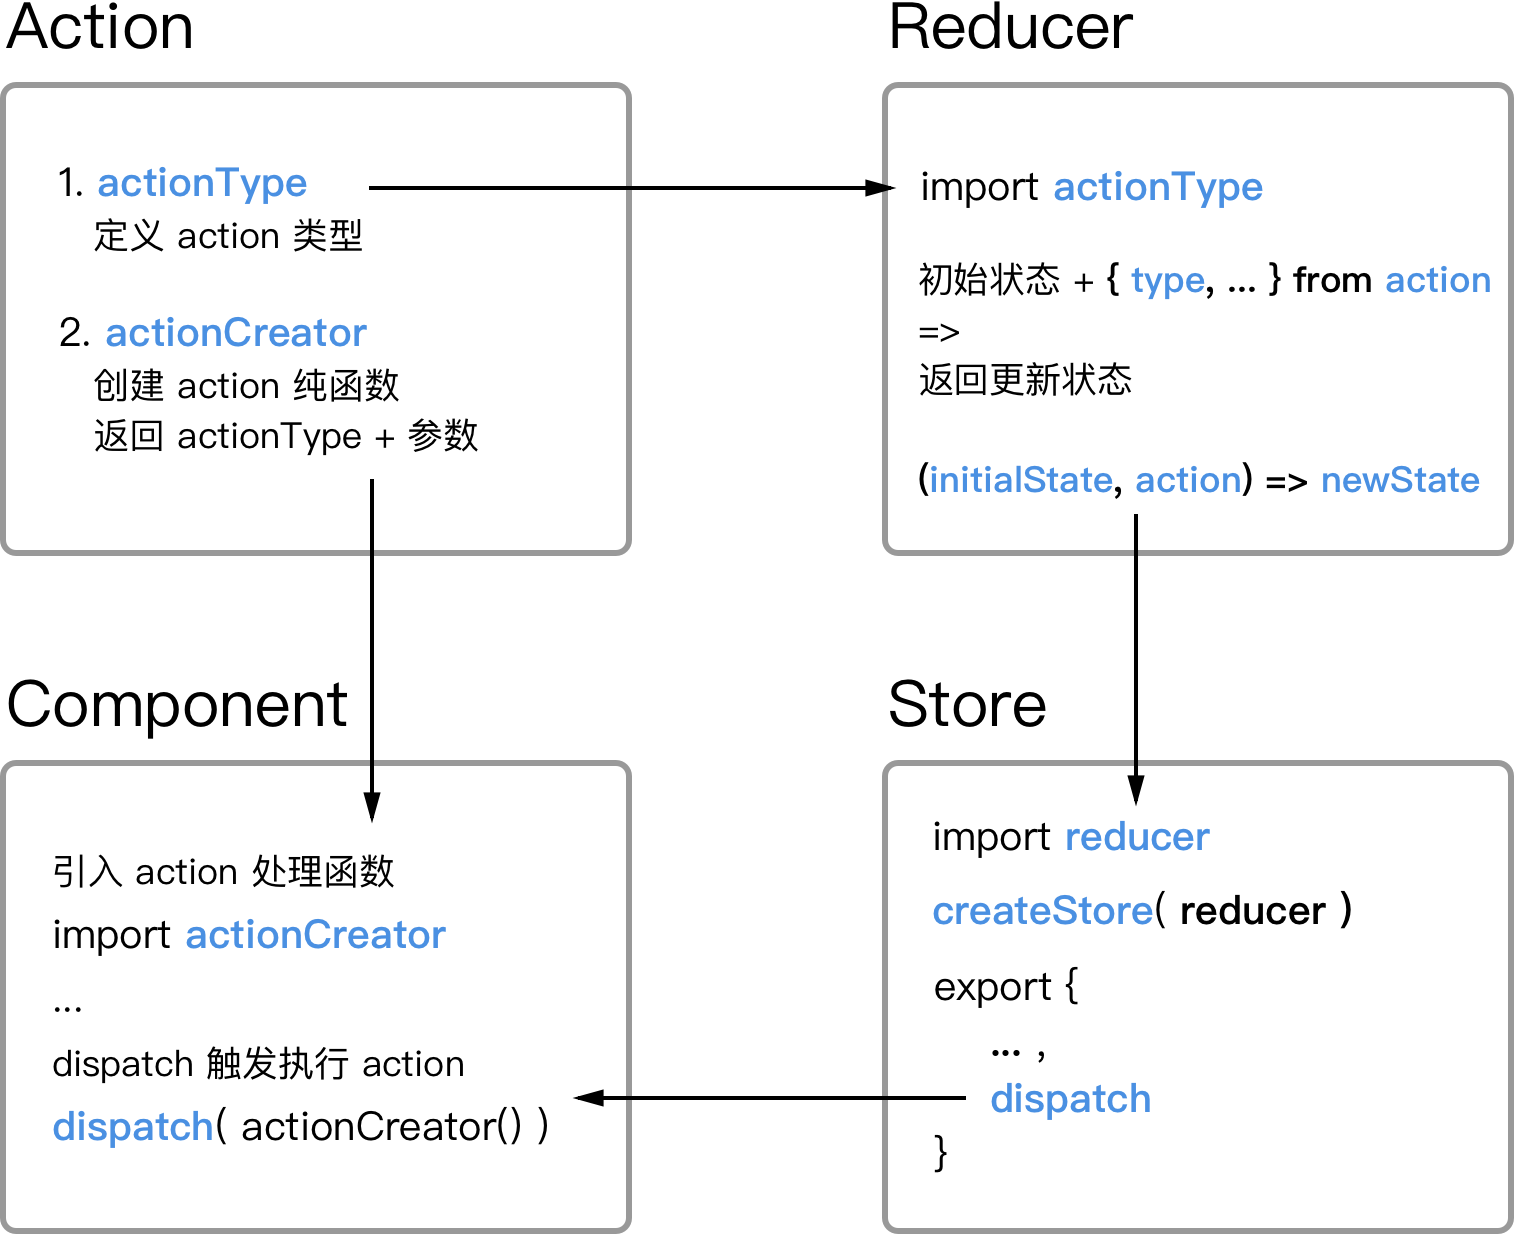
1. 单一数据源
all states => Store
2. 单向数据流
dispatch(actionCreator) => Reducer => (state, action) => state
// actionType
export const ACTION_TYPE = 'ACTION_TYPE';

// actionCreator
let actionCreator = (config) => {
    return {
        type: ACTION_TYPE, // 必须定义 type
        config // 传递参数 => reducer
    }
}redux-thunk 配置
redux-thunk 为独立工具,需要另外安装,通过 redux 提供的中间件 applyMiddleware ,绑定到 store 中。
import { createStore, applyMiddleware } from 'redux';
import thunk from 'redux-thunk';

let store = createStore(
  reducers,
  applyMiddleware(thunk)
);
Action 使用 redux-thunk
获取数据方法在异步获取数据后需要再次调用接收方法接收数据。
// 接收方法
let receiveSomething = (res) => {
    return {
        type: RECEIVE_SOME,
        res
    }
}

// 获取数据方法
export let fetchSomething = (args) => {
    return dispatch => {
        return fetch(args).then((res) => {
            return dispatch(receiveSomething(res))
        })
    }
}(initialState, action) => newStateimport { ACTION_A, ACTION_B } from '../actions';
let initialState = { ... }
function example(state = initialState, action) {
switch(action.type) {
case ACTION_A:
return Object.assign({}, state, action.config)
case ACTION_B:
return Object.assign({}, state, action.config)
}
}let doSomething = (config) => {
let { a, b } = config;
// do something with a, b
return { a, b }
}
function example(state = initialState, action) {
switch(action.type) {
case ACTION_TYPE:
return Object.assign({},
state,
doSomething(action.config))
}
}通过 redux 提供的 combineReducers 将不同处理逻辑的 reducer 合并起来。
import { combineReducers } from 'redux';

export default combineReducers({
  reducerA,
  reducerB
});

// or

export let reducer = (state = initialState, action) {
    a: processA(state.a, action),
    b: processB(state.b, action)
}使用 react-redux 提供的 Provider 可以将 Store 注入到 react 中。
Store 将合并后的 reducers 通过 createStore 创建,此外下面示例代码还使用中间件加入了一层 react-thunk 处理。
import ReactDOM from 'react-dom';
import { createStore, applyMiddleware } from 'redux';
import { Provider } from 'react-redux'
import thunk from 'redux-thunk';
import reducers from './reducers';

let store = createStore(
  reducers,
  applyMiddleware(thunk)
);

ReactDOM.render((
  <Provider store={store}>
   // ...
  </Provider>
), document.querySelector('#app'));使用 react-redux 提供的 connect 方法 将组件和所需数据绑定。
需要注意的是,Store 创建时接收的是合并后的 reducers, 因此不同 reducer 上的处理数据绑定在了不同 reducer 对象上,而不是全部挂载在 Store 上。
mapStateToProps 将组件内部所需数据通过 props 传入组件内部。更多绑定机制,具体可参考connect
import React, { Component } from 'react';
import { connect } from 'react-redux';

class ComponentA extends Component {
   //...
}

let mapStateToProps = (state) => {
  // attention !!!
  let { reducerA, reducerB } = state;
  return {
    propA: reducerA.propA,
    propB: reducerB.propB
  }
};

export default connect(mapStateToProps)(ComponentA);React bindings for Redux embrace the idea of separating presentational and container components.
Redux 的 React 绑定库包含了 容器组件和展示组件相分离 的开发**。
展示型组件和容器型组件的区别在官方文档中已经给出很详细的解释了,但是中文文档的翻译有误,所以直接看英文比较更容易懂。
| Presentational Components | Container Components | |
|---|---|---|
| Purpose | How things look (markup, styles) | How things work (data fetching, state updates) |
| Aware of Redux | No | Yes |
| To read data | Read data from props | Subscribe to Redux state |
| To change data | Invoke callbacks from props | Dispatch Redux actions |
| Are written | By hand | Usually generated by React Redux |
组件类型区分的模糊点在于怎么界定组件的内部功能规划。如果判定一个组件为展示型组件,那么它所需数据和处理方法都应该从父级传入,保持组件内部“纯净”。
在实际开发中,一个组件的逻辑跟业务紧密相关。如果需要将数据和方法从外部传入,那么父级组件所做的事情会很多,多重的子组件也会把父级逻辑弄乱,这就不是 redux 的初衷了。
中文文档翻译的意思是:容器组件应该为路由层面的组件,但这样既不符合实际开发需要,也违背了 redux **。真正界定两种组件的因素是:
当组件 connect 后,dispatch 方法已经注入到 props 中,所以触发 Action 可以从 props 获取 dispatch 方法。
import React, { Component } from 'react';
// actionCreator
import { actionA, actionB } from 'actions/actionA'

class ComponentA extends Component {
    constructor(props) {
        super(props);
    }
    componentDidMount() {
        let { dispatch } = this.props;
        dispatch(actionA())
    }
}
export default connect()(ComponentA);组件内部所需的渲染数据都已经绑定在了 props 上,直接获取即可。
需要注意的是,在事件监听中触发 Action,需要用一个匿名函数封装,否则 React 在渲染时就会执行事件绑定事件,而不是当事件发生再执行。
render() {
  let { dispatch, propA, propB } = this.props;

    return (
      <section>
        // Attention !!!
        <input type="text" onClick={(ev) => dispatch(actionB(ev))} />
        <p className={propA}>{propB}</p>
      </section>
    )
}容器型组件需要连接 Redux,使用 dispatch 触发 actionCreator。
展示型组件需要用到的方法调用在容器型组件内定义好,通过 props 传入到展示型组件中。
// get actionCreator
import { actionA } from './actions/actionA';

class Parent extends Component {
  handleCallback(data) {
    // use dispatch
    let { dispatch } = this.props;
    dispatch(actionA(data));
  }
  render() {
    return (
      <Child onSomethingChange={this.handleCallback} />
    )
  }
}
// connet Redux
export default connect()(Parent);展示型组件不需要用到 Redux 的一切,它的 props 仅仅存在于父级传入的数据和方法。
// don't need action/dispatch/connect
class Child extends Component {
  handleSomething(data) {
    // handle anything with props
    this.props.onSomethingChange(data);
  }
  render() {
    return (
     // just markup & style
      <input onChange={handleSomething} />
    )
  }
}图示箭头代表各概念之间的相互关系,不代表数据流。( 能理解下面这张图,这篇文章就没白看了 -。- )
参考文档
END.
打造全屏体验 | Web | Google Developers
document.documentElement.requestFullscreen();sindresorhus/screenfull.js 抹平各浏览器 API 使用差异
GitHub - sindresorhus/screenfull.js: Simple wrapper for cross-browser usage of the JavaScript Fullscreen API
<meta> 标签启动全屏模式iOS
<meta name="apple-mobile-web-app-capable" content="yes">Android
<meta name="mobile-web-app-capable" content="yes">manifest.json 网络清单设置使用 "display": "standalone" 表示全屏启动
{
  "short_name": "xxx's app",
  "name": "Amazing Application ++",
  "icons": [
    {
      "src": "launcher-icon-4x.png",
      "sizes": "192x192",
      "type": "image/png"
    }
  ],
  "start_url": "/index.html",
  "display": "standalone",
  "orientation": "landscape"
}navigator.standalone available on Apple's iOS Safari only
if (navigator.standalone === true) {
  // My app is installed and therefore fullscreen
}A declarative, efficient, and flexible JavaScript library for building user interfaces.
🖖 Vue.js is a progressive, incrementally-adoptable JavaScript framework for building UI on the web.
TypeScript is a superset of JavaScript that compiles to clean JavaScript output.
An Open Source Machine Learning Framework for Everyone
The Web framework for perfectionists with deadlines.
A PHP framework for web artisans
Bring data to life with SVG, Canvas and HTML. 📊📈🎉
JavaScript (JS) is a lightweight interpreted programming language with first-class functions.
Some thing interesting about web. New door for the world.
A server is a program made to process requests and deliver data to clients.
Machine learning is a way of modeling and interpreting data that allows a piece of software to respond intelligently.
Some thing interesting about visualization, use data art
Some thing interesting about game, make everyone happy.
We are working to build community through open source technology. NB: members must have two-factor auth.
Open source projects and samples from Microsoft.
Google ❤️ Open Source for everyone.
Alibaba Open Source for everyone
Data-Driven Documents codes.
China tencent open source team.