- What are web sockets
- How do web sockets work
- When and why to use web sockets
- Difference between web sockets, and normal HTTP
- React and web sockets
- Integrating react with Socket.IO
- Summary
According to the Mozilla developer website:
The WebSocket API is an advanced technology that makes it possible to open a two-way interactive communication session between the user's browser, and a server. With this API, you can send messages to a server and receive event-driven responses without having to poll the server for a reply.
Web socket is simply a protocol that makes it possible for a client to communicate with a server simultaneously over TCP(Transmission Control Protocol) connection.
Bringing it down to the web, sockets(as they are mostly called) make it possible for the web browser(client) to communicate with the server without the client initiating the communication by sending a request. This means that changes on the server can be pushed to the browser without the user having to click a button or reload the page.
This ensures real-time communication and allows for apps that depend on real-time communication like messaging services
This is made possible because sockets keep the TCP connection between the client and the server alive, allowing for bi-directional communication between the server and client.
Web sockets are quite different from HTTP but WebSockets are designed to support as well as work over HTTP connections.
- Fast
- Bi-directional
- Difficult to retrieve the connection after crash
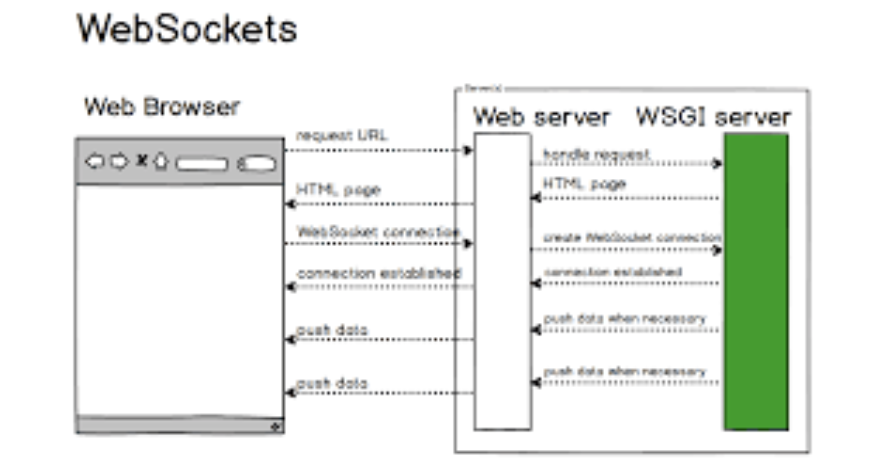
Web-sockets are protocols that are used for bi-directional communication between a server and a client. To establish a communication channel, the parties involved have to use a TCP-based server outside of HTTP. To start this process, a handshake is performed between the client and the server.
-
The client makes an HTTP request to the server and indicates that the client wishes to establish a WebSocket connection.
-
If the server supports WebSocket protocol, it will accept the request and send a response to the client by broadcasting a message on the channel.
-
With the handshake finished, the WebSocket protocol is used from now on. All communications will use the same underlying TCP port.
WebSockets - Full Stack Python
If you plan on an app that requires real-time updates, like sporting websites, to update scores in real-time, chat API, to manage communication between two people or a group of people, or a location-based app, etc. then you should consider Websockets, they work well with HTML5 and are supported by all the major browsers, like Google Chrome, Mozilla Firefox, etc.
Difference between web sockets and normal HTTP
- One way communication
- Connection is closed after server response
- Bi-directional communication
- Connection is left open even after the initial server response
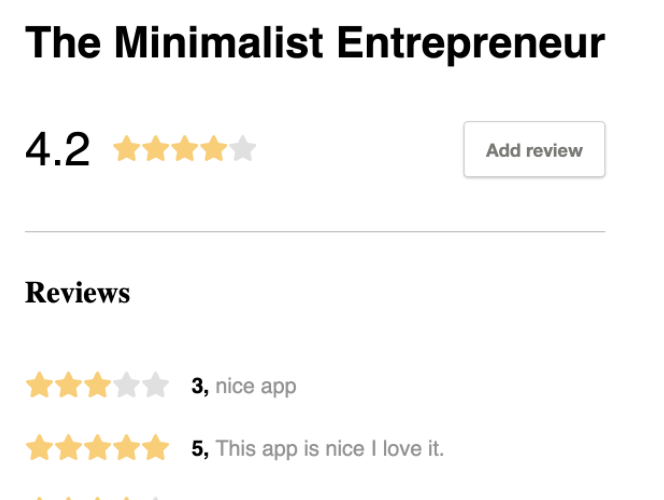
In this tutorial we’ll be building a user review server that updates in real-time, it's a simple app that allows users to add reviews and add stars to a project and it's going to have a real-time update feature. That means if you open the same page on two separate browser tabs and add a review on one tab it will automatically update on the other open tab without reloading the page.
We are going to be implementing this feature with React, Node, and a WebSocket library call Socket.IO. Socket.IO is a popular WebSocket library and we’re going to be using it to implement our web socket.
N.B: in this tutorial CSS is not our aim so we won’t pay much attention to styling.
Prerequisites :
- A basic understanding of React, NodeJs, and typescript is required
- You need to have node and npm installed, you can do that https://nodejs.org/en/.
- You need a MongoDB server. You can install it locally or just create an account on their Atlas website and get a MongoDB cluster for free here.
If we’re done with the prerequisites, navigate to any folder of your choice and run the command
npm init -y
This will create a new node project for you with a /package.json file in it.
We’ll be using typescript for the backend so let's install it and “nodemon” to automatically restart our server when we make a change.
npm install -D typescript nodemon
Now let’s install express
npm install -S express
Next run tsc --init To generate our tsconfig.json file file, we’ll go with the defaults but set "outDir": "./dist"
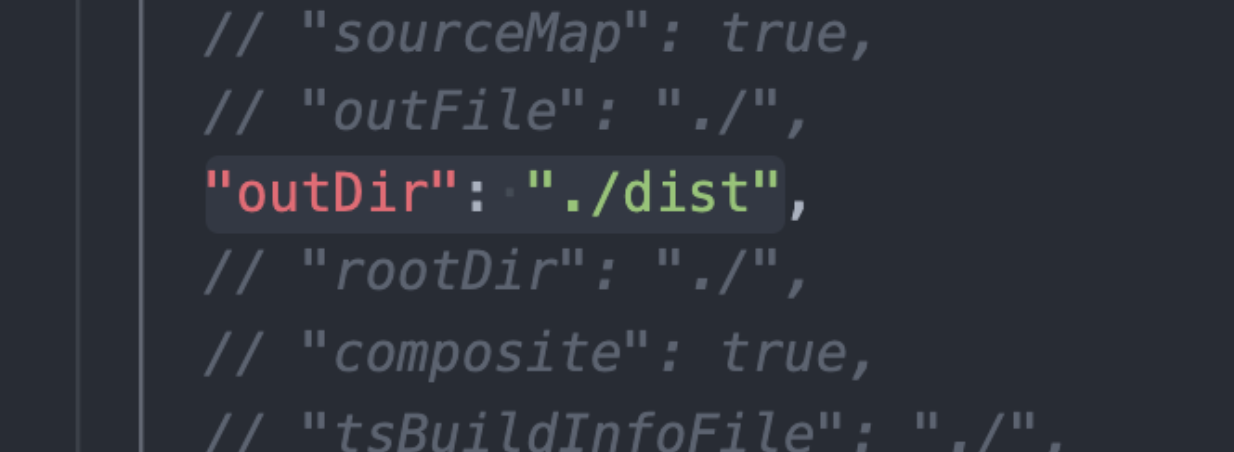
This tells typescript to store the generated javascript files in the ./dist directory
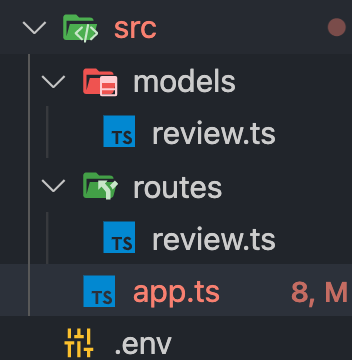
Next, we create our folder structure, create a /src folder, and inside it create /models and a /routes folder and then an app.ts file, this is the entry point of our server.
Inside both the /routes and /models folder you created ad a review.ts to them
Let us also create a .env file at the root of our project and it should look like this
DATABASE_URL=mongodb+srv://admin:[email protected]/reviews?retryWrites=true&w=majority
PORT=3000
Now, let's set up our model, this is how we’re going to be interacting with our database.
First, we import our functions from the mongoose library,
import { Schema, model, connect } from "mongoose";
Next, we define an interface that our table will conform to, our table will only have two fields “rating” and “comment”. So we create an interface for them
`interface IReview {

rating: number;

comment: string;

}
Next, we define our table schema
const schema = new Schema<IReview>({

    rating: {
	    type: Number,
	    required: true
    },
    comment: {
	    type: String,
	    required: true
    }
});
Then we create our model from the schema and name it ‘Review’
const ReviewModel = model<IReview>("Review", schema);
Now we move to the /routes/review file,
First, we initialise our model and express router,
Then create the “/get_reviews” Route. This route is just meant to fetch our reviews and comments nothing special is going on in it.
const Review = mongoose.model('Review');
const router = express.Router();

router.get('/get_reviews', async (req: Request, res: Response) => {
const reviews = await Review.find();
res.send(reviews);
});
Next, we add the “/add_review“ route, this is where the magic happens.
We first of all get our review and comment from our request body(req.body) then we do some validation checks and store the data to MongoDB,
const { comment, rating } = req.body;

if (!comment || !rating) {

return res

.status(422)

.send({ error: 'You must provide a comment and rating' });

}


const review = new Review({ comment, rating, });

await review.save();
After saving to the database we initiate our socket communication. To do this we emit or broadcast events that users on the channel can listen to. These events carry the data we wish to share. In our /src/app.ts file we export a class “io” this class contains an emit method attached to it that enables us to broadcast information on the channel. Like so:
io.emit("New_review", { status: "successful", review } );
The first argument passed to the emit method is the name we want to call the broadcast the second is the information we want to send.
All together the file should look like this
import express, { Request, Response } from 'express';

import mongoose from 'mongoose';

import { Socket } from 'socket.io';

import { io } from '../app';

const Review = mongoose.model('Review');

const router = express.Router();

router.get('/get_reviews', async (req: Request, res: Response) => {

const reviews = await Review.find();

res.send(reviews);

});

router.post('/add_review', async (req: Request, res: Response) => {

const { comment, rating } = req.body;

if (!comment || !rating) {

return res

.status(422)

.send({ error: 'You must provide a comment and rating' });

}

try {

const review = new Review({ comment, rating, });

await review.save();

_//adding realtime update with socket IO_

io.emit("New_review", { status: "successful", review } );

res.send({ status: "successful", review });

} catch (error) {

res.status(422).send({ error: error });

}

});

export default router;
Let's head up to our /src/app.ts file to set up our project.
Let us create some middlewares to help use parse incoming request
const app = express();
app.use(cors())
app.use(bodyParser.json());
app.use(trackRoutes);
We need to install these packages
npm install body-parser cors dotenv mongodb Mongoose socket.io-client socket.io
Lets also install the types for those packages
npm install -D @types/socket.io-client @types/cors @types/express @types/mongoose @types/socket.io
Next, we check if our database URL was set in the .env file
if (!process.env.DATABASE_URL) {
throw new Error(
`MongoURI was not supplied.`);
}
Next, we connect to MongoDB and create our HTTP server
mongoose.connect(process.env.DATABASE_URL);
mongoose.connection.on('connected', () => {
    console.log('Connected to mongo instance');
});

mongoose.connection.on('error', err => {
    console.error('Error connecting to mongo', err);
});

const httpServer = createServer(app)
Next, we initiate our WebSocket handshake and export it by calling the server imported from socket.io
And pass it Our HTTP server object as augment, cos if you remember WebSockets are based on HTTP.
export const io = (Server as any)(httpServer, {
    cors: {
	    origin: "*",
    }
});
So our final app.ts file should look like this
import {config} from 'dotenv';

import './models/review';

import express from "express";

import mongoose from 'mongoose';

import bodyParser from 'body-parser';

import trackRoutes from './routes/review';

import cors from 'cors'

import Server from "socket.io";

import { createServer, Server as serve } from "http";

import ioClient from 'socket.io-client';

config()

const app = express();

app.use(cors())

app.use(bodyParser.json());

app.use(trackRoutes);

if (!process.env.DATABASE_URL) {

throw new Error(

`MongoURI was not supplied.`);

}

mongoose.connect(process.env.DATABASE_URL);

mongoose.connection.on('connected', () => {

console.log('Connected to mongo instance');

});

mongoose.connection.on('error', err => {

console.error('Error connecting to mongo', err);

});

const httpServer = createServer(app)

export const io = (Server as any)(httpServer, {

cors: {

origin: "*",

}

});

io.on("connect", (socket: any) => {

socket.on("review_added", async () => {

io.emit("hello", { status: "successful" } );

})

});

httpServer.listen(process.env.PORT || 3000, () => {

console.log('Listening on port 3000');

});
And we have a running HTTP server that supports real-time updates with WebSockets.
We’ll build the frontend in react.Js in the next tutorial.
Link to repo
