Hidow
Hidow is a B2C website that was designed to accommodate and to be an eCommerce platform for users who are interested in buying TENS and EMS devices. Hidow provides the best-in-class devices and accessories for the devices that can be placed on almost every part of the body for pain relief, muscle stimulation, and recovery from training and injuries. The website is very intuitive and provides a seamless customer journey from the landing page to checkout. In addition, the website allows to read and write reviews about selected products that the website admin enables or disables from the app itself or from the admin panel.
Here is a link to the live version of the App

User Experience (UX)
Project Goals
- The website should have an intuitive and minimalist design, appealing to the customers.
- Allow users to be able to sort the products with a lot of sorting options and to make an informed decision based on previous customers' reviews.
- Provide the users with a post-purchase summary, confirmation email, and an option to store their data for future orders and to view past orders.
- Make sure the users' data is safe by offering secured login and by using Stripe as a secured online transactions expertise for payments processing.
User Stories
- As a website user I can see a list of products so that I can choose the product I would like to buy
- As a website user I can select a category so that I can easily find products
- As a website user I can get the product's information so that I can see the price, product description, and sizes, when there are ones
- As a website user I can see the shopping bag so that I can know how much I have spent so far
- As a website user I can register for an account so that I can see my order history and store my personal details
- As a website user I can easily log in and out of the account so that I can save my address and personal data
- As a website user I can recover my password so that I can log in if I forgot my password
- As a website user I can get a confirmation email after registration so that I can know that the registration was successful
- As a website user I can sort the products so that I can easily identify the products based on price or category
- As a website user I can sort the products within a specific category so that I can compare products based on price and description
- As a website user I can sort the products by inserting the product name of title so that I can easily find the specific product I am looking for
- As a website user I can easily select the size and amount of products so that I can ensure I have the correct sizes and the right product amount
- As a website user I can see the items and the prices detailed in the shopping bag so that I can know what I am ordering and what will it cost me
- As a website user I can adjust my shopping bag so that I can make changes to my order before the checkout
- As a website user I can quickly enter my payment information so that I can checkout with no hassle
- As a website user I can get an order confirmation after the checkout so that I can verify I did not make any mistakes
- As a website user I can securely enter my payment information so that I can be sure my information will not be used by malicious users
- As a website user I can get an email after completing the checkout so that I can have all the information and a reminder of what I have purchased
- As a Site owner I can add a product so that I can add new items to my store
- As a Site owner I can edit existing products so that I can change prices, sizes, and descriptions if I need to
- As a Site owner I can delete an item so that remove items that are no longer for sale
- As a website user I can add a review so that other users can get an honest opinion on the products
- As a website user I can read reviews about products so that I can make a decision if to buy it
- As a website owner I can delete reviews so that I can leave the ones I am using on the website
- As a website owner I can enable and disable the products' reviews so that I can decide which products to allow getting reviewed
Color Scheme
The colors used on the site are three different ones:
- The background is White: #ffffff
- The Text is black.
- The buttons and links are blue, light blue for positive actions, like updating orders and rating a product. They are white and black for standard actions like go to reviews or adding to bag and are red for removing a product from bag. I have chosen those basic colors as for me they represent luxury and high-end products like the brand I have chosen to create the App for. Those colors were also chosen to give the user good contrast between the background and text.
Typography
The main font used in the site Sans-Serif.
Existing Features
General
-
Responsive design across all device sizes.
-
Similar color scheme and design throughout all pages to effectively structure, categorize and present the information to the customers.
- Header

-
The header contains the business name and a fully responsive navigation bar positioned across the top of the screen.
-
The business name functions as a link to the landing page.
-
The navigation bar is identical on all pages and contains links to all pages to facilitate navigation across the site.
- The Navigation Bar
- The bar appears across all the website pages, and contains the following:
- The product name, also serve as a home button.
- The brands' categories.
- A review tab that redirects users to leave a review.
- Search bar, to easily find things on the website using search terms.
- It contains the user's login and registration links. If the user is logged in, it contains the user's profile as well.
- Shopping bag that stores the products that the user picked and presents the total amount of products picked so far.
- Footer

-
The footer includes links to Facebook and Mailchimp newsletter.
-
The footer contains a link to GDPR regulations file.
-
All footer links will open in a new tab.
- Landing Page


- The landing page contains the website header, 2 sections, and a footer.
- The main section is a cover image with an H2 headline and a call-to-action button for "Shop Now".
- The secondary section contains general information about the brand, the main benefits of using the products, and links to external links with further information.
- Products page

This page contains all the products and can be reached from the "Shop Now" button or the "ALL PRODUCTS" button in the main nav.
- The page has the following sorting options:
- Sort by price, rating, or category.
- Find specific products by using the search bar.
- Additional sorting bar that sorts by:
- Price- low to high and vice versa.
- Rating- low to high and vice versa.
- Name- A to Z and vice versa.
- Category- A to Z and vice versa.
- Every product has the following information:
- Title
- Category
- Price
- Rating
- Image of the item
- Product Details page


- The page contains a detailed description of the product.
- Every product has the following information:
- Title
- Category
- Price
- Rating
- Image of the item
- Under the description, there is a quantity selector, in case the user wants to get more than 1 item. The selector can be used by writing the quantity, using the +- buttons or the up\down arrows.
- Underneath the quantity selector there are 3 buttons:
- ADD TO BAG- keeps the user on the same page, but updates the bag in the right top corner with the amount that was added to the bag so far.
- KEEP SHOPPING- Sends the user back to the "ALL PRODUCTS" page.
- REVIEWS- Send the user to read the reviews about the product.
- The Shopping Bag


- Clicking on the shopping bag icon will redirect the user to the shopping bag page (one step before the checkout).
- The user will have a summary of the products he collected, including:
- Product name.
- Product image.
- Size (if applicable).
- Identifier.
- Price.
- Quantity.
- Subtotal.
-
In addition, the user can update his selection by using the same quantity selector as on the Product Details page, and additionally, he can remove the item completely from the bag.
-
The bottom part of the page includes the total amount, delivery cost, the grand total, and 2 buttons. One button to get to the checkout ("SECURE CHECKOUT") and the other to "KEEP SHOPPING".
- Checkout page


-
The user provides his information for the shipment and adds his payment information.
-
At the bottom of the form, he can create an account or log in so that his data can be saved on his profile for future visits to the website.
-
Next to the form there is a summary of the items to be purchased.
-
The very bottom of the page contains 2 buttons. One is for completing the order, and the other is to adjust the shopping bag. The total amount to be charged is presented under the "Complete Order" button.
-
Clicking the "Complete Order" button will initiate a link to Stripe for completing the order.
-
Click the "Adjust Bag" button will send the user back the shopping bag for editing the order.
- Thank you page


- The page contains the user order details. The form has the following:
- Summary of products purchased.
- Order number and date.
- Users' personal information.
- Grand total broken down to product price and shipping price.
- At the top of the form he will see a confirmation line saying: " Your order information is below. A confirmation email will be sent to {user email}."
- At the bottom of the form there is a call-to-action button that offers the user to check out the latest deal called "NOW CHECK OUT THE LATEST DEALS". The button will send the user to a page with products selected by the admin from any category he would like.
- Write a review


- The page contains products that were pre-approved by the admin to be eligible for getting a review.
- The page is accessed through the "REVIEW" tab from the main navigation bar.
- Every product in that section has an image, title, short description, and a button called "RATE NOW" that redirects to the review form.
- Review form
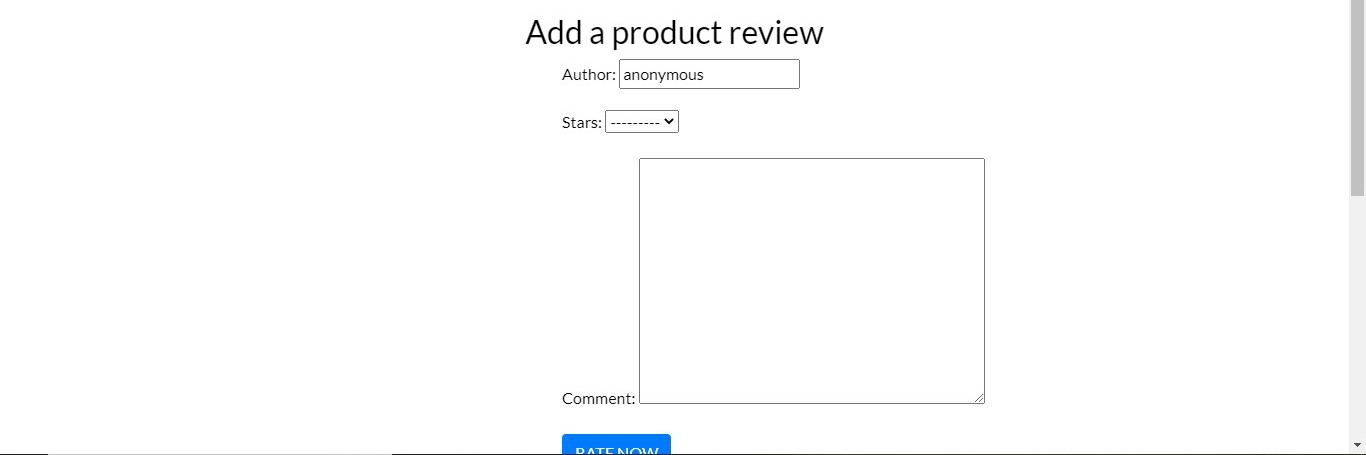
- The review form contains 3 parts:
- Auther title\name.
- The star rating 1-5.
- A comment section.
- The only mandatory fields are the star rating and comment fields.
- The author part has a default title of "anonymous".
- Once the form is complete, the user submits the review using the "RATE NOW" button.
- After submitting the form, the user will be redirected to a thank you page that has a "BACK TO OUR HOME PAGE" button and a "Thank you. Your review will be checked by the website owner." massage.
- My Profile

- The page contains 2 sections:
- Profile information: The information extracted at the checkout page, if the user created an account or has an account, is stored on the left side of the page.
- Previous orders: The right side contains all the user's past orders. The visible information includes the order date, order products, and the order amount. The order number is clickable and will redirect to an order's complete information.
Admin Features
- In the App
- The admin has 3 options that can only be shown to the admin.

Under every product there are 3 links: Edit: This page can be reached also from the Admin profile using the "Product Management" option. On this page, there is a form with all the product attributes. The admin can edit any of them including uploading a new image. The same option exists in the admin panel under the "Products" model.

Delete: This option will delete the product from the website. This option has no additional warning, so precaution is advised.
Enable\Disable reviews: This option can easily assist the admin in enabling and disabling a review. The link is conveniently changing colors according to the current review state. Yellow- means that the review is enabled. Green- means that the review is disabled.

- Admin panel
The Admin panel includes the following sections:
-
ACCOUNTS- the admin can view, add, remove and edit any user email in the section.
-
AUTHENTICATION AND AUTHORIZATION- the admin can view, add, remove and edit any user in the section. He can see what are the users' permissions on the website and can grant him different access levels.
-
CHECKOUT- the admin can view, add, remove and edit any order in the section.
-
PRODUCTS- this section has two models in use:
- Categories: the admin can view, add, remove and edit any category in the section.
- Products: the admin can view, add, remove and edit any product in the section.
-
REVIEWS- this section has two models in use:
- Products: the admin can view, add, remove and edit any product in the section.
- Reviews: the admin can view, add, remove and edit any review in the section.
- Reviews:

Technologies Used
Languages Used
Frameworks, Libraries and Programs Used
-
- Font Awesome was used throughout all pages to add icons in order to create a better visual experience for UX purposes.
-
- GitPod was used for writing code, committing, and then pushing to GitHub.
-
- GitHub was used to store the project after pushing.
-
- Balsamiq was used to create the wireframes during the design phase of the project.
-
- Am I Responsive was used to get a responsive design throughout the process and to generate mockup imagery to be used.
-
- Chrome DevTools was used during development process for code review and to test responsiveness.
-
- W3C Markup Validator was used to validate the HTML code.
-
- W3C CSS Validator was used to validate the CSS code.
-
- PEP8 was used to validate the python code.
-
- STRIPE was used to process payments.
-
- AWS was used to store the databases in production and to create the user policy.
-
- HEROKU was used to build the App for production.
-
- MAILCHIMP was used to create newsletter registarion for the website.
-
- FACEBOOK was used to create social media account for the brand.
Data Model
I have used six apps for this project, each serves a difernt porpuse:
-
The bag app:
-
The app doesn't use database models.
-
The app has 4 views:
- view_bag: renders the bag content.
- add_to_bag: Add a quantity of the specified product to the shopping bag.
- adjust_bag: Adjust the quantity of the specified product to the specified amount.
- remove_from_bag: Remove the item from the shopping bag.
-
The app is usig the data from the Product model of the products app. All the apps' functunality is revolved around the shopping bag signals.
-
The checkout app:
-
The app has 2 models:
- "Order" model that collects all the information needed from the user for shipment and payment.
- "OrderLineItem" that overrides the original save method to set the line item total and update the order total.
-
The app uses 3 views:
- "cache_checkout_data" is in charge of chaching the data in case of failed payment.
- "checkout" is in charge of collecting and processing the data for the products in the checkout and ensuring all users' required data was inserted in the form. It will also attempt to prefill the form if the data is found on the users' profile
- "checkout_success" view will handle successful checkouts. That includes saving users' information and order and redirecting to the “thank you" page.
This app makes use of models Product from products app, UserProfile form profiles, and UserProfileForm form from profile app.
-
-
The home app:
-
The app doesn't use database models.
-
The app has 1 view called called "index" that returns the index page.
-
-
The products app:
-
The app has 2 models:
- The Category model collects and stores the product's name and friendly name.
- The Product model that stores the product's category, SKU, description, size, price, rating, image URL, image, and reviews enabled\disabled.
-
The app has 8 views:
- "all_products"- A view to show all products, including sorting and search queries.
- "product_detail"- A view to show individual product details.
- "add_produc"- A view to add a product to the store.
- "edit_produc"- A view to edit a product in the store.
- "delet_produc"- A view to delete a product from the store.
- "enable_rating"- A view to enable reviewing a product.
- "disable_ratin"- A view to disable reviewing a product.
- "get_reviews"- A view to display reviews for the products.
-
The app is using the Products and Reviews models from the reviews app.
-
-
The profiles app:
-
The app uses 1 model called "UserProfile" that stores the user's default phone number, street address 1 and 2, city or town, county, postcode, and country. The model has a function that creates or edit profile details.
-
The app has 2 views:
- The "profile" view is in charge of rendering the user's profile in the "MY PROFILE" page. In addition, it will present profile changes and past orders.
- The "order_history" will present and render specific orders from the past orders stored on the database.
-
-
The reviews app:
-
The reviews app has 2 models:
- The Products model stores data that includes name, description, rating, image, and product id.
- The Review model stores the review's author, review date, rating 1-5 stars, comment, and product.
-
The app has 3 views:
- "products" is in charge of rendering the products to be reviewed.
- "rate" is a view to present the rate form and to redirect to the thank you page.
- "success" is a view to render the thank you page.
-
Testing
Testing User Stories
-
As a website user I can see a list of products so that I can choose the product I would like to buy
- The all products' page has a list of all the website's products
-
As a website user I can select a category so that I can easily find products
- The all products' page has a category sorting option. In addition, every category can be reached individually from the main navigation bar
-
As a website user I can get the product's information so that I can see the price, product description, and sizes when there are ones
- The product_details page presents the product's name, category, description, rating, and price
-
As a website user I can see the shopping bag so that I can know how much I have spent so far
- The shopping bag icon will change from black to light blue indicating that there is something on it. I have tested all scenarios including adding, removing, and updating the shopping bag
-
As a website user I can register for an account so that I can see my order history and store my personal details
- The MY PROFILE section was tested for being presented and all fields can be edited and saved. Creating a profile was also tested
-
As a website user I can easily log in and out of the account so that I can save my address and personal data
- Log in and out were tested. The user's data was presented in the account upon next sign in and presented in the checkout
-
As a website user I can recover my password so that I can log in if I forgot my password
- Password recovery process was tested and is working as intended
-
As a website user I can get a confirmation email after registration so that I can know that the registration was successful
- The confirmation email process was tested and it is working is intended
-
As a website user I can sort the products so that I can easily identify the products based on price or category
- The website contains sorting options for price and category. Tested for all pricing and categories. The prices can be sorted from low to high\high to low and the categories can be sorted for the same but also from A-Z and Z-A. all tested, all working
-
As a website user I can sort the products within a specific category so that I can compare products based on price and description
- Inside each category, a user can sort based on price or description if he uses the search bar. Both tested and function well
-
As a website user I can sort the products by inserting the product name or title so that I can easily find the specific product I am looking for
- The search bar is functioning well and will find results both in headline and product discription
-
As a website user I can easily select the size and amount of products so that I can ensure I have the correct sizes and the right product amount
- The app has the logic to enable size selection. As none of the current products has a size selection, it is not available for testing, but it was tested using a demo product and working. The logic implemented for potential future products with sizes. The quantity selector was tested for all the options that include manual quantity insert, using +- buttons and the up\down arrows in add a quantity selectors across the entire app
-
As a website user I can see the items and the prices detailed in the shopping bag so that I can know what I am ordering and what will it cost me
- The shopping bag app was tested for all possible scenarios including adding, removing, editing and deleting a product or all the products from the shopping bag. All tests updated quantities and order total prices
-
As a website user I can adjust my shopping bag so that I can make changes to my order before the checkout
- The bag page contains a summary of the products and all the editing options of the quantity selector. The page has additional functionality for updating shopping bag and removing a product from it. All tests were positive
-
As a website user I can quickly enter my payment information so that I can checkout with no hassle
- The checkout form uses a seamless method to increase UX. The only fields that need to be inserted manually are the user's name and email to avoid shipping issues and to add extra security to the order process. All were tested and were functioning as expected
-
As a website user I can get an order confirmation after the checkout so that I can verify I did not make any mistakes
- The confirmation email post payment was tested and emails are received as planned
-
As a website user I can securely enter my payment information so that I can be sure my information will not be used by malicious users
- The app is using Stripe as the payment processing institute. Stripe provides multiple layers of securing the payment method. Documentation can be found on STRIPE
-
As a website user I can get an email after completing the checkout so that I can have all the information and a reminder of what I have purchased
- The purchase email confirmation was tested and is working as intended
-
As a Site owner I can add a product so that I can add new items to my store
- The add_product page allows the owner to add a new product from the app without going to the admin panel. Adding a product was tested for a product with an image, without an image, and mistakes like wrong prices (too many numbers after the decimal point), and missing required information (mandatory fields are name, description, and price). All were tested and functioned as expected both in-app and admin panel
-
As a Site owner I can edit existing products so that I can change prices, sizes, and descriptions if I need to
- All editing functionalities were tested on the edit_product page and admin panel including mistakes like wrong prices (too many numbers after the decimal point), and missing required information (mandatory fields are name, description, and price). All were tested and functioned as expected both in-app and admin panel
-
As a Site owner I can delete an item so that I can remove items that are no longer for sale
- Removing an item was successfully tested both on the app and admin panel
-
As a website user I can add a review so that other users can get an honest opinion on the products
- The rate.html page is accessible from the reviews tab in the main navigation bar and leads to the allowed products to be reviewed by the website admin. The form was tested and the test included trying to submit a review without filling out the mandatory fields (star rating and description). Post a successful review, the review will appear on the reviews.html page
-
As a website user I can read reviews about products so that I can make a decision if to buy it
- The reviews page was tested and is working as intended. If there are reviews, they will show on the reviews.html page. If there are no reviews, the page will render a message that there are no current reviews, and a button to return to the all products page
-
As a website owner I can delete reviews so that I can leave the ones I am using on the website
- Deleting reviews is enabled through the admin panel and was tested successfully
-
As a website owner I can enable and disable the products' reviews so that I can decide which products to allow to get reviewed
- The admin has an enable\disable button in the app itself that changes colors accordingly. He can also enable\disable reviews through the product setting of the Product model in the admin panel. Both options were tested and logic is functioning as expected
Code validation
- The W3C Markup Validator and W3C CSS Validator services were used to validate all pages of the project in order to ensure there were no syntax errors.
- No errors were found in the HTML or the CSS files.
- Passed the code through PEP8 and made sure it is error free.
Accessibility
-
Used Lighthouse in Chrome DevTools to confirm that the colors and fonts being used throughout the website are easy to read and accessible. In addition, making sure that performance, accessibility, best practices, and SEO are on good terms (the lighthouse test was done based on sampling pages)
-
Lighthouse reports
- Landing Page

- Procudt details

- Checkout page

- Reviews page


Tools Testing
-
- Chrome DevTools was used during the development process to test, explore and modify HTML elements and CSS styles used in the project.
-
Responsiveness
- Am I Responsive? was used to check responsiveness of the site pages across different devices.
- Chrome DevTools was used to test responsiveness in different screen sizes during the development process.
Additional testing
- All buttons in the app were manually tested for desktop and mobile.
- Webhooks were tested by checking the webhooks on the Stripe website.
- Credit cards were tested by using the Stripe various card types for testing.
- The app was tested on all main browsers (Chrome, Firefox, Explorer).
- App was tested on IOS and Android.
- A test to add an ending to the URL resulted in a 404 error and redirecting button to home.
- The website is using toast messages across all major apps. All the messages were tested and worked as intended.
Authentication
The application is using the built-in "Allauth" app to authenticate users and Admin.
-
For Admins, the App will present a list of email addresses of users who created accounts in the Admin panel. The Admin can then authenticate those emails or delete them from the system. In addition, it will provide a list of users and the prospective usernames in the Admin panel.
-
For users, there is a simple and friendly signup process. Once a user has signed up or logged in, he will be redirected to the landing page. The same will happen if he logs out.
-
Registered and logged-in users will have access to their profiles where they can view and edit their details. In addition, they can see past orders and have the checkout form pre-filled for them for a faster checkout process.
-
For Admin, Admin has access to the Product Management tab for editing the products in the app. In addition, an admin can delete a product and enable\disable reviews from the app if logged in.
-
Allauth templates were changed to fit the style of the App and to be more appealing to the end-user.
Bugs
-
In production, the CSS files were not loading. That was due to the fact that DEBUG was set to True. Changing it to False and pushing again fixed the issue.
-
The toasts massages were not loading due to incorrect placement of Mailchimp js files. Moving the Mailchimp files to the bottom of the template solved the issue.
Deployment
To deploy the project, I have used the following steps:
-
Creating the Heroku app
-
In Heroku add Postgres database to the resources
-
In the workspace install and freeze dj_database_url, and psycopg2
-
Add import dj_database_urlto setting and change the DATEBASE URL to the Postgres url.
-
Run migrations
-
Make sure your manage.py file is connected to your sqlite3 database
-
Use this command to backup your current database and load it into a db.json file: ./manage.py dumpdata --exclude auth.permission --exclude contenttypes > db.json
-
Connect your manage.py file to your postgres database
-
Then use this command to load your data from the db.json file into postgres: ./manage.py loaddata db.json
-
In settings.py add this if\else statement to use the database in the correct environment: if 'DATABASE_URL' in os.environ: DATABASES = { 'default': dj_database_url.parse(os.environ.get('DATABASE_URL')) } else: DATABASES = { 'default': { 'ENGINE': 'django.db.backends.sqlite3', 'NAME': os.path.join(BASE_DIR, 'db.sqlite3'), } }
-
Install gunicorn and freeze
-
Create a Procfile at the same level as manage.py and add: web: gunicorn hidow.wsgi:application
-
Disable collectstatic by running Heroku config:set DISABLE_COLLECTSTATIC=1 --app appname
-
In settings.py add ['hidow.herokuapp.com', 'localhost'] to ALLOWED HOSTS
-
Push to Github then push to Heroku using git push Heroku main
-
Set auto-deploy to Heroku by linking the Github repository and enable automatic deploys
-
Add a SECRET KEY to Heroku config vars then import it to the workspace
-
Set DEBUG to be True only in local environment
-
Create an AWS account
-
Sign in to your account
-
On the AWS services find and go to s3.
-
Create a new bucket
-
Go to the bucket's settings and set the properties, permissions, and policy settings
-
Create an IAM service
-
Create a group
-
Create a policy for the group using the bucket's ARN
-
Attach the policy to the group
-
Create a user and give him programmatic access
-
Add the user to the group that has the policy attached to, and create the user
-
Download and save the CSV file to use in Heroku
-
In the workspace install and freeze boto3 And django-storages
-
Add 'storages' to installed apps in settings.py
-
Add to settings.py: if 'USE_AWS' in os.environ:
AWS_STORAGE_BUCKET_NAME = AWS_S3_REGION_NAME = AWS_ACCESS_KEY_ID = AWS_SECRET_ACCESS_KEY =
-
Add to Heroku config vars- AWS_SECRET_ACCESS_KEY, AWS_ACCESS_KEY_ID using information from the CSV file. In addition, add USE_AWS= True to config vars
-
Remove DISABLE_COLLECTSTATIC from Heroku config var
-
"Add AWS_S3_CUSTOM_DOMAIN =" to the AWS settings in settings.py
-
Create a file called custom_storage.py in the same level as manage.py and add: from django.conf import settings from storages.backends.s3boto3 import S3Boto3Storage
class StaticStorage(S3Boto3Storage): location = settings.STATICFILES_LOCATION
class MediaStorage(S3Boto3Storage): location = settings.MEDIAFILES_LOCATION
- Add to setting.py in the AWS section:
STATICFILES_STORAGE = 'custom_storages.StaticStorage' STATICFILES_LOCATION = 'static' DEFAULT_FILE_STORAGE = 'custom_storages.MediaStorage' MEDIAFILES_LOCATION = 'media' and STATIC_URL = f'https://{AWS_S3_CUSTOM_DOMAIN}/{STATICFILES_LOCATION}/' MEDIA_URL = f'https://{AWS_S3_CUSTOM_DOMAIN}/{MEDIAFILES_LOCATION}/'
- Push the changes to Heroku
- On s3, select your bucket and click "create folder" called media
- Inside the file click "upload" then "Add files" and select your images
- Click next and grant public access to the files and upload
- Login as a superuser to the deployed app
- Add Stripe's STRIPE_PUBLIC_KEY and STRIPE_SECRET_KEY to config vars
- Create in Stripe new endpoint webhooks by adding the Heroku deployed URL followed by checkout/wh to a new endpoint webhook
- Reveal the new endpoint and add it Heroku config vars as STRIPE_WH_SECRET
SEO
The SEO for this project included the following steps:
- Keywords research: I have used Google Ads account for keywords research and Google search organic results. I then filtered out short and long-tail keywords that were a good fit for the app.
- Implementing keywords on the website: I have used the selected keywords on H2 and H3 headlines. In addition, I have added a section on the landing page with 4 paragraphs that contain long and short-tail keywords. Lastly, I have used the element to let the search engine know those are important keywords.
- I have implemented the meta tags for keywords and descriptions in the header.
- I have 3 external links to blogs and websites that further explain medical terms regarding TENS and EMS, which increase SEO, and website reliability.
- I have implemented sitemap.xl and robot.txt, both contribute to the legitemisity of the website and improve SEO.
Marketing and business plan
The general business plan for Hidow is to make the transformation from a B2C to B2B business. The business plan is to combine offline promotions with online exposure. The offline exposure will be done by attending professional conventions and meeting prospective businesses to carry the brand. The online marketing I have chosen will expose the product in 3 different ways:
- Influencers: I will reach out to medical and sports influencers to post and promote the products for me, in return for a cut of the earnings.
- Targeting older population (product research shows best clients are 40-70 years old) via paid advertising on Facebook and Google Ads.

- By sending discount coupon codes to users who signup for the Mailchimp newsletter on the website
By using those targeting methods I will be able to draw attention to the brand and hopefully secure a deal with a big pharmaceutical chain.
Credit
- To Code Institue for the Boutique Ado walkthrough project that I have based large parts of my project on.
- To the tutor support for helping troubleshooting issues.
