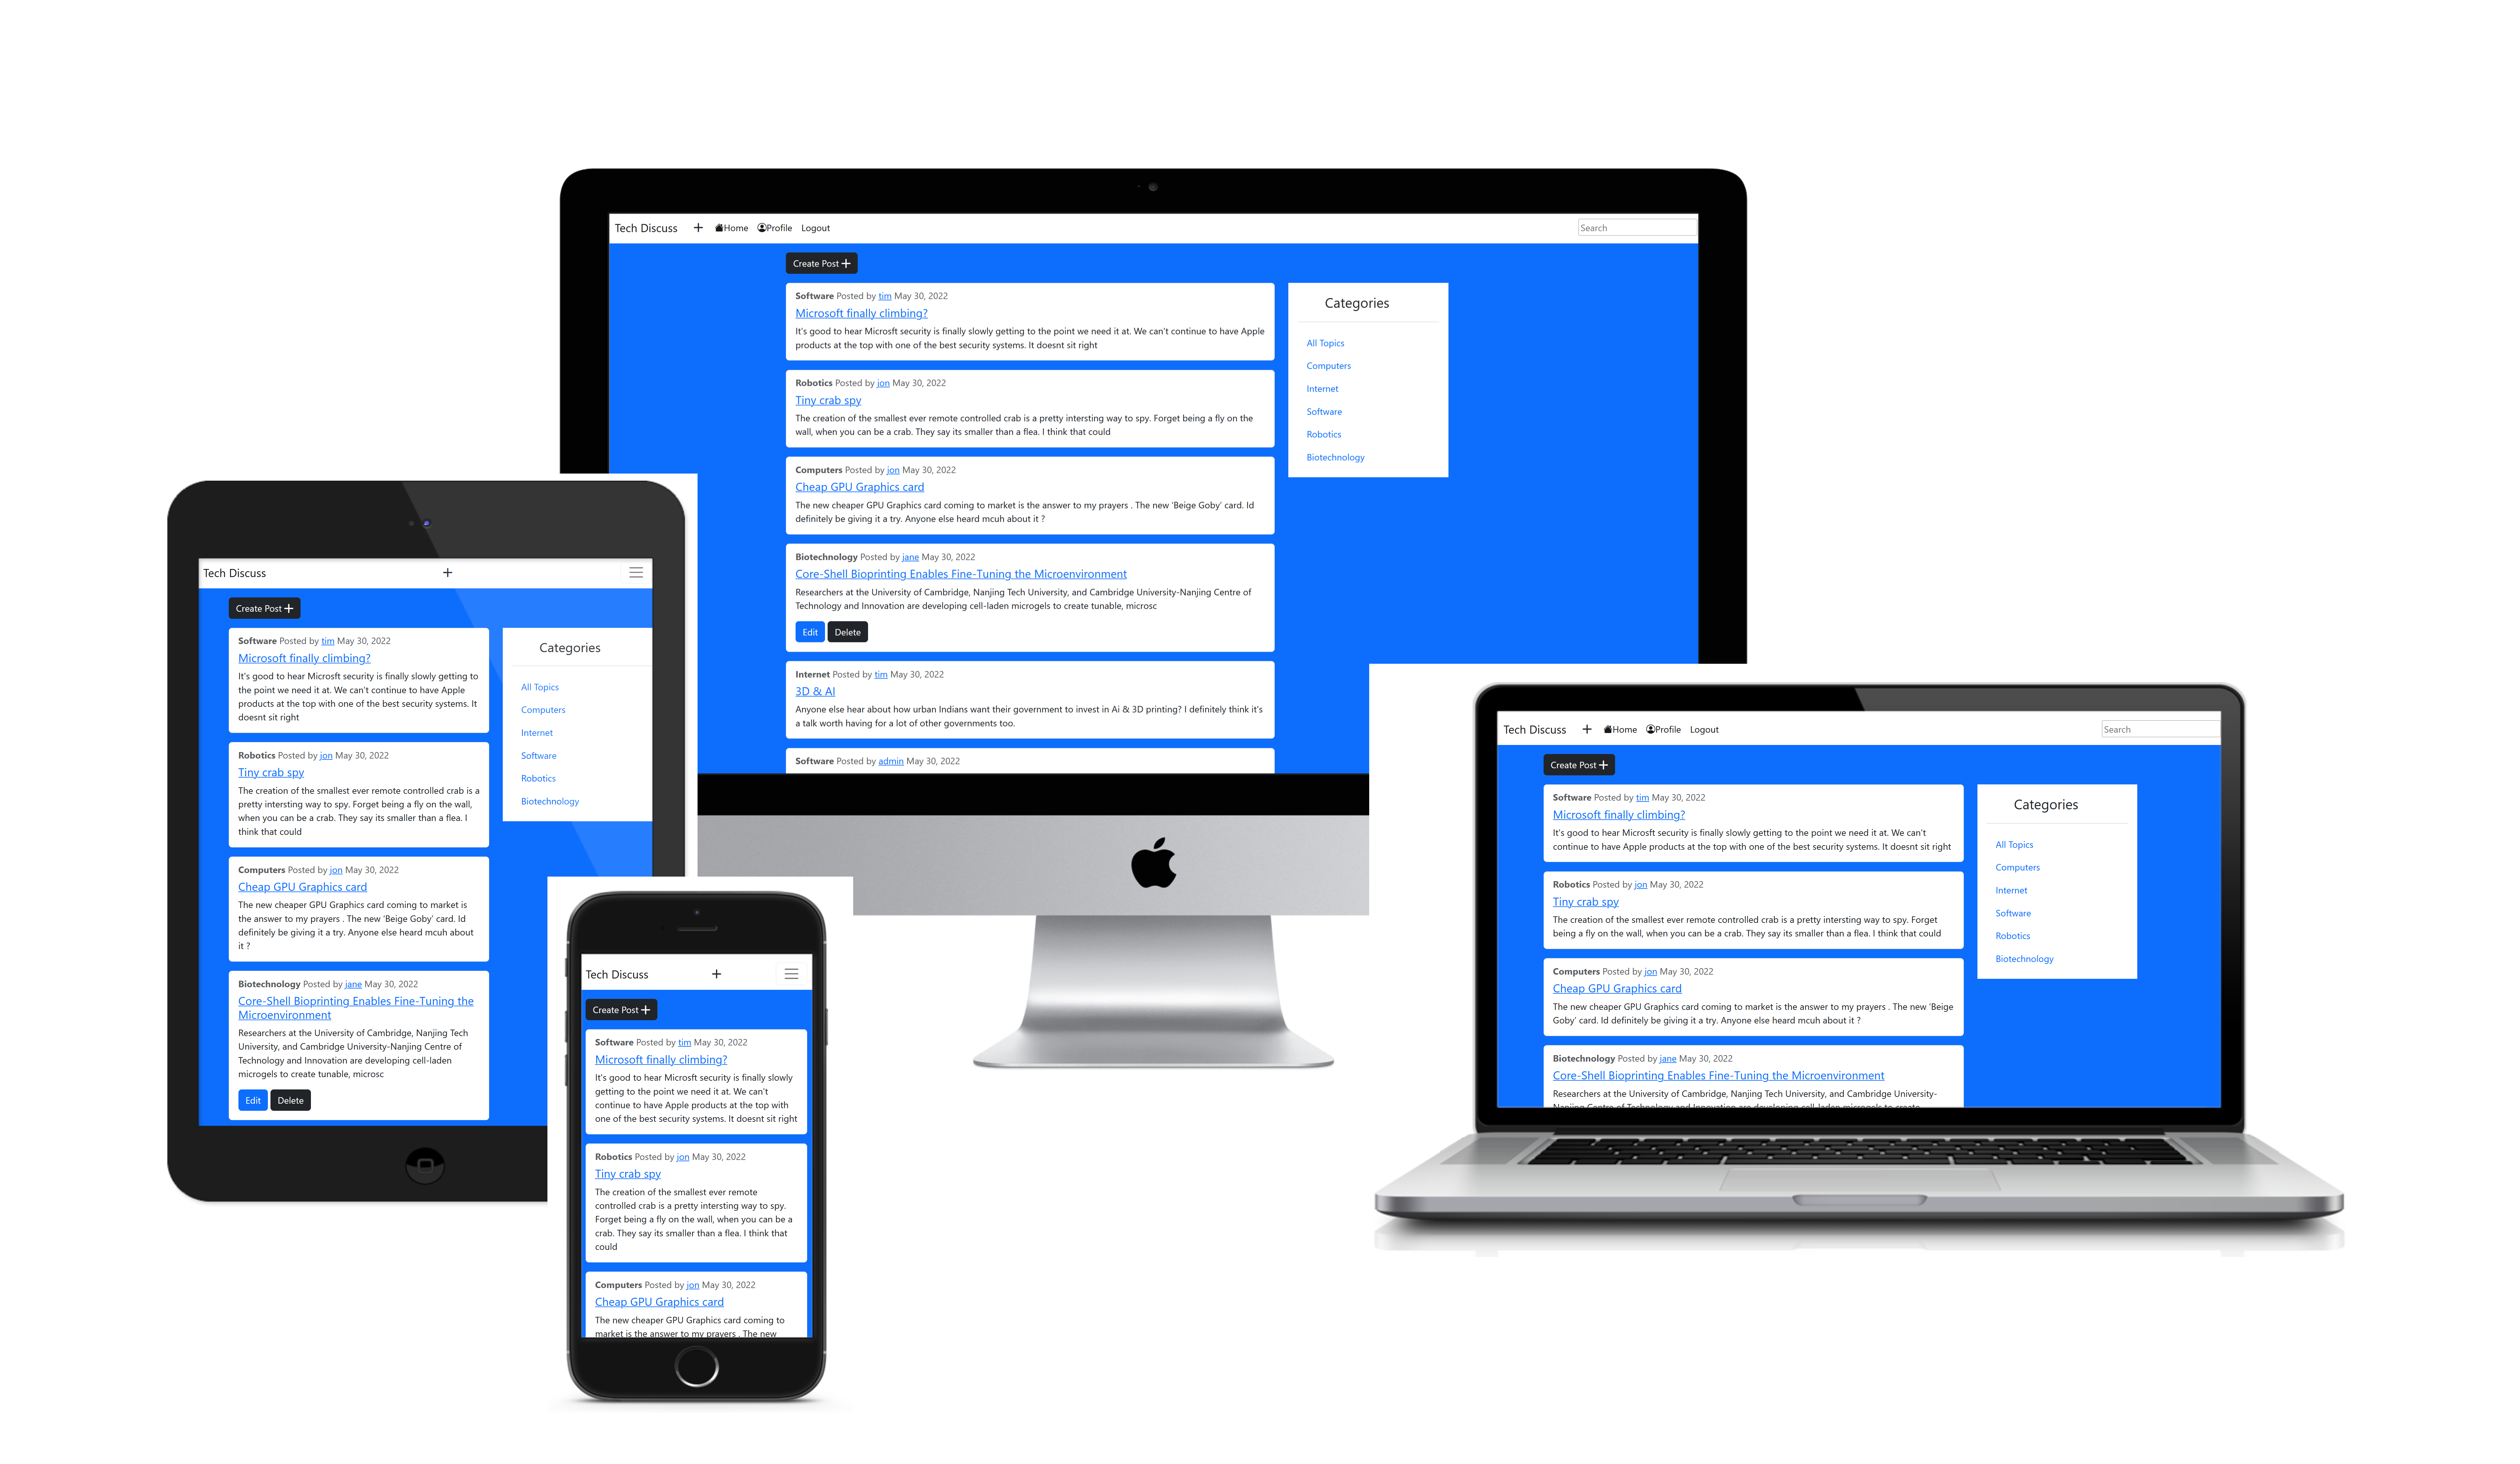
Tech Discuss is a website where people can talk about all things tech. It's a great place to find information and advice on all things related to technology. This is a site for people who are interested in technology. To be able to come together and report on the latest things that have happened in technology. Users can start discussions about different tech-related topics by posting their thoughts on these topics. Other users can then join in on these discussions by commenting on the posts.
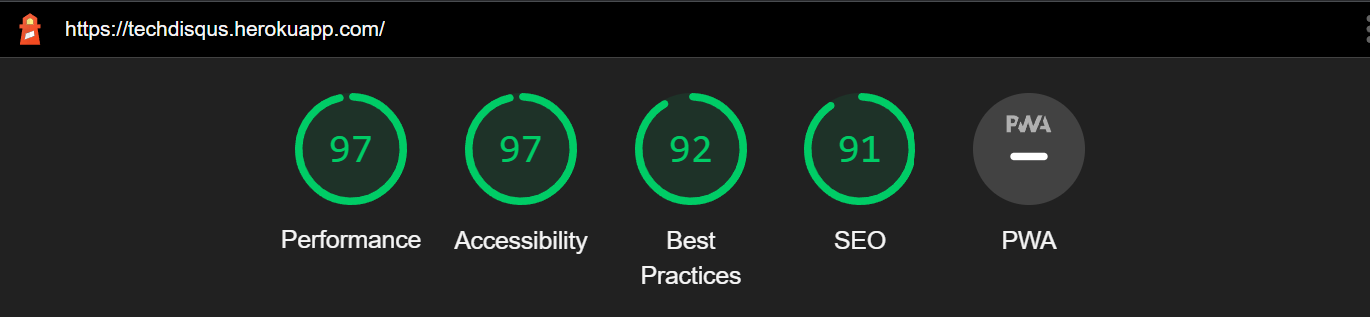
The live link can be found here - https://techdisqus.herokuapp.com/
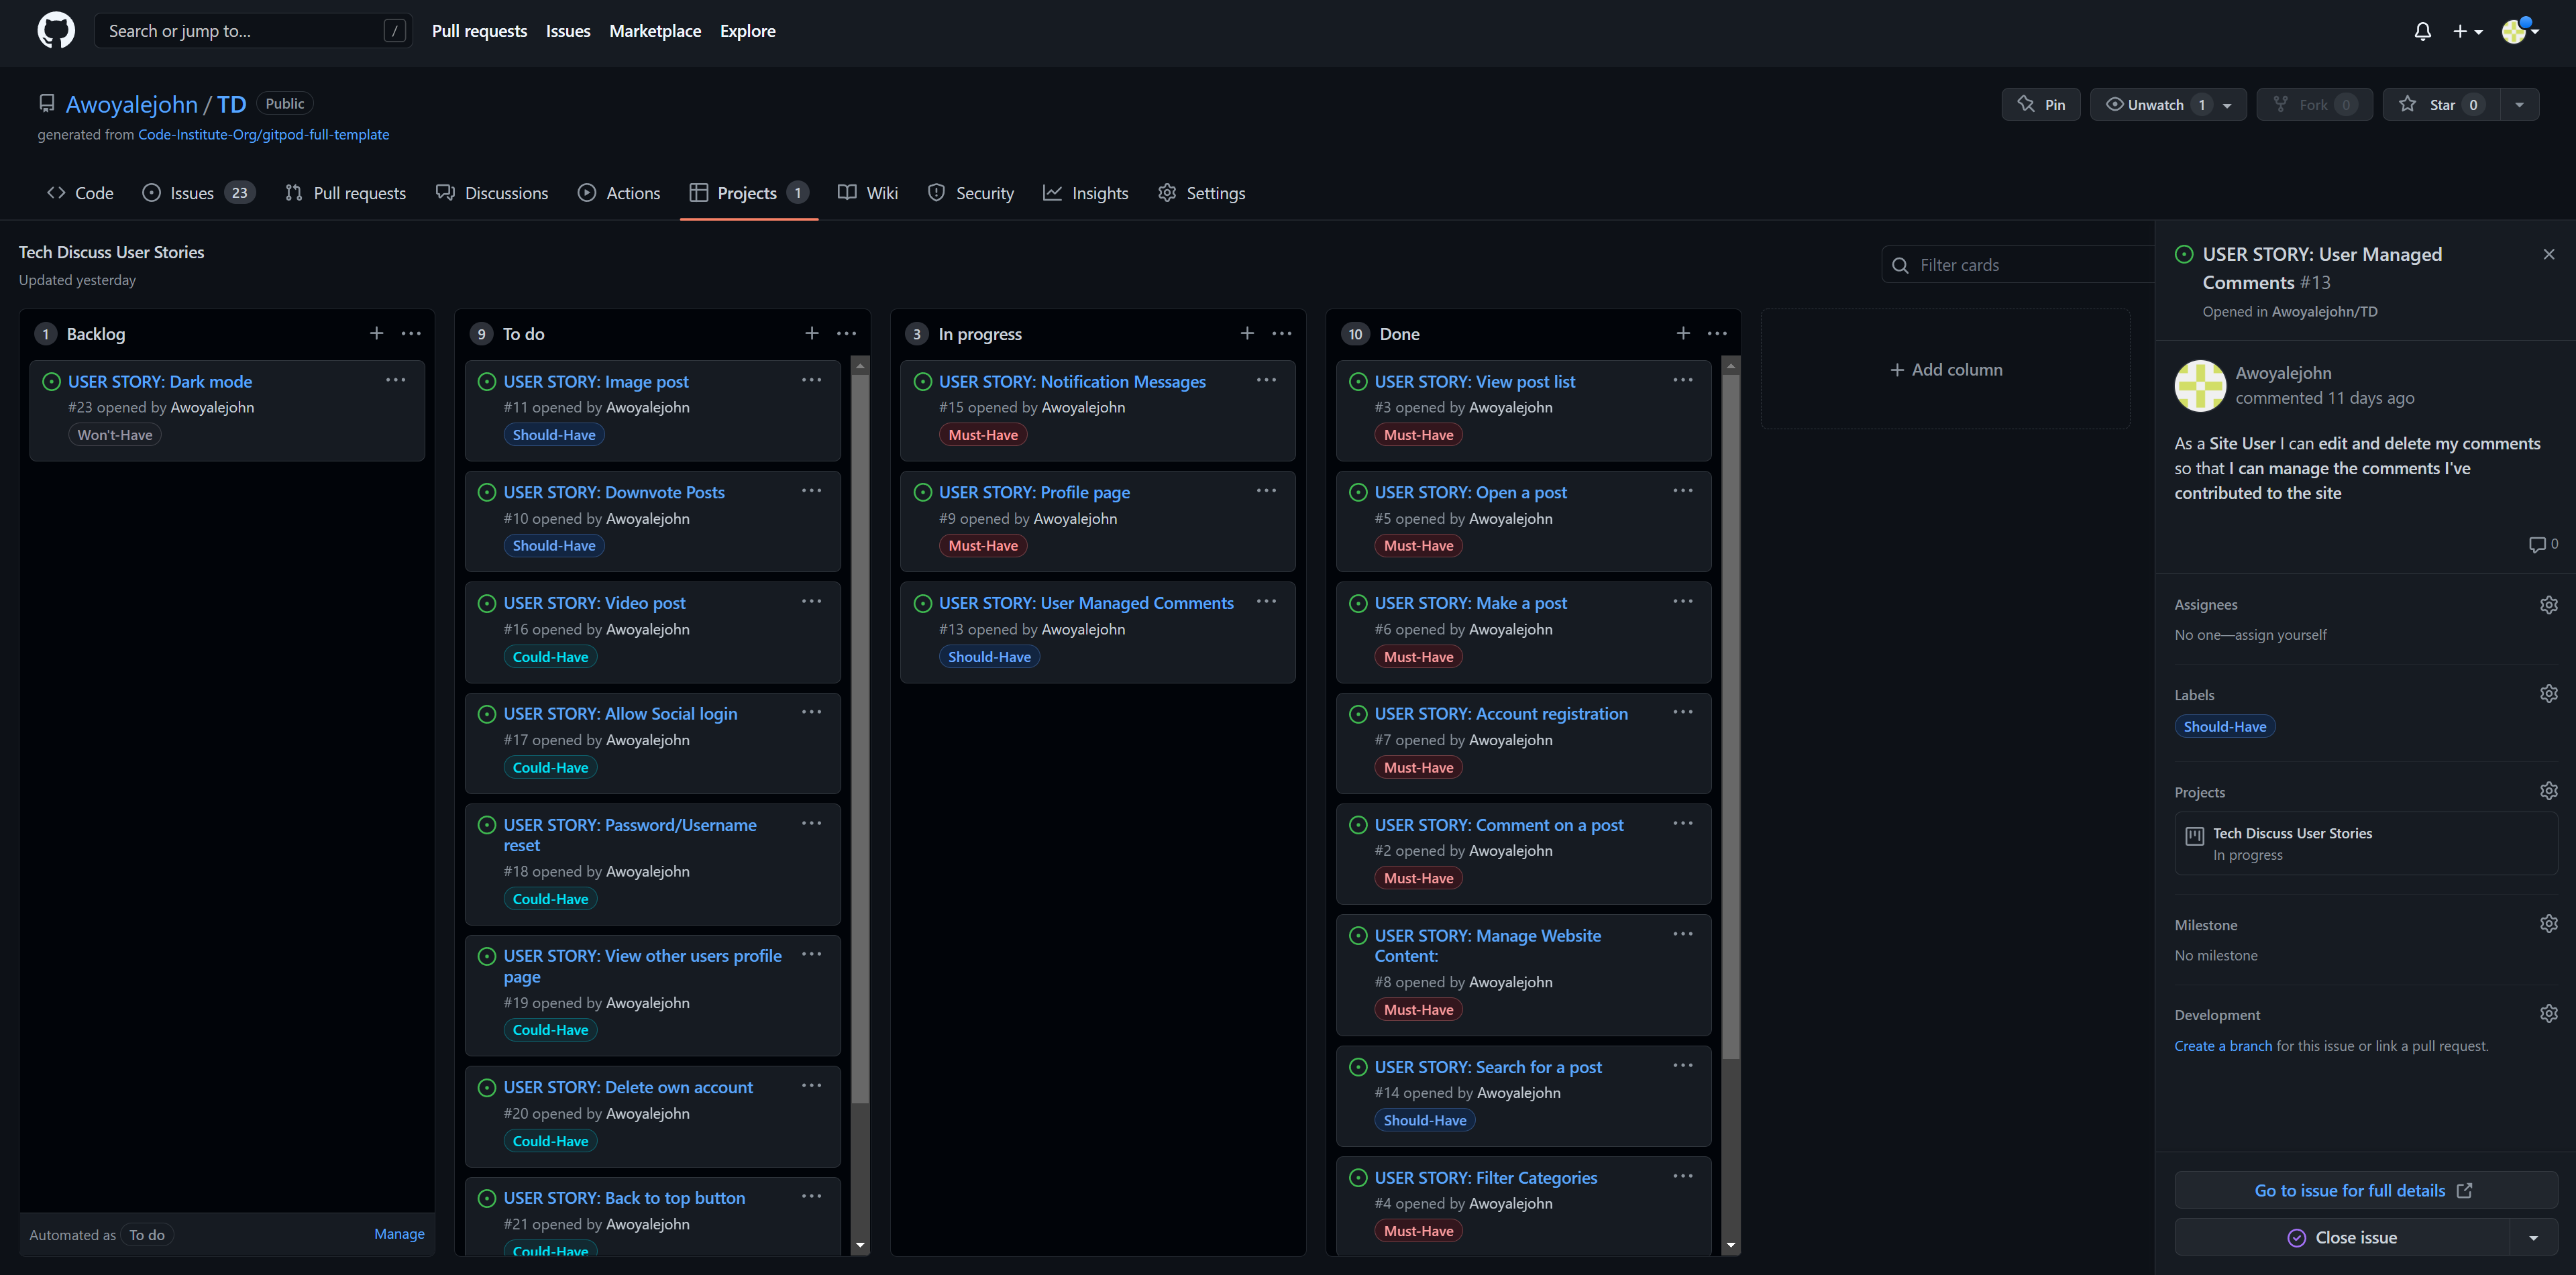
I made user stories to plan and develop the functionality of the website. Each user story was separated into Must Have, Should Have, Could Have, and Won’t Have categories to help determine what was most important to focus on or leave out when building the website.
-
Upvote Posts: As a Site User I can upvote a post so that it indicates that I agree with it
-
Comment on a post: As a Site User I can write comments on a post so that I participate in the discussion
-
View post list: As a Site User I can look through a list of posts so that I can find which ones I want to view
-
Filter Categories: As a Site User I can filter posts by category so that I only see those that are relevant to me
-
Open a post: As a Site User I can click on a post so that I can see the entire post, including upvotes and comments on a separate page
-
Make a post: As a Site User I can create my own post so that I can receive upvotes and comments for posting it
-
Account registration: As a Site User I can register for an account so that I can make posts, comments, and upvote.
-
Manage Website Content: As a Site Admin I can delete user posts and comments so that the website is free of objective content
-
Profile page: As a Site User I can view my profile page so that I can see my information, posts, and comments
-
Notification Messages: As a Site User I can receive a message after I make a post, comment, sign up, login, or logout so that I know it was done successfully
-
Downvote Posts: As a Site User I can downvote a post so that it indicates that I disagree with it
-
Image post: As a Site User I can post an image so that I receive upvotes and comments for posting an image
-
User Managed Posts: As a Site User I can edit and delete my posts so that I can manage the posts I've contributed to the site
-
User Managed Comments: As a Site User I can edit and delete my comments so that I can manage the comments I've contributed to the site
-
Search for a post: As a Site User I can search for posts so that I can find a specific post
-
Video post: As a Site User I can post a video so that I can receive upvotes and comments for posting video
-
Allow Social login: As a Site User I can register or login with my social account so that I don't have to create a new account
-
Password and Username reset: As a Site User I can reset my password/username so that I keep my account secure
-
View other users profile page: As a Site User I can look at another user's profile so that I can see their posts and comments
-
Delete own account: As a Site User I can delete my account so that I can remove all of my content as well as my profile from the website
-
Back to top button: As a Site User I can click a button to take me back to the post at the top of the page so that I can get to the top without having to scroll
-
Error Notification Messages: As a Site User I can receive an error message after I make mistake on a post, comment, sign up, or login so that I know it was not successful
- Dark mode: As a Site User I can set the website to dark mode so that I don’t strain my eyes
23 user stories in total composed of 10 Must-Have, 5 Should Have, 7 Could Have, and 1 Won’t Have. Must Haves make up 43% of the total user stories.
The website colours used are black, white and blue colours that contrast well with each other. I verified this using Adobe color.
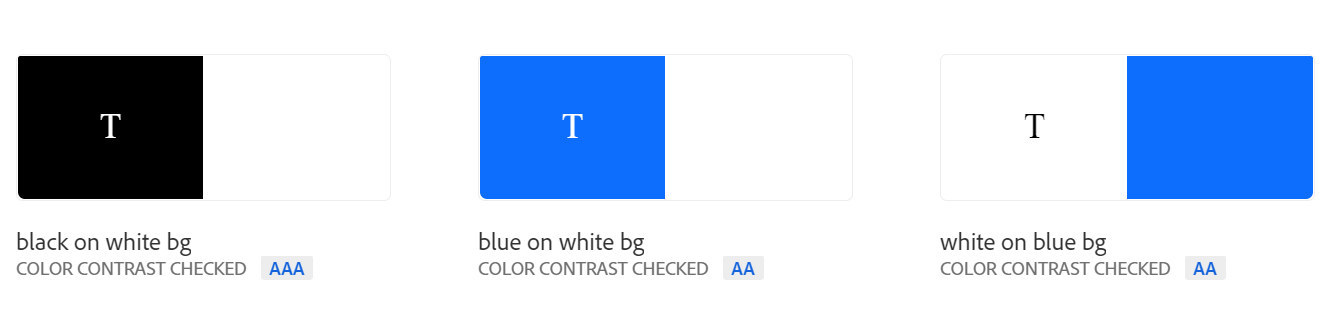
- The navbar uses a white background with black text
- The main website background used the blue colour
- The card items are white and their contrast with blue makes for a satisfying look
- Buttons are blue or black depending on their function. Blue usually edit buttons and black for everything else.
- Footer is white
The website uses Helvetica Neue as the main font-family and it is supplied by Bootstrap default.
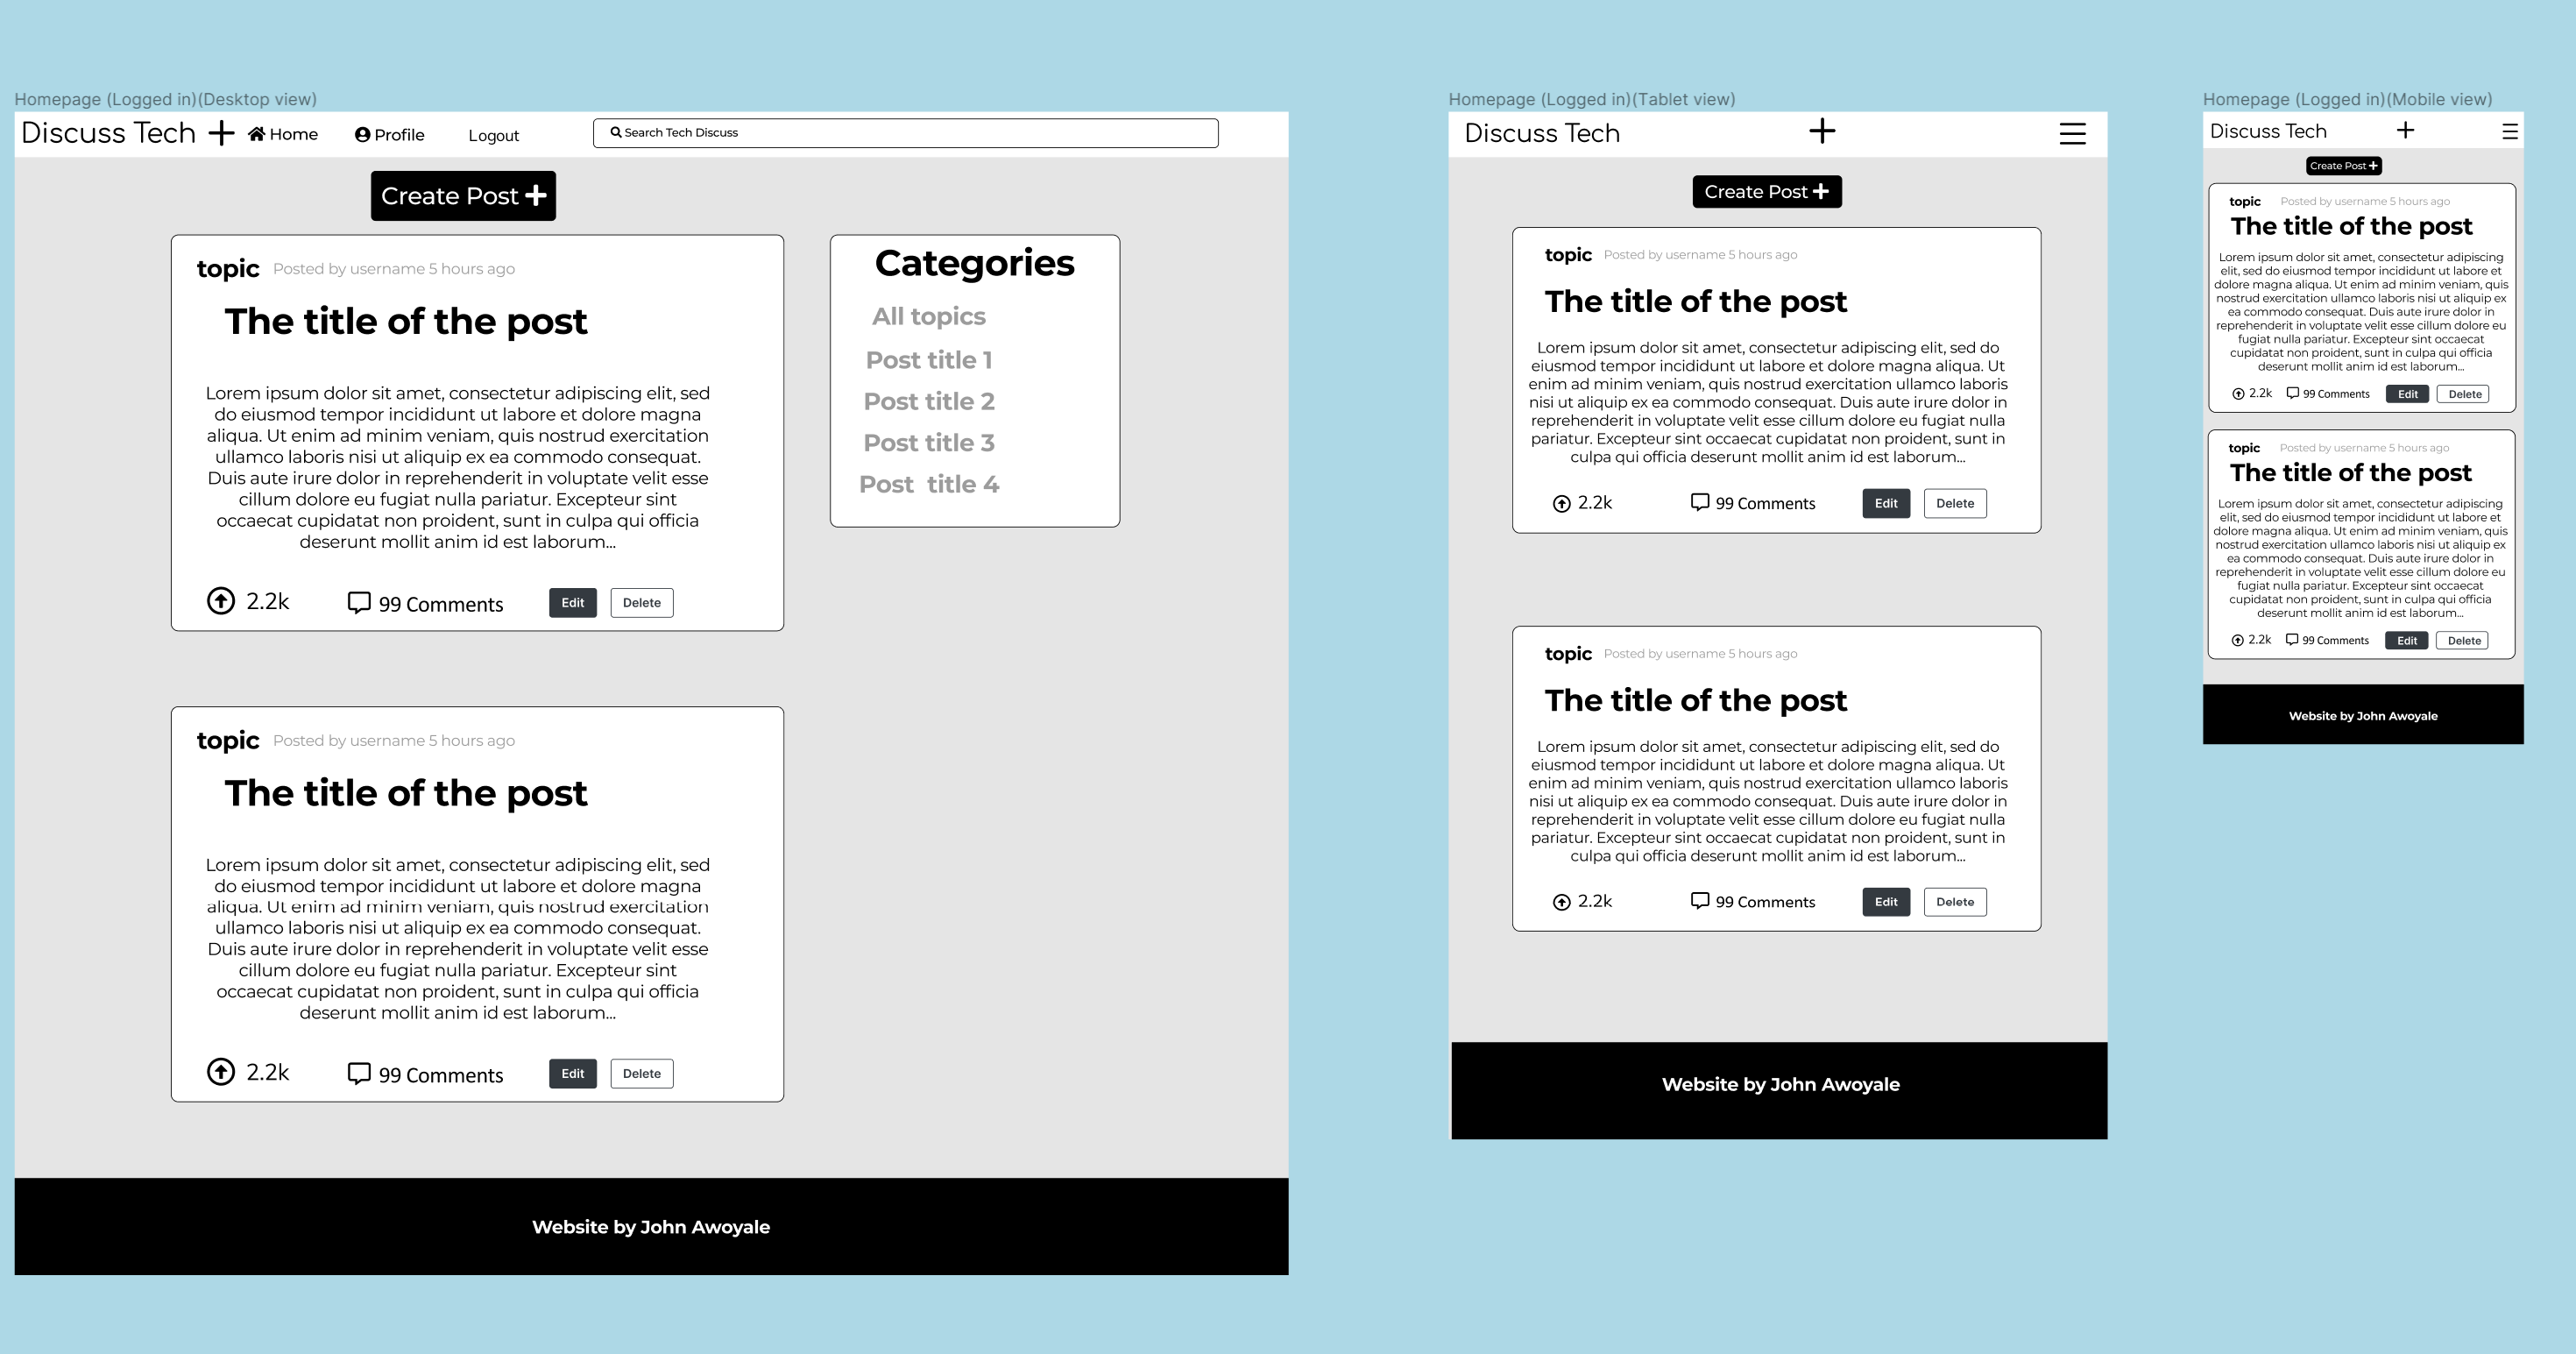
Wireframes were made with Figma to get a better idea on how things would look layout-wise on the website. The website is meant to look similar to Reddit, as it is a news posting website based on Reddit there are cards with post content inside them just like Reddit.
The projects feature on GitHub was used to create a Kanban board that lists all of the user stories. Each user story has a task that the user might be able to do on the website once the functionality has been added. All the must have user stories have been completed and the some of the user stories that are should have and could have will get implemented in the future when there is more time.
- Upvote Posts: As a Site User I can upvote a post so that it indicates that I agree with it.
- Comment on a post: As a Site User I can write comments on a post so that I participate in the discussion
- View post list: As a Site User I can look through a list of posts so that I can find which ones I want to view
- Filter Categories: As a Site User I can filter posts by category so that I only see those that are relevant to me
- Open a post: As a Site User I can click on a post so that I can see the entire post, including upvotes and comments on a separate page
- Make a post: As a Site User I can create my own post so that I can receive upvotes and comments for posting it
- Account registration: As a Site User I can register for an account so that I can make posts, comments, and upvote.
- Manage Website Content: As a Site Admin I can delete user posts and comments so that the website is free of objective content
- Profile page: As a Site User I can view my profile page so that I can see my information, posts, and comments
- Notification Messages: As a Site User I can receive a message after I make a post, comment, sign up, login, or logout so that I know it was done successfully
- User Managed Posts: As a Site User I can edit and delete my posts so that I can manage the posts I've contributed to the site
- User Managed Comments: As a Site User I can edit and delete my comments so that I can manage the comments I've contributed to the site
- Search for a post: As a Site User I can search for posts so that I can find a specific post
- View other users profile page: As a Site User I can look at another user's profile so that I can see their posts and comments
- Downvote Posts: As a Site User I can downvote a post so that it indicates that I disagree with it
- Image post: As a Site User I can post an image so that I receive upvotes and comments for posting an image
- Video post: As a Site User I can post a video so that I can receive upvotes and comments for posting video
- Allow Social login: As a Site User I can register or login with my social account so that I don't have to create a new account
- Password and Username reset: As a Site User I can reset my password/username so that I keep my account secure
- Delete own account: As a Site User I can delete my account so that I can remove all of my content as well as my profile from the website
- Back to top button: As a Site User I can click a button to take me back to the post at the top of the page so that I can get to the top without having to scroll
- Error Notification Messages: As a Site User I can receive an error message after I make mistake on a post, comment, sign up, or login so that I know it was not successful
- Dark mode: As a Site User I can set the website to dark mode so that I don’t strain my eyes
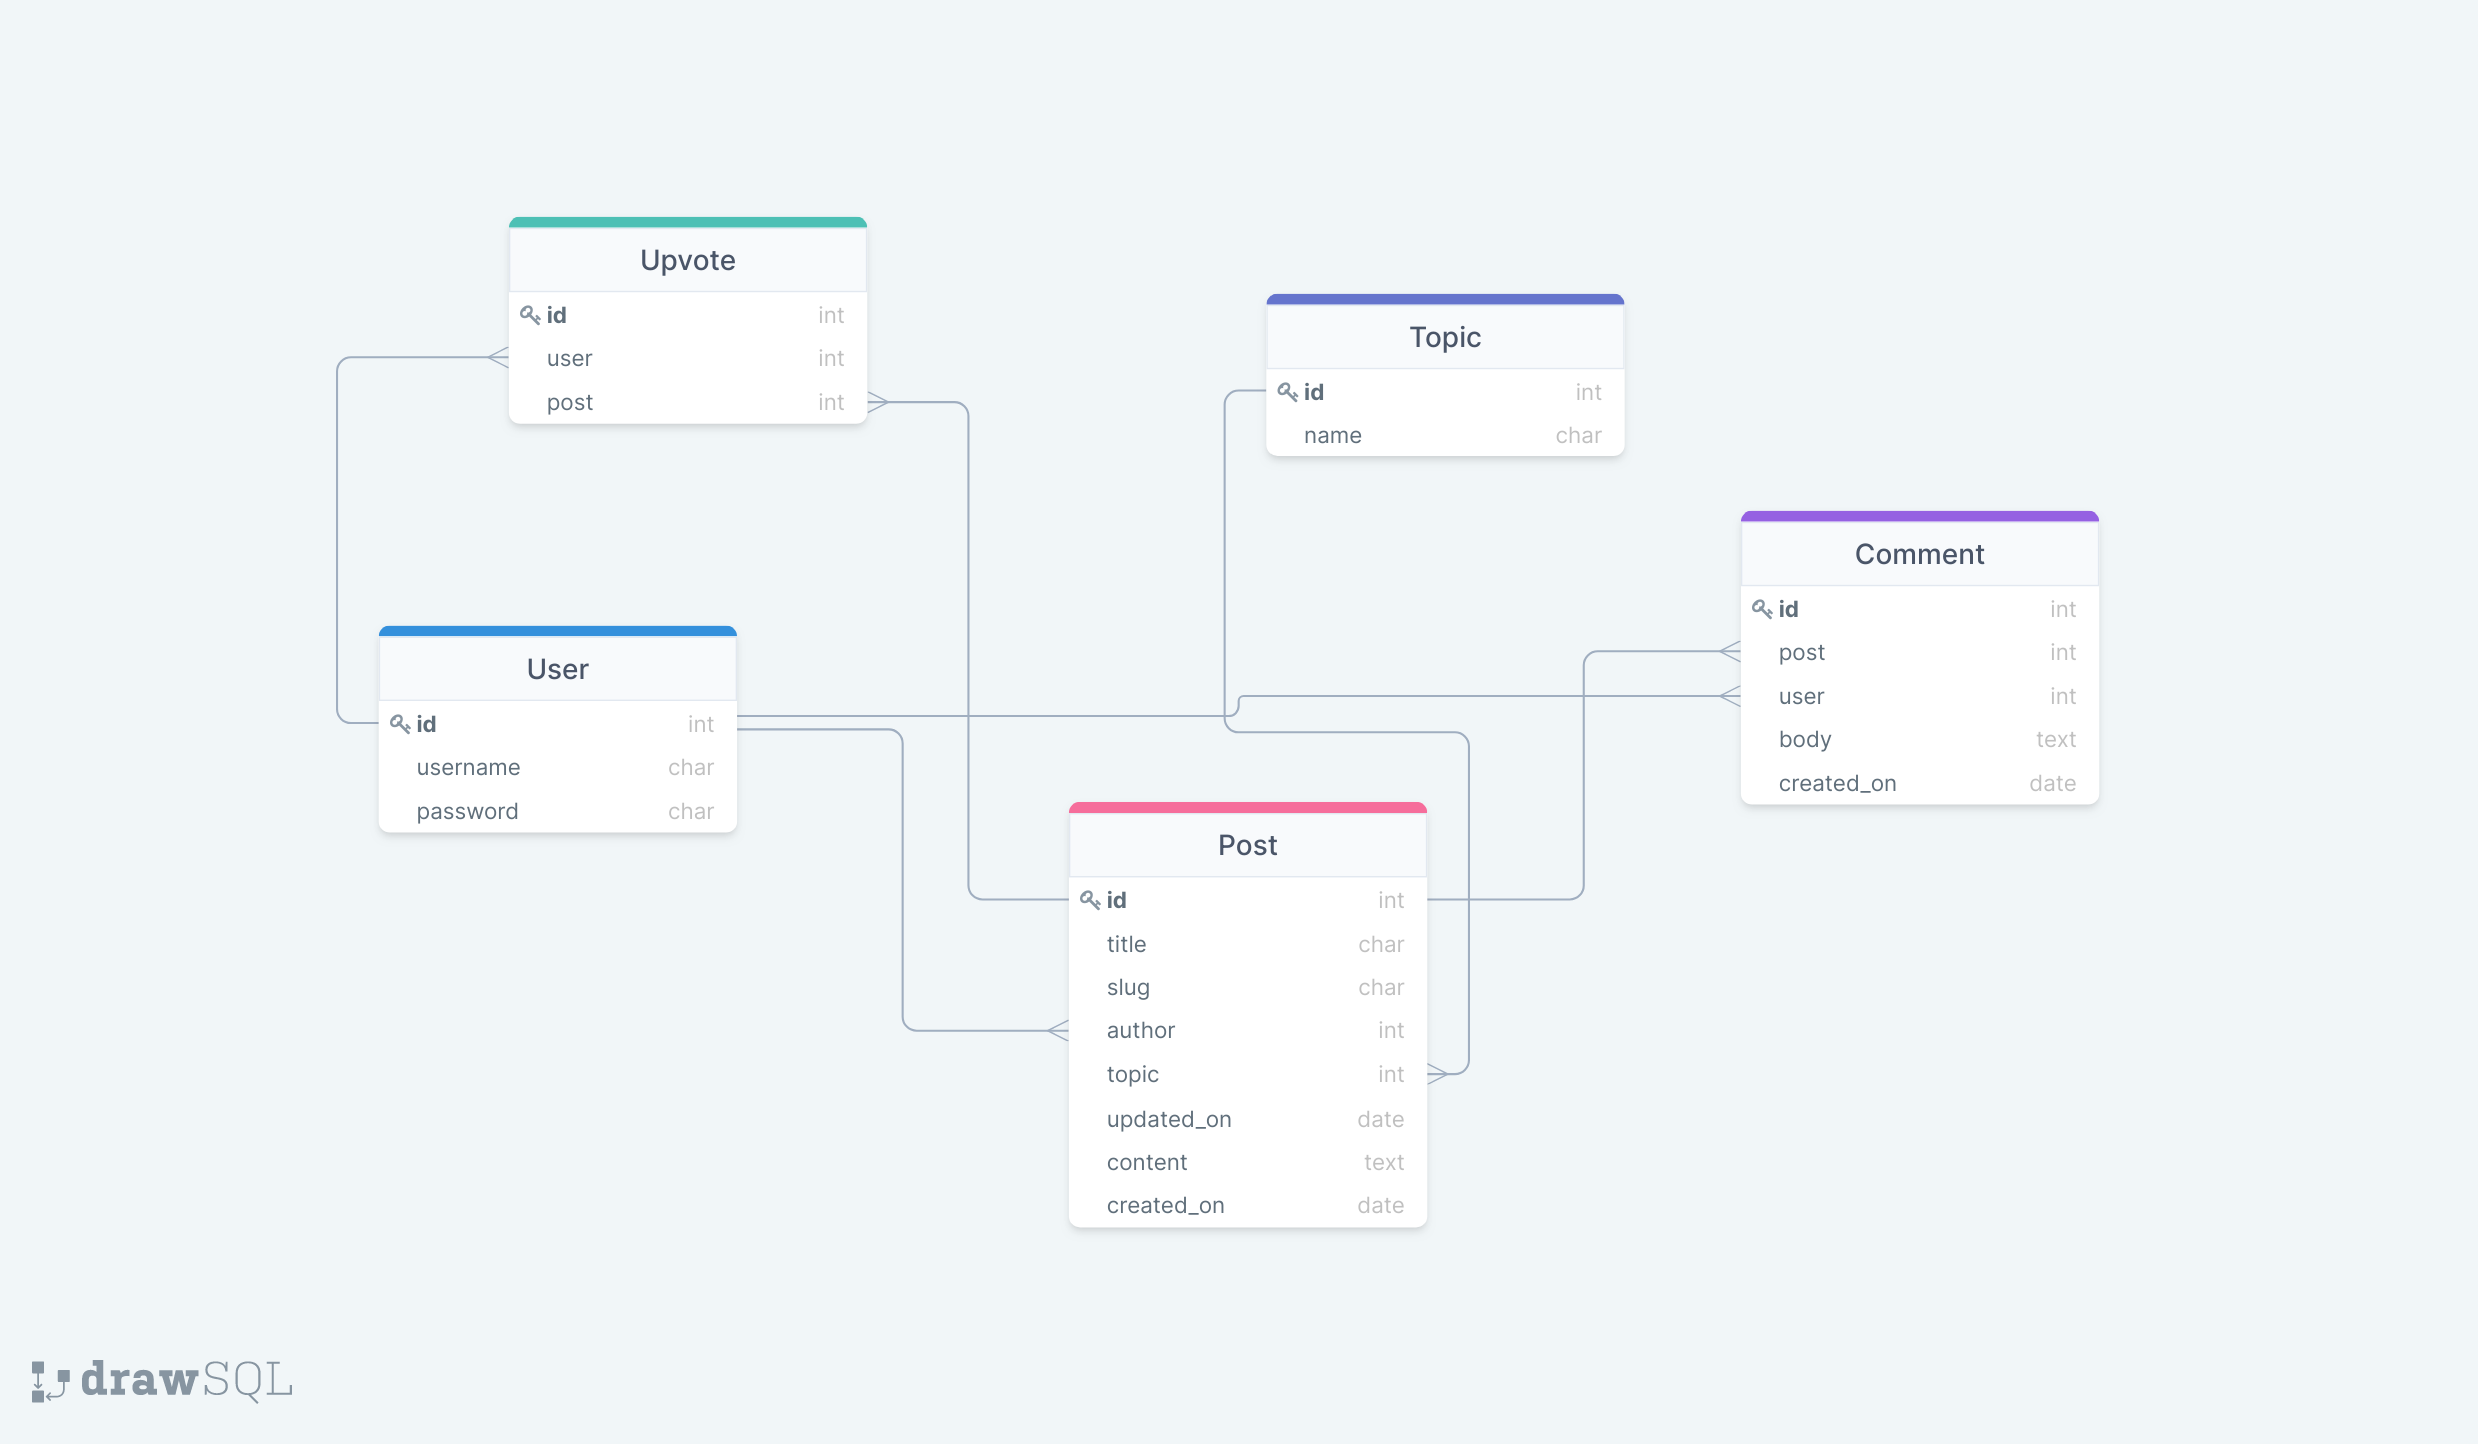
- User model is automatically generated by Django when a user creates their account.
- Topics are created by the admin user using superuser access to the admin interface. With this only the admin is capable of creating topics.
- The name attribute has a character field that allows the admin write a name for the topic.
- Post model allows users to make posts as authors
- The title attribute has character field for users to be able to write a title for their post.
- The slug attribute has slug field that will slugify title of the post so it shows in the url
- The author attribute has a foreign key field that has a relationship with the User model id attribute.
- The topic attribute has a foreign key field that has a relationship with the Topic model id attribute.
- The updated_on attribute has a datetime field that will show the date when the post was edited
- The content attribute has a text filed for users to be able to write text content in their post.
- The created_on attribute has a datetime field that will show the date when the post was made.
- The post attribute has a foreign key field that has a relationship with the Post model id attribute.
- The user attribute has a foreign key field that has a relationship with the User model id attribute.
- The body attribute has a text field for users to be able to write a comment.
- The created_on attribute has a DateTime field that will show the date when the comment was created.
- The user and post attributes have many to many relationship with the User model id and Post model id
- Allows users to put upvotes on a post
The SQL Relational database used was PostgreSQL
| Test | Action | Expected Result | Pass |
|---|---|---|---|
| Logo | Click “Tech Discuss” | Sends user to the home page | √ |
| Plus Icon | Click “Plus Icon” | Sends user to the post create page | √ |
| Home | Click “Home” | Sends user to the home page | √ |
| Profile | Click “Profile” | Sends user to the profile page | √ |
| Logout | Click “Logout” | Sends user to the sign out page | √ |
| Search | Search for a post | Displays posts related to the search | √ |
| Sign up | Click “Sign up” | Sends user to the sign up page | √ |
| Login | Click “Login” | Sends user to the sign in page | √ |
| Plus | Visit page logged in | Displays plus icon | √ |
| Profile | Visit page logged in | Displays profile | √ |
| Logout | Visit page logged in | Displays logout | √ |
| Plus | Visit page not logged in | Hides plus icon | √ |
| Profile | Visit page not logged in | Hides profile | √ |
| Logout | Visit page not logged in | Hides logout | √ |
| Sign up | Visit page not logged in | Displays sign up | √ |
| Login | Visit page not logged in | Displays login | √ |
| Sign up | Visit page logged in | Hides sign up | √ |
| Login | Visit page logged in | Hides login | √ |
| Home | Tablet/ mobile screen view logged in | Hides Home in navigation bar | √ |
| Profile | Tablet/ mobile screen view logged in | Hides Profile in navigation bar | √ |
| Logout | Tablet/ mobile screen view logged in | Hides Logout in navigation bar | √ |
| Sign up | Tablet/ mobile screen view unauthorised | Hides Sign up in navigation bar | √ |
| Login | Tablet/ mobile screen view unauthorised | Hides Login in navigation bar | √ |
| Test | Action | Expected Result | Pass |
|---|---|---|---|
| Create Post button | Click “Create Post button” | Sends user to the post create page | √ |
| User link | Click “User link” | Sends user to the clicked on user’s profile page | √ |
| Post link | Click “Post link” | Sends user to the clicked on post’s display page | √ |
| Edit | Click “Edit” | Sends user to the clicked on post’s edit page | √ |
| Delete | Click “Delete” | Sends user to the clicked on post’s delete page | √ |
| Topic | Click a topic | Displays posts related that topic | √ |
| Create Post button | Visit page logged in | Displays Create Post button | √ |
| Create Post button | Visit page not logged in | Hides Create Post button | √ |
| Edit | Visit page logged in | Displays only on posts by logged in user | √ |
| Edit | Visit page logged out | Hides Edit | √ |
| Delete | Visit page logged in | Displays only on posts by logged in user | √ |
| Delete | Visit page logged out | Hides Delete | √ |
| Side panel | Visit page logged in | Displays only Categories | √ |
| Side panel | Visit page logged out | Displays welcome card and Categories | √ |
| Side panel | mobile screen view | Hides side panel | √ |
| Test | Action | Expected Result | Pass |
|---|---|---|---|
| Form | Fill in form correctly then click post | Adds a new post to the homepage | √ |
| Form | Leave form empty then click post | Prompts user to fill in fields on form | √ |
| Quick tips card | Desktop view | Displays Quick tips card next to form | √ |
| Quick tips card | Tablet/ mobile screen view | Hides Quick tips card | √ |
| Test | Action | Expected Result | Pass |
|---|---|---|---|
| Upvote | click upvote logged in | increments by 1 | √ |
| Upvote | click upvote logged out | nothing happens | √ |
| Edit button on post | Visit page logged in | Displays only on posts by logged in user | √ |
| Edit button on post | Visit page logged out | Hides Edit button | √ |
| Edit button on post | Click “Edit” | Sends user to the clicked on post’s edit page | √ |
| Delete button on post | Visit page logged in | Displays only on posts by logged in user | √ |
| Delete button on post | Visit page logged out | Hides Delete button | √ |
| Delete button on post | Click “Delete” | Sends user to the clicked on post’s delete page | √ |
| Comment form | Visit page logged in | Displays comment form | √ |
| Comment form | Visit page logged out | Hides comment form | √ |
| Comment form | Fill in form correctly then click comment | Adds a new comment to that post page | √ |
| Comment form | Leave form empty then click comment | Prompts user to fill in fields on form | √ |
| Edit button in comments | Visit page logged in | Displays only on comments by logged in user | √ |
| Edit button in comments | Visit page logged out | Hides Edit button | √ |
| Delete button in comments | Visit page logged in | Displays only on comments by logged in user | √ |
| Delete button in comments | Visit page logged out | Hides Delete button | √ |
| Side panel | Visit page logged in | Displays only Polite reminder card | √ |
| Side panel | Visit page logged out | Displays Welcome and Polite reminder card | √ |
| Side panel | Desktop screen view | Displays side panel | √ |
| Side panel | Tablet/ mobile screen view | Hides side panel | √ |
| Test | Action | Expected Result | Pass |
|---|---|---|---|
| User link on user post | Click “User link” | Sends user to the clicked on user’s profile page | √ |
| Post link on post | Click “Post link” | Sends user to the clicked on post’s display page | √ |
| Edit button on post | Click “Edit” | Sends user to the clicked on post’s edit page | √ |
| Delete button on post | Click “Delete” | Sends user to the clicked on post’s delete page | √ |
| Edit button on post | User is authorised | Displays edit button | √ |
| Delete button on post | User is authorised | Displays delete button | √ |
| Edit button on post | User is not authorised | Hides edit button | √ |
| Delete button on post | User is not authorised | Hides delete button | √ |
| Test | Action | Expected Result | Pass |
|---|---|---|---|
| Form | fill in form edits | posts same page, but now edited | √ |
| Form | leave fields empty | Prompts user to fill in fields on form | √ |
| Test | Action | Expected Result | Pass |
|---|---|---|---|
| Go back button | Click “Go back button” | Sends user back to their last page | √ |
| Confirm | Click “Confirm” | Deletes the post then redirects back to homepage | √ |
| Test | Action | Expected Result | Pass |
|---|---|---|---|
| Form | fill in form edits | edits the comment and sends user back to the page they were on | √ |
| Form | leave fields empty | Prompts user to fill in fields on form | √ |
| Test | Action | Expected Result | Pass |
|---|---|---|---|
| Go back button | Click “Go back button” | Sends user back to their last page | √ |
| Confirm | Click “Confirm button” | Deletes the comment then redirects user back to the page the comment was from | √ |
| Test | Action | Expected Result | Pass |
|---|---|---|---|
| Sign in form | Fill in fields correctly then click sign in | User gets logged in | √ |
| Sign in form | Leave fields empty then click sign in | Nothing | √ |
| Sign in form | Fill in fields with incorrect info | Prompts user to fill in fields with correct info | √ |
| Sign in form | Click sign up link | Sends user to signup page instead | √ |
| Logout form | Click sing out Button | signs user out | √ |
| Sign up form | Fill in fields correctly then click sign up | Creates a new user for the website and sends them to homepage | √ |
| Sign up form | Leave fields empty then click sign in | Nothing | √ |
| Sign up form | Fill in fields with incorrectly | Prompts user to fill in fields correctly | √ |
| Sign up form | Click sign in link | Sends user to sign in page instead | √ |
| Test | Action | Expected Result | Pass |
|---|---|---|---|
| Django Message | When user Logs in | Message pops up with a success confirmation message | √ |
| Django Message | When user Logs out | Message pops up with a success confirmation message | √ |
| Django Message | When user Signs up | Message pops up with a success confirmation message | √ |
| Django Message | When user Creates a post | Message pops up with a success confirmation message | √ |
| Django Message | When user edits a post | Message pops up with a success confirmation message | √ |
| Django Message | When user deletes a post | Message pops up with a success confirmation message | √ |
| Django Message | When user Creates a comment | Message pops up with a success confirmation message | √ |
| Django Message | When user edits a comment | Message pops up with a success confirmation message | √ |
| Django Message | When user deletes a comment | Message pops up with a success confirmation message | √ |
- Django Generic list view does a lot things that is not clear and raised errors when a page with a slug URL was clicked on. Switching to a normal view fixed the issue.
-
Posts and comments aren’t ordered by most recernt even though the meta class is set to order by created on date
-
Likes and Comments don't show on homepage
-
Trying to edit or delete comments on profile pages causes errors
-
Create Repo
-
Clone Repo
-
Install python
-
Install Django and the supporting libraries
pip3 install django gunicorn
pip3 install dj_database_url psycopg2
pip3 install dj3-cloudinary-storage
-
Create requirements file for Heroku
pip3 freeze --local > requirements.txt -
Like this
asgiref==3.5.2
backports.zoneinfo==0.2.1
cloudinary==1.29.0
dj-database-url==0.5.0
dj3-cloudinary-storage==0.0.6
Django==4.0.4
django-allauth==0.50.0
django-autoslug==1.9.8
django-crispy-forms==1.14.0
django-summernote==0.8.20.0
gunicorn==20.1.0
oauthlib==3.2.0
psycopg2==2.9.3
PyJWT==2.4.0
python3-openid==3.2.0
requests-oauthlib==1.3.1
sqlparse==0.4.2
-
Create a new Django Project
django-admin startproject <projectName>
-
Create a new Django app
python3 manage.py startapp <appName>
-
Then add the new app to settings.py file
INSTALLED_APPS = [ 'django.contrib.admin', 'django.contrib.auth', 'django.contrib.contenttypes', 'django.contrib.sessions', 'django.contrib.messages', 'django.contrib.staticfiles', 'newapp', #new goes here ] -
Now you need to migrate changes
```bash
python3 manage.py migrate

```
- then run the project to make sure everything is working okay
```bash
python3 manage.py runserver

```
-
Then you sign up or login into Heroku to create the app
-
Create a new app on Heroku by clicking the new app button
-
Go to the resources tab
-
Search for ‘Heroku Postgres’
-
Click the submit order form button
-
Go to the settings tab
-
Click on the reveal Config Vars button
-
Copy the Postgres URL value to the right of the Database_url key
-
Go back to the Django project on the code editor
-
Create an env.py file in the same directory as your manage.py file.
-
Add in these environment variables for the database and secret key inside the env.py file.
-
Now copy the name value of your secret key and paste it into config vars on Heroku then click add.
-
Go to the settings.py file
-
Add these imports at the top of the settings.py file.
```python
from pathlib import Path
import os
import dj_database_url
if os.path.isfile('env.py'):
    import env

```
-
Then go to the insecure SECRET-KEY in settings.py and change its value to target the secret key in the env.py file instead.
-
Then go down to the database section in settings.py. Comments out the default DATABASES python dictionary with
ctrl +/then add your own database link to the env.py file. -
Now you need to migrate changes again
```bash
python3 manage.py migrate

```
-
You can go back to Heroku app now and click the resources tab
-
Then click on the Heroku Postgres add-on to check that the database is working.
-
Now you just need to log into your Cloudinary account and copy your API Emviroment Variable.
-
Go back to the Django project then go to the env.py file.
-
Then paste it in as a new environment variable. Make sure to remove the
Cloudinary_url=part at the beginning of the value or else it won’t be valid. -
Then copy the same key and value to Heroku config vars
-
Now add another config var DISABLE_COLLECTSTATIC
-
Then go back to the Django project on your code editor. Go to the settings.py file.
-
Add the cloudinary libraries to settings.py
```bash
INSTALLED_APPS = [
    'django.contrib.admin',
    'django.contrib.auth',
    'django.contrib.contenttypes',
    'django.contrib.sessions',
    'django.contrib.messages',
    'django.contrib.staticfiles',
    'cloudinary',
     'news', #new goes here
]

```
-
Now we just need to tell Django to use Cloudinary to store our media and static files.
-
Go to the static files section that is near the end of the settings.py file. Then add in these links.
```python
# Static files (CSS, JavaScript, Images)
# <https://docs.djangoproject.com/en/4.0/howto/static-files/>

STATIC_URL = '/static/'
STATICFILES_STORAGE = 'cloudinary_storage.storage.StaticHashedCloudinaryStorage'
STATICFILES_DIRS = [os.path.join(BASE_DIR, 'static')]
STATIC_ROOT = [os.path.join(BASE_DIR, 'staticfiles')]

MEDIA_URL = '/media/'
DEFAULT_FILE_STORAGE = 'cloudinary_storage.storage.MediaCloudinaryStorage'

```
-
Now you need to tell Django where the templates will be stored.
-
Back to the top of settings.py file in the base directory section. Add the templates directory variable
```python
# Build paths inside the project like this: BASE_DIR / 'subdir'.
BASE_DIR = Path(__file__).resolve().parent.parent
TEMPLATES_DIR = os.path.join(BASE_DIR, 'templates')

```
- Then go to the middle section in settings.py you need to find the templates list and add TEMPLATES_DIR to the DIRS KEY in the dictionary.
```python
TEMPLATES = [
    {
        'BACKEND': 'django.template.backends.django.DjangoTemplates',
        'DIRS': [TEMPLATES_DIR],
        'APP_DIRS': True,
        'OPTIONS': {
            'context_processors': [
                'django.template.context_processors.debug',
                'django.template.context_processors.request',
                'django.contrib.auth.context_processors.auth',
                'django.contrib.messages.context_processors.messages',
            ],
        },
    },
]

```
- Now go to the ALLOWED_HOSTS variable in the settings.py file and add the Heroku host name.
```python
# SECURITY WARNING: don't run with debug turned on in production!
DEBUG = True

ALLOWED_HOSTS = ['<appname>.herokuapp.com']

```
-
Now you to create 3 directories; media, static, templates in the root directory.
-
Now we nee to crate a ‘Procfile’ that contains this text
```
web: gunicorn <projectName>.wsgi

```
- Now you save all the files then use git to commit files to GitHub
```bash
git add.
git commit -m "deployment commit"
git push

```
-
Then we deploy to heroku
-
Open the terminal.
```bash
command: heroku login -i

```
- Get your app name from heroku.
```bash
heroku apps

```
- Set the heroku remote. (Replace <app_name> with your actual app name and remove the <> characters)
```bash
heroku git:remote -a <app_name>

```
- Add and commit any changes to your code if applicable
```bash
command: git add . && git commit -m "Deploy to Heroku via CLI"

```
- Push to both GitHub and Heroku
```bash
git push origin main
git push heroku main

```
-
Go to the settings.py file and set DEBUG to True
DEBUG = TRUE
-
Then below that add X_FRAME_OPTIONS = ‘SAMEORIGIN’
X_FRAME_OPTIONS = 'SAMEORIGIN'
-
Then you save eve thing then commit then push to GitHub
git add .
git commit -m "commit message"
git push
-
Then head over to your Heroku app on the Heroku website.
-
Go to settings reveal config vars then remove DISABLE_COLLECTSTATIC variable
-
Then deploy to Heroku
-
Open the terminal.
command: heroku login -i
-
Get your app name from Heroku.
heroku apps
-
Set the Heroku remote. (Replace <app_name> with your actual app name and remove the <> characters)
heroku git:remote -a <app_name>
-
Add and commit any changes to your code if applicable
```bash
command: git add . && git commit -m "Deploy to Heroku via CLI"

```
- Push to both GitHub and Heroku
```bash
git push origin main
git push heroku main

```
- The base code of the project is from Code institute’s I Think Therefore I Blog project.
- Cards, side panel, and footer is from Bootstrap
- Generating upvotes is from Code institute’s I Think Therefore I Blog project
- Using related names in models is taken from a Reddit answer in the comments
- Code for slug routing is from Vegibit
- Code on how to use auto slug
- Code for styling Django forms with Bootstrap is from the Codemy blog video
- Code for creating a form post that sets the currently logged in use
- Code used to redirect to same page
- Filter & Search functionality is from Traversy Media’s django 7 hour course
- Adding Django message with bootstrap to trigger after certain condition bootstrap messages video
- Code for creating a user profile pages is from Traversy Media’s django 7 hour course
The posts on the website to fill it with user content came from these links
- The cheap GPU post
- The posts about Microsoft’s windows server drop
- The post about the tiny remote controlled robot crab
