
YESMoney is a website which allows users to track and monitor their daily incomes and spendings. Users are able to create their virtual wallet, where they can add their planned or current expenses and incomes, view them on the graph, and easily search and catrgorize them for better budget management.
YESMoney is a Full Stack Application built with the Django Framework which includes full CRUD functionality allowing users to Sign Up / Log In to their account and Add, Edit or Delete expenses and incomes and have a overview through graphs and charts of their financial situation, and trends of spending/ gaining money (categories of expenses and sources of incomes).

The vision behind creating this site was focused on delivering a User an effective way to track their personal budget on daily basis. Allow the User to manage their wallet by using an easy to navigate website tool, that keeps it private (login required).User is able to follow the patterns of spendings based on categories and handy chart that visualize them, as well as summarize overall spendings and incomes over the last 6 months. The website was designed to be simple yet effective and provide a real use tool to people in need of monitoring their household budget. Page is easy and clear to navigate, based on the principle of "mobile first approach", which gives the freedom of using it on any type of device due to its full responsiveness. The aim was to provide all the main, necessary features expected for a personal budget tracker.
- Provide the User with an easy to use page that allows them to track their personal finances.
- Allow the User to Create, Update and Delete their incomes and expenses.
- Allow the User to View (Read) their expenses and incomes via table and chart.
- Allow the User to import their incomes and expenses to handy CSV file in order to print it or save to their device.
- Allow the User to easily search their incomes and expenses through a Search bar.
- Allow the User to sort their incomes and expenses by amount, category/ source, description (alphabetically), and date.
- Provide visible and easy to understand response to User's action on the page.
YESMoney project was based on the Agile Methodology, and Agile Kanban Board Framework was implemented in the site's creation process. It can be viewed here It was divided into three sections for clear tasks distribution and visual progress:
- Todo
- In Progress
- Done
-

Based on the Iterative Development idea - while working on this project, I added new functional capabilities and modified existing features as needed over time. Different parts of the project were developed at various times and were integrated based on their successful completion. Increments were build based on their functionality need to not spend efforts on building features not neccessary for the project. Subsequent iterations were implemented based on the Users feedback and tests.
MoSCoW prioritization was taken under consideration while creating this project - some of the User Stories were critical (like user authentication, CRUD functionality) compared to other User Stories rather considerable (chart, contact form, CSV exports). Those with smaller impact were left for the later phase of page development, while other - vital ones - were guaranteed to be delivered on time. Timeboxing and prioritization were crutial for this project and can be reflected by viewing Iteration process (Todo > In Progress > Done) and labels assigned to each User Story (Must Have, Should Have, Could Have and Won't Have).
YESMoney page was designed for all the Users, who are interested in tracking their personal budget, without any age limitation. Due to the nature of money - it is expected that adult Users will find it more useful and interesting as a product for a daily life use. By implementing modern design and vector graphics YESMoney is aspiring to be attractive also for younger Users, who wish to save information about their pocket money (this income source is available to choose) and various expenses.
- From the User Perspective:
- As a Site User I can show/ hide my password once login in/ registering the account, so that I can see if it's typed in correctly/ hide it for the safety reasons.
- As a Site User I can logout from the page so that no one can view my wallet details.
- As a Site User I can add preference to my wallet (like currency choice) so that I can personalize the settings more.
- As a Site User I can sign up with original, not repeating username and login to an account so that I can create and manage my wallet.
- As a Site User I can create, read, update and delete my Expenses details so that I can see a true reflection of my actual Expenses.
- As a Site User I can view a paginated list of expenses and incomes so that I can easily view and edit them on the page.
- As a Site User I can search for specific expense so that I can easily find it in my wallet.
- As a Site User I can create, read, update and delete my Income details so that I can see a true reflection of my actual Income.
- As a Site User I can search for specific income so that I can easily find it in my wallet.
- As a Site User I can view visual representation of my expenses (graph) so that I can have a better and easier look at my expenses details over certain period of time.
- As a Site User I can view visual representation of my incomes (graph) so that I can have a better and easier look at my income details over certain period of time.
- As a Site User I can provide feedback so that the Site Admin knows what needs to be changed in the app, and what additional categories they can add for expenses and incomes.
- As a Site User I export my expenses and incomes to CSV file so that I can print it out or view in Excel or other application.
- From the Admin perspective:
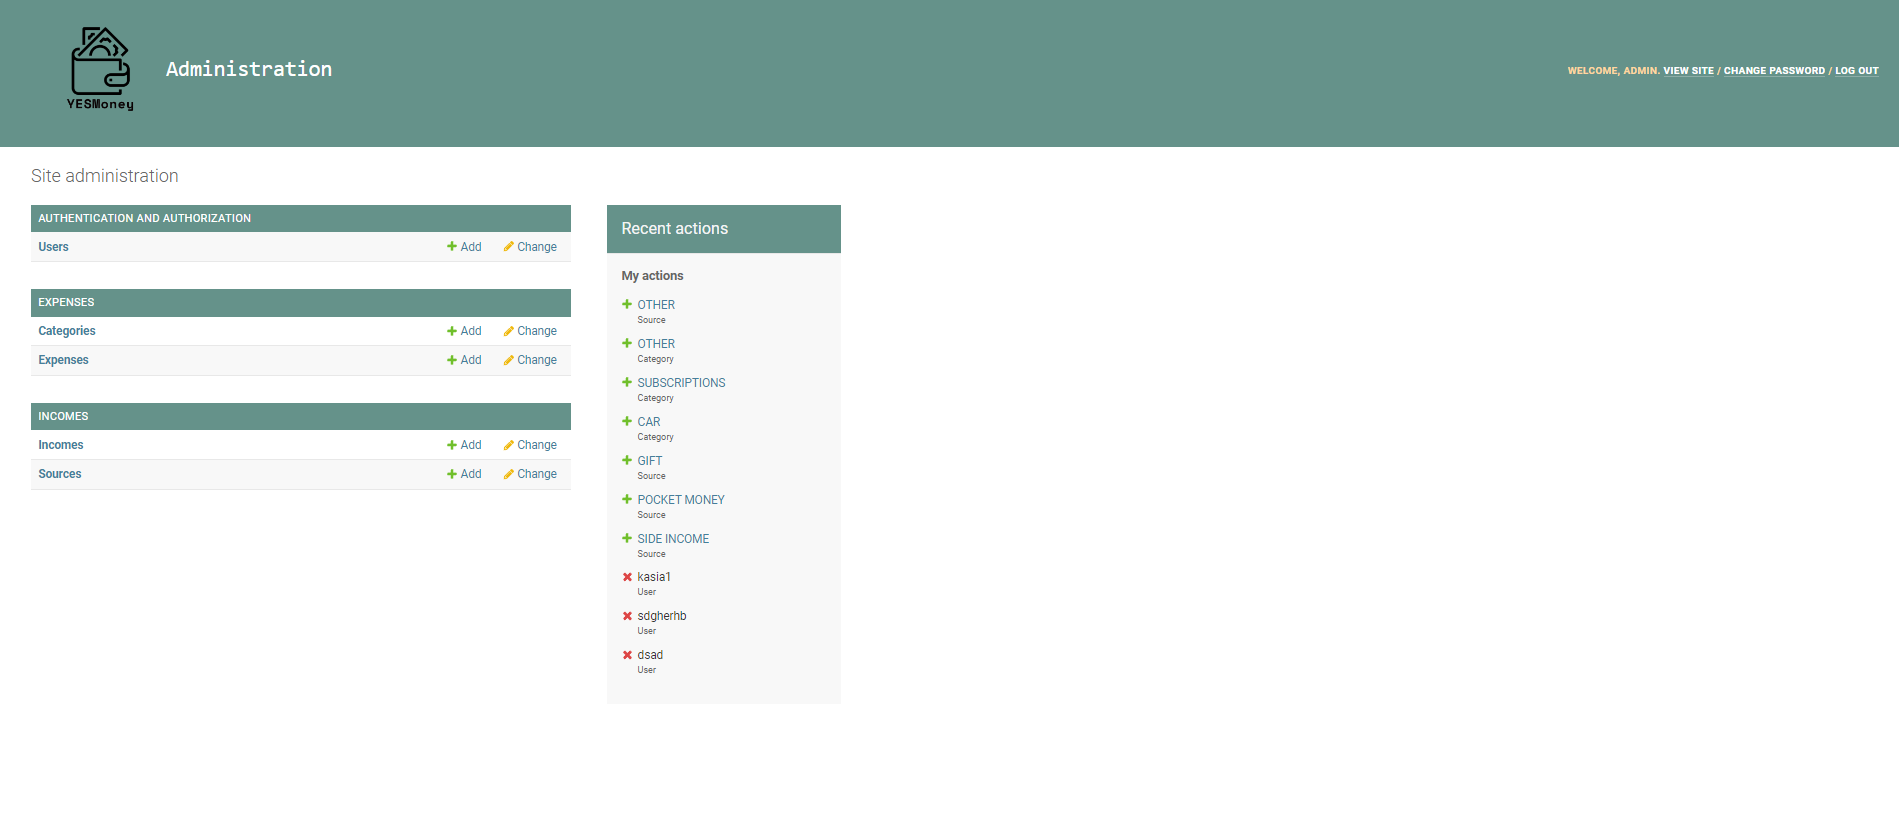
- As a Site Admin I can customize the Admin Panel so that I add different categories and features based on user's needs and feedback.
- As a Site Admin I can create expense categories so that the Site Users can see better what type of expenses are generated over time.
- As a Site Admin I can create income sources so that the Site Users can see better what type of incomes are generated over time.
- Sign-in, sign-up, logout
- Password (reset, show)
- Manage incomes (CRUD)
- Manage expenses (CRUD)
- Page visibility (table, pagination, buttons - search, export)
- User notifications (messages, confirmation window)
- Graph (income, expense based on the database information for a specific User)
YESMoney was developed usiutalizing Django. As a result the page functionality was split into separate applications. For this project I created 4 apps: authentication, expenses, incomes, userprferences for clear functionality split.
- Authentication - this app contains the pages that both: logged in and not logged in Users - will see: home page, contact page, login page and registration page. Those will be landing pages for the Users, who'll log out of the wallet (home), and those, who want to access the wallet (login).
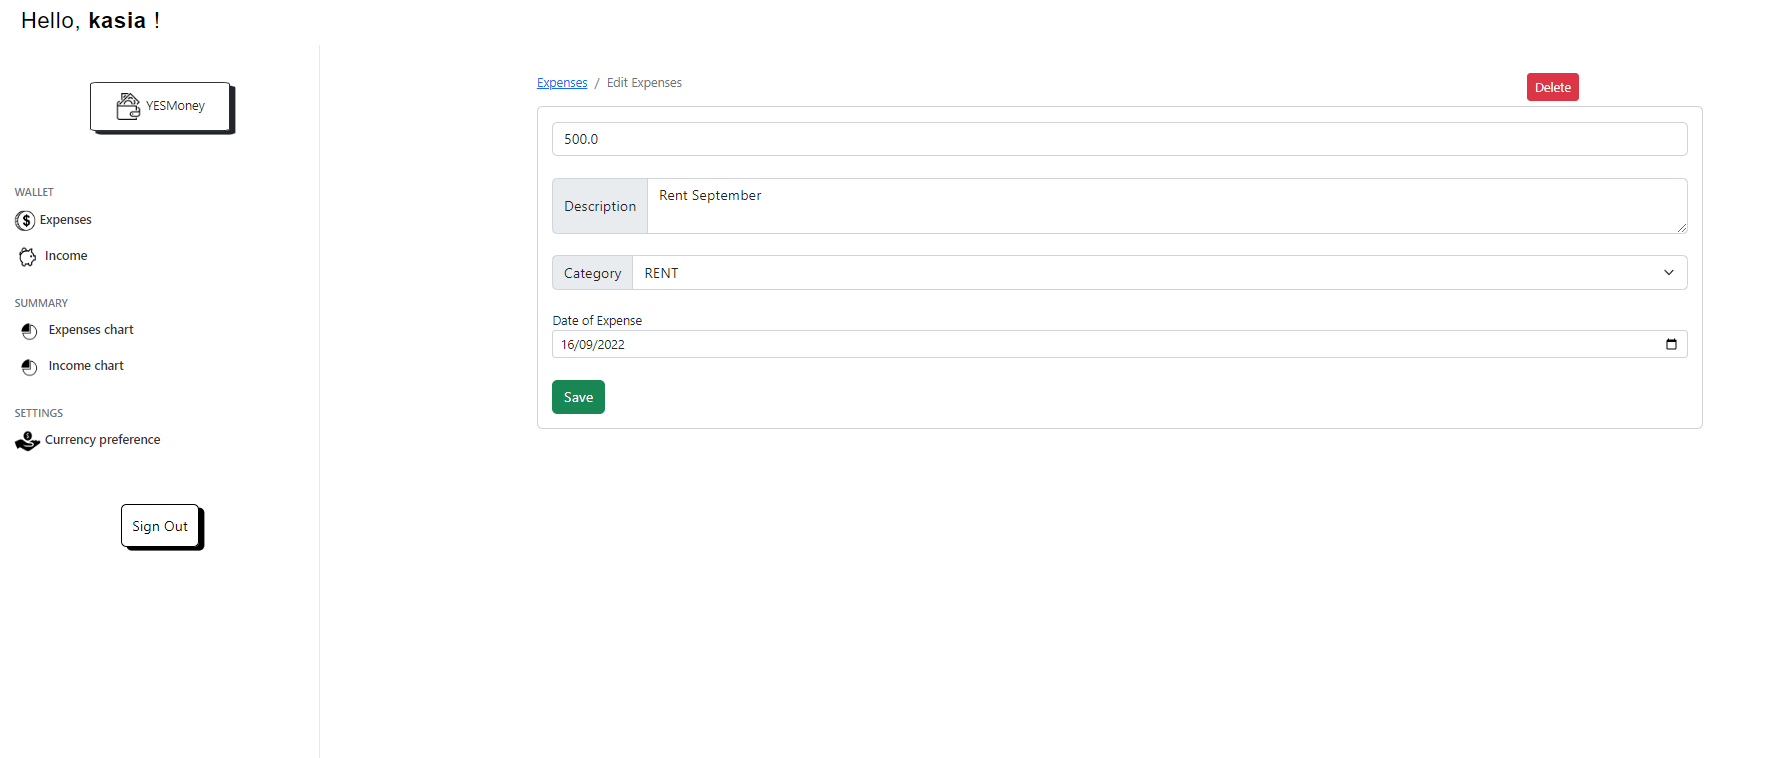
- Expenses - this app contain pages and functionality for Expenses site inside the wallet. Visible only for logged in Users. They allow the Users to see their expenses (main landing page), Add expenses, Edit Expenses, Delete Expenses, View the summary of expenses (chart).
- Income - this app contain pages and functionality for Income site inside the wallet. Visible only for logged in Users. They allow the Users to see their incomes (main landing page), Add incomes, Edit incomes, Delete incomes, View the summary of incomes (chart).
- Userpreferences - this app contain page and functionality for the User preferences inside the wallet under the tab "Currency preference". Visible only for logged in Users. Allows the User to choose their preffered currency out of the provided list and autopopulates this information across the other wallet pages.
Home page

Contact page

Login page

Registration page

Main wallet page

Chart page

Currency preference page

View the diagram

Database schema for this project required creating 5 different relational databases, which interact with each other to provide proper functionality of the page.
- Default Django User database - stores the usernames and passwords of all the registered Users. Allows them to login to the wallet, view their incomes and expenses, create new ones, edit them and delete. No need for creating any models, since come as default.
- Expense database with relationship to the Category database and Users database. Has fields for amount, date, description, owner and category. On this database all Expense related actions rely solely - without it the Users wouldn't be able to add any Expenses, then view them, see them on Chart, edit or delete, as all information from this database is crutial for all those wallet operations.
- Income database with relationship to the Source database and Users database. Has fields for amount, date, description, owner and source. On this database all Incomes related actions rely solely - without it the Users wouldn't be able to add any Incomes, then view them, see them on Chart, edit or delete, as all information from this database is crutial for all those wallet operations.
- Category database - allows the User to choose relevant category for their expenses based on the name field. New Category names are added by Admins within the panel, and then utilized by the Users in CRUD operations in the wallet.
- Source database - allows the User to choose relevant source for their incomes based on the name field. New Source names are added by Admins within the panel, and then utilized by the Users in CRUD operations in the wallet.
- UserPreference database - Expense and Income databases rely on the information passed from UserPreference fields about chosen currency for specific, logged in User. Data from this database populates the fileds within the tables in Income and Expense pages and definies specific, chosen from the JSON list, currency.
The colors used throughout the page for its main styling are shown below. They are complimented by more colorful images on the specific pages (home, contact, delete confirmation, currency preference), buttons, messages,and background on the login/ register page. The aim was to provide the website consistent, clean look. Colors and layout of the elements were intentionally picked to keep the modern, simple design. Colors compliment each other well and keep great page contrast, which makes it more user-friendly and readable.


I decided to stay mostly with default fonts that came with Bootstrap CSS styling. Two fonts I especially liked to continuously use within this project to provide satisfiying design:
- Monospace - well known, easy to read, fits the page overal style. Used for the page name and login/ registration pages.
- Segoe UI - sans-serif font - clean and easy to read.
All icons used for YESMoney come from IconScout
All images used for YESMoney come from Freepik
YESMoney is designed as a webpage and the functionality and features were selected based on the Kanban Board and MoSCoW prioritization (applied labels to User Stories). During the process of the page creation I was able to decide what needs to be implemented, and what set of features can be potentially added in the future.
YESMoney currently allows the User to go through the User authentication: register the account, login to their personal wallet. Unregistered User can send the feedback or comments through the contact form, but the rest of the features require authentication. Users must have an account in order to use the wallet features, which allow them to create, edit, delete and view their incomes and expenses. This way the User can keep track of their budget and monitor incomes and expenses over time by adding them to the table, generating CSV files, searching and viewing the chart.
Homepage

Contact

Login

Register

Main wallet page

Charts

Currency preference

Delete confirmation

Add expense/ income


Edit income/ expense
Messages


Admin Page

- Option for the Users to reset the password by email link
- Authentication of newly registered Users by email link
- Viewing the income on the timeline, where User can select time period (weekly, monthly, yearly expenses/ incomes)
- Add additional graphs for better income/ expense view (graphs: lines, bars)
- Add additional output boxes displaying overall spending/ income, this month's spending/ income, and amount of transactions
- History of User's actions
- HTML
- CSS
- JavaScript
- Python
- Django - Python Framework used to create the project.
- Bootstrap - CSS framework used for designing the project.
- DevTools - help fix problem areas and identify the errors.
- Heroku - project deployment.
- PostgreSQL (Heroku) - database used through Heroku.
- Cloudinary - store static files and images.
- GitHub, Gitpod - storing code and deploying the site, building and editing the code.
- Notepad++ - help with writing some additional code, experiments and changes.
- Balsamiq - wireframes creation.
- Postman Agent - API requests
- Diagram.net - database diagram schema creation
- Sortable - Vanilla JavaScript table sort
- E-wallet idea - found on Pinterest in design suggestions
- Django tutorial series from Cryce Truly - absolutely great content teaching basic Django and JavaScript/ Ajax in context of building financial websites and user authentication functionality
- Code Institute walkthrough project 'I think therefore I blog' - great sorece of information how to start Django project and how to move with project configuration
- Bootstrap Examples. Pages for this project are based on Dashboard, Cover, Sign-In, as well as Bootstrap documentation.
- Chart.js - provided base for project's charts for incomes and expenses
- Django Testing from Code Institute 'Hello Django' Walkthrough project
- Python Expense Tracker Project from Data-Flair - explaining step by step how to implement charts, table, history of User's actions
- Article Creating a Budget Web App with Django - useful information about the models and functions implementation
- Colorib - Bootstrap Hamburger Menu Examples > Here I used Menu Toggle Button for Login and Registration Page, and Contact Form
- Codepen - Sliding Diagonals Background - for interesting background effect for Login and Registration page
- Article about User Stories by Anastasiia Kalachova - explaining difference between epics and user stories
- Freepik - beautiful free vector images from Storyset
- Tutorial on contact forms functionality from Djangotutorials
- Color pallete creator and contrast checker were from on Coolors
- The logo was created on VistaCreate
Due to the size of the testing section, I created TESTING.md. It contains:
- Validators testing,
- Lighthouse scores,
- User Story Testing,
- Manual Tests,
- Error tracing and fixing in development process,
- Responsiveness Tests,
- Issues and bugs.
Please go to TESTING.md
To use this code and make changes without affecting the original code you can do what is called 'Forking the repository'. By forking this repository you are given a copy of the code at that moment in time that you can use freely. To fork this repository you need to follow the following few steps:
- Create an account or log into your existing GitHub account.
- Navigate to the Repository, you are wanting to fork.
- In the upper-right of the repository, click the 'Fork' button.
- A copy of the Repository will now be available within your repositories.
You will now have a copy of the code available to clone and work on without affecting the original code.
To make a local clone of the project follow these steps:
- Log into your GitHub account.
- Navigate to the Repository.
- In the upper section of the repository click the drop-down option: 'Code'.
- Ensure HTTPS is selected and click the clipboard on the right of the URL to copy it.
- Open a new workspace in GitPod.
- Open GitBash. In the bash terminal type 'git clone [copy url here from step 4]'
- Press enter - the IDE will clone and download the repo.
- GitBash will clone the repository into this directory.
- Optionally type: 'python3 manage.py runserver' to host the website locally - it won't run the python file, only allow you see how it looks.
- To use the required libraries: type in the console: pip3 install -r requirements.txt.
- To create a web-app from the repo, follow the instructions in "Heroku App Deployment".
- Log in to your GitHub account or create an account.
- Navigate to the Repository.
- Select the 'Code' button above the file list on the right had side.
- Select 'Open with GitHub Desktop'
- Install GitHub Desktop Application.
- The repo will be copied locally onto your machine.
- If you want to create a web-app from the repo please follow the instructions in "Heroku App Deployment"
- Log in to your GitHub account
- Navigate to the Repository
- Select the 'Code' button above the file list on the right had side
- Select 'Download Zip'
- Once you have the Zip downloaded, open it with your preferred file decompression software
- You can then drag and drop the files from the folder into your chosen IDE or view/edit them on your local machine
- In the console, run: pip install -r requirements.txt
- If you want to create a web-app from the repo please follow the instructions in "Project Deployment"
-
Create the GitPod repo from the CI Template via the GitPod button in GitHub.
-
Create an account or log into your existing Heroku account.
-
Click on: NEW in the top right corner and choose create a new app.
-
Enter a unique name for the Heroku app.
-
Click on: Create App.
-
Add Heroku PostgreSQL add-on in the Resources tab.
-
Once the app is built, navigate to "Settings" and scroll down to "Config Vars".
- Here the database URL is stored, it is the connection to the database, so this must be copied and stored within env.py as a root level file.
DATABASE_URL - linking to PostgrSQL
SECRET_KEY - needs to be created within the projects env.py file on GitPod, then added to the Config Vars on Heroku.
DISABLE_COLLECTSTATIC = 1 - temporary solution to enable deployment without any static files.
PORT = 8000
CLOUDINARY_URL - copied from Cloudinary Dashboard API Environment variable and pasted starting from 'cloudinary://...'
-
Within the settings.py in the workspace file you need to import several libraries:
import os
import dj_database_url
from django.contrib.messages import constants as messages
if os.path.isfile('env.py'):
import env
-
In env.py add the following:
os.environ["DATABASE_URL"] = "postgres://..."
os.environ["SECRET_KEY"] = <KEY SET UP WITHIN CONFIG VARS IN HEROKU>
os.environ ["CLOUDINARY_URL"] = "cloudinary://..." >> remove the first part of the url provided from the Cloudinary Dashboard, otherwise it'll fail.
-
Replace the not secured secret key with os.environ.get('SECRET_KEY)', that we set witin the env.py file
-
Add the following python dictionary:
DATABASES = { 'default': dj_database_url.parse(os.environ.get('DATABASE_URL')) }
-
Tell Django where to store the madia and static files in settings.py:
- Add Cloudinary in apps:
'cloudinary_storage',
'cloudinary',
- Change the static files settings to link it to Cloudinary:
MEDIA_URL = '/media/'
DEFAULT_FILE_STORAGE = 'cloudinary_storage.storage.MediaCloudinaryStorage'

STATIC_URL = '/static/'
STATICFILES_STORAGE = 'cloudinary_storage.storage.StaticHashedCloudinaryStorage'
STATICFILES_DIRS = [os.path.join(BASE_DIR, 'static'), ]
STATIC_ROOT = os.path.join(BASE_DIR, 'staticfiles')
-
In settings.py, under BASE_DIR add a templates directory and then scroll down to TEMPLATES and add the templates directory variable to 'DIRS':
BASE_DIR = Path(__file__).resolve().parent.parent
TEMLATES_DIR = os.path.join(BASE_DIR, 'templates')

TEMPLATES = [
    'DIRS' : [TEMPLATES_DIR]
]
-
Add the hostname in settings.py:
ALLOWED_HOSTS = ['<HTTPS HEROKU APP ADDRESS>', 'localhost']
-
Create a Procfile, so Heroku knows how to run the project. In Procfile add:
web: gunicorn APP-NAME.wsgi
-
In Heroku navigate to the "Deploy" section.
- Scroll down to "Deployment Method" and select "GitHub".
- Authorize the connection of Heroku to GitHub.
- Search for your GitHub repository name, and select the correct repository.
- For Deployment there are two options, Automatic Deployments or Manual.
- Automatic Deployment: This will prompt Heroku to re-build your app each time you push your code to GitHub.
- Manual Deployment: This will only prompt Heroku to build your app when you manually tell it to do so.
-
Ensure the correct branch is selected "master/Main", and select the deployment method that you desire.
-
Before deploying the final draft of your project you must:
- Remove staticcollect=1 from Config Vars within Heroku
- Ensure DEBUG is set to False in settings.py file
- Crycle Truly for his amazing Django tutorials that passed me so much knowledge.
- Huge thank you to my Code Institute amazing fellow students from cohort msletb-nov-2021 and our faciliator Kasia Bogucka.
- Thank you to my mentor Chris Quinn for his precious suggestions.
