This project is the microcontroler version of the one I've built with a Raspberry Pi Zero
The purpose of this project is to build an auxiliary pedal controller to be used with Zoom multi-effects processors like the G1XFour (tested with this model) and be able to toggle individual effects on/off, add a tap-tempo functionality, among other possible features.
This project wouldn't be possible without zoom-zt2 and ZoomPedalFun.
You'll have to install the Arduino IDE and add the Arduino-pico core to it, follow the installation instructions on the documentation. Tested with version 2.5, newer versions may not be compatible.
This project makes use of the following libraries:
- A custom version of Adafruit_TinyUSB_Arduino based on rppicomidi's fork of tinyusb
- Adafruit_SSD1306 and its dependencies
- Arduino MIDI
Copy the custom Adafruit_TinyUSB_Arduino library to you Arduino/libraries folder, be careful if you already have the original one installed as it will be overwritten.
Open the *.ino file and change whatever lines you need, you might want to change these lines to match your setup:
#define NUM_PEDALS 5 // Number of switches and screens - for now each switch has to be linked to an oled screen
int switch_pins[] = { 5, 6, 7, 8, 9 }; // GPIO pins on the pico the switches are attached to
FootSwitch footswitch[NUM_PEDALS];

int buses[] = { 7, 6, 5, 4, 3 }; // Buses on the TCA9548A the oled screens are attached to
Oled oleds[NUM_PEDALS];
For the G1XFour (possibly also the G1Four) no other line has to be changed.
On the IDE, go to Tools -> Board and select the Raspberry Pi Pico board (or other compatible) and select the appropriate comm Port.
Then again Tools -> CPU Speed and set it to 120 MHz (this is crucial for the USB over PIO) and Tools -> USB Stack and set it to Adafruit TinyUSB.
Click upload and it will be compiled and sent to the board.
If the IDE can't find the board, unplug it, hold the Bootsel button and plug it again. The PC will recognize it as a flash drive then on the IDE go to Sketch -> Export compiled binary and, after it is compiled, go to the sketch's folder and into the build folder look for the .UF2 file and drag and drop it on the Pico drive, all done.
To build it you'll need the following (G1XFour/G1Four):
- 1 x Raspberry Pi Pico (or a RP2040 based board)
- 5 x SSD1306 0.91" oled displays
- 1 x TC9548A
- 5 x SPST momentary footswitches
- 1 x female USB type A breakout board
- Some jumper wires
- Some box or case to contain everything - mine will be 3d printed and the files available on the case folder
Follow this wiring diagram (change GPIO if needed)

I recommend not to use headers but instead solder the jumper wires to the TCA9548A as it may, sometimes, get loose.
After all the connections are made, I recommend that before you assembly the controller, test it with the Pedal as it will be harder to debug later.
If all goes well, just put everything inside the box (stl/3mf files for 3d printing) and you're done!
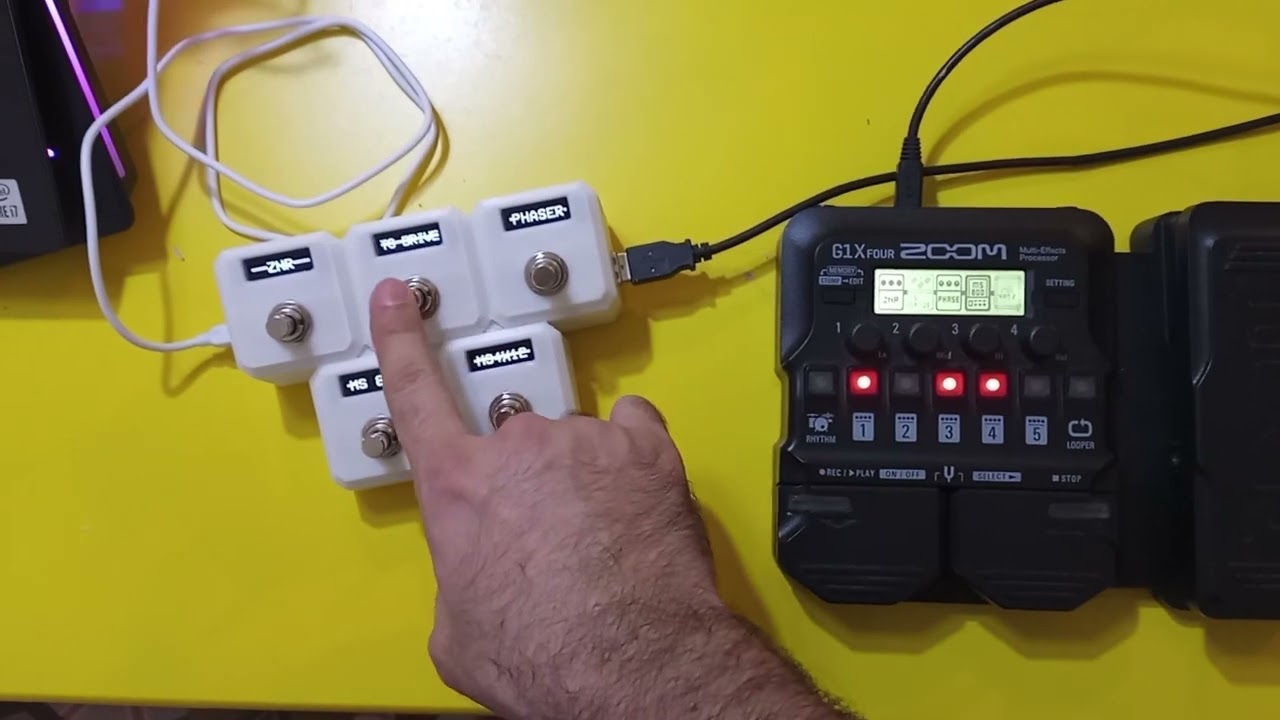
Power the controller through the Pico's micro USB port (5V required, 1+ amps prefered) then connect it to the Pedal's own micro USB. The controller will provide power to the pedal and then it will read the pedal's data and show the current patch effects on the OLED screens.
To toggle individual effects on/off just step on the corresponding switch, an active effect will have its name visible like -DELAY-, while an inactive one will have a strikethrough like -DELAY-.
This is a video showing how it behaves when plugging and toggling effects:
The tap tempo feature works when you have a delay effect on the current patch. To use it you'll have to hold its corresponding footswitch for at least 1 second, the OLED screen will then show the message TAP TEMPO, then you just have to press/tap the switch at the desire interval and the controller will show the current measured time between taps. When you're satisfied just stop tapping and wait for 3 seconds, the controller will send the measured interval to the pedal and will go back to the normal functions, showing the effect's name again. See the video bellow for a sample of how it works:

The global BPM feature works similarly but will ONLY be enabled when holding on any switch the DOES NOT correspond to a delay effect for 1 second. After activated a message GLOBAL BPM will show on the screen, then you just have to press/tap the switch at the desire interval and the controller will calculate the BPMs corresponding to that interval and show it on the screen. When you're satisfied just stop tapping and wait for 3 seconds, the controller will send the measured interval to the pedal and will go back to the normal functions, showing the effect's name again. See the video bellow for a sample of how it works:

- Ensure USB communications
- Detect pedal plug/unplug
- Handle MIDI packets
- Get pedal model/vid/pid
- Get current patch
- Get current patch effects state (on/off)
- Set current patch effect state (on/off)
- Implement tap tempo
- Implement change global BPM
- Handle footswitch press
- Handle OLEDs
- Create wiring diagram
- Record and publish sample videos
- Write a step-by-step guide
- Improve README
- Support other Zoom pedals by default?
- Add a battery?