Giter VIP home page Giter VIP logo

colour-checker-detection's Introduction

Colour - Checker Detection

Develop Build Status Coverage Status Code Grade Package Version

A Python package implementing various colour checker detection algorithms and related utilities.

It is open source and freely available under the BSD-3-Clause terms.
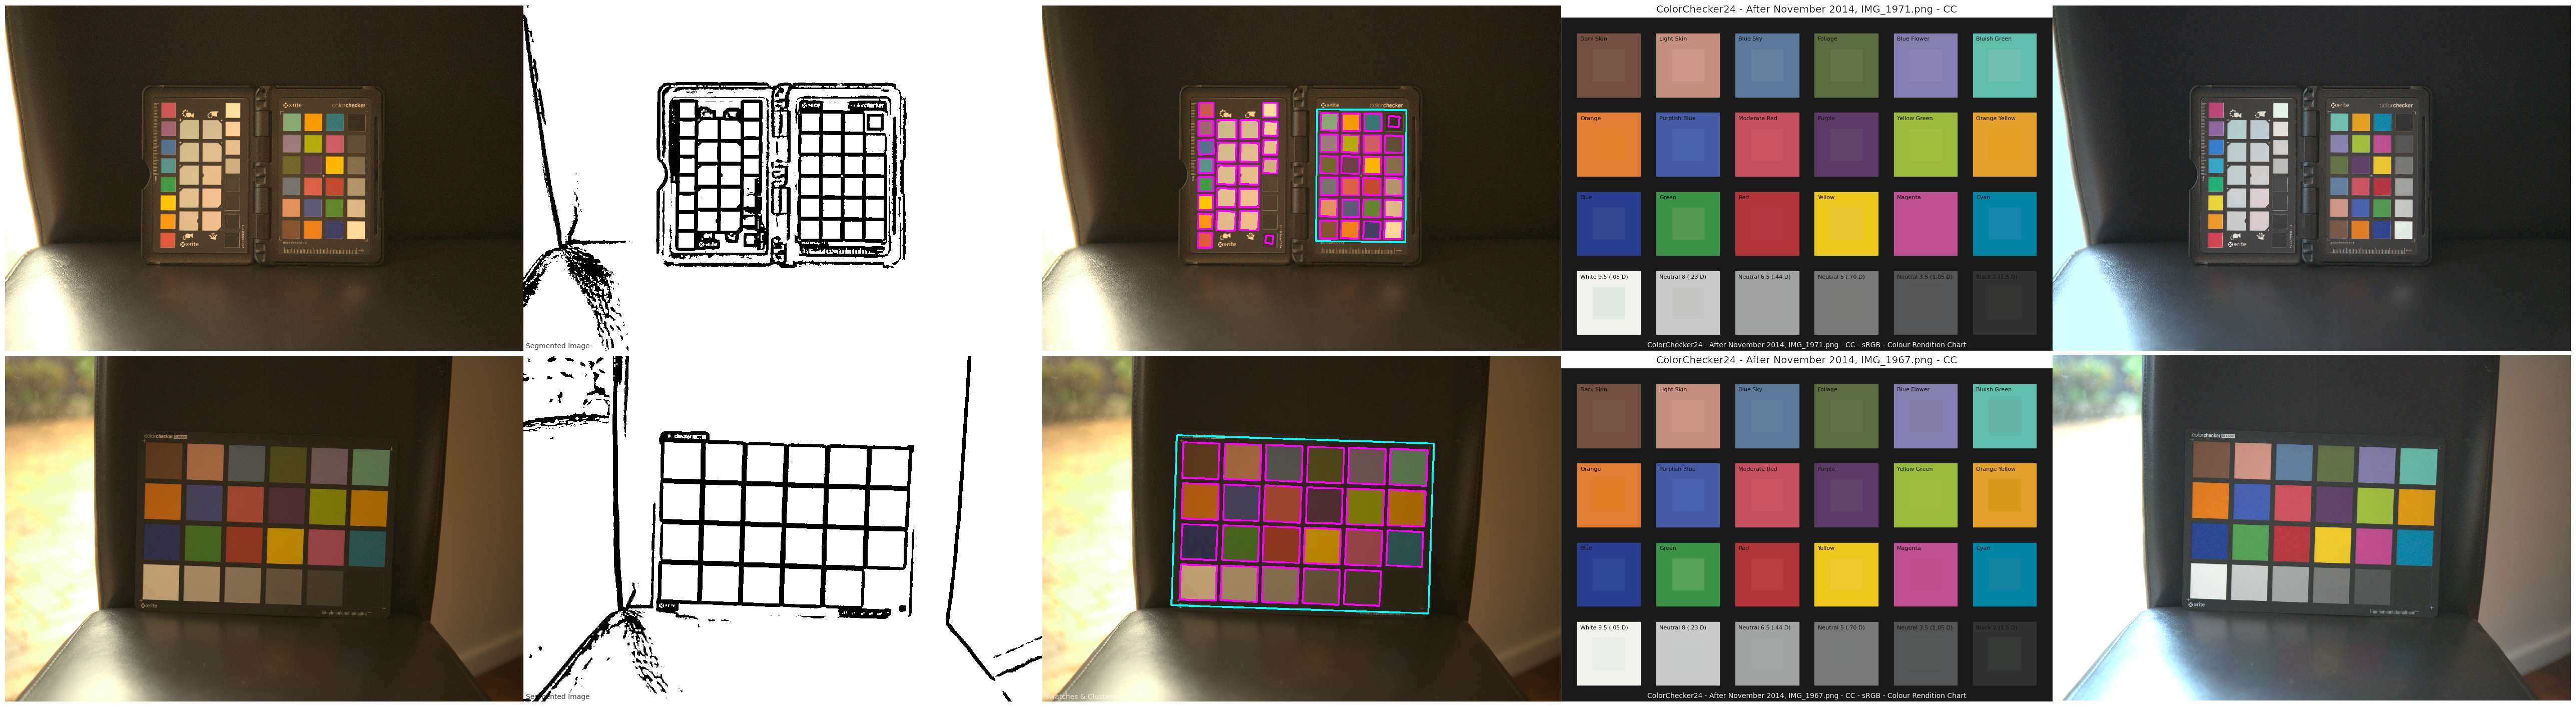
https://raw.githubusercontent.com/colour-science/colour-checker-detection/master/docs/_static/ColourCheckerDetection_001.png

1   Features

The following colour checker detection algorithms are implemented:

  • Segmentation
  • Machine learning inference via Ultralytics YOLOv8
    • The model is published on HuggingFace, and was trained on a purposely constructed dataset.
    • The model has only been trained on ColorChecker Classic 24 images and will not work with ColorChecker Nano or ColorChecker SG images.
    • Inference is performed by a script licensed under the terms of the GNU Affero General Public License v3.0 as it uses the Ultralytics YOLOv8 API which is incompatible with the BSD-3-Clause.

1.1   Examples

Various usage examples are available from the examples directory.

2   User Guide

2.1   Installation

Because of their size, the resources dependencies needed to run the various examples and unit tests are not provided within the Pypi package. They are separately available as Git Submodules when cloning the repository.

2.1.1   Primary Dependencies

Colour - Checker Detection requires various dependencies in order to run:

2.1.2   Secondary Dependencies

2.1.3   Pypi

Once the dependencies are satisfied, Colour - Checker Detection can be installed from the Python Package Index by issuing this command in a shell:

pip install --user colour-checker-detection

The overall development dependencies are installed as follows:

pip install --user 'colour-checker-detection[development]'

2.2   Contributing

If you would like to contribute to Colour - Checker Detection, please refer to the following Contributing guide for Colour.

2.3   Bibliography

The bibliography is available in the repository in BibTeX format.

3   API Reference

The main technical reference Colour - Checker Detection is the API Reference.

4   Code of Conduct

The Code of Conduct, adapted from the Contributor Covenant 1.4, is available on the Code of Conduct page.

5   Contact & Social

The Colour Developers can be reached via different means:

6   About

Colour - Checker Detection by Colour Developers
Copyright 2018 Colour Developers – [email protected]
This software is released under terms of BSD-3-Clause: https://opensource.org/licenses/BSD-3-Clause

colour-checker-detection's People

Contributors

corbanswain avatar kelsolaar avatar pre-commit-ci[bot] avatar skycaptain avatar

Stargazers

 avatar  avatar  avatar  avatar  avatar  avatar  avatar  avatar  avatar  avatar  avatar  avatar  avatar  avatar  avatar  avatar  avatar  avatar  avatar  avatar  avatar  avatar  avatar  avatar  avatar  avatar  avatar  avatar  avatar  avatar  avatar  avatar  avatar  avatar  avatar  avatar  avatar  avatar  avatar  avatar  avatar  avatar  avatar  avatar  avatar  avatar  avatar  avatar  avatar  avatar  avatar  avatar  avatar  avatar  avatar  avatar  avatar  avatar  avatar  avatar  avatar  avatar  avatar  avatar  avatar  avatar  avatar  avatar  avatar  avatar  avatar  avatar  avatar  avatar  avatar  avatar  avatar  avatar  avatar  avatar  avatar  avatar  avatar  avatar  avatar  avatar  avatar  avatar  avatar  avatar  avatar  avatar  avatar  avatar  avatar  avatar  avatar  avatar  avatar  avatar

Watchers

 avatar  avatar  avatar  avatar  avatar  avatar  avatar  avatar  avatar  avatar  avatar

colour-checker-detection's Issues

[FEATURE]: Adaptive samples count

Description

I noticed that in segmentation.py/detect_colour_checkers_segmentation the samples is a passed in parameter. Would it be more natural if we instead pass in the ratio of samples/colorchecker to adapt different checkerboard size?

This line can be modified as following:
https://github.com/colour-science/colour-checker-detection/blob/develop/colour_checker_detection/detection/segmentation.py#L1097

samples_ratio=4
samples = int(np.sqrt(height*width/(swatches_h*swatches_v))/samples_ratio)
masks = swatch_masks(width, height, swatches_h, swatches_v, samples)

Why is SVD not converging?

I was having trouble getting the SVD to converge while using the colour_correction_matrix_Cheung2004 function with the default 3 terms. Ended up figuring out that the array M_T had ??too small of numbers in it?? My current workaround is to multiply both M_T and M_R by an order of magnitude, which allows the SVD to converge.

The results seem to be correct, didn't know if this was bad practice?

[ENHANCEMENT] Proposal to allow detection from different perspectives

Hey,

I've been tinkering around the problem of being able to detect the color-checker when its shot was taken, so that the approximate rectangle of the checker is distorted.

I am unsure if the detection of such a contour is currently possible with this package, but I would like to contribute in order to enable such a functionality.

As the masking of the checker should stay fixed, the idea is to warp the detected contour to fit the mask.
When the contour is warped even the size of the mask can stay fixed.
This can be done as follows:

# the dimensions are somewhat arbitrary but should fit the aspect ratio of the checker 

def correct_distortion(distorted_cnt, x_dim, y_dim, img):
    desired_cnt = [[0,0],[x_dim,0],[x_dim,y_dim],[0, y_dim]]
    M = cv2.getPerspectiveTransform(np.float32(distorted_cnt), np.float32(desired_cnt))
    return cv2.warpPerspective(img, M,(x_dim,y_dim))

As the checker orientation matters, it is necessary to ensure that the points of the detected contour are ordered in the same way as the new coordinates e.g.

ordering

My attempt to ensure such an ordering are the following functions:

def order_clockwise(cnt):
    centroid = contour_centroid(cnt)
    angles = [math.atan2(c[1]-centroid[0][1], c[0]-centroid[0][0])*180//np.pi for corner in cnt]
    clockwise_contours = [c for c, a in sorted(zip(unpacked_cnt, angles), key=lambda pair: pair[1])]

    return clockwise_contours 

def order_cnt(cnt):
    clockwise_contour = order_clockwise(cnt)

    lowest_point_index = np.argmax([pt[0][1] for pt in clockwise_contour])
    next_index = (lowest_point_index+1) % len(clockwise_contour)
    previous_index = lowest_point_index-1

    
    lowest_point = clockwise_contour[lowest_point_index]
    next_point = clockwise_contour[next_index]
    previous_point = clockwise_contour[previous_index]
    
    next_diff_x = np.abs(lowest_point[0][0] - next_point[0][0])
    next_diff_y = np.abs(lowest_point[0][1] - next_point[0][1])
    previous_diff_x = np.abs(lowest_point[0][0] - previous_point[0][0])
    previous_diff_y = np.abs(lowest_point[0][1] - previous_point[0][1])
    
    anti_clockwise_angle = math.atan2(next_diff_y, next_diff_x) * 180 //np.pi
    clockwise_angle = math.atan2(previous_diff_y, previous_diff_x) * 180 //np.pi
    
    # Lower line is already aligned in the image
    if next_diff_y == 0 or previous_diff_y == 0:
        next_angle = previous_angle = "Aligned"
    
    # "Falling" to the right, Less rotation needed to align when rotating clockwise
    if anti_clockwise_angle > clockwise_angle: 
        first_index = next_index       
    
    # "Falling" to the left, Less rotation needed to align when rotating anti-clockwise
    if anti_clockwise_angle == "Aligned" or anti_clockwise_angle <= clockwise_angle: 
        first_index = next_index+1 if next_index+1 < len(clockwise_contour) else 0 
        if previous_diff_y == 0:
            first_index -= 1
        
    return clockwise_contour[first_index:] + clockwise_contour[:first_index]
    

This works under the assumption that the checker is not flipped but was recorded as the aspect ratio suggests. It is required to perform the ordering before the wrapping.

I've attached a notebook, with a demonstration of the described pipeline
Demo.zip

Cannot import `colour_checkers_coordinates_segmentation` definition.

Question

Hi, I can not import (colour_checkers_coordinates_segmentation) from colour_checker_detection. Do you know the reason?

from colour_checker_detection import (colour_checkers_coordinates_segmentation)
Traceback (most recent call last):

  Cell In[21], line 1
    from colour_checker_detection import (colour_checkers_coordinates_segmentation)

ImportError: cannot import name 'colour_checkers_coordinates_segmentation' from 'colour_checker_detection' (/Users/yixiangshan/opt/anaconda3/lib/python3.9/site-packages/colour_checker_detection/__init__.py)

[DISCUSSION]: My color checker is not being detected.

Question

Hello, I'm trying to detect checkers but module can't find it. I've tried to increase brightness, centering palette, correct its perspectively. What's wrong with my images? Here's an example of them
IMG_9536_b
a2
.

[FEATURE]: Colour Checker Nano detection

Description

Would it be possible to add Color Checker nano detection? I tried tweaking the settings but I couldn't make it work. I also tried resizing the picture so the colour fields are square (they are rectangular in this Color Checkre version) but still no luck.

[DISCUSSION]: Use of linear RGB in example notebook

Question

In the example notebook, the images are transformed to linear RGB via colour.cctf_decoding(). This means that the colors of the detected SWATCHES are also given in linear RGB coordinates, right?
However, the REFERENCE_SWATCHES are loaded as sRGB color values and, as far as I am concerned, are not further converted to linear RGB. In the subsequent color correction
colour.colour_correction(COLOUR_CHECKER_IMAGES[i], swatches, REFERENCE_SWATCHES) the original image is transformed such that the detected swatches match the REFERENCE_SWATCHES, but isn't this nonsensical as the values are given wrt different color spaces (linear RGB vs sRGB)? Or am I missing something?

Thanks.

Type exception raised with OpenCV 4.5.2.

I moved to a fresh install today, and this happened:

Traceback (most recent call last):
File "/home/davidd/git/UB-ISP/scripts/color_calib", line 88, in
result = detect_colour_checkers_segmentation(img, additional_data=True)
File "/home/davidd/.local/lib/python3.8/site-packages/colour_checker_detection/detection/segmentation.py", line 771, in detect_colour_checkers_segmentation
for colour_checker in extract_colour_checkers_segmentation(image):
File "/home/davidd/.local/lib/python3.8/site-packages/colour_checker_detection/detection/segmentation.py", line 694, in extract_colour_checkers_segmentation
colour_checker = crop_and_level_image_with_rectangle(
File "/home/davidd/.local/lib/python3.8/site-packages/colour_checker_detection/detection/segmentation.py", line 463, in crop_and_level_image_with_rectangle
M_r = cv2.getRotationMatrix2D(centroid, angle, 1)
TypeError: Can't parse 'center'. Sequence item with index 0 has a wrong type

Previously cv2 was at version 4.5.1, but with the fresh install it had moved to 4.5.2.

Modifying segmentation.py (line 451) from:
centroid = as_int_array(contour_centroid(cv2.boxPoints(rectangle)))
to:
centroid = as_float_array(contour_centroid(cv2.boxPoints(rectangle)))

fixed it for me.

[FEATURE]: More Robust Square Detection In Segmentation

Description

In segementation.py when filtering for squares/swatches contours

the original code reads:

# Filtering squares/swatches contours.
swatches = []
for contour in contours:
    curve = cv2.approxPolyDP(
        contour, 0.01 * cv2.arcLength(contour, True), True
    )
    if minimum_area < cv2.contourArea(curve) < maximum_area and is_square(
        curve
    ):
        swatches.append(
            as_int_array(cv2.boxPoints(cv2.minAreaRect(curve)))
        )

suggested way:

def angle_cos(p0, p1, p2):
    d1, d2 = (p0 - p1).astype('float'), (p2 - p1).astype('float')
    return abs(np.dot(d1, d2) / np.sqrt(np.dot(d1, d1) * np.dot(d2, d2)))

# Filtering squares/swatches contours.
swatches = []
for contour in contours:
    curve = cv2.approxPolyDP(
        contour, 0.01 * cv2.arcLength(contour, True), True
    )
    if len(curve) == 4 and minimum_area < cv2.contourArea(curve) < maximum_area and cv2.isContourConvex(curve):
        cnt = curve.reshape(-1, 2)
        max_cos = np.max([angle_cos( cnt[i], cnt[(i+1) % 4], cnt[(i+2) % 4] ) for i in range(4)])
        if max_cos < 0.1:
            swatches.append(as_int_array(cv2.boxPoints(cv2.minAreaRect(curve))))

From my little testing it seems to help prevent erroneous contours from being detected on the passport color-checker eg:
WITHOUT SUGGESTION:
step_5_mod

WITH SUGGESTION:
step_5

[BUG]: File not found when running examples

Description

I am trying to run the examples_detection_segmentation.ipynb notebook.
First, for some reason, the example images were not downloaded, and the directory to which ROOT_RESOURCES_EXAMPLES refers is empty. I manually downloaded the images and changed the ROOT_RESOURCES_EXAMPLES variable to refer to the downloaded photos.
Now to my actual problem. An error occurs, however, when I do the "detection" step:

SWATCHES = []
for image in COLOUR_CHECKER_IMAGES:
	for colour_checker_data in detect_colour_checkers_inference(
    	image, additional_data=True):
   	 
    	swatch_colours, swatch_masks, colour_checker_image = (
        	colour_checker_data.values)
    	SWATCHES.append(swatch_colours)
   	 
    	# Using the additional data to plot the colour checker and masks.
    	masks_i = np.zeros(colour_checker_image.shape)
    	for i, mask in enumerate(swatch_masks):
        	masks_i[mask[0]:mask[1], mask[2]:mask[3], ...] = 1
   	 
    	colour.plotting.plot_image(
        	colour.cctf_encoding(
            	np.clip(colour_checker_image + masks_i * 0.25, 0, 1)));

Apparently, the results file in a temporary directory is not found:

---------------------------------------------------------------------------
FileNotFoundError                         Traceback (most recent call last)
Cell In[10], line 3
      1 SWATCHES = []
      2 for image in COLOUR_CHECKER_IMAGES:
----> 3     for colour_checker_data in detect_colour_checkers_inference(
      4        image, additional_data=True):
      6         swatch_colours, swatch_masks, colour_checker_image = (
      7             colour_checker_data.values)
      8         SWATCHES.append(swatch_colours)

File[ ~\miniconda3\Lib\site-packages\colour_checker_detection\detection\inference.py:367](http://localhost:8888/lab/tree/Andi/pigmentation/code/~/miniconda3/Lib/site-packages/colour_checker_detection/detection/inference.py#line=366), in detect_colour_checkers_inference(image, samples, cctf_decoding, apply_cctf_decoding, inferencer, inferencer_kwargs, show, additional_data, **kwargs)
    364 working_width = settings.working_width
    365 working_height = settings.working_height
--> 367 results = inferencer(image, **inferencer_kwargs)
    369 if is_string(image):
    370     image = read_image(cast(str, image))

File[ ~\miniconda3\Lib\site-packages\colour_checker_detection\detection\inference.py:218](http://localhost:8888/lab/tree/Andi/pigmentation/code/~/miniconda3/Lib/site-packages/colour_checker_detection/detection/inference.py#line=217), in inferencer_default(image, cctf_encoding, apply_cctf_encoding, show)
    206     output_results = os.path.join(temp_directory, "output-results.npz")
    207     subprocess.call(
    208         [  # noqa: S603
    209             sys.executable,
   (...)
    216         + (["--show"] if show else [])
    217     )
--> 218     results = np.load(output_results, allow_pickle=True)["results"]
    219 finally:
    220     shutil.rmtree(temp_directory)

File[ ~\miniconda3\Lib\site-packages\numpy\lib\npyio.py:427](http://localhost:8888/lab/tree/Andi/pigmentation/code/~/miniconda3/Lib/site-packages/numpy/lib/npyio.py#line=426), in load(file, mmap_mode, allow_pickle, fix_imports, encoding, max_header_size)
    425     own_fid = False
    426 else:
--> 427     fid = stack.enter_context(open(os_fspath(file), "rb"))
    428     own_fid = True
    430 # Code to distinguish from NumPy binary files and pickles.

FileNotFoundError: [Errno 2] No such file or directory: 'C:\\Users\\CYBERT~1\\AppData\\Local\\Temp\\tmpxan6xbhi\\output-results.npz'

The images were correctly plotted in the
previous part (Caption: "Images").

Do you have an idea what I might try? T

Code for Reproduction

No response

Exception Message

No response

Environment Information

No response

Support for other colour rendition charts?

This is a question than an issue.

I am designing software with GUI allowing users to extract color values of patches in different color targets (e.g., X-rite color checker SG, IT8.7/2, and HCT). I think that color target detection in the software does not have to be automatic as it can ask users to select 4 corner points. I wonder how your code can be extended for the other color targets. Thanks.

[BUG]: Flipped colour chart

I try to colour-correct underwater photos with your package and the X-Rite colour chart.

Usually, the detection works very well, but sometimes, there is an issue when the chart is detected as flipped. I uploaded an example here.
The colour chart is correctly detected in the image, but it is (wrongly) detected as flipped (this is displayed as a warning). I think that in this case, the order of SWATCHES is reversed. Like that, it does not fit anymore to the colour chart in the photo. I assume that this is because the colours are very off underwater. Is there a way to optimise the detection of the orientation of the colour chart? For me, this is quite obvious with the cyan and orange values.

On colour checker detection robustness?

Colour checker detection fails with the following image:

colourchecker.bmp.gz

The following is my minimal test case:

import colour
from colour_checker_detection import detect_colour_checkers_segmentation

image = colour.cctf_decoding(colour.io.read_image('colourchecker_crop.bmp'))

swatches = detect_colour_checkers_segmentation(image)

if len(swatches) == 0:
    print("Detection failed")

I found that I can make the detection work if I replace INTER_CUBIC with INTER_LINEAR in adjust_image(). With Cubic interpolation, only 15 swatches are detected ("counts" in colour_checkers_coordinates_segmentation()), whereas with Linear interpolation, 19 swatches are detected.

A strange thing I observed is that if I convert the image to .png first, everything changes, even though the images should be identical. In this case Linear interpolation detects 18 swatches, whereas Cubic interpolation detects 19.

Can't parse 'center'. Sequence item with index 0 has a wrong type

i use your code from the examples but i'm getting an error: Can't parse 'center'. Sequence item with index 0 has a wrong type.

here's the code:

from colour import read_image
import colour_checker_detection as ccd

path = '/home/ftn21/Documents/ran/colour/img/IMG_1967.png'
image = read_image(path)
arr = ccd.detect_colour_checkers_segmentation(image)

here's the console output:

runfile('/home/ftn21/Documents/ran/colour/src/exmp_detect.py', wdir='/home/ftn21/Documents/ran/colour/src')
Traceback (most recent call last):

  File "/home/ftn21/Documents/ran/colour/src/exmp_detect.py", line 14, in <module>
    arr = ccd.detect_colour_checkers_segmentation(image)

  File "/home/ftn21/anaconda3/lib/python3.8/site-packages/colour_checker_detection/detection/segmentation.py", line 769, in detect_colour_checkers_segmentation
    for colour_checker in extract_colour_checkers_segmentation(image):

  File "/home/ftn21/anaconda3/lib/python3.8/site-packages/colour_checker_detection/detection/segmentation.py", line 692, in extract_colour_checkers_segmentation
    colour_checker = crop_and_level_image_with_rectangle(

  File "/home/ftn21/anaconda3/lib/python3.8/site-packages/colour_checker_detection/detection/segmentation.py", line 461, in crop_and_level_image_with_rectangle
    M_r = cv2.getRotationMatrix2D(centroid, angle, 1)

TypeError: Can't parse 'center'. Sequence item with index 0 has a wrong type


Recommend Projects

  • React photo React

    A declarative, efficient, and flexible JavaScript library for building user interfaces.

  • Vue.js photo Vue.js

    🖖 Vue.js is a progressive, incrementally-adoptable JavaScript framework for building UI on the web.

  • Typescript photo Typescript

    TypeScript is a superset of JavaScript that compiles to clean JavaScript output.

  • TensorFlow photo TensorFlow

    An Open Source Machine Learning Framework for Everyone

  • Django photo Django

    The Web framework for perfectionists with deadlines.

  • D3 photo D3

    Bring data to life with SVG, Canvas and HTML. 📊📈🎉

Recommend Topics

  • javascript

    JavaScript (JS) is a lightweight interpreted programming language with first-class functions.

  • web

    Some thing interesting about web. New door for the world.

  • server

    A server is a program made to process requests and deliver data to clients.

  • Machine learning

    Machine learning is a way of modeling and interpreting data that allows a piece of software to respond intelligently.

  • Game

    Some thing interesting about game, make everyone happy.

Recommend Org

  • Facebook photo Facebook

    We are working to build community through open source technology. NB: members must have two-factor auth.

  • Microsoft photo Microsoft

    Open source projects and samples from Microsoft.

  • Google photo Google

    Google ❤️ Open Source for everyone.

  • D3 photo D3

    Data-Driven Documents codes.