使用方式
mkdir build && cmake .. && make # 之后运行可执行文件即可用到的技术栈:
- Json 序列化和反序列化,借助于 json for Modern C++
- muduo 网络库开发,借助于 muduo
- nginx 源码编译安装和环境部署
- nginx 的 tcp 负载均衡器配置
- 基于发布-订阅的服务器中间件 redis 消息队列编程实践,借助于 hiredis
- MySQL 连接池的使用,借助于 MySQL-Connection-Pool
建议参照 开发日志 进行开发学习
- 客户端新用户注册
- 客户端用户登录
- 客户端用户退出
- 添加好友和群组
- 好友聊天
- 群组聊天
- 离线消息
- nginx 配置 tcp 负载均衡
- 集群聊天系统支持客户端跨服务器通信
- 掌握服务器的网络 I/O 模块,业务模块,数据模块分层的设计**
- 掌握 C++ muduo 网络库的编程以及实现原理
- 掌握 Json 的编程应用
- 掌握 MySQL 连接池的使用
- 掌握 Docker 一键部署
- 掌握 CMake
- 掌握 nginx 配置部署 tcp 负载均衡器的应用以及原理
- 掌握服务器中间件的应用场景和基于发布-订阅的 redis 编程实践以及应用原理
参考官方仓库或者 testjson.cpp 示例文件
muduo 的网络设计:reactors in threads --- one loop per thread
特点是 one loop per thread,有一个 main reactor 负责 accept 连接,然后将连接分发给某一个 sub reactor 处理(采用 round-robin 的方式来选择 sub reactor),该连接的所有操作都在那个 sub reactor 所处的线程中完成。多个连接可能被分派到多个线程中,以充分利用 CPU 的多核性能。
Reactor poll 的大小是固定的,根据 CPU 的数目确定。
// 设置 EventLoop 的线程个数,底层通过 EventLoopThreadPool 线程池管理线程类 EventLoopThread
_server.setThreadNum(10);
如果有过多的耗费 CPU I/O 的计算任务,可以提交到创建的 ThreadPool 线程池中专门处理耗时的计算任务。
更多详细内容参考 muduo 官方文档 或者 mymuduo
使用方式参考muduo_server.cpp 示例文件
.
├── bin # 可执行文件
│   ├── ChatClient
│   └── ChatServer
├── build   # 编译文件
├── CMakeLists.txt  # CMake 配置文件
├── include # 头文件
│   ├── public.hpp  # 公共头文件
│   └── server      # 服务器头文件
│       ├── chatserver.hpp  # 服务器类
│       ├── chatservice.hpp # 服务器业务类
│       ├── dbORM           # 数据库 ORM
│       │   ├── group.hpp       # 群组
│       │   ├── groupuser.hpp   # 群组用户
│       │   └── user.hpp        # 用户
│       ├── model           # 数据库操作
│       │   ├── friendmodel.hpp
│       │   ├── groupmodel.hpp
│       │   ├── model.hpp
│       │   ├── offlinemessagemodel.hpp
│       │   └── usermodel.hpp
│       ├── MySQLConnectionPool # MySQL 连接池
│       │   ├── CommonConnectionPool.h
│       │   ├── Connection.h
│       │   └── public.h
│       └── redis
│           └── redis.hpp
├── lib
│   └── libmysql_connection_pool.so # MySQL 连接池动态库
├── logs.md     # 开发日志
├── README.md   # 项目说明
├── src # 源文件
│   ├── client
│   │   ├── CMakeLists.txt
│   │   └── main.cpp
│   ├── CMakeLists.txt
│   └── server
│       ├── chatserver.cpp
│       ├── chatservice.cpp
│       ├── CMakeLists.txt
│       ├── main.cpp
│       ├── model
│       │   ├── friendmoel.cpp
│       │   ├── groupmodel.cpp
│       │   ├── offlinemessagemodel.cpp
│       │   └── usermodel.cpp
│       └── redis
│           └── redis.cpp
├── test        # 测试文件
│   ├── testjson        # Json 序列化和反序列化测试
│   │   ├── json.hpp
│   │   └── testjson.cpp
│   └── testmuduo       # muduo 网络库测试
│       ├── CMakeLists.txt
│       └── muduo_server.cpp
└── thirdparty
└── json.hpp # Json 序列化和反序列化头文件当 ChatServer 集群部署多台服务器以后,登录在不同服务器上的用户如何进行通信?
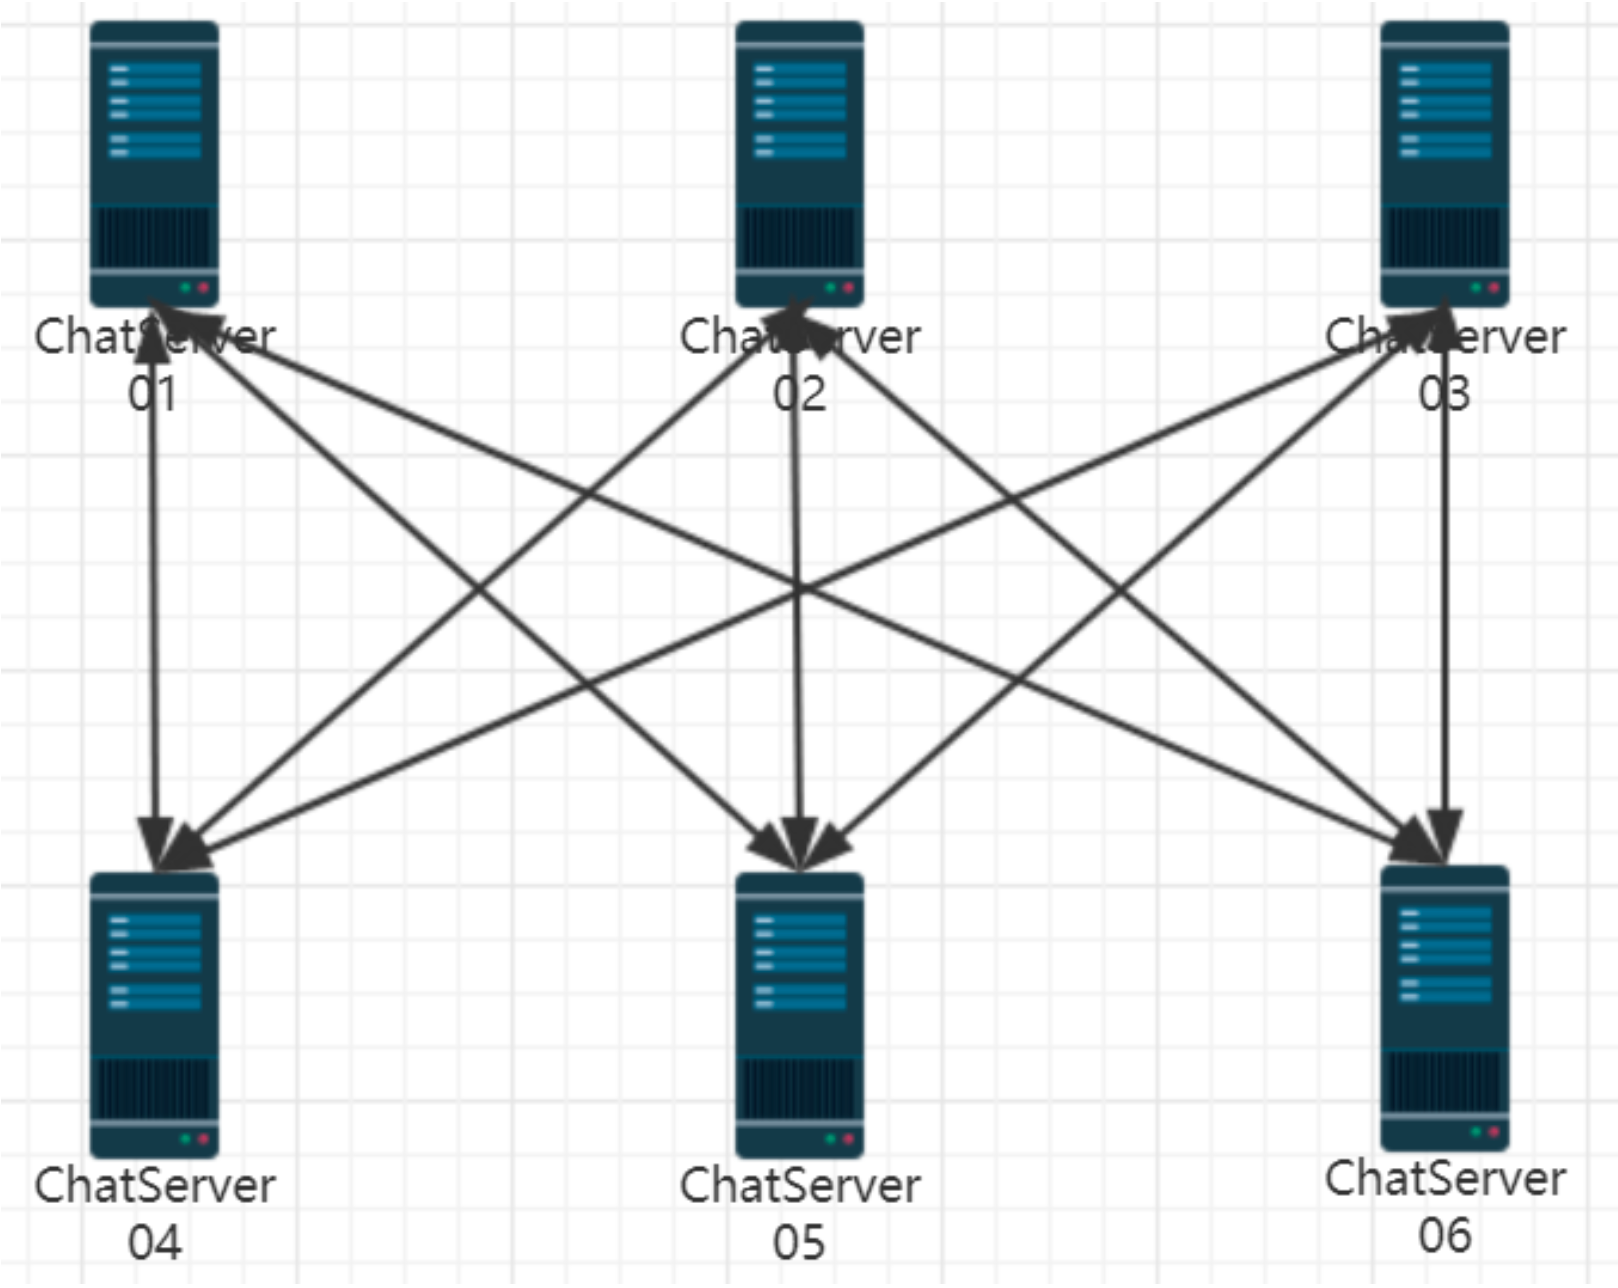
上面的设计,让各个 ChatServer 服务器两两之间建立 TCP 连接进行通信,这等价于在服务器网络之间进行广播。这样的设计使用每个服务器即是服务端,又是客户端,各个服务器之间耦合度太高,不利于系统扩展,并且会占用系统大量的 socket 资源,各服务器之间的带宽压力很大,不能够节省资源给更多的客户端提供服务,因此这是一个很不好的设计!
集群部署的服务器之间进行通信,最好的方式就是引入中间件消息队列,解耦各个服务器,使整个系统松耦合,提高服务器的响应能力,节省服务器的带宽资源,如下图所示:
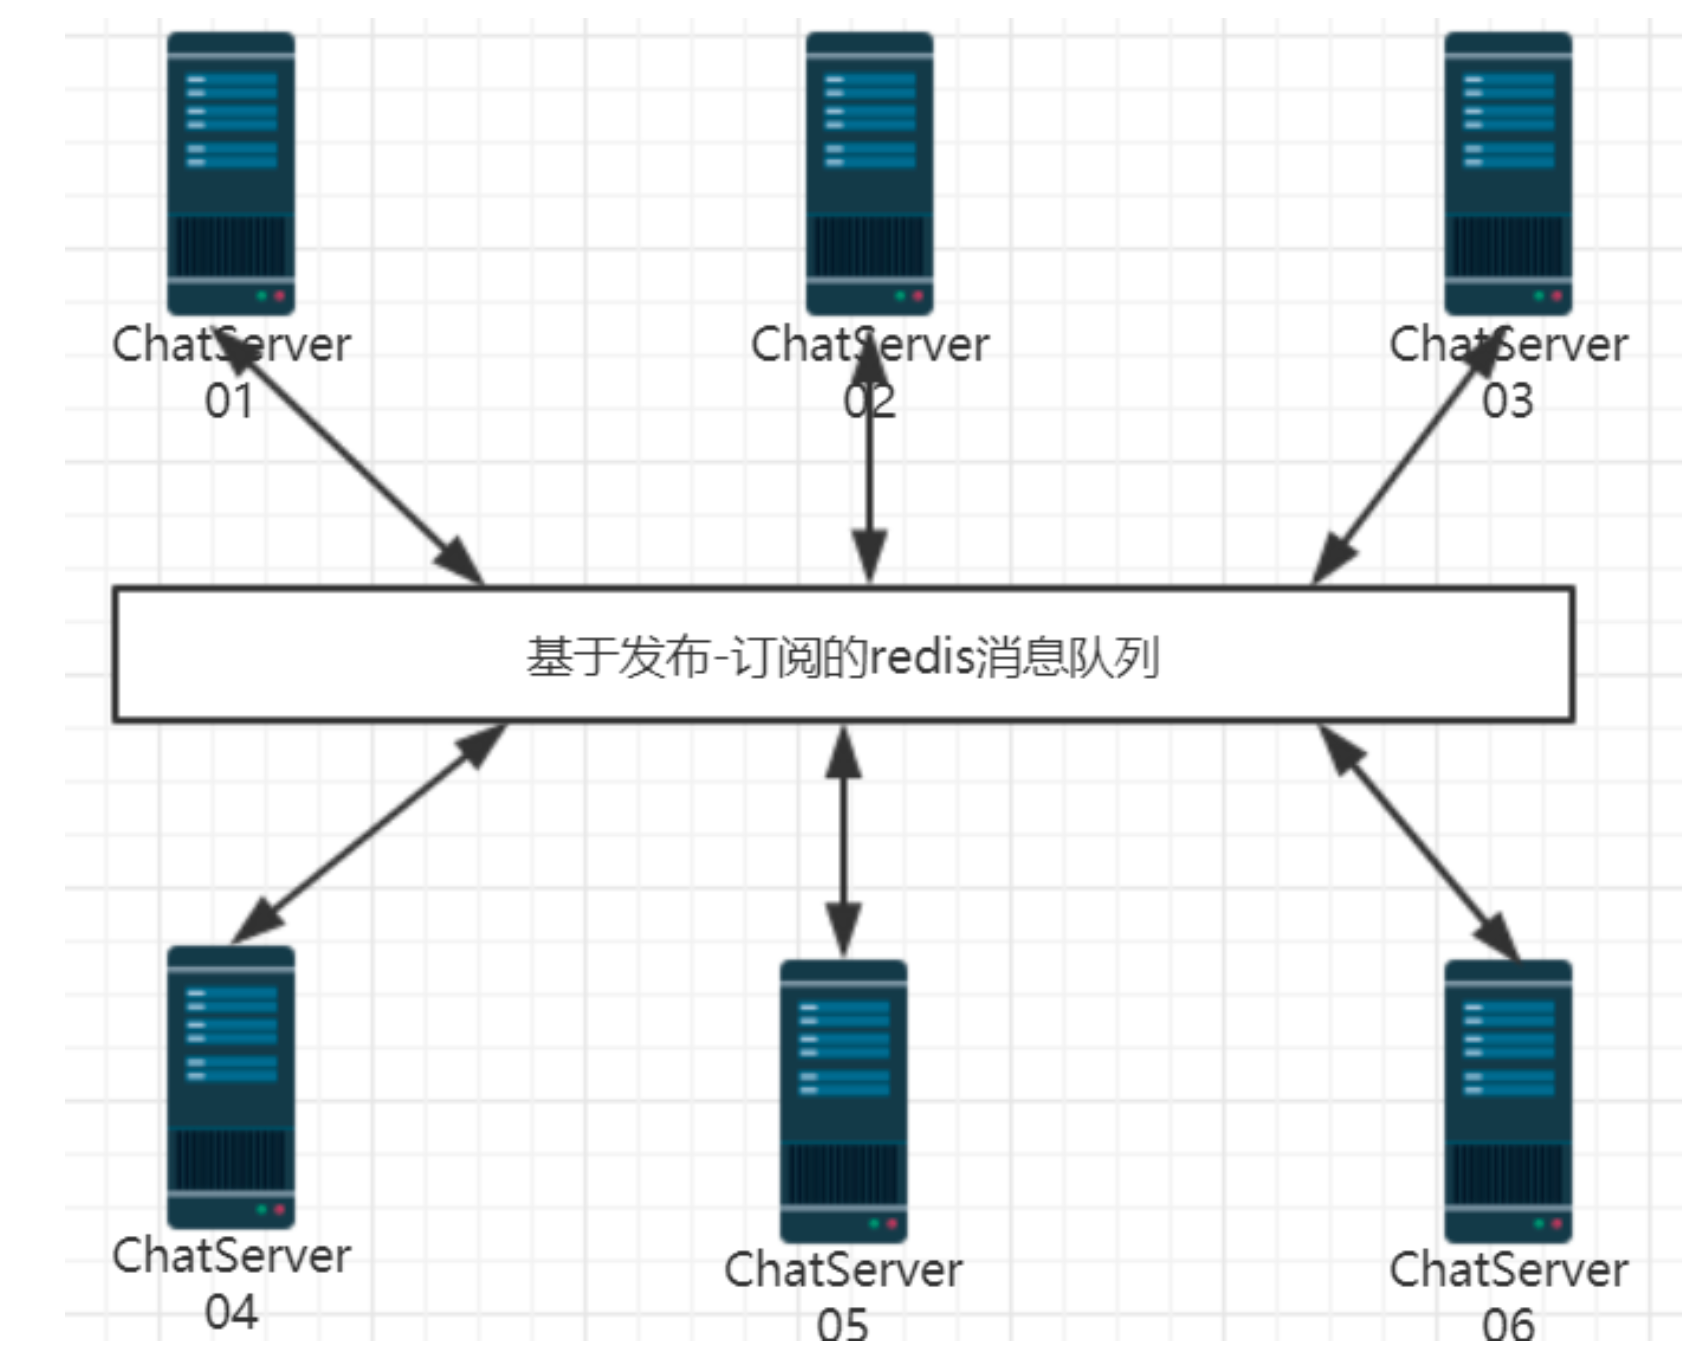
redis 的发布-订阅机制:发布-订阅模式包含了两种角色,分别是消息的发布者和消息的订阅者。订阅者可以订阅一个或者多个 channel,发布者可以向指定的 channel 发送消息,所有订阅了该 channel 的订阅者都会收到消息。
订阅 channel:SUBSCRIBE channel [channel ...]
root@14178aa96595:~# redis-cli
127.0.0.1:6379> SUBSCRIBE channel "corner"
Reading messages... (press Ctrl-C to quit)
1) "subscribe"
2) "channel"
3) (integer) 1
1) "subscribe"
2) "corner"
3) (integer) 2
1) "message"
2) "corner"
3) "hello corner!"
说明:
SUBSCRIBE命令会阻塞当前客户端,直到有消息发布到指定的 channel,这时候会收到消息。此状态下,只能执行subscribe、unsubscribe、psubscribe、punsubscribe四个命令。
另一个客户端:
root@14178aa96595:~# redis-cli
127.0.0.1:6379> publish "corner" "hello corner!"
(integer) 1
127.0.0.1:6379>
说明:
publish命令用于向指定的 channel 发送消息,返回值是订阅该 channel 的订阅者数量。
进入订阅状态后客户端可能收到 3 种类型的回复。每种类型的回复都包含 3 个值,分别是消息类型、channel 名称和消息体。根据消息类型的不同,后两个值的意义也不同。消息类型的取值如下:
subscribe:订阅成功。第二个值是订阅成功的 channel 名称,第三个值是当前客户端订阅的 channel 数量。message:收到消息。第二个值是产生消息的 channel 名称,第三个值是消息体。unsubscribe:取消订阅。第二个值是取消订阅的 channel 名称,第三个值是当前客户端订阅的 channel 数量,如果数量为 0,则客户端会退出订阅状态。
redis 支持不同的客户端编程语言,如 C、C++、Python、Java 等。这里使用 C++ 编程语言,使用 hiredis 库进行编程。
安装 hiredis 库:
git clone https://github.com/redis/hiredis  # 下载 hiredis 源码
cd hiredis  # 进入 hiredis 目录
make    # 编译
make install  # 安装,将头文件拷贝到 /usr/local/include,将库文件拷贝到 /usr/local/lib
ldconfig /usr/local/lib # 更新动态链接库单台服务器受限于硬件资源,其性能是有上限的,当单台服务器不能满足应用场景的并发需求量时,就需要考虑部署多个服务器共同处理客户端的并发请求,但是客户端怎么知道去连接具体哪台服务器呢?
此时就需要一台负载均衡器,通过预设的负载算法,指导客户端连接服务器。
负载均衡器有基于客户端的负载均衡和服务器的负载均衡
在服务器快速集群环境搭建中,都迫切需要一个能拿来即用的负载均衡器,nginx 在 1.9 版本之前,只支持 http 协议 web 服务器的负载均衡,从 1.9 版本开始以后,nginx 开始支持 tcp 的长连接负载均衡,但是 nginx 默认并没有编译 tcp 负载均衡模块,编译时,需要加入 --with-stream 参数来激活这个模块
nginx 编译时加入
--with-stream参数激活 tcp 负载均衡模块
nginx 编译安装需要先安装 pcre、openssl、zlib 等库,也可以直接编译执行下面的 configure 命令,根据错误提示信息,安装相应缺少的库。
git clone https://github.com/nginx/nginx.git    # 下载 nginx 源码
apt update && apt install -y libpcre3 libpcre3-dev  # 安装 pcre 库
cd nginx    # 进入 nginx 目录
./auto/configure --with-stream  # 编译 nginx,激活 tcp 负载均衡模块
make && make install    # 编译安装
此时 nginx 默认安装在 /usr/local/nginx 目录下,有如下 4 个目录 conf html logs sbin。可执行文件在 sbin 目录下,配置文件在 conf 目录下。
nginx 常用命令:
./sbin/nginx启动 nginx 服务./sbin/nginx -s stop停止 nginx 服务./sbin/nginx -s reload重新加载配置文件
root@14178aa96595:/usr/local/nginx# netstat -tanp
Active Internet connections (servers and established)
Proto Recv-Q Send-Q Local Address           Foreign Address         State       PID/Program name
tcp        0      0 127.0.0.1:33060         0.0.0.0:*               LISTEN      -
tcp        0      0 127.0.0.1:40309         0.0.0.0:*               LISTEN      36793/code-f1e16e1e
tcp        0      0 127.0.0.1:3306          0.0.0.0:*               LISTEN      -
tcp        0      0 127.0.0.11:40853        0.0.0.0:*               LISTEN      -
tcp        0      0 0.0.0.0:80              0.0.0.0:*               LISTEN      61913/nginx: master
tcp        0      0 0.0.0.0:22              0.0.0.0:*               LISTEN      24/sshd: /usr/sbin/
tcp        0      0 127.0.0.1:6379          0.0.0.0:*               LISTEN      -
tcp        0      0 127.0.0.1:40309         127.0.0.1:34242         ESTABLISHED 36793/code-f1e16e1e
tcp        0      0 172.19.0.2:37324        185.125.190.82:80       TIME_WAIT   -
tcp        0      0 172.19.0.2:56746        140.82.112.22:443       ESTABLISHED 36830/node
tcp        0      0 127.0.0.1:34242         127.0.0.1:40309         ESTABLISHED 36754/sshd: root@no
tcp        0      0 172.19.0.2:52358        138.91.182.224:443      ESTABLISHED 36830/node
tcp        0      0 172.19.0.2:22           10.0.0.141:61819        ESTABLISHED 36754/sshd: root@no
tcp        0      0 172.19.0.2:49448        140.82.112.21:443       ESTABLISHED 36830/node
tcp6       0      0 :::22                   :::*                    LISTEN      24/sshd: /usr/sbin/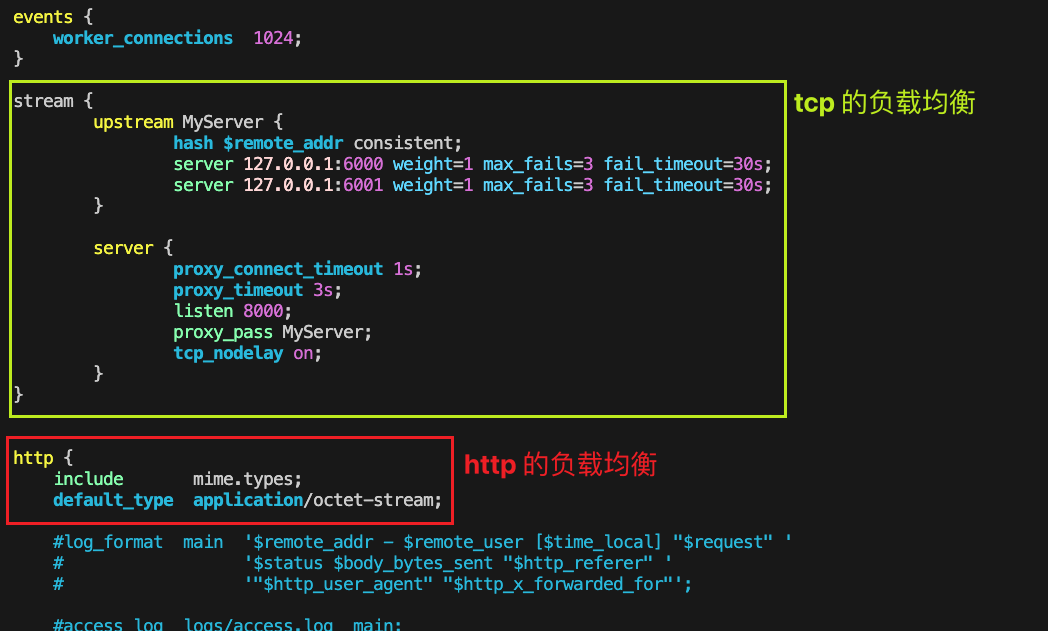
tcp6 0 0 ::1:6379 :::* LISTEN -配置 conf 文件夹下的 nginx.conf 文件,添加如下配置:
stream {
    # 定义一个名为 "MyServer" 的上游服务器组
    upstream MyServer {
        # 使用客户端 IP 地址的哈希值来进行负载均衡,使用一致性哈希算法
        hash $remote_addr consistent;

        # 定义第一台上游服务器
        server 127.0.0.1:6000 weight=1 max_fails=3 fail_timeout=30s;
        # weight=1 表示这台服务器的权重,默认为1,权重越高,被选中的概率越大
        # max_fails=3 表示在 fail_timeout 时间内,最多允许失败的次数
        # fail_timeout=30s 表示在30秒内如果失败次数超过 max_fails,这台服务器会被标记为不可用

        # 定义第二台上游服务器,配置与第一台相同
        server 127.0.0.1:6001 weight=1 max_fails=3 fail_timeout=30s;
    }

    # 定义代理服务器配置
    server {
        # 设置与上游服务器建立连接的超时时间为1秒
        proxy_connect_timeout 1s;

        # 设置代理连接的超时时间为3秒
        proxy_timeout 3s;

        # 定义代理服务器监听的端口为8000
        listen 8000;

        # 将请求代理到上游服务器组 "MyServer"
        proxy_pass MyServer;

        # 启用 TCP_NODELAY 选项,减少延迟,立即发送数据
        tcp_nodelay on;
    }
}
之后
./sbin/nginx -s reload重新加载配置文件,然后netstat -tanp查看端口监听情况。
如果出现很快断开的情况,可以分别尝试以下两种方法:
- 加大超时时间
- 请打开
keepalive,并确保操作系统级别的keepalive设置打开。确保操作系统级别的keepalive设置也支持长时间保持连接。可以在系统配置文件中检查并配置这些参数,例如/etc/sysctl.conf:
# 在/etc/sysctl.conf中添加以下设置,或使用sysctl命令临时设置

# 启用TCP keepalive机制
net.ipv4.tcp_keepalive_time = 1200  # 连接空闲时间,单位为秒
net.ipv4.tcp_keepalive_intvl = 75   # 保持活动探测之间的间隔时间,单位为秒
net.ipv4.tcp_keepalive_probes = 9 # 在认为连接已断开之前发送的探测包数然后应用这些设置:sudo sysctl -p,重新加载 nginx 配置文件。
User 表
| 字段名 | 类型 | 说明 | 约束 |
|---|---|---|---|
| id | INT | 用户 id | PRIMARY KEY , AUTO_INCREMENT |
| name | VARCHAR(50) | 用户名 | NOT NULL , UNIQUE |
| password | VARCHAR(50) | 密码 | NOT NULL |
| state | ENUM('online', 'offline') | 用户登录状态 | DEFAULT 'offline' |
Friend 表
| 字段名 | 类型 | 说明 | 约束 |
|---|---|---|---|
| userid | INT | 用户 id | NOT NULL , 联合主键 |
| friendid | INT | 好友 id | NOT NULL , 联合主键 |
AllGroup 表
| 字段名 | 类型 | 说明 | 约束 |
|---|---|---|---|
| id | INT | 群组 id | PRIMARY KEY , AUTO_INCREMENT |
| groupname | VARCHAR(50) | 群组名 | NOT NULL , UNIQUE |
| groupdesc | VARCHAR(200) | 群组描述 | DEFAULT '' |
GroupUser 表
| 字段名 | 类型 | 说明 | 约束 |
|---|---|---|---|
| groupid | INT | 群组 id | NOT NULL , 联合主键 |
| userid | INT | 组员 id | NOT NULL, 联合主键 |
| grouprole | ENUM('creator', 'normal') | 组员角色 | DEFAULT 'normal' |
OfflineMessage 表
| 字段名 | 类型 | 说明 | 约束 |
|---|---|---|---|
| userid | INT | 用户 id | NOT NULL |
| message | VARCHAR(500) | 离线消息(存储 Json 字符串) | NOT NULL |
