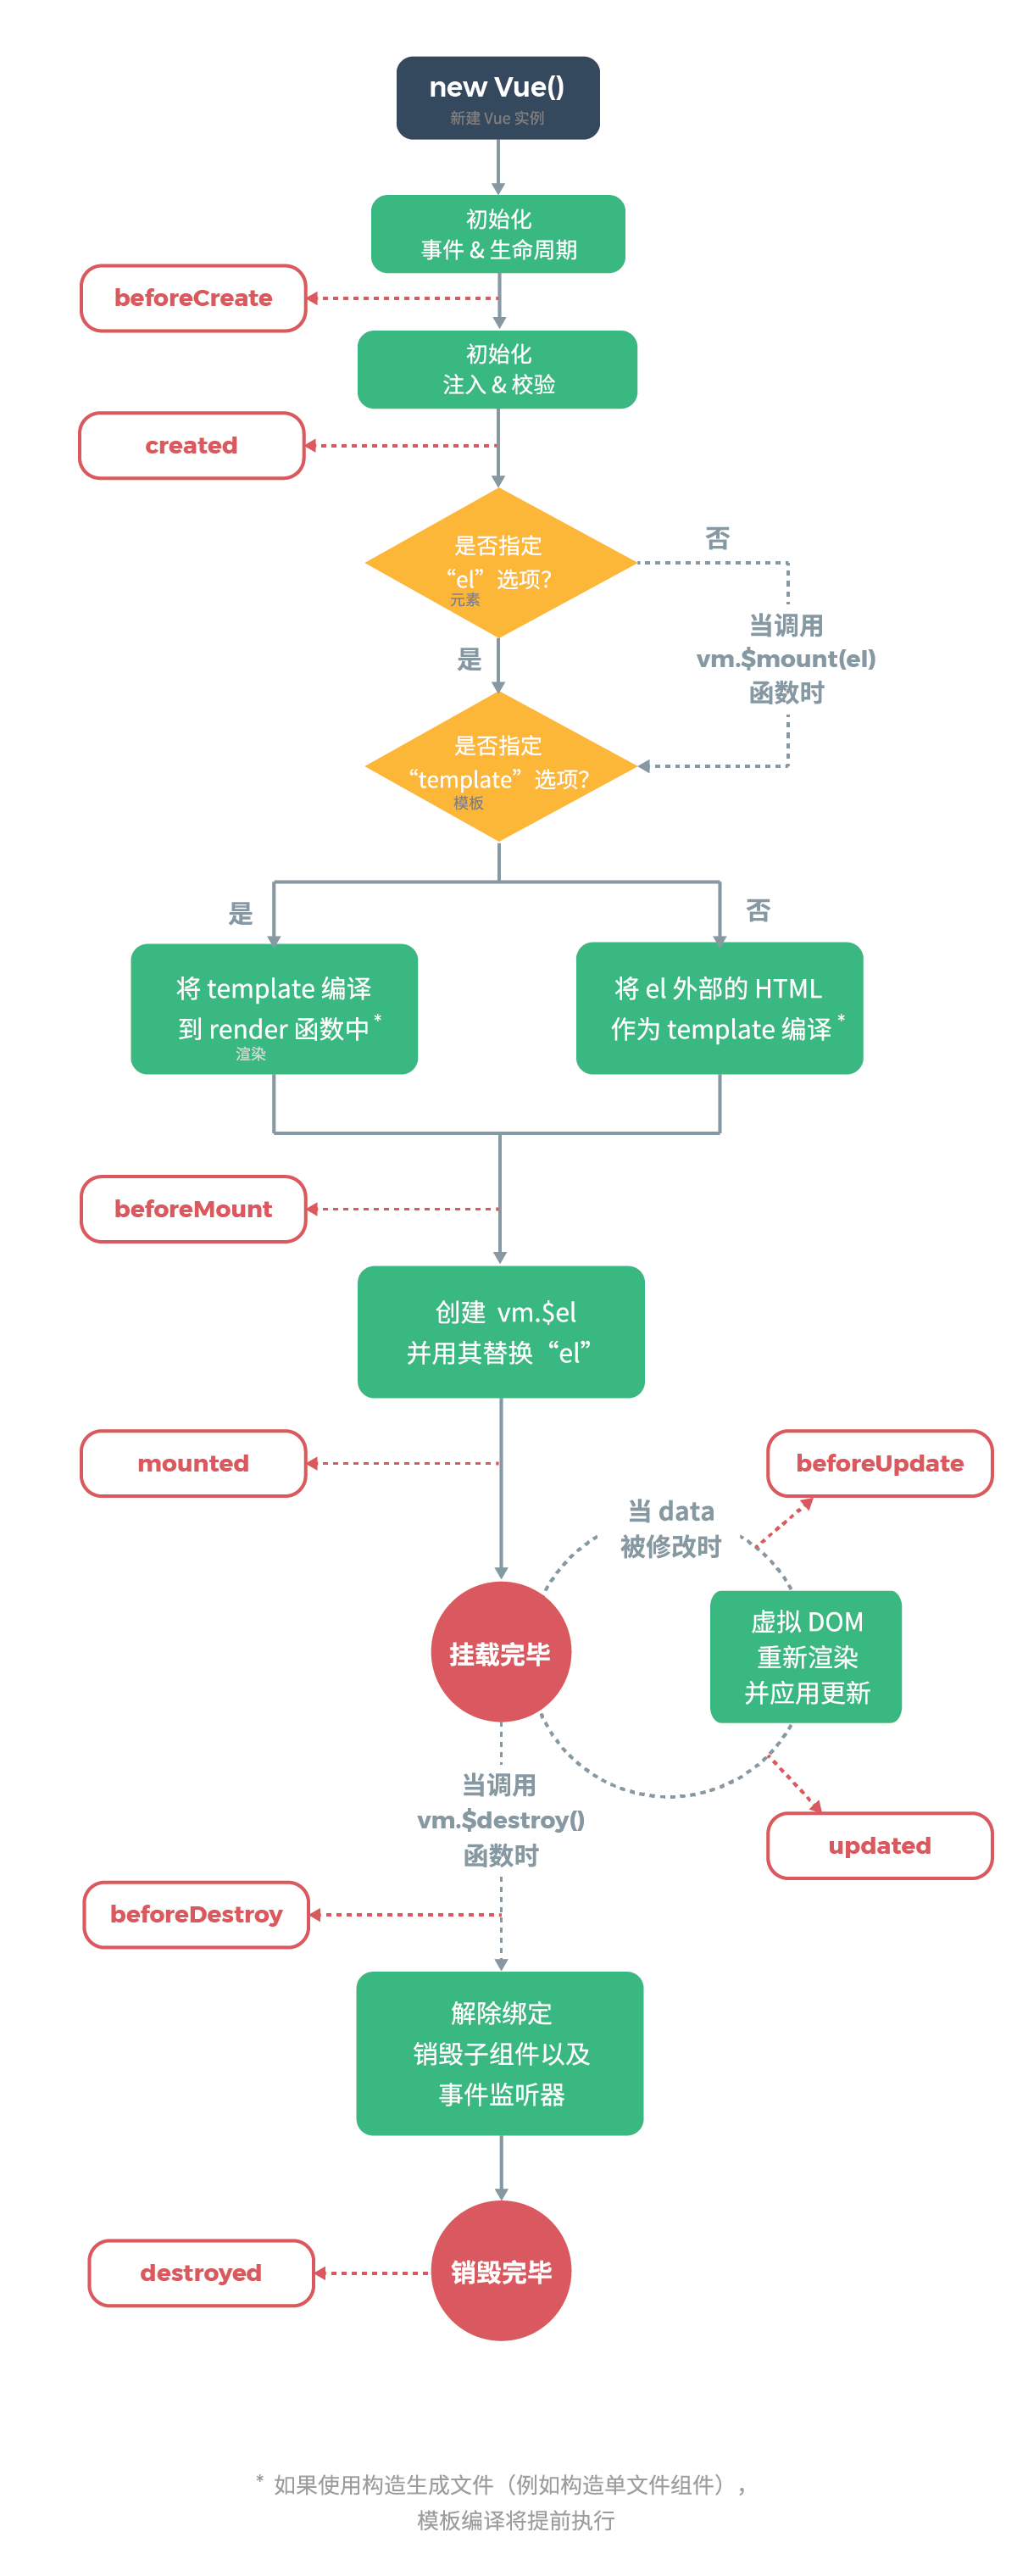
引言(文末有福利)🏂
算法一直是大厂前端面试常问的一块,而大家往往准备这方面的面试都是通过leetcode刷题。
我特地整理了几道leetcode中「很有意思」而且非常「高频」的算法题目,分别给出了思路分析(带图解)和代码实现。
认真仔细的阅读完本文,相信对于你在算法方面的面试一定会有不小的帮助!🤠
两数之和 🦊
题目难度easy,涉及到的算法知识有数组、哈希表
题目描述
给定一个整数数组 nums 和一个目标值 target,请你在该数组中找出和为目标值的那两个整数,并返回他们的数组下标。
你可以假设每种输入只会对应一个答案。但是,数组中同一个元素不能使用两遍。
示例:
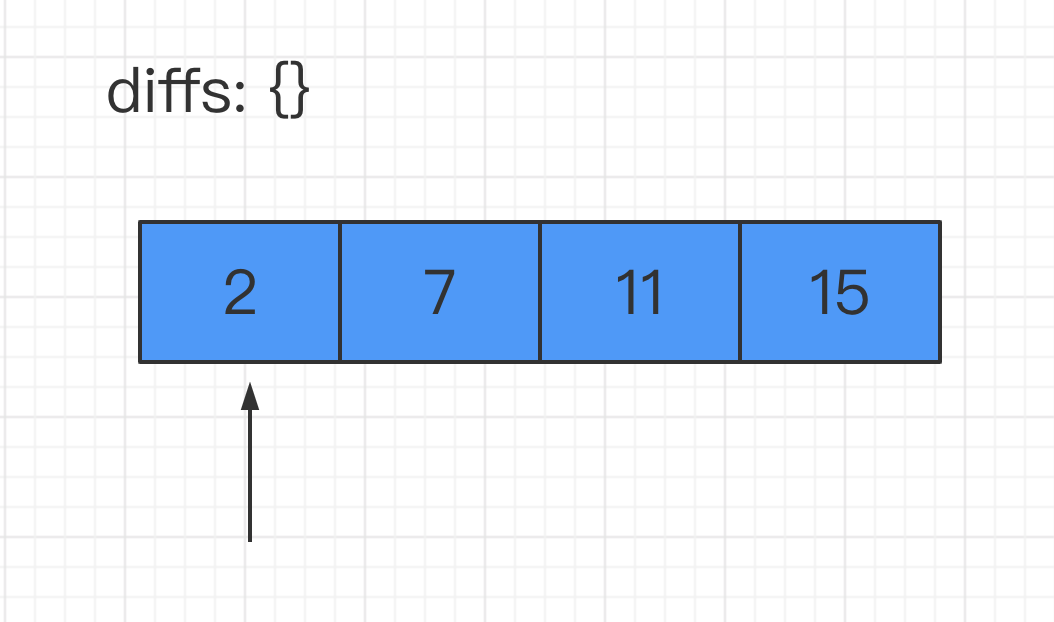
给定 nums = [2, 7, 11, 15], target = 9
因为 nums[0] + nums[1] = 2 + 7 = 9
所以返回 [0, 1]
思路分析
大多数同学看到这道题目,心中肯定会想:这道题目太简单了,不就两层遍历嘛:两层循环来遍历同一个数组;第一层循环遍历的值记为a,第二层循环时遍历的值记为b;若a+b = 目标值,那么a和b对应的数组下标就是我们想要的答案。
这种解法没毛病,但有没有优化的方案呢?🤔
要知道两层循环很多情况下都意味着O(n^2) 的复杂度,这个复杂度非常容易导致你的算法超时。即便没有超时,在明明有一层遍历解法的情况下,你写了两层遍历,面试官也会对你的印象分大打折扣。🤒
其实我们可以在遍历数组的过程中,增加一个Map结构来存储已经遍历过的数字及其对应的索引值。然后每遍历到一个新数字的时候,都回到Map里去查询targetNum与该数的差值是否已经在前面的数字中出现过了。若出现过,那么答案已然显现,我们就不必再往下走了。
我们就以本题中的例子结合图片来说明一下上面提到的这种思路:
代码实现
/**
* @param {number[]} nums
* @param {number} target
* @return {number[]}
*/
const twoSum = function (nums, target) {
const diffs = {};
// 缓存数组长度
const len = nums.length;
// 遍历数组
for (let i = 0; i < len; i++) {
// 判断当前值对应的 target 差值是否存在
if (diffs[target - nums[i]] !== undefined) {
// 若有对应差值,那么得到答案
return [diffs[target - nums[i]], i];
}
// 若没有对应差值,则记录当前值
diffs[nums[i]] = i;
}
};三数之和 🦁
题目难度medium,涉及到的算法知识有数组、双指针
题目描述
给你一个包含n个整数的数组nums,判断nums中是否存在三个元素a,b,c ,使得a + b + c = 0。请你找出所有满足条件且不重复的三元组。
注意:答案中不可以包含重复的三元组。
示例:
给定数组 nums = [-1, 0, 1, 2, -1, -4],
满足要求的三元组集合为:
[
[-1, 0, 1],
[-1, -1, 2]
]
思路分析
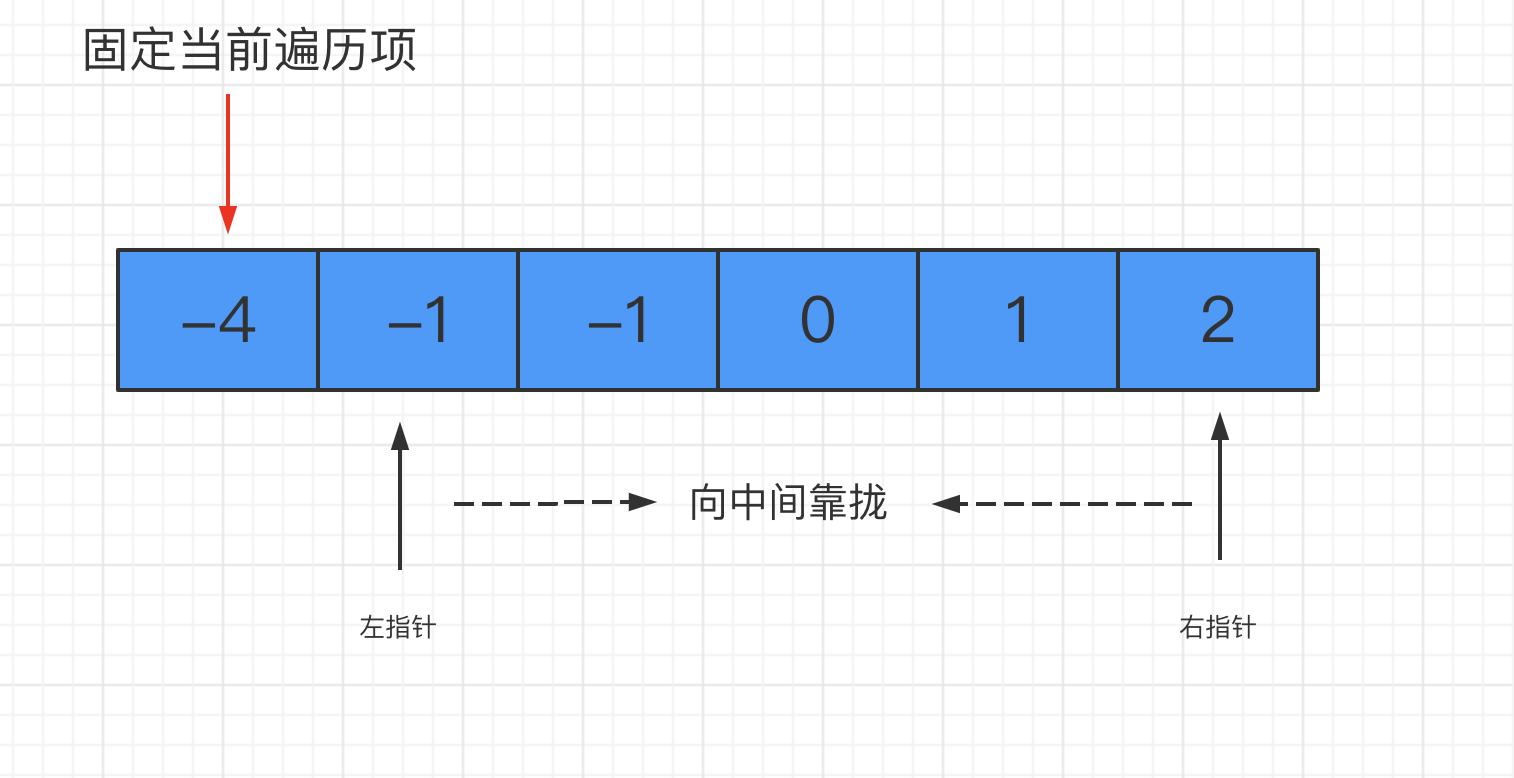
和上面的两数之和一样,如果不认真思考,最快的方式可能就是多层遍历了。但有了前车之鉴,我们同样可以把求和问题变为求差问题:固定其中一个数,在剩下的数中寻找是否有两个数的和这个固定数相加是等于 0 的。
这里我们采用双指针法来解决问题,相比三层循环,效率会大大提升。
双指针法的适用范围比较广,一般像求和、比大小的都可以用它来解决。但是有一个前提:数组必须有序
因此我们的第一步就是先将数组进行排序:
// 给 nums 排序
nums = nums.sort((a, b) => {
return a - b;
});然后对数组进行遍历,每遍历到哪个数字,就固定当前的数字。同时左指针指向该数字后面的紧邻的那个数字,右指针指向数组末尾。然后左右指针分别向中间靠拢:

每次指针移动一次位置,就计算一下两个指针指向数字之和加上固定的那个数之后,是否等于 0。如果是,那么我们就得到了一个目标组合;否则,分两种情况来看:
- 相加之和大于 0,说明右侧的数偏大了,右指针左移
- 相加之和小于 0,说明左侧的数偏小了,左指针右移
代码实现
/**
* @param {number[]} nums
* @return {number[][]}
*/
const threeSum = function (nums) {
// 用于存放结果数组
let res = [];
// 目标值为0
let sum = 0;
// 给 nums 排序
nums = nums.sort((a, b) => {
return a - b;
});
// 缓存数组长度
const len = nums.length;
for (let i = 0; i < len - 2; i++) {
// 左指针 j
let j = i + 1;
// 右指针k
let k = len - 1;
// 如果遇到重复的数字,则跳过
if (i > 0 && nums[i] === nums[i - 1]) {
continue;
}
while (j < k) {
// 三数之和小于0,左指针前进
if (nums[i] + nums[j] + nums[k] < 0) {
j++;
// 处理左指针元素重复的情况
while (j < k && nums[j] === nums[j - 1]) {
j++;
}
} else if (nums[i] + nums[j] + nums[k] > 0) {
// 三数之和大于0,右指针后退
k--;
// 处理右指针元素重复的情况
while (j < k && nums[k] === nums[k + 1]) {
k--;
}
} else {
// 得到目标数字组合,推入结果数组
res.push([nums[i], nums[j], nums[k]]);
// 左右指针一起前进
j++;
k--;
// 若左指针元素重复,跳过
while (j < k && nums[j] === nums[j - 1]) {
j++;
}
// 若右指针元素重复,跳过
while (j < k && nums[k] === nums[k + 1]) {
k--;
}
}
}
}
// 返回结果数组
return res;
};盛最多水的容器 🥃
题目难度medium,涉及到的算法知识有数组、双指针
题目描述
给你 n 个非负整数 a1,a2,...,an,每个数代表坐标中的一个点 (i, ai) 。在坐标内画 n 条垂直线,垂直线 i 的两个端点分别为 (i, ai) 和 (i, 0)。找出其中的两条线,使得它们与 x 轴共同构成的容器可以容纳最多的水。
说明:你不能倾斜容器,且 n 的值至少为 2。

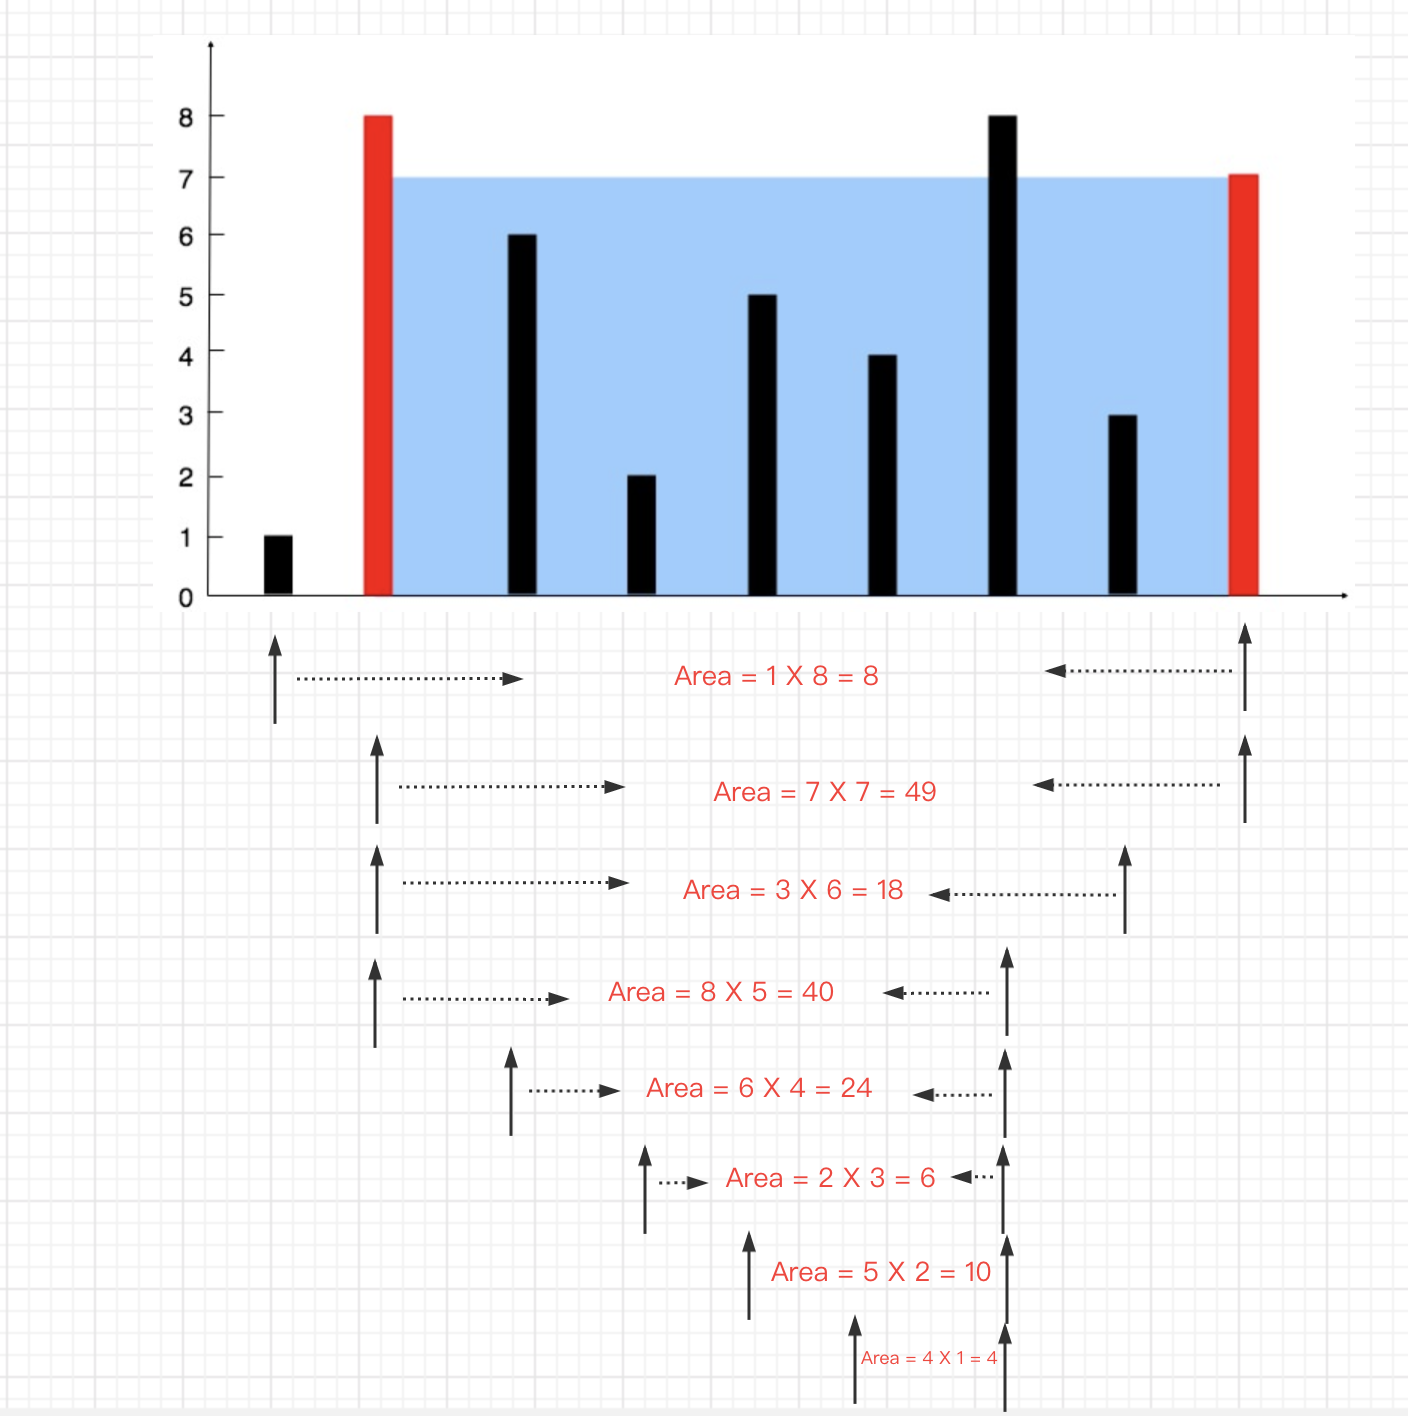
图中垂直线代表输入数组[1,8,6,2,5,4,8,3,7]。在此情况下,容器能够容纳水(表示为蓝色部分)的最大值为 49。
示例:
输入:[1,8,6,2,5,4,8,3,7]
输出:49
思路分析
首先,我们能快速想到的一种方法:两两进行求解,计算可以承载的水量。 然后不断更新最大值,最后返回最大值即可。
这种解法,需要两层循环,时间复杂度是O(n^2)。这种相对来说比较暴力,对应就是暴力法。
暴力法
/**
* @param {number[]} height
* @return {number}
*/
var maxArea = function (height) {
let max = 0;
for (let i = 0; i < height.length - 1; i++) {
for (let j = i + 1; j < height.length; j++) {
let area = (j - i) * Math.min(height[i], height[j]);
max = Math.max(max, area);
}
}
return max;
};那么有没有更好的办法呢?答案是肯定有。
其实有点类似双指针的概念,左指针指向下标 0,右指针指向length-1。然后分别从左右两侧向中间移动,每次取小的那个值(因为水的高度肯定是以小的那个为准)。

如果左侧小于右侧,则i++,否则j--(这一步其实就是取所有高度中比较高的,我们知道面积等于长*宽)。对应就是双指针 动态滑窗
双指针 动态滑窗
/**
* @param {number[]} height
* @return {number}
*/
var maxArea = function (height) {
let max = 0;
let i = 0;
let j = height.length - 1;
while (i < j) {
let minHeight = Math.min(height[i], height[j]);
let area = (j - i) * minHeight;
max = Math.max(max, area);
if (height[i] < height[j]) {
i++;
} else {
j--;
}
}
return max;
};爬楼梯 🎢
题目难度easy,涉及到的算法知识有斐波那契数列、动态规划。
题目描述
假设你正在爬楼梯。需要 n 阶你才能到达楼顶。
每次你可以爬 1 或 2 个台阶。你有多少种不同的方法可以爬到楼顶呢?
注意:给定 n 是一个正整数。
示例 1:
输入: 2
输出: 2
解释: 有两种方法可以爬到楼顶。
1. 1 阶 + 1 阶
2. 2 阶
示例 2:
输入: 3
输出: 3
解释: 有三种方法可以爬到楼顶。
1. 1 阶 + 1 阶 + 1 阶
2. 1 阶 + 2 阶
3. 2 阶 + 1 阶
思路分析
这道题目是一道非常高频的面试题目,也是一道非常经典的斐波那契数列类型的题目。
解决本道题目我们会用到动态规划的算法**-可以分成多个子问题,爬第 n 阶楼梯的方法数量,等于 2 部分之和:
- 爬上
n−1阶楼梯的方法数量。因为再爬 1 阶就能到第 n 阶
- 爬上
n−2阶楼梯的方法数量,因为再爬 2 阶就能到第 n 阶

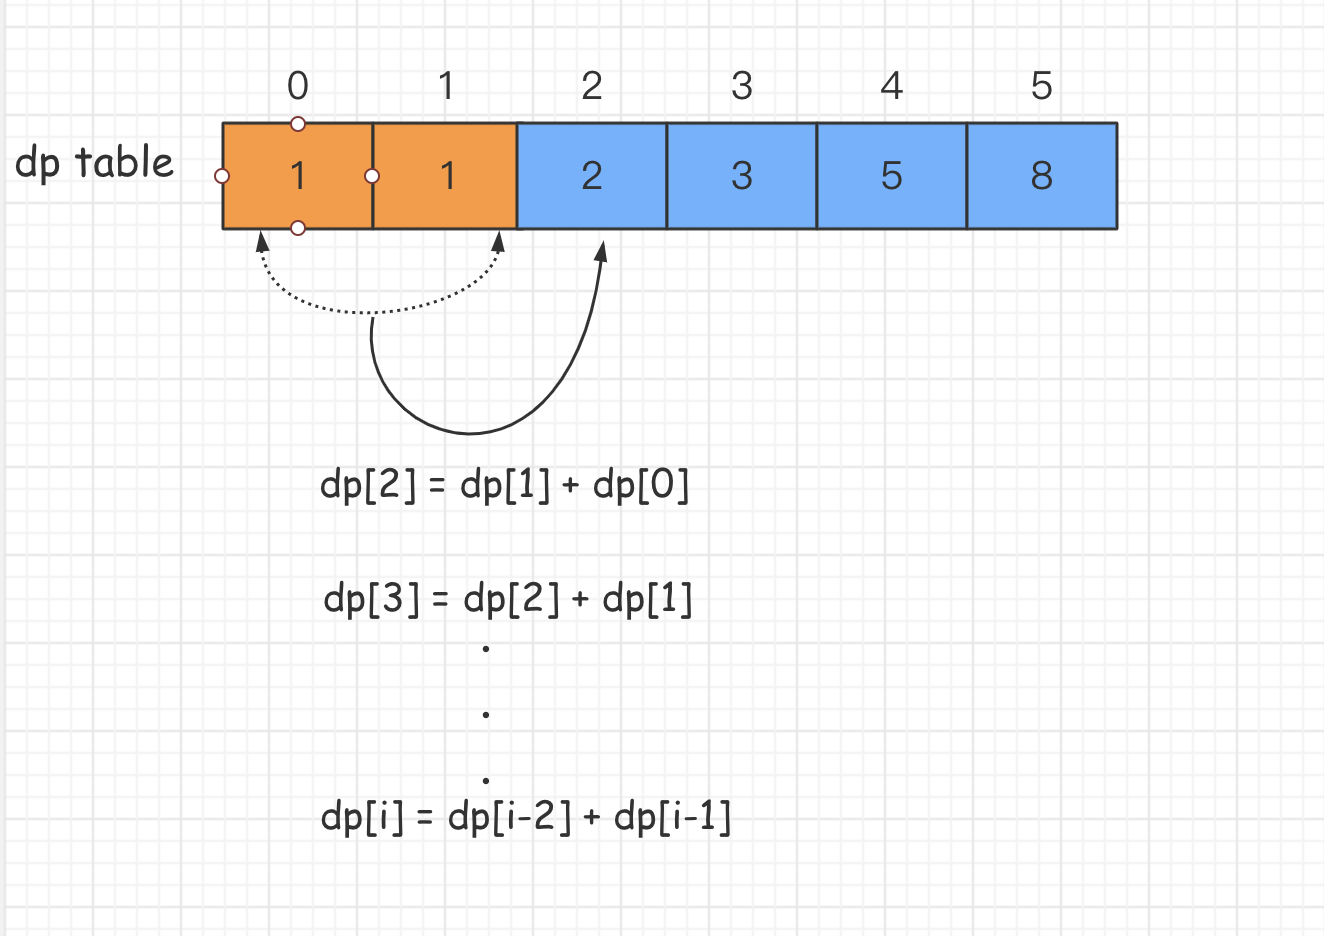
可以得到公式:
climbs[n] = climbs[n - 1] + climbs[n - 2];
同时需要做如下初始化:
climbs[0] = 1;
climbs[1] = 1;
代码实现
/**
* @param {number} n
* @return {number}
*/
var climbStairs = function (n) {
let climbs = [];
climbs[0] = 1;
climbs[1] = 1;
for (let i = 2; i <= n; i++) {
climbs[i] = climbs[i - 1] + climbs[i - 2];
}
return climbs[n];
};环形链表 🍩
题目难度easy,涉及到的算法知识有链表、快慢指针。
题目描述
给定一个链表,判断链表中是否有环。
为了表示给定链表中的环,我们使用整数 pos 来表示链表尾连接到链表中的位置(索引从 0 开始)。 如果 pos 是 -1,则在该链表中没有环。
示例 1:
输入:head = [3,2,0,-4], pos = 1
输出:true
解释:链表中有一个环,其尾部连接到第二个节点。

示例 2:
输入:head = [1,2], pos = 0
输出:true
解释:链表中有一个环,其尾部连接到第一个节点。

示例 3:
输入:head = [1], pos = -1
输出:false
解释:链表中没有环。

思路分析
链表成环问题也是非常经典的算法问题,在面试中也经常会遇到。

解决这种问题一般有常见的两种方法:标志法和快慢指针法。
标志法
给每个已遍历过的节点加标志位,遍历链表,当出现下一个节点已被标志时,则证明单链表有环。
/**
* Definition for singly-linked list.
* function ListNode(val) {
* this.val = val;
* this.next = null;
* }
*/
/**
* @param {ListNode} head
* @return {boolean}
*/
var hasCycle = function (head) {
while (head) {
if (head.flag) return true;
head.flag = true;
head = head.next;
}
return false;
};快慢指针(双指针法)
设置快慢两个指针,遍历单链表,快指针一次走两步,慢指针一次走一步,如果单链表中存在环,则快慢指针终会指向同一个节点,否则直到快指针指向null时,快慢指针都不可能相遇。
/**
* Definition for singly-linked list.
* function ListNode(val) {
* this.val = val;
* this.next = null;
* }
*/
/**
* @param {ListNode} head
* @return {boolean}
*/
var hasCycle = function (head) {
if (!head || !head.next) {
return false;
}
let slow = head,
fast = head.next;
while (slow !== fast) {
if (!fast || !fast.next) return false;
fast = fast.next.next;
slow = slow.next;
}
return true;
};有效的括号 🍉
题目难度easy,涉及到的算法知识有栈、哈希表。
题目描述
给定一个只包括'(',')','{','}','[',']' 的字符串,判断字符串是否有效。
有效字符串需满足:
1、左括号必须用相同类型的右括号闭合。
2、左括号必须以正确的顺序闭合。
注意空字符串可被认为是有效字符串。
示例 1:
示例 2:
示例 3:
示例 4:
示例 5:
思路分析
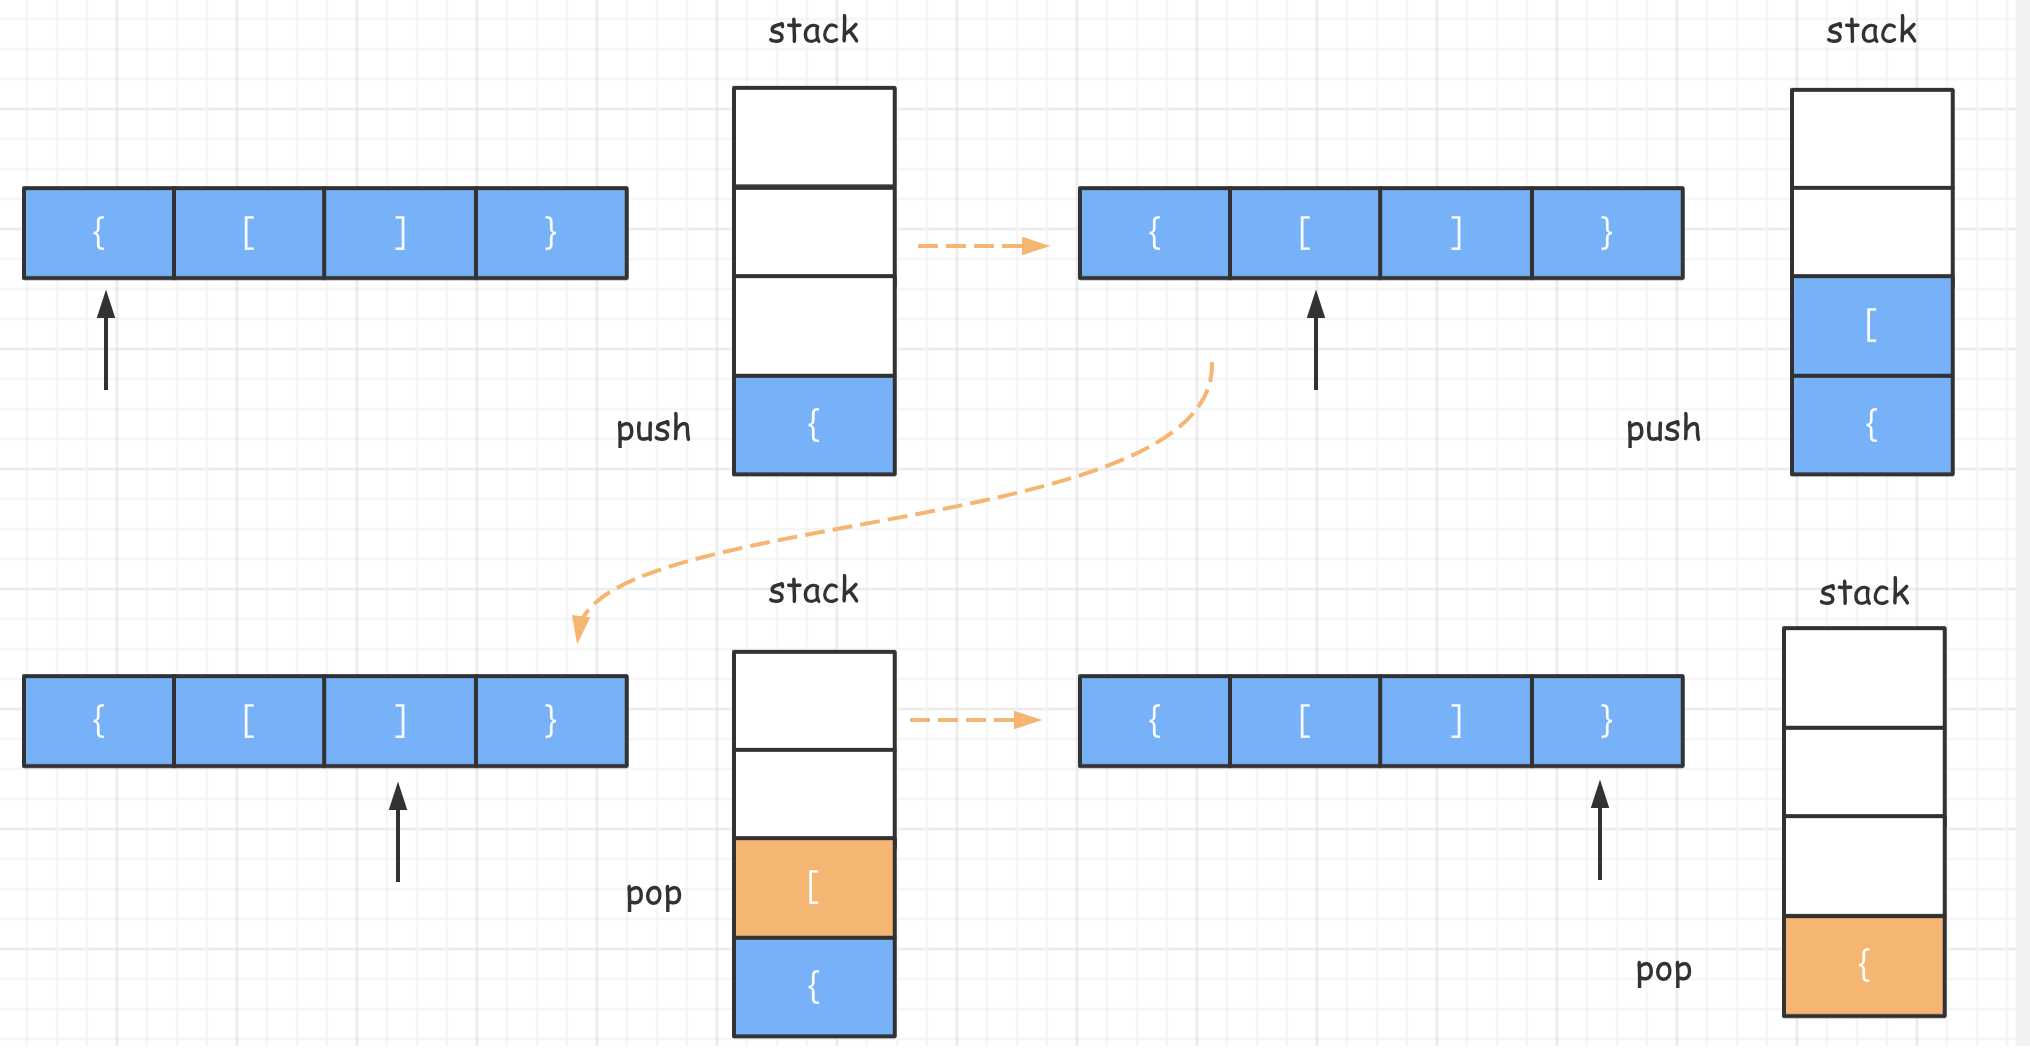
这道题可以利用栈结构。
思路大概是:遇到左括号,一律推入栈中,遇到右括号,将栈顶部元素拿出,如果不匹配则返回 false,如果匹配则继续循环。

第一种解法是利用switch case。
switch case
/**
* @param {string} s
* @return {boolean}
*/
var isValid = function (s) {
let arr = [];
let len = s.length;
if (len % 2 !== 0) return false;
for (let i = 0; i < len; i++) {
let letter = s[i];
switch (letter) {
case "(": {
arr.push(letter);
break;
}
case "{": {
arr.push(letter);
break;
}
case "[": {
arr.push(letter);
break;
}
case ")": {
if (arr.pop() !== "(") return false;
break;
}
case "}": {
if (arr.pop() !== "{") return false;
break;
}
case "]": {
if (arr.pop() !== "[") return false;
break;
}
}
}
return !arr.length;
};第二种是维护一个map对象:
哈希表map
/**
* @param {string} s
* @return {boolean}
*/
var isValid = function (s) {
let map = {
"(": ")",
"{": "}",
"[": "]",
};
let stack = [];
let len = s.length;
if (len % 2 !== 0) return false;
for (let i of s) {
if (i in map) {
stack.push(i);
} else {
if (i !== map[stack.pop()]) return false;
}
}
return !stack.length;
};滑动窗口最大值 ⛵
题目难度hard,涉及到的算法知识有双端队列。
题目描述
给定一个数组 nums,有一个大小为 k 的滑动窗口从数组的最左侧移动到数组的最右侧。你只可以看到在滑动窗口内的 k 个数字。滑动窗口每次只向右移动一位。
返回滑动窗口中的最大值。
进阶:你能在线性时间复杂度内解决此题吗?
示例:
输入: nums = [1,3,-1,-3,5,3,6,7], 和 k = 3
输出: [3,3,5,5,6,7]
解释:
滑动窗口的位置 最大值
--------------- -----
[1 3 -1] -3 5 3 6 7 3
1 [3 -1 -3] 5 3 6 7 3
1 3 [-1 -3 5] 3 6 7 5
1 3 -1 [-3 5 3] 6 7 5
1 3 -1 -3 [5 3 6] 7 6
1 3 -1 -3 5 [3 6 7] 7
提示:
- 1 <= nums.length <= 10^5
- -10^4 <= nums[i] <= 10^4
- 1 <= k <= nums.length
思路分析
暴力求解
第一种方法,比较简单。也是大多数同学很快就能想到的方法。
/**
* @param {number[]} nums
* @param {number} k
* @return {number[]}
*/
var maxSlidingWindow = function (nums, k) {
let len = nums.length;
if (len === 0) return [];
if (k === 1) return nums;
let resArr = [];
for (let i = 0; i <= len - k; i++) {
let max = Number.MIN_SAFE_INTEGER;
for (let j = i; j < i + k; j++) {
max = Math.max(max, nums[j]);
}
resArr.push(max);
}
return resArr;
};双端队列
这道题还可以用双端队列去解决,核心在于在窗口发生移动时,只根据发生变化的元素对最大值进行更新。

结合上面动图(图片来源)我们梳理下思路:
- 检查队尾元素,看是不是都满足大于等于当前元素的条件。如果是的话,直接将当前元素入队。否则,将队尾元素逐个出队、直到队尾元素大于等于当前元素为止。(这一步是为了维持队列的递减性:确保队头元素是当前滑动窗口的最大值。这样我们每次取最大值时,直接取队头元素即可。)
- 将当前元素入队
- 检查队头元素,看队头元素是否已经被排除在滑动窗口的范围之外了。如果是,则将队头元素出队。(这一步是维持队列的有效性:确保队列里所有的元素都在滑动窗口圈定的范围以内。)
- 排除掉滑动窗口还没有初始化完成、第一个最大值还没有出现的特殊情况。
/**
* @param {number[]} nums
* @param {number} k
* @return {number[]}
*/
var maxSlidingWindow = function (nums, k) {
// 缓存数组的长度
const len = nums.length;
const res = [];
const deque = [];
for (let i = 0; i < len; i++) {
// 队尾元素小于当前元素
while (deque.length && nums[deque[deque.length - 1]] < nums[i]) {
deque.pop();
}
deque.push(i);
// 当队头元素的索引已经被排除在滑动窗口之外时
while (deque.length && deque[0] <= i - k) {
// 队头元素出对
deque.shift();
}
if (i >= k - 1) {
res.push(nums[deque[0]]);
}
}
return res;
};每日温度 🌡
题目难度medium,涉及到的算法知识有栈。
题目描述
根据每日气温列表,请重新生成一个列表,对应位置的输出是需要再等待多久温度才会升高超过该日的天数。如果之后都不会升高,请在该位置用 0 来代替。
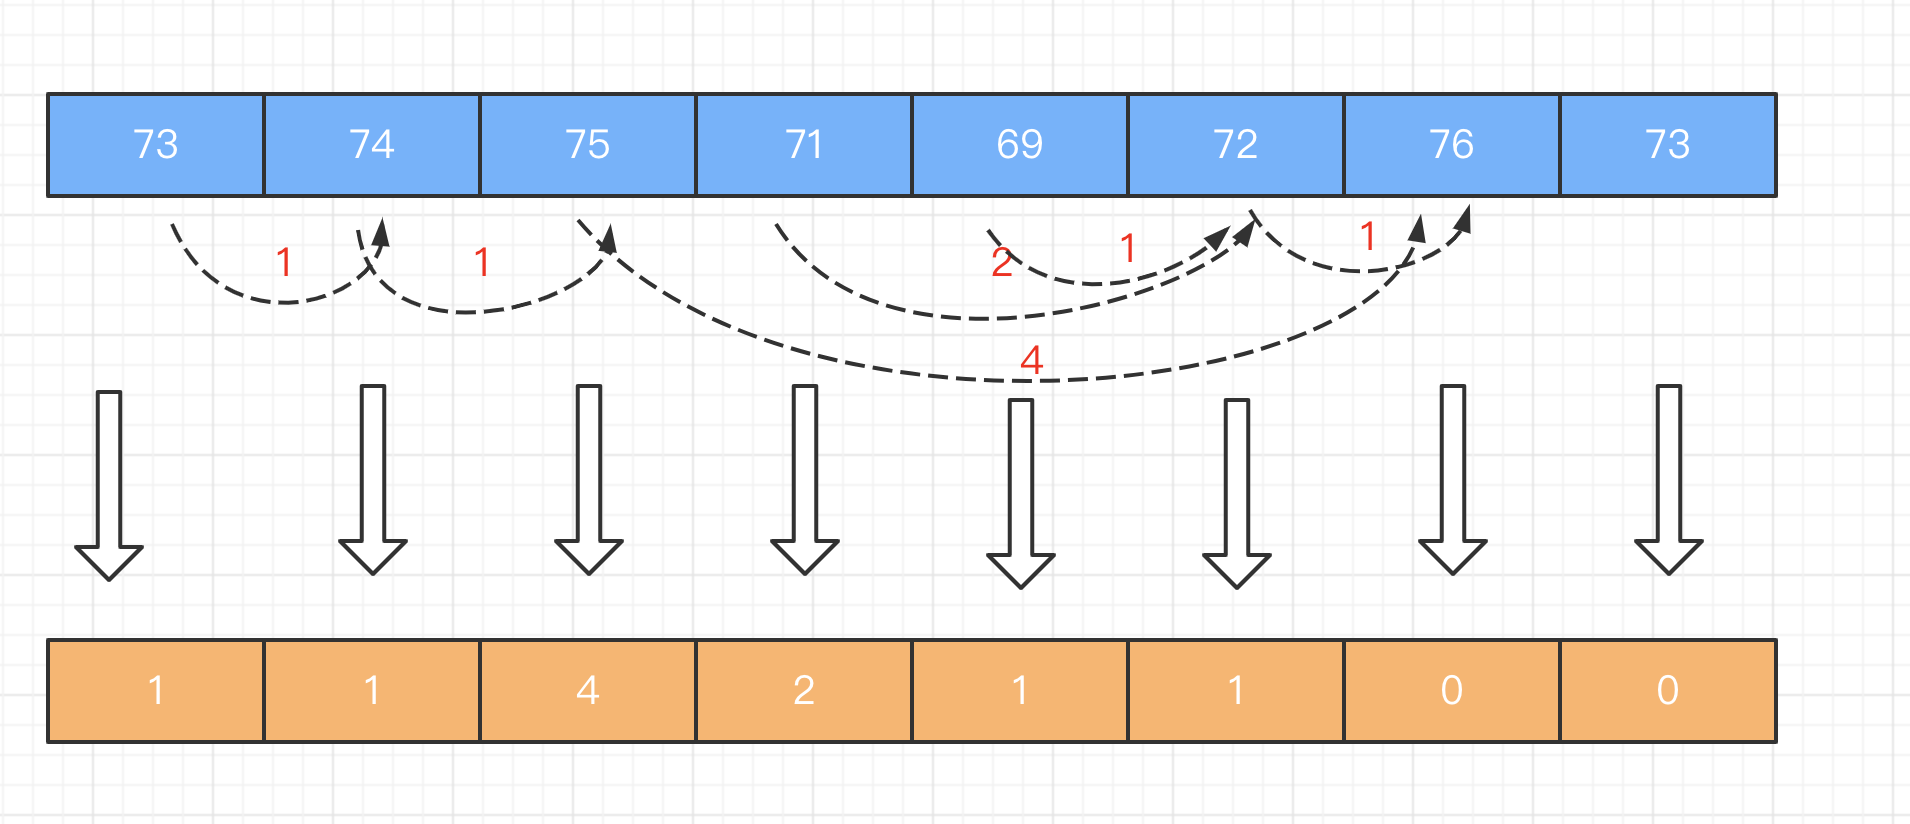
例如,给定一个列表 temperatures = [73, 74, 75, 71, 69, 72, 76, 73],你的输出应该是 [1, 1, 4, 2, 1, 1, 0, 0]。
提示:气温列表长度的范围是 [1, 30000]。每个气温的值的均为华氏度,都是在 [30, 100] 范围内的整数。
思路分析
看到这道题,大家很容易就会想到暴力遍历法:直接两层遍历,第一层定位一个温度,第二层定位离这个温度最近的一次升温是哪天,然后求出两个温度对应索引的差值即可。
然而这种解法需要两层遍历,时间复杂度是O(n^2),显然不是最优解法。
本道题目可以采用栈去做一个优化。

大概思路就是:维护一个递减栈。当遍历过的温度,维持的是一个单调递减的态势时,我们就对这些温度的索引下标执行入栈操作;只要出现了一个数字,它打破了这种单调递减的趋势,也就是说它比前一个温度值高,这时我们就对前后两个温度的索引下标求差,得出前一个温度距离第一次升温的目标差值。
代码实现
/**
* @param {number[]} T
* @return {number[]}
*/
var dailyTemperatures = function (T) {
const len = T.length;
const stack = [];
const res = new Array(len).fill(0);
for (let i = 0; i < len; i++) {
while (stack.length && T[i] > T[stack[stack.length - 1]]) {
const top = stack.pop();
res[top] = i - top;
}
stack.push(i);
}
return res;
};括号生成 🎯
题目难度medium,涉及到的算法知识有递归、回溯。
题目描述
数字 n 代表生成括号的对数,请你设计一个函数,用于能够生成所有可能的并且 有效的 括号组合。
示例:
输入:n = 3
输出:[
"((()))",
"(()())",
"(())()",
"()(())",
"()()()"
]思路分析
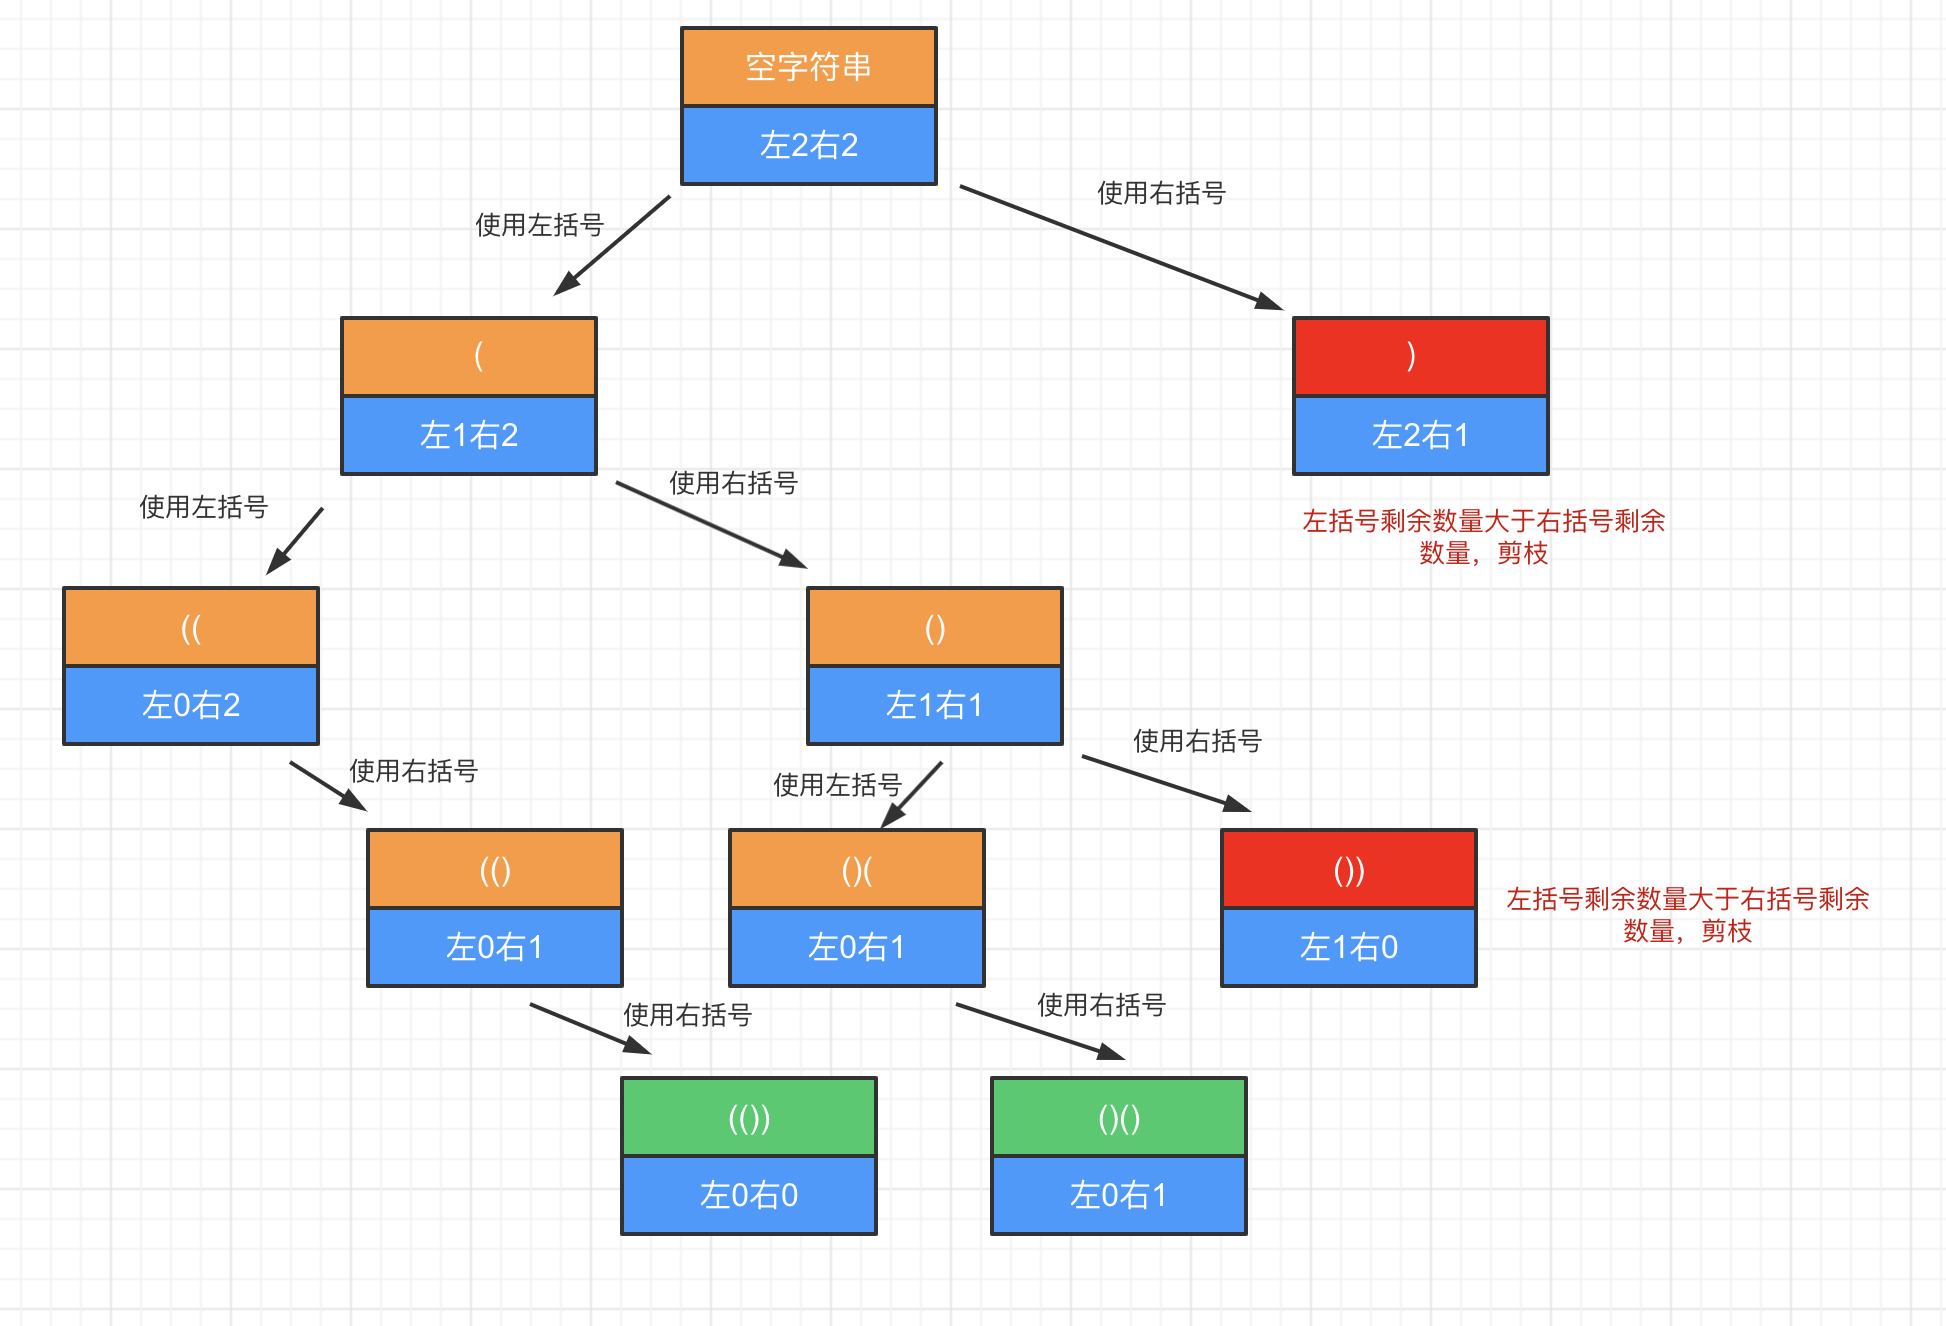
这道题目通过递归去实现。
因为左右括号需要匹配、闭合。所以对应“(”和“)”的数量都是n,当满足这个条件时,一次递归就结束,将对应值放入结果数组中。
这里有一个潜在的限制条件:有效的括号组合。对应逻辑就是在往每个位置去放入“(”或“)”前:
- 需要判断“(”的数量是否小于 n
- “)”的数量是否小于“(”

代码实现
/**
* @param {number} n
* @return {string[]}
*/
var generateParenthesis = function (n) {
let res = [];
const generate = (cur, left, right) => {
if (left === n && right === n) {
res.push(cur);
return;
}
if (left < n) {
generate(cur + "(", left + 1, right);
}
if (right < left) {
generate(cur + ")", left, right + 1);
}
};
generate("", 0, 0);
return res;
};电话号码的字母组合 🎨
题目难度medium,涉及到的算法知识有递归、回溯。
题目描述
给定一个仅包含数字 2-9 的字符串,返回所有它能表示的字母组合。
给出数字到字母的映射如下(与电话按键相同)。注意 1 不对应任何字母。

示例:
输入:"23"
输出:["ad", "ae", "af", "bd", "be", "bf", "cd", "ce", "cf"].
思路分析
首先用一个对象map存储数字与字母的映射关系,接下来遍历对应的字符串,第一次将字符串存在结果数组result中,第二次及以后的就双层遍历生成新的字符串数组。

代码实现
哈希映射 逐层遍历
/**
* @param {string} digits
* @return {string[]}
*/
var letterCombinations = function (digits) {
let res = [];
if (digits.length === 0) return [];
let map = {
2: "abc",
3: "def",
4: "ghi",
5: "jkl",
6: "mno",
7: "pqrs",
8: "tuv",
9: "wxyz",
};
for (let num of digits) {
let chars = map[num];
if (res.length > 0) {
let temp = [];
for (let char of chars) {
for (let oldStr of res) {
temp.push(oldStr + char);
}
}
res = temp;
} else {
res.push(...chars);
}
}
return res;
};递归
/**
* @param {string} digits
* @return {string[]}
*/
var letterCombinations = function (digits) {
let res = [];
if (!digits) return [];
let map = {
2: "abc",
3: "def",
4: "ghi",
5: "jkl",
6: "mno",
7: "pqrs",
8: "tuv",
9: "wxyz",
};
function generate(i, str) {
let len = digits.length;
if (i === len) {
res.push(str);
return;
}
let chars = map[digits[i]];
for (let j = 0; j < chars.length; j++) {
generate(i + 1, str + chars[j]);
}
}
generate(0, "");
return res;
};岛屿数量 🏝
题目难度medium,涉及到的算法知识有 DFS(深度优先搜索)。
题目描述
给你一个由 '1'(陆地)和 '0'(水)组成的的二维网格,请你计算网格中岛屿的数量。
岛屿总是被水包围,并且每座岛屿只能由水平方向或竖直方向上相邻的陆地连接形成。
此外,你可以假设该网格的四条边均被水包围。
示例 1:
输入: 11110;
11010;
11000;
00000;
输出: 1;
示例 2:
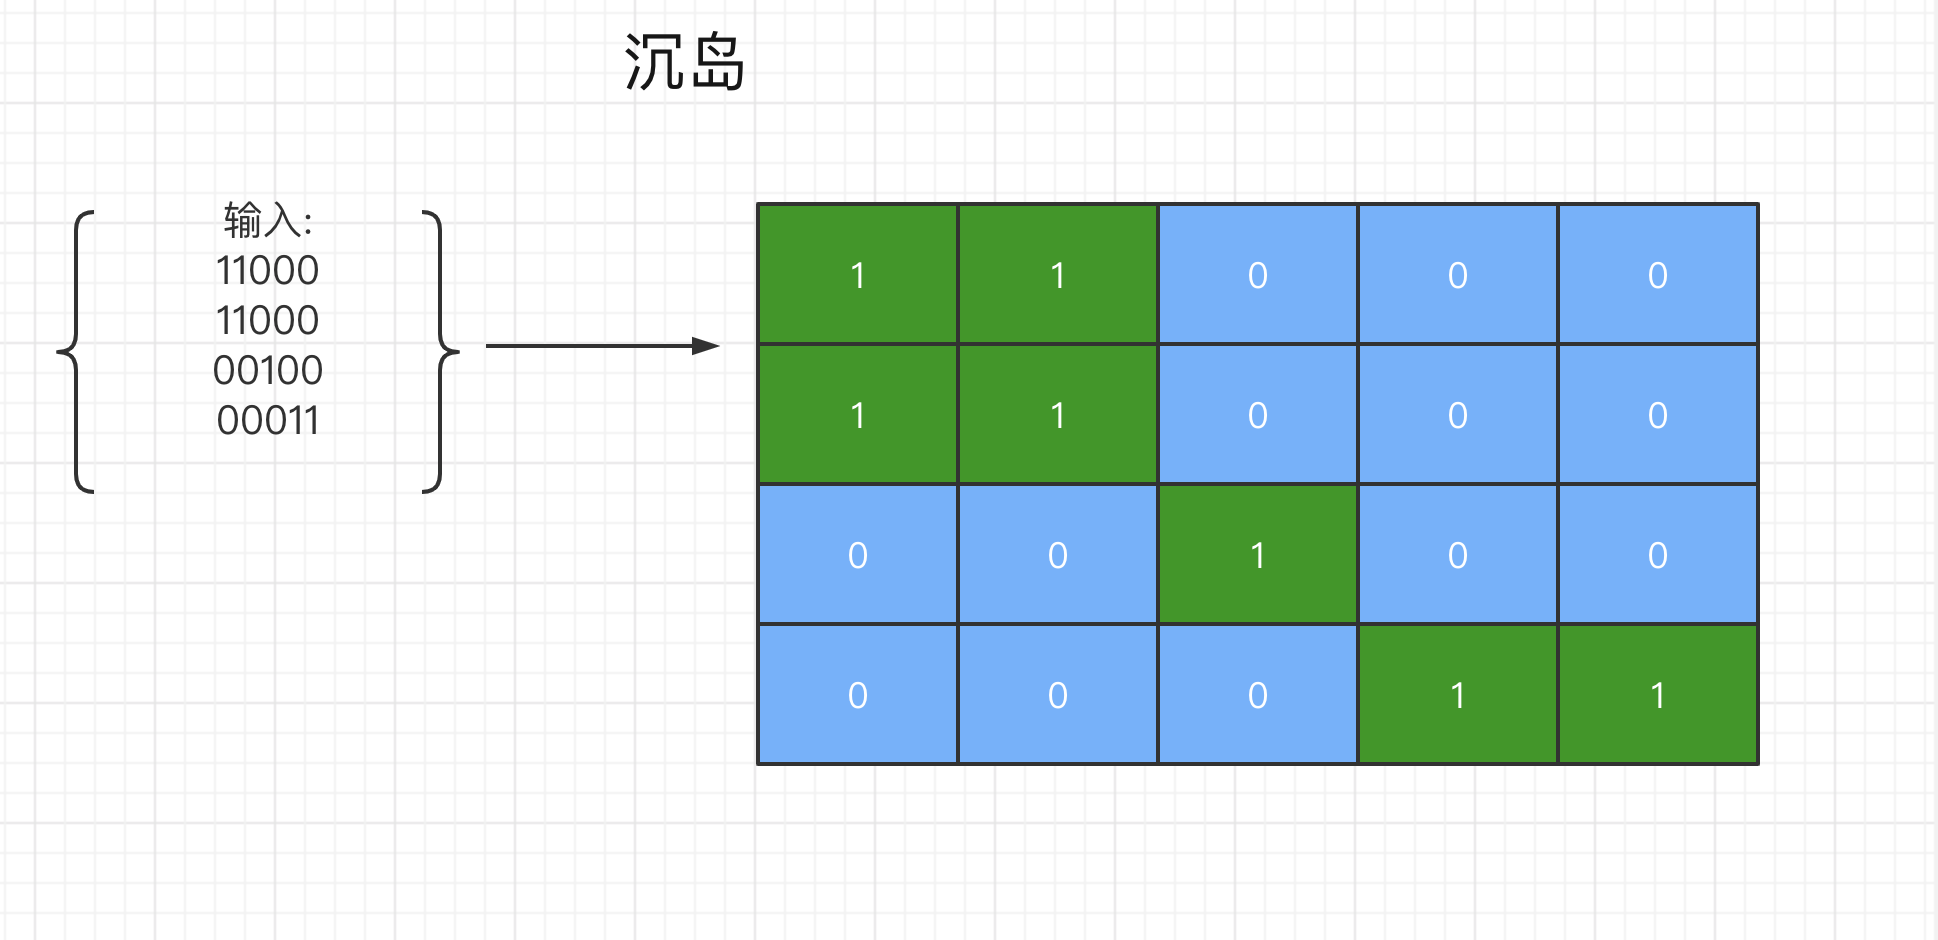
输入:
11000
11000
00100
00011
输出: 3
解释: 每座岛屿只能由水平和/或竖直方向上相邻的陆地连接而成。
思路分析

如上图,我们需要计算的就是图中相连(只能是水平和/或竖直方向上相邻)的绿色岛屿的数量。
这道题目一个经典的做法是沉岛,大致思路是:采用DFS(深度优先搜索),遇到 1 的就将当前的 1 变为 0,并将当前坐标的上下左右都执行 dfs,并计数。
终止条件是:超出二维数组的边界或者是遇到 0 ,直接返回。
代码实现
/**
* @param {character[][]} grid
* @return {number}
*/
var numIslands = function (grid) {
const rows = grid.length;
if (rows === 0) return 0;
const cols = grid[0].length;
let res = 0;
for (let i = 0; i < rows; i++) {
for (let j = 0; j < cols; j++) {
if (grid[i][j] === "1") {
helper(grid, i, j, rows, cols);
res++;
}
}
}
return res;
};
function helper(grid, i, j, rows, cols) {
if (i < 0 || j < 0 || i > rows - 1 || j > cols - 1 || grid[i][j] === "0")
return;
grid[i][j] = "0";
helper(grid, i + 1, j, rows, cols);
helper(grid, i, j + 1, rows, cols);
helper(grid, i - 1, j, rows, cols);
helper(grid, i, j - 1, rows, cols);
}分发饼干 🍪
题目难度easy,涉及到的算法知识有贪心算法。
题目描述
假设你是一位很棒的家长,想要给你的孩子们一些小饼干。但是,每个孩子最多只能给一块饼干。对每个孩子 i ,都有一个胃口值 gi ,这是能让孩子们满足胃口的饼干的最小尺寸;并且每块饼干 j ,都有一个尺寸 sj 。如果 sj >= gi ,我们可以将这个饼干 j 分配给孩子 i ,这个孩子会得到满足。你的目标是尽可能满足越多数量的孩子,并输出这个最大数值。
注意:
你可以假设胃口值为正。
一个小朋友最多只能拥有一块饼干。
示例 1:
输入: [1,2,3], [1,1]
输出: 1
解释:
你有三个孩子和两块小饼干,3个孩子的胃口值分别是:1,2,3。
虽然你有两块小饼干,由于他们的尺寸都是1,你只能让胃口值是1的孩子满足。
所以你应该输出1。
示例 2:
输入: [1,2], [1,2,3]
输出: 2
解释:
你有两个孩子和三块小饼干,2个孩子的胃口值分别是1,2。
你拥有的饼干数量和尺寸都足以让所有孩子满足。
所以你应该输出2.
思路分析
这道题目是一道典型的贪心算法类。解题思路大概如下:
- 优先满足胃口小的小朋友的需求
- 设最大可满足的孩子数量为
maxNum = 0
- 胃口小的拿小的,胃口大的拿大的
- 两边升序,然后一一对比
- 当
饼干j >= 胃口i 时,i++、j++、maxNum++
- 当
饼干j < 胃口i时,说明饼干不够吃,换更大的,j++
- 到边界后停止
代码实现
/**
* @param {number[]} g
* @param {number[]} s
* @return {number}
*/
var findContentChildren = function (g, s) {
g = g.sort((a, b) => a - b);
s = s.sort((a, b) => a - b);
let gLen = g.length,
sLen = s.length,
i = 0,
j = 0,
maxNum = 0;
while (i < gLen && j < sLen) {
if (s[j] >= g[i]) {
i++;
maxNum++;
}
j++;
}
return maxNum;
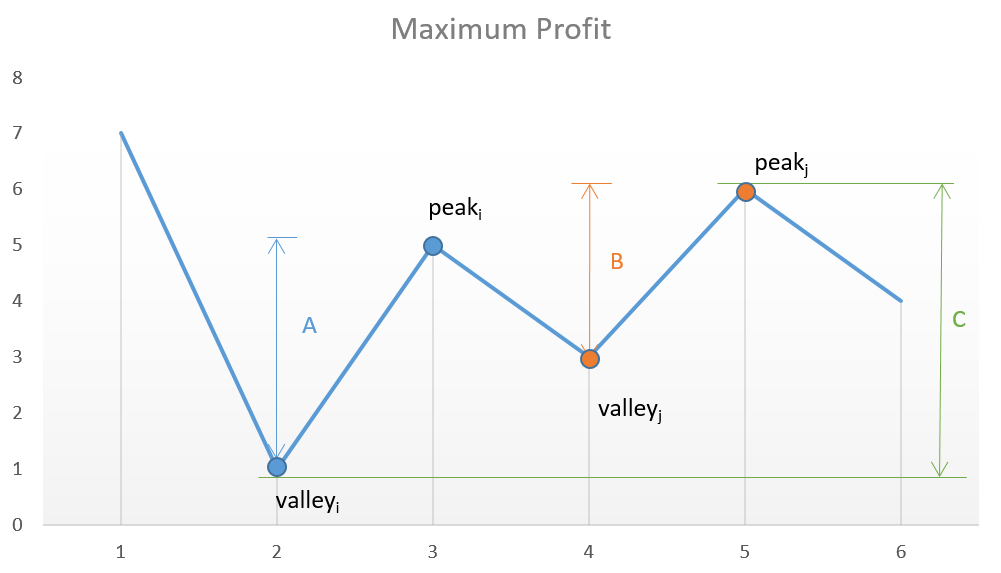
};买卖股票的最佳时机 II 🚁
题目难度easy,涉及到的算法知识有动态规划、贪心算法。
题目描述
给定一个数组,它的第 i 个元素是一支给定股票第 i 天的价格。
设计一个算法来计算你所能获取的最大利润。你可以尽可能地完成更多的交易(多次买卖一支股票)。
注意:你不能同时参与多笔交易(你必须在再次购买前出售掉之前的股票)。
示例 1:
输入: [7,1,5,3,6,4]
输出: 7
解释: 在第 2 天(股票价格 = 1)的时候买入,在第 3 天(股票价格 = 5)的时候卖出, 这笔交易所能获得利润 = 5-1 = 4 。
随后,在第 4 天(股票价格 = 3)的时候买入,在第 5 天(股票价格 = 6)的时候卖出, 这笔交易所能获得利润 = 6-3 = 3 。
示例 2:
输入: [1,2,3,4,5]
输出: 4
解释: 在第 1 天(股票价格 = 1)的时候买入,在第 5 天 (股票价格 = 5)的时候卖出, 这笔交易所能获得利润 = 5-1 = 4 。
注意你不能在第 1 天和第 2 天接连购买股票,之后再将它们卖出。
因为这样属于同时参与了多笔交易,你必须在再次购买前出售掉之前的股票。
示例 3:
输入: [7,6,4,3,1]
输出: 0
解释: 在这种情况下, 没有交易完成, 所以最大利润为 0。
提示:
- 1 <= prices.length <= 3 * 10 ^ 4
- 0 <= prices[i] <= 10 ^ 4
思路分析
其实这道题目思路也比较简单:
- 维护一个变量
profit用来存储利润
- 因为可以多次买卖,那么就要后面的价格比前面的大,那么就可以进行买卖
- 因此,只要
prices[i+1] > prices[i],那么就去叠加profit
- 遍历完成得到的
profit就是获取的最大利润

代码实现
/**
* @param {number[]} prices
* @return {number}
*/
var maxProfit = function (prices) {
let profit = 0;
for (let i = 0; i < prices.length - 1; i++) {
if (prices[i + 1] > prices[i]) profit += prices[i + 1] - prices[i];
}
return profit;
};不同路径 🛣
题目难度medium,涉及到的算法知识有动态规划。
题目描述
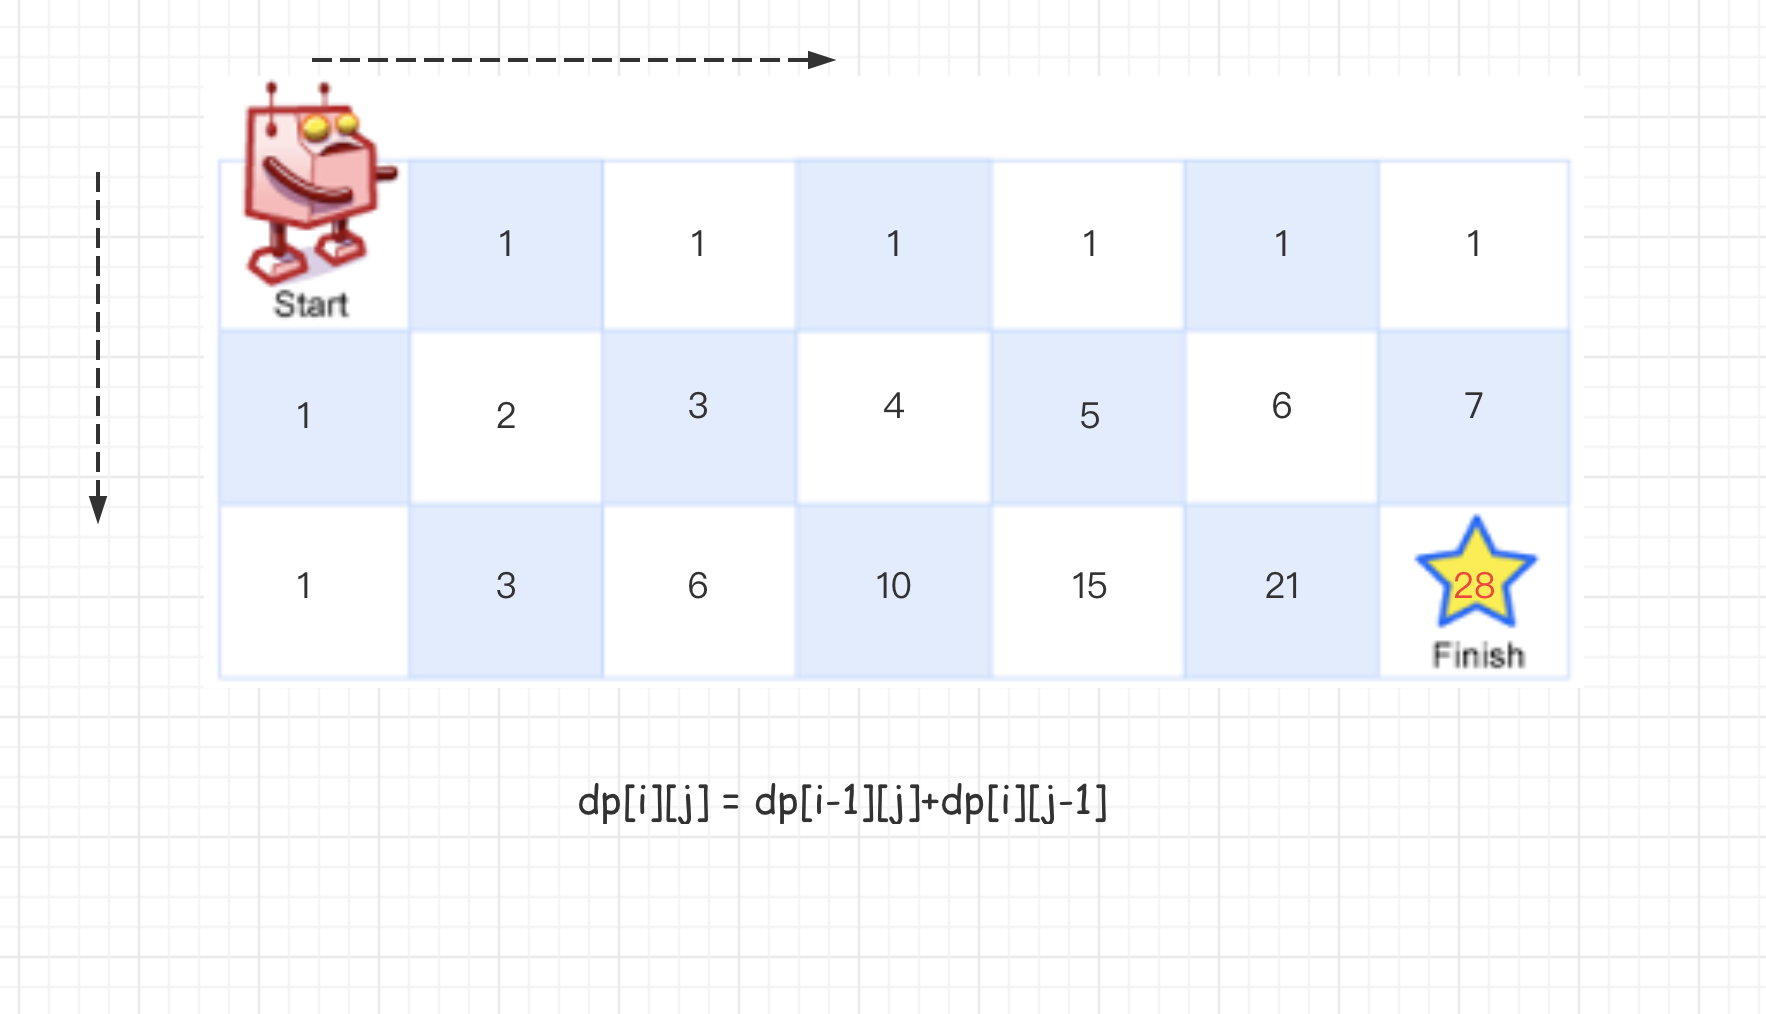
一个机器人位于一个 m x n 网格的左上角 (起始点在下图中标记为“Start” )。
机器人每次只能向下或者向右移动一步。机器人试图达到网格的右下角(在下图中标记为“Finish”)。
问总共有多少条不同的路径?

例如,上图是一个 7 x 3 的网格。有多少可能的路径?
示例 1:
输入: m = 3, n = 2
输出: 3
解释:
从左上角开始,总共有 3 条路径可以到达右下角。
1. 向右 -> 向右 -> 向下
2. 向右 -> 向下 -> 向右
3. 向下 -> 向右 -> 向右
示例 2:
输入: (m = 7), (n = 3);
输出: 28;
思路分析
由题可知:机器人只能向右或向下移动一步,那么从左上角到右下角的走法 = 从右边开始走的路径总数+从下边开始走的路径总数。

所以可推出动态方程为:dp[i][j] = dp[i-1][j]+dp[i][j-1]。
代码实现
这里采用Array(m).fill(Array(n).fill(1))进行了初始化,因为每一格至少有一种走法。
/**
* @param {number} m
* @param {number} n
* @return {number}
*/
var uniquePaths = function (m, n) {
let dp = Array(m).fill(Array(n).fill(1));
for (let i = 1; i < m; i++) {
for (let j = 1; j < n; j++) {
dp[i][j] = dp[i - 1][j] + dp[i][j - 1];
}
}
return dp[m - 1][n - 1];
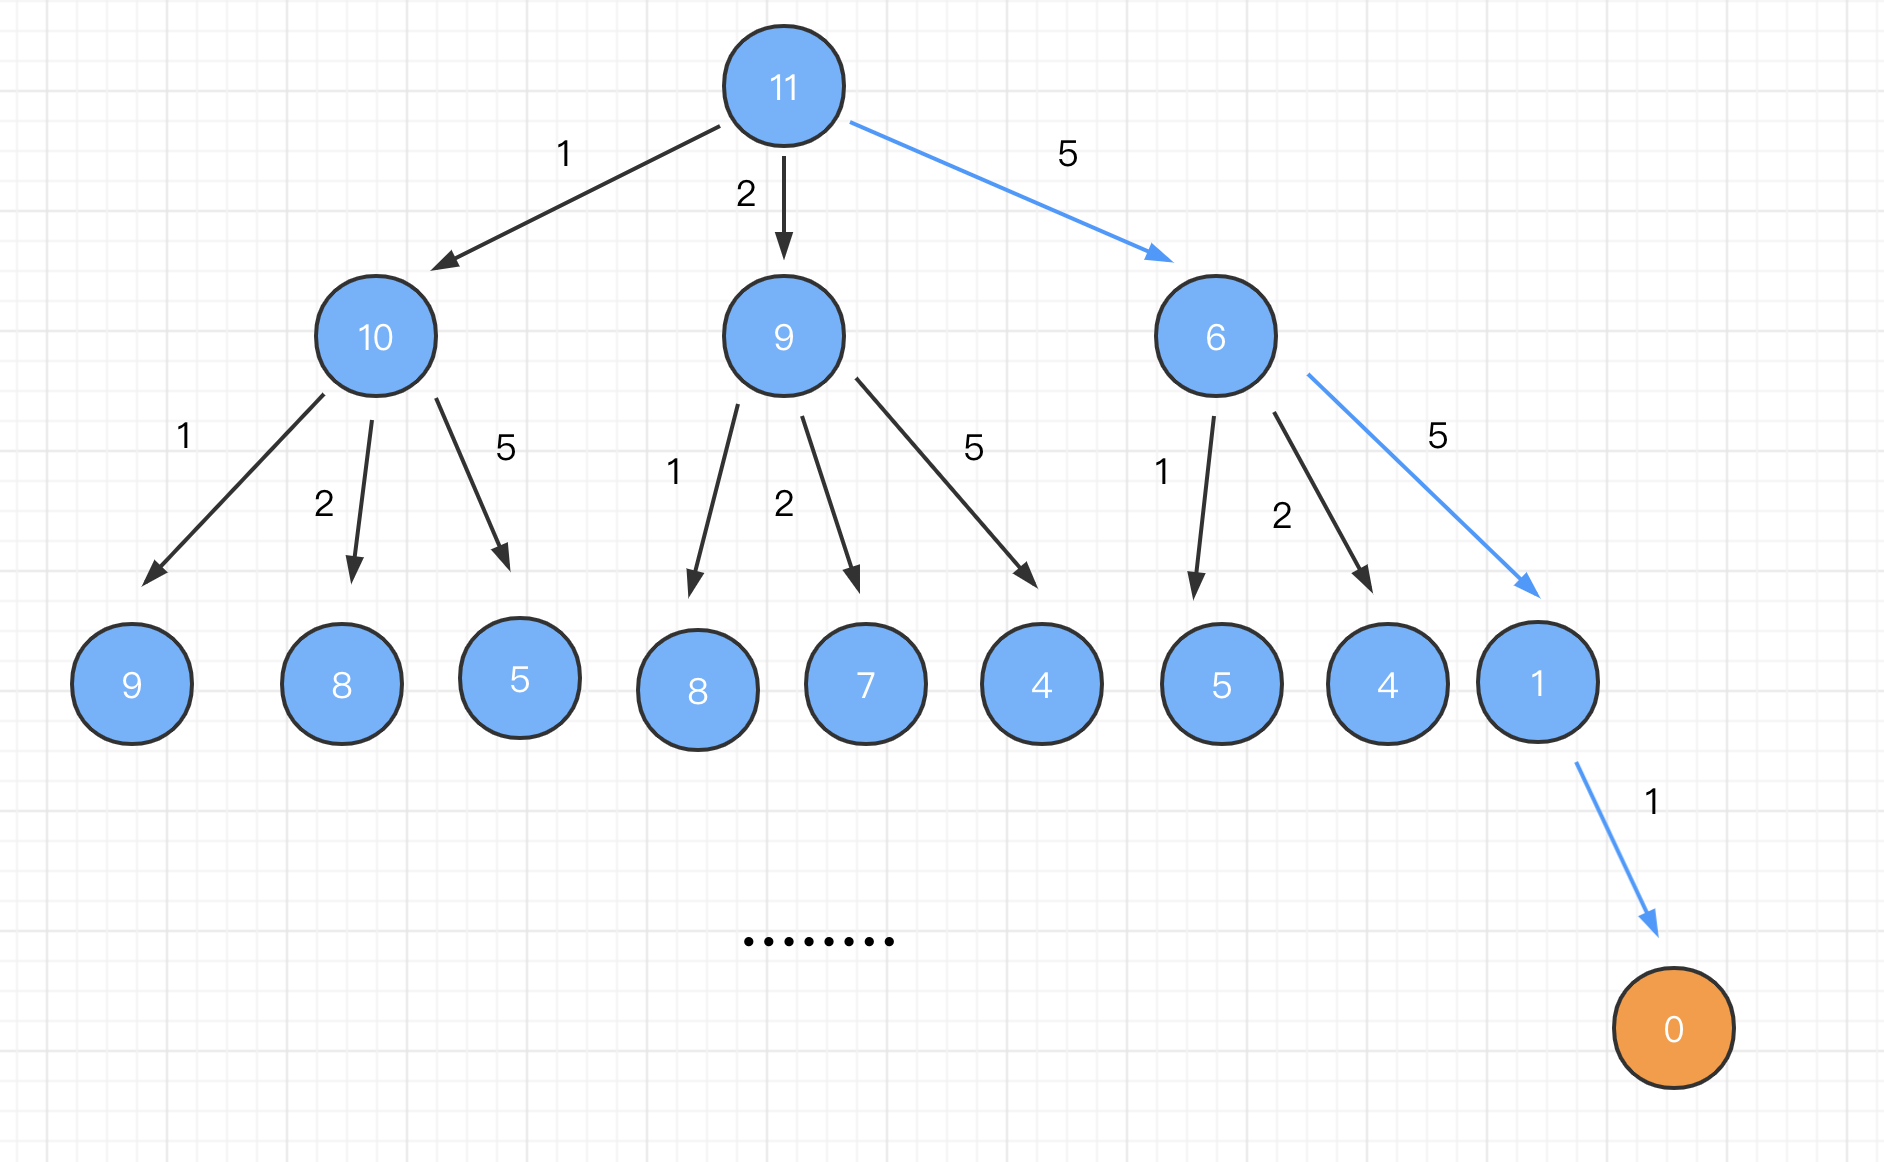
};零钱兑换 💰
题目难度medium,涉及到的算法知识有动态规划。
题目描述
给定不同面额的硬币 coins 和一个总金额 amount。编写一个函数来计算可以凑成总金额所需的最少的硬币个数。如果没有任何一种硬币组合能组成总金额,返回 -1。
示例 1:
输入: (coins = [1, 2, 5]), (amount = 11);
输出: 3;
解释: 11 = 5 + 5 + 1;
示例 2:
输入: (coins = [2]), (amount = 3);
输出: -1;
说明:
你可以认为每种硬币的数量是无限的。
思路分析
这道题目我们同样采用动态规划来解决。

假设给出的不同面额的硬币是[1, 2, 5],目标是 60,问最少需要的硬币个数?
我们需要先分解子问题,分层级找最优子结构。
dp[i]: 表示总金额为 i 的时候最优解法的硬币数
我们想一下:求总金额 60 有几种方法?一共有 3 种方式,因为我们有 3 种不同面值的硬币。
- 拿一枚面值为 1 的硬币 + 总金额为 59 的最优解法的硬币数量。即:dp[59] + 1
- 拿一枚面值为 2 的硬币 + 总金额为 58 的最优解法的硬币数。即:dp[58] + 1
- 拿一枚面值为 5 的硬币 + 总金额为 55 的最优解法的硬币数。即:dp[55] + 1
所以,总金额为 60 的最优解法就是上面这三种解法中最优的一种,也就是硬币数最少的一种,我们下面用代码来表示一下:
dp[60] = Math.min(dp[59] + 1, dp[58] + 1, dp[55] + 1);
推导出状态转移方程:
dp[i] = Math.min(dp[i - coin] + 1, dp[i - coin] + 1, ...)
其中 coin 有多少种可能,我们就需要比较多少次,遍历 coins 数组,分别去对比即可
代码实现
/**
* @param {number[]} coins
* @param {number} amount
* @return {number}
*/
var coinChange = function (coins, amount) {
let dp = new Array(amount + 1).fill(Infinity);
dp[0] = 0;
for (let i = 0; i <= amount; i++) {
for (let coin of coins) {
if (i - coin >= 0) {
dp[i] = Math.min(dp[i], dp[i - coin] + 1);
}
}
}
return dp[amount] === Infinity ? -1 : dp[amount];
};福利
大多数前端同学对于算法的系统学习,其实是比较茫然的,这里我整理了一张思维导图,算是比较全面的概括了前端算法体系。

另外我还维护了一个github仓库:https://github.com/Cosen95/js_algorithm,里面包含了大量的leetcode题解,并且还在不断更新中,感觉不错的给个star哈!🤗
❤️ 爱心三连击
1.如果觉得这篇文章还不错,来个分享、点赞、在看三连吧,让更多的人也看到~
2.关注公众号前端森林,定期为你推送新鲜干货好文。
3.特殊阶段,带好口罩,做好个人防护。