Giter VIP home page Giter VIP logo

blog's Introduction

CSS魔法 - 博客

所有博文均以 GitHub issue 的形式发布,点此阅读:

立即阅读

关于作者 / About

订阅

  • 新文章将在 “CSS魔法” 微信公众号首发,扫码立即订阅:

    weixin-qrcode-public-account

捐助

为什么要捐助?

一篇好文章可以帮助你节省大量的时间,而你的时间是相当宝贵的。

向文章的作者提供小额捐助,可以鼓励作者写出更好的文章。这是一种良性循环,现在就行动吧!

立即捐助
(支持微信与支付宝)

版权声明

  • 所有翻译文章(标题注明 [译] 的所有文章)的原文著作权属于原作者,译文的著作权属于 CSS魔法
  • 所有原创文章(除翻译文章外的所有文章)的著作权属于 CSS魔法

转载注意事项

除注明外,所有文章均采用 Creative Commons BY-NC-ND 4.0(自由转载-保持署名-非商用-禁止演绎)协议发布。

这意味着你可以在非商业的前提下免费转载,但同时你必须:

  • 保持文章原文,不作修改。
  • 明确署名,即至少注明 作者:CSS魔法 字样以及文章的原始链接,且不得使用 rel="nofollow" 标记。

如需商业合作,请直接联系作者

blog's People

Contributors

cssmagic avatar

Stargazers

 avatar  avatar  avatar  avatar  avatar  avatar  avatar  avatar  avatar  avatar  avatar  avatar  avatar  avatar  avatar  avatar  avatar  avatar  avatar  avatar  avatar  avatar  avatar  avatar  avatar  avatar  avatar  avatar  avatar  avatar  avatar  avatar  avatar  avatar  avatar  avatar  avatar  avatar  avatar  avatar  avatar  avatar  avatar  avatar  avatar  avatar  avatar  avatar  avatar  avatar  avatar  avatar  avatar  avatar  avatar  avatar  avatar  avatar  avatar  avatar  avatar  avatar  avatar  avatar  avatar  avatar  avatar  avatar  avatar  avatar  avatar  avatar  avatar  avatar  avatar  avatar  avatar  avatar  avatar  avatar  avatar  avatar  avatar  avatar  avatar  avatar  avatar  avatar  avatar  avatar  avatar  avatar  avatar  avatar  avatar  avatar  avatar  avatar  avatar  avatar

Watchers

 avatar  avatar  avatar  avatar  avatar  avatar  avatar  avatar  avatar  avatar  avatar  avatar  avatar  avatar  avatar  avatar  avatar  avatar  avatar  avatar  avatar  avatar  avatar  avatar  avatar  avatar  avatar  avatar  avatar  avatar  avatar  avatar  avatar  avatar  avatar  avatar  avatar  avatar  avatar  avatar  avatar  avatar  avatar  avatar  avatar  avatar  avatar  avatar  avatar  avatar  avatar  avatar  avatar  avatar  avatar  avatar  avatar  avatar  avatar  avatar  avatar  avatar  avatar  avatar  avatar  avatar  avatar  avatar  avatar  avatar  avatar  avatar  avatar  avatar  avatar  avatar  avatar  avatar  avatar  avatar  avatar  avatar  avatar  avatar  avatar  avatar  avatar  avatar  avatar  avatar  avatar  avatar  avatar  avatar  avatar  avatar  avatar  avatar  avatar  avatar

blog's Issues

前端进阶之路:点击事件绑定


引言

前端之所以被称为前端,是因为它是整个 Web 技术栈中距离用户最近、直接与用户进行交互的一环。而网页界面与用户的交互通常是通过各种事件来达成的;在各种事件之中,点击事件 往往又是最常见、最通用的一种界面事件。

本文将介绍我在 “点击事件绑定” 这一场景下的进阶之路。

背景

我是一个前端小兵,我在一家互联网公司做做一些简单的业务开发。

某一天,我接到了一个需求,做一个抽奖功能。公司里的前辈们已经完成了业务逻辑,而且已经提供了业务功能的接口,只需要我制作页面并完成事件绑定即可。

实践

开动

我写好了页面,页面中有一个 ID 为 lucky-draw 的按钮元素。接下来,我需要为它绑定点击事件。我是这样写的:

var btn = document.getElementById('lucky-draw')
btn.onclick = function () {
	BX.luckyDraw()
}

这其中 BX.luckyDraw() 就是前辈们提供的业务接口,执行它就可以运行后续的抽奖功能。

我测试了一下,代码工作正常,于是很开心地准备上线。

第一关

然而前辈们告诉我,这些重要功能的按钮是需要加统计的。这也难不倒我,因为我很熟悉统计系统的 API。于是我修改了一下事件绑定的代码:

btn.onclick = function () {
	BX.luckyDraw()
	BX.track('lucky-draw')
}

这样做是有效的,但前辈们又告诉我,因为某些原因,统计代码和业务代码是分布在不同位置的,以上代码需要拆开。于是我尝试这样修改:

btn.onclick = function () {
	BX.luckyDraw()
}

// some code...

btn.onclick = function () {
	BX.track('lucky-draw')
}

结果发现点击按钮时的抽奖功能失效了。原来,使用 .onclick 这样的事件属性来绑定事件有一个非常大的缺点,重复赋值会覆盖旧值。也就是说,这种方式只能绑定最后一次赋值的事件处理函数。

我硬着头皮去请教前辈,才知道原来这种方式早已经不推荐使用了,应该使用 DOM 标准的事件绑定 API 来处理(在旧版 IE 下有一些兼容性问题,这里不展开)。因此我的代码改成了这样:

btn.addEventListener('click', function () {
	BX.luckyDraw()
}, false)

// some code...

btn.addEventListener('click', function () {
	BX.track('lucky-draw')
}, false)

所有功能终于又正常了,我很开心地准备上线。

第二关

事实证明我还是太天真了,PM 是不会一次性把所有需求都告诉你的。原来,这个抽奖功能还需要做 A/B 测试,也就是说,只有一半的用户会看到这个抽奖功能。

这意味着用户的页面上可能根本没有 btn 这个元素,那么 btn.addEventListener(...) 这一句直接就抛错了。因此,在为按钮绑定事件处理函数之前,我不得不先判断一下:

if (btn) {
	btn.addEventListener('click', function () {
		BX.luckyDraw()
	}, false)
}

// some code...

if (btn) {
	btn.addEventListener('click', function () {
		BX.track('lucky-draw')
	}, false)
}

虽然这样的代码在所有用户的页面上都可以正常工作,但这些预先判断看起来很蛋疼啊。我再次带着疑惑向前辈请教。前辈慈祥地看着我,说出了一句经典名言:

傻瓜,为什么不用万能的 jQuery 呢?

原来,神奇的 jQuery 允许我们忽略很多细节,比如这种没有取到元素的情况会被它默默地消化掉。而且 jQuery 的事件绑定方法也不存在兼容性问题,API 也比较好看。不错不错,不管网上的大神们怎么喷 jQuery,但它简直是我的救星啊!

于是,我的代码变成了以下这样:

var $btn = $('#lucky-draw')
$btn.on('click', function () {
	BX.luckyDraw()
})

// some code...

$btn.on('click', function () {
	BX.track('lucky-draw')
})

我的代码看起来像那么回事了,我很开心地准备上线。

第三关

当然,我的故事不会这么快结束。要知道,对一个有追求的前端团队来说,不断提升用户体验是永恒的目标。比如,我们网站使用了一些方法来提升页面加载性能,部分页面内容并不是原本存在于页面中的,而是在用户需要时,由 JavaScript 动态生成的。

拿这个抽奖功能来说,抽奖按钮存在于一个名为 “惊喜” 的 tab 中,而这个 tab 在初始状态下是没有内容的,只有当用户切换到这个 tab 时,才会由 JS 填充其内容。示意代码是这样的:

$('.tabs > .surprise').on('click', function () {
	var htmlSurpriseTab = [
		'<div>',
			'<button id="lucky-draw">Lucky Draw</button>',
		'</div>'
	].join('')
	$('.tab-panels > .surprise').html(htmlSurpriseTab)

	// BTN READY
})

这意味着,我写的事件绑定代码需要写在 // BTN READY 处。这种深层的耦合看起来很不理想,我需要想办法解决它。

我想起来,我在阅读 jQuery 文档时看到有一种叫作 “事件委托” 的方法,可以在元素还未添加到页面之前就为它绑定事件。于是,我尝试这样来写:

$(document.body).on('click', '#lucky-draw', function () {
	BX.luckyDraw()
})

果然,我成功了!好事多磨啊,这个需求终于开心地上线了。

经过进一步的研究,我了解到 “事件委托” 的本质是利用了事件冒泡的特性。把事件处理函数绑定到容器元素上,当容器内的元素触发事件时,就会冒泡到容器上。此时可以判断事件的源头是谁,再执行对应的事件处理函数。由于事件处理函数是绑定在容器元素上的,即使容器为空也没有关系;只要容器的内容添加进来,整个功能就是准备就绪的。

虽然事件委托的原理听起来稍有些复杂,但由于 jQuery 对事件委托提供了完善的支持,我的代码并没有因此变得很复杂。

多想一步

经过这一番磨炼,我收获了很多经验值;同时,我也学会了更进一步去发现问题和思考问题。比如,在我们的网页,通常会有多个按钮,那为它们绑定事件的脚本代码可能就是这样的:

$body = $(document.body)
$body.on('click', '#lucky-draw', function () {
	BX.luckyDraw()
})

$body.on('click', '#some-btn', function () {
	// do something...
})
$body.on('click', '#another-btn', function () {
	// do something else...
})

我隐隐觉得这样不对劲啊!虽然这些代码可以正常工作,但每多一个按钮就要为 body 元素多绑定一个事件处理函数;而且根据直觉,这样一段段长得差不多的代码是需要优化的。因此,如果我可以把这些类似的代码整合起来,那不论是在资源消耗方面,还是在代码组织方面,都是有益的。

于是,我尝试把所有这些事件委托的代码合并为一次绑定。首先,为了实现合并,我需要为这些按钮找到共同点。很自然地,我让它们具有相同的 class:

<button class="action" id="lucky-draw">Lucky Draw</button>
<button class="action" id="some-action">Button</button>
<a href="#" class="action" id="another-action">Link</a>
<a href="#" class="action" id="another-action-2">Link</a>

然后,我试图通过一次事件委托来处理所有这些按钮:

$body.on('click', '.action', function () {
	// WHEN CLICK ANY '.action', WE COME HERE.
})

很显然,所有具有 action 类名的元素被点击后都会触发上面这个事件处理函数。那么,接下来,我们在这里区分一下事件源头,并执行对应的任务:

$body.on('click', '.action', function () {
	switch (this.id) {
		case 'lucky-draw':
			BX.luckyDraw()
			break
		case 'some-btn':
			// do something...
			break
		// ...
	}
})

这样一来,所有分散的事件委托代码就被合并为一处了。在这个统一的事件处理函数中,我们使用 ID 来区分各个按钮。

但 ID 有一些问题,由于同一页面上不能存在同名的元素,相信前端工程师们都对 ID 比较敏感,在日常开发中都尽量避免滥用。此外,如果多个按钮需要执行的任务相同,但它的 ID 又必须不同,则这些 ID 和它们对应的任务之间的对应关系就显得不够明确了。

于是,我改用 HTML5 的自定义属性来标记各个按钮:

<button class="action" data-action="lucky-draw">Lucky Draw</button>
<button class="action" data-action="some-action">Button</button>
<a href="#" class="action" data-action="another-action">Link</a>
<a href="#" class="action" data-action="another-action-2">Link</a>

我在这里使用了 data-action 这个属性来标记各个按钮元素被点击时所要执行的动作。回过头看,由于各个按钮都使用了这个属性,它们已经具备了新的共同点,而 class 这个共同点就不必要了,于是我们的 HTML 代码可以简化一些:

<button data-action="lucky-draw">Lucky Draw</button>
<button data-action="some-action">Button</button>
<a href="#" data-action="another-action">Link</a>
<a href="#" data-action="another-action-2">Link</a>

同时 JS 代码也需要做相应调整:

$body.on('click', '[data-action]', function () {
	var actionName = $(this).data('action')
	switch (actionName) {
		case 'lucky-draw':
			BX.luckyDraw()
			break
		case 'some-btn':
			// do something...
			break
		// ...
	}
})

我们的代码看起来已经挺不错了,但我已经停不下来了,还要继续改进。那个长长的 switch 语句看起来有点臃肿。通常优化 switch 的方法就是使用对象的键名和键值来组织这种对应关系。于是我继续改:

var actionList = {
	'lucky-draw': function () {
		BX.luckyDraw()
	},
	'some-btn': function () {
		// do something...
	}
	// ...
}

$body.on('click', '[data-action]', function () {
	var actionName = $(this).data('action')
	var action = actionList[actionName]

	if ($.isFunction(action)) action()
})

经过这样的调整,我发现代码的嵌套变浅了,而且按钮们的标记和它们要做的事情也被组织成了 actionList 这个对象,看起来更清爽了。

在这样的组织方式下,如果页面需要新增一个按钮,也很容易做扩展:

// HTML
$body.append('<a href="#" data-action="more-action">Link</a>')

// JS
$.extend(actionList, {
	'more-action': function () {
		// ...
	}
})

到这里,这一整套实践终于像那么回事了!

开源

我自己用这一套方法参与了很多项目的开发,在处理事件绑定时,它节省了我很多的精力。我忽然意识到,它可能还适合更多的人、更多的项目。那不妨把它开源吧!

于是我发布了 Action 这个项目。这个小巧的类库帮助开发者轻松随意地绑定点击事件,它使用 “动作” 这个概念来标记按钮和它被点击后要做的事情;它提供的 API 可以方便地定义一些动作:

action.add({
	'my-action': function () {
		// ...
	}
})

也可以手动触发已经定义的动作:

action.trigger('my-action')

应用

Action 这个类库已经被移动 Web UI 框架 CMUI 采用,作为全局的基础服务。CMUI 内部的各个 UI 组件都是基于 Action 的事件绑定机制来实现的。我们这里以对话框组件为例,来看看 Action 在 CMUI 中的应用(示意代码):

CMUI.dialog = {
	template: [
		'<div class="dialog">',
			'<a href="#" data-action="close-dialog">×</a>',
			'<h2><%= data.title %></h2>',
			'<div class="content"><%- data.html %></div>',
		'</div>'
	].join(''),

	init: function () {
		action.add({
			'close-dialog': function () {
				$(this).closest('.dialog').hide()
			}
		})
	},
	open: function (config) {
		var html = render(this.template, config)
		$(html).appendTo('body').show()
	}
}

CMUI.dialog.init()

只要当 CMUI.dialog.init() 方法执行后,对话框组件就准备就绪了。我们在业务中直接调用 CMUI.dialog.open() 方法、传入构造对话框所需要的一些配置信息,这个对话框即可创建并打开。

大家可以发现,在构造对话框的过程中,我们没有做任何事件绑定的工作,对话框的关闭按钮就自然具备了点击关闭功能!原因就在于关闭按钮(<a href="#" data-action="close-dialog">×</a>)自身已经通过 data-action 属性声明了它被点击时所要执行的动作('close-dialog'),而这个动作早已在组件初始化时(CMUI.dialog.init())定义好了。

结语

希望本文对你有所启发,也希望 Action 能在实际开发中帮到你。

关于更多细节,欢迎继续阅读:


© Creative Commons BY-NC-ND 4.0   |   我要订阅   |   我要打赏

UTM 参数、URL 和 HTML 实体的那点事

UTM 参数、URL 和 HTML 实体的那点事

这篇文章是写给运营同学的科普文。

源起

想写这篇文章,是因为最近在 GA 中发现了一些问题。

EmarSys 是公司新签约的 EDM 服务商,在 GA 中已经可以看到最新一期 EDM 带来的流量。但它的媒介参数似乎不正确,理论上应该设置为 email

图1

运营部的同学认为提供给 EDM 的链接不会有错,于是我深入分析之后便有了这篇文章。写完它,我以后应该就不需要口头再解答很多问题了。


UTM 参数

UTM 参数的作用这里暂不赘述。我们先看一个正常的、加了 UTM 参数的链接(URL),它通常是这样的:

http://www.foobar.com/?utm_source=google&utm_medium=cpc&utm_campaign=test&utm_term=test

简单小结一下参数规则:

  • UTM 参数可能有一个或多个。
  • 每个 UTM 参数由参数名和参数值组成,使用等号(=)连接。
  • 多个 UTM 参数之间使用 and 字符(&)连接。
  • 所有参数使用问号(?)附加到原始链接的尾部。
  • (其它略微高级一点的规则与主题无关,暂且略过。)

实际工作中,建议使用专门的链接生成工具来为链接添加 UTM 参数,避免手工失误。

当有人用浏览器访问这个 URL 时,UTM 参数就会发挥作用。

图2

好的,如果你只是提供一个最终链接给一个靠谱的 Agency,那么直接提供上面的链接就可以了。但是如果是自己制作 EDM,情况会稍稍复杂一些。

HTML 实体

EDM 的本质实际上是一个 HTML 页面(或一段 HTML 代码),理论上它需要遵守 HTML 规范。

我们在上面提到的 & 字符在 HTML 代码中是一个特殊字符,有特殊用途,它不能直接代表它自己。如果要在 HTML 页面中表达这个字符时,你需要在源代码中把它写成 &amp;。这种写法叫做“HTML 实体”,其它一些字符也需要以实体的形式来写入 HTML 代码中(比如大于号 >&gt;、人民币符号 ¥&yen; 等等)。

所以,如果要把链接加到 EDM 中的某个元素身上,在 HTML 源码中就需要这样写(摘自 EDM 源文件):

图3

当然,用户并不会接触到源代码。用户通常是使用邮件客户端(比如 FoxMail、Outlook 等)或浏览器来查看邮件,这些程序都是遵循 HTML 规范来开发的,它们可以正确地解析实体,将其转换为本来的字符。

所以,虽然我们在源代码中看到链接使用的是 &amp; 实体,但邮件在显示的时候,这些实体会被解读为 & 字符。也就是说,用户在查看邮件的时候,会得到一个正确的链接。如下图(EDM 源文件在浏览器中的效果):

图4


好,文章正文到此已经结束。不过文章开头的问题还没有解决,所以我们继续。

继续分析问题

到目前为止,事情看起来都还不错,对吧?

可是,我们并不是直接发送 HTML 文件,而是通过 EDM 投放系统(比如目前刚刚开始使用的 EmarSys)来完成邮件的发送。一封 EDM 从我们做好的 HTML 页面到发送到用户的邮箱中,经历了一些处理。其中一个相当重要的处理步骤,是把页面中原有的链接(通常已经加上了 UTM 参数)“包装”起来。也就是说,并不会把原链接直接提供给用户,而是把原链接替换成一个“中转链接”(格式大约是 http://link2.foobar.com/u/nrd.php?p=XXX)。

我们观察一下收到的 EDM 邮件,可以发现这一点:

图5

这个中转链接会把用户带到真正的目标页面。(为什么 EmarSys 要使用这种中转链接?其实几乎所有成熟的 EDM 服务商都会这样做,这样做有一些好处,不过这里也不赘述了。)

发现问题

铺垫了这么久,终于要发现真相了——问题就出在 EmarSys 的系统和这个中转链接。

这个系统并不能正确识别 HTML 页面中的实体,在生成中转链接的过程中,并不能把原链接中的 &amp; 实体解析为它的本意 & 字符,而是直接理解为实体的字面。这样一来,用户会被中转链接带到一个错误的、不是我们本意的地址。

下图是我对中转链接的跟踪,它通过 HTTP 重定向(302)实现跳转,跳转目标由 Location 字段指定:

图6

发现问题了吧?如果点击 EDM 中的链接,用户真正到达的地址是这样的:

图7

不要小看这几个字符的差异,这个 URL 的实际效果已经不是我们最初期望的那样了。如果你分析一下,会发现这个页面(除了 utm_source 参数以外)真正接收到的是 amp;utm_media 这样的参数,而不是原本的 utm_media 等等。参数传错了,GA 当然也就收不到正确的值,所以实际上不仅媒介参数有问题,活动、内容、关键字参数都没有收到:

图8

图9

图10

解决方案

目前我们所能做的:

  1. 向 EmarSys 反馈此问题,要求修复此缺陷。
  2. 在此问题修复之前,我们在 HTML 代码的链接中,不使用实体,直接使用 & 字符。(需要注意的是,这样编写的 HTML 代码是不规范的,我们这样做仅仅是为了绕过 EmarSys 系统的缺陷。)

© Creative Commons BY-NC-ND 4.0   |   我要订阅   |   我要打赏

About / 关于作者

About / 关于作者

My cyber-name is "cssmagic". I'm a web front-end engineer and an interaction designer, working for an Internet company in Shanghai China.

我的网名叫 “CSS魔法”,前端开发工程师 + 交互设计师,目前就职于上海某家互联网公司。

Contact / 联系方式

  • Email / 电子邮件: cssmagic.cn(at)gmail(dot)com

  • WeChat / 微信公众号: “CSS魔法”

    weixin-qrcode
    (扫描二维码,立即关注 “CSS魔法” 公众号。)

SNS / 社交网络


© Creative Commons BY-NC-ND 4.0   |   我要订阅   |   我要捐助

如何打赏

如何打赏

很高兴我写的文章(或我写的工具)对你有帮助,请我喝杯咖啡吧!

微信

用微信扫描以下二维码,即可发起转账。

(请核对收款人信息为 CSS魔法。另建议在本页留言注明打赏原因。)

二维码:微信转账页面

支付宝

用支付宝钱包 app 扫描以下二维码,即可发起转账。

(请核对收款账户为 psd***@gmail.com。另建议在转账备注中注明打赏原因。)

二维码:支付宝钱包付款页面

常见问题

  • 打赏多少?

    小额打赏,一杯咖啡钱就足够了。当然,多多益善,来者不拒。

  • 可以留名吗?

    可以留名,而且欢迎留名。在下面评论就可以了。


© Creative Commons BY-NC-ND 4.0   |   我要订阅   |   我要打赏

Unofficial Stylus org

Hi, @cssmagic! I couldn't find your e-mail, so I'm opening this issue in order to contact you about https://github.com/stylus/

I'm a maintainer for Stylus and we've thought about using the stylus org for some time in the past, but didn't “claimed” it yet. But now we're thinking about it more, and would like to know if it is possible for you to transfer the ownership for the @stylus org to us?

I can see that you have mostly placeholder projects there, so there shouldn't be any problems for you in transfering the org I think.

Windows XP、ClearType 和微软雅黑字体的那点事

Windows XP、ClearType 和微软雅黑字体的那点事

本文的部分内容整理自我对此问题的解答: XP 中微软雅黑的安装率是多少?哪个版本的更新包中带了微软雅黑字体?ClearType 在 XP 中是自动打开的吗? - 知乎

前言

多年以来,中文网页设计师一直处于一种 “字体匮乏” 的窘境之中。

这是因为从中文 Windows 的第一个版本 3.2 开始,在相当长的一段时期内,系统自带的中文字体就仅仅局限于苍白单调的 “宋黑仿楷”。加上长期以来 Windows 在字体渲染技术方面的严重缺失,使得设计师在为中文网页选择正文字体时,基本上就只有中易宋体的点阵形态这唯一的选择。

直到 Vista 携微软雅黑字体横空出世,中文网页设计师才仿佛看到了世界的曙光。

微软雅黑脱胎于方正集团旗下的新锐字体 “兰亭黑” 家族,不仅字体的间架结构针对屏幕阅读场景进行改造,同时还针对液晶屏幕下小字号的显示效果进行逐字的笔划微调工作(hinting),以保证最终为用户呈现出清晰、平滑、易于阅读的显示效果。

因此,微软雅黑一经推出,便在中文网页设计界引发不小的震动。网页设计师和前端工程师们不禁打起它的主意——如何将微软雅黑字体广泛、安全地应用到网页设计中去?或者说,微软雅黑字体的普及率究竟如何?

微软雅黑在 XP 中的安装率

微软雅黑是 Vista 及更高版本 Windows 的标配字体,但不是 XP 的标配字体。XP 的任何一个 SP 或更新包都没有(将来也不太可能)包含它。

XP 系统上的微软雅黑字体,通常有两种来源:

  • 用户主动下载安装。
  • 安装 Office 2007 以上版本时自动获得。

windows-xp-cleartype-and-microsoft-yahei-font-0

由此可见,稍微“高端”一些的 XP 用户都有可能安装了微软雅黑字体,但 具体比率不详

对此,我的建议是:

  • 考虑这个比率不如考虑目标受众群的划分和取舍。
  • 在一定程度上考虑好无雅黑情况下的平稳退化。

微软雅黑与 ClearType

ClearType 是微软开发的 次像素字体渲染 技术,这项技术的本质是充分利用液晶显示屏单颗像素内的 RGB 三基色的次像素(sub-pixel,也称作 “亚像素” 或 “子像素”)、独立控制每颗次像素的明暗度,在次像素的级别进行字体的渲染和显示,从而令字体在水平方向上的渲染分辨率达到了原来的三倍。

微软雅黑字体只有在使用 ClearType 技术进行渲染时,才会达到最佳视觉效果。下面的图片展示了不同情况下微软雅黑字体的渲染效果:

  1. 已启用 ClearType 渲染方式
  2. 已启用传统的字体平滑渲染方式
  3. 未启用任何字体平滑技术

windows-xp-cleartype-and-microsoft-yahei-font-1

从 Vista 开始,Windows 系统默认开启 ClearType 特性。但 Windows XP 是否支持 ClearType 字体渲染模式呢?

ClearType 在 XP 中的启用率

Windows XP 原生支持 ClearType,但可能是出于对性能的考虑,默认是关闭状态。用户可以通过以下步骤在 XP 中启用 ClearType:

控制面板 → 显示 → 外观 → 效果 → 使用下列方式使屏幕字体的边缘平滑:清晰

windows-xp-cleartype-and-microsoft-yahei-font-2

XP 用户还可以通过安装微软提供的 ClearType 设置工具(ClearType Tuner PowerToy)来获得对 ClearType 效果的更多控制。

windows-xp-cleartype-and-microsoft-yahei-font-3

(图片来源:Microsoft.com)

那么,在 XP 中手动打开 ClearType 的用户比率有多少?这个数字恐怕不是很乐观。但是幸运的是,IE 7.0 及以上版本都是在自身视口内强制开启 ClearType 的(哪怕你用的不是液晶显示器)。

而 XP 下的非 IE 用户呢?或许你可以假设他们都比较 “高端”,已经给自己的 XP 手动开启 ClearType 了。

结语

在国内,Windows XP 操作系统目前仍然拥有不可忽视的用户数量。如果要在网页中使用微软雅黑作为主力字体,我们不得不考虑 XP 环境下所存在的一些不确定因素。

那么,我们有没有可能对 XP 用户的这些情况进行针对性的探测和统计,以便根据数据来做决策呢?

对于用户的 ClearType 设置情况,网页中的 JavaScript 脚本无法获取。而对于用户是否安装了微软雅黑字体,实际上是有探测方法的,有兴趣的朋友请继续关注后续文章。


© Creative Commons BY-NC-ND 4.0   |   我要订阅   |   我要打赏

[译] 分分钟学会一门语言之 Ruby 篇

[译] 分分钟学会一门语言之 Ruby 篇

声明:原文版权属于 David UnderwoodJoel WaldenLuke Holder,原文以 CC BY-SA 3.0 协议发布。

# This is a comment
# 这是一行注释

=begin
This is a multiline comment
No-one uses them
You shouldn't either
多行注释是这样写的,
没人用它,你也不要用它。
=end

# First and foremost: Everything is an object.
# 第一条也是最重要的一条:每样东西都是对象。

# Numbers are objects
# 数字是对象

3.class #=> Fixnum
        # (译注:`class` 属性指向对象所属的类。这里的 Fixnum 即整数类。)

3.to_s #=> "3"
       # (译注:`to_s` 是整数对象的一个方法,其作用是转换为字符串。)


# Some basic arithmetic
# 一些基本运算
1 + 1 #=> 2
8 - 1 #=> 7
10 * 2 #=> 20
35 / 5 #=> 7

# Arithmetic is just syntactic sugar
# for calling a method on an object
# 这些运算符实际上都是语法糖,
# 相当于在对象上调用方法
1.+(3) #=> 4
10.* 5 #=> 50

# Special values are objects
# 特殊值也是对象
nil # Nothing to see here
    # 空值
true # truth
     # 真值
false # falsehood
      # 假值

nil.class #=> NilClass
true.class #=> TrueClass
false.class #=> FalseClass

# Equality
# 等式判断
1 == 1 #=> true
2 == 1 #=> false

# Inequality
# 不等式判断
1 != 1 #=> false
2 != 1 #=> true
!true  #=> false
!false #=> true

# apart from false itself, nil is the only other 'falsey' value
# 除了 false 本身之外,nil 是剩下的唯一假值

!nil   #=> true
!false #=> true
!0     #=> false
       # (译注:这个毁三观啊!)

# More comparisons
# 更多比较操作
1 < 10 #=> true
1 > 10 #=> false
2 <= 2 #=> true
2 >= 2 #=> true

# Strings are objects
# 字符串当然还是对象

'I am a string'.class #=> String
"I am a string too".class #=> String
# (译注:用单引号或双引号来标记字符串。)

placeholder = "use string interpolation"
"I can #{placeholder} when using double quoted strings"
#=> "I can use string interpolation when using double quoted strings"
# (译注:这里展现了字符串插入方法。)


# print to the output
# 打印输出
puts "I'm printing!"

# Variables
# 变量
x = 25 #=> 25
x #=> 25

# Note that assignment returns the value assigned
# This means you can do multiple assignment:
# 请注意,赋值语句会返回被赋进变量的那个值,
# 这意味着你可以进行多重赋值:

x = y = 10 #=> 10
x #=> 10
y #=> 10

# By convention, use snake_case for variable names
# 按照惯例,变量名使用由下划线串连的小写字母
# (译注:因为看起来像一条蛇,这种拼写称作“snake case”)
snake_case = true

# Use descriptive variable names
# 建议使用描述性的变量名
path_to_project_root = '/good/name/'
path = '/bad/name/'

# Symbols (are objects)
# Symbols are immutable, reusable constants represented internally by an
# integer value. They're often used instead of strings to efficiently convey
# specific, meaningful values
# 符号(也是对象)
# 符号是不可修改的、可重用的常量,在内部表示为一个整数值。
# 它们通常被用来代替字符串,来有效地传递一些特定的、有意义的值。

:pending.class #=> Symbol

status = :pending

status == :pending #=> true

status == 'pending' #=> false

status == :approved #=> false

# Arrays
# 数组

# This is an array
# 这是一个数组
[1, 2, 3, 4, 5] #=> [1, 2, 3, 4, 5]

# Arrays can contain different types of items
# 数组可以包含不同类型的元素

array = [1, "hello", false] #=> => [1, "hello", false]

# Arrays can be indexed
# From the front
# 数组可以用索引号来查询,下面是顺序索引查询
array[0] #=> 1
array[12] #=> nil

# Like arithmetic, [var] access
# is just syntactic sugar
# for calling a method [] on an object
# 类似于运算符,[var] 这种查询语法也是语法糖,
# 相当于在对象上调用 [] 方法
array.[] 0 #=> 1
array.[] 12 #=> nil

# From the end
# 下面是逆向索引查询
array[-1] #=> 5

# With a start and end index
# 使用开始和结束索引来查询
array[2, 4] #=> [3, 4, 5]

# Or with a range
# 或者使用范围来查询
array[1..3] #=> [2, 3, 4]

# Add to an array like this
# 用这种方式来向数组追加元素
array << 6 #=> [1, 2, 3, 4, 5, 6]

# Hashes are Ruby's primary dictionary with keys/value pairs.
# Hashes are denoted with curly braces:
# 哈希表是 Ruby 最主要的字典型名值对数据。
# 哈希表用花括号来表示:
hash = {'color' => 'green', 'number' => 5}

hash.keys #=> ['color', 'number']

# Hashes can be quickly looked up by key:
# 哈希表可以通过键名来快速查询:
hash['color'] #=> 'green'
hash['number'] #=> 5

# Asking a hash for a key that doesn't exist returns nil:
# 向哈希表查询一个不存在的键名会返回 nil:
hash['nothing here'] #=> nil

# Iterate over hashes with the #each method:
# 使用 #each 方法来迭代哈希表:
hash.each do |k, v|
  puts "#{k} is #{v}"
end

# Since Ruby 1.9, there's a special syntax when using symbols as keys:
# 从 Ruby 1.9 开始,当使用符号作为键名时,有其特定语法:

new_hash = { defcon: 3, action: true}

new_hash.keys #=> [:defcon, :action]

# Tip: Both Arrays and Hashes are Enumerable
# They share a lot of useful methods such as each, map, count, and more
# 提示:数组和哈希表都是可枚举的。
# 它们拥有很多相似的方法,比如 each、map、count 等等。

# Control structures
# 控制结构

if true
  "if statement" # (译注:条件语句)
elsif false
 "else if, optional" # (译注:可选的 else if 语句)
else
 "else, also optional" # (译注:同样也是可选的 else 语句)
end

for counter in 1..5
  puts "iteration #{counter}"
end
#=> iteration 1
#=> iteration 2
#=> iteration 3
#=> iteration 4
#=> iteration 5

# HOWEVER
# No-one uses for loops
# Use `each` instead, like this:
# 不过,
# 没人喜欢用 for 循环,
# 大家都用 `each` 来代替了,像这样:

(1..5).each do |counter|
  puts "iteration #{counter}"
end
#=> iteration 1
#=> iteration 2
#=> iteration 3
#=> iteration 4
#=> iteration 5

counter = 1
while counter <= 5 do
  puts "iteration #{counter}"
  counter += 1
end
#=> iteration 1
#=> iteration 2
#=> iteration 3
#=> iteration 4
#=> iteration 5

grade = 'B'

case grade
when 'A'
  puts "Way to go kiddo"
when 'B'
  puts "Better luck next time"
when 'C'
  puts "You can do better"
when 'D'
  puts "Scraping through"
when 'F'
  puts "You failed!"
else
  puts "Alternative grading system, eh?"
end

# Functions
# 函数

def double(x)
  x * 2
end

# Functions (and all blocks) implcitly return the value of the last statement
# 函数(包括所有的代码块)隐式地返回最后一行语句的值
double(2) #=> 4

# Parentheses are optional where the result is unambiguous
# 当不会产生歧义时,小括号居然也是可写可不写的。
double 3 #=> 6

double double 3 #=> 12
# (译注:连续省略小括号居然也可以!)

def sum(x,y)
  x + y
end

# Method arguments are separated by a comma
# 方法的参数使用逗号来分隔
sum 3, 4 #=> 7

sum sum(3,4), 5 #=> 12

# yield
# All methods have an implicit, optional block parameter
# it can be called with the 'yield' keyword
# 所有的方法都有一个隐式的、可选的块级参数,
# 它可以通过 `yield` 关键字来调用。

def surround
  puts "{"
  yield
  puts "}"
end

surround { puts 'hello world' }

# {
# hello world
# }


# Define a class with the class keyword
# 使用 class 关键字来定义类
class Human

    # A class variable. It is shared by all instances of this class.
    # 一个类变量。它将被这个类的所有实例所共享。
    @@species = "H. sapiens"

    # Basic initializer
    # 基本的初始化函数(构造函数)
    def initialize(name, age=0)
        # Assign the argument to the "name" instance variable for the instance
        # 把参数 `name` 赋值给实例变量 `@name`
        @name = name
        # If no age given, we will fall back to the default in the arguments list.
        # 如果没有指定 age,我们会从参数列表中获取后备的默认值。
        @age = age
    end

    # Basic setter method
    # 基本的 setter 方法
    def name=(name)
        @name = name
    end

    # Basic getter method
    # 基本的 getter 方法
    def name
        @name
    end

    # A class method uses self to distinguish from instance methods.
    # It can only be called on the class, not an instance.
    # 一个类方法使用开头的 `self` 来与实例方法区分开来。
    # 它只能在类上调用,而无法在实例上调用。
    def self.say(msg)
       puts "#{msg}"
    end

    def species
        @@species
    end

end


# Instantiate a class
# 实例化一个类
jim = Human.new("Jim Halpert")

dwight = Human.new("Dwight K. Schrute")

# Let's call a couple of methods
# 我们试着调用一些方法
jim.species #=> "H. sapiens"
jim.name #=> "Jim Halpert"
jim.name = "Jim Halpert II" #=> "Jim Halpert II"
jim.name #=> "Jim Halpert II"
dwight.species #=> "H. sapiens"
dwight.name #=> "Dwight K. Schrute"

# Call the class method
# 调用类方法
Human.say("Hi") #=> "Hi"

原文版本:2013-07-30 (如果原文已更新,请提醒我。)


© Creative Commons BY-NC-ND 4.0   |   我要订阅   |   我要打赏

[译] [PJA] [508] 基于 CommonJS、npm、Grunt 和 Browserify 构建客户端代码

[译] [PJA] [508] 基于 CommonJS、npm、Grunt 和 Browserify 构建客户端代码

Building Client-Side Code With CommonJS, npm, Grunt, and Browserify

基于 CommonJS、npm、Grunt 和 Browserify 构建客户端代码

There are a variety of competing standards for module management with JavaScript, but due to the popularity of Node, by far the most established is npm & CommonJS. There have been efforts to create a similar combination of features for the client-side, including AMD, Yeoman, and Bower, but none of them can compete with the simplicity and package availability of npm and CommonJS modules.

市面上有很多种相互竞争的 JavaScript 模块管理方案,不过由于 node 的流行,目前看来 npm 和 CommonJS 已经成为事实上的标准。于是,也有人在试图在客户端打造一个类似的功能组合,这其中包括 AMD、YeomanBower,但它们在易用性和包的丰富程度方面还无法与 npm 和 CommonJS 的模块系统相媲美。

To demonstrate, take a look at how you might build a minimal client-side guestlist app (just in case you need a bouncer at your birthday party).

下面我们就来演示一下,怎样构建一款精简的、纯客户端的“来宾清单”应用(假设你的生日聚会有保镖守门)。

Defining the App

定义你的应用

Most new software projects use agile development methods to produce quick software creation and enhancement iterations. In agile software, the time between releases is measured in days or weeks rather than months or years. To learn more about agile, see The Art of Agile Development: Pragmatic guide to agile software development, by James Shore, Chromatic.

新的软件项目大多采用“敏捷开发”方式来提高开发速度和迭代频率。在敏捷开发中,版本更迭的周期往往只是数天或数周,而不是相隔几个月或几年。如果你想进一步了解敏捷开发,参见由 James Shore 和 Chromatic 编写的《The Art of Agile Development: Pragmatic guide to agile software development》一书。

Typically when you set out to build an app, you'll start with a list of user stories. You can use those scenarios to come up with acceptance criteria, which can be further distilled into functional unit tests.

通常当你着手构建一款应用时,你应该从一系列 用户故事(User Story)开始。你可以从这些场景中总结出 验收准则,它们可以进一步提练为功能性的单元测试。

A user story is a short, simple description of some action that your user might want to perform. For example, "As an event organizer, I want to check arriving guests against the guestlist." User stories should always contain a role along with the story. Answer the questions, "who is performing the action?" and "what is the user trying to accomplish?"

用户故事实际上是一种简短描述,它勾勒出用户想要完成的某些动作。比如这样:“作为一个活动的组织者,我想通过这个来宾清单来核对客人的出席情况”。用户故事必须要有一个角色贯穿始终。要把这些问题表述清楚:“谁来完成这个动作”以及“用户想要完成什么任务”。

To express this example story in code, you'll need a list element with clickable links in list items. The unit tests might look something like this:

为了用代码来描述这些需求,你需要有一个列表元素,每个列表项还需要包含可点击的链接。好的,单元测试看起来可能是这样的:

Example 5-2. guestlist/test/test.js

示例 5-2. guestlist/test/test.js

var $list = $('#guestlist-view'),
  checkedinClass = 'icon-check',
  guestSelector = '.guest';

test('Guestlist', function () {
  ok($list.length,
    'List element should have guests.');
});

test('Guests', function () {

  // Grab the first guest from the list
  // 从列表中抓取第一位客人
  var $guest = $($list.find(guestSelector)[0]),
    guestExists = !!$guest[0];

  // Simulate click
  // 模拟点击操作
  $guest.click();

  ok($guest.hasClass(checkedinClass),
      'Should be checked on click');

  $guest.click();

  // To avoid a false positive, make sure
  // you have a guest element to test against.
  // 在个测试中,需要先确保操作对象是存在的,以免出现误报
  ok(guestExists && !$guest.hasClass(checkedinClass),
      'Should toggle off when clicked again');
});

You'll need to include that in your QUnit HTML file:

然后你需要在 QUnit HTML 文件中加入以下代码:

Example 5-3. guestlist/test/index.html

示例 5-3. guestlist/test/index.html

<!DOCTYPE html>
<html>
<head>
</head>
<body>
	<section>
		<h1 id="qunit-header">QUnit Test Suite</h1>
		<h2 id="qunit-banner"></h2>
		<div id="qunit-testrunner-toolbar"></div>
		<h2 id="qunit-userAgent"></h2>
		<ol id="qunit-tests"></ol>
	</section>

	<section id="container"></section>

	<script src="jquery.js"></script>
	<script src="qunit.js"></script>
	<script src="../public/app.js"></script>
	<script src="test.js"></script>
	<link href="qunit.css" rel="stylesheet"></style>

</body>
</html>

These tests will obviously fail at first. That's a good thing. If you can see your tests fail before you make them pass, you eliminate the possibility that your test results are showing you false positives. For this reason, TDD (Test Driven Development) proponents advocate writing your unit tests before you implement the code that they're written against. Because you're writing from an API user perspective when you write tests first, using test driven development forces you to write more modular, testable code. You may also notice that your APIs are easier to use because you're not worried about implementation details when you write your tests -- you won't accidentally leak implementation details into your APIs.

这些测试在第一次运行时显然会失败,不过这并不是坏事。因为,如果开始的测试结果是失败的,然后你一步步地让它们一条条通过,这就说明这些单元测试是可信的,并没有误报。基于这个原因, TDD(测试驱动开发)的支持者们主张在编写功能代码之前,先为这些代码编写单元测试。因为如果你先写测试代码,你就会从一个 API 用户的角度来做开发——换句话说,使用测试驱动开发强迫你写出更加模块化、更易于测试的代码。你可能也会发现,你写出来的 API 会更好用,因为你在写测试时并不关注实现的细节,这意味着你不会无意中把实现细节泄露到 API 中。

In fact, while I was writing this example, I started with the tests above, and then decided to implement the features. I was tempted to use some Twitter Bootstrap controls out of the box to implement my styles, but that would have forced me to expose unnecessary markup details in the API because Bootstrap makes assumptions about the tags you'll use to implement controls. As a result, I adapted the stylesheet to pass the tests, and the API is better for it. Had I not written failing tests first, I might have accepted the extra markup, and over-complicated the example, and then written tests that passed against the inferior implementation.

我在写这个示例的时候,事实上也是先从上面的测试代码入手,然后再开始完成具体功能的。在进入功能开发阶段时,我偷了个懒,引用了一些现成的 Twitter Bootstrap 控件来帮助我搞定样式问题。但我发现,这样一来,我就不得不把一些不必要的结构层细节暴露到 API 中,因为 Bootstrap 在实现控件时设立了一套结构层的约定。最终,我通过修改样式表的方法来通过测试(而不是去修改测试代码或 API),而 API 因此变得更好了(译注:这里的 API 不仅仅是指 JavaScript 方法,也包括事先定好的 CSS 类名或 HTML 标记)。如果我不是先写出了这些测试,我可能就会接受那些额外的结构层标签,并且把这个示例过度复杂化,然后又要为这个臃肿的实现来编写额外的测试代码。

(译注:作者这样做是为了避免单元测试和结构层发生不必要的耦合并增加不必要的复杂度。而且作者一直在强调一个原则:“先写单元测试,再做功能开发”,为了后者的便利而回头去修改前者,有违这个原则。不过在实际开发中,大家可以适当取舍,毕竟调样式也是需要成本的啊。)

[$]

Twitter Bootstrap is a popular CSS framework that is sometimes useful for prototyping web applications quickly. It's a good idea to play with it and see if it would be useful to you. Remember though that it's designed to be tweaked and customized. Don't feel like you have to conform to the default markup and classes if they don't fit your particular use-case.

Twitter Bootstrap 是一个流行的 CSS 框架,当你需要快速实现一个 web app 的原型时,它会很好用。值得花点时间来研究一下,看它是不是合你的胃口。不过别忘了它天生是可以微调和自定义的。如果它的标签和类名约定跟你的特定应用场景有冲突,不要以为你只能迁就它。

There's a running joke about how many sites look the same because they use all the same Bootstrap styles and controls. You may want to mix it up a little. There's an interesting blog post on the topic called, "Customize Twitter Bootstrap To Not Look Bootstrap-y" by Antonin Januska.

最近流行一个笑话,说的是现在的网站看起来千篇一律,原因是它们都在用 Bootstrap 的样式和控件。你可能希望自己能稍微有点儿与众不同。有一篇有趣的博文就是专门说这个的,是 Antonin Januska 写的《怎样把 Twitter Bootstrap 整得不那么俗》

Time to see the test output from QUnit:

我们该看一下 QUnit 的测试输出了:

Failing QUnit Screenshot

Figure 5-3. Failing QUnit Screenshot

图 5-3. 失败的 QUnit 截图

Failing tests will be listed in red. To make the tests turn green, you'll need to implement the features. Normally it's wise to break the code up into separate concerns. There's a lot more on that topic in Chapter 6. In this case, you'll separate presentation concerns from data management. The data will come from a stubbed model module named guestlistmodel.js. For now it will just return some hard-coded names. You can implement loading and saving later:

失败的测试会显示为红色。如果想让测试结果变绿,你需要把这些特性开发完成。一般来说,把代码拆解为分离的关注点是一个明智之举。我们会在 第六章 详细讨论这个话题。在这里,你将从数据管理中剥离出表现层的关注点。数据取自一个名为 guestlistmodel.js 的独立的模型模块(译注:“模型”一词通常表示以一定方式组织的数据源)。目前它只会返回一些事先写好的名字,你可以稍后自己实现增删改之类的功能:

Example 5-4. guestlist/src/guestlistmodel.js

示例 5-4. guestlist/src/guestlistmodel.js

var api = {
  load: function load() {
    return [
      'Jimi Hendrix',
      'Billie Holiday',
      'Nina Simone',
      'Jim Morrison',
      'Duke Ellington',
      'John Bonham'
    ];
  }
};

module.exports = api;

As you can see, this file is pretty straightforward. It just defines an api object and sets it on module.exports to expose it to other modules in accordance with the CommonJS specification.

如你所见,这个文件非常直接了当。它仅仅定义了一个 api 对象,然后通过 module.exports 暴露给其它模块,这与 CommonJS 的模块规范保持一致。

The code to manipulate the list DOM elements will go into a file named guestlistview.js:

接下来,负责 DOM 操作的代码将写进 guestlistview.js 文件中:

Example 5-5. guestlist/src/guestlistview.js

示例 5-5. guestlist/src/guestlistview.js

var $ = require('jquery-browserify'),
  checkedinClass = 'icon-check',
  listClass = 'dropdown-menu',
  guestClass = 'guest',

  toggleCheckedIn = function toggleCheckedIn(e) {
    $(this).toggleClass(checkedinClass);
  },

  $listView = $('<ol>', {
    id: 'guestlist-view',
    'class': listClass
  }).on('click', '.' + guestClass, toggleCheckedIn),

  render = function render(guestlist) {

    $listView.empty();

    guestlist.forEach(function (guest) {
      $guest = $('<li class="' + guestClass + '">' + 
        '<span class="name">' + guest + 
        '</span></li>');
      $guest.appendTo($listView);
    });

    return $listView;
  },

  api = {
    render: render
  };

module.exports = api;

This is the file doing all the work. First it uses .require() to get a reference to jQuery, and sets a few self-documenting variable names. The toggleCheckedIn() function is an event handler for the click event.

这就是这个文件完成了所有的核心功能。首先它使用 require() 来获取对 jQuery 的引用,然后定义了一些很直观的变量名。那个 toggleCheckedIn() 函数是一个事件处理函数,用于处理 click 事件。

The list element gets added. Note that it's using jQuery's .on() method to delegate the click events. .on() is the recently recommended way to hook up event handlers in jQuery. It replaces the deprecated .bind(), .live(), and .delegate() methods with a simplified syntax, and more consistent signature.

接下来,列表元素被添加到页面中。请注意它使用的是 jQuery 的 .on() 方法来委托点击事件。.on() 是目前 jQuery 推荐绑定事件处理函数的方式。它的语法更简单,而且传参方式更统一,取代了过时的 .bind().live().delegate() 方法。

[$]

By delegating to the parent ordered list element, you can replace, remove, and add children to the list without worrying about removing and replacing event listeners. There won't be any memory leaks, and you don't have to wait until the whole list is rendered before you attach the listener. If you're hooking up listeners to DOM elements, most of the time, delegating to an ancestor is the right approach.

通过在有序列表(父元素)身上进行事件委托,你可以在列表中替换、移除、增加列表项,而不用操心增减相应的事件监听器。这种方式一来避免了内存泄露,二来不需要在等待整个列表渲染完成之后再绑定监听器。如果你需要在多个 DOM 元素上绑定监听器,那么委托给一个祖先元素往往是正确的选择。

The .render() method takes an array of guest names, iterates over each one, and adds a corresponding list item to the $listView element. It then returns the rendered element to the calling function.

.render() 方法可以接收一个数组,并遍历数组中各位来宾的姓名,然后把对应的列表项添加到 $listView 元素中。最后它将返回渲染完成的列表元素。

The rest of the code simply defines the public API and exposes it via CommonJS.

剩下的代码就很简单了——定义公开 API,并且以 CommonJS 的方式暴露出来。

[$]

Some developers will intersperse module.exports assignments throughout a module. I find that having a single module.exports at the bottom of the file more clearly documents the module's public API.

有些开发者可能会在模块内部零星地为 module.exports 赋值。而我更倾向于在模块底部只保留一条赋值语句,这样可以更加清晰地展示出这个模块的所有公开 API。

So far, the modules don't know about each other, so there's no way for them to do any work. To bring all the pieces together and manage the initial render, you'll need a higher level abstraction to kick things off. Enter app.js:

到目前为止,模块之间还并不了解,所以它们还无法协同工作。为了把所有的零件组合起来,并处理好页面的初始化渲染,你需要一个更高级别的抽象来启动这些工作。进入 app.js 文件:

Example 5-6. guestlist/src/app.js

示例 5-6. guestlist/src/app.js

var $ = require('jquery-browserify'),
  guestlistModel = require('./guestlistmodel'),
  guestlistView = require('./guestlistview'),
  $container = $('#container');

$(function init() {
  var guestlistData = guestlistModel.load(),
    $guestlist = guestlistView.render(guestlistData);
  $container.empty().append($guestlist);
});

This one should be fairly simple to follow. It uses .require() to reference guestlistModel and guestlistView, loads the guestlist, passes the data into guestlistView.render(), and adds it to the container element.

这段代码应该很容易看明白。这里先使用 .require() 来引入 guestlistModelguestlistView 模块,然后读取来宾的名单数据,再将数据传入 guestlistView.render() 方法,最后将渲染结果添加到 #container 元素中。

[$]

The .append() line at the end of the init() function calls jQuery's .empty() method first for a couple of important reasons: First, if there's anything in that space already, it should be replaced, but it also releases references to event listeners so that the memory can be garbage collected. This is a better strategy than simply calling .html(). The latter is by far the more popular method, but it can be a major source of bugs and confusion when you start to develop large, client-heavy applications in JavaScript.

init() 函数的尾部,.append() 所在的那一行首先调用了 jQuery 的 .empty() 方法,这样做是基于以下一些重要原因:首先,如果那里已经有一些东西的话,它应该被替换掉;同时,这样做也将释放对事件监听器的引用,从而触发垃圾回收,释放内存。这个策略比单纯地调用 .html() 方法要更好一些。虽然后者明显更加流行,但当你在开发重量级的客户端 JavaScript 应用程序时,它可能会导致 bug 或一些莫名其妙的情况。

(译注:这里再展开讲一下这两者的区别。.html() 的本质是对容器元素的 .innerHTML 属性进行赋值,浏览器需要经过一个“HTML→DOM”的解析步骤才能在容器内部生成子元素。而这个过程如果发生在 DOM 树上,往往会消耗大量时间,因此浏览器可能会出于优化的目的,把这个过程作异步处理。此时,如果你立即操作子元素,可能会出现错误,因为子元素还没有生成。而作者所使用的方法实际上是在先“异次元空间”中构建好 $listView 及其子元素,然后再把它们附着到 DOM 树上,这样就有效避免了上述问题。)

None of this is going to work yet, because the modules all need to be compiled together in order of their dependencies. For that, you'll need Browserify.

不过它们目前还无法正常工作,因为所有模块都需要按照它们的依赖关系进行编译打包。要完成这一步,你需要用到 Browserify。

Browserify is a Node module that makes CommonJS modules work in the browser, using a server-side build step. The browserify command is available to kick off the bundle:

Browserify 本身是一个 Node 模块,它通过一个服务器端的构建步骤,来使 CommonJS 模块工作在浏览器中。使用 browserify 命令可以启动软件包。

$ browserify src/app.js -o public/app.js

That's a bit too manual, though. You'll want to use grunt to automate the build. That way you can lint, build, and run your unit tests all in one step. Start with package.json:

不过这种方式看起来有一点“人肉”。你可能想用 grunt 来把这个构建环节自动化。通过它的帮助,你可以一键完成代码校验、构建打包、单元测试等任务。我们从 package.json 开始入手:

Example 5-7. guestlist/package.json

示例 5-7. guestlist/package.json

{
  "name": "guestlist",
  "version": "0.1.0",
  "author": "Eric Elliott",
  "description": "A handy tool for bouncers.",
  "keywords": ["party", "guestlist"],
  "main": "dist/app.js",
  "scripts": {
    "test": "grunt test"
  },
  "dependencies": {
    "jquery-browserify": "*"
  },
  "devDependencies": {
    "traverse": "*",
    "grunt": "*",
    "grunt-browserify": "*",
    "browserify": "*"
  },
  "engines": {
    "node": "&gt;=0.6"
  }
}

Since you'll be deploying this app, you should consider all of the code it uses to be part of the app, including its dependencies. You don't want those dependency versions shifting around under your feet during your deploy step. The less uncertainty and moving parts you have in a deploy step the better. For that reason, you're going to want to check in your node_modules directory (don't add it to .gitignore).

如果你将来打算把这个应用部署到各处或持续更新下去,那么,除了应用本身的代码之外,你还应该把应用的依赖库也看作应用的一部分。你肯定不愿意在每次部署时都担心这些依赖库的版本是不是又变了。在部署环节中,不确定因素和外围部件当然是越少越好。因此,你需要把你的 node_modules 目录提交至代码仓库(千万不要把它加到 .gitignore 文件中,以防被版本控制系统忽略)。

Because all of the dependencies are going to be checked into the repository, you don't need to specify the versions to install. The "*" indicates that you want to use the latest version.

由于所有的依赖库都将被提交到仓库,你就不需要在这里指定安装什么版本了。这里的 "*" 表明你想使用最新的版本。

You'll also need a gruntfile. Currently the latest stable version of grunt looks for grunt.js by default. That's changed in the current alpha version, so you might need to use gruntfile.js as the filename. Here's what it looks like:

你还需要有一个 Grunt 启动文件。目前 Grunt 的最新稳定版会默认去找 grunt.js 文件。但在最新的内测版中,这一行为发生了变化,因此你可能需要使用 gruntfile.js 作为文件名。这个文件看起来是这样的:

Example 5-8. guestlist/grunt.js

示例 5-8. guestlist/grunt.js

/*global module*/
module.exports = function(grunt) {
  'use strict';
  grunt.initConfig({

    // Read package.json into an object for later
    // reference (for example, in meta, below).
    // 读取 package.json 并存入一个对象以便稍后引用,
    // 比如在下面的 meta 字段中会用到。
    pkg: '<json:package.json>',

    meta: {

      // A template to add to the top of the bundled
      // output.
      // 这个模板会插入到打包输出文件的顶部。
      banner: '\n/*! <%= pkg.title || pkg.name %> ' +
        '- v<%= pkg.version %> - ' +
        '<%= grunt.template.today("yyyy-mm-dd") %>\n ' +
        '<%= pkg.homepage ? "* " + pkg.homepage + "\n' +
        ' *\n " : "" %>' +
        '* Copyright (c) ' +
        '<%= grunt.template.today("yyyy") %> ' +
        '<%= pkg.author.name %>;\n' +
        ' * Licensed under the <%= ' +
        '_.pluck(pkg.licenses, "type").join(", ") %>' +
        ' license */'
    },

    // Specify which files to send through JSHint.
    // 指定哪个文件将被发送给 JSHint 工具。
    lint: {
      all: ['./grunt.js', './src/**/*.js',
        './test-src/test.js']
    },

    // JSHint configuration options.
    // JSHint 的选项设置。
    jshint: {
      browser: false,
      node: true,
      strict: false,
      curly: true,
      eqeqeq: true,
      immed: true,
      latedef: true,
      newcap: true,
      nonew: true,
      noarg: true,
      sub: true,
      undef: true,
      unused: true,
      eqnull: true,
      boss: false
    },

    // Specify test locations for QUnit.
    // 为 QUnit 指定测试地址。
    qunit: {
      browser: ['test/index.html']
    },

    // Configuration for browserify.
    // browserify 的配置信息。
    browserify: {
      "public/app.js": {
        requires: ['traverse'],
        entries: ['src/**/*.js'],
        prepend: ['<banner:meta.banner>'],
        append: [],
        hook: function () {
          // bundle is passed in as first param
          // 打包文件会作为第一个参数传进来。
        }
      }
    }

  });

  // Load browserify tasks. Needed for bundling.
  // 读取 browserify 任务,用于打包。
  grunt.loadNpmTasks('grunt-browserify');

  // Setup command line argument tasks. For e.g.:
  // $ grunt # executes lint, browserify, qunit
  // $ grunt test # runs qunit task, only.
  // 设置命令行参数:
  // $ grunt  # 执行 lint, browserify, qunit 任务
  // $ grunt test  # 只执行 qunit 任务
  grunt.registerTask('default', 'lint browserify qunit');
  grunt.registerTask('install', 'browserify');
  grunt.registerTask('test', 'qunit');
};

The Grunt configuration file is just a Node JavaScript module, so you can write functions in it, evaluate expressions, and so on.

Grunt 配置文件就是一个 Node 版的 JavaScript 模块,因此你可以在它里面编写函数、执行表达式等等。

Browserify requires a little extra configuration sometimes. Please refer to the grunt-browserify documentation for specific settings. Just don't forget to load the grunt tasks with grunt.loadNpmTasks('grunt-browserify').

有时 Browserify 还需要做一点额外的配置工作。详细设置请参考 grunt-browserify 的相关文档。别忘了要使用 grunt.loadNpmTasks('grunt-browserify') 来加载 grunt 任务。

The .registerTask() calls make grunt command line arguments available. For example, all the default tasks will run when you execute grunt without any arguments, and grunt test will only run the tests.

最后几个 .registerTask() 语句将使 grunt 的命令行参数变得可用。举个例子,当你以不指定任何参数的方式执行 grunt 命令时,所有的 default 任务都将运行;而 grunt test 命令将只运行测试任务。

Time for some action:

现在可以跑起来了:

$ grunt
Running "lint:all" (lint) task
Lint free.

Running "browserify:public/app.js" (browserify) task

Running "qunit:browser" (qunit) task
Testing index.html..OK
>> 3 assertions passed (32ms)

Done, without errors.

Notice the QUnit task output. The tests are green, and in this form, you can run them on an automated continuous integration system.

请注意 QUnit 任务的输出,测试都是绿色的了。你还可以在一个自动化的持续集成系统中以这种形式运行测试。

In case you're curious, the browser output looks like this:

如果你好奇的话,可以看一下浏览器中的测试结果:

Passing QUnit Screenshot

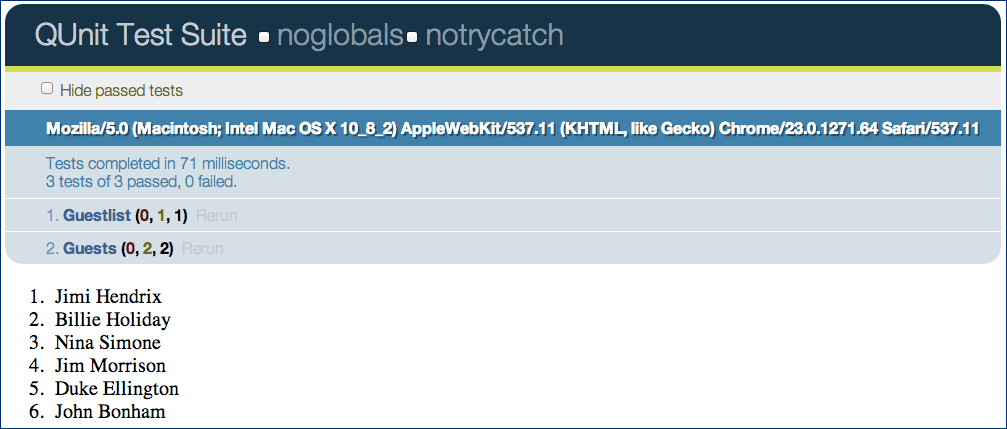
Figure 5-4. Passing QUnit Screenshot

图 5-4. Passing QUnit Screenshot

In general, CSS is a little outside the scope of this book, but there are a few tips you should be aware of. For some great ideas on how to use CSS for applications, see Scalable and Modular Architecture for CSS, by Jonathan Snook.

大体来说,CSS 有点超出了本书的范畴,但有些小技巧还是应该掌握的。关于如何在应用程序中使用 CSS,你可以在 Jonathan Snook 的《可扩展与模块化的 CSS 架构》一书中找到一些好想法。

The Guestlist code employs a custom icon font for the checkbox. Fonts provide a major advantage over traditional methods like png icons. For instance, they are infinitely scaleable, and you can apply any CSS you'd normally apply to text. You can also create a single, custom font that is easy for clients to download. The font was created using a free custom font app called IcoMoon. The icon font related CSS looks like this:

这个应用使用了一个自定义的“图标字体”来显示复选框。字体提供了比传统方式(比如 png 图片)更大的优势。比如说,它们可以被无限放大而不失真(译注:因为它们是矢量的),而且你可以对它们应用任何适用于文本的 CSS 样式。你也可以创建一个单字符的字体文件,从而易于在客户端下载。有一个免费的字体自定义应用叫做 IcoMoon,可以用来创建这种字体。跟图标字体相关的 CSS 代码如下:

Example 5-9. Icon Font CSS

示例 5-9. Icon Font CSS

@font-face {
  font-family: 'guestlist';
  src:url('fonts/guestlist.eot');
  src:url('fonts/guestlist.eot?#iefix')
      format('embedded-opentype'),
    url('fonts/guestlist.svg#guestlist')
      format('svg'),
    url('fonts/guestlist.woff') format('woff'),
    url('fonts/guestlist.ttf') format('truetype');
  font-weight: normal;
  font-style: normal;
}

[class^="icon-check"]:before,
[class*=" icon-check"]:before {
  font-family: 'guestlist';
  font-style: normal;
  font-size: .75em;
  speak: none;
  font-weight: normal;
  -webkit-font-smoothing: antialiased;
}
.icon-check:before {
  content: "\e000";
}
.dropdown-menu .icon-check .name {
  padding-left: 1em;
}

(译注:本节简要演示了一个客户端项目的开发流程和构建工具链。不过,如果想在浏览器端用 CommonJS 方式来写模块,国内开发者应该还是会选择 Sea.js 作为解决方案吧。)


© Creative Commons BY-NC-ND 4.0   |   我要订阅   |   我要打赏

[译] YUI 的浏览器分级支持策略

[译] YUI 的浏览器分级支持策略

译者札记:YUI 停止开发,宣告了一个旧王朝的结束,和一个新时代的到来。尽管如此,YUI 所倡导的“浏览器分级”策略对前端开发领域的影响仍将延续。今日重新翻出这篇文章,别有一番滋味。

About the Browser Test Baseline and Operating Systems

关于浏览器测试基准与操作系统

The Browser Test Baseline provides a baseline set of browsers that should be tested. It is designed to maximize coverage with limited testing resources by testing the smallest possible subset of browser combinations and leveraging implicit coverage from shared core browser engines. At the very least, all listed browsers should be tested in one operating system, in order to provide "baseline" coverage. Testing on multiple operating systems should be accommodated after all browsers have been verified with baseline coverage and should start with features that have known platform-specific issues. The test platforms should be chosen based on usage statistics and market trends.

“浏览器测试基准”规定了哪些浏览器是必测的。它的设计原理在于,努力把测试目标收窄为浏览器(平台与版本)组合的最小子集,同时利用浏览器引擎的共通性扩大实际的测试覆盖面,最终在有限的测试资源下实现测试覆盖率的最大化。最低的限度是,所有目标浏览器都至少需要先在一款操作系统下进行测试,以提供一个“基准”覆盖。多操作系统测试应该在所有浏览器已经经受基准覆盖的检验之后再进行,并且应该将测试重点放在那些已知在特定平台上存在问题的特性上。这个测试平台(操作系统)应该是根据流量统计和市场趋势来选定的。

(译注:在当下更加复杂的浏览器环境下,已经不可能找到一个上文所述的通用测试平台了。不过这无伤大雅,我们仍然可以对每款浏览器在其特定平台上分别测试,以完成基准覆盖。所谓“基准覆盖”,就是测试覆盖面的最底限——土豪项目组尽管去做更多的测试,但屌丝项目组不得少于这个基准的测试覆盖面。因此,虽然浏览器生态今非昔比,这里的“基准覆盖”理论在维护测试成本方面仍具实践意义。)

The Browser Test Baseline defines the current set of browsers that should receive a verified, usable experience. However, trying to deliver the same "A-grade" experience across all tested browsers is neither cost-effective nor common. We support a tiered approach to user experience design, development, and testing, and encourage each project to define their own tiers that serve their users and their testing resources best.

“浏览器测试基准”还规定了当前哪些浏览器应该(在使用网页服务时)获得可靠的、可用的体验。不过,向所有受测浏览器提供同等“A 级”的体验,既不划算,也很难做到。我们推荐以“分层”的方式来进行用户体验的设计、开发和测试,也鼓励每个项目去定义自己的分层标准,以便更好地服务用户、更有效地利用测试资源。

Graded Browser Support: What and Why

浏览器分级支持策略的含义和意义

In the first 10 years of professional web development, back in the early '90s, browser support was binary: Do you -- or don't you -- support a given browser? When the answer was "No", user access to the site was often actively prevented. In the years following IE5's release in 1998, professional web designers and developers have become accustomed to asking at the outset of any new undertaking, "Do I have to support Netscape 4.x browsers for this project?"

在专业的 Web 开发的头十年,也就是九十年代初,浏览器支持策略通常是二元化的——对于某个浏览器,你要么支持,要么不支持。当你选择“不”时,使用这款浏览器的用户往往会被你直接挡在门外。在 IE5 发布(1998 年)之后的几年里,专业的 Web 设计师和工程师在开始一个新项目时,总免不了要问一下自己:“我到底要不要支持网景浏览器 4.x 呢?”

By contrast, in modern web development we must support all browsers. Choosing to exclude a segment of users is inappropriate, and, with a "Graded Browser Support" strategy, unnecessary.

相比之下,在现代 Web 开发中,我们必须支持所有浏览器。把一部分用户挡在门外是不合适的;而且,如果有了“浏览器分级支持”策略,你也用不着这样做。

Graded Browser Support offers two fundamental ideas:

浏览器分级支持策略包含两个基本理念:

  • A broader and more reasonable definition of "support."

  • The notion of "grades" of support.

  • 对“支持”的更广泛、也更合理的定义

  • “分级”支持的概念

What Does "Support" Mean?

到底什么叫“支持”?

Support does not mean that everybody gets the same thing. Expecting two users using different browser software to have an identical experience fails to embrace or acknowledge the heterogeneous essence of the Web. In fact, requiring the same experience for all users creates an artificial barrier to participation. Availability and accessibility of content should be our key priority.

“支持”不表示所有人得到同样的结果。期望两个使用不同浏览器的用户得到完全一致的体验,这实际上违背了(或者说否认了)Web 多样性的本质。要求向所有用户提供相同的体验,这恰恰成为一道人为的壁垒,阻碍了用户的参与。内容的可用性和可访问性才是我们的首要目标。

Consider television. At the core: TV distributes information. A hand-cranked emergency radio is capable of receiving television audio transmissions. It would be counter-productive to prevent access to this content, even though it's a fringe experience.

来看看电视这个例子。从本质上说,电视是用来传播信息的。一台手摇发电式应急收音机具备接收电视音频信号的能力。如果因为它的体验不够完整,就禁止它获取信息,这显然背离了电视技术的初衷。

Some viewers still have black-and-white televisions. Broadcasting only in black-and-white -- the "lowest common denominator" approach -- ensures a shared experience but benefits no one. Excluding the black-and-white television owners -- the "you must be this tall to ride" approach -- provides no benefit either.

现在仍有些电视观众在使用黑白电视机。只广播黑白电视信息(即“最低共同标准”方案)确实保证了一致的体验,但并没有人从中受益。而把黑白电视机的用户挡在门外(即“穷鬼死开”方案)同样也没有提供益处。

An appropriate support strategy allows every user to consume as much visual and interactive richness as their environment can support. This approach--commonly referred to as progressive enhancement -- builds a rich experience on top of an accessible core, without compromising that core.

正确的支持策略是允许每个电视观众都可以享受到他们的设备所能提供的最好的视觉和互动体验。这种方法——通常被称为“渐进增强”——是在“可访问”这个前提之上建立丰富的体验,但不会为了体验而牺牲这个前提。

Progressive Enhancement vs. Graceful Degradation

渐进增强 vs 优雅降级

(译注:后者也译作“平稳退化”。)

The concepts of graceful degradation and progressive enhancement are often applied to describe browser support strategies. Indeed, they are closely related approaches to the engineering of "fault tolerance".

渐进增强优雅降级 的概念通常用来描述浏览器支持策略。它们确实是“容错”工程中联系紧密的两种方式。

These two concepts influence decision-making about browser support. Because they reflect different priorities, they frame the support discussion differently. Graceful degradation prioritizes presentation, and permits less widely-used browsers to receive less (and give less to the user). Progressive enhancement puts content at the center, and allows most browsers to receive more (and show more to the user). While close in meaning, progressive enhancement is a healthier and more forward-looking approach. Progressive enhancement is a core concept of Graded Browser Support.

这两个概念影响着我们对浏览器支持的决策。它们反映了不同的优先顺序,因此引导着不同的讨论方向。优雅降级侧重于 表现,允许更少使用的浏览器接收更少的内容(浏览器传达给用户的也更少)。而渐进增强是把 内容 放在首位,允许大多数浏览器接收更多内容(浏览器向用户展示的也更多)。意思很接近,但渐进增强的方式更健康,而且更具前瞻性。因此,渐进增强是浏览器分级支持策略的核心概念。

What are Grades of Support?

什么叫“支持级别”?

While an inclusive definition of browser support is necessary, the support continuum does present design, development, and testing challenges. If anything goes, how do I know when the experience is broken? To address this question and return a sense of order to the system, we define grades of support. There are three grades: A-grade, C-grade, and X-grade support.

浏览器支持策略需要有一个完整的定义,支持策略的连续统一性确实对设计、开发和测试带来了挑战。一旦有任何事情变化,我如何判断产品体验是否会受到影响?为了解决这个问题,并让测试系统更具条理性,我们定义了支持的“级别”。一共有三个级别:A 级支持、C 级支持和 X 级支持。

Before examining each grade, here are some characteristics useful for defining levels of support.

在具体探究这三个级别之前,我们先来看对描述支持程度很有帮助的几个特征点。

Identified vs. Unknown
There are over 10,000 browser brands, versions, and configurations and that number is growing. It is possible to group known browsers together.

已知的 vs 未知的
市面上有超过一万种浏览器的品牌、版本和配置组合,并且这个数字还在增长。但把已知的浏览器划分出来还是可以的。

Capable vs. Incapable
No two browsers have an identical implementation. However, it is possible to group browsers according to their support for most web standards.

有能力的 vs 能力不足的
没有两个浏览器具有完全一致的功能实现。不过,如果要根据浏览器对主流 Web 标准的支持情况来把它们分组,还是可以做到的。

Modern vs. Antiquated
As newer browser versions are released, the relevancy of earlier versions decreases.

现代的 vs 过时的
当浏览器的新版本发布时,旧版本的重要程度会降低。

Common vs. Rare
There are thousands of browsers in use, but only a few dozen are widely used.

常见的 vs 不常见的
市面上有数千种浏览器,但其中只有几十种是比较流行的。

Three Grades of Support

三个支持级别

C-grade

C 级

C-grade is the base level of support, providing core content and functionality. It is sometimes called core support. Delivered via nothing more than semantic HTML, the content and experience is highly accessible, unenhanced by decoration or advanced functionality, and forward and backward compatible. Layers of style and behavior are omitted.

C 级是最基本的支持程度,只提供核心内容和功能。它有时也被称作“基础支持”。内容和体验的载体无非就是语义化的 HTML,虽然没有视觉装饰或高级功能作为增强,但它是高度可访问的,且具备向前和向后的兼容性。样式层和行为层将被忽略。

C-grade browsers should be identified on a blacklist.

C 级浏览器应该被明确标记在一份黑名单上。

Summary: C-grade browsers are identified, incapable, antiquated and rare. QA tests a sampling of C-grade browsers, and bugs are addressed with high priority.

总结:C 级浏览器是已知的、能力不足的、过时的和不常见的。QA 会抽样测试 C 级浏览器,并会把 bug 标记为高优先级。

A-grade

A 级

A-grade support is the highest support level. By taking full advantage of the powerful capabilities of modern web standards, the A-grade experience provides advanced functionality and visual fidelity.

A 级表示最高的支持程度。充分利用现代 Web 标准的强大能力,A 级体验会提供先进的产品功能和完整的视觉效果。

A-grade browsers should be identified on a whitelist. Approximately 96% of our audience enjoys an A-grade experience.

A 级浏览器应该被明确标记在一份白名单上。大约 96% 的用户会享受到 A 级体验。

Summary: A-grade browsers are identified, capable, modern and common. QA tests all A-grade browsers, and bugs are addressed with high priority.

总结:A 级浏览器是已知的、有能力的、现代的和常见的。QA 会测试所有 C 级浏览器,并会把 bug 标记为高优先级。

(译注:YUI 目标环境一览表 中所列的各浏览器及具体版本就是 YUI 的“浏览器测试基准”中所规定的“A 级浏览器”……IE6 还在里面呢。)

X-grade

X 级

X-grade provides support for unknown, fringe or rare browsers as well as browsers on which development has ceased. Browsers receiving X-grade support are assumed to be capable. (If a browser is shown to be incapable -- if it chokes on modern methodologies and its user would be better served without decoration or functionality -- then it should considered a C-grade browser.)

X 级支持主要面向那些未知的、非主流的或冷僻的浏览器,也包括那些已经停止开发的浏览器。被判为 X 级的浏览器被假定为有能力的。(如果某个浏览器表现为能力不足——比如它搞不定一些现代技术,而且其用户在缺少装饰和功能的情况下反而更舒服——那么它应该被视为 C 级浏览器。)

X-grade browsers are all browsers not designated as any other grade.

X 级浏览器就是那些没有被划为其它两类的浏览器。

Summary: X-grade browsers are assumed to be capable and modern. QA does not test, and bugs are not opened against X-grade browsers.

总结:我们假设 X 级浏览器是有能力的、现代的。QA 不会去测试 X 级浏览器,也不会记录在它们身上遇到的 bug。

The Relationship Between A-grade and X-grade Support

A 级和 X 级之间的关系

A bit more on the relationship between A-grade and X-grade browsers: One unexpected instance of X-grade is a newly released version of an A-grade browser. Since thorough QA testing is an A-grade requirement, a brand-new (and therefore untested) browser does not qualify as an A-grade browser. This example highlights a strength of the Graded Browser Support approach. The only practical difference between A-grade and X-grade browsers is that QA actively tests against A-grade browsers.

我们来进一步阐述 A 级和 X 级浏览器之间的关系:一个突然出现的 X 级浏览器很可能就是某个 A 级浏览器刚刚发布的一个新版本。由于 A 级浏览器必须进行全面的 QA 测试,那么一个刚出炉的(当然也是未测过的)浏览器还不具备 A 级浏览器的资格。这个例子凸显了浏览器分级支持策略的优势。A 级浏览器和 X 级浏览器之间仅有的实质性区别就是 QA 只对前者做积极全面的测试。

(译注:所谓“优势”,说白了还是这种主次分明的成本意识。)

Unlike the C-grade, which receives only HTML, the X-grade receives everything that A-grade does. Though a brand-new browser might be characterized initially as a X-grade browser, we give its users every chance to have the same experience as A-grade browsers.

不像 C 级浏览器只会收到 HTML,X 级浏览器会收到 A 级浏览器会收到的所有东西。虽然一款刚出炉的浏览器刚开始可能会被定位为 X 级浏览器,但我们会尽可能让它的用户享受到与 A 级浏览器同等的体验。

Beyond the Three Grades

更复杂的分级

In recent years, we have seen a proliferation in tiers of support above and beyond the three grades identified above, where certain subsets of features are implemented only on certain subsets of browsers. Defining and implementing tiers of user experience should be done by each individual project. Overall, we promote the simplest Progressive Enhancement approach possible and discourage projects from creating new tiers without accounting for the additional costs in development, testing, and maintenance resources.

近年来,我们看到,在上述三个级别的基础之上,分层支持策略产生了复杂化的倾向——这也归咎于各种浏览器对各种功能的实现情况越发复杂化。诚然,定义和执行用户体验层级确实应该因项目而异;但总的来说,我们认为“三个级别”方案最有利于渐进增强的实现,而且,我们不建议任何项目在不考虑开发、测试、维护等方面的额外成本的情况下发明更复杂的分层策略。

Quality Assurance (QA) Testing

质量保证(QA)测试

Grading the browser ecosystem enables meaningful, targeted, and cost-effective QA testing. As noted, representative C-grade testing and systematic A-grade testing ensures a usable and verified experience for the vast majority of our audience. A-grade testing must be thorough and complete, while C-grade testing can be accomplished with one or two representative browsers (e.g., Netscape 4.x and Lynx), or by using a modern browser with CSS and JavaScript disabled.

对浏览器生态系统进行分级,将使 QA 测试更加有意义、有目标,且成本效率更高。如上所述,抽样型的 C 级测试和系统型的 A 级测试可以确保我们的绝大部分用户获得可用、可靠的产品体验。A 级测试必须是全面和完整的,而 C 级测试可以只在一到两款有代表性的浏览器上完成(比如网景浏览器 4.x 或 Lynx),或者用一款禁用了 CSS 和 JavaScript 的现代浏览器来模拟。

It's worth reiterating that testing resources do not examine X-grade browsers.

这里有必要再次强调,测试团队 不需要 测试 X 级浏览器。

Representative testing of the core experience is critical. If you choose to adopt a Graded Browser Support approach for your own projects, be sure your site's core content and functionality are accessible without images, CSS, and JS. Ensure that the keyboard is adequate for task completion and that when your site is accessed by a C-grade browser all advanced functionality prompts are hidden.

针对基础体验的抽样测试是至关重要的。如果你决定在你自己的项目中采用浏览器分级支持策略,请确保你的网站的核心内容和功能在缺少图片、CSS 和 JS 时仍然是可访问的;请确保键盘操作也可以完成任务;请确保 C 级浏览器在访问你的网站时,所有高级功能的提示都已经隐藏掉了。

Conclusion

总结

Graded Browser Support provides an inclusive definition of support and a framework for taming the ever-expanding world of browsers and frontend technologies.

浏览器分级支持策略提供了一套关于“支持”的完整定义,这个框架将帮助你从容面对蓬勃发展的浏览器生态和日新月异的前端技术。

Tim Berners-Lee, inventor of the World Wide Web and director of the W3C, has said it best:

这里引用万维网发明人、W3C 主席 蒂姆·伯纳斯-李 的话再合适不过:

"Anyone who slaps a 'this page is best viewed with Browser X' label on a Web page appears to be yearning for the bad old days, before the Web, when you had very little chance of reading a document written on another computer, another word processor, or another network."

如果有人在网页上贴出“本页在某浏览器下效果最好”这样的标签,他看起来就像是在怀念以前的苦日子——就像在 Web 出现之前,那时我们几乎无法读到在其它电脑/其它软件/其它网络上写的文档。


© Creative Commons BY-NC-ND 4.0   |   我要订阅   |   我要打赏

[译] [PJA] 《JavaScript 应用程序设计》总目录

[译] [PJA] 《JavaScript 应用程序设计》总目录

programming-javascript-applications-book-cover

译者按

这是一本 O'Reilly 的新书,于 2013 年 2 月发布 在线预览版,目前还未正式出版(预计英文原版纸质书的出版日期为 2013-11-22)。

本书全名《Programming JavaScript Applications: Robust Web Architecture With Node, HTML5, and Modern JS Libraries》,暂译作《JavaScript 应用程序设计:基于 Node、HTML5 及主流 JS 类库构建网络应用》,本博客使用其缩写 [PJA] 作为代号。

声明:本书版权属于 O'Reilly 公司。本人参与翻译工作仅出于学习的目的。任何组织与个人不得在未获授权的情况下将本书原文与译文用于商业用途。

警告:这本书目前并非最终版本,只是作者提供的原始书稿,还未经润色与审校。因此书中可能存在错漏或不严谨的内容,请合理使用。另外,译者的专业水平和精力均十分有限,仅供参考,后果自负。

目录

  • 部分术语的翻译可能有误,请在本页底部评论,感谢您协助纠正。
  • 当任一章节翻译完成后,会在下面的目录中加链接。

Preface

  • Conventions Used in This Book
  • Using Code Examples
  • Safari® Books Online
  • How to Contact Us
  • Introduction
  • Who this Book is For
  • Who this Book is Not For
  • About the Author

序言

  • 本书所使用的约定
  • 使用示例代码
  • Safari 图书在线
  • 如何联系我们
  • 导言
  • 这本书适合谁
  • 这本书不适合谁
  • 关于作者

Chapter 1. The JavaScript Revolution

  • Performance
  • Objects
  • Syntax
  • First Class Functions
  • Events
  • Reusability
  • The Net Result
  • Anatomy of a Typical Modern JavaScript App
    • Infrastructure
    • JSON: Data Storage and Communication
    • NoSQL Datastores
    • RESTful JSON Web Services

第一章 JavaScript 革命

  • 性能
  • 对象
  • 语法
  • 函数是一等公民
  • 事件
  • 重用
  • 最终结果
  • 解构一个典型的现代 JavaScript 应用
    • 底层架构
    • JSON:数据的存储与通信
    • NoSQL 数据库存储
    • REST 风格的 JSON 网页接口

Chapter 2. JavaScript Style Guide

  • Example Tests
    • QUnit Primer
  • Code Quality
    • Best Practices Quick Reference

第二章 JavaScript 代码风格指南

  • 测试示例
    • QUnit 入门
  • 代码质量
    • 最佳实践的快速参考

Chapter 3. Functions

  • Function Definition
    • Named Function Expressions
    • Lambdas
    • Immediately Invoked Function Expressions
    • Method Context
  • Function Scope
    • Hoisting
    • Closures
  • Method Design
    • Named Parameters
    • Function Polymorphism
    • Generics and Collection Polymorphism
    • Method Chaining and Fluent APIs
  • Functional Programming
    • Stateless Functions (aka Pure Functions)
    • Partial Application and Currying
  • Asynchronous Operations
    • Callbacks
    • Promises and Deferreds

第三章 函数

  • 函数定义
    • 具名函数表达式
    • Lambda 函数
    • 立即调用的函数表达式
    • 方法的上下文
  • 函数作用域
    • 声明的隐式提升
    • 闭包
  • 方法的设计
    • 为参数命名
    • 函数的多态特性
    • 泛型与集合多态
    • 链式方法与语流式 API
  • 函数式编程
    • 无状态函数(亦称纯粹函数)
    • 偏函数应用与科里化
  • 异步操作
    • 回调函数
    • 许诺机制与延迟执行

Chapter 4. Objects

  • Classical Inheritance is Obsolete
  • Fluent Style JavaScript
  • Prototypes
    • The Prototype Property
    • Prototype Cloning
    • The Flyweight Pattern
  • Object Creation
  • Factories
  • A Prototypal Object Creation Library
    • Object Creation
    • Factory Creation

第四章 对象

  • 类继承已经过时了
  • 语流风格的 JavaScript
  • 原型
    • 原型属性
    • 复制原型
    • 享元模式
  • 创建对象
  • 工厂函数
  • 创建原型对象的类库
    • 对象创建法
    • 工厂创建法

Chapter 5. Modules

  • Principles of Modularity
  • Interfaces
  • The Module Pattern
  • AMD
    • Plugins
  • CommonJS Modules
  • npm
    • Directives
  • Harmony Modules
  • Building Client-Side Code With CommonJS, npm, Grunt, and Browserify
    • Defining the App

第五章 模块

Chapter 6. Separation of Concerns

  • Client Side Concerns
    • Module Management
    • Events
    • MVC / MV*
    • Presentation and DOM Manipulation
  • Server Side Concerns
    • Getting Started With Node and Express
  • Internationalization
    • Locale Determination

第六章 关注点分离

  • 客户端的关注点
    • 模块管理
    • 事件
    • MVC / MV* 模式
    • 表现层与 DOM 操作
  • 服务器端的关注点
    • 从 Node 和 Express 开始入手
  • 国际化工程
    • 地域探测

关于作者

Eric Elliott

Eric Elliott

Eric Elliott is a veteran of JavaScript application development. His roles include JavaScript Lead at Tout (social video), Senior JavaScript Rockstar at BandPage (an industry leading music app), head of client side architecture at Zumba Fitness (the leading global fitness brand), several years as a UX and viral application consultant, and author of h5Validate, an HTML5 form validation plugin for jQuery. You can find Eric online on his blog at ericleads.com.

埃瑞克·埃利奥特

埃瑞克·埃利奥特是一名 JavaScript 应用开发高手。他的身份数不胜数:

  • Tout(一家视频分享网站)的 JavaScript 领头人
  • BandPage(一款业内领先的音乐应用)上的资深 JavaScript 大腕
  • Zumba Fitness(全球领先的健身品牌)的客户端架构领导者
  • 多年的用户体验与病毒营销领域的顾问
  • 以及 h5Validate(一款 HTML5 表单校验 jQuery 插件)的作者等等

你可以在他的博客 ericleads.com 找到他。


© Creative Commons BY-NC-ND 4.0   |   我要订阅   |   我要打赏

[译] [PJA] [401] 类继承已经过时了

[译] [PJA] [401] 类继承已经过时了

Classical Inheritance is Obsolete

类继承已经过时了

"Those who are unaware they are walking in darkness will never seek the light."

-- Bruce Lee

不知道自己正走在黑暗中的人是永远不会去搜寻光明的。

——李小龙

In "Design Patterns: Elements of Reusable Object Oriented Software", the Gang of Four opened the book with two foundational principles of object oriented design:

在《设计模式:可复用面向对象软件的基础》一书的开头,“四人帮”就推出了面向对象设计的两大基本原则:(译注:该书由四位作者合著,均为国际公认的面向对象软件领域的专家。)

  1. Program to an interface, not an implementation.

    面向接口编程,而非面向实现编程。

  2. Favor object composition over class inheritance.

    优先使用对象组合,而非继承。

In a sense, the second principle could follow from the first, because inheritance exposes the parent class to all child classes. The child classes are all programming to an implementation, not an interface. Classical inheritance breaks the principle of encapsulation, and tightly couples the child class to its ancestors.

从某种意义上说,第二条规则可以从第一条推导出来,因为“继承”把父类暴露给了所有子类。子类的本质都是面向实现编程,而非面向接口。类继承打破了封装的原则,它把子类和它的祖先类紧密地耦合起来了。

Think of it this way: Classical inheritance is like Ikea furniture. You have a bunch of pieces that are designed to fit together in a very specific way. If everything goes exactly according to plan, chances are high that you'll come out with a usable piece of furniture, but if anything at all goes wrong or deviates from the preplanned specification, there is little room for adjustment or flexibility. Here's where the analogy (and the furniture, and the software) breaks down: The design is in a constant state of change.

不妨从这个角度来想想: 类继承类似于宜家的家具。你有一堆零件,它们天生需要以一种非常特定的方式来组装。如果每个零件都严格按计划组装,那么你应该会得到一件可用的家具;但如果任何一个零件装错了,或者偏离了说明书的规定,那就没有多少可以灵活调整的空间了。这种方式(家具或是软件)的失败原因在于:这种设计无法承受持续不断的变数。

Composition is more like Lego blocks. The various pieces aren't designed to fit with any specific piece. Instead, they are all designed to fit together with any other piece, with few exceptions.

而组合更像是乐高积木。各式各样的零件并不只能与指定的零件组合。相反,每一块积木都被设计为可以与其它零件任意组合,几乎没有例外。

When you design for classical inheritance, you design a child class to inherit from a specific parent class. The specific parent class name is usually hard coded right in the child class, with no mechanism to override it. Right from the start, you're boxing yourself in -- limiting the ways that you can reuse your code without rethinking its design at a fundamental level.

当你在设计类继承时,你会从一个特定的父类继承出一个子类。这个特定的父类的名称通常会在子类中写死,而没有任何机制可以覆盖它。而从一开始,你就在跟自己搏斗——你限制了重用代码的方式,而没有从一个基本层面去反思它的设计。

When you design for composition, the sky is the limit. As long as you can successfully avoid colliding with properties from other source objects, objects can be composed and reused virtually any way you see fit. Once you get the hang of it, composition affords a tremendous amount of freedom compared to classical inheritance. For people who have been immersed in classical inheritance for years, and learn how to take real advantage of composition (specifically using prototypal techniques), it is literally like walking out of a dark tunnel into the light and seeing a whole new world of possibilities open up for you.

当你在设计组合方式的时候,那就是一片海阔天空。只要你可以成功地避免其它“源对象”引入的属性冲突,对象实际上就可以以任何你认为合适的方式进行组合和重用。一旦你掌握了其中的要领,相对于类继承,组合将赋予你极大的自由。对于那些在类继承中已经沉浸多年的人来说,学习如何从组合中受益(尤其是使用原型方面的技巧),真的像是从一条黑暗的地道中走向光明,发现一个全新的世界正向你敞开大门。

Back to "Design Patterns". Why is the seminal work on Object Oriented design so distinctly anti-inheritance? Because inheritance causes several problems:

回到《设计模式》。为什么这本面向对象领域的著作会如此旗帜鲜明地反对继承?因为继承会导致以下问题:(译注:“面向对象”即 Object Oriented,以下简称 OO。)

  1. Tight coupling. Inheritance is the tightest coupling available in OO design. Descendant classes have an intimate knowledge of their ancestor classes.

    强耦合。在 OO 设计中,继承是所能找到的最强的耦合方式。后代类对它们的祖先类了如指掌。

  2. Inflexible hierarchies. Single parent hierarchies are rarely capable of describing all possible use cases. Eventually, all hierarchies are "wrong" for new uses -- a problem that necessitates code duplication.

    层级系统不灵活。单个父类层级很难描述所有应用场景的可能性。最终,所有层级对新用法来说都是“错误”的——这必然产生代码重复。

  3. Multiple inheritance is complicated. It's often desirable to inherit from more than one parent. That process is inordinately complex and its implementation is inconsistent with the process for single inheritance, which makes it harder to read and understand.

    多重继承十分复杂。从多个父类继承有时会很诱人。这种方法非常复杂,并且它的实现与单继承的方式不一致,这将导致它难于阅读和理解。

  4. Brittle architecture. Because of tight coupling, it's often difficult to refactor a class with the "wrong" design, because much existing functionality depends on the existing design.

    架构脆弱。由于强耦合的存在,通常很难对一个使用了“错误”设计的类进行重构,因为有太多既有功能依赖这些既有设计。

  5. The Gorilla / Banana problem. Often there are parts of the parent that you don't want to inherit. Subclassing allows you to override properties from the parent, but it doesn't allow you to select which properties you want to inherit.

    大猩猩与香蕉问题。父类总会有某些部分是你不想继承的。子类允许你覆盖父类的属性,但它不允许你选择哪些属性是你想继承的。

These problems are summed up nicely by Joe Armstrong in "Coders at Work", by Peter Siebel:

这些问题都已经被 Joe Armstrong 很好地总结在了《Coders at Work》一书中,该书由 Peter Siebel 联合执笔。

“The problem with object-oriented languages is they've got all this implicit environment that they carry around with them. You wanted a banana but what you got was a gorilla holding the banana and the entire jungle.”

面向对象语言与生俱来的问题就是它们与生俱来的这一整个隐性环境。你想要一根香蕉,但你得到的是一头手里握着香蕉的大猩猩,以及整个丛林。

-- Joe Armstrong

Inheritance works beautifully for a short time, but eventually the app architecture becomes arthritic. When you've built up your entire app on a foundation of classical inheritance, the dependencies on ancestors run so deep that even reusing or changing trivial amounts of code can turn into a gigantic refactor. Deep inheritance trees are brittle, inflexible, and difficult to extend.

在短时间内,继承会工作得很完美,但最终,应用的架构会变得僵硬迟缓。当你已经在一个类继承体系上建立起你的整个应用之后,由于祖先类的依赖关系是如此之深,以致于重用或改变一些细枝末节的代码都将导致一场大规格的重构。深度继承树是脆弱的、不灵活的、难于扩展的。

More often than not, what you wind up with in a mature classical OO application is a range of possible ancestors to inherit from, all with slightly different but often similar configurations. Figuring out which to use is not straightforward, and you soon have a haphazard collection of similar objects with unexpectedly divergent properties. Around this time, people start throwing around the word "rewrite" as if it's an easier undertaking than refactoring the current mess.

多半时候,在一个成熟的基于类的 OO 应用程序中,你最终会得到一堆可以用来继承的祖先类,它们之间有着细微的差别,但又常常具备相似的配置。找出一个适用的祖先类并不容易,而且你很快会拥有一堆杂乱无章的相似对象,这些对象又拥有一堆杂乱无章的属性。到了这个时候,人们开始抛出“重写”这个词,仿佛这样会比重构眼下这一团槽更容易些。

Many of the patterns in the GoF book were designed specifically to address these well-known problems. In many ways, the book itself can be read as a critique of the shortcomings of most classical OO languages, along with the accompanying lengthy work-arounds. In short, patterns point out deficiencies in the language. You can reproduce all of the GoF patterns in JavaScript, but before you start using them as blueprints for your JavaScript code, you'll want to get a good handle on JavaScript's prototypal and functional capabilities.

“四人帮”书里的很多模式都特别适合讲解这些比较典型的问题。很多时候,这本书读起来就像是对众多基于类的 OO 语言缺陷的一种批判,同时书中也提供了冗长的变通解决方案。简单来说,设计模式指出了语言中的短板。你可以用 JavaScript 重现书中的所有模式,但在你准备以它们为基础来构建你的 JavaScript 代码之前,不妨先掌握好 JavaScript 的原型式和函数式编程能力。

For a long time, many people were confused about whether JavaScript is truly object oriented, because they felt that it lacked features from other OO languages. Setting aside the fact that JavaScript handles classical inheritance with less code than most class-based languages, coming to JavaScript and asking how to do classical inheritance is like picking up a touch screen mobile phone and asking where the rotary dial is. Of course people will be amused when the next thing out of your mouth is, "if it doesn't have a rotary dial, it's not a telephone!"

在很长一段时间内,很多人都对 JavaScript 是否是一门真正的 OO 语言感到疑惑,因为他们感觉它缺少其它 OO 语言的一些特性。这里暂且不提 JavaScript 只需要(与大多数基于类的语言相比)更少的代码就可以搞定类继承;实际上,刚接触 JavaScript 就问如何实现类继承,就好像捡起一部触屏手机然后问别人它的拨号转盘在哪里。当然,如果你回答“它没有拨号转盘,它不是电话机”,那些人也许会被逗乐。

JavaScript can do most of the OO things you're accustomed to in other languages, such as inheritance, data privacy, polymorphism, and so on. However, JavaScript has many native capabilities that make some classical OO features and patterns obsolete. It's better to stop asking "how do I do classical inheritance in JavaScript?", and start asking, "what cool new things does JavaScript enable me to do?"

JavaScript 几乎可以实现所有其它语言所能做到的 OO 行为,比如继承、数据私有化、多态等等。然而,JavaScript 原生具备的很多能力就足以让一些基于类的 OO 特性和模式相形见绌。所以最好别再问“怎样在 JavaScript 中实现类继承”,而应该问“我在 JavaScript 中可以做哪些特别的、超酷的事情?”

[!]

I wish I could tell you that you'll never have to deal with classical inheritance in JavaScript. Unfortunately, because classical inheritance is easy to mimic in JavaScript, and many people come from class-based programming backgrounds, there are several popular libraries which feature classical inheritance prominently, including Backbone.js, which you'll have a chance to explore soon. When you do encounter situations in which you're forced to subclass by other programmers, keep in mind that inheritance hierarchies should be kept as small as possible. Avoid subclassing subclasses, remember that you can mix and match different code, reuse styles, and things will go more smoothly.

但愿你可以明白,你永远不需要在 JavaScript 中使用类继承模式。但不幸的是,由于类继承在 JavaScript 中很容易模似,而且有太多人来自于基于类的编程背景,导致很一些流行的类库特意引入了类继承的特性,这其中包括 Backbone.js,我们会在后面详细了解它。如果有时候你不得不使用其它程序员写的子类,请务必牢记继承层级应该控制得尽可能少。要避免创建子类的子类,别忘了你可以混合并匹配不同的代码、重用样式,然后一切会变得更加顺利。


© Creative Commons BY-NC-ND 3.0   |   我要订阅   |   我要捐助

[译] [PJA] [506] npm 包管理器

[译] [PJA] [506] npm 包管理器

npm

npm 包管理器

npm is a package manager that comes bundled with Node. Contrary to popular belief npm is not an acronym. According to the npm FAQ It provides an easy way to install modules for your application, including all required dependencies. Node relies on the package.json specification for package configuration. It's common to use npm to pull in all of your project's open source JavaScript requirements on the server-side, but there is also a movement forming to use npm to pull in open-source dependencies for the client-side, as well.

npm 是一款包管理器,随 Node 捆绑发布。人们普遍以为 npm 是一个首字母缩写词,但其实不是。据 npm 的 FAQ 所说,它提供了一种简易的方式来为你的应用程序安装模块,并且包括所有必要的依赖模块。Node 依靠 package.json 规约来进行包的配置。在服务器端 JavaScript 项目中,使用 npm 来拖入所需的开源依赖库是很普遍的做法;但最近也有人开始把它用于客户端项目。

(译注:好吧,八卦一下。npm 实际上就是“Node Package Manager”的缩写,没有第二种含义,你不用怀疑自己的智商。只不过 npm 官方的这些人否认了这一点,并且强调这个词应该全小写,具体可以参见 npm 的 FAQ,看起来很二很扯淡。不过实际上背景是这样的,软件业内有一股另类风气,就是开发者很热衷于把自己的软件名解释为一个很扯的递归缩写,比如 LAME 就声称自己是“Lame Aint an MP3 Encoder”的缩写,可是地球人都知道你丫就是啊!又比如 GNU 声称“GNU's Not Unix”,一定要与 UNIX 划清界限,等等等等。于是,npm 官方的这群奇异动物借自己的项目对此吐槽了一把。你可能注意到了,本文作者也提到了“npm 的 FAQ”这个梗。)

Directives

指令

npm has a number of well documented directives, but for the purposes of this book, you'll only need to know the ones you'll commonly need to modify in order to get your typical app up and running:

npm 有很多指令,相关文档也很详尽,不过对本书来说,只需要向你介绍其中最常修改的那些指令,就足以让一个常规应用跑起来了:

  • name - The name of the package.

  • version - Package version number. npm modules must use semantic versioning.

  • author - Some information about the author.

  • description - A short description of the package.

  • keywords - Search terms to help users find the package.

  • main - The path of the main package file.

  • scripts - A list of scripts to expose to npm. Most projects should define a "test" script that runs with the command npm test. Use it to execute your unit tests.

  • repository - The location of the package repository.

  • dependencies, bundledDependencies - Dependencies your package will require().

  • devDependencies - A list of dependencies that developers will need in order to contribute.

  • engines - Specifies which version of Node to use.

  • name - 包的名称。

  • version - 包的版本号。npm 模块必须使用语义化版本管理方式。

  • author - 有关作者的信息。

  • description - 包的简要描述。

  • keywords - 可以帮助用户找到这个包的搜索关键词。

  • main - 包的主文件的所在路径。

  • scripts - 需要暴露给 npm 的脚本的清单。大多数项目应该定义一个 "test" 脚本,可以通过 npm test 命令来运行。用这个命令来执行单元测试。

  • repository - 包的代码仓库所在的位置。

  • dependencies, bundledDependencies - 你的包需要 require() 的依赖库清单。

  • devDependencies - 开发者所需要的依赖库清单,以便他们贡献代码。

  • engines - 指定适用的 Node 版本。

If you want to build a node app, one of the first things you'll need to do is create a server. One of the easiest ways to do that is to use Express, a minimal application framework for Node. Before you begin, you should look at the latest version available. By the time you read this, the version you see here should no longer be the latest:

如果你想构建一个 Node 应用,首先要做的事情就是创建一个服务器。有一个最简单的方法,就是使用 Express,它是一个精简的 Node 应用程序框架。在开始之前,你应该优先考虑最新的版本。当你读到这里的时候,本书使用的版本应该已经不是最新版了。

$ npm info express
3.0.0rc5


Now you can add it to your `package.json` file:

现在你可以把它加入到你的 `package.json` 文件中:

Example 5-1. `package.json`

示例 5-1. `package.json`

```js
{
  "name": "simple-express-static-server",
  "version": "0.1.0",
  "author": "Sandro Padin",
  "description": "A very simple static file server. For development use only.",
  "keywords": ["http", "web server", "static server"],
  "main": "./server.js",
  "scripts": {
    "start": "node ./server.js"
  },
  "repository": {
    "type": "git",
    "url": "https://github.com/spadin/simple-express-static-server.git"
  },
  "dependencies": {
    "express": "3.0.x"
  },
  "engines": {
    "node": "&gt;=0.6"
  }
}

Notice that the express version is specified as "3.0.x". The x acts like a wildcard. It will install the latest 3.0 version, regardless of the patch number. It's another way of saying, "give me bug fixes, but no API changes". Node modules use Semantic Versioning. Read it as Major.Minor.Patch. Working backwards, bug fixes increment the patch version, non-breaking API changes increment the minor version, and backward breaking changes increment the major version. A zero for the major version indicates initial development. The public API should not be considered stable, and there is no indication in the version string for backward-breaking changes.

请注意 Express 的版本被指定为 3.0.x 。这里的 x 的作用相当于通配符。它将会安装最新的 3.0 版本,无需指定补丁版本号。换句话说就是,“给我最新的 bug 修复版,但 API 不要变”。Node 模块使用 语义化版本管理方式。它的格式是 主版本号.次版本号.补丁版本号。我们从后向前看,bug 修复性的更新将会增加补丁版本号,非破坏性的 API 更新将会增加次版本号,而无法向后兼容的大更新将会增加主版本号。主版本号为零表示这是首个开发版本,模块的公开 API 还不够稳定,并且版本字符串也不会告诉你是否存在向后兼容的问题。

Now that your package and dependencies are declared, return to the console and run:

既然你的包和依赖关系都已经声明好了,让我们回到控制台并且运行一下:

$ npm install

When you run npm install, it will look at package.json and install all of the dependencies for you, including those that were declared by the express package.

当你运行 npm install 时,系统就会寻找 package.json 文件,然后为你安装所有的依赖库,其中也包括 Express 自己声明的依赖库。


© Creative Commons BY-NC-ND 4.0   |   我要订阅   |   我要打赏

[译] iOS 7 之 HTML5 综合测评:亮点、缺点和槽点

[译] iOS 7 之 HTML5 综合测评:亮点、缺点和槽点

iOS7 iPhone

We've been testing the final release of iOS 7 over the last few days against our usual battery of HTML5 tests. Normally we're effusive about new releases of iOS to the point of fanboy-dom, but this time, and for the first time ever, we're disappointed in the execution of iOS software. Although there are some impressive performance gains in SVG and JavaScript, the sheer number of bugs and broken features, clearly mark this release as a beta. While nowhere as bad as the Android 3 browser -- our all time champ of broken web releases -- we recommend that organizations standardized on HTML5 development hold off upgrading until an iOS update fixes these issues.

过去几天以来,我们一直在用我们的那套常规 HTML5 测试套件来考验 iOS 7 的最终发布版。正常来说,每当迎来 iOS 的新版发布,我们都忍不住像果粉一样喜大普奔;但这一次,也是有史以来的第一次,我们对 iOS 软件的完成度表示失望。虽然在 SVG 和 JavaScript 方面有一些突出的性能增长,但面对如此之多的 bug 和不正常的特性,我们只能无情地为这个版本打上 beta 的标签。当然,它还远远没有败坏到 Android 3 浏览器的程度——那才是无可争议的烂浏览器之终极奥义——但我们仍然建议那些以 HTML5 作为开发标准的公司暂不升级,等到 iOS 7 后续版本修复这些问题之后再说。

iOS 7 Bugs & Features

iOS 7 的 bug 和特性

Max Firtman has already done an excellent first pass about the new features, bugs and quirks in iOS 7's web runtime. If you haven't read his post, you should read it now. We will not repeat all the findings here; but to review, there are two very big bugs in iOS 7. First, WebSQL permissions to increase the default 5MB of space for an app to the previously permitted 50MB limit no longer work correctly, and require a workaround. Second, "Save to Home Screen" apps are basically broken. Once more than four apps are saved to home screen, the save slots are recycled and sometimes duplicated, and the phone has to be rebooted in order to clear itself. Further, any external URI no longer opens correctly and all JavaScript modal dialogs (alert, prompt etc.) are disabled. Finally, If your app uses AppCache and you are managing state via hash or other mechanisms, the history object will never update, disabling history.back.

Max Firtman 已经对 iOS7 浏览器的新功能、bug 以及奇怪特性 进行了出色的首轮总结,强烈建议你先读一遍这篇文章。(译注:也可以参考 这篇文章的中文译版。)本文不再重复他的所有发现,我们只回顾一下其中两个巨大的 bug。

首先,单个应用对 WebSQL 存储空间的需求从默认的 5MB 申请为 50 MB 上限的过程无法正常实现(译注:实际上是 iOS 7 在这方面的许可策略发生了变化),需要想办法绕过去。

其次,“保存到主屏幕”的 web app 基本上废掉了。似乎主屏幕最多只提供 4 个蹲位来容纳 web app 图标,一旦你试图突破这个数量,web app 图标就会相互循环覆盖,有时甚至出现重复,此时手机不得不重启才能将主屏幕恢复正常。此外,所有的外部 URL 都无法正常打开(译注:包括可以拨打电话的 tel: 伪协议链接),而且所有的 JavaScript 原生模态对话框(alert()prompt() 等等)也都被禁用。别着急,还有,如果你的应用使用了 AppCache(译注:HTML5 的离线应用缓存特性)并且你通过 hash 或其它机制来管理浏览进程,那么 history 对象永远都不会更新,history.back() 方法也因此失效。

"We recommend that organizations standardized on HTML5 development, hold off on upgrading to iOS 7 until an update fixes these issues."

“我们建议那些以 HTML5 作为开发标准的公司暂不升级,等到 iOS 7 后续版本修复这些问题之后再说。”

Beyond these major bugs, there are also some very troublesome design decisions in iOS 7. First, there is no way to hide the URL bar using JavaScript (and the user no longer has a "full screen" button in mobile Safari). This will throw a wrench into layouts if your app relies on absolute positioning. One workaround, suggested by Andrea Giammarchi, is to ask the user to take an action (such as swiping up) in order to reset into full-screen. But there is no programmatic way to do this (as of yet). And once you are in full-screen, tapping anywhere in the bottom region first summons the browser chrome and there is no way to cancel this. This makes for poor UX for bottom-positioned toolbars: the first user tap summons the browser chrome, which boosts the tool-bar up the page, and then requires the user to tap again to take an action. There are related problems with the status bar which can be worked around.

抛开这些重大 bug 不谈,iOS 7 还采用了一些非常讨厌的设计决策。首先,无法通过 JavaScript 来隐藏地址栏(而且 Safari 也不再提供一个“全屏”按钮)。如果你的应用依赖于绝对定位,这个问题将破坏应用的布局。有一个变通方案(由 Andrea Giammarchi 提议),就是要求用户做一个动作(比如向上滚屏),以便进入全屏状态。但到目前为止,还没有一个纯程序的方式可以实现类似的效果。而且一旦你进入了全屏状态,在屏幕底部区域的任意位置点击,会首先呼出浏览器边框(包括浏览器的工具栏和地址栏),而且没有办法能阻止这种行为。这将导致定位在底部的工具栏呈现出非常恶心的用户体验(译注:这里的工具栏是指应用自己实现的工具栏):用户的第一次点击工具栏会呼出浏览器的边框,工具栏会被向上推起,然后用户还需要移动手指并再次点击,才能最终触发工具栏上的某个动作按钮。状态栏也有着类似的问题,不过幸好有人找出了 一个变通方法。(译注:此链接所描述的状态栏问题实际上只出现在基于 PhoneGap 开发的混合应用身上,并不涉及 Safari 或 web view 形态的页面布局。下个版本的 PhoneGap 很可能会从自身层面来解决这个问题。)

In addition to these decisions, right and left swipe gestures within about 10 percent of display edge are always grabbed by iOS and treated as a forward/back request, and not passed to the browser. Furthermore, if you've built back/forward behavior into your app using history push-state, then accidental swipes will load the previous state as if it was a prior web-site. This will probably be unexpected behavior. Chrome for Android was the first browser to introduce this behavior, but has now removed it based on feedback from web developers. We hope Apple follows suit quickly.

除了这些设计决策之外,从屏幕边缘大约 10% 区域内发起的左右横扫手势总是会被系统捕获,并被视为一次后退/前进的导航操作,而不会作为事件传递给浏览器。不仅如此,如果你的应用使用了历史记录的 pushState 接口来管理后退/前进行为,那么无意的横扫动作将导致页面回到上一个状态,本质上相当于后退到上了一个页面。这很可能不是我们所期望的行为。Android 版的 Chrome 是最先引入了这种行为的浏览器,但后来又在 web 开发者的要求下去除了。我们也希望苹果能尽快回到正轨。(译注:这里提到的后退/前进手势只会在 Safari 下起作用,主屏幕 web app 或 web view 并没有这两个手势。)

In our own testing, we discovered a number of additional bugs in the iOS 7 runtime.

在我们自己的测试中,我们还在 iOS 7 中发现了一些其它 bug。

  • On iPad, an orientation change when an input is focused shifts content unpredictably, and causes screen rendering artifacts.

  • 在 iPad 上,当一个输入框获得焦点时,屏幕旋转会导致页面内容无规律地偏移,以及屏幕渲染错乱。

  • Launching and quitting the same home screen app several times can hard lock the device requiring a hardware reboot.

  • 启动并退出同一个主屏幕 web app 数次之后,会导致设备锁死,只能通过硬件重启来解决。

  • requestAnimationFrame animations do not appear to background correctly, and cause performance degradation in RAF animations on the active page. This defeats one of the major purposes of using RAF animations.

  • requestAnimationFrame 动画(以下简称 RAF 动画)在后台运作不正常,而且会导致当前页面的 RAF 动画性能下降。这一点直接灭掉了 RAF 动画的最大优势。

  • On iPad, if the document body is set to 100 percent height, content is shifted upwards by 20px in landscape mode. This can be worked around by calling window.scrollTo(0, 0) on the orientationchange event.

  • 在 iPad 上,如果 body 的高度被设置为 100% 时,在横屏状态下,内容会向上偏移大约 20px。还好这也是可以补救的,我们在 orientationchange 事件上调用一次 window.scrollTo(0, 0) 就可以了。(译注:这个方法真的好吗?如果我在竖屏状态下滚动到一半再旋转为横屏呢……)

  • In certain cases, resizing a composited layer (an element with 3D transform) does not repaint it correctly. Instead, the cached bitmap is stretched.

  • 在某些情况下,一个经过渲染合成的图层(比如一个具有 3D 变形属性的元素)在改变大小时无法正确地重绘。仅仅是把已缓存的位图(即以前渲染完成的结果)拉伸一下完事,并没有重新渲染生成。

  • CSS Animations will sometimes fire before implicit z-indexes have been calculated, resulting in incorrect z layering during an animation.

  • CSS 动画启动时,隐式的 z-index 并不会被计算,这导致动画期间图层的堆叠不正确。(译注:“隐式的 z-index”是指定位元素未明确设置 z-index 的情况。)

  • Scripts running within Web Workers are not suspended unless either the originating page is explicitly killed, or the Safari process is explicitly terminated. Neither switching to another tab, nor minimizing Safari, nor turning off the screen seem to stop Worker execution. This is a serious issue that allows any web page to drain the battery of an iOS 7 device and slow down performance of the whole system without a user alert.

  • 在 Web Worker 内运行的脚本永远不会停止,除非发起 Web Worker 的页面被强制关闭,或者 Safari 进程被强制终止。切换到另一个页面、最小化 Safari(译注:即切换到后台)或者锁屏都无法停止 Web Worker 的运行。这是一个很严重的问题,它放任任意网页在没有任何提示的情况下把电池耗光,并拖慢整个系统的性能。

Performance Characteristics

性能评估

In addition to feature/bug testing, we also put iOS 7 through a battery of our standard performance tests on an iPhone 5 running iOS 6.1 vs. iOS 7. There are some remarkable increases in benchmark performance as well as some very notable misses. First up, we want to note that something odd has happened to the JavaScript timer on iOS 7. In previous versions, iOS had an exceptionally well implemented timer: 4ms with extremely good consistency (see below). But using John Resig's standard timer test resulted in this odd profile: a timer that jumps between 4ms and 12ms with clockwork regularity and much more noise than iOS 6.

除了特性测试和 bug 测试之外,我们对 iOS 7 进行了一系列我们自己的标准性能测试,并对比 iPhone 5 上 iOS 7 和 iOS 6.1 的测试结果。在跑分方面,有一些值得注意的增长,同时也有一些无法忽视的倒退。首先,我们想指出,iOS 7 上的 JavaScript 定时器出现了一些奇怪的情况。在上一个 iOS 版本中,定时期简直就是梦幻般地完美:4ms 并且有着非常好的一致性(见下图)。但 iOS 7 在进行 John Resig 的标准定时器测试 时,结果十分奇怪:定时器的间隔在 4ms 和 12ms 之间有规律地来回摆动,与 iOS 6 相比要杂乱不少。

iOS7 timer

Figure 1A: JavaScript timer resolution: iPhone 5/iOS 7

图 1A:JavaScript 定时器解析度:iPhone 5/iOS 7

iOS6 timer

Figure 1B: JavaScript timer resolution: iPhone 5/iOS 6

图 1B:JavaScript 定时器解析度:iPhone 5/iOS 6

Perhaps this is a limitation of the test in some way, but it's certainly nothing we've ever seen before, and one more reason to make sure that you use requestAnimationFrame for JavaScript animation.

可能这个测试在某些方面存在局限性,但这种情况是我们以前从未见过的,于是我们又多了一个使用 requestAnimationFrame 来实现动画的理由。

In good news, raw JavaScript performance has increased substantially. SunSpider 1.0 is about 15% faster on iOS 7 vs iOS 6.1, and iOS 7's Octane score is 70% better vs. iOS 6. Some Octane tests showed dramatic speed-ups: Navier-Stokes performance increased by almost 4x. By comparison, Safari on my 2 year old MacBook clocks in at 5,600 -- so iOS 7 is now 50% as fast as desktop Safari on Octane! This is either some serious JIT hacking, or we also speculate that there may be some GPU offloading of general computation in iOS 7?

好消息还是有的,纯 JavaScript 性能有了大幅度的提升。与 iOS 6 相比,iOS 7 的 SunSpider 1.0 跑分提升了 15%,Octane 跑分提升了 70%。部分 Octane 测试显示出了惊人的速度增长:Navier-Stokes 运算的性能涨幅几乎达到了 4 倍。要知道在两年前的老 MacBook 笔记本上,Safari 的 Octane 综合得分是 5600 分,相比之下,现在 iOS 7 的性能已经相当于桌面平台的 50% 了!这有可能是某些 JIT 技巧的功劳,也有可能是 GPU 在 iOS 7 下以某种方式分担了 CPU 的运算工作?

Octane Benchmark

Figure 2: Octane Benchmark - iPhone 5 iOS 6 vs. iOS 7 (higher is better)

图 2:Octane 性能评分:iPhone 5 iOS 6 与 iOS 7 相比(得分越高越好)

But it's not all good news on the performance front. During the iOS 7 beta, we were concerned at the very slow DOM interaction benchmarks that we were seeing from Dromaeo on iOS 7, and expected that Apple would get performance back to snuff before final release. For DOM traversal, attributes and modification, performance is now back at iOS 6 levels, which is good. However DOM Query is still 50% of iOS 6 speed. This is a major concern for the many HTML5 apps that perform high numbers of DOM queries, and this needs to be on Apple's fix-list for its next update.

不过在性能方面并不都是好消息。在 iOS 7 的 beta 期间,我们就曾为 iOS 7 在 Dromaeo 测试上超低的 DOM 操作得分捏把汗,并期待苹果在最终正式版中扭转局面。果然,在 DOM 遍历、存取属性和修改操作方面,iOS 7 的性能已经回到了 iOS 6 的水准,这很好。但是 DOM 查询的速度仍然只有 iOS 6 的 50% 左右。这对很多需要大量查询 DOM 的 HTML5 应用来说,会是一个很大的顾虑,这也是苹果在下一次更新时需要重点考虑的问题。

Dromaeo benchmark

Figure 3: Dromaeo benchmark - iOS 6 vs iOS 7 (iOS 6 = 1.00 - higher is better)

图 3:Dromaeo 性能评分:iOS 6 与 iOS 7 相比(iOS 6 的得分换算为 1.00,得分越高越好)

Graphics Performance

图形性能

Test of Canvas performance show a minor improvement in iOS 7 -- about 10% in the Fishtank test and on Mindcat microbenchmarks. But SVG is the real revelation. Thanks to a switch to a new drawing algorithm, SVG Path drawing speed has improved 200x. Yes that's literally 200 times faster. In iOS 6, a 10,000 segment SVG path took about 11 seconds to draw. In iOS 7 that's now 53 milliseconds. iOS is now 6x faster than the Surface RT -- the previous champ at SVG drawing performance.

在 Canvas 性能方面,iOS 7 表现出了少许进步——在 Fishtank 测试和 Mindcat 性能评分中均有 10% 左右的提升。但真正令人惊讶的是 SVG 性能。得益于全新的绘图算法,SVG 路径绘制速度提升了 200 倍,是的,你没有看错,两百倍。在 iOS 6 中,一条 10,000 个片段的 SVG 路径需要花费 11 秒才能绘制完成;但在 iOS 7 中,只需要 53 毫秒。iOS 目前以 6 倍性能领先于 Surface RT——上一代的 SVG 性能之王。

SVG Path Drawing Benchmark

Figure 4: SVG Path Drawing Benchmark (lower is better)

图 4:SVG 路径绘制性能评分(得分越少越好)

Other SVG capabilities experience similar speed-ups. Some SVG Filter operations now appear to be GPU accelerated -- which means that meaningful filter animations are now possible on iOS. But performance is dependent on specific filters. Color transformations (Color Matrix & Color Curves) and displacementMaps are fast. Complex compositing and lighting effects are still slow.

其它的 SVG 指标方面也有着类似的速度提升。一些 SVG 滤镜操作看起来已经支持 GPU 加速——这意味着精心设计的滤镜动画在 iOS 上将成为可能。不过性能表现还是因滤镜而异,色彩变换(色彩矩阵与色彩曲线)和置换贴图是最快的,但复杂的合成和光照效果仍然比较慢。

And now the real killer. In the rush to get iOS 7 out the door, making sure SVG animation via JavaScript was fast seems to have been dropped on the floor. Animating SVG with JavaScript is now a hit or miss proposition. Animating 500 SVG circles used to be 50 fps on iOS 6. On iOS 7, the animation simply freezes after a few frames. We tried other apps that have interactive UI elements built with SVG, and we saw a similar severe performance degradation.

接下来的这个才是极品。苹果赶着把 iOS 7 推到台前,结果把 SVG 动画这件事儿抛到九霄云外了。用 JavaScript 实现的 SVG 动画这一需求被完全地漠视了。500 个动态的 SVG 圆圈测试 在 iOS 6 上可以轻易跑到 50 帧/秒,但在 iOS 7 上,动画在跑了几帧之后就完全卡住了。我们心有不甘,又尝试了其它一些基于 SVG 实现 UI 交互的应用,但我们遭遇到了同样不忍直视的低下性能。

iOS 7: A Beta Release of Web

iOS 7 在 web 方面仍未成熟

iOS7 Logo

Given all these bugs and issues, combined with some genuine major advances, it's hard not to interpret this as a beta release that was rushed into production for the release of the iPhone 5S. In a way, it reminds us of the Android 3 release -- which was rushed into production for the Motorola Xoom tablet -- with severe bugs and performance deficiencies. We're eagerly awaiting the release of the first update for iOS 7 when we hope Apple delivers on its usual commitment to quality.

综合所有这些 bug 和缺陷,以及少许有诚意的进步,我们不得不认为,为了配合 iPhone 5s 的如期发布,一个 beta 级别的系统就这么仓促地被推到了台前。在某种程度上,这让我们想起了 Android 3 的发布——为了配合 Motorola Xoom 平板电脑的发布而不得不赶着上线——结果留下了严重的 bug 和性能缺陷。我们急切盼望 iOS 7 后续更新的发布,同时我们希望苹果可以履行它一直以来对品质的承诺。

But beyond bugs, the design decisions in iOS 7 clearly privilege consumer content over business applications. We remain convinced that Enterprises that want to deploy HTML5 applications to mobile devices can't rely on consumer browsers and need a secure and predictable mobile environment designed for business applications. iOS 7 has convinced us that more than ever that the future of HTML5 app deployment for business is Sencha Space.

但是抛开这些 bug 不谈,iOS 7 所采用的设计策略是十分清晰的——重消费者内容,轻商业应用。我们相信,那些需要将 HTML5 应用部署到移动端的企业们不能依赖消费级浏览器,而是需要一个专为商业应用设计的、安全可控的移动环境。iOS 7 更加明确地告诉我们,HTML5 商业应用部署方式的未来就是 Sencha Space

(译注:你妹,翻译了这大半天,原来是篇软文?不过 iOS 7 这回真的让人揪心啊,曾经的 web 技术先锋,曾经的最佳 web app 平台,如今迷失在自己曾经的辉煌里。话说近日 iOS 7.0.2 已经发布,不知道是否有所改观……)

Written by Michael Mullany

作者介绍

Michael Mullany is Sencha's CEO. He has held various product and executive marketing roles at influential Silicon Valley startups Netscape, Loudcloud, and VMware. He holds an MBA from Stanford University and a BA in economics from Harvard College.

Michael Mullany 是 Sencha 的 CEO。他曾在很多有影响力的硅谷创业公司(比如网景、Loudcloud、VMware)中担任过多个产品和营销高层职位。他获得了斯坦福大学的 MBA 学位,以及哈佛大学的经济学学士学位。


© Creative Commons BY-NC-ND 4.0   |   我要订阅   |   我要打赏

如何订阅这个博客

如何订阅这个博客


新文章将在 “CSS魔法” 微信公众号首发,扫码立即订阅:

weixin-qrcode


这个博客并没有采用流行的 WordPress 来搭建,而是直接利用了 GitHub 现成的 Issue 系统,零成本、功能完备、交互方便,唯一不便之处是无法原生提供 RSS feed 输出。如果你想在第一时间获取博客的更新,则需要通过 GitHub 特有的各种机制来实现“订阅”的效果。

我相信对一个程序员来说,在后 GR 时代,这不算太麻烦。而且随着越来越多的知名程序员(比如 @lifesinger @wintercn)选择用 GitHub Issue 来写博客,这篇文章也可以做为通用教程。

加星标

首先,我建议你对本博客加星标。这相当于在 GitHub 中把这个项目加入收藏夹了,这样你在任何时候都可以重新回到这里。

在页面右上角,点击 Star 按钮即可。

加星标

(如果你有兴趣的话,还可以点击按钮旁边的数字,看看还有谁收藏了本博客。)

加星标成功之后,你可以在 已收藏的项目 中找到这个博客。

加关注

如果你希望在第一时间收到本博客的更新,可以尝试使用 GitHub 的关注(Watch)功能。

在页面右上角,点击 Watch 按钮,再选中 Watching 即可。

加关注

关注成功后,GitHub 会根据 你的提醒设置,通过网站或邮件向你发送消息。

提醒设置

这两个项选的效果分别是:

  • Web - 当有新消息到达时,GitHub 网站顶部状态栏会有小蓝点提示。点击它进入 通知中心 可以查看所有未读消息。
  • Email - 当有新博文发布时,GitHub 会把文章全文(包含图片)发送到你的邮箱,而且你还可以直接回复邮件参与评论。如果你对邮箱做一些过滤或转发设置,结合一些开放接口或在线服务,则可以实现更舒适的阅读方式。

关注评论

博文的评论区经常会有干货,同样值得关注。如果你已经关注了本博客,则不需要再做额外操作,GitHub 会自动把最新评论发送给你。

你完全不用担心会收到太多不感兴趣的邮件和通知。如果你不希望继续收到某篇博文的评论通知,可以手工关闭。在博文页面的底部,点击 Mute thread 按钮即可。

在博文页面取消对讨论的关注

如果你在通知中心收到了评论通知,也可以就地取消对某篇博文的后续关注。

在通知中心取消对讨论的关注

如何参与

评论

直接在每篇博文的下方评论即可。如果你有任何想说的话,都请果断评论!

Fork 和 Pull Request?

理论上这个项目不接受 Pull Request,意义不大。所以如果你想帮忙纠错,直接评论吧,更快更方便!

关注微博

除了写博客,我也经常会在微博分享一些有用的东东。不妨加我:


© Creative Commons BY-NC-ND 3.0   |   我要订阅   |   我要捐助

[译] [PJA] [507] Harmony 的模块机制

[译] [PJA] [507] Harmony 的模块机制

Harmony Modules

Harmony 的模块机制

None of the module systems discussed so far are included in the official ECMAScript specifications. In the future, a module system will be built-in to all ECMA-compliant JavaScript engines.

目前为止我们所讨论到的模块机制都并没有收录进官方的 ECMAScript 规范中。但在未来,将会有一个模块系统内建到所有兼容 ECMA 规范的 JavaScript 引擎中。

The Harmony module specification hasn't stabilized yet, but when it does, it should be possible to write harmony modules and compile using build tools to fall back on the module pattern, AMD, and CommonJS where required.

Harmony 的模块规范现在还没有稳定,但一旦它稳定下来,我们应该就能编写 Harmony 模块;在必要时,还可以通过构建工具的编译操作,降级到模块模式、AMD 和 CommonJS 的模块机制。(译注:以便适配那些尚未支持 Harmony 模块规范的环境。)

Harmony module build tools are already beginning to appear, but since the specification is likely to change, you should probably wait a bit longer before you start to rely on them for your production applications.

Harmony 模块构建工具已经开始出现了,但由于规范还有可能变动,在将这些工具投入生产之前,你可能还需要再等一等。


© Creative Commons BY-NC-ND 4.0   |   我要订阅   |   我要打赏

[多图] 苹果 2013 iPhone 5c/5s 发布会简译与简评

[多图] 苹果 2013 iPhone 5c/5s 发布会简译与简评

9 月 10 日发布会当晚我并没有熬夜看直播,而是选择第二天一早下载官方视频慢慢看。这样也有好处,发布会 Keynote 的很多细节可以定格,慢慢听,慢慢看,慢慢品。看完官方视频之后,就会发现很多媒体报道已经没法看了,微博上的很多评论也令人哑然——不求甚解想当然的观点太多,静心思考的观点太少。(也有可能是我还没有领悟到大家吐槽的方式吧……)

所以,即使这个话题在快速消费的大背景下已经开始有点过气了,我还是决定把发布会的视频拿出来,简要翻译一下,再加点自己的小感想,与同好分享。


开场

2013-09-10-apple-keynote-01

发布会就安排在苹果总部的一个小厅内。场面明显比不上 WWDC 那般宏大,不过实际上很多重要产品(比如第二代 MacBook Air 和 iPhone 4S 等等)也是在这里发布的。这次发布会也很紧凑,一个小时解决问题。

2013-09-10-apple-keynote-02

近年来的苹果发布会 Keynote 封面都会拿 logo 作文章,这一次是活(闹)泼(心)的“五彩”主题。

2013-09-10-apple-keynote-03

(介绍 iTunes 音乐节和苹果零售店的环节这里就略过了。)

iOS 7 回顾

2013-09-10-apple-keynote-04

接下来是 iOS 7 的回顾。重点提到 Siri 增加了对 Twitter 和维基百科的搜索支持,以及就地显示网页搜索和图片搜索的结果,而无需跳转到 Safari 窗口;另外,Siri 有男声了(是否支持中文普通话暂不清楚)。

iOS 7 还增加了一些新铃声,听起来都不错。这将大大减少我们在公共场合“撞铃”的机率。

(除此以外的一些特性与**观众关系不大,略过。)

2013-09-10-apple-keynote-05

iOS 7 将于 9 月 18 日(也就是**大陆的 19 日)起正式开放下载,支持以下机型:

  • iPhone 4+
  • iPad 2+
  • iPad mini
  • iPod touch 5

这意味着(除了硬件吃紧的 touch 4 以外),iOS 7 “向后兼容”到了三年前的设备。虽然这是苹果的一贯传统,但仍然不禁要赞一下。

2013-09-10-apple-keynote-06

Tim Cook 谈到了自家的五款“业内领先”的办公与生活移动应用——iWork 三件套和 iPhoto、iMovie,同时宣布这五款应用的 iOS 版本从即日起免费发布,只要你购买新的 iOS 设备。

看到这里,估计有人会大喊“坑爹”、“退钱”,其实 Mac 版的 iWork 并没有免费。而且我相信以前购买过 iOS 版 iWork/iPhoto/iMovie 的**用户应该不会很多,即便是 iPad 用户,亦然。

2013-09-10-apple-keynote-07

苹果此举更多是战略上为 iOS 设备增值,类似从 2010 年起为新售出的 Mac 免费附送 iPhoto、iMovie 和 GarageBand 三款家用多媒体创作软件。“仅限新售出的设备”也是一种安抚策略,不至于让已付费的老用户感到太亏。

2013-09-10-apple-keynote-08

从图上来看,这五款应用的免费发布方式类似于 iOS 6 的 App Store 应用对苹果自家应用(iBooks、Podcasts、Find My iPhone 等)的推荐。

2013-09-10-apple-keynote-09

这里插一句,此次 Keynote 从开始到现在,基本上没有在关键镜头中出现 iPad 4,所有需要 iPad 露脸的场合几乎都是 iPad mini 在撑场面。这似乎表明,一方面 iPad 4 确实将在不久之后(估计是 10 月份)更新换代;另一方面,(我猜测) iPad mini 很可能不会在短期内升级。毕竟苹果今天要发布两款新手机,一个月后如果还要再发两款新 iPad,稍显吃力。

因此,我建议那些热切期待 iPad mini 2 甚至 Retina iPad mini 的朋友,做好心理准备。

新款 iPhone

2013-09-10-apple-keynote-10

终于到 iPhone 的环节了。

这曲线很徒很好看,不过这是 iPhone 的 累计销量,不好看才怪。

2013-09-10-apple-keynote-11

“往年,在发布新产品时,我们的做法是把当前产品降价,令其价位更具亲和力;但今年, 由于这个盘子已经越来越大,我们将换种玩法。我们将一次推出两款新品,来满足更多用户的需要。而至于 iPhone 5,它将被新品完全取代。”——言下之意就是,一款新产品已经完全 hold 不住阵势了。

2013-09-10-apple-keynote-12

Phil 上来了,开门见山,先推出 iPhone 5c。

“5c 不仅沿续了 iPhone 5 身上为群众所喜闻乐见的先进特性,还有更多——不可思议的全新设计,更多乐趣、更多色彩。”

接下来是一段关于 iPhone 5c 外观概念的视频,缓缓流淌的色彩最终凝固成一台 iPhone。

2013-09-10-apple-keynote-13

iOS 7 会自动根据 5c 的外观显示对应颜色的壁纸和主题(“主题”是指系统原生的各种按钮和控件等)。嗯……在看到真机之前就不评论了。

iPhone 5c 共有五种不同的颜色,5 对应五种颜色,那么 c 就应该是指“color”了。

2013-09-10-apple-keynote-14

苹果还专门为 5c 设计了彩色保护套,还是那五种颜色,采用超细纤维内衬的硅胶材质来打造超凡手感,并对塑料后壳提供贴身呵护。背后还有大片大口径的镂空网点设计,设计师试图用色彩对比和材质对比(哑光 vs 高光,软质 vs 硬质)来烘托 5c 的外观和质感。

“这绝对是美呆了,”Phil 说到。

有人说老外很喜欢色彩斑斓的电子产品,比如 iPod。嗯……在看到真机之前还是不评论。

2013-09-10-apple-keynote-15

“当你初次把它拿到手上时,你会被它的质感和手感惊住。”后壳与侧边是一整块塑料,其材料工艺被称作“硬质涂层聚碳酸酯”。

“塑料材质更适合表现鲜艳的色彩。”——而不是为了降低成本。

2013-09-10-apple-keynote-16

在艳丽的外表之下,是你看不到的钢制加固结构,兼任多频带天线系统。

这样看来,塑料后壳基本上相当于额外增加的部件,因此 iPhone 5c 三围数据应该比 5(以及后面的 5s)要略大;此外,把铝换成钢,重量方面也会有所增加。我查了一下官网数据,确实证实了这一点。

2013-09-10-apple-keynote-17

iPhone 5c 的各项指标与 5 相比基本一致,但电池容量更大。

2013-09-10-apple-keynote-18

图上是 iPhone 5c 在北美的两年合约价。据说国行版裸机的价格是:

  • 16GB 版: 4488 元
  • 32GB 版: 5288 元

这样的裸机价估计很难卖得动,还是要看国内三大运营商提供的合约价。

2013-09-10-apple-keynote-19

Phil 在这里吐了个小槽:“5c 同样十分环保,不含 BFR、不含 PVC、 不含 Android!”

2013-09-10-apple-keynote-20

接下来是一段 iPhone 5c 的专属宣传视频,官方中文版 也已经出来了,中文字幕翻译得很好。

值得一看的是塑料后壳的生产工艺。Jony Ive 说,“(它)远远超越你对一款塑料材质产品的期望”。乔布斯曾经嘲笑过竞争对手是“cheap plastic(廉价塑料)”,现在苹果自己也做塑料了,会有多大改观?能把塑料做到珠圆玉润般的观感和手感吗?拭目以待。

(如果你的 Windows 系统没有安装 QuickTime,也可以拿起你的 iPhone/iPad 扫描以下二维码观看。)

2013-09-10-apple-keynote-qrcode

发布会 iPhone 5c 的环节到此就告一段落了。5c 意取“五彩”,其官方广告标语就是“For the colorful/生来多彩”,再结合它的定价,可见 “C” 从来就不是什么廉价版(Cheap Edition),是媒体和观众们自作多情了。

苹果面对股价和华尔街的重重压力,并没有打算通过降低品质和压缩低利空间来争取更好看的市场占有率。但这不代表苹果对各方压力无动于衷,只不过它试图打动消费者的思路仍然是强调产品可以帮助你做什么、强调产品是你生活中的一部分。比如,苹果免费发布 iOS 版 iWork、iPhoto、iMovie 的举措就很明确地传达了这种产品价值观。

主角驾到

2013-09-10-apple-keynote-21

iPhone 5s 登场了。

Phil 先播放了一段“土豪金”的概念视频(图略)。

2013-09-10-apple-keynote-22

5s 有三种颜色。黑色不再是纯黑,而是变成了“空间灰”。灰色?貌似不是很顺眼,但我应该还是会选择它。到时候看真机吧。

“今天只介绍 iPhone 5s 的三大亮点。首先是性能。”

亮点一:性能

2013-09-10-apple-keynote-23

A7 处理器,一枚 64 位 ARM 处理器。

2013-09-10-apple-keynote-24

“这是 64 位处理器首次应用于智能手机。”

64 位意味着两倍的 CPU 寻址能力,在某些层面体现出更高的性能。

2013-09-10-apple-keynote-25

“苹果通过对硬件、软件、分发三个环节的紧密整合,实现从 32 位到 64 位的平滑切换。”

请注意,这里提到了 App Store

有人担心将来的 app 为了同时支持 32 位和 64 位的系统和硬件(可以预见新旧设备会并存很长时间),二进制文件体积会显著增大,这对移动设备来说显然是十分不利的。

但是,如果开发者同时提交两个版本的二进制文件呢?

这看起像是一种倒退,因为苹果在二合一方面已经有非常成功的经验(Mac OS X 在从 PowerPC 向 Intel 架构迁移的时候,提出可将应用程序打包为复合式的二进制文件,即 Universal Binary)。不过今时不同往日,如今苹果在移动领域已经牢牢掌控了应用程序的分发渠道。因此,app 的 32 位和 64 位版本自动侦测下载并非不可实现,对用户来说,这个过程同样是完全透明的。

这一点是我作为一个 iOS 开发外行的一通乱弹,回头看看是不是蒙对了。

2013-09-10-apple-keynote-26

A7 处理器的一些特性:

  • 桌面级 64 位架构
  • 支持更高效的现代 ARM 指令集
  • 双倍的通用运算寄存器
  • 双倍的浮点运算寄存器
  • 超过十亿个晶体管,是 A6 的两倍
  • 芯片内核面积仅有 102 平方毫米,几乎与 A6 相同

2013-09-10-apple-keynote-27

首次披露 iOS 7 为 64 位所做的工作:

  • 所有的内核、库、驱动程序均以原生 64 位模式运行
  • 所有自带 app 全部以 64 位模式重写
  • 开发者可以无缝切换到 64 位时代
  • Xcode 依然提供有力支持
  • iOS 7 可同时运行 32 位和 64 位的 app

Phil 在介绍第三、四点时提到,在升级开发工具之后,开发者可以方便地构建 32 位或 64 位的 app。貌似印证了我上面的猜测。

“iOS 7 可以同时运行 32 位和 64 位的 app”,对用户完全透明。苹果在这方面也有非常成功的经验,Mac OS X 内核从 32 位向 64 位升级过程虽然横跨了几个 OS X 大版本,但却是以一种用户无法察觉的方式悄悄完成的。

2013-09-10-apple-keynote-28

来看一下 A7 的跑分。CPU 运算性能最高可以达到 A6 的两倍,图形性能也是两倍。(当然,这些都是理论值。)

上图是历代 iPhone 的 CPU 性能比较,iPhone 5s 是初代 iPhone 的 40 倍。另一张图表显示,图形性能的提升达到了 56 倍(图略)。

一直以来,苹果都不太乐意告诉你具体的硬件参数,比如 CPU 是几核的、主频是多少、内存有多大,而只是告诉你它进步了多少、提升了多少倍。这种直观的、感性的表达方式极力避免用户迷失在似懂非懂的参数谜团中,以唤起大众消费者的认同和购买欲。

2013-09-10-apple-keynote-29

“A7 支持 OpenGL ES 3.0,最新的图形语言标准,可将主机级或桌面级的 3D 影像体验轻松引入 iPhone 平台。”

插播关于 OpenGL ES 的科普:

OpenGL ES (OpenGL for Embedded Systems) 是 OpenGL 三维图形 API 的子集,针对手机、PDA 和游戏主机等嵌入式设备而设计。OpenGL ES 是从 OpenGL 裁剪定制而来的,去除了许多复杂的、但并非绝对必要的特性。

OpenGL ES 3.0 于 2012 年公布,加入了大量新特性。

(接下来是《无尽之剑 3》的广告时间,略过。)

2013-09-10-apple-keynote-30

在 A7 之外,还有一颗运动协处理器 M7(不知道两者是否封装在一起)。“M”自然取的就是“motion”的开头字母。

M7 将从 CPU 肩上接过各类传感器的数据监控和处理工作。减轻耗电大户的负担,手机自然更省电。

2013-09-10-apple-keynote-31

M7 将持续收集和处理运动传感器的数据,这包括加速度传感器、陀螺仪和数字罗盘。这为新一代健身应用创造了机遇。

暂不确定 M7 是否也在不间断地收集和处理地理定位数据。由于 GPS 和 GLONASS 需要动用天线系统,因此定位模块的功耗与传感器相比,应该不可同日而语。我估计定位数据并不在 M7 的实时监测范围之内。

2013-09-10-apple-keynote-32

iOS 7 也在软件层面对手机的运动信息进行了充分利用。它将通过 M7 来识别用户的状态(行走、驾驶、睡眠等),并开放全新的 CoreMotion API 给开发者。这将在一定程度上取代周边设备(比如智能腕带、智能手表)的部分功能。

此外,iOS 7 还借助这些运动信息,对自身功能进行了一些很有意义的优化。以下摘自苹果官网的介绍:

由于 M7 协处理器知道你何时身处行驶的车辆中,因此 iPhone 5s 不会询问你是否要加入路过的无线网络。如果你的手机许久未动,例如当你睡觉时,M7 协处理器会减少网络检测,从而节省电池电量。

(后面关于 Nike+ 的介绍略过。)

2013-09-10-apple-keynote-33

“多了一个处理器,又在持续不断地工作,那么耗电情况如何?”

各项续航指标与 iPhone 5 相比,基本持平或有小幅提升——5s 的电池容量应该也是增加了吧。

亮点二:摄像头

2013-09-10-apple-keynote-34

“第二大亮点是摄像头。”

5s 采用了全新的镜头组件,其中包括更大的 f/2.2 光圈、更大的感光元件。

2013-09-10-apple-keynote-35

而 800 万像素保持不变,所以单颗像素的面积也更大(“达到 1.5 微米”,应该指的是 1.5 微米见方吧?)。

苹果并没有追求表面上好看的像素数量指标,而是通过提升更加实质性的因素来提升拍摄质量,同时通过对软件的不断优化来传达更轻松的拍摄体验和更愉悦的回放体验。

2013-09-10-apple-keynote-36

在你按下快门的一瞬间,苹果自动做了以下事情,令你在不知不觉中拍出更高质量的照片:

  • 自动白平衡
  • 自动曝光
  • 首次启用的“动态的本地色调映射”(估计对图像的动态范围有帮助)
  • “自动对焦矩阵测量”(对准确对焦有帮助)
  • “连拍选优”策略

其它关于拍摄的功能增强如下(图略):

  • iPhone 5s 的一项创新是“真实色调闪光灯”,这也是苹果在数字影像领域首创的。为了应对不同环境光的巨大色温差异,手机同时配备了冷色(白色)和暖色(琥珀色)两枚 LED 闪光灯,由软件自动侦测环境光色温并独立控制两枚闪光灯的强度,涵盖了一千多种色温组合,令肤色曝光更加自然。(“一千多种”……是 1024 种吧?)

  • 虽然 iPhone 不具备硬件防抖功有,但“连拍选优”、“多图复合”策略能帮助你获得更稳定、更锐利的照片。

  • 得益于更强的处理器,iPhone 终于有了原生的“连拍模式”。它能以最多每秒 10 帧的速度连续拍摄,非常适合拍摄动态目标。

  • 支持以每秒 120 帧的速度拍摄 720p 的高清视频(相当于常规拍摄的 4~5 倍速),并以慢动作回放。

写完这么多,才发现苹果官网已经发布了一段 中文版视频,详细讲解了这些特性。

亮点三:指纹识别

2013-09-10-apple-keynote-37

第三大亮点是事前已经泄露出来的“指纹识别”,苹果称之为“Touch ID”。

2013-09-10-apple-keynote-38

“大约有一半的用户因为嫌烦,而没有为手机设置密码。”

现在,懒人有福了。

2013-09-10-apple-keynote-39

Touch ID 传感器的主要特性:

  • 电容型传感器(不是光电扫描型)
  • 超薄(0.17 毫米,其厚度相当于头发的直径)
  • 500ppi 的分辨率(相当高)
  • 扫描下表皮层(可得到更清楚的指纹图像)
  • 各角度通吃

2013-09-10-apple-keynote-40

传感器集成在 Home 键中,其主要结构如下:

  • 激光切割的蓝宝石水晶玻璃(sapphire crystal)
  • 不锈钢探测环
  • Touch ID 传感器
  • 触觉开关(物理按键)

先科普一下,说说“蓝宝石”吧。

蓝宝石和红宝石同属于刚玉类宝石,这两者的主要成份都是氧化铝,因含有不同的少量其它元素而呈现出不同的颜色。摩氏硬度 9,是硬度仅次于钻石的天然矿物。

蓝宝石是价值不菲的天然宝石,又怎么会大批量地应用于手机这样的消费级电子产品呢?苹果岂不是亏死?实际上 iPhone 5s 的 Home 键和 iPhone 5 镜头的保护层所使用的并非天然蓝宝石,而是所谓的“蓝宝石水晶玻璃”。

“蓝宝石水晶玻璃”(及其原文 sapphire crystal)并不是一个精确严谨的名称。这种材料的制造方法是在非常高温的条件下,使氧化铝结晶化,说白了就是“人工合成蓝宝石”。因为从化学角度来看,它的主要成份与天然蓝宝石无异,硬度也一样;但由于缺少少量的其他元素,呈现出无色透明的形态。(试想,如果 iPhone 5 用的是带颜色的天然蓝宝石,那还怎么拍照啊?)

“蓝宝石水晶玻璃”的制造成本并不高,但由于高档手表和手机常用它来制作防刮镜面,不方便说得太直白,所以就用了这么一个隐晦的称呼。它跟玻璃完全不是一回事;它和水晶(石英结晶体)也没有任何关系(水晶的硬度较低,只有 7,还不如大猩猩玻璃)。这里的“crystal”并不是指水晶(rock crystal),而是指广义上的“结晶体”。

接下来说说这个不锈钢探测环,它的作用是在需要时感知用户的手指是否正放在 Home 键上,以便激活指纹传感器,而无需用户做出其它多余动作。(不过对于解锁主屏幕的场景,还是需要你先按一下 Home 键或开关键唤醒屏幕,再用指纹解锁。不用担心一碰就解锁,苹果没有那么傻。)

指纹识别还可用于 iTunes 和 App Store 等购买行为,不过目前还没有开放给第三方应用。

Touch ID 这个特性我很喜欢,不过有一点不开心的是,Home 键上的小方框不见了,总觉得少了点儿什么……

2013-09-10-apple-keynote-41

接下来是一段详细讲解 Touch ID 的视频(官方中文版在这里),透露了更多的重要信息,比如:

  • 用户可以设置多个手指(这似乎令多人共用一台设备成为可能)
  • 苹果对指纹信息做了充分的加密工作
  • 指纹数据不会上传到 iCloud

另外,据报道,Touch ID 收集的并不是指纹的完整图像,而是指纹的部分特征信息(比如线条深浅、线条断裂的位置等等)。这样即使你的手机被盗,你的指纹图像也不会泄露,不用担心你的保险箱被盗开。

而且,指纹只是一种辅助性的便利设施,密码在任何时候都是可用的(不用担心刷不出指纹而用不了手机了,苹果真的没有那么傻);甚至在必要时,系统可能会临时禁用 Touch ID,要求手工输入密码以确保安全。

2013-09-10-apple-keynote-42

好,来看一下价位。图上还是北美的两年合约价。而国行版裸机的价格据说与去年的 iPhone 5 持平:

  • 16GB 版: 5288 元
  • 32GB 版: 6088 元
  • 64GB 版: 6888 元

值得一提的是,16GB 版本并没有像传言的那样被取消,传说中的 128GB 版本也没有出现。

尾声

2013-09-10-apple-keynote-43

iPhone 5 就这样从产品线中淡出了,而 8GB 版的 iPhone 4S 才是真正意义上的“廉价版 iPhone”。

2013-09-10-apple-keynote-44

从 9 月 20 号开始,iPhone 5s 接受预订。我大瓷国(包括香港)终于加入首发行列,不容易啊!

2013-09-10-apple-keynote-45

Phil 介绍完新产品,Tim Cook 又回到台上。

“What~~?!” 播了一段苹果味十足的、生活气息浓郁的电视广告视频之后,整场发布会就结束了。


后记

总之,这次发布会给我的感觉是, 突破之下实为保守,平淡之中也有期待

iOS 7 被认为是近几年来 iOS 系统的最大革新,堪称大破大立;iPhone 5c 的彩色战略也足够大胆,为女性消费者和年轻时尚一族提供了更多选择。但是,你会发现,苹果一直以来的核心价值观仍然没有变,并没有为了争夺市场而采取“低质低价”的策略,仍然固守其赖以生存的高端定位和高利润率。

整场发布会在事前已经被“剧透”了不少,但 iPhone 5s 的几大亮点和 iOS 7 的新增特性对我的吸引力并不会因此减少。看着手里已经落后三代的 iPhone 4,我已经不需要犹豫了,这一代的新机是必入的。

最后,附上昨天上午写的一条比较受欢迎的微博,结束这篇文章。感谢您的陪伴!


有一个小细节。苹果为了避免“5S”看起来像是“55”或“SS”,特意把 S 小写了,即写成“5s”;同期发布的“5c”自然也是小写。但令人不敢相信的是,为了保持统一,苹果一夜之间把官网所有的“4S”也都改成了“4s”。

2013-09-12 11:41

2013-09-10-apple-keynote-lowercase-4s


© Creative Commons BY-NC-ND 4.0   |   我要订阅   |   我要打赏

[多图] 电影《阿凡达》如何拍摄失重场景

[多图] 电影《阿凡达》如何拍摄失重场景

本文是对此问题的解答: 阿凡达电影开头的失重场景是怎么拍摄的? - 知乎

所有图片均为 720p,点击图片可查看原图。

多图杀猫,手机慎入。

首先说一下电影拍摄中对失重的模拟,一般是两种方式:吊钢丝和飞抛物线。吊钢丝大家都比较了解,成本低,但表现力有局限,毕竟此时重力还是存在的,钢丝只能从一个方向上“抵销”重力,很难模拟大空间内各个方向上的失重效果。

而后者是在专门的失重飞机的舱内搭棚,飞机飞抛物线可以取得完全真实的失重(或低重力)场景,可以直接拍摄到物体(甚至液体)悬浮、人体翻转等逼真效果,演员也可以亲身体验失重,表现力极强。在影视 3D 动画技术成熟之前,飞抛物线的方法主要运用于太空戏的拍摄。(事实上飞抛物线本来就是航天员失重训练的主要手段。)

飞抛物线的短处主要在于成本高、时间短(通常只有 30 秒以内),所以对目前的电影拍摄来说,只要是室内吊钢丝可以满足的失重效果,一般都不再会选择“实拍”。具体到《阿凡达》的这个片断,使用的是吊钢丝、绿幕、CGI 动画等拍摄方法,同时结合了很多拍摄技巧来保证最终效果。

下面详细说一下,有图有真相。


背景空间

首先说船舱内的背景空间。美国人连街景都懒得拍了,这种虚拟场景肯定是绿幕 + CGI 后期合成。

(图1、图2:绿幕原片与最终成片的叠加示意。)

电影《阿凡达》如何拍摄失重场景 - 图1

电影《阿凡达》如何拍摄失重场景 - 图2

(图3、图4、图5:船舱内的纵深空间是分段渲染再合成的,可能是因为渲染负荷太大。)

电影《阿凡达》如何拍摄失重场景 - 图3

电影《阿凡达》如何拍摄失重场景 - 图4

电影《阿凡达》如何拍摄失重场景 - 图5

抽屉胶囊内船员的飘浮感

虽然人物看起来是躺着的,但实际上是站着拍的。演员的身体前后晃动来模拟失重般上下浮动、轻微撞击绑带再回弹的效果。也就是说,图1 中的男主角实际上是被向上提起来的,而不是被水平拉出胶囊的。

(图6:离镜头较近的女演员的拍摄真相,更远一些的就不需要真人演员了,直接 CGI 搞定。绿幕上的红点用于空间定位,以便后期合成。)

电影《阿凡达》如何拍摄失重场景 - 图6

(图7:绿幕原片与最终成片的叠加示意。)

电影《阿凡达》如何拍摄失重场景 - 图7

船舱内的量产型船员

除了极少数离镜头较近的主要演员外,其它在船舱内随意游弋的船员基本上都是 CGI 人形(可能结合了动作捕捉)。

(图8:背景里的船员原来都不是真人啊。)

电影《阿凡达》如何拍摄失重场景 - 图8

飘浮的大夫

确实就是吊钢丝。注意腰上的吊环也是绿色的,本意是便于后期擦除,但实际上……

(图9:绿幕原片。绿幕上同样有红点。)

电影《阿凡达》如何拍摄失重场景 - 图9

衣服的悬浮感

这些细节是影响到失重真实感的关键点,拍摄真相同样是令人震惊的。

(图10:这群疯狂的美国人居然把实拍人物都进行 3D 数字化了!!!不知道是怎么做到的,也可能是用数字模型去“套”实拍人物。)

电影《阿凡达》如何拍摄失重场景 - 图10

(图11:所以衣服都可以单独建模、渲染再合成到实拍镜头上。)

电影《阿凡达》如何拍摄失重场景 - 图11

(图12:成片效果。)

电影《阿凡达》如何拍摄失重场景 - 图12

(图13:仍然不敢相信?好的,用这张图来对比一下图9,注意袖口领口等等细节的差异。估计本来在拍绿幕时,打算把大夫的腰环和钢丝擦除就算完成了,但后来发现衣服的悬浮感不够逼真,于是这群疯狂的美国人干脆决定:衣服重做!)

电影《阿凡达》如何拍摄失重场景 - 图13


题外话一

在《阿凡达》上映后不久,便有砖家宣称“国内只要 6 千万人民币就能拍出同样效果”。

题外话二

这里送上飞船内景的概念设计稿若干,算是补完从草稿到成片的创作过程。

电影《阿凡达》如何拍摄失重场景 - 附图1

电影《阿凡达》如何拍摄失重场景 - 附图2

电影《阿凡达》如何拍摄失重场景 - 附图3

题外话三

以上所有截图来自《阿凡达》花絮碟。不知道有没有和我一样喜欢收集花絮的电影爱好者?


© Creative Commons BY-NC-ND 4.0   |   我要订阅   |   我要打赏

关于“从网页分享到微信”的实现

关于“从网页分享到微信”的实现

公司的手机版网站是与微信公众账号配合运营的,有相当大的一部分流量来自微信用户。手机版的商品详情页提供了“分享到微博”功能,那么很自然地,老板希望也可以分享到微信。

在接到这个需求之后,我搜了一下相关资料,针对这个问题做了一些研究,简单小结如下。

官方文档

微信开放平台的介绍: http://open.weixin.qq.com/intro/

可以看出微信提供了“分享给好友”和“分享到朋友圈”官方接口,效果看起来也很不错。但是,这个接口只适用于 iOS/Android App,并不适用于网页。

除此以外,微信没有公开任何相关资料,也就是说,微信官方没有提供任何从网页分享到微信的解决方案。当然这也可以理解,毕竟微信的整个生态都是建立在手机客户端之上的,目前对网页端缺乏支持也是情理之中。

民间传说

官方不给力,还是求助于民间高人吧。很快,找到了这篇文章:《36氪:如何在网页中添加“分享到朋友圈”按钮》

(下图摘自该文章)

36氪的微信分享功能

有图有真相,36氪自己的网站就是这么做的。当用户使用微信浏览网站时,可以将当前页面分享至朋友圈。

其中的技术原理可以参考“我爱水煮鱼”的一篇教程。简单来说,微信在自己的浏览器(WebView)中埋了一个桥变量 WeixinJSBridge,可以实现 WebView 中的 JavaScript 对外层原生应用的功能调用。显然这是一个私有接口,而很多网站利用了这个未公开的桥变量实现了“分享给好友”、“分享到朋友圈”甚至是“关注微信”这样的功能。

既然如此,开工!

残酷真相

很快在详情页部署了相关脚本,并且确实可以获取到这个桥变量及其 .invoke() 方法,心中不禁一阵窃喜!

函数源码

上面这张图就是 alert() 出来的 WeixinJSBridge.invoke() 方法的源码。虽然是混淆过的,但基本上也可以看得出来它是干什么的。这里遇到一个小坑,WeixinJSBridge 对象会在页面加载一段时间之后才会埋入页面,并且其 .invoke() 方法也要再等一会儿才会生成。当然这都不算什么,因为更大的坑还在后面。

参照民间高人的示例,试着写了个分享到朋友圈的方法,放到微信里测试,怎么都出不来。

“程序写错了?” “不支持开发环境的假域名?” “人品问题?”

在经历了反复的自我否定和反复的否定自我否定之后,我只好继续搜索答案。果然,有网友反映说,从微信 4.2 版开始,这个 WeixinJSBridge 桥变量就不好用了。我一看自己手机上的微信,妈呀,都 4.5 了。

这么说,是微信把原先的“漏洞”给堵上了。好日子到头了,查了一下,果然连 36氪 自己的新版网站也已经找不到这功能了。

退求其次

既然如此,我也就不作梦了,从网页直接分享至微信的功能基本上是不可能实现了。

不过,这并不代表我们不能再做些努力。我发现,微信的浏览器已经整合了分享功能。点击微信浏览器右上角的动作按钮,可以选择各种分享方式和其它操作。既然如此,我们至少还可以提醒用户——“微信也能分享哦”!

微信分享提示

至此,这个需求算是告一段落,老板在了解到我的坎坷经历后,对这个结果还是比较满意的。


© Creative Commons BY-NC-ND 4.0   |   我要订阅   |   我要打赏

[译] [PJA] [500] 第五章 模块

[译] [PJA] [500] 第五章 模块

Chapter 5. Modules

第五章 模块

Modules are reusable software components which form the building blocks of applications. Modularity satisfies some very important design goals, perhaps the most important of which is simplicity.

模块是指可重用的软件组件,它们就像是组成应用程序的积木。而 模块化 是为了满足一些非常重要的设计目标,这其中最重要的目标可能就是“简单性”。

When you design an application with a lot of interdependencies between different parts of the application, it becomes more difficult to fully understand the impact of your changes across the whole system.

如果你正在设计一款应用程序,而且它由一堆相互依赖的不同部分所组成,那么,要想完全理解某些修改会在整个系统中造成什么样的影响,恐怕是非常困难的。

When you design part of a system to a modular interface contract, you can safely make changes without having a deep understanding of all of the related modules.

而当你把系统中的某个部分设计为一个模块化的接口约定时,你可以安全地进行修改,而不需要对所有相关模块进行深入了解。

Another important goal of modularity is the ability to reuse your module in other applications. Well designed modules built on similar frameworks should be easy to transplant into new applications with few (if any) changes. By defining a standard interface for application extensions, and then building your functionality on top of that interface, you'll go a long way toward building an application that is easy to extend and maintain, and easy to reassemble into different forms in the future.

模块化的另一个重要目标是令模块在其它应用程序中得到重用。模块只要基于相似的框架进行良好的设计,就可以很容易地移植到新的应用程序中,而几乎不需要(即使需要也很少)修改。在对应用程序进行扩展的时候,我们可以先为扩展部分定义一套标准接口,然后在这个接口之上构建新功能——这种方式对于构建一个易于扩展和维护的应用程序来说大有裨益,这样的应用程序也易于在未来重新组装为不同的形态。

JavaScript modules are encapsulated, meaning that they keep implementation details private, and expose a public API. That way, you can change how a module behaves under the hood without changing code that relies on it. Encapsulation also provides protection, meaning that it prevents outside code from interfering with the functionality of the module.

JavaScript 模块是封装式的,也就是说,模块将自身的实现细节保留在内部,仅向外暴露一套公开的 API。这样一来,你就可以随时改变一个模块的内部行为,而不需要同时去修改那些依赖它的外部代码。封装同样提供了一种“保护”,这意味着它会防止外部代码干涉模块内部的功能。

There are several ways to define modules in JavaScript. The most popular and common are the module pattern, CommonJS modules (used in Node), and AMD (Asynchronous Module Definition).

在 JavaScript 中,有多种方法可以定义模块。这其中最流行、最普遍的方法分别是模块模式、CommonJS 模块规范(主要用于 Node)和 AMD(Asynchronous Module Definition,异步模块定义)规范。


© Creative Commons BY-NC-ND 4.0   |   我要订阅   |   我要打赏

交互设计师的工作内容与发展前景

交互设计师的工作内容与发展前景

本文的部分内容整理自我对此问题的解答: 交互设计师的主要工作是什么?发展前景如何? - 知乎

交互设计的工作内容是什么

我也只是一个初学者,所以只简单说两句:

  • 如果说视觉设计决定了产品是不是“好看”
  • 那么交互设计将决定产品是不是“好用”

再深入一些的东西我就不扯太多了,只推荐一本书吧——《交互设计之路:让高科技产品回归人性》。书里的一些内容可以作为这个问题的答案来参考,我在看了《Don't Make Me Think》和这本书之后就毅然入坑了,以 30 岁“高龄”转行互联网,从老家奔到了大上海。

交互设计的发展前景如何

说到发展前景,我这里理解为两个方面:

交互设计在整个产品生命周期内的是否重要?

举个我自己的例子吧。我在一家电商公司独立负责手机版网站项目,我重新设计了整个结算流程。手机版网站上线之后,我连续三个月统计了这个结算流程的转化率,发现它的数据明显比桌面版网站明显要高。

这意味着:

  • 桌面版网站的结算流程设计得不够好。
  • 好的设计可以改善转化率。
  • 差的设计很可能就是当前的业务瓶颈。

对电商行业来说,转化率提升,意味着在相同的营销推广成本下,收益会更高。而对于其它行业,我认为交互设计的价值也是类似的。

交互设计师的待遇怎样?

这个我不太好回答,确实不太清楚,毕竟我目前不是以这个身份糊口。为交互设计师单独设立职位的公司并不多,中小公司基本上会把这个职位跟产品经理甚至视觉设计师整合在一起;甚至更多公司会完全忽视(或忽略)交互设计这一块。

尽管如此,我仍然看好它。毕意,你的待遇来自于你贡献的价值,而交互设计的价值刚才已经解释过。只不过,很多时候你可能顶着的是其它头衔,而实际上正在做着交互设计。


© Creative Commons BY-NC-ND 4.0   |   我要订阅   |   我要打赏

实战中踩到的 JSON 小坑

实战中踩到的 JSON 小坑

前端工程师对 JSON 是再熟悉不过了。它语法简单,表现力强,常用于前后端的数据交换。

在实战中,我也遇到过跟 JSON 有关的小坑。

JSON 数据中的 tab 字符

背景

某日在手机版的商品详情页发现了一个隐蔽的 bug,在 iOS 5 下并不会触发,但在当前最新版的 Chrome、Firefox 和 iOS 6+ 下可以重现。故障表现为个别详情页的脚本会挂掉,无法工作。

分析

经过简单的隔离分析之后,把疑点定位到某个 JSON 的解析操作上。该页面的脚本使用了浏览器原生的解析 JSON 的方法 JSON.parse(),但奇怪的是,此方法偶尔会抛出异常,导致后续代码无法执行。(示意如下)

json-traps-in-practice-tab-1

进一步分析发现,与 iOS 5 相比,iOS 6(以及其它较新的浏览器)更严格地遵守了 JSON 规范——如果 JSON 数据中需要出现 tab 字符,必须是经过转义的("\t""\u0009");如果是直接出现,则被认为是非法字符,JSON.parse() 方法会报错。

(相关的讨论可以参见 这里,其中提到了 JSON 的规范 RFC4627。)

后续

JSON 数据中怎么会出现 tab 字符呢?

json-traps-in-practice-tab-2

原来,详情页是以这个 JSON 为载体,将后端数据传递给前端脚本;而这个 JSON 是由 PHP 代码手工拼接的,其中的某个字段是从数据库中直接读取输出的。运营同学在从 Excel 向数据库导入数据时,很可能不小心在数据中混入了一些 tab 字符。

所以,这也算是一个教训,对于那些人工生成的字符数据,还是需要做一定的过滤和校验。在这个案例中,更好方式应该是先把数据存入一个 PHP 数组,再用 json_encode() 将其编码为 JSON 字符串,以确保 JSON 数据的规范性。

JSON 键名中的空格

背景

某天,某后端同学声称,他已经按需求开发完成了一个 API。好的,在浏览器里跑一下,打开 Firebug 查看一下 Ajax 返回的 JSON 数据,看起来没问题。

json-traps-in-practice-space-1

但在渲染这块数据的时候,发现 thumbnail 字段总是无法输出正确的值,总是显示 undefined。难道是拼写有误?我从 Firebug 的 JSON 视图(上图)中复制粘贴过来还是照样出错。真是怪事!

分析

在格式化过的 JSON 视图中看不出问题,那就进一步追查原始数据吧。于是把 Ajax 的返回数据切换到原码视图,搜索 thumbnail 关键字,终于发现问题所在。

json-traps-in-practice-space-2

原来这个字段的键名尾部有一个空格。空格也是键名的一部分,我当然无法输出这个带尾巴的字段了。

后端哥哥,你玩儿我呢吧?

后续

后端哥哥把那个空格去掉,这没什么好说的。


© Creative Commons BY-NC-ND 4.0   |   我要订阅   |   我要打赏

[译] [PJA] [505] CommonJS 模块规范

[译] [PJA] [505] CommonJS 模块规范

CommonJS Modules

CommonJS 模块规范

CommonJS is a set of standards for JavaScript environments that attempts to make JavaScript engine implementations more compatible with each other. CommonJS modules specify an API which modules use to declare dependencies. CommonJS module implementations are responsible for reading the modules and resolving those dependencies.

CommonJS 是为 JavaScript 环境制定的一系列标准的集合,它试图令各种 JavaScript 引擎之间达到更好的兼容性。CommonJS 模块指定了一个 API,模块用它来声明依赖性。CommonJS 的模块机制主要负责读取模块,并解析它们的依赖关系。

Before Node.JS, there were several other attempts to run JavaScript on the server side, as far back as the late 1990's. Both Netscape and Microsoft allowed JavaScript compatible scripting in their server environments. However, few people used those capabilities. The first server side JavaScript solution to gain any real traction was Rhino, but it was too slow and cumbersome to build web scale applications on top of.

在 Node.js 之前,就有一些想把 JavaScript 运行在服务器端的尝试,这些尝试可以追溯到上世纪 90 年代。当年网景和微软都允许在他们的服务器环境中运行 JavaScript 或兼容脚本(译注:因为微软的 JavaScript 实现被命名为“JScript”)。不过很可惜,几乎没有人这样用过。第一个受到广泛关注的服务器端 JavaScript 解决方案是 Rhino,但它太慢而且笨重,很难基于它来构建网站级别的应用程序。

By the time Node.JS arrived on the scene, there were several different server side environments for JavaScript, that all started out using different conventions for dealing with issues such as module loading. CommonJS was created to solve that problem.

等到 Node.js 登场的时候,服务器端的 JavaScript 环境就已经有好几种了,而且它们在模块加载问题上又分别使用了不同的约定。CommonJS 就是为了统一这个乱世而生的。

The CommonJS module system has a much simpler syntax than either the module pattern or AMD. In CommonJS, the file is the module. There is no need for a function wrapper to contain the scope, because each file is given its own scope. Modules declare dependencies with a synchronous require() function. That means that execution is blocked while the required module is being resolved, so it's safe to start using the module immediately after you require it.

CommonJS 的模块系统拥有一个比模块模式或 AMD 更简单的语法。在 CommonJS 中,文件就是模块。不需要用一个包裹函数来创建作用域,因为每个文件本身就已经划清了它自己的作用域。模块使用一个同步的 require() 函数来声明依赖关系。这意味着,当那个被 require 的模块正在解析时,代码执行是处于阻塞状态的,所以你可以放心地在 require 它之后就立即开始使用它。

First, assign to keys on the free variable exports to declare your module's public API:

首先,通过对自由变量 exports 的键进行赋值,可以声明模块的公开 API:

'use strict';
var foo = function () {
  return true;
};

exports.foo = foo;

Then use require() to import your module and assign it to a local variable. You can specify the name of a module in the list of installed Node modules, or specify a path to the module using relative paths.

此外,使用 require() 可以引入其它模块,将其赋值给一个本地变量。你可以指定一个已经安装的 Node 模块的名字,也可以通过相对路径来指定一个模块的路径。

For example, if you want to use the Flatiron HTTP Module, you can require() by name. (From the Flatiron.js docs):

举个例子,如果你想使用 Flatiron 的 HTTP 模块,你可以通过名字 require() 它。(以下摘自 Flatiron.js 的文档):

var flatiron = require('flatiron'),
  app = flatiron.app;

app.use(flatiron.plugins.http, {
  // HTTP options
  // HTTP 选项写在这里
});

//
// app.router is now available. app[HTTP-VERB] is also available
// as a shortcut for creating routes
// app.router 现在可用了。
// app[HTTP-VERB] 作为一个创建路由的快捷方式也可用了。
//
app.router.get('http://chimera.labs.oreilly.com/version', function () {
  this.res.writeHead(200, { 'Content-Type': 'text/plain' })
  this.res.end('flatiron ' %2B flatiron.version);
});

app.start(8080);

Or specify a relative path:

或指定一个相对路径:

'use strict';
var mod = require('./ch05-modules.js'),
  result = (mod.foo() === true) ? 'Pass:' : 'Fail:';

console.log(result, '.foo() should return true.');

You can use console.log() to simulate a unit testing framework, but there are several better alternatives for Node. See the Chapter "RESTful APIs with Node" for an introduction to unit testing with NodeUnit.

你可以使用 console.log() 来模拟一个单元测试框架,但对 Node 来说还有一些更好的替代方案。参见《基于 Node 实现 REST 风格的 API》章节来了解如何使用 NodeUnit 来进行单元测试。


© Creative Commons BY-NC-ND 4.0   |   我要订阅   |   我要打赏

终于知道 GA 订单统计中的 store 字段怎么用了

终于知道 GA 订单统计中的 store 字段怎么用了

GA 的电子商务追踪(订单统计)功能很强大。做过一些电商网站之后,我对这一块还是比较熟悉的。在开发中,需要在订单完成页面,将订单及订单内商品的数据发送给 GA。其中发送订单的代码片断如下(摘自 GA 官方提供的示例代码):

_gaq.push(['_addTrans',
	'1234',           // transaction ID - required
	'Acme Clothing',  // affiliation or store name
	'11.99',          // total - required
	'1.29',           // tax
	'5',              // shipping
	'San Jose',       // city
	'California',     // state or province
	'USA'             // country
]);

这其中有一个字段叫 affiliation or store name,非必填项(可以留空字符串),直译过来就是“加盟店的名称”。但我一直不知道这个字段有什么用,在以前做过的项目中,都是直接把网站的名称传给它,很显然这个字段没有发挥出实际作用。

我在最近的一个新项目中尝试使用供应商代码来标记这个字段,终于找到它的作用。在电子商务分析的次级维度中可以使用它进行多维分析,在 GA 中它被称为“联属机构”。

GA 电子商务分析


© Creative Commons BY-NC-ND 4.0   |   我要订阅   |   我要打赏

[译] [PJA] [501] 模块化的原则

[译] [PJA] [501] 模块化的原则

Principles of Modularity

模块化的原则

You can think of modules as small, independent applications that are fully functional and fully testable in their own right. Keep them as small and simple as possible to do the job that they are designed to do.

我们可以把模块定义为小巧而独立的应用程序,每个模块都独立具备完整的功能性和完整的可测试性。应该让它们尽可能地保持小巧和简单,从而更好地完成它们的本职工作。

Modules should be:

模块应该具备:

  • Specialized: Each module should have a very specific function. The module's parts should be integral to solving the single problem that the module exists to solve. The public API should be simple and clean.

  • 针对性:每个模块都应该具备非常专精的功能。模块的各个部分应该紧密团结,来完成模块的份内工作。对外公开的 API 应该干净利落。

  • Independent: Modules should know as little as possible about other modules. Instead of calling other modules directly, they should communicate between mediators, such as a central event handling system or command object.

  • 独立性:模块对其它模块的了解应该越少越好。模块不应直接调用其它模块,它们应该通过中介者进行通信,比如一个**事件处理系统或命令对象。

  • Decomposable: It should be fairly simple to test and use modules in isolation from other modules. It's common to compare them to components in an entertainment system. You could have a disc player, radio receiver, TV, amplifier and speakers, all of which can operate independently of each other. If you remove the disc player, the rest of the components continue to function properly.

  • 可分解性:以相互隔绝的方式对模块进行测试和使用应该是十分简单的。模块通常可以比喻为一套组合音响中的各个部件。你家的组合音响中可能包含了影碟机、收音机、电视机、功放和音箱,所有这些部件都可以独立工作。即使你移走了影碟机,剩下的部件也可以继续正常运作。

  • Recomposable: It should be possible to fit various modules together in different ways, in order to build a different version of the same software, or an entirely different application.

  • 可重组性:应该可以以不同的方式将各种模块组装到一起,以便构建某个软件的一个新版本,或者构建一个完全不同的应用程序。

  • Substitutable: It should be possible to completely substitute one module with another, as long is it supplies the same interface. The rest of the application should not be adversely impacted by the change. The substitute module doesn't have to perform the same function. For example, you might want to substitute a data module that uses REST endpoints as its data source with one that uses a local storage database as its data source.

  • 可替换性:应该可以用另一个模块完全替代眼前的这个,只要它们提供了相同的接口。应用程序中的其余部分不应该因为这种变化而受到负面影响。同时,这个替补模块并不需要以相同的方式运作。举个例子,系统中有一个由 REST 端点作为数据源的数据模块,你可能想把它替换为一个使用本地存储数据库作为数据源的模块。

[$]

The Open Closed Principle states that a module interface should be open to extension but closed to modification. Changing an interface that a lot of software relies on can be a daunting task. It's best if you can avoid making changes to an existing interface once it has been established. However, software should evolve, and as it does, it should be easy to extend existing interfaces with new functionality.

开闭原则 的意思是,一个模块的接口应该对于扩展是开放的,而对于修改是关闭的(译注:即禁止修改)。修改一个很多软件都依赖的接口往往是一项令人望而却步的任务。避免对一个既有接口做修改,是上上策。不过,软件产品应该(也一直在)不断进化,因此,为既有接口扩展新功能不应该成为一件难事。


© Creative Commons BY-NC-ND 4.0   |   我要订阅   |   我要打赏

[译] 如何做到一秒渲染一个移动页面

[译] 如何做到一秒渲染一个移动页面(原名:使用 PageSpeed Insights 分析移动网站)

声明:原文版权属于 Google,原文以 CC BY 3.0 协议发布,原文中的代码部分以 Apache 2.0 协议发布。中文翻译部分并非官方文档,仅供参考。

PageSpeed Insights analyzes a page to see if it follows our recommendations for making a page render in under a second on a mobile network. Research has shown that any delay longer than a second will cause the user to interrupt their flow of thought, creating a poor experience. Our goal is to keep the user engaged with the page and deliver the optimal experience, regardless of device or type of network.

一个网页是否可以在移动环境下用不到一秒的时间完成渲染,是一项非常重要的性能指标。研究显示,任何超过一秒钟的延迟都将打断用户的思维顺流状态,带来较差的体验。我们的目标是不论在任何设备或网络条件下,都要维持用户在网页中的沉浸状态,提供更好的体验。

It is not easy to meet the one second time budget. Luckily for us, the whole page doesn’t have to render within this budget, instead, we must deliver and render the above the fold (ATF) content in under one second, which allows the user to begin interacting with the page as soon as possible. Then, while the user is interpreting the first page of content, the rest of the page can be delivered progressively in the background.

想要达到这个标准并不是那么容易。不过幸运的是,我们并不需要在这个时间指标内渲染出整个页面,而是要在一秒以内传输并渲染出“首屏内容”(ATF),让用户尽快与页面交互。接下来,当用户与首屏内容进行交互的同时,页面的剩余部分可以在后台持续加载完成。

(译注:原文中的“ATF”一词源自传统出版业,指的是报纸头版的中折线以上区域,这块黄金区域往往用来刊登最有吸引力的新闻。延伸到互联网领域,ATF 指的是页面中不需要滚动就可以看到的首屏内容。)

Adapting to high latency mobile networks

适应高延迟的移动网络

Meeting the one second ATF criteria on mobile devices poses unique challenges which are not present on other networks. Users may be accessing your site through a variety of different 2G, 3G, and 4G networks. Network latencies are significantly higher than a wired connection, and consume a significant portion of our 1000 ms budget to render the ATF content:

在移动设备上达到“首屏秒开”的准则,需要面对其它网络所遇不到的独特挑战。用户可能正通过 2G、3G 或 4G 等各种各样的网络来访问你的网站。移动网络的延迟要明显高于有线连接,并且将消耗我们“首屏秒开”预算中的一大部分:

  • 200-300 ms roundtrip times for 3G networks
  • 50-100 ms roundtrip times for 4G networks
  • 3G 网络的往返时间将消耗 200-300 ms
  • 4G 网络的往返时间将消耗 50-100 ms

3G is the dominant network type around the world, and while 4G deployments are in progress around the world, you should still expect that the majority of users will be accessing your page on a 3G network. For this reason, we have to assume that each network request will take, on average, 200 milliseconds.

3G 是全球范围内占据**地位的移动网络,而 4G 网络正在普及之中,你需要明白你的主流用户仍然在使用 3G 网络来访问你的页面。基于这个原因,我们不得不假设平均每次网络请求将消耗 200 ms。

With that in mind, let’s now work backwards. If we look at a typical sequence of communication between a browser and a server, 600 ms of that time has already been used up by network overhead: a DNS lookup to resolve the hostname (e.g. google.com) to an IP address, a network roundtrip to perform the TCP handshake, and finally a full network roundtrip to send the HTTP request. This leaves us with just 400 ms!

明白了这一点之后,我们来倒推一下时间。如果我们来分析一下浏览器与服务器之间一次典型的通信过程,会发现 600 ms 的时间就已经被网络本身消耗掉了:一次 DNS 查询用于将主机名(比如 google.com)解析为 IP 地址,一次网络往返用于发起 TCP 握手,以及最后一次完整的网络往返用于发送 HTTP 请求。我们就只剩下 400 ms 了!

Render a mobile page in 1 second

[Figure 1] Render a mobile page in 1 second

[图 1] 一秒渲染一个移动页面

  • DNS Lookup (200 ms)
  • TCP Connection (200 ms)
  • HTTP Request and Response (200 ms)
  • DNS 查询 (200 ms)
  • TCP 连接 (200 ms)
  • HTTP 请求与响应 (200 ms)

600 ms mandatory 3G network overhead which you cannot do anything about

这 600 ms 是不可避免的 3G 网络消耗,你对此无能为力。

  • Server Response Time (200 ms)
  • Client-Side Rendering (200 ms)
  • 服务器响应时间 (200 ms)
  • 客户端渲染 (200 ms)

400 ms which you can optimize by updating your server and structuring your page appropriately (what the tool tries to help you with)

这 400 ms 是你可以优化的,只要你合理地更新你的服务器,并以适当的方式构建你的页面(这正是 PageSpeed Insights 这个工具可以帮到你的)。

Delivering the sub one second rendering experience

实现半秒渲染的体验

After subtracting the network latency, we are left with just 400 milliseconds in our budget, and there is still a lot of work to do: server must render the response, client-side application code must execute, and the browser must layout and render the content. With that in mind, the following criteria should help us stay within the budget:

在除去网络延迟之后,我们的预算只剩下区区 400 ms 了,但我们仍然还有大量的工作要做:服务器必须渲染出响应内容,客户端应用程序代码必须执行,而且浏览器必须完成内容的布局和渲染。了解了这些之后,下面这些准则将帮助我们控制住预算:

(1) Server must render the response (< 200 ms)

(1) 服务器必须在 200 ms 以内渲染出响应内容

Server response time is the time it takes for a server to return the initial HTML, factoring out the network transport time. Because we only have so little time, this time should be kept at a minimum - ideally within 200 milliseconds, and preferably even less!

服务器响应时间就是在除去网络传输时间之后,一台服务器首先返回 HTML 所花费的时间。因为我们剩下的时间实在太少了,这个时间应该控制在最低限度——理想情况下应该低于 200 ms,而且越少越好!

(2) Number of redirects should be minimized

(2) 重定向的次数应该减至最少

Additional HTTP redirects can add one or two extra network roundtrips (two if an extra DNS lookup is required), incurring hundreds of milliseconds of extra latency on 3G networks. For this reason, we strongly encourage webmasters to minimize the number, and ideally eliminate redirects entirely - this is especially important for the HTML document (avoid “m dot” redirects when possible).

额外的 HTTP 重定向会增加一次或两次额外的网络往返(如果需要再次查询 DNS 的话就是两次),这在 3G 网络上将导致几百毫秒的额外延迟。因此,我们强烈建议网站管理员们减少重定向的次数,而且最好完全消除重定向——这对 HTML 文档来说尤其重要(尽可能避免重定向到 “m.” 二级域名的行为)。

(3) Number of roundtrips to first render should be minimized

(3) 首次渲染所需的网络往返次数应该减至最少

Due to how TCP estimates the capacity of a connection (i.e. TCP Slow Start), a new TCP connection cannot immediately use the full available bandwidth between the client and the server. Because of this, the server can send up to 10 TCP packets on a new connection (~14KB) in first roundtrip, and then it must wait for client to acknowledge this data before it can grow its congestion window and proceed to deliver more data.

由于 TCP 在评估连接状况方面采用了一套特殊机制(参见 TCP 慢启动),一次全新的 TCP 连接无法立即用满客户端和服务器之间的全部有效带宽。在这种情况下,服务器在首次网络往返中,通过一个新连接(约 14kB)只能发送最多 10 个 TCP 包,接下来它必须等待客户端应答这些数据,然后才能增加它的拥塞窗口并继续发送更多数据。

Due to this TCP behavior, it is important to optimize your content to minimize the number of roundtrips required to deliver the necessary data to perform the first render of the page. Ideally, the ATF content should fit under 14KB - this allows the browser to paint the page after just one roundtrip. Also, it is important to note that the 10 packet (IW10) limit is a recent update to the TCP standard: you should ensure that your server is upgraded to latest version to take advantage of this change. Otherwise, the limit will likely be 3-4 packets!

考虑到 TCP 的这种行为,优化你的内容就显得十分重要。传输必要数据、完成页面首次渲染所需的网络往返次数应该减至最少。理想情况下,首屏内容应该小于 14KB——这样浏览器才能在一次网络往返之后就可以绘制页面。同时,还有一个关键点需要留意,10 个数据包上限(IW10)源自 TCP 标准的最近一次更新:你应该确保你的服务器软件已经升级到最新版本,以便从这次更新中获益。否则,这个上限将可能降到 3~4 个数据包。

(4) Avoid external blocking JavaScript and CSS in above-the-fold content

(4) 避免在首屏内容中出现外链的阻塞式 JavaScript 和 CSS

Before a browser can render a page to the user, it has to parse the page. If it encounters a non-async or blocking external script during parsing, it has to stop and download that resource. Each time it does that, it is adding a network round trip, which will delay the time to first render of the page.

浏览器必须先解析页面,然后才能向用户渲染这个页面。如果它在解析期间遇到一个非异步的或具有阻塞作用的外部脚本的话,它就不得不停下来,然后去下载这个资源。每次遇到这种情况,都会增加一次网络往返,这将延后页面的首次渲染时间。

As a result, the JavaScript and CSS needed to render the above the fold region should be inlined, and JavaScript or CSS needed to add additional functionality to the page should be loaded after the ATF content has been delivered.

结论就是,首屏渲染所需的 JavaScript 和 CSS 应该内嵌到页面中,而用于提供附加功能的 JavaScript 和 CSS 应该在首屏内容已经传输完成之后再加载。

(5) Reserve time for browser layout and rendering (200 ms)

(5) 为浏览器的布局和渲染工作预留时间 (200 ms)

The process of parsing the HTML, CSS, and executing JavaScript takes time and client resources! Depending on the speed of the mobile device, and the complexity of the page, this process can take hundreds of milliseconds. Our recommendation is to reserve 200 milliseconds for browser overhead.

解析 HTML 和 CSS、执行 JavaScript 的过程也将消耗时间和客户端资源!取决于移动设备的速度和页面的复杂度,这个过程将占用几百毫秒。我们的建议是预留 200 ms 作为浏览器的时间消耗。

(6) Optimize JavaScript execution and rendering time

(6) 优化 JavaScript 执行和渲染耗时

Complicated scripts and inefficient code can take tens and hundreds of milliseconds to execute - use built-in developer tools in the browser to profile and optimize your code. For a great introduction, take a look at our interactive course for Chrome Developer Tools.

执行复杂的脚本和低效的代码可能会耗费几十或上百毫秒——可以使用浏览器内建的开发者工具来收集概况、优化代码。如果你想深入这个话题,不妨看看我们的《Chrome 开发者工具交互教程》

Note: The above is also not the complete list of all possible optimizations - it is a list of top mobile criteria to deliver a sub one second rendering time - and all other web performance best practices should be applied. Check out PageSpeed Insights for further advice and recommendations.

请注意:以上并未列举出所有可能的优化方案——只列出了一些移动端达成半秒渲染时间的基本准则——其它所有的网页性能最佳实践也应该运用起来。到 PageSpeed Insights 来看看,获取进一步的建议和推荐方案。

For a deep-dive on the above mobile criteria, also check out

如果需要深入探索上述移动端准则,请参阅:

  • Optimizing the Critical Rendering Path for Instant Mobile Websites (slides, video).
  • Instant Mobile Websites: Techniques and Best Practices (slides, video)
  • 为极速移动网站优化渲染的关键路径 (幻灯片视频).
  • 极速移动网站:技巧与最佳实践 (幻灯片, 视频)

FAQ

常见问题

How do 4G networks impact above mobile criteria?

4G 网络对上述移动端准则有何影响?

Lower roundtrip latencies are one of the key improvements in 4G networks. This will help enormously, by reducing the total network overhead time, which is currently over 50% of our one second budget on 3G networks. However, 3G is the dominant network type around the world, and will be for years to come - you have to optimize pages with 3G users in mind.

较低的网络往返延迟是 4G 网络的一处关键改良。减少所有的网络损耗时间对网页性能将有巨大帮助,而目前在 3G 网络上这些损耗就占用了我们一秒预算中的大半时间。不管怎样,3G 仍然是全球最主流的移动网络,并且在今后几年都将如此——我们在优化网页时不得不把 3G 用户放在心上。

I am using a JavaScript library, such as JQuery, any advice?

我正在使用一个 JavaScript 类库,比如 jQuery,有什么建议吗?

Many JavaScript libraries, such as JQuery, are used to enhance the page to add additional interactivity, animations, and other effects. However, many of these behaviors can be safely added after the ATF content is rendered. Investigate moving the execution and loading of such JavaScript until after the page is loaded.

大多数 JavaScript 类库,比如 jQuery,通常用来增强页面、提供附加的交互、动画和其它效果。但是,大多数这些行为可以安全地在首屏渲染之后再加入进来。研究一下是否可以把这些 JavaScript 的加载和执行推迟到页面加载之后。

I am using a JavaScript framework, to construct the page, any advice?

我在正使用一个 JavaScript 框架来渲染整个页面,有什么建议吗?

If the content of the page is constructed by client-side JavaScript, then you should investigate inlining the relevant JavaScript modules to avoid extra network roundtrips. Similarly, leveraging server-side rendering can significantly improve first page load performance: render JS templates on the server, inline the results into HTML, and then use client-side templating once the application is loaded.

如果页面内容是由客户端 JavaScript 来渲染的,那么你应该研究一下是否可以把相关的 JavaScript 模块都内嵌进来,以免产生额外的网络往返开销。同样,利用服务器端渲染可以显著地改善首次页面加载的性能:在服务器端渲染 JS 模板,并内嵌到 HTML 中,然后一旦应用程序加载完成就立即在客户端渲染模板。

How will SPDY and HTTP 2.0 help?

SPDY 和 HTTP 2.0 协议会有什么帮助?

SPDY and HTTP 2.0 both aim to reduce latency of page loads by making more efficient use of the underlying TCP connection (multiplexing, header compression, prioritization). Further, server push can further help improve performance by eliminating extra network latency. We encourage you to investigate adding SPDY support on your servers, and switching to HTTP 2.0 once the standard is ready.

SPDY 和 HTTP 2.0 协议的目标都是通过更有效地利用底层的 TCP 连接(多路复用、头压缩、优先化处理),来减少页面的加载延迟。而且服务器 push 通过消除额外的网络延迟,可以进一步促进性能的改善。我们建议你为服务器增加对 SPDY 协议的支持,并且当 HTTP 2.0 标准就绪之后就立即切换过去。

How do I identify critical CSS on my page?

如何判断页面中的哪些 CSS 是 critical CSS?

(译注:“Critical CSS” 是指首屏渲染所必需的最小化的 CSS 代码集合。)

In Chrome Developer Tools, open the Audits panel, and run a Web Page Performance report, in the generated report, look for Remove unused CSS rules. Or use any other third party tool, or script, to identify which CSS selectors are applied on each page.

在 Chrome 开发者工具中,打开审计(Audits)面板,然后运行一次网页性能(Web Page Performance)报告。在生成的报告中,试一下“删除未使用的 CSS 规则(Remove unused CSS rules)”。也可以使用其它第三方工具或脚本,来识别每个页面分别应用了哪些 CSS 选择符。

Can these best practices be automated?

这些最佳实践可以自动化吗?

Absolutely. There are many commercial and open-source web performance optimization (WPO) products which can help you meet some or all of the criteria above. For open-source solutions, take a look at the PageSpeed optimization tools.

当然可以。有很多商业的或开源的网页性能优化(WPO)产品都可以帮你达成上述部分或全部准则。对于开源解决方案,不妨看看 PageSpeed 优化工具

How do I tune my server to meet these criteria?

我怎样调整我的服务器来符合这些准则?

First, ensure that your server is running an up-to-date version of the operating system. In order to benefit from the increased initial TCP congestion window size (IW10), you will need Linux kernel 2.6.39+. For other operating systems, consult the documentation.

首先,确保你的服务器正在运行最新版的操作系统。为了从 TCP 初始拥塞窗口数量的增加(IW10)中获益,你需要 2.6.39+ 版本的 Linux 内核。对于其它操作系统,请查阅相关文档。

To optimize server response time, instrument your code, or use an application monitoring solution to identify your bottleneck - e.g., scripting runtime, database calls, RPC requests, rendering, etc. The goal is to render the HTML response within 200 milliseconds.

为了优化服务器的响应时间,请测评你的代码性能,或使用监控程序来发现性能瓶颈——比如脚本运行时、数据库调用、RPC 请求、渲染等等。最终目标就是在 200 ms 内渲染出 HTML 响应内容。

What about Content Security Policy?

内容安全策略(Content Security Policy)怎么办?

If you are using CSP, then you may need to update your default policy.

如果你正在使用 CSP,那么你可能需要更新你的默认策略。(译注:CSP 是一项用于防范 XSS 的安全性规范,具体参见 Content Security Policy - 维基百科。)

First, inline CSS attributes on HTML elements(e.g., <p style=...>) should be avoided where possible, as they often lead to unnecessary code duplication, and are blocked by default with CSP (disabled via “unsafe inline” on “style-src”). If you have inline JavaScript, then you will need to update the CSP policy with “unsafe-inline” to enable its execution. By default, CSP will block all inline script tags.

首先,尽可能避免在 HTML 元素中内联 CSS 属性(比如这样 <p style=...>),因为它们常常导致不必要的重复代码,而且默认会被 CSP 拦截(对 style-src 字段使用 unsafe-inline 指令可以禁用此类拦截)。如果你使用了内联的 JavaScript,那么你需要在 CSP 策略中使用 unsafe-inline 指令来令其执行。默认情况下,CSP 将拦截所有内联脚本标签。(译注:这里的“内联 JavaScript”包括多种形态的 HTML 内部的脚本代码,包括类似 <script>foo();</script> 这样的内嵌脚本标签、<a href="javascript:foo();"> 这样的伪协议 URL、以及 <a href="#" onclick="foo();"> 这样的事件处理属性。)

Have more questions? Please feel free to ask and provide feedback in our discussion group at page-speed-discuss.

还有其它问题?请在我们的 page-speed-discuss 讨论组内随意提问或提供反馈。


原文版本:2013-08-06 (如果原文已更新,请提醒我。)


© Creative Commons BY-NC-ND 4.0   |   我要订阅   |   我要打赏

[译] JavaScript 开发者经常忽略或误用的七个基础知识点

[译] JavaScript 开发者经常忽略或误用的七个基础知识点

JavaScript

JavaScript, at its base, is a simple language that we continue to evolve with intelligent, flexible patterns. We've used those patterns in JavaScript frameworks which fuel our web applications today. Lost in JavaScript framework usage, which many new developers are thrust right into, are some of the very useful JavaScript techniques that make basic tasks possible. Here are seven of those basics:

JavaScript 本身可以算是一门简单的语言,但我们也不断用智慧和灵活的模式来改进它。昨天我们将这些模式应用到了 JavaScript 框架中,今天这些框架又驱动了我们的 Web 应用程序。很多新手开发者被各种强大的 JavaScript 框架吸引进来,但他们却忽略了框架身后浩如星海的 JavaScript 实用技巧。本文将为你呈献其中七个基础知识点:

1. String.prototype.replace: /g and /i Flags

1. 在 String.prototype.replace 方法中使用 /g/i 标志位

One surprise to many JavaScript newbies is that String's replace method doesn't replace all occurrences of the needle -- just the first occurrence. Of course seasoned JavaScript vets know that a regular expression and the global flag (/g) need to be used:

令很多 JavaScript 初学者意外的是,字符串的 replace 方法并不会 替换所有匹配的子串——而仅仅替换第一次匹配。当然 JavaScript 老手们都知道这里可以使用正则表达式,并且需要加上一个全局标志位(/g):

// Mistake
// 踩到坑了
var str = "David is an Arsenal fan, which means David is great";
str.replace("David", "Darren"); // "Darren is an Arsenal fan, which means David is great"

// Desired
// 符合预期
str.replace(/David/g, "Darren"); // "Darren is an Arsenal fan, which means Darren is great"

Another basic logical mistake is not ignoring case when case is not critical to the validation (letters may be uppercase or lowercase), so the /i flag is also useful:

另一个基本的逻辑错误就是在大小写不敏感的校验场合(字母可大写可小写)没有忽略大小写,此时 /i 标志位就很实用:

str.replace(/david/gi, "Darren"); // "Darren will always be an Arsenal fan, which means Darren will always be great"

(译注:上面这段例程我没有看懂用意,可能是注释有误吧……)

Every JavaScript developer has been bitten by each of the flags in the past -- so be sure to use them when when appropriate!

每个 JavaScript 开发者都曾踩过这两个标志位的坑——因此别忘了在适当的时候用上它们!

2. Array-Like Objects and Array.prototype.slice

2. 类数组对象和 Array.prototype.slice 方法

Array's slice method is principally for grabbing segments of an array. What many developers don't know is that slice can be used to covert Array-like objects like arguments, NodeLists, and attributes into true arrays of data:

数组的 slice 方法通常用来从一个数组中抽取片断。但很多开发者不了解的是,这个方法还可以用来将“类数组”元素(比如 arguments 参数列表、节点列表和属性列表)转换成真正的数组:(译注:DOM 元素的属性列表通过 attributes 属性获取,比如 document.body.attributes。)

var nodesArr = Array.prototype.slice.call(document.querySelectorAll("div"));
// "true" array of DIVs
// 得到一个由 div 元素组成的“真正的”数组

var argsArr = Array.prototype.slice.call(arguments);
// changes arguments to "true" array
// 把 arguments 转换成一个“真正的”数组

You can even clone an array using a simple slice call:

你还可以使用一次简单的 slice 调用来克隆一个数组:

var clone = myArray.slice(0); // naive clone
                              // 浅克隆

(译注:这里的参数 0 也可以省略,我估计 undefinedslice 方法自动转换为 0 了吧。)

Array.prototype.slice is an absolute gem in the world of JavaScript, one that even novice JavaScript developers don't know the full potential of.

Array.prototype.slice 绝对是 JavaScript 世界中的一玫珍宝,但 JavaScript 初学者们显然还没有意识到它的全部潜力。

3. Array.prototype.sort

3. Array.prototype.sort 方法

The Array sort method is vastly underused and probably a bit more powerful than most developers believe. Many developers would assume sort would do something like this:

数组的 sort 方法 远远没有被充分利用,而且可能比开发者们想像的更加强大。很多开发者可能觉得 sort 方法可以用来做这种事情:

[1, 3, 9, 2].sort();
    // Returns: [1, 2, 3, 9]
    // 返回 [1, 2, 3, 9]

...which is true, but sort has more powerful uses, like this:

……这没错,但它还有更强大的用法,比如这样:

[
    { name: "Robin Van PurseStrings", age: 30 },
    { name: "Theo Walcott", age: 24 },
    { name: "Bacary Sagna", age: 28  }
].sort(function(obj1, obj2) {
    // Ascending: first age less than the previous
    // 实现增序排列:前者的 age 小于后者
    return obj1.age - obj2.age;
});
    // Returns:  
    // [
    //    { name: "Theo Walcott", age: 24 },
    //    { name: "Bacary Sagna", age: 28  },
    //    { name: "Robin Van PurseStrings", age: 30 }
    // ]

You can sort objects by property, not just simple basic items. In the event that JSON is sent down from the server and objects need to be sorted, keep this in mind!

你不仅可以对简单类型的数组项进行排序,可以通过属性来排序对象。如果哪天服务器端发来一段 JSON 数据,而且其中的对象需要排序,你可别忘了这一招!

4. Array Length for Truncation

4. 用 length 属性来截断数组

There's not a developer out there that hasn't been bitten by JavaScript's pass-objects-by-reference nature. Oftentimes developers will attempt to empty an array but mistakenly create a new one instead:

几乎所有开发者都踩过 JavaScript 的这个坑——“传对象只是传引用”。开发者们经常会试图 把一个数组清空,但实际上却错误地创建了一个新数组。

var myArray = yourArray = [1, 2, 3];

// :(
// 囧
myArray = []; // `yourArray` is still [1, 2, 3]
              // `yourArray` 仍然是 [1, 2, 3]

// The right way, keeping reference
// 正确的方法是保持引用
myArray.length = 0; // `yourArray` and `myArray` both []
                    // `yourArray` 和 `myArray`(以及其它所有对这个数组的引用)都变成 [] 了

What these developers probably realize is that objects are passed by reference, so while setting myArray to [] does create a new array, other references stay the same! Big mistake! Use array truncation instead.

坑里的人们终于明白,原来传对象只是在传引用。因此当我把 myArray 重新赋值为 [] 时,确实会创建出一个新的空数组,但其它对老数组的引用仍然没变!大坑啊!还是换用截断的方法吧,少年。

5. Array Merging with push

5. 使用 push 来合并数组

I showed in point 2 that Array's slice and apply can do some cool stuff, so it shouldn't surprise you that other Array methods can do the same trickery. This time we can merge arrays with the push method:

在上面的第 2 节里,我展示了数组的 sliceapply 方法所能组合出的几个小妙招,所以对于数组方法的其它技巧,你应该已经做好心理准备了吧。这次我们使用 push 方法来合并数组:

var mergeTo = [4,5,6];
var mergeFrom = [7,8,9];

Array.prototype.push.apply(mergeTo, mergeFrom);

mergeTo; // is: [4, 5, 6, 7, 8, 9]

A wonderful example of a lessor-known, simple native method for completing the basic task of array merging.

这是一项不为人知的小技巧,简单的原生方法就可以实现数组合并这样的常见任务。

(译注:这个方法的巧妙之处不仅在于 push 方法可以接收多个参数,还涉及到 apply 方法的第二个参数的用法。)

6. Efficient Feature/Object Property Detection

6. 高效探测功能特性和对象属性

Oftentimes developers will use the following technique to detect a browser feature:

很多时候开发者们会像下面这样来探测浏览器的某个特性:

if(navigator.geolocation) {
    // Do some stuff
    // 在这里干点事情
}

While that works correctly, it isn't always efficient, as that method of object detection can initialize resources in the browser. In the past, the snippet above caused memory leaks in some browsers. The better and more efficient route is checking for a key within an object:

当然这可以正常工作,但它并不一定有很好的效率。因为这个对象探测方法会在浏览器中初始化资源。在过去,上面的代码片断可能会在某些浏览器下导致内存泄露。更好、更快的方法是检查对象是否包含某个键名:

if("geolocation" in navigator) {
    // Do some stuff
    // 在这里干点事情
}

This key check is as simple as it gets and may avoid memory problems. Also note that if the value of a property is falsy, your check will fail despite the key being present.

键名检查十分简单,而且可以避免内存泄露。另外请注意,如果这个属性的值是假值,那么前一种探测方式将会得到“否”的结果,并不能真正探测出这个键名是否存在。

7. Event preventDefault and stopPropagation

7. 事件对象的 preventDefaultstopPropagation 方法

Oftentimes we trigger functionality when action elements like links are clicked. Obviously we don't want the browser to follow the link upon click, so we use our handy JavaScript library's Event.stop method:

很多时候,当一个动作元素(比如链接)被点击时,会触发某个功能。显然我们并不希望点击链接时浏览器顺着这个链接跳转,于是我们会习惯性地使用 JavaScript 类库的 Event.stop 方法:

$("a.trigger").on("click", function(e) {
    e.stop();

    // Do more stuff
    // 在这里干点事情
});

(译注:不知道哪个类库有这个方法,估计其作用相当于 return false; 吧。语法看起来像 jQuery,但 jQuery 并没有这个方法,而且 jQuery 是支持 e.preventDefaulte.stopPropagation 方法的。)

The problem with this lazy method of stopping the event is that not only does it prevent the default action, but it stops propagation of the event, meaning other event listeners for the elements wont fire because they don't know about the event. It's best to simply use preventDefault!

这个懒方法有一个问题,它不仅阻止了浏览器的默认动作,同时也阻止了事件继续冒泡。这意味着元素上绑定的其它事件监听器将不会被触发,因为它们根本就不知道有事件发生。此时不妨使用 preventDefault 吧!

Seasoned JavaScript developers will see this post and say "I knew those," but at one point or another, they got tripped up on some of these points. Be mindful of the little things in JavaScript because they can make a big difference.

JavaScript 老鸟们看到这篇文章可能会说“我早知道了”,但说不定什么时候,他们就会在某一点上栽跟头。提醒大家留意 JavaScript 中的各种小细节,失之毫厘谬以千里啊!


© Creative Commons BY-NC-ND 4.0   |   我要订阅   |   我要打赏

CSS 类名的单词连字符:下划线还是横杠?

CSS 类名的单词连字符:下划线还是横杠?

本文的部分内容整理自我对此问题的解答: 命名 CSS 的类或 ID 时单词间如何连接? - 知乎

问题

CSS 类或 ID 命名时单词间连接通常有这几种写法:

  • 驼峰式: solutionTitlesolutionDetail
  • 用横杠连接: solution-titlesolution-detail
  • 下划线连接: solution_titlesolution_detail

应该采用哪种写法呢?选择的时候是出于个人习惯还是有别的考虑?

看了下豆瓣,美团,淘宝的源码,都是采用 solution_title 的写法。

我的回答

首先定个性,这是个纯粹的“代码风格”问题。

什么是“代码风格”问题?有一些特征:

  • 技术规范不会硬性规定。虽然规范有时可能会提供指导性的建议,或者有时会有行业大牛出来鼓吹最佳实践。

  • 个性化十分明显。也就是萝卜青菜各有所爱、公说公有理婆说婆有理,永无定论。

扯完之后说一下我自己的习惯:

以前用下划线

主要原因是在编辑器中双击可以选中;另外自己觉得下划线好看(纯个人喜好)。除此以外可能还有一点“小白式谨慎”(避免与 CSS 属性名/值弄混、避免与减号弄混),或者我的启蒙教材就是使用下划线的。

现在主要使用连字符

后来逐渐接手或参与了一些别人的项目,接触过各种代码风格。在老外的一些项目中接触到大量的使用连字符的命名,看多了感觉也不难看。在编辑器中也可以通过“双击并拖动”来选中,所以就逐渐过渡到了连字符。

在特殊场合用驼峰式

驼峰式写法输入不方便、引入了大小写的复杂度、可读性无优势,因此很少在日常开发中使用。而正因为如此,我目前主要在一些框架级的类名中使用,以便于日常开发的命名习惯区分开,避免无意中污染框架级样式的可能性。

关于标准

有网友提到:

HTML 和 CSS 语法中,无论是属性名和值,用到连接符的地方都是 - 没有 _。Follow 标准有益无害。

这种说法我并不赞同。因为“follow 标准”一说没有根据,而且逻辑不清。

我们很容易理清一件事——给元素的 class 和 id 命名,本质上是给 HTML 标签的 class 与 id 属性写入值。HTML 的 标签属性值 的合法性与 HTML 标签属性名、CSS 属性的名/值的命名习惯有关系吗?

说到“标准”,其实我也完全不知道 class 和 id 的合法值是什么、不知道下划线是否合法,甚至记不太清楚 class 与 id 的值是否是大小写敏感的。为此,我查阅了现行规范 HTML 4.01 和 CSS 2.1 的部分章节。CSS 2.1 是这样说的:

In CSS, identifiers (including element names, classes, and IDs in selectors) can contain only the characters [a-zA-Z0-9] and ISO 10646 characters U+00A0 and higher, plus the hyphen (-) and the underscore (_); ...

也就是说,用下划线来连接多个单词作为 class 或 id 的值,是合法的。

(贺师俊老师提示道:CSS 1 和 2 的规范在这一点上有错误,没有把下划线加进去;直到 CSS 2.1 中,这个问题才被修正。)

其它观点

关于可读性

贺师俊老师(@hax)提出了一个容易被忽略但实际上很重要的因素:

-_ 有一点好的地方是 _ 有时候会难以分辨,就好像空格一样。而 class 里面有没有空格是挺重要的。比较以下三种用法:

  • <div class="a_very_very_very_long long_class short_class">
  • <div class="a-very-very-very-long long-class short-class">
  • <div class="aVeryVeryVeryLong longClass shortClass">

关于编辑器

很多同学提到了不同的单词连接方式对选择操作的影响,比如双击可以直接选中用 _ 连接的多个单词,但用 - 连接的多个单词则无法全部选中,选区会在 - 处终止,即只能选中一个单词。

Sublime Text

对此,一丝同学(@yisibl)在 微博 做了科普:

CSS 命名用连字符 - 不能双击选中的问题一直是一个伪命题,这是编辑器的问题,因为这个而选用下划线 _ 实在有些牵强。在 Sublime Text 2 的全局配置文件 Preferences.sublime-settings 中找到 word_separators 字段,删掉其中的 - 即可双击选中一连串的多个单词。

hyphen-in-css-class-dash-or-underscore-sublime-text

Vim

也有一位 潘魏增同学 提供了 Vim 的配置方法:

如果使用 vim,可以设置 set iskeyword+=-,这样就可以匹配选中以 - 连接的关键词,search 和 mark 的时候会比较方便。

(抱歉,这里只是纯转发,暂时无法验证。)

UltraEdit

我在 Windows 下一般用 UltraEdit 干活,它有一种操作叫作 Ctrl + 双击。而且我们可以设置此操作的分界符,很灵活。

hyphen-in-css-class-dash-or-underscore-ultraedit

鼠标选择

如果你的编辑器不支持上述配置或操作,要想一次性选中以 - 连接的多个单词,其实也是有解决方案的: 双击的最后一击先不要松开,再左右拖动就可以以单词为单位扩张选区。(这种选择方式几乎适用于所有编辑器,而且 Windows 和 Mac 通吃。)

实际上我并不建议像前面几种方法那样在编辑器中取消 - 的分界符身份,而是建议使用这种“双击 + 拖动”的方法来选择任意数量的单词。因为,某些时候你只想选中 one-two-three 中的 one-twotwo-three 或单个单词,那么这种方法显然更自由更精确——想选少选少,想选多选多。

--- Bonus Track ---

如果你在使用 WebStorm(或它的兄弟 IDE),就不要用鼠标点来点去了,不优雅。

你可以把光标移到某个单词上,用 Ctrl + W(在 Mac 下是 Cmd + W)快捷键就可以选中当前单词;更神奇的是,这个快捷可以连续使用,可以不断把选区扩张到更大的语法单元:单词 → 一串单词 → 整个字符串(或语句) → 对象(或函数作用域) → …… → 整个文件。

(唯一不便的是,这个快捷键在其它程序中是关闭当前窗口的操作,容易混淆,建议在 IDE 中给这个操作分配其它的快捷键。)


© Creative Commons BY-NC-ND 4.0   |   我要订阅   |   我要打赏

[译] 程序员的困境

[译] 程序员的困境

Programmer's Dilemma

Recently I interviewed tens of candidates for a kernel programmer's position. These candidates are from big, good companies, which are famous for chips or embedded OS/systems. Many of them claimed they have at least 10 years on-job experience on kernel. Their resumes look fairly shiny -- all kinds of related projects, buzz words and awards...

最近我为一个内核程序员的职位面试了十几个候选人。这些候选人都来自一些不错的大公司,这些公司在芯片或嵌入式操作系统领域十分有名。这些候选人大多声称自己在内核方面有着十年的在职工作经验。他们的简历看起来非常耀眼——各种相关的项目、术语和奖项……

But most of them cannot answer a really basic question: When we call the standard malloc function, what happens in kernel?

但他们几乎无人能够回答一个非常基础的问题: 当我们调用标准的 malloc 函数时,内核中会发生什么?

Don't be astonished. When I ask one of the candidate to write a simple LRU cache framework based on glib hash functions, he firstly claimed he had never used glib -- that's what I expected -- I showed the glib hash api page and explained the APIs to him in detail, then after almost an hour he wrote only a few lines of messy code.

先别吃惊。当我要求其中一位候选人基于 glib 的哈希函数写一个简单的 LRU 缓存框架时,他先是表示从来没用过 glib——如我所料——于是我帮他打开了 glib 哈希 API 的页面,并向他详细讲解了这些 API;然后大约一个小时以后,他只写出了几行凌乱的代码。

I don't know if the situation is similar in other countries, but in China, or more specifically, in Beijing, this is reality. "Senior" programmers who worked for big, famous foreign companies for years cannot justify themselves in simple, fundamental problems.

我不知道其它国家是否也有类似的情况,但在**,或者更具体一点,在北京,这就是现状。那些在不错的大公司里工作了多年的“资深”程序员们无法在一些简单的、基本的问题上证明自己。


Why did this happen?

这到底是怎么回事?

The more I think about it, the more I believe it is caused not only by themselves but also by the companies they worked for. These companies usually provide stable stack of code, which has no significant changes for years. The technologies around the code wraps up people's skills, so that they just need to follow the existing path, rather than to be creative. If you happened to work for such kind of code for a long period and did not reach to the outer world a lot, one day you will find yourself to be in a pathetic position -- they called you " EXPERT " inside the team or company, yet you cannot find an equally good job in the market unfortunately.

当我在这个问题上思索得越多,我就更加相信,这不仅有他们自身的原因,同时也归咎于他们所供职的这些公司。这些公司通常提供了一个稳定的代码堆,往往几年都不会有大更新。这些代码的专有技术把人们的技能框进一个定式,以致于他们只需要遵循现有的路径,而不需要发挥创意。如果你碰巧为这类代码工作,而且与世隔绝了很长一段时间,那么有一天你会发现你自己已经陷入一个可悲的位置——他们在团队或公司内称呼你为 “ 专家 ”,但不幸的是,你无法在市场上找到一份同等待遇的工作。

This is so called " Expert Trap ". From day to day, we programmers dreamed of being an expert inside the team/company; however, when that day really comes we trapped ourselves. The more we dig into existing code, the deeper we trapped into it. We gradually lose our ability to write complete projects from scratch, because the existing code is so stable (so big/so profitable). What's the worse, if our major work is just to maintain the existing code with little feature development, after a while, no matter how much code we've read and studies, we will find we cannot write code -- even if the problem is as simple as a graduate school assignment. This is the programmer's dilemma: we make our living by coding, but the big companies who fed us tend to destroy our ability to make a living.

这就叫作 “ 专家陷阱 ”。日复一日,程序员们都渴望在团队或公司内成为一名专家;但是,当那一天真正到来时,我们却早已作茧自缚。我们在既有代码中钻得越深,我们自己就陷得越深。既有代码是如此稳定(如此宠大、如此好用),让我们渐渐地失去了从无到有独立编写完整项目的能力。更糟糕的是,如果我们的主要工作就是维护这些既有代码、很少开发新功能,那么过不了多久,无论研读了多少代码,我们都会发现自己不会写代码了——哪怕是一个像毕业大作业那样简单的任务。这就是程序员的困境: 我们以编码为生,但那些养活我们的大公司却在无形中磨灭了我们的生存技能。


How to get away from this dilemma?

如何打破这种困境?

For personal --

对于个人:

  • First of all, Do your own personal projects. You need to "sharpen your saw" continuously. If the job itself cannot help you do so, pick up the problems you want to concur and conquer it in your personal time. By doing so, most likely you will learn new things. If you publish your personal projects, say in github, you may get chances to know people who may pull you away from your existing position.

  • 首先, 打造你自己的私人项目。你需要不断地打磨自己的技艺。如果工作本身并不能帮助你做到这一点,就捡起那些你感兴趣的问题,然后用你的私人时间去攻克它。通过这个方法,你应该会学到新东西。如果把你的私人项目发布出去,比如在 GitHub 上,你说不定会认识一些人,帮助你大踏步地向前迈进。

  • Do not stay in a same team for more than two years. Force yourself to move around, even if in the same organization, same company, you will face new challenges and new technologies. Try to do job interviews every 18 months. You don't need to change your job, but you can see what does the market require and how you fit into it.

  • 不要在一个团队中停留超过两年。强迫你自己四处转转,哪怕在是同一家公司内,你会面对新的挑战和新的技术。试着每隔 18 个月就出去面试工作。你并不需要真的换工作,但是这能让你看到真实的市场需求,以及怎样与时俱进。

For team/company --

对于团队和公司:

  • Give pressures and challenges to the employees. Rotate the jobs, let the "experts" have chance to broaden their skills. Start new projects, feed the warriors with battles.

  • 给予员工压力和挑战。实行轮岗制度,让“专家”们有机会拓展他们的技能。启动新项目,用战役来磨炼你的勇士。

  • Hold hackathon periodically. This will help to build a culture that embrace innovation and creation. People will be motivated by their peers -- "gee, that bustard can write such a beautiful framework for 24 hours, I gotta work hard".

  • 周期性地举办黑客马拉松活动。这有助于营造一种崇尚创新和创作的企业文化,人们会受到同伴的激励——“擦,这个混蛋居然可以在 24 小时内写出这么漂亮的框架,我也得加把劲儿了!”


相关链接


© Creative Commons BY-NC-ND 4.0   |   我要订阅   |   我要打赏

如何正确接收 GitHub 的消息邮件

如何正确接收 GitHub 的消息邮件

背景

我厂的开发流程通常都是基于 GitHub 的。在 GitHub 上 review 代码,也是我日常工作的重要组成部分。对我来说,在 code review 过程中最讨厌的莫过于,我在 pull request 或 commit 下面评论或 @ 人,往往石沉大海,没有回音。我事后追问当事人,他们的回复往往是 “不知道你 @ 我了呀~”。

这让我非常恼火。所以,我决定写篇文档给所有人看,避免他们漏看重要的 GitHub 消息。此后在 GitHub 不回复我的人,差不多也可以绝交了罢!

GitHub 的通知机制

通知的类型和方式

在两种情况下,我们会收到 GitHub 的通知。

  • 我关注的(Watching):当我关注了某个项目之后,相当于订阅了这个项目的所有更新,即这个项目的新 release、新 issue、新 PR 及所有讨论都会通知我。

  • 我参与的(Participating):当我参与到某个 issue、PR 或 commit 的讨论,或被别人 @ 后,我都会持续收到这个讨论的后续更新。

后面一种情况似乎对我更加重要一些。如果不需要密切跟进某个项目,我应该避免关注它。

另外,GitHub 会通过以下两种方式来通知我们:

  • 站内信(Web):当我登录 GitHub 网站时,如果有新消息,在导航栏会看到一个小蓝点。点进去就可以看到详细通知。

    站内信收件箱

  • 电子邮件(Email):通知会直接发送到我的邮箱,而且我直接回复邮件的效果相当于登录到相关页面回复,非常方便。

可见,前者是被动方式,提醒能力太弱。而后者是主动推送,时效性好,但我需要注意的就是控制消息密度,避免被轰炸。因此,接下来,我们来了解一下 GitHub 的 “自动关注” 功能。

自动关注

不错过重要的消息,首先意味着不能被无关紧要的消息湮没。如果你经常收到大量的 GitHub 消息,那你可能就全都不看了。因此,我们需要关掉 “自动关注” 功能。

登录 GitHub 通知中心页面,即可关闭这个功能:

自动关注功能

为什么要关它?这个功能很有意思,每当你获得了一个 repo 的 push 权限之后,GitHub 就会帮你自动关注这个 repo。这在开源社区是很有用的,因为当你获得了这个权限时,往往意味着你成为了这个 repo 的核心维护者,你确实需要第一时间掌握这个项目的一举一动。

但这对于公司内部项目就不那么合适了。比如我们的主站项目是一个私有 repo,几乎公司内的每位工程师都会 fork 它;同时出于协作的需要,每个 fork 都需要向所有工程师开放读写权限。因此,你将自动关注这近百个 repo,而这些 repo 的任何风吹草动都会通知你,即使你并未真正在其它同事的 fork 上工作。

总之,为了避免无关消息对你的轰炸,请关掉自动关注功能。你可能已经关注了一堆无关紧要的 fork 了,请记得在你的 关注列表页面 逐一取消。(如果你不是核心管理员,建议你把主站项目的 upstream 也取消关注。)

个人设置

了解完 GitHub 的特性之后,我们就可以针对性地做出配置和选择了。

设定 Email

正常情况下,每个人在工作时间都会开着自己的工作邮箱。那么首先,需要确保 GitHub 的消息是发到这个邮箱的。由于每个人的 GitHub 账号往往并非是用工作邮箱注册的,我们需要把邮箱搞对。

登录 GitHub 的邮箱设置页面,添加自己的工作邮箱。随后工作邮箱会收到一封验证邮件,完成验证之后,你的 GitHub 账号就绑定了两个邮箱。

账号邮箱设置

(并不需要为把这个工作邮箱设置为 “primary”,只要验证通过就可以了。)

到这里我们就做好 Email 的准备工作。

通知中心

接下来,我们进入 GitHub 通知中心,为两种不同类型的通知选择通知方式。请确保至少第一个 “Email” 是被选中的:

通知方式设置

接下来,选择接收邮件通知的邮箱。选择我们刚刚添加的工作邮箱,保存。

通知邮箱设置

(这里的邮箱设置只会影响消息的接收,不会影响账号身份。)

好了,大功告成。从此以后,所有重要的 GitHub 消息都会发送到你的工作邮箱。最后,再告诉你几个小技巧,相信你用得上。

减少干扰

取消关注某个 Repo

前面已经提到过 你的关注列表,在那里,你可以随时清理不再重要的项目。同时,进入任何项目的页面,在右上角都可以选择对它的关注方式。

Repo 的关注选项

“Not watching” 意味着取消关注,你将不会收到与你无关的通知。而与你有关的(你发起的、主动参与的或被 @ 的)讨论有新回复,你还是会收到通知的。

请注意不要选择 “Ignoring”,那意味着你连重要的消息也收不到了。

取消关注某个讨论

当某个讨论已经没你什么事了,但仍然不断有后续消息涌进来,那就果断屏蔽它吧。从消息邮件中的链接点到网页,找到如下所示的 “取消订阅” 的按钮,即可取消关注这个讨论。

取消订阅-1

取消订阅-2

锁定某个讨论

当某个 issue 或 PR 已经没有继续讨论的必要的,你可以锁定它——当然前提是你得是这个 repo 的管理员。

屏蔽某个人

如果你遇到了无聊的人总是*扰你,可以到它的用户页面,屏蔽并举报。

结语

相信看到这里,你已经对 GitHub 的通知机制十分了解了吧,并且应该可以灵活配置 GitHub 消息的接收方式了。

好吧,就这样吧。如果以后还是不回复我,绝交。


© Creative Commons BY-NC-ND 4.0   |   我要订阅   |   我要打赏

WebStorm,你一直在寻找的前端开发 IDE

WebStorm,你一直在寻找的前端开发 IDE

人生苦短,用 IDE 吧。

  • 我不是屌丝,也不是高富帅,我是一个正常的普通人。

  • 我成家了,我有自己的小日子,我想过更好的生活,我的时间很宝贵。

  • 我是一个前端工程师,大多数时候我靠写代码挣钱,最终,我决定用 IDE 来干活。

  • 我觉得你——我的战友——时间同样很宝贵,所以我推荐你用 WebStorm。

WebStorm Logo

简介

WebStorm 是一款前端开发 IDE(集成开发环境),可以简单理解为,它是一个智能的、强大的代码编辑器。

语法着色、代码补全、代码分析、代码导航、格式化、快捷键、就地参考文档、实时纠错提示、代码重构、脚本调试、版本控制、单元测试、工程管理、收藏夹、Zen Coding、文件模板、代码片断、语言混编……你听说过的、你想到过的、你渴望的、你想像不出来的……所有的跟干活有关的功能,WebStorm 都可以做到,而且做得漂亮、简单快捷。

前端技术日新月异,WebStorm 紧跟前沿技术,贴进开发者的实际需求。全面原生支持 ECMAScript Harmony、CoffeeScript、NodeJS、Jade、Sass/LESS、HTML5+CSS3,全面原生支持主流的库和框架,全面兼容主流的开发/部署工具,还有大量第三方插件,只有想不到没有做不到。普通的文本编辑器和 Dreamweaver 神马的,简直弱爆了。

所以,我很严肃地说,前端工程师们必须要试试。

WebStorm 的自定义功能超强,习惯问题其实并不是大问题,你总是可以通过精细的配置来还原现有的工作习惯(当然这需要花点时间);或者干脆忘记过去,拥抱全新的工作环境。

你放心,转换工具的痛苦绝对不会超过你老婆生孩子的痛苦。别抱着少年时的女神 Dreamweaver 不放了,提高效率省下时间来陪你被窝里的女人才是王道。千万别学别人装逼号称只用记事本,前端工程师别拿自己不当程序员,你的鸟枪早就该换炮了!

上手

先到 WebStorm 官方下载页 去下载一个最新版,装上,30 天合法免费试用。

国内已经有一些中文教程了,可以先看看 WebStorm 可以做什么。

如果你觉得有兴趣,可以边看边试,保证越看越爽。看了你就知道,为什么阿里系内部在“偷偷推广”,为什么越来越多的同行把它叫做“神器”。

接下来,如果你想真正精通这件神器,从本质上提高生产力,可以到它的官网去深入研究相关的文档和资料:

纯英文,但是图文并茂,一点都不难读。哥每天回家看一个小时,一个月后就是大师。

如果某一天你发现,WebStrom 改变了你的生活,不用客气,请我吃顿饭就行。

费用

WebStorm 是 JetBrains 公司旗下的商业软件产品,该公司还提供了 PhpStorm 和 Intellij IDEA 这样支持语言范围更广的选择(其中后者是旗舰产品)。这些产品内核相同,操作大同小异,对于前端开发(包括 Node.js)来说,WebStorm 的功能完全足够了,而且它所需的系统资源也相对较低。

WebStorm 是收费软件,不过这不是大问题,我们有一些免费使用的方案:

  • 官方下载的版本都是可以 30 天免费试用的。到期之后还可以继续安装更新的 EAP 预览版,继续合法免费试用。只要自己勤快一点儿,备份好个人设置,基本上可以一直免费用下去。所以,我完全不建议你去找什么破解版或盗版序列号。

  • 如果你是教师或学生,仅将其用于学习和作业,可以尝试申请免费的 教育版授权

  • 如果你足够牛逼,有拿得出手的开源项目,还可以申请免费的 开源项目开发者授权。哥 2013 年就以此为目标。

其实如果觉得好用,也不妨考虑购买一份正版授权。WebStorm 的个人版和企业版授权都是终生免费使用,一年内免费升级(包括大版本),十分厚道。价格也是相当亲民,个人版 $49,作为吃饭的工具真不算什么;商业版 $99,对靠谱的公司来说,这点投资毛都不是!

你已经准备掏口袋了?别急,其实你还可以享受个折扣价。开源**社区和 JetBrains 正在合作,面向**用户推出正版开发工具的优惠活动,不可错过:

后记

相对于文本编辑器来说,IDE 的学习曲线会陡很多。很多同学在试用之后纷纷表示不错,但很快又纷纷用回自己原来熟悉的工具了,毕竟“习惯”就像万有引力一样很难摆脱,而尝试新事物的道路总是充满各种痛苦。

对此,我想说的是,在开始阶段一定要坚持下去,只要一旦进入状态,尝到甜头,你就停不下来了!好了,朋友们,我们这就约好,在成功的彼岸再相会!


© Creative Commons BY-NC-ND 4.0   |   我要订阅   |   我要打赏

PHP 和 JSON 都说 `_.isEmpty()` 是个好方法

PHP 和 JSON 都说 _.isEmpty() 是个好方法

背景

我们在通过后端 API 获取 JSON 数据时,有时会遇到这个问题:

在需要输出为对象的地方,如果没有数据,以前端的习惯来说,我们会期待收到一个空对象 {};但实际上,此时我们往往会收到一个空数组 []

前端在检查和处理此类数据时,会感到稍许不便。如果考虑不周,还会引发错误。

原因

在 PHP 中,与 JavaScript 数组对象对应的概念都是数组;而且 PHP 实际上并不区分索引数组关联数组,只是允许开发者通过数组键名的约定来产生这两种数组的效果。也就是说,对于空数组,由于它不包含键名,无法判断它是“索引数组”还是“关联数组”。因此,PHP 的 json_encode() 方法在处理空数组时,一律将其编码为 []

由此可见,要求后端来改变这种情况恐怕不太容易,还是需要前端在处理类似数据的时候做个容错判断(我们常说“发送时要严格、接收时要宽松”嘛)。那么,怎样判断既简单又方便呢?

解决方案

这里就要隆重推出 _.isEmpty() 啦!请看以下代码:

_.isEmpty()  //true
_.isEmpty(null)  //true
_.isEmpty(undefined)  //true
_.isEmpty('')  //true
_.isEmpty({})  //true
_.isEmpty([])  //true

_.isEmpty('foo')  //false
_.isEmpty([foo, bar])  //false
_.isEmpty({foo: bar})  //false

同时我们注意到,即使后端将空数据输出为 null,仅用这一个方法也可以一并判断。

注意事项

需要注意的是,不能把这货当成 toBoolean() 来用。这样用是有坑的:

_.isEmpty(1)  //true
_.isEmpty(0)  //true
_.isEmpty(NaN)  //true
_.isEmpty(true)  //true
_.isEmpty(false)  //true
_.isEmpty(_.isEmpty)  //true

所以,只应该用它来判断一个数据集合是否为空。


© Creative Commons BY-NC-ND 4.0   |   我要订阅   |   我要打赏

[译] [PJA] [503] 模块模式

[译] [PJA] [503] 模块模式

The Module Pattern

模块模式

Modules in the browser use a wrapping function to encapsulate private data in a closure (for example, with an IIFE, see the section an Immediately Invoked Function Expressions). Without the encapsulated function scope provided by the IIFE, other scripts could try to use the same variable and function names, which could cause a lot of unexpected behavior.

浏览器中的模块通常使用一个包裹函数来把私有数据封装到一个闭包中(比如我们可以通过 IIFE 来实现,参见本书的《立即调用的函数表达式》章节)。如果没有 IIFE 提供的这个封闭的函数级作用域,一旦其它脚本尝试使用同名的变量或函数,将会导致很多意想不到的情况。

Most libraries, such as jQuery and Underscore, are encapsulated in modules.

大多数类库,比如 jQuery 或 Underscore,都封装在这样的模块中。

The module pattern encapsulates module contents in an immediately invoked function expression (IIFE), and exposes a public interface by assignment. Douglas Crockford gave the module pattern its name, and Eric Miraglia popularized it in a well-known blog post on the YUI Blog.

这种“模块模式”将模块内容封闭在一个 IIFE 中,然后通过赋值向外暴露接口。Douglas Crockford 提出了“模块模式”这个名词,而 Eric Miraglia 通过 YUI 博客上的一篇著名文章 将它推广开来。

The original module pattern assigns the result of the IIFE to a predefined namespace variable:

最初的模块模式是将 IIFE 运行的结果赋值给一个预定义的命名空间变量:

var myModule = (function () {
  return {
    hello: function hello() {
      return 'Hello, world!';
    }
  };
}());

test('Module pattern', function () {
  equal(myModule.hello(),
    'Hello, world!',
    'Module works.');
});

The problem with this pattern is that you have no choice but to expose at least one global variable for each module. If you're building an application with a lot of modules, that is not a good option. Instead, it's possible to pass in an existing variable to extend with your new module.

这种模式的问题是,你不得不为每个模块暴露至少一个全局变量,别无它法。如果你正在构建一个拥有大量模块的应用程序,这显然不是一个好办法。实际上,我们可以传一个已经存在的、以供扩展的变量(命名空间)进去,用你的新模块来扩展它。

Here that variable is called exports, for compatibility with CommonJS (see the section on Node Modules for an explanation of CommonJS). If exports does not exist, you can fall back on window:

为了与 CommonJS 保持兼容(后面的《CommonJS 模块规范》章节会详细解释 CommonJS),我们将这个变量命名为 exports。如果 exports 不存在,那么至少你还可以回退至 window 对象:(译注:扩展 window 对象即相当于暴露新的全局变量。不过不用担心,这只是以防万一的退路。)

(function (exports) {
  var api = {
      moduleExists: function test() {
        return true;
      }
    };
  $.extend(exports, api);
}((typeof exports === 'undefined') ?
    window : exports));

test('Pass in exports.', function () {
  ok(moduleExists(),
    'The module exists.');
});

A common mistake is to pass in a specific application namespace inside your module's source file (instead of using a globally defined exports). Normally, that will not harm anything. However, if you wish to reuse the module in another application, you'll have to modify the source of the module in order to attach it to the correct namespace.

一个常见的错误是把一个特定的应用程序命名空间传进了模块内部的源码中(而不是使用一个全局定义的 exports)。一般来说,这不会导致什么严重后果。但是,如果你希望在其它应用程序中重用这个模块,你就不得不修改模块的源码,以便将它绑定到正确的命名空间上。

Instead, you can pass your application object in as exports. It's common in client side code to have a build step that wraps all of your modules together in a single outer function. If you pass your application object into that wrapper function as a parameter called exports, you're in business.

正确的方案是这样的,你可以把你的应用程序对象(命名空间)传进去作为 exports。在客户端采用一个构建步骤已经很常见了,这个步骤可以把你的所有模块包裹到一个外层函数中。如果你把你的应用程序对象(命名空间)作为一个名为 exports 的参数传进这个外层包裹函数中,你就算是走上正轨了。

var app = {};

(function (exports) {

  (function (exports) {
    var api = {
        moduleExists: function test() {
          return true;
        }
      };
    $.extend(exports, api);
  }((typeof exports === 'undefined') ?
      window : exports));

}(app));

test('Pass app as exports.', function () {
  ok(app.moduleExists(),
    'The module exists.');
});

An upside to this version of the module pattern is that the code you write with it can be easily run and tested in Node. From this point on, when the module pattern gets mentioned, this is the version that should spring to mind. It's older ancestor is obsolete.

最后这个版本的模块模式有一个好处是,你用它编写的代码可以很容易地在 Node 中运行和测试。从现在开始,每当提到“模块模式”时,你脑袋里面就应该立马蹦出这个版本。比它更早的那些版本已经过时了。


© Creative Commons BY-NC-ND 4.0   |   我要订阅   |   我要打赏

Underscore 模板引擎 API 更新

Underscore 模板引擎 API 更新

语法

Underscore 的模板引擎 _.template() 脱胎于 jQuery 作者的作品 Micro-Templating。但从 Underscore 1.3.3 开始,这个方法做了较大的调整,在保留旧语法的基础上,还新增支持了一个 {variable: 'foo'} 对象作为第三个参数。

一旦传入了这个参数,则模板(第一个参数)中的变量将不再指向待渲染数据(第二个参数)的属性,模板中的 foo 变量将直接指向待渲染数据(第二个参数)自身

比如,原来的调用方法:

_.template('I love <%= person %>.', {person: 'you'});

在新语法下可以写为:

_.template('I love <%= foo.person %>.', {person: 'you'}, {variable: 'foo'});

比较

看起来似乎变复杂了,但这样做有两个好处:

内部实现

旧语法在实现上,需要使用 with 声明来实现对数据对象属性的查找。with 有哪些问题,这里就不多说了。而新语法由于已经在模板中指定了数据对象自身,则不需要用 with 来搜索其属性。据官方文档称,“模板渲染性能得到极大提升”。

外部接口

新语法带来了一个隐性的改良——接口灵活性更高,即待渲染数据(第二个参数)可以不仅是对象,也可以是数组等其它数据类型。仍然以上面的代码为例,用新语法还可以写成这样:

_.template('I love <%= foo %>.', 'you', {variable: 'foo'});

这样传入的数据更自由,数组等数据不需要被包装为对象再传入了。

使用

在实际应用中,往往存在某个常用的模板需要被多次渲染的情况。此时,为优化性能,我们通常会采用“两步渲染法”——先把模板编译成模板函数备用;按需执行已经编译好的模板函数,把不同的数据渲染为不同的结果——以避免同一模板的重复编译。如下所示:

var fnRender = _.template('I love <%= person %>.');
fnRender({person: 'you'});  //'I love you.'
fnRender({person: 'her'});  //'I love her.'

在这种情况下,我们无法使用 {variable: 'foo'} 参数。那怎么办呢?

幸好有 _.templateSettings 可以进行 _.template() 的全局设置:

_.extend(_.templateSettings, {variable: 'foo'});

在此之后编译的所有模板函数即工作在新语法之下。需要注意的是,这个设置是全局的,也就是说,当前页面的所有模板和相关功能都需要以新语法来写,并将 foo 统一命名。


更新

从 Underscore 1.7 开始,这个 API 的行为又发生了一些变化,我们有必要再来看一看。

从这个版本开始,_.template() 方法将不再接受模板数据了,它的返回值就总是编译生成的模板函数了。也就是说原先一步渲染模板的用法需要修改成两步走:

// before
_.template('I love <%= person %>.', {person: 'you'});

// after
_.template('I love <%= person %>.')({person: 'you'});

看起来很蛋疼?无关痛痒?其实 Underscore 下决心引入这个 “破坏性变更” 还是很有深意的。我认为这个改动的好处在于:

  • 消灭了返回值的不确定性,令这个 API 的行为更易于理解。
  • 去掉一步到位的用法,虽然牺牲了眼前的便利,但同时也强制使用者了解模板引擎的基本原理,一定程度上会推动使用者考虑模板缓存,进而提升应用的整体性能。

© Creative Commons BY-NC-ND 4.0   |   我要订阅   |   我要打赏

GitHub 第一坑:换行符自动转换

GitHub 第一坑:换行符自动转换

源起

一直想在 GitHub 上发布项目、参与项目,但 Git 这货比较难学啊。买了一本《Git 权威指南》,翻了几页,妈呀,那叫一个复杂,又是 Cygwin 又是命令行的,吓得我不敢学了。

终于某天发现 GitHub 还有一个 Windows 客户端,试了一下还挺好用。不需要掌握太多的 Git 原理和命令,也可以在 GitHub 上麻溜建项目了,甚是欢喜。可是好景不长,第一次参与开源项目就出洋相了。

经过

小心翼翼地 Fork 了朴灵大大 (@JacksonTian) 的 EventProxy 项目,本地改好提交,同步到服务器,怀着激动的心情发出 Pull Request……这时发现问题了。我发现 diff 图表显示的更新并不仅是我修改的那几行,而是整个文件都显示为已修改。(下图为示意图)

first-trap-on-github-autocrlf-diff

这看起来很奇怪啊,于是赶紧撤回 Pull Request,自己闷头找原因。

初步定位是文件的换行符问题,因为我发现本地的文件是 Windows 换行符,但很显然大家现在做项目都是用 UNIX 换行符啊。这是一大疑点,于是在反复对比 Web 端和本地的各个文件、各个版本之后,基本定位到了问题所在。

背景

在各操作系统下,文本文件所使用的换行符是不一样的。UNIX/Linux 使用的是 0x0A(LF),早期的 Mac OS 使用的是 0x0D(CR),后来的 OS X 在更换内核后与 UNIX 保持一致了。但 DOS/Windows 一直使用 0x0D0A(CRLF)作为换行符。(不知道 Bill Gates 是怎么想的,双向兼容?)

这种不统一确实对跨平台的文件交换带来麻烦。虽然靠谱的文本编辑器和 IDE 都支持这几种换行符,但文件在保存时总要有一个固定的标准啊,比如跨平台协作的项目源码,到底保存为哪种风格的换行符呢?

Git 作为一个源码版本控制系统,以一种(我看起来)有点越俎代庖、自作聪明的态度,对这个问题提供了一个“解决方案”。

Git 由大名鼎鼎的 Linus 开发,最初只可运行于 *nix 系统,因此推荐只将 UNIX 风格的换行符保存入库。但它也考虑到了跨平台协作的场景,并且提供了一个“换行符自动转换”功能。

安装好 GitHub 的 Windows 客户端之后,这个功能默认处于“自动模式”。当你在签出文件时,Git 试图将 UNIX 换行符(LF)替换为 Windows 的换行符(CRLF);当你在提交文件时,它又试图将 CRLF 替换为 LF。

(看明白了吗?一个版本控制系统会在你不知不觉的情况下修改你的文件。这 TM 简直酷毙了,对吧?)

缺陷

Git 的“换行符自动转换”功能听起来似乎很智能、很贴心,因为它试图一方面保持仓库内文件的一致性(UNIX 风格),一方面又保证本地文件的兼容性(Windows 风格)。但遗憾的是,这个功能是有 bug 的,而且在短期内都不太可能会修正。

问题具体表现在,如果你手头的这个文件是一个 包含中文字符的 UTF-8 文件,那么这个“换行符自动转换”功能 在提交时是不工作的(但签出时的转换处理没有问题)。我猜测可能这个功能模块在处理中文字符 + CRLF 这对组合时直接崩溃返回了。

这可能还不是唯一的触发场景(毕竟我没有太多精力陪它玩),但光这一个坑就已经足够了。

踩坑

这是一个相当大的坑,Windows 下的中文开发者几乎都会中招。举个例子,你在 Windows 下用默认状态的 Git 签出一个文件,写了一行中文注释(或者这个文件本来就包含中文),然后存盘提交……不经意间,你的文件就被毁掉了。

因为你提交到仓库的文件已经完全变成了 Windows 风格(签出时把 UNIX 风格转成了 Windows 风格但提交时并没有转换),每一行都有修改(参见本文开头的示意图),而这个修改又不可见(大多数 diff 工具很难清楚地显示出换行符),这最终导致谁也看不出你这次提交到底修改了什么。

这还没完。如果其他小伙伴发现了这个问题、又好心地把换行符改了回来,然后你又再次重演上面的悲剧,那么这个文件的编辑历史基本上就成为一个谜团了。

由于老外几乎不可能踩到这个坑,使得这个 bug 一直隐秘地存在着。但在网上随便搜一下,就会发现受害者绝对不止我一个,比如 这位大哥的遭遇 就要比我惨痛得多。

防范

首先,不要着急去整 Git,先整好自己。你的团队需要确立一个统一的换行符标准(推荐使用 UNIX 风格)。然后,团队的成员们需要分头做好准备工作——配置好自己的代码编辑器和 IDE,达到这两项要求:

  • 在新建文件时默认使用团队统一的换行符标准
  • 在打开文件时保持现有换行符格式不变(即不做自动转换)

这样一方面可以最大程度保证项目代码的规范一致,另一方面,即使现有代码中遗留了一些不规范的情况,也不会因为反复转换而导致混乱。(当然,作为一个强迫症患者,我还是祝愿所有的项目从一开始就步入严谨有序的轨道。)

接下来,我们就可以开始调教 Git 了。我的建议是, 完全关掉这个自作聪明的“换行符自动转换”功能。关闭之后,Git 就不会对你的换行符做任何手脚了,你可以完全自主地、可预期地控制自己的换行符风格。

下面主要针对不同的 Git 客户端,分别介绍一下操作方法。

Git for Windows

这货由 Git 官方出品,在安装时就会向你兜售“换行符自动转换”功能,估计大多数人在看完华丽丽的功能介绍之后会毫不犹豫地选择第一项(自动转换)。请千万抵挡住诱惑,选择最后一项(不做任何手脚)。

first-trap-on-github-autocrlf-git-install

如果你已经做出了错误的选择,也不需要重新安装,可以直接使用命令行来修改设置。很简单,直接打开这货自带的命令行工具 Git Bash,输入以下命令,再敲回车即可:

git config --global core.autocrlf false

first-trap-on-github-autocrlf-bash

TortoiseGit

很多从 TortoiseSVN 走过来的同学很可能会选用 TortoiseGit 作为主力客户端,那么也需要配置一下。在 Windows 资源管理器窗口中点击右键,选择“TortoiseGit → Settings → Git”,做如下设置。

first-trap-on-github-autocrlf-tortoisegit

(由于 TortoiseGit 实际上是基于 Git for Windows 的一个 GUI 外壳,你在上一节所做的设置会影响到上图这些选项的状态,它们可能直接就是你所需要的样子了。)

GitHub 的 Windows 客户端

它是今天的第二被告。这货很容易上手,很适合小白,我主要用它来一键克隆项目到本地。可能正是为了维护简洁易用的亲切形象,这货并没有像 TortoiseGit 那样提供丰富的选项(对“换行符自动转换”这样的细节功能完全讳莫如深啊,我这样的小白死了都不知道怎么死的……)。因此,我们需要手动修改一下它的配置。

GitHub 的 Windows 客户端实际上也是一个壳,它自带了一个便携版的 Git for Windows。这个便携版和你自己安装的 Git for Windows 是相互独立的,不过它们都会使用同一个配置文件(实际上就是当前用户主目录下的 .gitconfig 文件)。

所以如果你已经配置好了自己安装的 Git for Windows,那就不用操心什么了。但如果你的机器上只装过 GitHub 的 Windows 客户端,那么最简单的配置方法就是手工修改配置文件了。

修改 Git 的全局配置文件

进入当前用户的主目录(通常 XP 的用户目录是 C:\Documents and Settings\yourname,在 Vista 和 Win7 下是 C:\Users\yourname),用你最顺手的文本编辑器打开 .gitconfig 文件。

[core] 区段找到 autocrlf,将它的值改为 false。如果没找到,就在 [core] 区段中新增一行:(最终效果见图)

    autocrlf = false

first-trap-on-github-autocrlf-gitconfig

事实上上面介绍的所有命令行或图形界面的配置方法,最终效果都是一样的,因为本质上都是在修改这个配置文件。

还有

关掉了 Git 的“换行符自动转换”功能就万事大吉了吗?失去了它的“保护”,你心里会有点不踏实。你可能会问:如果我不小心在文件中混入了几个 Windows 回车该怎么办?这种意外可以防范吗?

事实上 Git 还真能帮你阻止这种失误。它提供了一个换行符检查功能(core.safecrlf),可以在提交时检查文件是否混用了不同风格的换行符。这个功能的选项如下:

  • false - 不做任何检查
  • warn - 在提交时检查并警告
  • true - 在提交时检查,如果发现混用则拒绝提交

我建议使用最严格的 true 选项。

core.autocrlf 一样,你可以通过命令行、图形界面、配置文件三种方法来修改这个选项。具体操作就不赘述了,大家自己举一反三吧。

最后

你可能还会问,如果我自己一不小心用编辑器把整个文件的换行符都转换成了另一种格式怎么办?还能预防吗?

这……我就真帮不了你了。所以还是建议大家在提交文件之前多留心文件状态:

first-trap-on-github-autocrlf-commit

如果发现变更行数过多,而且增减行数相同,就要警惕是不是出了意外状况。被图形界面惯坏的孩子往往缺乏耐心,对系统信息视而不见,看到按钮就点,容易让小疏忽酿成大事故。所以高手们青睐命令行,并不是没有道理的。

好了,小伙伴们,今天的《踩坑历险记》就到这儿,我们下集再见!祝大家编码愉快!


© Creative Commons BY-NC-ND 4.0   |   我要订阅   |   我要打赏

[译] [信息图表] 色彩心理学:设计师的选色指南

[译] [信息图表] 色彩心理学:设计师的选色指南


色彩心理学:设计师的选色指南-01

The Psychology of Color: A Guide for Designers

色彩心理学:设计师的选色指南


色彩心理学:设计师的选色指南-02

The color wheel is a tool for understanding color and color relationships.

色环是一种帮助我们理解色彩和色彩关系的工具。

The most common color wheel is the twelve (12) hue wheel. A color wheel could have as few as six hues or as many as 24, 48, 96 or more.

最常见的色环是 12 色环。通常一个色环包含至少 6 种、多到 24、48、96 或更多种颜色。

  • Yellow
  • Yellow-Green
  • Green
  • Blue-Green
  • Blue
  • Blue-Violet
  • Violet
  • Red-Violet
  • Red
  • Red-Orange
  • Orange
  • Yellow-Orange
  • 黄色
  • 黄绿色
  • 绿色
  • 蓝绿色
  • 蓝色
  • 蓝紫色
  • 紫色
  • 紫红色
  • 红色
  • 红橙色
  • 橙色
  • 黄橙色

色彩心理学:设计师的选色指南-03

Primary colors

三原色

There are three primary colors. They are the hues yellow, blue and red. These three colors are the hues that theory can be mixed to make all other colors. If you mix the three primary colors, in theory it would produce black.

色环中有三种原色。它们分别是红、黄、蓝。理论上这三种颜色可以混合出任何其它颜色。当你把这三种颜色混合到一起时,理论上会产生黑色。(译注:本文的三原色理论基于较传统的颜料消减型混合体系,有别于计算机领域常用的 RGB 光源叠加型三基色体系和 CMY 印刷消减型分色体系。延伸阅读: 原色 - 维基百科

Secondary colors

三间色

By mixing two primary hues together you create a secondary color. There are three secondary colors. They are the hues green, violet (purple) and orange. Orange from mixing red and yellow, violet (purple) from blue and red, and green from yellow and blue.

通过混合两种原色,你将得到一种间色。总共有三种间色,分别是绿色、紫色、橙色。橙色由红和黄混合而来,紫色由蓝和红混合而来,而绿色由黄和蓝混合而来。

Tertiary colors

复色

The third set of hues are known as tertiary or intermediate colors. These hues are made by mixing adjacent primary and secondary hues. The six tertiary or intermediate colors are yellow-green, blue-green, blue-violet, red-violet, red-orange, and yellow-orange.

色环中的第三类颜色就是复色,或称为三次色。它们是由色环中邻近的原色和间色混合而来。这六种复色分别是黄绿色、蓝绿色、蓝紫色、紫红色、红橙色、黄橙色。


色彩心理学:设计师的选色指南-04

Hue: A hue is the purest or brightest form of a color. Hues are colors that have not been mixed with white, gray, or black. The twelve colors around on the outermost part of the wheel are hues.

纯色:纯色是一种颜色最纯最亮的形态,是还没和白、灰或黑色进行混合时的形态。色环最外圈的 12 种颜色即代表了 12 种纯色。

Tint: The circle of colors next to the hues represent the tint of each hue. A tint is the hue mixed with white. The hue may be mixed with just a touch of white or with so much white that the hue is very faint.

浅色:色环向内紧贴纯色的一环就是各种色彩的浅色形态。浅色是纯色与白色混合后的结果。纯色可以只混入一丁点儿白色,也可以被大量白色冲淡得几乎看不出来。

Tone: The next circle of colors represent the tone of each hue. A tone is the hue mixed with true gray. The hue mixed with any amount of gray is considered a tone of the hue.

深色:色环的更内一层就是各种颜色的深色形态。深色是纯色与灰色混合的产物。纯色混入不同数量的灰色,可以得到不同程度的深色调。

Shade: The inner most circle of colors represent the shade of each hue. A shade is the hue mixed with black. Just as with the tines, the hue may be mixed with just a touch of black or with so much black that you are.

暗色:色环中的最内圈代表各种颜色的暗色形态。暗色由纯色和黑色混合而来。和浅色一样,纯色可以只混入一丁点儿黑色,也可以和大量黑色进行混合。

(译注:这一节是对色彩三要素色相、明度、纯度的比较通俗的描述。)


色彩心理学:设计师的选色指南-05

Yellow

黄色

Yellow shines with optimism, enlightenment, and happiness. Shades of golden yellow carry the promise of a positive future. Yellow will advance from surrounding colors and instill optimism and energy, as well as spark creative thoughts.

黄色散发着乐观、灵性和欢乐的气息。暗金黄色可以让你看见一个积极的未来。黄色会从五彩丛中脱颖而出,并缓缓释放出乐观与能量,不断激发出灵感的火花。

Effects

效果

  • Stimulates mental processes
  • Stimulates the nervous system
  • Activates memory
  • Encourages communication
  • 刺激思维
  • 刺激神经系统
  • 激活记忆力
  • 鼓励沟通

Facts

趣闻

  • During the tenth century in France, the doors of traitors and criminals were painted yellow.

  • Yellow signifies "sadness" in Greece's culture and "jealousy" in France's culture.

  • Yellow is psychologically the happiest color in the color spectrum.

  • The comic book character Green Lantern was afraid of the color yellow.

  • 75% of the pencils sold in the United States are painted yellow.

  • 在第十世纪的法国,叛徒和罪犯的家门会被漆成黄色。

  • 黄色在希腊文化中表示“悲伤”,而在法国文化中表示“妒忌”。

  • 从心理学上讲,黄色是色谱中最令人愉悦的颜色。

  • 漫画人物绿灯侠惧怕黄色。

  • 在美国售出的铅笔中,有四分之三是漆成黄色的。


色彩心理学:设计师的选色指南-06

Green

绿色

Green occupies more space in the spectrum visible to the human eye than most colors, and is second only to blue as a favorite color. Green is the pervasive color in the natural world, making it an ideal backdrop in interior design because we are so used to seeing it everywhere.

在人眼可识别的光谱中,绿色相比其它颜色占据了更多空间;同时它是仅次与蓝色的最受欢迎的颜色。绿色在自然界中无处不在,这使它成为室内设计中理想的背景色,因为我们已经习惯于身处其中了。

Effects

效果

  • Soothes
  • Relaxes mentally, as well as physically
  • Helps alleviate depression, nervousness, and anxiety
  • Offers a sense of renewal, self-control, and harmony
  • 有镇静作用
  • 令人放松身心
  • 有助于缓解压力、紧张和焦虑
  • 提供一种新生、内敛、和谐的感觉

Facts

趣闻

  • The solid green flag of Libya is currently the only national flag of a single color.

  • There is a superstition that sewing with green thread on the eve of a fashion show brings bad luck to the design house.

  • Green was the favorite color of George Washington, the first President of the United States.

  • Green is the color used for night-vision goggles because the human eye is most sensitive to and able to discern the most shades of that color.

  • NASCAR racers have shared a bias against the color green for decades. Reportedly, it began after a 1920 accident in Beverly Hills, California, that killed defending Indianapolis 500 champion Gaston Chevrolet. It was the first known racing accident in the United States to kill two drivers, and Chevrolet reportedly was driving a green car.

  • 利比亚的满幅绿色国旗是目前唯一的单色国旗。

  • 有一种迷信认为在时装秀的前夜用绿线缝衣服会给设计工作室带来厄运。

  • 绿色是美国第一任总统乔治·华盛顿最喜欢的颜色。

  • 绿色是夜视镜所采用的颜色,因为人类的视觉对绿色的不同深浅色调最为敏感,更易于辨识。

  • 全美房车竞赛协会数十年来对绿色一直怀有偏见。据传,这种偏见始于 1920 年发生于加州比佛利山庄的一次事故,这次事故夺去了“Indianapolis 500”赛事的卫冕冠军 Gaston Chevrolet(加斯顿·雪佛兰)的生命。这是美国赛车运动有史以来首次造成两名车手丧生的意外事故,而当时雪佛兰驾驶的就是一辆绿色赛车。(译注:此话题可参阅此文《绿车不吉利?》。)


色彩心理学:设计师的选色指南-07

Blue

蓝色

Blue is seen as trustworthy, dependable, and committed. The color of ocean and sky, blue is perceived as a constant in our lives. As the collective color of the spirit, it invokes rest and can cause the body to produce chemicals that are calming.

蓝色通常被视为值得信赖、坚实可靠的象征。作为海洋和天空的颜色,蓝色被认为是我们生命中的永恒色彩。作为心灵的共通之色,它可以唤起休憩之意,令身体产生有安神作用的化学物质。

Effects

效果

  • Calms and sedates
  • Cools
  • Aids intuition
  • 静心安神
  • 凉意
  • 促生直觉

Facts

趣闻

  • Blue is the least "gender specific" color, having equal appeal to both men and women.

  • Blue is the favored color choice for toothbrushes.

  • Owls are the only birds that can see the color blue.

  • People are often more productive in blue rooms.

  • Mosquito's are attracted to the color blue twice as much as to any other color.

  • 蓝色是最不具有“性别特征”的色彩,对男性和女性有同等的吸引力。

  • 蓝色是最受牙刷青睐的颜色之选。

  • 猫头鹰是唯一能识别蓝色的鸟类。

  • 人们在蓝色房间里通常更有工作效率。

  • 蓝色对蚊子的吸引力是其它颜色的两倍。


色彩心理学:设计师的选色指南-08

Purple

紫色

Purple embodies the balance of red's stimulation and blue's calm. With a sense of mystic and royal qualities, purple is a color often well liked by very creative or eccentric types and is the favorite color of adolescent girls.

紫色体现了红色般跳跃与蓝色般平和之间的平衡。由于它的神秘气息和贵族气质,紫色通常会受到那些创意人士或古怪人群的偏爱,同时它也是少女们最爱的颜色。

Effects

效果

  • Uplifts
  • Calms the mind and nerves
  • Offers a sense of spirituality
  • Encourages creativity
  • 鼓舞人心
  • 平静心灵,舒缓神经
  • 提供灵性的感觉
  • 激发创造力

Facts

趣闻

  • Purple was the royal color of the Caesars.

  • Purple was the color of the first dye made by man.

  • Purple is the color of Madison Square Garden and seating for VIP’s was once covered in purple.

  • Purple is the color of the highest denomination = $5,000.

  • During the Silver Age of comic books, those with purple on their covers sold better.

  • 紫色是凯撒大帝的皇家色系。

  • 紫色是人类发明的第一种染料的颜色。

  • 紫色是麦迪逊广场花园(纽约曼哈顿的一个大型室内运动场)的代表色,而且 VIP 专座就曾使用紫色覆盖。

  • 紫色被用于最高面额的纸币(5000 美元)。

  • 在漫画书的兴盛时期,采用紫色封面的书往往卖得更好。


色彩心理学:设计师的选色指南-09

Pink

粉色

Brighter pinks are youthful, fun, and exciting while vibrant pinks have the same high energy as red; they are sensual and passionate without being too aggressive. Toning down the passion of red with the purity of white results in the softer pinks that are associated with romance and the blush of a young woman's cheeks.

浅粉色给人一种年轻活泼、激动人心的感受,而鲜粉色则像红色一样蕴涵了极高的能量。这两种粉色都不乏感官刺激,令人激情澎湃,但又不过于张扬。用白色的纯净冲淡了红色的激情之后,会得到柔合的粉色,令人联想到浪漫气息和羞涩少女的那一抹腮红。

Effects

效果

  • Bright pinks, like the color red, stimulate energy and can increase the blood pressure, respiration, heartbeat, and pulse rate. They also encourage action and confidence.
  • Pink has been used in prison holding cells to effectively reduce erratic behavior.
  • 亮粉色,具有类似红色的效果,可以激发能量,增加血压、呼吸、心跳和脉搏;还可以激发斗志和信心。
  • 粉色常被用于监狱的牢房隔间,可有效地降低异常行为。(译注:据说,在男厕使用粉色装修和粉色小便斗,可以有效减少小便洒落地面的情况。)

Facts

趣闻

  • In 1947, fashion designer Elsa Schiaparelli introduced the color "hot pink" to western fashion.

  • Pink encourages friendliness while discouraging aggression and ill-will.

  • Since the color pink is said to have a tranquilizing effect, sports teams sometimes use pink to paint the locker room used by opposing teams.

  • Studies of the color pink suggest that male weightlifters seem to lose strength in pink rooms, while women weightlifters tend to become stronger around the color.

  • Pastries taste better when they come out of pink boxes or served on pink plates (it only works with sweets) because pink makes us crave sugar.

  • 1947 年,时装设计师 Elsa Schiaparelli 将“艳粉色”引入西方时尚圈。

  • 桃色可以营造亲密氛围,减少攻击性和敌意。

  • 由于听说粉色有一种镇定效果,有些球队会把客队的休息室漆成粉色。

  • 对于粉色的研究发现,男性举重运动员在粉色房间内似乎感到力不从心,而女性举重运动员面对这种颜色反而会有变强的倾向。

  • 糕点从粉色盒子里取出或盛在粉色盘子里时,尝起来会更美味(这种情况仅适用于甜点),因为粉色令我们渴望糖份。


色彩心理学:设计师的选色指南-10

Red

红色

Red has more personal associations than any other color. Recognized as a stimulant, red is inherently exciting and the amount of red is directly related to the level of energy perceived. Red draws attention and a keen use of red as an accent can immediately focus attention on a particular element.

与其它颜色相比,红色产生更多的人际交往。作为一种公认的兴奋剂,红色天生令人血脉贲张,而且红色的剂量会直接影响到能量的爆发程度。红色引人注目,巧妙地将它用作一种强调,可以立即将众人的注意力聚集到某个特定元素上。

Effects

效果

  • Increases enthusiasm
  • Stimulates energy and can increase the blood pressure, respiration, heartbeat, and pulse rate
  • Encourages action and confidence
  • Provides a sense of protection from fears and anxiety
  • 焕发热情
  • 激发活力,可以提高血压、呼吸、心跳和脉搏
  • 激发斗志和信心
  • 通过恐惧和焦虑来提供一种警戒意识

Facts

趣闻

  • Red is the highest arc of the rainbow.

  • Red is the first color you lose sight of at twilight.

  • The longest wavelength of light is red.

  • Feng shui recommends painting the front door of a home red to invite prosperity to the residents.

  • Bees can't see the color red, but they can see all other bright colors. Red flowers are usually pollinated by birds, butterflies, bats, and wind, rather than bees.

  • 红色是彩虹最外圈的颜色。

  • 红色是你在黄昏时最先无法辨别的颜色。

  • 波长最长的可见光就是红色的。

  • **的风水学建议将住宅的前门漆成红色,取兴旺红火之意。

  • 蜜蜂看不见红色,但它们可以看见其它鲜艳的颜色。红色花卉通常依靠鸟类、蝴蝶、蝙蝠和风媒进行授粉,而不是靠蜜蜂。


色彩心理学:设计师的选色指南-11

Orange

橙色

Orange, a close relative of red, sparks more controversy than any other hue. There is usually strong positive or negative association to orange and true orange generally elicits a stronger "love it" or "hate it" response than other colors. Fun and flamboyant orange radiates warmth and energy.

橙色,是红色的近亲,比其它颜色更容易激起争论。对于橙色,往往存在极端正面或负面的联想;与其它颜色相比,纯正的橙色通常会引发更强烈的好恶反应。欢快而耀眼的橙色会放射出暖意和能量。

Effects

效果

  • Stimulates activity
  • Stimulates appetite
  • Encourages socialization
  • 激发活力
  • 刺激食欲
  • 鼓励社交

Facts

趣闻

  • The interior dash lights on older model Suburu cars were orange.

  • Orange is the color that means "high" in the color-coded threat system established by presidential order in March 2002.

  • In the United States Army, orange is the color of the United States Army Signal Corps.

  • Safety orange is a color used to set things apart from their surroundings.

  • Agent Orange, an herbicide named after the color of its containers, was used in a systematic herbicidal program organized by the US military that ran from 1961 through 1971 in Vietnam.

  • 一些老款的 Suburu 汽车的仪表盘灯光就是橙色的。

  • 2002 年 3 月,由总统令确立的“威胁等级色彩代号”系统中,橙色代表“高”。

  • 在美国陆军中,橙色是通信兵的代表色。

  • “安全橙”是一种用于将物体从周边环境中区分开来的颜色。

  • “橙剂”是一种除草剂,得名于它容器的颜色。这种除草剂曾用于 1961 至 1971 年间美军在越南组织的一项系统的除草工程。


色彩心理学:设计师的选色指南-12

White

白色

white projects purity, cleanliness, and neutrality. Doctors don white coats, brides traditionally wear white gowns, and a white picket fence surrounds a safe and happy home.

白色表达出纯粹、洁净、中性的意味。医生穿上白色大褂,新娘披上白色长裙,一圈白色栅栏围出欢乐祥和的家园。

Effects

效果

  • Aids mental clarity
  • Encourages us to clear clutter or obstacles
  • Evokes purification of thoughts or actions
  • Enables fresh beginnings
  • 有助于头脑清醒
  • 鼓励我们扫除混乱和障碍
  • 唤起**或行为的净化
  • 提供一个全新的开端

Facts

趣闻

  • A white flag is universally recognized as a symbol of truce.

  • According to Pantone Inc., white is the best selling color for the classic American t-shirt.

  • More shades of white are available commercially than any other color.

  • White clothing typically becomes translucent when wet.

  • The appearance of white in a dream is thought to represent happiness at home. White castles are a symbol of achievement, destiny perfectly fulfilled, and spiritual perfection.

  • Originally, scientists wore beige coats. In the late 19th century, medical professionals chose white ones. The color white was chosen because of the idea of hope and expectations for healing and recovery that the physicians would bring.

  • 白旗是普遍公认的停战标志。

  • 据彩通公司称,美国传统 T 恤还是白色的最好卖。(译注:彩通公司是一家权威的色彩研究机构,该公司推出的彩通配色系统是印刷配色领域的事实标准。)

  • 白色衣服通常在湿水后会变得有些半透明。

  • 梦里出现白色,通常被认为是家庭幸福的表现。白色城堡通常是功成名就、精神圆满的象征。

  • 最初,科学家们通常穿着米色外套。到了 19 世纪晚期,医学专家们开始选择白色外套,因为他们心怀对健康事业信心和期望,这与临床医师们的目标一致。


色彩心理学:设计师的选色指南-13

Gray

灰色

Gray is the color of intellect, knowledge, and wisdom. It is perceived as long-lasting, classic, and often as sleek or refined. It is a color that is dignified, conservative, and carries authority. Gray is a perfect neutral, which is why designers often use it as a background color.

灰色象征着智慧和学识。它给人一种经典久远的感觉,又不失时尚优雅。灰色是一种严肃、保守、有份量的颜色。灰色是完美的中性色,因而经常被设计师用作背景色。

Effects

效果

  • Unsettles
  • Creams expectations
  • 增加变数
  • 突破常规

Facts

趣闻

  • The New York Times is sometimes called "Gray Lady".

  • Gray represents non-involvement, giving it a formal authority.

  • Gray is associated with intellect and the brain is composed of "gray matter".

  • Gray is representative of pessimism.

  • The human eye can distinguish about 500 shades of gray.

  • 纽约时报有时也被称为“灰色女士”。(译注:主要原因是该报的风格较为古典严肃。)

  • 灰色代表金盆洗手,放弃形式上的权力。

  • 灰色经常和智慧联系在一起,而大脑恰好由“灰质”组成。

  • 灰色是悲观主义的代表色。

  • 人类的眼睛可以区分大约 500 种不同明暗程度的灰色。


色彩心理学:设计师的选色指南-14

Black

黑色

Black is authoritative and powerful; because black can evoke strong emotions, too much can be overwhelming. Black represents a lack of color, the primordial void, emptiness. It is a classic color for clothing, possibly because it makes the wearer appear thinner and more sophisticated.

黑色就是权威和力量,这是因为它能唤引强烈的情绪,大片浓重的黑色简直势不可挡。黑色意味着色彩消逝,以及混沌般的空洞虚无。它是经典的服装用色,可能是因为它令人看起来更加干练。

Effects

效果

  • Makes one feel inconspicuous
  • Provides a restful emptiness
  • Is mysterious by evoking a sense of potential and possibility
  • 低调
  • 提供一种空无一物般的宁静
  • 它的神秘感来自于它所唤起的一种潜藏而未知的感觉

Facts

趣闻

  • In England, taxi cabs are traditionally black.

  • Black implies weight -- people will think a black box weighs more than a white one.

  • The color black is associated with sophistication and power – tuxedos, limousines, judge's robes, and priests' attire are all typically black.

  • The color black is so widely regarded as sophisticated in fashion that the term "the new black" is often used to describe and give merit to a color trend.

  • One old wives' tale claims that if a woman is buried wearing the color black, she'll come back to haunt the family.

  • 在英格兰,出租车传统上都是黑色的。

  • 黑色意味着份量——人们会觉得一个黑盒子会比白盒子要重。

  • 黑色往往跟修养和权势联系在一起——正式礼服、豪华轿车、法官的长袍、神父的正装通常都是黑色的。

  • 黑色在时尚界广受赞誉,比如人们经常使用“新黑色”这个名词来表达对一种色彩潮流的推崇。

  • 有一种迷信说法认为,如果一个女人被埋葬时穿着黑衣,她就会经常游荡在她的家人周围。


色彩心理学:设计师的选色指南-15

The Colors of the Chakras

色彩与脉轮

The chakras are related to the seven basic energy centers in the body. Each of the chakras correlates to a major nerve ganglia branching out from the spinal column. In addition the chakras are correlated to colors, sounds, body functions, and much more.

脉轮指的是人体的七个基本的能量中枢。每个脉轮都与一个由脊柱分支出来的神经中枢相关联。此外,脉轮还与颜色、声音、身体功能等众多因素有关联。(译注:脉轮译自梵文“查克拉”,源自印度瑜伽的哲学理念。)


色彩心理学:设计师的选色指南-16

Violet (purple) is the color of the Crown chakra, also known as Sahasrara. This chakra is located at the top of the head. The Crown chakra is linked to the crown of the head, the nervous system and the brain, and is representative of pure thought.

Indigo: The color of the Brow or Third-Eye chakra, also known as Ajna. This chakra is located at the top of the head.

Blue: The color of the Throat chakra, also known as Visuddha. This chakra is located in the throat. It is linked to the throat, neck, hands, and arms. The Throat chakra is connected with speech and hearing and encourages spiritual communication.

Green: The color of the Heart chakra, also known as Anahata. This chakra is located at the center of the chest area and is linked to this entire area, the heart, lungs, circulatory system, and cardiac plexus.

Yellow: The color of the Solar Plexus chakra, also known as Manipura. This chakra is located in the stomach area and is linked to organs & muscular system in that area.

Orange: The color of the Sacral chakra, also known as Svadhisthana. This chakra is located beneath the naval close to the genitals The Sacral Chakra is linked to the sexual organs and reproductive system.

Red: The color or the Base or Root chakra, also known as Muladhara. This chakra is located at the base of the spine and allows us to be grounded and connect to the universal energies.

(译注:这一节就略过不译了。有兴趣的同学请阅读原文,并可参阅 查克拉 - 维基百科


色彩心理学:设计师的选色指南-17

Source: http://www.sensationalcolor.com/

资料来源: http://www.sensationalcolor.com/


© Creative Commons BY-NC-ND 4.0   |   我要订阅   |   我要打赏

[译] [PJA] [600] 第六章 关注点分离

[译] [PJA] [600] 第六章 关注点分离

Chapter 6. Separation of Concerns

第六章 关注点分离

Separation of concerns is the idea that each module or layer in an application should only be responsible for one thing, and should not contain code that deals with other things. Separating concerns reduces code complexity by breaking a large application down into many smaller units of encapsulated functionality.

关注点分离 的意思是,应用程序中的每个模块或逻辑层只应该对一件事情负责,而不应该包含处理其它事情的代码。分离关注点的做法就是把一个大型的应用程序打散为多个稍小一些的封闭功能单元,从而减少代码的复杂度。

It's easy to confuse separation of concerns with employing modules for the construction of your application, but separation of concerns also implies the layering of functionality in your application. For example, n-tier architecture and MVC architectures are the result of separating concerns across the entire application, rather than at the individual module level. The goal of MVC and related patterns is to separate data management and presentation.

我们很容易误以为关注点分离就是对应用程序的结构进行模块划分,其实关注点分离同时也意味着在你的应用程序中对功能进行分层。比如说,多层架构和 MVC 架构就是在整个应用程序范围内进行关注点分离的结果,远远超出了“模块划分”这个层面。MVC 以及类似模式的目标就是为了将数据管理和表现层分离。

Separation of concerns can be expressed as functions, modules, controls, widgets, layers, tiers, services, and so on. The various units of concern vary from one app to the next, and each different app may use a different combination. Functions and modules have already been discussed.

关注点分离可以表现为函数、模块、控件、组件、功能层、逻辑层、服务等等形式。不同的应用程序在实现关注点分离时,可能会采用不同的表现形式和组合形式。其中函数和模块已经在前面的章节讨论过了。(译注:分别是第三章和 第五章。)

A control is a reusable GUI input that enables user interaction with your application. For example, combo boxes, calendar inputs, sliders, buttons, switches, and knobs are all controls.

控件 是一种可重用的 GUI 输入元素,使得用户可以与你的应用程序进行互动。比如说,组合框(译注:即输入框与下拉列表的组合体)、日历选择框、滑动条、按钮、开关和旋钮都属于控件。

A widget is a small application which is intended to be embedded in other applications. For example, WordPress allows developers to offer embeddable units of functionality to blog owners through its plugin ecosystem. There are many widgets to manage calendars, comments, maps, and all sorts of services from third party providers.

组件(译注:widget 往往也被译为“窗口小部件”、“挂件”等等)是一种小型应用程序,被设计为可以嵌入到其它应用程序中。比如 WordPress 就允许开发者基于其插件系统向博客站长提供可嵌入的功能单元。这些组件可以管理日历事件、用户评论、地图标记以及各种来自第三方的服务(译注:比如微博挂件等等)。

[$]

The word widget is historically used to mean the same thing as controls. To avoid confusion, this book will always refer to interactive form inputs as controls (or inputs), and widgets will always refer to embeddable mini applications.

一直以来,“组件”这个名词往往也被用作“控件”的同义词。为了避免混淆,在本书中,“控件”仅指那些可交互的表单输入元素,而“组件”仅指那些可嵌入的小型应用程序。

Layers are logical groupings of functionality. For example, a data layer might encapsulate functionality related to data and state, while a presentation layer handles display concerns, such as rendering to the DOM and binding UI behaviors.

功能层 是程序功能的逻辑分组。举例来说,“数据层”可能封装了与数据和状态相关的功能;而“表现层”用于处理显示方面的问题,比如渲染 DOM 结构并绑定 UI 交互行为。

Tiers are the runtime environments that layers get deployed to. A runtime environment usually consists of at least one physical computer, an operating system, the runtime engine (e.g., Node, Java, or Ruby) and any configuration needed to express how the application should interact with its environment.

逻辑层 是用于部署功能层的各种运行时环境。一个运行时环境至少要包含一台实体计算机、一个操作系统、一种运行时引擎(比如 Node、Java 或 Ruby)以及一些必不可少的配置信息——这些配置信息描述了应用程序应该如何与其所处的环境进行交互。

It's possible to run multiple layers on the same tier, but tiers should be kept independent enough that they can easily be deployed to separate machines, or even separate data centers. For large scale applications, it's usually also necessary that tiers can scale horizontally, meaning that as demand increases, you can add machines to a tier in order to improve its capacity to meet that demand.

在同一个逻辑层内运行多个功能层是可能的,但逻辑层必须保持足够独立,以便部署到分离的多台机器、甚至是分离的多个数据中心中(译注:互联网数据中心,IDC,指的是专业的服务器机房及相关设施)。对于大规模应用程序来说,逻辑层还必须具备水平伸缩能力。这意味着一旦需求增长,你只需要为逻辑层增加机器就可以提升整个应用的处理能力,从而满足这些新增需求。


© Creative Commons BY-NC-ND 4.0   |   我要订阅   |   我要打赏

[译] [PJA] [504] AMD 规范

[译] [PJA] [504] AMD 规范

AMD

AMD 规范

On the client side, there is often a need to load modules asynchronously at runtime in order to avoid the need for the client to download the entire codebase every time the app is loaded. Imagine you have an app like twitter, where users can post messages or status updates. The core of the application is the messaging feature. However, you also have a large profile editing module that allows users to customize the look of their profile pages.

在客户端,经常会有一种需求,在运行时异步加载模块,以避免每次应用启动时都需要把完整的代码库下载到客户端。想像一下你有一个类似 twitter 的应用,用户可以在上面发布消息或更新状态。这个应用程序的核心功能就是消息系统。不过,你还建立了一个庞大的账号编辑模块,允许用户自定义个人主页的外观。

Users will generally update the look of their profiles a few times per year, so the entire profile editing module (all 50,000 lines of it) goes completely unused 99% of the time. What you need is a way to defer the loading of the profile editor until the user actually enters edit mode. You could just make it a separate page, but then the user has to endure a page refresh, when maybe all they wanted to do was change their profile image. It would be a much better experience to keep this all on one page, with no new page load.

一般来说用户只会偶尔更新一下他们的个人主页,因此整个账号编辑模块(差不多五万行代码)在 99% 的情况下完全用不到。于是你渴望有一种方法,可以延迟账号编辑器的加载——直到用户真的进入编辑模式时才加载。当然你也可以简单地把它设为一个单独的页面,不过这样的话,用户就不得不忍受一次页面刷新(跳转),而此时他们想做的可能仅仅是更新一下头像。避免页面跳转,让所有功能在一个页面内搞定,这种方式会带来更好的体验。

The module pattern doesn't solve this problem. CommonJS modules (like those used by Node) are not asynchronous. In the future, JavaScript will have a native module system that works in the browser (see “Harmony Modules”), but it's very young technology that may not be widely implemented in all major browsers for the foreseeable future.

上一节介绍过的“模块模式”并不能解决这个问题。CommonJS 模块规范(比如 Node 所采用的模块系统)也不是异步的。在未来,JavaScript 将会有一个工作在浏览器端的原生的模块系统(参见《Harmony 的模块机制》一节),但它还是一项非常年轻的技术,在可预见的未来,都不太可能在所有主流浏览器中普遍实现。

Asynchronous Module Definition (AMD) is an interim solution to the problem. It works by wrapping the module inside a function called define(). The call signature looks like this:

异步模块定义 规范(AMD)是为这个问题而生的一个过渡性的解决方案。它的工作方式是把模块包裹进一个叫做 define() 的函数中。它的调用语法看起来是这样的:

define([moduleId,] dependencies, definitionFunction);

The moduleId parameter is a string that will identify the module, however, this parameter has fallen out of favor because changes in the application or module structure can necessitate a refactor, and there really is no need for an ID in the first place. If you leave it out and begin your define call with the dependency list, you'll create a more adaptable anonymous module:

那个 moduleId 参数是一个字符串,它用于标识这个模块。不过这个参数现在已经失宠了,因为对应用程序或模块结构的修改会不可避免地导致重构,我们真的不需要先给模块定好一个 ID。如果你忽略它,直接用依赖列表(即 dependencies 参数)开始你的 define 调用,那么你将创建一个适应性更强的 匿名模块

define(['ch05/amd1', 'ch05/amd2'],
  function myModule(amd1, amd2) {
    var testResults = {
        test1: amd1.test(),
        test2: amd2.test()
      },

      // Define a public API for your module:
      // 为你的模块定义一个公开的 API:
      api = {
        testResults: function () {
          return testResults;
        }
      };

    return api;
  });

To kick it off, call require(). You specify dependencies similar to define():

要启动这个模块,需要调用 require()。你可以指定依赖关系,类似于 define() 的用法:

require(['ch05-amd'], function (amd) {
  var results = amd.testResults();

  test('AMD with Require.js', function () {
    equal(results.test1, true,
      'First dependency loaded correctly.');

    equal(results.test2, true,
      'Second dependency loaded correctly.');
  });
});

[$]

Use anonymous modules wherever possible in order to avoid refactors.

只要有可能,就应该使用匿名模块,以避免重构。

The problem with this approach is that if you define your module this way, it can only be used with an AMD loader, such as Require.js or Curl.js (two popular AMD loaders). However, it is possible to get the best of both AMD and module pattern modules. Simply create your module as you normally would, at the end of the wrapping function, add this:

这种方式所带来的问题是,如果你像这样来定义你的模块,模块就只能通过一个 AMD 加载器(比如目前流行的 Require.js 和 Curl.js)来调用。不过,让你的模块同时享受 AMD 和模块模式这两种方式的益处也是可能的。像往常一样(用模块模式)创建你的模块,然后再在包裹函数的结尾加上这个:

if (typeof define === 'function') {
  define([], function () {
    return api;
  });
}

That way, it will be possible to load your module asynchronously if you want to, but your module will still function properly if it's loaded with a simple script tag, or compiled together with a bunch of other modules. This is the pattern that jQuery uses to add AMD loader support. The only trouble with this pattern is that dependency timing is a little more complicated. You'll need to ensure that your dependencies have loaded before you try to use them.

这样就可以实现这种效果:当你想用 AMD 的时候,你可以异步加载这个模块;而当你用普通的 script 标签来加载模块或把一堆模块编译到一起时,你的模块也可以正常工作。这种方式带来的唯一麻烦就是,处理依赖关系有一点困难。在使用模块之前,你需要确保依赖条件都已经加载好了。

Plugins

插件

Loader plugins are an AMD mechanism that allow you to load non-JavaScript resources, such as templates, css, etc... Require.js supplies a text! plugin that you can use to load your HTML templates. To use a plugin, simply prefix the file path with the plugin name:

加载器插件是 AMD 的一项机制,它允许你加载非 JavaScript 资源,比如模板、CSS 等等。Require.js 提供了一个 text! 插件,通过它可以加载 HTML 模板。如果你想使用一个插件,只需要简单地在文件路径前面加上插件名就可以了:

'use strict';
require(['ch05/mymodule.js', 'text!ch05/mymodule.html'],
    function (myModule, view) {
  var container = document.body,
    css = 'ch05/mymodule.css';

  myModule.render(container, view, css);

  test('AMD Plugins', function () {
    equal($('#mymodule').text(), 'Hello, world!',
      'Plugin loading works.');
  });
});

Here's what mymodule.js looks like:

那么 mymodule.js 看起来是这样的:

define(function () {
  'use strict';
  var api = {
    render: function render(container, view, css) {
      loadCss('ch05/mymodule.css');

      $(view).text('Hello, world!')
        .appendTo(container);
    }
  };

  return api;
});

And the mymodule.html template:

还有 mymodule.html 模板是这样:

<div id="mymodule"></div>

The stylesheet is simple:

那个样式表也很简单:

#mymodule {
  font-size: 2em;
  color: green;
}

Note that the css is not loaded as a plugin. Instead, the url is assigned to a variable and passed into the .render() method for manual loading. The loadCSS() function looks like this:

请留意 CSS 文件并没有以插件的方式加载进来。而是将其 URL 赋值给一个变量,并传进 .render() 方法以便手工加载。那个 loadCSS() 函数差不多是这样的:

function loadCss(url) {
  $('<link>', {
    type: 'text/css',
    rel: 'stylesheet',
    href: url,
  }).appendTo('head');
}

This obviously isn't an ideal solution, but as of this writing, there is no standard recommended css! plugin for Require.js. There is a css! plugin for Curl.js, and you might want to try Xstyle. Use them the same way you define the HTML template.

这显然不是一个完美的解决方案,但直到下笔的此刻,Require.js 还没有发布官方的 css! 插件。Curl.js 倒是有一个 css! 插件,此外你还可以试试 Xstyle。你可以像加载 HTML 模板那样去使用它们。(译注:Xstyle 是一个 CSS 工具集,可以用做 AMD 加载器的 CSS 插件。)

AMD has a couple of serious drawbacks. First, it requires you to include a boilerplate wrapper function for every module, and second, it forces you to either compile your whole application in a compile step, or asynchronously load every single module on the client side, which, in spite of advertising to the contrary, could actually slow down the load and execution of your scripts due to simultaneous download limits and connection latency.

AMD 其实也存在一些严重的缺陷。首先,它需要你为每个模块包上一层公式化的包裹函数;其次,它强迫你要么在一个编译步骤中把你的整个应用程序编译,要么你就不得不在客户端异步地加载每个模块——这与它所宣扬的卖点背道而驰,由于并行下载的限制以及网络延迟的关系,这实际上会拖慢脚本的加载和执行。

I recommend the precompile solution over the asynchronous load solution, and as long as you're doing that anyway, you may as well be using the simplified CommonJS syntax and a tool like Browserify. More on that soon.

相对于异步加载的方案,我更倾向于预编译的方案。但如果你正在尝试前者,那不妨使用 CommonJS 的简化语法,并且使用一个像 Browserify 这样的工具。我们稍后会继续这个话题。


© Creative Commons BY-NC-ND 4.0   |   我要订阅   |   我要打赏

浅析 Bootstrap 的 CSS 类名设计

浅析 Bootstrap 的 CSS 类名设计

最近在重新设计一个 UI 框架,因此也在考察同类项目的特征和要素。在读到《Bootstrap 编码规范》时,顺着链接发现了其作者 @mdo 的一篇文章,其中讲到 CSS 类名的设计思路。


[译] 使用前缀来限定 CSS 类的作用范围

When building a CSS design system like Bootstrap, it's important to keep things simple, durable, and flexible. This is no easy task, especially on larger teams and projects where the number of components can become quite high. To help improve this situation in a CSS design system, you might consider using prefixed classes instead of chained classes.

在构建类似 Bootstrap 这样的 CSS 系统时,保持系统的简单性、稳定性、灵活性是相当重要的。这并非易事,尤其对于大型团队和项目来说,组件的数量可能会变得相当庞大。为了改善这种状况,你不妨考虑用前缀式类名取代链式类名。

Taking the chained classes approach, your CSS selectors might look something like this for a given set of components:

在使用 链式类名 方案时,你可能会把一系列特定组件的 CSS 选择符写成这样:

.success { ... }
.btn.success { .. }
.alert.success { ... }

We have here a global base class, .success, that might house all the commonalities between successful buttons and alerts. Then, at the individual component level, we add on or override as necessary. However, this wide open class and chained approach exposes developers to a number of questions and potential paint points:

我们在这里设置了一个全局基础类 .success,它可能涵盖了成功按钮和成功提示框之间的所有共性。然后,在单个组件层面,我们又需要对它进行扩充或覆盖。但是,这种完全开放式的类名和链式风格令开发者面临一些困扰和潜在痛点:

  • What's that base class stand for
  • What elements will be affected at the root level
  • How many elements have .success chained onto them
  • Can it be extended further to more components
  • What if one instance of .success uses green text on a white background while another uses white text on a green background
  • 这个基础类到底代表什么
  • 哪些元素会在根层级受到影响(译注:啥意思?)
  • 哪些元素可以把 .success 类链到自己身上
  • 它是否可以被进一步扩展到更多的组件上
  • 假如一个 .success 的实例要用白底绿字,而另一个要用绿底白字,怎么办?

And those questions barely scratch the surface. This solution isn't necessarily bad, but when scale, brevity, and flexibility are your top requirements, it might not be the best idea. A better solution might be using prefixed classes.

而且这些问题还只是冰山一角。这种方案未必很差,但如果可扩展性、简单性和灵活性是你的最高需求,这可能就不是最好的办法。此时,前缀式类名方案可能更加适合你。

Prefixed classes guide developers towards a simpler and more maintainable direction for building an extensive CSS design system. Here's what we have if we take away the generic base class and scope things per component with prefixes:

前缀式类名 将开发者引入一种更简单、更易维护的方向,从而构建一个可扩展的 CSS 系统。当我们抛弃常规的基础类的方式,并将每个组件的样式用前缀限制起来时,我们的代码会变成这样:

.btn-success { ... }
.alert-success { ... }

This way, the base class is at the component level and not the entire system level. In other words, our base classes have become .btn and .alert, not .success. There's no bleeding of styles or behavior from one component to another here because we treat components in a "successful state" as an idea across the design system. That is to say, we have a shared idea of what "success" looks for buttons and alerts, but the execution is scoped entirely to each independent component. No questions of where common styles are used and no concern of unintended effects, making each component more durable and flexible.

这样一来,基础类被设定在组件级别,而不是整个系统级别。换句话说,我们的基础类变成了 .btn.alert,而不是 .success。所有组件之间都不会出现样式和行为上的相互干扰,因为我们把组件具备“成功状态”视为贯穿整个系统的一种概念。这就是说,每个组件在“成功”状态下的样式,只有在 概念 层面才是相通的;而对于如何 实现 这个样式,是被约束在每个独立的组件内部的。不用操心通用的样式还会在哪里使用,也不用顾虑不可意料的副作用,这种方式使得每个组件更加稳定和灵活。

While a very tactical and detail-oriented practice, building components that inherently isolate themselves for improved modularity and customization in a system like Bootstrap makes for better code and a more enjoyable project down the line.

构建组件是一项非常具有策略性并且注重细节的工作,在一个类似 Bootstrap 的系统中,组件需要天生具备独立性,以提高模块分离度和可定制性。我们通过这种方式来打造更好的代码和一个令人愉悦的项目。


我的体会

作者视角

我自己在 CMUI 第一版中,基本上使用的是文章开头所说的“链式类名”风格。比如说,一个大号按钮的结构可能是这样的:

<button type="button" class="cmBtn cmLarge">Large button</button>

而在 Bootstrap 中,类似的元素是这样的:

<button type="button" class="btn btn-lg">Large button</button>

最开始我并没有觉得这两者有什么不同——前一个类名用于挂载框架预定义的按钮样式,后一个类名用于指定按钮的尺寸。把 Bootstrap 源码中所有的 .btn-lg 替换成 .cmBtn.cmLarge,不就跟我的 CMUI 一样了嘛?我甚至觉得 Bootstrap 的类命名有点啰嗦,.btn.btn-lg 中的 btn- 不是重复了吗?还是 CMUI 干净利落啊!

然而,看完这篇文章,我似乎体会到 Bootstrap 这种设计的好处。我的理解可能并不是原作者的出发点,但也不妨列举出来,仅供参考。

用户视角

这两种类名风格的差异并不在于源码是怎么写的,而是在于开发者(这里指使用 Bootstrap 制作网页的开发者)在看到类名时的反应。我的理解是,不同的命名风格,对开发者的暗示是不同的

开发者们并不总是会按照组件文档的示例来编写组件的结构代码。比如说,某些时候他们手边没有文档(或不想找文档),又或者他们所期望的样式在文档中并没有列出。他们可能会抱着一种试试看的心态,尝试修改或组合手头的几个类名,以期产生某种新的样式效果。

如果类名是宽泛的(比如 CMUI 中的 .cmLarge),就很容易被拿来尝试——比如开发者会给一个 ul.cmList 元素增加 .cmLarge 类并期望得到一个大号的列表,但实际上 CMUI 并没有提供这种组合!这破坏了开发者的预期,导致心理受挫,以致最终放弃这个组件库(夸张了点哈)。

但如果类名是被一个“组件级”前缀限定的(比如 Bootstrap 中的 .btn-lg),那么它被开发者拿去组合到其它组件身上的可能性就相当低。即使某个异想天开的开发者试图把 .btn-lg 改成 .dropdown-lg 并应用到一个下拉菜单上,当他失败时,他应该也已经做好心理准备了罢。

结语

这样看来,Bootstrap 的做法确有它的好处,我的 CMUI 2.0 不妨也试试看。

你如何评论这两种类名风格呢?不妨留下你的观点吧!


© Creative Commons BY-NC-ND 4.0   |   我要订阅   |   我要打赏

[译] ScrollFix.js:一个 iOS5 溢出滚动的(有限)修复方案

[译] ScrollFix.js:一个 iOS5 溢出滚动的(有限)修复方案

Update: Unfortunately this does not 100% solve the problem, the script falls down when handling touch interactions when a scrolling section is bouncing/rubber banding. I don’t think this issue can be worked around (but would love to be proved wrong!). As such, I don’t advise the use of overflow: scroll for web apps until Apple provide a fix, I’d recommend continuing to use iScroll or Scrollability in the meantime!

更新:遗憾的是,这个脚本不能百分之百地解决问题,如果滚动区块正处在橡皮筋效果的回弹过程中,此时的触摸交互无法修正(译注:有机会再详述)。我认为这个问题无法变通解决(但我希望你能证明我错了)。因此,我不建议在 web app 中使用 overflow: scroll,除非将来 Apple 提供修复。我目前会推荐继续使用 iScrollScrollability


One of the things I was most looking forward to in iOS5 was the added support for overflow: scroll and the associated -webkit-overflow-scrolling: touch.

iOS5 最令人期待的一点,就是增加对 overflow: scroll 以及与之相关的 -webkit-overflow-scrolling: touch 的支持。

After a bit of use, there is at least one issue with the implementation that makes it difficult to use for full screen web apps. Fortunately there is a work around.

在稍加试用之后,我发现这个特性的实现方式至少存在一个问题——很难用于全屏的 web app。幸运的是,我找到了一个变通方法。

The newly supported overflow:scroll is a great addition to Mobile Safari’s arsenal and works well except under the following conditions:

这个新特性令 Mobile Safari 如虎添翼,十分好用,但以下情况除外:

  • The scroll area is at the top and the user tries to scroll up
  • The scroll area is at the bottom and the user tries to scroll down.
  • 滚动区域已经滚到顶部时,用户试图继续向上滚动。
  • 滚动区域已经滚到底部时,用户试图继续向下滚动。

In a native app, you’d expect the content to rubber band but in Safari the whole page is scrolled instead.

在原生应用中,你会期望只有内容区呈现橡皮筋效果,但在浏览器中的效果是整个页面都被拖动了。

Enter ScrollFix.js, a small script that works around this problem.

试试 ScrollFix.js 吧,一小段脚本就可以变通解决这个问题。

ScrollFix works around this by manually offsetting the scrollTop value to one away from the limit at either extreme, which causes the browser to use rubber banding rather than passing the event up the DOM tree.

ScrollFix 的原理是这样的,在触摸开始时,如果发现滚动区域已经处于极限状态时,就手工设置 scrollTop 的值,将滚动内容向边缘方向偏移 1px(这实际上改变了滚动区域的极限状态),从而诱使浏览器对滚动区块使用橡皮筋效果,而不会把触摸事件向上传播到 DOM 树(引起整页滚动)。

To better demonstrate the problem (and solution) here are a couple of videos:

为了更好地演示这个问题(和解决方案),这里放出两个视频(YouTube 需翻小墙):

(译注:同时附上后者的 在线演示,请使用 iOS 设备访问。)

ScrollFix is a work in progress (there are still bugs!) and can be downloaded for free from GitHub. Please contribute code fixes or open tickets for discussion.

ScrollFix 仍然在开发中,还有一些 bug,但你可以在 GitHub 免费下载(译注:在原文发表后不久,这个项目就基本成熟了)。你可以贡献代码,也可以提交 issue 展开讨论。


译者后记

在 iOS5 发布之前,构建 web app 的一个老大难问题就是局部滚动。实现类似原生应用的“页头固定 + 内容滚动”这一经典布局,正是 web app 的一大痛点,这也催生了 iScroll 这类项目。

幸运的是,iOS5 对 overflow: scroll 的支持为 web app 的 UI 进化提供了新的契机。本文作者的探索进一步将梦想变为现实。

ScrollFix.js 用非常巧妙思路的解决了溢出滚动区域的触摸交互问题,更有价值的是,它使用的是浏览器的原生滚动特性,而不是像 iScroll 这样的模拟滚动实现。原生滚动带来的好处是更少的性能消耗、更灵敏的触控体验,同时可以与表单元素的交互行为合睦相处。

本文作者是个完美主义者,他在文章开头中提到的“小问题”实际上并没有那么严重(在 iOS 5.1 中已经很难重现,而且 iOS6 已经修复)。因此,我的建议是,如果你的项目只需要支持较高版本的 iOS 5+ 和 Android 4+,就果断放弃 iScroll,拥抱轻巧顺滑的原生滚动吧!


© Creative Commons BY-NC-ND 4.0   |   我要订阅   |   我要打赏

沟(你妹的)通

沟(你妹的)通

前言

本文完成于数月之前。部分内容可能有争议,所以低调发布。

本文涉及场景纯属虚构。本文仅描述一种可能性。

警告:本文可能包含令人不适的内容(粗口、暴力倾向等),18 周岁以下读者请在父母陪同下阅读。

对话

AA:“Hi,BB,你给的这个数据是错的。”

BB:“……你这个人怎么这样说话呢,婉转一点不行嘛。看来你情商不高。”

AA:“我情商是不高。这个数据错了,麻烦改一下。”

BB:“向别人提意见要注意方式啊,这样别人才更容易接受啊。要注意沟通技巧嘛……”

AA:“这个数据错了,我这里程序跑不下去了。”

BB:“你知道吗,沟通是工作中的一项软技能,很重要的。”

AA:“对对,我会改进。您给的数据麻烦改一下。”

BB:“你这人怎么老是抓着小问题不放呢,有毛病是吧?”

AA:“对,我老婆也说我有人格缺陷。麻烦抽空改一下数据,今天要上线的。”

BB:“你技术确实不错,但平时也要注意跟别人沟通的方式啊,光技术好是不行的。”

AA:“……”

警惕

诚然,“沟通”在工作当中是相当重要的,良好的沟通助你事半功倍。

但是朋友,我忍不住要提醒你,如果无论你怎样努力改进,却似乎总是没有起色的时候,你最好警惕一种可能性:

你身边的二逼和娘炮太多了。

自尊

我无意神化史蒂夫·乔布斯,但他老人家说的话实在是太到位了:

和聪明人在一起工作,最大的好处就是不用考虑他们的自尊。

看到这里,你可能才意识到你一直小心翼翼地磨炼自己的沟通技巧,到底是为了哪般。好吧,如果你不幸是个聪明人,而恰好又成了团队中那个“沟通有问题”的人的时候,不妨试试换个团队?

后记

  • 一家之言,仅供参考,后果自负。

  • 聪明人,你已做好准备把自己的自尊置之度外了吗?(包括别人说你“沟通有问题”的时候?)


© Creative Commons BY-NC-ND 4.0   |   我要订阅   |   我要打赏

[译] [PJA] [100] 第一章 JavaScript 革命

[译] [PJA] [100] 第一章 JavaScript 革命

Chapter 1. The JavaScript Revolution

第一章 JavaScript 革命

In case you haven’t heard, JavaScript is arguably the most important programming language on Earth. Once thought of as a toy, JavaScript is now the most widely deployed programming language in history. Almost everyone with a computer or a smart phone has all the tools they need to execute JavaScript programs, and create their own. All you need is a browser and a text editor.

你可能还不知道,JavaScript 可以说是地球上最重要的程序语言。虽然曾经被看作“玩具语言”,但 JavaScript 目前已经成为史上应用最广的程序语言。拥有一台电脑或智能手机,就相当于拥有了执行(甚至创建)JavaScript 程序的必备工具。你所需要的一切,就是一款网页浏览器,加上文本编辑器。

JavaScript, HTML and CSS have become so prevalent that many operating systems have adopted the open web standards as the presentation layer for native apps. Even Microsoft announced that the Windows 8 UI will be driven by open web standards.

JavaScript、HTML 和 CSS 已经变得如此流行,以至于许多操作系统已经采用了这些开放的 Web 标准作为原生应用的表现层。甚至微软公司也声称 Windows 8 的 UI 层将由这些开放的 Web 标准技术来驱动。

Creating a JavaScript program is as simple as editing a text file and opening it in the browser. No complex development environments to download and install. No complex IDE to learn. JavaScript is easy to learn, too. The basic syntax is immediately familiar to any programmer who has been exposed to the C family syntax. No other language can boast a barrier to entry as low as JavaScript.

创建一个 JavaScript 程序十分简单,编辑一个文本文件并在浏览器中打开它就行了。并不需要下载安装复杂的开发环境;不需要学习复杂的 IDE 工具;JavaScript 语言本身也十分易学。对于任何一个接触过类 C 语法的程序员来说,JavaScript 的基本语法可以立即上手。没有其它语言可以像 JavaScript 这样拥有如此之低的学习门槛。

That low barrier to entry is probably the main reason that JavaScript was once widely (perhaps rightly) shunned as a toy. It was mainly used to create UI effects in the browser. That situation has changed.

“低门槛”可能就是当年 JavaScript 被普遍地贬低为一门玩具语言的主要原因(或许人们并没说错)。那时它主要用于在浏览器中创建 UI 特效。但是,时局已变。

For a long time, there was no way to save data with JavaScript. If you wanted data to persist, you had to submit a form to a web server and wait for a page refresh. That hindered the process of creating responsive and dynamic web applications. However, in 2000, Microsoft started shipping Ajax technology in Internet Explorer. Soon after, other browsers added support for the XMLHttpRequest object.

在相当长的时间内,JavaScript 无法保存数据。如果你想把数据持久保存,就只能通过表单把数据提交到一台 Web 服务器,并等待页面刷新。这阻碍了创建快速响应的、动态的 Web 应用的步伐。然而在 2000 年,微软开始在 IE 浏览器中搭载 Ajax 技术。此后不久,其它浏览器也纷纷增加了对 XMLHttpRequest 对象的支持。

In 2004, Google launched Gmail. Initially applauded because it promised users nearly infinite storage for their email, Gmail also brought a major revolution. Gone were the page refreshes. Under the hood, Gmail was taking advantage of the new Ajax technology, creating a single page, fast, responsive web application that would forever change the way that web applications are designed.

2004 年,Google 发布 Gmail。这项服务首先通过近乎无限的存储空间赢得了用户的喝彩,同时它也引发了一场重大变革。“页面刷新”一去不复返了。在程序内部,Gmail 得益于全新的 Ajax 技术,打造了一款单页的、快速响应的 Web 应用程序,它永久改变了 Web 应用程序的设计方式。

Since that time, web developers have produced nearly every type of application, including full blown cloud-based office suites (see Zoho.com), social APIs like Facebook’s JavaScript SDK, even graphically intensive video games.

从那时开始,Web 开发者们实现了各种类型的应用程序,这其中包括完全成熟的基于云端的办公套件(参见 Zoho.com)、以 Facebook 的 JavaScript SDK 为代表的社会化 API、甚至是图形密集的电子游戏等等。

JavaScript didn’t just luck into its position as the dominant client side language on the web. It is actually very well suited to be the language that took over the world. It is one of the most advanced and expressive programming languages developed to date. Here are some of the features you may or may not be familiar with:

JavaScript 并没有固步于 Web 客户端的垄断地位,它实际上也十分适合成为那种掌管一切的语言。它是人类迄今为止创造出的最先进、最具表现力的程序语言之一。以下是一些你可能熟悉(或不熟悉)的关于它的特征。


© Creative Commons BY-NC-ND 4.0   |   我要订阅   |   我要打赏

苹果 WWDC 2013 絮语

苹果 WWDC 2013 絮语

到了这把年纪,除了苹果的发布会,几乎也没有其它理由能让我熬夜了。今晚在 iNews.io 图文直播腾讯视频原声直播苹果官方视频直播 三个地方来回切换,断断续续看完了 WWDC 2013 整场发布会。我把在 iNews.io 写的直播留言转录过来,并以此为引子展开观点。

OS X 的一些更新确实很实用。

总感觉 Finder 这货跟 Windows 的资源管理器很像,作为系统原生的文件管理器,够用,但又似乎缺了点什么。这次新增的两大功能是标签页浏览(tab)和文件标签(tags),对文档管理的效率会有一定帮助。这些小功能在操作上也相当直观,各种拖拽 + 实时更新,现场演示相当行云流水。这也是苹果一贯的长处。

另一个系统级的优化是多对显示器的支持。以前玩过 MacBook Air 外接电视机,感觉 Mac 对外部显示器的支持不过尔尔,跟 Windows 是一个思路。这次的优化十分到位,外部显示器(甚至是通过 AirPlay 驱动的电视机)与内置显示器的地位终于平等了,均可作为工作主体。看过演示,你不禁会说,外接显示器的工作状态不就应该是这个样子嘛?

介绍 OS X 的这位老兄很赶啊,各种小失误。

这位老兄是 Craig Federighi,现任苹果软件工程的资深副总裁。在以往的发布会上,都是由他来主持 OS X 环节。可能是因为发布会比较紧凑,这位老兄语速很快,口误不断,而且貌似在第一轮演示环节漏掉了 Mail 的介绍,不过总体无伤大雅。

这次的系统升级不仅是应用层面的小修小补,底层技术也有很大的改进和突破。新增的内存压缩技术将提升系统整体的响应速度;应用打盹儿(App Nap)特性可有效减少后台应用的能量消耗,类似 iOS 后台应用的挂起机制;定时器合并技术可以获得更长的 CPU 空闲时间,从而减少电量消耗和热量产生。

因此,虽然近几代 OS X 在用户可见的功能上变化不大,但深层的技术革新已经足以成为用户升级的主要动力。

后面介绍的新版 Safari 也有一些亮点,不仅推出了很多便民设施,而且在节能方面也作出了显著优化。对,又是节能,这实际上为下面的一个惊喜埋下了伏笔。

Phil 来介绍 MBA 的更新了!

MacBook Air 产品线迎来常规更新,硬件配置增强,但外观没有变化。一方面说明目前的这套模具已经非常经典了,另一方面是不是也说明笔记本的厚度确实已经到了某个极限?

哇,新的 MBA 太强大了……

对我来说最震撼的一个更新就是 MBA 的续航时间,达到了惊人的 9~12 小时,Phil 称之为“全天续航”。这实在太逆天了,相比上一代几乎增加了一倍!虽然近几年的电池技术并没有实质性的飞跃,但得益于 Intel 最新的超节能移动 CPU,加上苹果自身在软件层面的深入优化(上面提到的种种新技术),创造了这个令人难以置信的便携笔记本的续航神话。

相信下半年更新 MBP 产品线时,续航时间同样会是一个亮点。

Mac Pro 的 CPU 是新一代的 Intel 至强。GPU 是 AMD 的。

许久未获更新的 Mac Pro 产品线终于焕然新生。苹果就是这样博采众长,总是可以汇聚最前沿的技术成果为我所用。苹果在使用新技术方面一向毫不手软,最顶级的 CPU + GPU、5G Wi-Fi、雷电 2 接口,将 Mac Pro 的性能推向极致。

不过总体来说,我对 Mac Pro 兴趣不大,毕竟不是消费级产品。

哇,iWork for iCloud,叹为观止的 web app!

iCloud 是目前苹果产品生态的枢纽,近两年我们对 iCloud + OS X + iOS 的整合已经相当熟悉了,但似乎一直忽略了 iCloud 在 web 端的表现。今晚我受到的第二个冲击,便是 iWork for iCloud。

iWork 套件在 web 端的完美表现令人恍若置身于原生应用。作为一个前端工程师,面对这样一个华丽而强大的在线应用,怎能不惊愕、怎能不膜拜?!

“这里有 IE 和 Chrome,我打开 Chrome。”——哈哈。不过貌似也是支持 IE 10 的?

小小地黑了一把 IE。但后面证实 iWork 确实也可以跑在 IE 上,如此工程,实在逆天……

这一期的 Keynote 都是扁平设计风格了。

发布会到这里,基本上就要迎来今晚的压轴戏了。Jony Ive 执导后的 iOS “扁平化”传言究竟如何,今晚的 Keynote 已经可窥一斑。虽然字体没有变化,但有的图表都已经是简洁风格了。

iOS7 这设计风格看起来就是 Android + WP 啊。

经过一段设计理念的宣讲视频之后,新版 iOS 终于揭开神秘面纱。这……估计很多人都不敢相信自己的眼睛吧……

其实从 6 开始,我认为 iOS 的视觉设计就已经有了“失控”的倾向。虽然这其中的差别极其细微,但仍导致直观的粗糙和恶俗感,行色匆匆之中遗失了 iOS 4/5 的精致。而这次的 7 则干脆是一次彻底的颠覆、一次果断的决裂。既然如此,有了 6 的心理准备,面对 7 的到来,我反而坦然了。

我的 iPhone4 就停留在 iOS 5.0.1 吧。然后再买一台 5S 用 7。

现在手里的这台 iPhone 4 一直没有刷 iOS6,貌似也没什么损失,本来就跑不了 Siri,也没有全景拍照,也用不着 Passbook。新系统带来的好处并不多,加上怀旧情结,就一直停留在已越狱的 iOS 5.0.1。装了几个顺手的插件,除了性能稍显吃紧,基本没有缺憾。而且手里总要有台旧版的设备做网页的兼容性测试啊!

下半年的 iPhone 5S 是必入的,到那时再细细体验 iOS7 吧。

黑了一下 NFC(Bump 交换文件)。

iOS7 的很多功能其实还是挺令人欣喜的,控制中心是水到渠成,AirDrop 是众望所归。

硬件机能的提升为软件创造了无限可能。

这大概是我今晚第三次受到触动的地方。

iOS7 引入了大量的炫酷特效,在我看来几乎已经到了纯粹为炫而炫的地步。比如锁屏界面的动画、主屏壁纸的动态景深、天气动画等等。这些东西难道不是 TMD 电量杀手吗?但同样不可否认,大众消费者对“Eye Candy(视觉甜品)”总是难以抗拒的,“表面功夫”也一直是苹果的强项。所以,只要能令用户开心、令销售增长,耗点电又何妨?

其实在 iOS6 中,这一趋势就已见端倪。比如音乐 app 的音量滑块,可以根据手机的倾斜角度动态变换光泽的角度,让你感到那仿佛就是真实的金属控件。在微博上看到 @tinyfool 老师称之为“带感的产品设计”,这在设计心理学理论中又称为“情感化设计”。

这些年来,我逐渐领悟到情感化设计所蕴含的能量。这些设计可能会技术宅被视为“费电”的累赘;但对消费者来说,可能正是令人怦然心动的消费动力。

回到这条留言的本意,我再说两句。老罗在锤子发布会上提到,“第一代 iPhone 的主屏幕是不能设置壁纸的,这是英明的决策;但后来苹果逐渐向庸俗大众妥协了,结果令主屏幕一团糟……”

这听起来很文艺,但是我对此事的理解并不是这样。我认为第一代 iPhone 没有开放主屏幕壁纸功能是由于硬件性能的限制——如果使用主屏幕壁纸,在当时的硬件配置与软件优化程度下,主屏幕的流畅度将无法保证(我的 iPod touch 2 即使升级到 iOS 4 也无法启用主屏幕壁纸)。而一旦硬件机能提升之后,这一限制就不存在了。类似的,当 GPU 和电池足够强大之后,视网膜显示屏就降临了;当 CPU 足够强大之后,本地语音识别就浮出水面了;等等等等。

纵观历代 iPhone 与 iOS 的推演,硬件与软件无不相互制约又相互促进。这种关系在 iOS7 身上又再次重演,如果 CPU 与 GPU 足够强大,壁纸景深的实时渲染为什么不能做到?如果电池足够强大,更真实的后台多任务为什么不可实现?

以应用为单位的 VPN 设置,电话/FaceTime/信息的黑名单,中英双向词典这些是非常实用的。另外有一个新特性是汉字词组的笔画输入?

这些都是比较令人期待的功能,对日常使用很有吸引力,所以不管它看起来怎样,它确实会更好用!

好了,今天就扯这么多,下次见!


© Creative Commons BY-NC-ND 4.0   |   我要订阅   |   我要打赏

[译] 分分钟学会一门语言之 Python 篇

[译] 分分钟学会一门语言之 Python 篇

声明:原文版权属于 Louie Dinh,原文以 CC BY-SA 3.0 协议发布。

Python was created by Guido Van Rossum in the early 90's. It is now one of the most popular languages in existence. I fell in love with Python for its syntactic clarity. It's basically executable pseudocode.

Python 是 90 年代初由 Guido Van Rossum 创立的。它是当前最流行的程序语言之一。它那纯净的语法令我一见倾心,它简直就是可以运行的伪码。

Feedback would be highly appreciated! You can reach me at @louiedinh or louiedinh [at] [google's email service]

非常欢迎您提交反馈!您可以通过 @louiedinh 联系到我,也可以发邮件到 louiedinh 开头的 Google Email 账号。

Note: This article applies to Python 2.7 specifically, but should be applicable to Python 2.x. Look for another tour of Python 3 soon!

请注意:本文以 Python 2.7 为基准,但也应该适用于所有 2.X 版本。还要继续学习最新的 Python 3 哦!

# Single line comments start with a hash.
# 单行注释由一个井号开头。
""" Multiline strings can be written
    using three "'s, and are often used
    as comments
    三个双引号(或单引号)之间可以写多行字符串,
    通常用来写注释。
"""

####################################################
## 1. Primitive Datatypes and Operators
## 1. 基本数据类型和操作符
####################################################

# You have numbers
# 数字就是数字
3 #=> 3

# Math is what you would expect
# 四则运算也是你所期望的那样
1 + 1 #=> 2
8 - 1 #=> 7
10 * 2 #=> 20
35 / 5 #=> 7

# Division is a bit tricky. It is integer division and floors the results
# automatically.
# 除法有一点棘手。
# 对于整数除法来说,计算结果会自动取整。
5 / 2 #=> 2

# To fix division we need to learn about floats.
# 为了修正除法的问题,我们需要先学习浮点数。
2.0     # This is a float
2.0     # 这是一个浮点数
11.0 / 4.0 #=> 2.75 ahhh...much better
11.0 / 4.0 #=> 2.75 啊……这样就好多了

# Enforce precedence with parentheses
# 使用小括号来强制计算的优先顺序
(1 + 3) * 2 #=> 8

# Boolean values are primitives
# 布尔值也是基本数据类型
True
False

# negate with not
# 使用 not 来取反
not True #=> False
not False #=> True

# Equality is ==
# 等式判断用 ==
1 == 1 #=> True
2 == 1 #=> False

# Inequality is !=
# 不等式判断是用 !=
1 != 1 #=> False
2 != 1 #=> True

# More comparisons
# 还有更多的比较运算
1 < 10 #=> True
1 > 10 #=> False
2 <= 2 #=> True
2 >= 2 #=> True

# Comparisons can be chained!
# 居然可以把比较运算串连起来!
1 < 2 < 3 #=> True
2 < 3 < 2 #=> False

# Strings are created with " or '
# 使用 " 或 ' 来创建字符串
"This is a string."
'This is also a string.'

# Strings can be added too!
# 字符串也可以相加!
"Hello " + "world!" #=> "Hello world!"

# A string can be treated like a list of characters
# 一个字符串可以视为一个字符的列表
# (译注:后面会讲到“列表”。)
"This is a string"[0] #=> 'T'

# % can be used to format strings, like this:
# % 可以用来格式化字符串,就像这样:
"%s can be %s" % ("strings", "interpolated")

# A newer way to format strings is the format method.
# This method is the preferred way
# 后来又有一种格式化字符串的新方法:format 方法。
# 我们推荐使用这个方法。
"{0} can be {1}".format("strings", "formatted")

# You can use keywords if you don't want to count.
# 如果你不喜欢数数的话,可以使用关键字(变量)。
"{name} wants to eat {food}".format(name="Bob", food="lasagna")

# None is an object
# None 是一个对象
None #=> None

# Don't use the equality `==` symbol to compare objects to None
# Use `is` instead
# 不要使用相等符号 `==` 来把对象和 None 进行比较,
# 而要用 `is`。
"etc" is None #=> False
None is None  #=> True

# The 'is' operator tests for object identity. This isn't
# very useful when dealing with primitive values, but is
# very useful when dealing with objects.
# 这个 `is` 操作符用于比较两个对象的标识。
# (译注:对象一旦建立,其标识就不会改变,可以认为它就是对象的内存地址。)
# 在处理基本数据类型时基本用不上,
# 但它在处理对象时很有用。

# None, 0, and empty strings/lists all evaluate to False.
# All other values are True
# None、0 以及空字符串和空列表都等于 False,
# 除此以外的所有值都等于 True。
0 == False  #=> True
"" == False #=> True


####################################################
## 2. Variables and Collections
## 2. 变量和集合
####################################################

# Printing is pretty easy
# 打印输出很简单
print "I'm Python. Nice to meet you!"


# No need to declare variables before assigning to them.
# 在赋值给变量之前不需要声明
some_var = 5    # Convention is to use lower_case_with_underscores
                # 变量名的约定是使用下划线分隔的小写单词
some_var #=> 5

# Accessing a previously unassigned variable is an exception.
# See Control Flow to learn more about exception handling.
# 访问一个未赋值的变量会产生一个异常。
# 进一步了解异常处理,可参见下一节《控制流》。
some_other_var  # Raises a name error
                # 会抛出一个名称错误

# if can be used as an expression
# if 可以作为表达式来使用
"yahoo!" if 3 > 2 else 2 #=> "yahoo!"

# Lists store sequences
# 列表用于存储序列
li = []
# You can start with a prefilled list
# 我们先尝试一个预先填充好的列表
other_li = [4, 5, 6]

# Add stuff to the end of a list with append
# 使用 append 方法把元素添加到列表的尾部
li.append(1)    #li is now [1]
                #li 现在是 [1]
li.append(2)    #li is now [1, 2]
                #li 现在是 [1, 2]
li.append(4)    #li is now [1, 2, 4]
                #li 现在是 [1, 2, 4]
li.append(3)    #li is now [1, 2, 4, 3]
                #li 现在是 [1, 2, 4, 3]
# Remove from the end with pop
# 使用 pop 来移除最后一个元素
li.pop()        #=> 3 and li is now [1, 2, 4]
                #=> 3,然后 li 现在是 [1, 2, 4]
# Let's put it back
# 我们再把它放回去
li.append(3)    # li is now [1, 2, 4, 3] again.
                # li 现在又是 [1, 2, 4, 3] 了

# Access a list like you would any array
# 像访问其它语言的数组那样访问列表
li[0] #=> 1
# Look at the last element
# 查询最后一个元素
li[-1] #=> 3

# Looking out of bounds is an IndexError
# 越界查询会产生一个索引错误
li[4] # Raises an IndexError
      # 抛出一个索引错误

# You can look at ranges with slice syntax.
# (It's a closed/open range for you mathy types.)
# 你可以使用切片语法来查询列表的一个范围。
# (这个范围相当于数学中的左闭右开区间。)
li[1:3] #=> [2, 4]
# Omit the beginning
# 省略开头
li[2:] #=> [4, 3]
# Omit the end
# 省略结尾
li[:3] #=> [1, 2, 4]

# Remove arbitrary elements from a list with del
# 使用 del 来删除列表中的任意元素
del li[2] # li is now [1, 2, 3]
          # li 现在是 [1, 2, 3]

# You can add lists
# 可以把列表相加
li + other_li #=> [1, 2, 3, 4, 5, 6] - Note: li and other_li is left alone
              #=> [1, 2, 3, 4, 5, 6] - 请留意 li 和 other_li 并不会被修改

# Concatenate lists with extend
# 使用 extend 来合并列表
li.extend(other_li) # Now li is [1, 2, 3, 4, 5, 6]
                    # 现在 li 是 [1, 2, 3, 4, 5, 6]

# Check for existence in a list with in
# 用 in 来检查是否存在于某个列表中
1 in li #=> True

# Examine the length with len
# 用 len 来检测列表的长度
len(li) #=> 6


# Tuples are like lists but are immutable.
# 元组很像列表,但它是“不可变”的。
tup = (1, 2, 3)
tup[0] #=> 1
tup[0] = 3  # Raises a TypeError
            # 抛出一个类型错误

# You can do all those list thingies on tuples too
# 操作列表的方式通常也能用在元组身上
len(tup) #=> 3
tup + (4, 5, 6) #=> (1, 2, 3, 4, 5, 6)
tup[:2] #=> (1, 2)
2 in tup #=> True

# You can unpack tuples (or lists) into variables
# 你可以把元组(或列表)中的元素解包赋值给多个变量
a, b, c = (1, 2, 3)     # a is now 1, b is now 2 and c is now 3
                        # 现在 a 是 1,b 是 2,c 是 3
# Tuples are created by default if you leave out the parentheses
# 如果你省去了小括号,那么元组会被自动创建
d, e, f = 4, 5, 6
# Now look how easy it is to swap two values
# 再来看看交换两个值是多么简单。
e, d = d, e     # d is now 5 and e is now 4
                # 现在 d 是 5 而 e 是 4


# Dictionaries store mappings
# 字典用于存储映射关系
empty_dict = {}
# Here is a prefilled dictionary
# 这是一个预先填充的字典
filled_dict = {"one": 1, "two": 2, "three": 3}

# Look up values with []
# 使用 [] 来查询键值
filled_dict["one"] #=> 1

# Get all keys as a list
# 将字典的所有键名获取为一个列表
filled_dict.keys() #=> ["three", "two", "one"]
# Note - Dictionary key ordering is not guaranteed.
# Your results might not match this exactly.
# 请注意:无法保证字典键名的顺序如何排列。
# 你得到的结果可能跟上面的示例不一致。

# Get all values as a list
# 将字典的所有键值获取为一个列表
filled_dict.values() #=> [3, 2, 1]
# Note - Same as above regarding key ordering.
# 请注意:顺序的问题和上面一样。

# Check for existence of keys in a dictionary with in
# 使用 in 来检查一个字典是否包含某个键名
"one" in filled_dict #=> True
1 in filled_dict #=> False

# Looking up a non-existing key is a KeyError
# 查询一个不存在的键名会产生一个键名错误
filled_dict["four"] # KeyError
                    # 键名错误

# Use get method to avoid the KeyError
# 所以要使用 get 方法来避免键名错误
filled_dict.get("one") #=> 1
filled_dict.get("four") #=> None
# The get method supports a default argument when the value is missing
# get 方法支持传入一个默认值参数,将在取不到值时返回。
filled_dict.get("one", 4) #=> 1
filled_dict.get("four", 4) #=> 4

# Setdefault method is a safe way to add new key-value pair into dictionary
# Setdefault 方法可以安全地把新的名值对添加到字典里
filled_dict.setdefault("five", 5) #filled_dict["five"] is set to 5
                                  #filled_dict["five"] 被设置为 5
filled_dict.setdefault("five", 6) #filled_dict["five"] is still 5
                                  #filled_dict["five"] 仍然为 5


# Sets store ... well sets
# set 用于保存集合
empty_set = set()
# Initialize a set with a bunch of values
# 使用一堆值来初始化一个集合
some_set = set([1,2,2,3,4]) # some_set is now set([1, 2, 3, 4])
                            # some_set 现在是 set([1, 2, 3, 4])

# Since Python 2.7, {} can be used to declare a set
# 从 Python 2.7 开始,{} 可以用来声明一个集合
filled_set = {1, 2, 2, 3, 4} # => {1, 2, 3, 4}
                             # (译注:集合是种无序不重复的元素集,因此重复的 2 被滤除了。)
                             # (译注:{} 不会创建一个空集合,只会创建一个空字典。)

# Add more items to a set
# 把更多的元素添加进一个集合
filled_set.add(5) # filled_set is now {1, 2, 3, 4, 5}
                  # filled_set 现在是 {1, 2, 3, 4, 5}

# Do set intersection with &
# 使用 & 来获取交集
other_set = {3, 4, 5, 6}
filled_set & other_set #=> {3, 4, 5}

# Do set union with |
# 使用 | 来获取并集
filled_set | other_set #=> {1, 2, 3, 4, 5, 6}

# Do set difference with -
# 使用 - 来获取补集
{1,2,3,4} - {2,3,5} #=> {1, 4}

# Check for existence in a set with in
# 使用 in 来检查是否存在于某个集合中
2 in filled_set #=> True
10 in filled_set #=> False


####################################################
## 3. Control Flow
## 3. 控制流
####################################################

# Let's just make a variable
# 我们先创建一个变量
some_var = 5

# Here is an if statement. Indentation is significant in python!
# prints "some_var is smaller than 10"
# 这里有一个条件语句。缩进在 Python 中可是很重要的哦!
# 程序会打印出 "some_var is smaller than 10"
# (译注:意为“some_var 比 10 小”。)
if some_var > 10:
    print "some_var is totally bigger than 10."
    # (译注:意为“some_var 完全比 10 大”。)
elif some_var < 10:    # This elif clause is optional.
                       # 这里的 elif 子句是可选的
    print "some_var is smaller than 10."
    # (译注:意为“some_var 比 10 小”。)
else:           # This is optional too.
                # 这一句也是可选的
    print "some_var is indeed 10."
    # (译注:意为“some_var 就是 10”。)


"""
For loops iterate over lists
for 循环可以遍历列表
prints:
如果要打印出:
    dog is a mammal
    cat is a mammal
    mouse is a mammal
"""
for animal in ["dog", "cat", "mouse"]:
    # You can use % to interpolate formatted strings
    # 别忘了你可以使用 % 来格式化字符串
    print "%s is a mammal" % animal
    # (译注:意为“%s 是哺乳动物”。)
    
"""
`range(number)` returns a list of numbers 
from zero to the given number
`range(数字)` 会返回一个数字列表,
这个列表将包含从零到给定的数字。
prints:
如果要打印出:
    0
    1
    2
    3
"""
for i in range(4):
    print i

"""
While loops go until a condition is no longer met.
while 循环会一直继续,直到条件不再满足。
prints:
如果要打印出:
    0
    1
    2
    3
"""
x = 0
while x < 4:
    print x
    x += 1  # Shorthand for x = x + 1
            # 这是 x = x + 1 的简写方式

# Handle exceptions with a try/except block
# 使用 try/except 代码块来处理异常

# Works on Python 2.6 and up:
# 适用于 Python 2.6 及以上版本:
try:
    # Use raise to raise an error
    # 使用 raise 来抛出一个错误
    raise IndexError("This is an index error")
    # 抛出一个索引错误:“这是一个索引错误”。
except IndexError as e:
    pass    # Pass is just a no-op. Usually you would do recovery here.
            # pass 只是一个空操作。通常你应该在这里做一些恢复工作。


####################################################
## 4. Functions
## 4. 函数
####################################################

# Use def to create new functions
# 使用 def 来创建新函数
def add(x, y):
    print "x is %s and y is %s" % (x, y)
    # (译注:意为“x 是 %s 而且 y 是 %s”。)
    return x + y    # Return values with a return statement
                    # 使用 return 语句来返回值

# Calling functions with parameters
# 调用函数并传入参数
add(5, 6) #=> prints out "x is 5 and y is 6" and returns 11
          # (译注:意为“x 是 5 而且 y 是 6”,并返回 11)

# Another way to call functions is with keyword arguments
# 调用函数的另一种方式是传入关键字参数
add(y=6, x=5)   # Keyword arguments can arrive in any order.
                # 关键字参数可以以任意顺序传入

# You can define functions that take a variable number of
# positional arguments
# 你可以定义一个函数,并让它接受可变数量的定位参数。
def varargs(*args):
    return args

varargs(1, 2, 3) #=> (1,2,3)


# You can define functions that take a variable number of
# keyword arguments, as well
# 你也可以定义一个函数,并让它接受可变数量的关键字参数。
def keyword_args(**kwargs):
    return kwargs

# Let's call it to see what happens
# 我们试着调用它,看看会发生什么:
keyword_args(big="foot", loch="ness") #=> {"big": "foot", "loch": "ness"}

# You can do both at once, if you like
# 你还可以同时使用这两类参数,只要你愿意:
def all_the_args(*args, **kwargs):
    print args
    print kwargs
"""
all_the_args(1, 2, a=3, b=4) prints:
    (1, 2)
    {"a": 3, "b": 4}
"""

# When calling functions, you can do the opposite of varargs/kwargs!
# Use * to expand tuples and use ** to expand kwargs.
# 在调用函数时,定位参数和关键字参数还可以反过来用。
# 使用 * 来展开元组,使用 ** 来展开关键字参数。
args = (1, 2, 3, 4)
kwargs = {"a": 3, "b": 4}
all_the_args(*args) # equivalent to foo(1, 2, 3, 4)
                    # 相当于 all_the_args(1, 2, 3, 4)
all_the_args(**kwargs) # equivalent to foo(a=3, b=4)
                       # 相当于 all_the_args(a=3, b=4)
all_the_args(*args, **kwargs) # equivalent to foo(1, 2, 3, 4, a=3, b=4)
                              # 相当于 all_the_args(1, 2, 3, 4, a=3, b=4)

# Python has first class functions
# 函数在 Python 中是一等公民
def create_adder(x):
    def adder(y):
        return x + y
    return adder

add_10 = create_adder(10)
add_10(3) #=> 13

# There are also anonymous functions
# 还有匿名函数
(lambda x: x > 2)(3) #=> True

# There are built-in higher order functions
# 还有一些内建的高阶函数
map(add_10, [1,2,3]) #=> [11, 12, 13]
filter(lambda x: x > 5, [3, 4, 5, 6, 7]) #=> [6, 7]

# We can use list comprehensions for nice maps and filters
# 我们可以使用列表推导式来模拟 map 和 filter
[add_10(i) for i in [1, 2, 3]]  #=> [11, 12, 13]
[x for x in [3, 4, 5, 6, 7] if x > 5] #=> [6, 7]

####################################################
## 5. Classes
## 5. 类
####################################################

# We subclass from object to get a class.
# 我们可以从对象中继承,来得到一个类。
class Human(object):

    # A class attribute. It is shared by all instances of this class
    # 下面是一个类属性。它将被这个类的所有实例共享。
    species = "H. sapiens"

    # Basic initializer
    # 基本的初始化函数(构造函数)
    def __init__(self, name):
        # Assign the argument to the instance's name attribute
        # 把参数赋值为实例的 name 属性
        self.name = name

    # An instance method. All methods take self as the first argument
    # 下面是一个实例方法。所有方法都以 self 作为第一个参数。
    def say(self, msg):
       return "%s: %s" % (self.name, msg)

    # A class method is shared among all instances
    # They are called with the calling class as the first argument
    # 类方法会被所有实例共享。
    # 类方法在调用时,会将类本身作为第一个函数传入。
    @classmethod
    def get_species(cls):
        return cls.species

    # A static method is called without a class or instance reference
    # 静态方法在调用时,不会传入类或实例的引用。
    @staticmethod
    def grunt():
        return "*grunt*"


# Instantiate a class
# 实例化一个类
i = Human(name="Ian")
print i.say("hi")     # prints out "Ian: hi"
                      # 打印出 "Ian: hi"

j = Human("Joel")
print j.say("hello")  # prints out "Joel: hello"
                      # 打印出 "Joel: hello"

# Call our class method
# 调用我们的类方法
i.get_species() #=> "H. sapiens"

# Change the shared attribute
# 修改共享属性
Human.species = "H. neanderthalensis"
i.get_species() #=> "H. neanderthalensis"
j.get_species() #=> "H. neanderthalensis"

# Call the static method
# 调用静态方法
Human.grunt() #=> "*grunt*"


####################################################
## 6. Modules
## 6. 模块
####################################################

# You can import modules
# 你可以导入模块
import math
print math.sqrt(16) #=> 4

# You can get specific functions from a module
# 也可以从一个模块中获取指定的函数
from math import ceil, floor
print ceil(3.7)  #=> 4.0
print floor(3.7) #=> 3.0

# You can import all functions from a module.
# Warning: this is not recommended
# 你可以从一个模块中导入所有函数
# 警告:不建议使用这种方式
from math import *

# You can shorten module names
# 你可以缩短模块的名称
import math as m
math.sqrt(16) == m.sqrt(16) #=> True

# Python modules are just ordinary python files. You
# can write your own, and import them. The name of the 
# module is the same as the name of the file.
# Python 模块就是普通的 Python 文件。
# 你可以编写你自己的模块,然后导入它们。
# 模块的名称与文件名相同。

# You can find out which functions and attributes
# defines a module.
# 你可以查出一个模块里有哪些函数和属性
import math
dir(math)

Ready For More?

还没过瘾吗?

Free Online

免费在线阅读

Dead Tree

实体书


译者后记

哗众取宠?

此文一发,估计又会被喷:“分分钟学会?哗众取宠!Python 哪有那么简单!!!”

原文取自一个很有意思的网站 Learn X in Y minutes(分分钟学会一门语言),我确实被这个口号吸引住了;然后凭着对 Python 的好奇,拿来翻译。为了更准确地翻译出原文的用意,我自己还特意学习了这篇 中文版的 Python 基础教程。(当然,如果你发现了错误,请立即留言纠正,多谢!)

所以你看,一篇“哗众取宠”的文章本身不是坏事,只要它能勾起好奇、激发兴趣,为读者打开一扇门、展现一个新的世界,就已经功德圆满。

或许真的有人从这篇文章开始走进了 Python 的世界,然后改变了自己的人生、改变了整个世界?谁知道呢,反正我自己会一直翻译、一直传播、一直哗众取宠下去就是了。

版本

原文基于 Python 2.7,但现在 Python 的最高版本已经到了 3.4 Alpha 了。

版本重要吗?Python 3 普及吗?这个我真不太清楚,大家可以参与评论。

翻译

刚开始打算翻译的时候,原文所在网站还没有发布中文版;但当我快完成的时候,中文版出来了!不过我还是放出自己翻译的版本吧,已经花的时间不能白费,而且我对自己的翻译质量还是相当有信心的。

博客里的好几篇翻译文章都撞车了,下次就避开主流,找些偏门点的吧。其实草稿箱里还有好多原创文章没有结尾呢…… 😭


原文版本:2013-08-08 (如果原文已更新,请提醒我。)


© Creative Commons BY-NC-ND 4.0   |   我要订阅   |   我要打赏

[译] [PJA] [101] 性能

[译] [PJA] [101] 性能

Performance

性能

Just in Time compiling -- In modern browsers, most JavaScript is compiled, highly optimized and executed like native code, so run-time performance is close to software written in C or C++. Of course, there is still the overhead of garbage collection and dynamic binding, so it is possible to do certain things faster -- however, the difference is generally not worth sweating over until you’ve optimized everything else. With Node.js (a high-performance, evented, server-side JavaScript environment built on Google's highly optimized V8 JavaScript engine), JavaScript apps are event-driven and non-blocking, which generally more than makes up the code execution difference between JavaScript and less dynamic languages.

JIT 编译——在现代浏览器中,大多数 JavaScript 代码会被编译和高度优化、并以接近原生代码的方式执行,所以运行时性能非常接近以 C 或 C++ 编写的软件。当然,仍然会存在由垃圾回收和动态绑定所产生的额外消耗,所以在某些场景下仍有提速的空间——不过这种差异并不值得纠结,除非你已经把其它所有事情都优化到位了。随着 Node.js(一个基于 Google 高度优化的 V8 引擎的、高性能的、事件化的、服务器端的 JavaScript 环境)的到来,JavaScript 应用开始采用事件驱动、无阻塞的方式。相对于试图弥补 JavaScript 和静态语言之间的代码执行差异,这个思路总体上要强得多。


© Creative Commons BY-NC-ND 4.0   |   我要订阅   |   我要打赏

[译] [PJA] [502] 接口

[译] [PJA] [502] 接口

Interfaces

接口

"Program to an interface, not an implementation."

-- The Gang of Four, "Design Patterns"

面向接口编程,而非面向实现编程。

——“四人帮”,《设计模式》

Interfaces are one of the primary tools of modular software design. Interfaces define a contract that an implementing module will fulfill. For instance, a common problem in JavaScript applications is that the application stops functioning if the Internet connection is lost. In order to solve that problem, you could use local storage and sync changes periodically with the server. Unfortunately, some browsers don't support local storage, so you may have to fall back to cookies or even flash (depending on how much data you need to store).

接口 是模块化软件设计的一个基本工具。接口约定了一个还在开发中的模块将要实现哪些功能。我们用一个实例来讲解吧。JavaScript 应用程序有一个常见问题,一旦互联网连接断开之后,应用程序就停止工作了。为了解决这个问题,你可能会使用本地存储(localStorage)特性,并且定期向服务器同步数据变化。不幸的是,部分浏览器并不支持本地存储,所以你可能不得不降级到 Cookie 或 Flash 的存储功能(这取决于你需要存储的数据量大小)。

That will be difficult if your business logic depends directly on your the localStorage features. For example, in Figure 5-1:

如果你的业务逻辑直接依赖于本地存储特性,事情就比较难办了。如 图 5-1 所示:

Direct Dependency

Figure 5-1. Direct Dependency

图 5-1. 直接依赖

A better alternative is to create a standard interface to provide data access for the post module. That way, the module can retrieve data using the same interface, regardless of where the data is being stored. See Figure 5-2:

一个更好的替代方案是创建一个标准的接口,来为数据发送(post)模块提供数据存取渠道。这样,模块可以使用相同的接口获取数据,而不用操心数据实际上保存在哪里。参见 图 5-2

Interface

Figure 5-2. Interface

图 5-2. 接口

Other languages have native support for interfaces which may enforce the requirements of an interface. You might know them as abstract base classes, or pure virtual functions. In JavaScript, there is no distinction between a class, interface, or object instance. There are only object instances, and that simplification is a good thing. You may be wondering, if there's no native support for interfaces in JavaScript, why bother to write one at all?

其它语言对接口特性提供了原生支持,比如可以指定接口需求。你可能知道这种支持称作“抽象基类”或“纯虚函数”。在 JavaScript 中,类、接口和对象实例之间并没有什么区别。它们都只是对象实例,而且这种简化也有它的好处。你可能会问,既然 JavaScript 没有对接口特性提供原生支持,我们又何必要自己写一个出来呢?

When you need multiple implementations of the same interface, it's good to have a canonical reference in the code that explicitly spells out exactly what that interface is. It's important to write code that is self-documenting. When it's time to add another concrete instance, simply call a predefined factory function and pass in the methods you need to override.

当你需要为同一接口编写多个实现时,最好采用一种成熟的模式来组织代码,从而指明这个接口的真实出处。编写可以自我描述的代码是很重要的。当你需要创建一个新的具体实例时,只需要简单地调用一个预定义的工厂函数,并传入你想覆盖的方法就可以了。

For example, using O.js to define the factory:

比如说,我们使用 O.js 来定义工厂函数:

(译注:O.js 是作者本人写的一个用于创建对象的类库,本书第四章介绍了它的基本原理。作者在这里用它来简化示例代码的结构,以便更好地表达核心思路。)

(function (exports, o) {
  'use strict';

  var ns = 'post',

    // Make sure local storage is supported.
    // 确认是否支持本地存储。
    supportsLocalStorage =
      (typeof localStorage !== 'undefined')
        && localStorage !== null,

    stream,

    // Define the stream interface.
    // 定义数据流(stream)接口。
    streamInterface = o.factory({
      sharedProperties: {
        save: function saveStream() {
          // Save the post stream.
          // 保存待发送的数据流。
          // (译注:这个空函数只是占位而已,这个方法会在下面被覆盖掉。)
        }
      }
    }),

    localStorageProvider = streamInterface({
      save: function saveStreamLocal() {
        localStorage.stream = JSON.stringify(stream);
      }
    }),

    cookieProvider = streamInterface({
      save: function saveStreamCookie() {
        $.cookie('stream', JSON.stringify(stream));
      }
    }),

    // Define the post interface.
    // 定义数据发送(post)接口。
    post = o.factory({
      sharedProperties: {
        save: function save() {
          stream[this.id] = this.data;
          stream.save();
          return this;
        },
        set: function set(name, value) {
          this.data[name] = value;
          return this;
        }
      },
      defaultProperties: {
        data: {
          message: '',
          published: false
        }
      },
      initFunction: function initFunction() {
        this.id = generateUUID();
        return this;
      }
    }),

    api = post;

  // If localStorage is supported, use it.
  // 如果支持本地存储,就用。
  stream = (supportsLocalStorage)
    ? localStorageProvider
    : cookieProvider; // Fall back on cookies.
                      // 否则就降级到 Cookie。

  exports[ns] = api;

}((typeof exports === 'undefined')
    ? window
    : exports,
  odotjs
));

$(function () {
  'use strict';

  var myPost = post().set('message', 'Hello, world!');

  test('Interface example', function () {
    var storedMessage,
      stream;

    myPost.save();
    stream = JSON.parse(localStorage.stream);
    storedMessage = stream[myPost.id].message;

    equal(storedMessage, 'Hello, world!',
      '.save() method should save post.');
  });
});

The important part here is the stream interface. First you create the factory (using O.js in this case, but it can be any function that returns an object that demonstrates the interface). This example has only one method: .save()

其中的重要部分是数据流(stream)接口。首先你创建了工厂函数(我们在这里使用了 O.js 来做这件事,当然也可以用其它方法来生成这个工厂函数,只要它返回的对象可以用来演示接口)。这段示例只包含一个方法:.save()

    // Define the stream interface.
    // 定义数据流(stream)接口。
    streamInterface = o.factory({
      sharedProperties: {
        save: function saveStream() {
          // Save the post stream.
          // 保存待发送的数据流。
        }
      }
    }),

Create a concrete implementation by calling the factory function, and passing in the concrete methods. If the interface is especially large, you might want to put each implementation in a separate file. In this case, it's a single one-line method. Notice that the concrete implementations are using named function expressions. During debugging, you'll be able to see which concrete implementation you're using by looking at the function name in the call stack:

通过调用工厂函数来创建一个具体实现,然后把具体方法传进去。如果接口的代码量特别大,你可能倾向于把每个实现分别放进独立的文件中。在这种情况下,每个文件就只包含一个单行方法。请注意这些具体实现都使用了具名函数表达式。这样在调试期间,你可以通过观察调用堆栈中的函数名来判断你正在使用哪种具体实现:

(译注:这是一个不错的调试技巧。“具名函数表达式”是指使用了 saveStreamLocalsaveStreamCookie 这样的函数名的函数表达式。)

    localStorageProvider = streamInterface({
      save: function saveStreamLocal() {
        localStorage.stream = JSON.stringify(stream);
      }
    }),

    cookieProvider = streamInterface({
      save: function saveStreamCookie() {
        $.cookie('stream', JSON.stringify(stream));
      }
    }),

The final step is to decide which implementation to use:

最后一步决定了要使用哪种实现:

  // If localStorage is supported, use it.
  // 如果支持本地存储,就用。
  stream = (supportsLocalStorage)
    ? localStorageProvider
    : cookieProvider; // Fall back on cookies.
                      // 否则就降级到 Cookie。

There are alternative ways to define interfaces in JavaScript. For example, if your concrete implementations are large or resource intensive you may not want to instantiate them until you know they're needed. One way is to move the calls to the factory into the ternary expression. Another is to turn the concrete definitions into factories themselves, and only call the factory corresponding to the implementation you need.

在 JavaScript 中,还有一些备用方法可以定义接口。比如说,如果你的具体接口代码量很大,或者需要消耗大量资源,在你真正用到它们之前,你可能都不想把它们实例化。一种方法就是把对工厂函数的调用移到三元表达式中;另一种方法是将具体定义转变为工厂函数本身,然后只调用与你需要的实现相关的工厂函数。

You could also define the concrete implementations as prototype objects, and then pass the appropriate prototype into O.js or Object.create() during the final step. I prefer the factory approach, because it gives you a lot of flexibility.

你也可以将具体实现定义为原型对象,然后在最后一步将合适的原型传递给 O.jsObject.create() 方法。我更倾向于使用工厂函数的方法,因为这种方法赋予你更多的灵活性。

Erich Gamma, one of the Gang of Four authors who created "Design Patterns", shared some interesting thoughts about interfaces in an interview with Bill Venners: "Leading-Edge Java Design Principles from Design Patterns: A Conversation with Erich Gamma, Part III".

Erich Gamma,“四人帮”中创造了“设计模式”概念的那位,在接受 Bill Venners 采访时,分享了一些关于接口的有趣想法:“源自《设计模式》的前沿 Java 设计原则:与 Erich Gamma 对话(第三部分)”


© Creative Commons BY-NC-ND 4.0   |   我要订阅   |   我要打赏

如何在 iOS 设备上配置 hosts

如何在 iOS 设备上配置 hosts

前提

iOS 设备指的是 iPhone/iPod touch/iPad 等运行 iOS 操作系统的移动设备。

为了测试网页在这些移动设备上的表现,我们往往需要使用真实的设备去访问内网的开发/测试环境。在某些时候,服务器端严格绑定域名(不允许使用 IP 地址访问),而且这个域名往往是虚拟的域名(比如 yoursite.dev 之类),我们就需要在移动设备上配置 hosts。

最重要的一点,你的 iOS 设备最好已经越狱了。越狱的目的不是为了安装盗版软件,而是为了获取系统的最高权限,这样才有可能修改 hosts 这样的系统级文件。(同理,在 Android 设备上修改 hosts 文件需要获取 root 权限。)

如果无法越狱(比如你手贱把 iOS 系统升级到了最高版本),则可参考本文末尾的后备方案。

操作步骤

首先,我们需要安装最新版的 iTunes。因为它包含了 iOS 设备的驱动程序,装了它,Windows 才能正常识别设备。

然后,我们需要安装“同步助手”。暂不去纠结这个软件是不是盗版工具,它是目前最好用的 iOS 设备的资源管理器,我们这里只需要用到它的文件管理的功能。

tongbu

进入文件管理界面,进入 /etc 目录,可以找到 hosts 文件。

file

把它拖到桌面,就可以为所欲为了。修改完成之后,再拖回去替换原文件即可。

在修改过程中,唯一值得一提的恐怕就是换行符的格式了吧。本质上 iOS 是一个功能完备的 UNIX 系统,它的文本文件的换行符当然使用 UNIX 格式,与我们通常使用的 DOS/Windows 格式不一样。安全起见,建议你在保存文件的时候,留意换行符的格式。(参见下图)

unix

后备方案

这里介绍两种后备方案,也适用于无法修改 hosts 的其它移动设备。

真实域名法

即注册一个真实的域名,解析到内网的开发/测试机。这实际上是一个变通的办法,它有一些显而易见的缺点:

  • 需要花钱买域名。
  • 可能需要更新服务器端的域名白名单——前端工程师往往没有这个权限。
  • 域名解析通过外网 DNS 实现,比起 hosts 本地解析要慢一些。

代理法

在本地开发机上建一个代理服务器,让 iOS 设备通过代理服务器访问。这样域名解析这一步是在开发机完成的,只要把开发机的 hosts 配置好就可以了。

架设代理服务器并不复杂,有现成的方案,就是前端神器 Fiddler(只需要选中“允许其它机器连接”选项就可以了),顺道还可以调试移动设备的 HTTP 连接。iOS 设备端的配置也比较简单,这里就不赘述了。


© Creative Commons BY-NC-ND 4.0   |   我要订阅   |   我要打赏

Recommend Projects

  • React photo React

    A declarative, efficient, and flexible JavaScript library for building user interfaces.

  • Vue.js photo Vue.js

    🖖 Vue.js is a progressive, incrementally-adoptable JavaScript framework for building UI on the web.

  • Typescript photo Typescript

    TypeScript is a superset of JavaScript that compiles to clean JavaScript output.

  • TensorFlow photo TensorFlow

    An Open Source Machine Learning Framework for Everyone

  • Django photo Django

    The Web framework for perfectionists with deadlines.

  • D3 photo D3

    Bring data to life with SVG, Canvas and HTML. 📊📈🎉

Recommend Topics

  • javascript

    JavaScript (JS) is a lightweight interpreted programming language with first-class functions.

  • web

    Some thing interesting about web. New door for the world.

  • server

    A server is a program made to process requests and deliver data to clients.

  • Machine learning

    Machine learning is a way of modeling and interpreting data that allows a piece of software to respond intelligently.

  • Game

    Some thing interesting about game, make everyone happy.

Recommend Org

  • Facebook photo Facebook

    We are working to build community through open source technology. NB: members must have two-factor auth.

  • Microsoft photo Microsoft

    Open source projects and samples from Microsoft.

  • Google photo Google

    Google ❤️ Open Source for everyone.

  • D3 photo D3

    Data-Driven Documents codes.