A Raspberry Pi based scan-to-dropbox utility with a Blynk UI. Uses an HP scanner for scanning documents.
Install the "Blynk" app on your phone. If you can't find the app in the store, then try using the direct link from the following page: http://docs.blynk.cc/
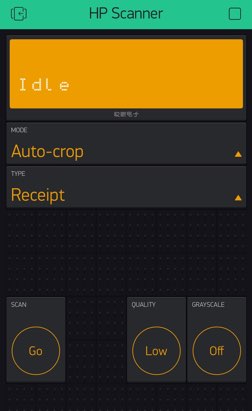
Then within the app scan the following QR code to import the 'HP Scanner' project:

This utility uses an HP scanner such as the one built into HP MFP printers. It uses the 'hp-scan' utility which comes with HPLIP to perform the scan from the Raspberry Pi. Some scanners require use of the binary plugin from HP and only HPLIP v3.15.4 or newer supports the binary plugin for ARM. As of this writing, the default Raspberry Pi package for HPLIP is older than this version, so you can get the latest version by enabling backports. See instructions here for how to enable the backports:
https://backports.debian.org/Instructions/
Then install the 'hplip' package from the backports. Assuming you're using the 'jessie' sources:
$ sudo apt-get -t jessie-backports install hplip
Run the following utilities to setup the scanner:
- hp-probe
- hp-setup (use with -i switch if you don't have a GUI)
- hp-plugin (use with -i switch if you don't have a GUI)
- hp-doctor
Finally, make sure your 'hp-scan' utility works from the command line. Try to scan a document:
$ hp-scan -mcolor -o/tmp/scan.png
If it doesn't work, try running hp-doctor to see what's wrong.
Install the following packages on your Raspberry Pi:
$ sudo apt-get install python-pillow
$ sudo apt-get install python-numpy
Also install the 'dropbox' Python package. This doesn't have a .deb port so you can install it as follows:
$ sudo apt-get install python-pip
$ sudo pip install dropbox
Install NodeJS and the Blynk library on the Raspberry Pi by following step 1 here: http://www.instructables.com/id/Blynk-JavaScript-in-20-minutes-Raspberry-Pi-Edison
Then clone this GitHub project into your home directory:
$ cd ~/
$ git clone https://github.com/fakhir/rpi-docscanner.git
First open the Blynk app on your phone and open the imported 'HP Scanner' project. Then within the project settings, obtain the authentication key (you can email it to yourself). Then on your Raspberry Pi, edit the ~/rpi-docscanner/blynk-docscanner.js file and locate the AUTH variable near the top. Set this AUTH variable's value to the authentication key which you had obtained earlier from within the Blynk app on your phone.
Next, obtain a Dropbox app key and secret. You will need to go to the following page and log in using your Dropbox account: https://www.dropbox.com/developers/apps
Then on that page select 'Create App', choose the 'Dropbox API' followed by the 'App folder' option. Also provide a name for your app, which is also the name of the folder into which your scanned images will go. Copy the app key and secret from the Dropbox page and paste it into the ~/rpi-docscanner/dropboxupload.py file, within the APP_KEY and APP_SECRET values near the top of the file. Then save the file. Then make sure the Dropbox uploader utility is working by running these commands:
$ cd ~/rpi-docscanner
$ echo hello > /tmp/test.txt
$ ./dropboxupload.py /tmp/test.txt
The utility should run successfully and you should see a test.txt file uploaded to your Dropbox.
First manually run the docscanner and check everything works fine:
$ cd ~/rpi-docscanner
$ ./blynk-docscanner.js
Then run the 'HP Scanner' project within the Blynk app on your phone and you should now be able to scan, auto-crop and upload the scanned images to your Dropbox.
You can then add the following line to the /etc/rc.local file on your Raspberry Pi so that it runs everytime the Raspberry Pi reboots:
sudo -g xbian -u xbian NODE_PATH=/usr/local/lib/node_modules /home/xbian/rpi-docscanner/blynk-docscanner.js &


