- Install and configure the
learn-labgem. - Understand the steps needed to complete an assignment and submit it in Canvas.
During this course, you will work on various assignments as you learn to code. All assignments will be interactive pieces of curriculum that require some work. Some assignments may ask you to follow a set of instructions, while others will ask you to figure out your own solution to pass specific tests. This lesson is your first assignment!
All assignments are hosted on GitHub. In order to work on them, however, you will need to complete work on your local machine. The general process is:
- Go to the assignment's GitHub page.
- Create a personal copy (a fork) of the assignment.
- Download your personal copy (referred to as cloning) to your environment.
- Complete the required work (including passing any tests).
- Upload the work you've done to your personal copy of the assignment on GitHub.
- Submit the assignment in Canvas.
For this assignment, we'll get you set up to complete and submit your assignments. We'll also do a quick walkthrough of the steps so you will know what to do in future assignments.
Through this course, you will be downloading many assignments, so it is important to take a moment now to think about how you'll organize this work on your computer. You are welcome to do what you like, but we recommend setting up a directory where you can keep all of your work for this course.
- Go to your terminal and navigate to your home directory by typing
cd ~. - Create a
Developmentfolder by typingmkdir Development(if you're a mac user, this folder already exists). - Navigate into this folder with
cd Development. - In here, create a
codefolder withmkdir code. - Navigate into this folder with
cd code.
You'll be going through multiple phases in this course, so it may also be
helpful to go one step further and create folders for phases 0 through 5 within
code.
Having a specific place for your work will make it easier to find if you ever need to look back at an earlier project. It'll also keep the rest of your computer's folders clear of random code.
Note: The process we'll go through in this lesson will create sub-folders automatically. Whenever you are starting a new assignment, navigate back to your main
codefolder (cd ~/Development/code) to ensure these sub-folders don't get created within each other.
One of the tools you'll be using to submit your assignments is the learn-lab
gem. This gem will do two things for you:
- Run the assignment's tests, and
- Verify that you got all the tests to pass.
Important: The command you will need to use throughout the course to run the
tests is learn-lab test. In the course materials, you may instead see
instructions to run learn test or learn. These commands are used with a
different gem so they will not work. You may also see instructions to run
either npm test (for JavaScript and React labs) or rspec (for Ruby and Rails
labs). While these commands will correctly run the tests, they will not print
out the token you need to verify that you passed all the tests.
Be sure to disregard any other instructions you encounter and use
learn-lab test to run the tests.
Note: The instructions here assume you've successfully installed Ruby and Node in the previous environment setup instructions.
To install the gem, run the following in your terminal:
$ gem install learn-labTo configure the gem, do the following:
- Open your terminal.
- In your terminal run
learn-lab config. - Enter the same email you used for your Canvas login.
All the lessons in this course have a corresponding repository in GitHub. On this page in Canvas, you should see three icons in the upper right corner. The first says Fork. The second is a button that looks like a large-headed cat (GitHub's 'Octocat' icon); this button will open the lesson's GitHub repo without forking. The third is a flag, which you can use to submit an issue for the lesson (e.g., if you find a typo or other error).
One way to fork an assignment is to click the Octocat button to go to the assignment's GitHub repo and fork directly from that page. (We'll go through that process in a later lesson.) However, the easiest way to fork the assignment is by clicking the Fork button at the top of the page. It looks like this:

Clicking the Fork button will do one of two things — it will either start the forking process or bring you to a page where you select where to create your fork. If you're prompted to choose, select your personal GitHub account. The forking process will begin and may take a few moments. When complete, you will be redirected to a new copy of the assignment that exists under your GitHub account.
Forking is a process which creates an exact copy of a collection of code and files. Once you've created a fork on your own GitHub account, you will be able to edit the files in the repository and write your own code solution without interfering with the original copy.
Go ahead and fork this assignment. The README.md file in the repository
contains these instructions, so you can continue here or in GitHub.
With a fork created, the next step is to download your new repository to your local machine.
To download the repository for this lesson, make sure you're in your personal
fork on GitHub, then click the Code button. A pop-up will appear which shows
several options for cloning: HTTPS, SSH, and GitHub CLI. Before
doing anything else, be sure to switch to SSH. With SSH selected, you
should see what looks sort of like an email in the box below, starting with
[email protected]:. You should see your GitHub name after the :.
Aside: Why SSH? If you followed the setup instructions, you have added your personal SSH key to GitHub. GitHub will store your personal copies of all the work you do in this course. Because you've added your SSH key, GitHub will know who you are when you send work from your local machine to GitHub to be stored. Using HTTPS instead would require you to sign in from your terminal using your log-in credentials each time you try to push your code to GitHub; it also may not work at all for some assignments.
From here, click the copy button.

Now, open your terminal and navigate to where you'd like to download the
assignment (e.g. cd ~/Development/code/phase-0). Type git clone and a space,
then paste in the copied SSH link from GitHub. It should look something like
this:
$ git clone [email protected]:<your-user-name>/phase-0-completing-assignments-learn-lab-gem.gitPress enter, and you should see a flurry of terminal activity. Once the terminal gives you control to type again, a new folder with the GitHub name of the assignment will be present. Change directory into this folder to access the assignment files.
$ cd phase-0-completing-assignments-learn-lab-gemNow, if you've set up VS Code, type code . to open up a text editor window
with access to all of the assignment's files. The instructions are now also
available on your local machine in README.md.
Most assignments will have tests that check your work and provide immediate feedback in the terminal; that feedback will help you figure out what you need to do to get the tests passing. We'll walk through some examples in upcoming lessons.
For each assignment, before you can run the tests, you need to install the dependencies the test package requires. To install the dependencies for this lab, run the following:
$ npm installThis assignment has a single test that checks to see if you've correctly cloned the assignment to your local machine. If you've followed the steps above, you've completed everything you need to do to pass the test; all that is left to do is run it:
$ learn-lab testYou should see the following:

Note that, by cloning this assignment down, you've already passed the test! The other thing to notice in the screenshot above is that, once all the tests are passing (in this case it's just the one), you will also see a token printed in the test output. This token indicates that you have successfully passed all the tests for the lab.
The next step is to upload your completed assignment to GitHub. Be sure to leave the terminal window open because you will need to copy and paste the token into Canvas in order to submit your assignment.
When all tests are passing, the next step is to upload your work. To do this, we need to complete three steps:
- staging the work so it's ready to save
- committing the work to actually save it
- pushing the work up to GitHub
Step 1 To stage the work, type the following, then press <Enter>:
$ git add .By typing this command, you're indicating that any work you've done (i.e., all changes you've amde to any of the files in your local copy of an assignment) should be saved in the next step.
Step 2: To actually save the changes, we run the following, then press
<Enter>:
$ git commit -m 'Done with assignment'This is known as creating a commit. A commit preserves all staged changes from the previous command. Any work you've done is now recorded as part of your copy of the assignment. This copy, however, is still only on your local environment.
Step 3: To upload your completed assignment, there is one final command to
run. Type the following, then press <Enter>:
$ git pushThis command sends the changes you've made to GitHub. If you revisit your personal copy of the assignment on GitHub, the commit you just created (with the message 'Done with assignment') will be the most recent commit on the assignment.
Each assignment will be slightly different and will include instructions on what
is required to complete it. Depending on the testing tools in an assignment, the
specific commands may change. For JavaScript and React labs, you will need to
run npm install to set up the necessary tools before running the tests. For
Ruby and Rails labs, the corresponding command is bundle install. Each lab
will include instructions indicating which command to run.
Once you've installed the dependencies, you can run learn-lab test as many
times as you like. Some labs will have many tests and may require running the
tests many times while you solve them.
To register completion of an assignment in Canvas, you must submit a link to your GitHub repository along with the token that is printed in the terminal once you get all the tests passing. Let's do that now:
-
After pushing your code up following the previous steps, go to your repository and copy the URL link in the browser's URL bar.
-
In Canvas, navigate to the assignment you've been working on. In the upper right corner of the assignment, you should see a Submit Assignment button. When you click it, you will be directed to a form at the bottom of the page where you can enter the URL and token.
-
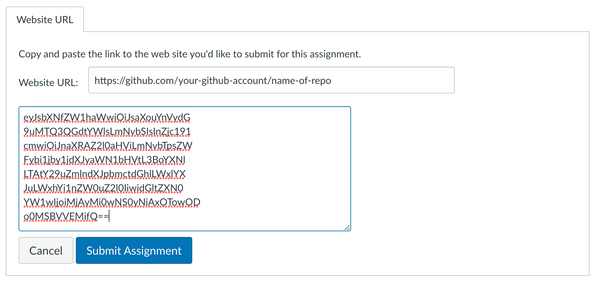
Paste in your repository's GitHub URL in the box labeled "Website URL".
-
Go back to your terminal, select the entire token and copy it (using ctrl-C or cmd-C), then paste it in the "Comments" box in Canvas. It should look something like this:
- Click Submit Assignment.
Canvas will indicate a successful submission and refresh the page. In the Modules view of your course, you should now see a checkmark next to the assignment, indicating a successful submission.
Let's quickly review the entire process for completing and submitting assignments:
-
Create a personal fork of the GitHub assignment by clicking the Fork button in the upper right corner of the assignment on Canvas.
-
Once forked to your personal account, start the cloning for your assignment. Do this by clicking the Code button in GitHub, choosing SSH, then clicking the clipboard icon to copy the assignment's GitHub info.
-
Go to your local environment's terminal and navigate to where you'd like to store your assignment locally. Remember to make sure you aren't inside the directory for another assignment.
-
Type
git clone, then paste in what you copied from GitHub. This will create a copy on your local machine. -
Navigate into the new cloned assignment.
-
Install testing tools with
npm install(orbundle installif tests use Ruby). -
Run tests with
learn-lab test. -
If all tests are passing, stage and commit your solution with the following commands:
$ git add .
$ git commit -m 'Done with assignment'-
Push your work to your personal fork on GitHub with the
git pushcommand. -
Go to your repository in GitHub and copy the URL. It should be copied from the browser's address bar, and should start with
https://github.com/ -
Go to the assignment in Canvas and click the Submit Assignment button. (Note: the button might instead say Start Assignment).
-
Paste your GitHub URL into the "Website URL" box.
-
Go back to the terminal and copy the token, then paste it in the "Comments" box in Canvas.
-
Click "Submit Assignment".
Congratulations! You've completed your first assignment! You now know how to work on and submit assignments. Don't worry if this feels a little overwhelming right now — soon enough you'll internalize these steps and won't even need to think about it. In the meantime, we recommend bookmarking this lesson to keep these steps handy. Equipped with this knowledge, you are now ready to tackle greater challenges!


