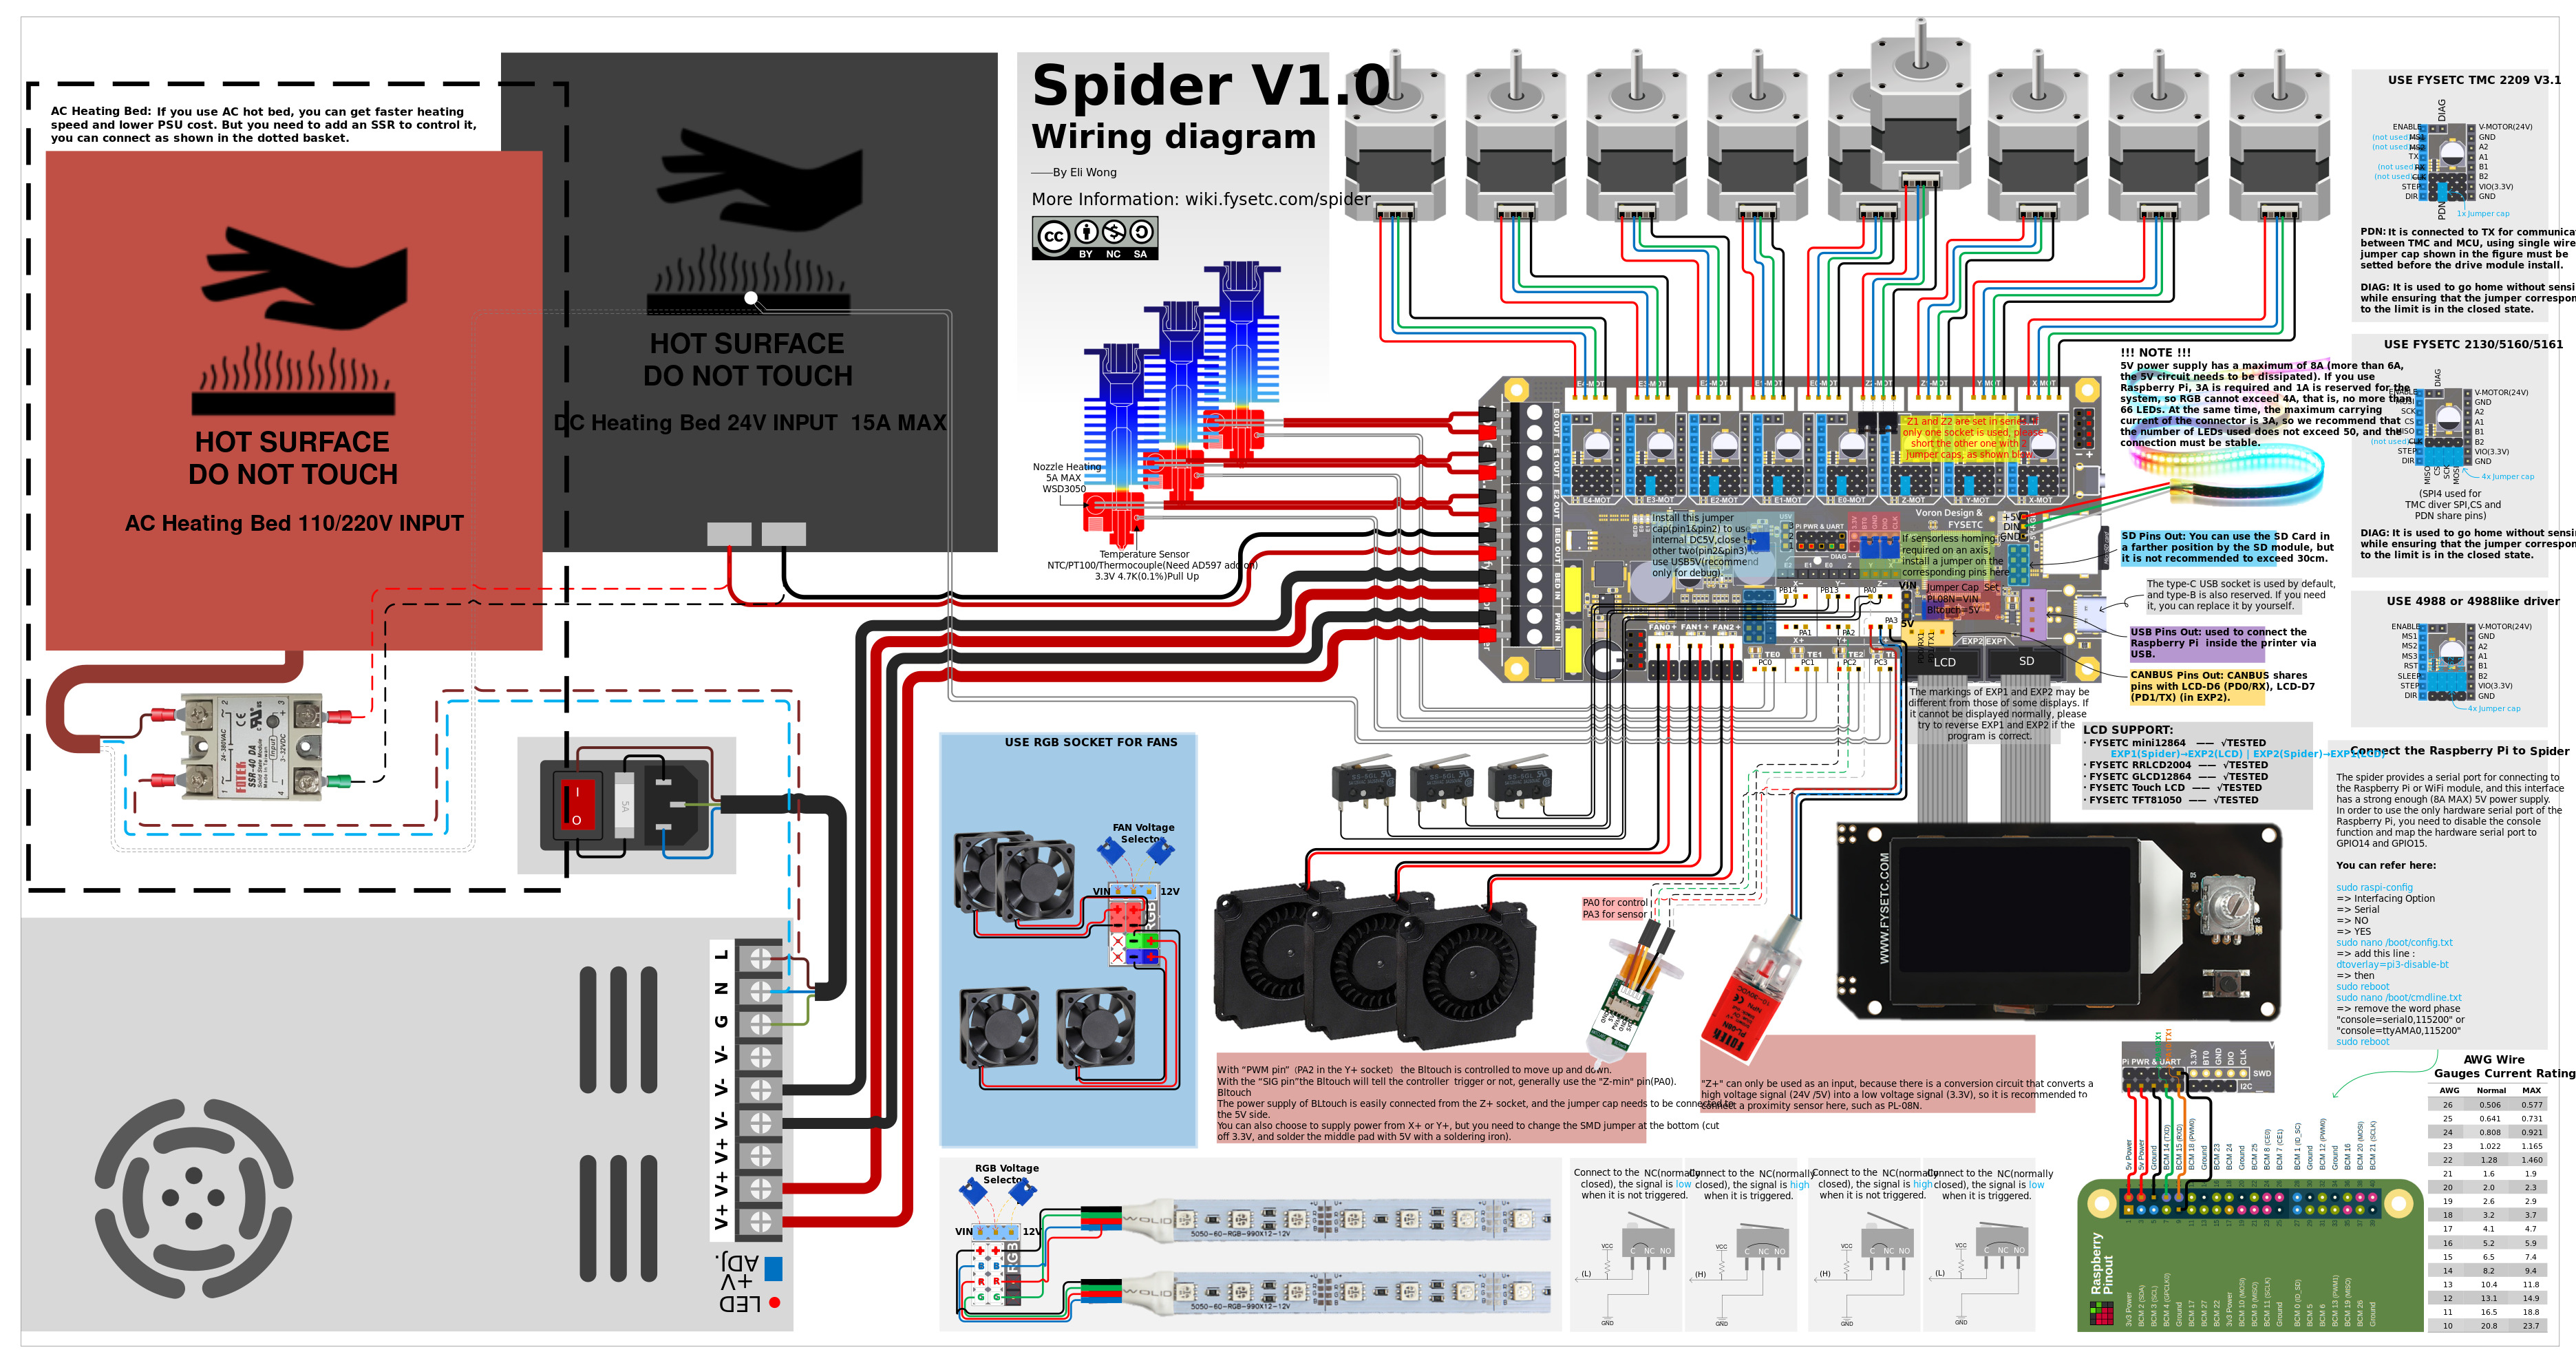
Giter VIP home page Giter VIP logo

fysetc / fysetc-spider Goto Github PK

View Code? Open in Web Editor NEW
306.0 17.0 147.0 545.71 MB

FYSETC Board - 3d printer motherboard for VORON and other open source project.

C 83.43% Makefile 0.02% C++ 4.31% Python 0.05% Shell 0.05% NASL 0.01% GDB 0.01% OpenSCAD 0.01% JavaScript 0.02% G-code 1.06% HTML 0.69% CSS 0.01% Dockerfile 0.01% Perl 0.01% Assembly 0.81% Batchfile 0.01% Roff 9.55% Go 0.01% CMake 0.01% GAP 0.01%

fysetc-spider's Introduction

1. Product Introduction

2. Features

3. Hardware Guide

4. Firmware Guide

5. Issue shot

6. How to buy

7. Tech Support

8. Related Articles

1. Product Introduction

SPIDER is a small but powerful 3D printer control board. In a limited space, it integrates 8 stepper motor drives, 5A 12V power supply, 8A 5V power supply, which provides powerful energy for fans of various voltages, various RGB light strips and Raspberry Pi. You can build a 3D printer with rich functions through SPIDER. Especially for VORON V2.4, we cooperated with the VORON team in the early stage of design, and many features have been recognized by the VORON team. If you are building VORON, this will be your best choice.

1.1 Change log

V1.1

  1. Add 5pin connector for BL-Touch

  2. Switch EXP1 & EXP2 mark(Only mark, not socket)

  3. Add +/- mark

  4. Add room for RaspberryPI USB-A power supply port

  5. You can solder the below USB port, then you can power-up RPI with a USB-A cable. It is USB power-supply port without USB signal.


V2.0

  1. Add 48V stepstick support x3
  2. Add TVS and Bleeding resistance to every stepstick socket
  3. Change 12V/5A to SY8205
  4. Change the Raspberry Pi 5V and system 5V to separate DC-DC circuits (3A per channel)
  5. Add separate 3.3V to stepsticks
  6. Change PCB to 6 layers
  7. Optimize some wiring.
  8. Change the series diode of the driver circuit to a 15A fuse(1808)

V2.1

  1. Change 48V stepstick support to 2
  2. Change 12V/5A to 12V/3A
  3. Change the Raspberry Pi 5V (3A to 5A) and system 5V(5A to 3A )
  4. Add RESET 1x2 Pin header

V2.2

  1. Add two thermistor sockets, a total of 6.
  2. Change FAN0 to PA13,FAN1 to PA14
  3. Add pin definition silkscreen on the bottom.

V2.3

  1. Change 12v-24v RGB port layout to 3 fan ports, which can be used as a fan port more conveniently and still maintain RGB output support
  2. Optimize the fan control circuit, upgrade the buffer chip to independent triode control, enhance stability and greatly improve safety performance
  3. All motor drive module interface communication networks add high voltage buffering and voltage clamping processing, adding a shield to the MCU
  4. Re-layout the PCB, connectors position changed

V3.0

  1. Added 74HCT365 buffers for all stepper motor drive signals. All the motor drive IO signal voltages are changed from 3.3V to 5V, the driving ability is enhanced, and the external driver connettion is simpler.
  2. An onboard CAN transceiver is added to enable the mainboard to communicate directly with CAN devices, no need for expansion boards.
  3. A 3.3V power supply indicator is added, and different power supplies are indicated by LEDs of different colors, so that the working status of each power supply on the motherboard can be seen at a glance.
  4. The main board has been re-layouted, and all the marks are placed on the top layer, which makes it easier for users to view the marks of the pins and easier for firmware configuration.
  5. Connect the BOOT0 and RESET pins of the STM32 to the Pi's IO through the switch (disconnected by default), which provides the basis for directly entering the programming mode through the Pi.

2. Features

  • Compact size: 155.3mm x 76.5mm
  • Based on STM32F446 180Mhz,all IOs can withstand 5V voltage
  • 8 TMC stepper drivers support, with Uart&SPI support
  • V2.2:Add Two 60V-Max stepper driver slot
  • Improved TMC jumper settings again,simpler and easier
  • V1.0&V1.1: 28V input max,12V@5A DC-DC,5V@8A DC-DC (Especially for Raspberry Pi)[email protected] LDO
  • V2.2: 28V input max,12V@3A DC-DC,5V@5A DC-DC for Raspberry,5V@3A DC-DC for mcu and RGB, Two [email protected] LDO for MCU and motors
  • Two car fuses for hot bed input and main power input
  • Limit switch socket 24V/5V/3.3V optional, ready for more other equipment, such as -inductive sensor, BL-Touch
  • XH2.54 connectors
  • 10x PWM capable power mosfet outputs (1 for HotBed, 3 for Heat-End, 3 for fans, 3 for RGB LED strip)
  • V1.0&V1.1: 3pin temperature header, you can use thermistor or thermocouple (requires AD597 module)
  • V2.2: Up to 6 temperature sensors support
  • Up to 8 ways PWM fans (only use 1 extrueder and no 12V/24V RGB used ),2 ways RGB led(12V & 24V optional) ,1 way 5V-RGB led (NEO-PIXEL/WS2812)
  • RepRapDiscount SmartController compatible pin header on board
  • UART1-Raspberry Pi pin header (including 5V@8A power supply)
  • 2X4 PinHeader Out for SD Card moudle
  • Onboard micro-SD card
  • Type-C and Type-B USB connector optional
  • EXP1 & EXP2 have more multiplexing functions, such as USART, I2C, CAN
  • SD card & USB upload support
  • A 4.7kOhm 0.1% temperature sensor pull up resistor is used, PT1000 can be connected directly. For PT100, an amplifier board must be used.
  • V2.2: Add more protection (TVS for each motor divers, current limit resistor, VMOT fuse)

3. Hardware Guide

3.1 Spider wiring

3.1.1 Spider v1.0 wiring

3.1.2 Spider v1.1 wiring

3.1.3 Spider v2.2 wiring

48v and 24v connector

Spider v2.2 wiring for VORON 2.4

Spider v2.2 wiring for VORON Trident

Spider v2.2 Afterburner Toolhead wiring

3.1.4 Spider v2.3 wiring

Spider v2.3 wiring for VORON 2.4

Spider v2.3 wiring for VORON Trident

Spider v2.3 Afterburner Toolhead wiring

3.2 Wiring : FYSETC mini 12864 v2.1

注意/NOTICE:

为了兼容某些主板,如RAMPS1.4,FYSETC mini12864 设置了 RST(R3) 和 KILL(R4) 的可选择电阻。目前,有些主板(S6/Spider)将 KILL 换成 5V,此时,请确认FYSETC mini12864 上 R4处于空贴状态,否则按下屏幕上的按钮会致使 5V 与 GND 短路,长时间操作会导致主板损坏。
In order to be compatible with some motherboards, such as RAMPS1.4, mini12864 is equipped with RST (R3) and KILL (R4) optional resistors. At present, some motherboards (S6/Spider) change the KILL to 5V. At this time, please make sure that R4 is not on the mini12864 (please remove it if it is on the board), otherwise pressing the button on the screen will cause a short circuit between 5V and GND, and long-term operation will cause the motherboard to be damaged.

目前发现有些主板在接上 mini12864,并采用 USB 进行烧录时会导致无法烧录的情况,请去除 R1 10K 电阻。
At the moment , some Spider can't upload the firmware using USB if mini12864 is connected to the board, if you run into this issue, please remove R1 resistor.

Wiring

3.3 Wiring : TMC2209

3.4 Wiring : RaspberryPi

Spider 1.x, Spider 2.2

Spider 2.3

CAN BUS

If you want to enable Spider CANBUS network in Klipper, please check 4.2.1 chapter Communication interface section.

3.5 Pin Out

3.5.1 Spider v1.x

3.5.2 Spider v2.2

3.5.3 Spider v2.3

3.6 Pin Definition

3.6.1 Spider v1.x

FeaturesSpider PinSTM32 PinPin No.Comment
X-MOTOR(1)X-StepPE1142
X-DIRPE1041
X-ENPE940
X-CS/PDNPE738
Y-MOTOR(2)Y-StepPD855
Y-DIRPB1251
Y-ENPD956
Y-CS/PDNPE1546
Z-MOTOR(3)Z-StepPD1461
Z-DIRPD1360
Z-ENPD1562
Z-CS/PDNPD1057
E0-MOTOR(4)E0-StepPD586
E0-DIRPD687
E0-ENPD485
E0-CS/PDNPD788
E1-MOTOR(5)E1-StepPE65
E1-DIRPC137
E1-ENPE54
E1-CS/PDNPC148
E2-MOTOR(6)E2-StepPE21
E2-DIRPE43
E2-ENPE32
E2-CS/PDNPC159
E3-MOTOR(7)E3-StepPD1239
E3-DIRPC433
E3-ENPE859
E3-CS/PDNPA1577
E4-MOTOR(8)E4-StepPE134
E4-DIRPE097
E4-ENPC598
E4-CS/PDNPD1158
TMC Driver SPI (SPI4)MOSIPE1445
MISOPE1344
SCKPE1243
End-stopsX-MINPB1453Share with X-DIAG
X-MAXPA124Share with E0-DIAG
Y-MINPB1352Share with Y-DIAG
Y-MAXPA225Share with E1-DIAG
Z-MINPA023Share with Z-DIAG
Z-MAX(Probe)PA326Share with E2-DIAG
FAN/RGBFAN0PB035
FAN1PB136
FAN2PB2/BOOT137
LED-RPB692Can be used for fan3
LED-GPB591Can be used for fan4
LED-BPB793Can be used for fan5
5V-LED(WS2812)PD384Share with flash indicator(Bootloader)
HeatingE0-HeaterPB1554
E1-HeaterPC865
E2-HeaterPB389
Heated-BedPB490
TemperatureTE0(THERM0)PC015A 4.7kOhm 0.1% temperature sensor pull up resistor is used,PT1000 can be connected directly. For PT100, an amplifier board must be used.
TE1(THERM1)PC116A 4.7kOhm 0.1% temperature sensor pull up resistor is used,PT1000 can be connected directly. For PT100, an amplifier board must be used.
TE2(THERM2)PC217A 4.7kOhm 0.1% temperature sensor pull up resistor is used,PT1000 can be connected directly. For PT100, an amplifier board must be used.
TB(THERM3)PC318A 4.7kOhm 0.1% temperature sensor pull up resistor is used,PT1000 can be connected directly. For PT100, an amplifier board must be used.
EXP2LCD_D7PD1/CAN-TX182Share with CAN-TX1
LCD_D6PD0/CAN-RX181Share with CAN-RX1
LCD_D5PC12/MOSI3/TX5/SDA280
LCD_D4PC10/SCK3/TX3/478
LCD_ENPC11/MISO3/RX3/479
LCD_RSPD2/RX583
ENC_CPA8/SCL367
BEEPPC9/SDA366
EXP1RESETNRST14
ENC_APC6/TX663
ENC_BPC7/RX664
SD-DETPB10/SCL247
SD-MISOPA6/MISO131
SD-MOSIPA7/MOSI132
SCKPA5/SCK130
CSPA4/CS129
EEPROM(4K) I2C Pin-OutSCLPB8/SCL195Connect to 24LC32(4K EEPROM)
SDAPB9/SDA196Connect to 24LC32(4K EEPROM)
Pi_PWR/UARTTXPA9/TX168
RXPA10/RX169
SWD DebugPA13/SWDIO72only used for debugging now and can be used for other purposes.
PA14/SWCLK76only used for debugging now and can be used for other purposes.

3.6.2 Spider v2.x

FeaturesSpider PinSTM32 PinPin No.Comment
X-MOTOR(1)X-StepPE1142
X-DIRPE1041
X-ENPE940
X-CS/PDNPE738
Y-MOTOR(2)Y-StepPD855
Y-DIRPB1251
Y-ENPD956
Y-CS/PDNPE1546
Z-MOTOR(3)Z-StepPD1461
Z-DIRPD1360
Z-ENPD1562
Z-CS/PDNPD1057
E0-MOTOR(4)E0-StepPD586
E0-DIRPD687
E0-ENPD485
E0-CS/PDNPD788
E1-MOTOR(5)E1-StepPE65
E1-DIRPC137
E1-ENPE54
E1-CS/PDNPC148
E2-MOTOR(6)E2-StepPE21
E2-DIRPE43
E2-ENPE32
E2-CS/PDNPC159
E3-MOTOR(7)E3-StepPD1239
E3-DIRPC433
E3-ENPE859
E3-CS/PDNPA1577
E4-MOTOR(8)E4-StepPE134
E4-DIRPE097
E4-ENPC598
E4-CS/PDNPD1158
TMC Driver SPI (SPI4)MOSIPE1445
MISOPE1344
SCKPE1243
End-stopsX-MINPB1453Share with X-DIAG
X-MAXPA124Share with E0-DIAG
Y-MINPB1352Share with Y-DIAG
Y-MAXPA225Share with E1-DIAG
Z-MINPA023Share with Z-DIAG
Z-MAX(Probe)PA326Share with E2-DIAG
FAN/RGBFAN0PA1372
FAN1PA1476
FAN2PB2/BOOT137
LED-RPB692Can be used for fan3
LED-GPB591Can be used for fan4
LED-BPB793Can be used for fan5
5V-LED(WS2812)PD384Share with flash indicator(Bootloader)
HeatingE0-HeaterPB1554
E1-HeaterPC865
E2-HeaterPB389
Heated-BedPB490
TemperatureTE0(THERM0)PC015A 4.7kOhm 0.1% temperature sensor pull up resistor is used,PT1000 can be connected directly. For PT100, an amplifier board must be used.
TE1(THERM1)PC116A 4.7kOhm 0.1% temperature sensor pull up resistor is used,PT1000 can be connected directly. For PT100, an amplifier board must be used.
TE2(THERM2)PC217A 4.7kOhm 0.1% temperature sensor pull up resistor is used,PT1000 can be connected directly. For PT100, an amplifier board must be used.
TE3(THERM3)PC318A 4.7kOhm 0.1% temperature sensor pull up resistor is used,PT1000 can be connected directly. For PT100, an amplifier board must be used.
TE4(THERM4)PB136A 4.7kOhm 0.1% temperature sensor pull up resistor is used,PT1000 can be connected directly. For PT100, an amplifier board must be used.
TB(THERM3)PB035A 4.7kOhm 0.1% temperature sensor pull up resistor is used,PT1000 can be connected directly. For PT100, an amplifier board must be used.
EXP2LCD_D7PD1/CAN-TX182Share with CAN-TX1
LCD_D6PD0/CAN-RX181Share with CAN-RX1
LCD_D5PC12/MOSI3/TX5/SDA280
LCD_D4PC10/SCK3/TX3/478
LCD_ENPC11/MISO3/RX3/479
LCD_RSPD2/RX583
ENC_CPA8/SCL367
BEEPPC9/SDA366
EXP1RESETNRST14
ENC_APC6/TX663
ENC_BPC7/RX664
SD-DETPB10/SCL247
SD-MISOPA6/MISO131
SD-MOSIPA7/MOSI132
SCKPA5/SCK130
CSPA4/CS129
EEPROM(4K) I2C Pin-OutSCLPB8/SCL195Connect to 24LC32(4K EEPROM)
SDAPB9/SDA196Connect to 24LC32(4K EEPROM)
Pi_PWR/UARTTXPA9/TX168
RXPA10/RX169
SWD DebugPA13/SWDIO72only used for debugging now and can be used for other purposes.
PA14/SWCLK76only used for debugging now and can be used for other purposes.

4. Firmware Guide

Spider support Marlin firmware, Klipper firmware and RRF firmware. Choose one you need.

4.1 Marlin

4.1.1 Download Vscode + platformio

To compile the firmware , you need to install Visual Studio Code and the platformio pulg-in.

4.1.2 Download firmware

The Marlin firmware is in the firmware/Marlin folder in this repository , you can also get the firmware from latest Marlin bugfix-2.0.x branch. You need to enable following define in configuration.h file

#define MOTHERBOARD BOARD_FYSETC_SPIDER
#define SERIAL_PORT -1

Then we need to change platformio.ini file

default_envs = FYSETC_S6 (For old bootloader,boot address is 0x10000, see below)

default_envs = FYSETC_S6_8000 (For new bootloader,boot address is 0x8000, see below)

Note: The bootloader boot address have been change to 0x08008000 since 2021/06/23, you can check bootloader details github or gitee, and you can check the Marlin PR here.

4.1.3 Compile the firmware

Open Vscode and open platformio main page and click the "Open Project" button , and direct to the folder where you put your firmware.

1561099422559

If everything goes fine , at the bottom you can see several buttons

1561099546202

The check mark is for compiling , click it to compile. You can find built firmware.bin at .pio\build\FYSETC_S6 or .pio\build\FYSETC_S6_8000 folder.

4.1.4 Upload firmware

Follow Firmware Update guide here.

4.2 Klipper

We put Klipper related files like printer.cfg in firmware/Klipper folder in this repo. Please read the README there.

If you want to use Klipper. You need to follow the Klipper installation guide to install Klipper first. When we try to compile it, we need to call make menuconfig to choose compile options, please select options for Spider as below describe.

4.2.1 menuconfig

Please choose these options for Spider, you need to decide which to choose according to your board and wiring on some options.

  • Enable extra low-level configuration options

  • Micro-controller Architecture

Select STMicroelectronics STM32

  • Processor model

Select STM32F446

  • Clock reference

Select 12 MHz crystal

  • Bootloader offset

  • 2. 32KiB bootloader

Choose 32kiB bootloader offset in Klipper make menuconfig. You may need to flash the spider board bootloader named Bootloader_FYSETC_SPIDER first(If you get your Spider board after 2021/06/23, no worries, the bootloader is on the board when it leave the factory,if not,flash it first). The bootloader is in the folder named bootloader in this repo, please follow the README in bootloader folder(github or gitee) to flash the bootloader. We provide pre-build firmwares with 32KiB bootloader named klipper-32k-USB.bin and klipper-32k-UART.bin for you,find them here github gitee. These pre-build firmware will be outdated if Klipper update and will not match your new downloaded Klipper and cause annoying issues. We will try to catch up with Klipper, but i recommend to build the firmware yourself.

image-20210705151337765

  • Communication interface

    You have there choices here, if you use USB cable to connect RaspeberryPI and Spider, you need to follow 1. USB (on PA11/PA12) below. If you use serial to connect RaspberryPI and Spider, then check 2. Serial (on USART1 PA10/PA9). If you connect RaspberryPI and Spider with CAN bus, then check 3. CAN bus (on PD0/PD1).

  • 1. USB (on PA11/PA12)

If you want to connect Spider to RaspberryPI with USB cable. You need to select USB (on PA11/PA12)

image-20210705154413053

And in printer.cfg you need to set the serial as below. We provide an example cfg file printer.cfg for VORON 2 machine here.

Obtain definition by "ls -l /dev/serial/by-id/" then unplug to verify
##--------------------------------------------------------------------
serial: /dev/serial/by-id/usb-Klipper_stm32f446xx_230032000851363131363530-if00
  • 2. Serial (on USART1 PA10/PA9)

If you want to connect Spider UART1(RX1:PA10, TX1:PA9) port to RPI uart0(TX:GPIO14,RX:GPIO15) port, you need to select Serial (on USART1 PA10/PA9)

image-20210705154625673

In printer.cfg you need to uncomment the following line as our example printer.cfg file here (github gitee)do, if your cfg file don't have this line, please add it.

serial: /dev/ttyAMA0

Besides this make option, you still need to follow the instructions that Connect RPI uart.md file says, you can find the file github or gitee.

3. CAN bus (on PD0/PD1)

You need to follow Klipper CANBUS instruction here CANBUS - Klipper documentation after you compiled and upload the firmware.

4.2.2 Compile firmware

make

4.2.3 Upload firmware

Follow Firmware Update guide here.

4.3 RRF

As RRF firmware requires more than 512KB of Flash space, the Spider equipped with 446 cannot meet its requirements. So it needs to disable some features to make it work, please check the README in firmware/RRF folder github gitee.

4.4 Firmware Upload

We provide several ways to upload the firmware including SDCARD, dfu-util, DFU and platformio.

4.4.1 Upload the firmware(SDCARD)

Uploading firmware using SD card is our default way to update the firmware as Spider already has the bootloader in it when it leave the factory. But if you once upload the firmware to Spider flash address 0x08000000, then the bootloader in Spider will be gone, then you need to upload the bootloader to Spider yourself, please follow the README in bootloader folder (github or gitee) to upload the bootloader.

Uploading firmware using SD card: copy your compiled firmware file firmware.bin(If you use klipper firmware, you need to rename klipper.bin to firmware.bin) file to the SD card , and insert it to the SD card slot which is at the right side of the board, and then power up the board. You may need to wait for about 30s to finish uploading, there is LED beside the sdcard slot blinking when it is uploading.

4.4.2 Upload the firmware(dfu-util)

This method works in linux, that means should work in raspberry pi.

Step 1. Enter DFU mode first

  1. First power off the board

  2. Set jumper on 5V pin and DC5V

  3. Place jumper on BT0 to 3.3V pin

  4. Connect USB cable to the board and your computer (If you use raspberry pi to upload firmware, connect USB cable to your raspberry pi)

  5. Power up the board with 24v

    Now the board is in DFU mode. If not, click the reset button. Also you can power on the board with 5v, but you need to set jumper on 5V and USB5V (Check the silkscreen lable on the back of the board) but not on 5V and DC5V.

    REMEMBER to remove BT0 jumper if you finish uploading firmware or it will enter DFU mode again.

Step 2. Install dfu-util

Make sure dfu-util is installed, shoot dfu-util --version command to check.

Sample output:

dfu-util 0.9

Copyright 2005-2009 Weston Schmidt, Harald Welte and OpenMoko Inc.
Copyright 2010-2016 Tormod Volden and Stefan Schmidt
This program is Free Software and has ABSOLUTELY NO WARRANTY
Please report bugs to http://sourceforge.net/p/dfu-util/tickets/

If not , you should install it first, use the package manager of your distribution to get the latest version, like

sudo apt-get install dfu-util

Step 3. Use command to upload firmware

Then use the command below to upload the firmware. You should replace firmware.bin below with your built firmware bin(or hex) file location like out/klipper.bin. Change flash address 0x08008000 to bootloader you choosed. (If you use Marlin firmware and your platformio env is default_envs = FYSETC_S6, then you need to set it to 0x08010000, if env is default_envs = FYSETC_S6_8000, then you need to set it to 0x08008000 . If you use klipper firmware and you choose boot address No bootloader when compiling then set it 0x08000000, if 32kiB bootloader , set it 0x08008000. if 64KiB bootloader set it to 0x08010000.If yours is hex file, set it 0x08000000).

dfu-util -R -a 0 -s 0x08008000:leave -D firmware.bin

Step 4. Reset MCU

Remove BT0 jumper and click the Spider RESET button.

4.4.3 Upload the firmware(DFU)

The other way to upload the firmware is using DFU.

Step 1. Download stm32cubeprogrammer

You can download it from ST website.

Chinese: STM32CubeProg

English: STM32CubeProg

Open the STM32CubeProgrammer software.

1574332767079

Step 2. Enter DFU mode

  1. First power off the board
  2. Set jumper on 5V pin and DC5V
  3. Place jumper on BT0 to 3.3V pin
  4. Connect USB cable to the board and your computer
  5. Power up the board with 24v

Now the board is in DFU mode. If not, click the reset button. Also you can power on the board with 5v, but you need to set jumper on 5V and USB5V (Check the silkscreen lable on the back of the board) but not on 5V and DC5V.

REMEMBER to remove BT0 jumper if you finish uploading firmware or it will enter DFU mode again.

Step 3. Upload the firmware

Now you can connect and flash the Spider board with stm32cubeprogrammer with the following operation.

1574386395071

Do as the red number shows in the screen shot.

  1. Change to USB
  2. Click the button to find the DFU port.
  3. Connect the DFU
  4. Change to "Erase and Programming"
  5. Choose the "firmware.bin" file. (or .hex file).
  6. Fill in the 'Start address' (If you use Marlin firmware and your platformio env is default_envs = FYSETC_S6, then you need to set it to 0x08010000, if env is default_envs = FYSETC_S6_8000, then you need to set it to 0x08008000 . If you use klipper firmware and you choose boot address no bootloader when compiling then set it 0x08000000, if 32kiB bootloader , set it 0x08008000. if 64KiB bootloader set it to 0x08010000. If yours is hex file, don't need to set anything).
  7. Start Programming

Step 4. Reset MCU

Remove BT0 jumper and click the Spider RESET button.

4.4.4 Upload the firmware(platformio)

If you compile Marlin yourself with platformio,you can follow the instructions below to upload the firmware.

Step 1. Enter DFU mode first

  • First power off the board

  • Set jumper on 5v pin and DC5V

  • Place jumper on BT0 to 3.3V pin

  • Connect USB cable to the board and your computer

  • Power up the board with 24v

    Now the board is in DFU mode. If not, click the reset button. Also you can power on the board with 5v, but you need to set jumper on 5V and USB5V (Check the silkscreen lable on the back of the board) but not on 5V and DC5V.

    REMEMBER to remove BT0 jumper if you finish uploading firmware or it will enter DFU mode again.

Step 2. Click the upload button to upload firmware

4.5 Test firmware

If you suspect there is something wrong with your board, you can use our test firmware to have a test. Follow the README here (github gitee).

5. Issue shot

5.1 Spider 3.3v issue

Please check here(github gitee).

5.2 TMC2209 connection issue

Fix 1 : Please add a jumper on each TMC2209 on your Spider board. And restart the machine again.

image-20220115115634509

Fix 2: Try to shoot Klipper command

INIT_TMC STEPPER=<name>

name can be stepper_x,stepper_yand other stepper in your printer.cfg.

5.3 firmware.bin not changed to old.bin/bootloader not working

Fix 1: Reflash the bootloader, follow the instruction here ( github gitee ).

Fix 2: Format your SD card with SD Card Formatter.

Fix 3: If you use Klipper firmware, choose No bootloader option when compiling, and upload the firmware to 0x08000000 flash address. Refer to Upload the firmware(dfu-util) or Upload the firmware(DFU) chapter.

5.4 Not boot to klipper/No id found

Try to set No bootloader bootloader offset in Klipper make menuconfig.This option means you don't have any bootloader flashed or don't want any bootloader, then you can follow Upload the firmware(DFU) to upload the firmware to Spider board. But you need to set the 'Start address' to 0x08000000.

image-20210705151440643

6. How to buy

7. Tech Support

You can submit issue in our github https://github.com/FYSETC/FYSETC-SPIDER/issues Or submit any technical issue into our forum

8. Related Articles

English

Español

9. Application examples

Check the README in example folder (github gitee).

fysetc-spider's People

Contributors

eliwong avatar gerogefu avatar jdelpero avatar jdkd44 avatar schattenphoenix avatar shiftingtech avatar wile-e1 avatar

Stargazers

 avatar  avatar  avatar  avatar  avatar  avatar  avatar  avatar  avatar  avatar  avatar  avatar  avatar  avatar  avatar  avatar  avatar  avatar  avatar  avatar  avatar  avatar  avatar  avatar  avatar  avatar  avatar  avatar  avatar  avatar  avatar  avatar  avatar  avatar  avatar  avatar  avatar  avatar  avatar  avatar  avatar  avatar  avatar  avatar  avatar  avatar  avatar  avatar  avatar  avatar  avatar  avatar  avatar  avatar  avatar  avatar  avatar  avatar  avatar  avatar  avatar  avatar  avatar  avatar  avatar  avatar  avatar  avatar  avatar  avatar  avatar  avatar  avatar  avatar  avatar  avatar  avatar  avatar  avatar  avatar  avatar  avatar  avatar  avatar  avatar  avatar  avatar  avatar  avatar  avatar  avatar  avatar  avatar  avatar  avatar  avatar  avatar  avatar  avatar  avatar

Watchers

 avatar  avatar  avatar  avatar  avatar  avatar  avatar  avatar  avatar  avatar  avatar  avatar  avatar  avatar  avatar  avatar  avatar

fysetc-spider's Issues

Possible Issue in PinOut.SVG

Good Morning,

I am planing to use one of the RGB Ports for a Chamber Fan on my Voron 2.4 which i am building currently.
Because i already had all 3 FAN Ports in use, i think over to use a RGB Port for a additional Fan (Chamber Fan)

I noticed that in the PinOut.SVG the Negative Pin is marked as Red?
grafik

And in the Wiring.SVG i think that "+" & "-" are reversed?
grafik

I am not 100% sure, but if i understand this right "+" should be left and "-" right? - regarding to this Diagram here:
grafik

SKR TFT 35 or TFT 70 Touch Screen with Spider

Hello, Is it possible to use a BTT SKR TFT35 or TFT70 type screen for choosing the Marlin or Graphic screen as on SKR Pro 1.2 or MKS L Gen L. I use the connector at the center of the Map with 5V, GND, RX1 and TX1. I have an inserted SD card back or remove but I do not have a dialog with the card. Thanks a lot for your help.

X+ endstop not firing on PA1

On setting up the new board I had sensorless homing setup. I ran into issues not being able to properly set the sensitivity and decided to switch to mechanical end stops. This is on an Ender 5 Plus modified for core XY, so end stops are at max X & Y (right rear). Board connectors are wired with red wire on tan pins, black on black pins (see picture)

X+ was on PA1 and Y+ was on PA2. The X+ would not trigger but the Y+ would. I swapped connections on the board and X+ on PA2 would trigger but Y+ on PA1 would not trigger. I put Y+ back on PA2 and moved X+ to PA3, and both trigger correctly. The soldering on the back of the board on PA1, PA2, and PA3 looks good. Is it possible there is an issue with my PA1 connection?

Without 3.3V

Hello.
I have update the firmware and connect the stepper drivers.
They have worked about 2 minutes and then I lost the connection with computer. The 3.3v led light is off. I have everything disconnected and try on the other day, but I don't have 3.3V anymore.

I need to know where is located the 3.3V ldo chip his reference number to be able to replace it.
Thanks

Bigtreetech mini 12864 v1.0 configuration Marlin with Fysetc Spider

I had previously purchased a Bigtreetech mini 12864 v1.0 display. I want to connect it to the new Fystec Spider board. But only the backlight comes on, but the screen is blank. Is it normal for the speaker to make noises while loading the firmware? Will this display work with the new Fysets board?

Enclosure Heater

Hi,

I was wondering if it is possible to change one of the hotend pins to connect to an SSR to power an enclosure heater (heat resistors, PTC, etc., it will be connected to mains).

Thanks :)

Transceiver CAN

Does the motherboard have a built-in CAN Transceiver. Does it require external use ??

Error compiling Klipper for Spider board

Hi

I am new to Klipper and want to install it on my 3D printer where I am using the Spider 1.0 board. I have installed OctoPrint and everything is ok there and I am following the installation procedure on https://www.klipper3d.org/Installation.html. For the "make menuconfig" then I am entering the parameters as describer in https://github.com/FYSETC/FYSETC-SPIDER#421-menuconfig.

When I type "make" through Putty then I get the following error message:
pi@octopi:~/klipper $ make Compiling out/src/sched.o make: arm-none-eabi-gcc: Command not found make: *** [Makefile:64: out/src/sched.o] Error 127 pi@octopi:~/klipper $

So I get that the compiler can not find the file "arm-none-eabi-gcc" but how can I install that file?
Any help will be much appreaciated.

Christian

TMC2209 and Diag-Pins with Endstops

Does the Diag-Pins from the Stepper needed to bend by side or cutted of if using the Fystec TMC2209 V3.1 with the Spider V1 WITH Endstops?

Probe Problem

I have Problems with my Inductive Probe.
My Probe is always Triggered.

I've been using a PNP-Probe.

I measured 3.3V between Pin PA3 & GND.

So i need an NPN Probe, right?

New board won’t connect

I have a brand new board that has been in the antistatic bag until last night. I recently purchased the Voron 2.4 kit. I am unable to get it into dfu mode. I followed the instructions on the wiki. I am unable to get it into DFU mode. Since the 32K boot loader supposed to be on the board since June I tried flashing the 32K uart via SD card., which appears to have failed. And then tried doing the same for USB, and neither can connect to the pi. right now when I put the firmware on an SD and put it onto the board it stays flashing for over 40 minutes. after looking through these issue requests I tried clearing the power on the board and removing the stepper drivers and everything except for the two jumpers to enter DFU mode. It is still unable to connect and does not seem to respond via any commands. Please assist.

Klipper w/ PT100 amplifier, wrong temp

Hi,
I have a PT100 amplifier from triangle labs connected like this (to get 5V in amp board) :
Sans titre

In klipper I tried "PT100 INA826" and "AD595" in sensor-type, with and without ADC voltage to 5V.

I even created my own sensor type using datasheet from E3D amp like this :
image
image

The temperature table :
image

but even if I measure 1.20V-1.24V with a voltmeter on the signal pin (while connected to the board) the klipper displays around 190°C...

EDIT : I just realised my custom sensor was misconfigured, but the issue is still here with this config :
image

Heating the hotend with a lighter raised the displayed temp to 213°C with 1.296V measured with voltmeter

Nevermore Micro V5 Duo Not working on E1 Out

Hello,
I have a Nevermore Micro V5 Duo that isn't working on E1 Out (It's actually the one pictured at the bottom of the link :) ). When I start it, it runs fun but eventually slows down and completely stops.
Here's my printer.cfg:

[fan_generic nevermore]
#  Nevermore - In E1 OUT Position
pin: PC8
max_power: 1.0
kick_start_time: 0.5

And here are my macros that I use to control it:

[gcode_macro nvmOff]
gcode:
    SET_FAN_SPEED FAN=nevermore SPEED=0

[gcode_macro nvmHi]
gcode:
    SET_FAN_SPEED FAN=nevermore SPEED=1

[gcode_macro nvmMid]
gcode:
    SET_FAN_SPEED FAN=nevermore SPEED=.5

[gcode_macro nvmLo]
gcode:
    SET_FAN_SPEED FAN=nevermore SPEED=.25

At first I thought it was a connection problem. I was using a wago connector. So then I went to coupling connectors and had the same problem. I then just soldered the wires together, doing away with the connectors and the problem still remains. I'm convinced it's something to do with the board/printer.cfg.
Does anyone have any ideas?

exp1 and exp2 description

the pinout of exp1 and exp2 are a little bit messed up. In some documents exp1 ist sd and exp2 lcd, sometimes the other way around. In the pinout graphics some ports are named totally wrong e.g. BA8 and DP2. MOSI is twice in the diagram whereas other ports are missing. Could you please provide one correct layout?

TMC2209 V3.0 on Spider

I received TMC2209 V3.0 and pins are different compared to TMC2209 V3.1. Is there a way I can still use TMC2209 V3.0 on a Spider board or do I have tu use TMC2209 V3.1?

3.3V does not work when stepper drivers installed, firmware also unable to flash

I have purchased 2 spider 1.0 boards, both having the same 3.3v issue with stepper drivers plugged in. Initially, I could not figure out why the SD would not flash with a firmware.bin in the root directory. I realized 3.3v was not working after plugging in my second board with no stepper drivers installed. I initially tried with BTT 2209 driver boards, and have also tried now with Fysetc 2209 v3.1 boards and have the same 3.3v issue once installed.

when drivers are not installed I am able to get the SD reader to flash its LED when a firmware.bin is on the SD but I do not get the firmware to accept and never get the cursor extension from a successful flash.

Without drivers installed, I am trying to flash the firmware for Klipper and have tried and all combinations, uart, no boot, 32k, 64k, I have checked my wiring for UART it is correct and tried USB with corrected Klipper config settings. I also tried all firmwares from the github as well. I also tried to reflash the bootloader via stm32cube. I tried both bootloaders provided but no luck getting the firmware to flash via SD or STM32.

From klipper log:
cu 'mcu': Starting serial connect
Got error -1 in read: (11)Resource temporarily unavailable
mcu 'mcu': Timeout on connect
mcu 'mcu': Wait for identify_response
Traceback (most recent call last):
File "/home/pi/klipper/klippy/serialhdl.py", line 69, in _get_identify_data
params = self.send_with_response(msg, 'identify_response')
File "/home/pi/klipper/klippy/serialhdl.py", line 258, in send_with_response
return src.get_response([cmd], self.default_cmd_queue)
File "/home/pi/klipper/klippy/serialhdl.py", line 316, in get_response
cmd_queue)
File "/home/pi/klipper/klippy/serialhdl.py", line 250, in raw_send_wait_ack
self._error("Serial connection closed")
File "/home/pi/klipper/klippy/serialhdl.py", line 62, in _error
raise error(self.warn_prefix + (msg % params))
error: mcu 'mcu': Serial connection closed
mcu 'mcu': Timeout on connect
mcu 'mcu': Wait for identify_response
Traceback (most recent call last):

FAN not working on FAN1 (PB1) and FAN2 (PB2)

Can't get fan to work on Spider board with FAN1 or FAN2.
With the cooling fan connected with FAN0 and below config, the fan works perfectly.

[fan]
pin: PB0
max_power: 1.0
kick_start_time: 0.5
off_below: 0.10

But when I connect the same fan to FAN1/2 and change the pin to PB1/2 it doesn't work.
No voltage on the pins. Either at 50% fanspeed or 100% fanspeed.
Using Klipper.

Something I have noticed is when I set the voltage jumpers to 12V, FAN1 is always ON. There is always 12V on the pins.
See attachment, the led at FAN1 is ON, immediately at startup. That doesn't look right.
Is this issue hardware related?

2021-06-24 21 36 48

Neopixel on Marlin 2.0.8.2 issue

Using Marlin 2.0.8.2 when Neopixel enabled using PD3 pin (following Spider scheme and wiki documentation) UART communication all low issues.

Klipper's flash-sdcard.sh script can't find the SD card.

My board updates fine from the sdcard via the firmware.bin/old.bin method.

If I use Klipper's built-in flash-sdcard.sh script, though:
./scripts/flash-sdcard.sh /dev/serial/by-id/usb-Klipper_stm32f446xx_140025000750305538333620-if00 fysetc-spider-v1

This fails when it's trying to issue the first GO_IDLE_STATE command to the SD card.

Presumably the bootloader is doing something to the sdcard or the pin config after it checks for firmware.bin, preventing the remote access scripts from working. I'd check the bootloader sources, but they aren't available. Reportedly this USED to work with the older bootloader...

3.3v regulator overheating

I was going to test a spider board that just arrived but I did not get very far. There seems to be a short in the 3.3 voltage system somewhere, since the 3v3 regulator is overheating, and the voltage on the 3v3 line have droppet to 0.05v I can't locate where it is. I have added a image of the board setup and a thermal image of the 3v3 regulator.

I can find any other places on the board that seems to overheat unexpectedly.

img_thermal_1626604945731
20210718_125129

No connection with pi and no heat

i have 2 board spider 1.1
One of this work well but other don't work.
My board has many problems:

  1. When i flash usb firmware . Pi not recorgnize.
  2. When i flash uart mod. Pi can connect it. But no heat extruder, no heat bed. I see led of heat not light up. use voltage meter no power out to extruder and bed.
  3. I try contact fysetc on taobao (send video about problem, write description about problem).
    But they don't know why and want me to write on github. no star for FYSETC support.
    With me 30-40usd is not problem. But it can use to evaluate level of support.
    next time i will buy from bigtree and mks.

Wrong labeling of VCC and GND

Hi!

I am a newbie who is dealing with the Spider Board for the first time and is also building my first Voron!
But when I was about to wire up the RPi, I noticed something!
I wanted to connect 2x VCC and 2x GND from the Pi PWR & UART interface and it occurred to me that the pin on the top right is black, but was marked as 5V!
In the other section or the picture, however, this is again listed as GND!

Sorry i hope everybody here can understand / follow me what i mean, because my English Skills are so terrible Bed.
I am a Austrian User, and could only speak German =)

Some Pictures what i mean from the Documentation of the Spider 1.0 Wiring:

https://raw.githubusercontent.com/FYSETC/FYSETC-SPIDER/main/images/Spider_v1.0_wiring.jpg
image

image

Kind Regards from Upper Austria ;)

max heater power

hello everyone!

can i use 100W hotend heater at 24V? or is it too much?

No Connections

Hi have issues as Uart and USB will not connect to Pi.
Also when jumper is in 3.3v and BT0, It does not go into DFU mode, therfore I cannot connect to reflash st start again.
I think the USBC port is faulty. Please advise

Maybe Wrong Config Info in printer.cfg for Inductive Probe

Hello together!

I have a Spider Board and currently creating my config for my first own Voron with an inductive Probe! (a VINDA NC Probe from vonWange)
I used the default config from here:
https://github.com/FYSETC/FYSETC-SPIDER/blob/main/firmware/Klipper/printer.cfg

And i had to remove the ! from "^!PA3", so now it is "^PA3"
Then the Trigger / Open Status are correct, with a ! the are inverted.

Could it be that the Description in the Config is wrong?
In my opinion the description is reversed! With ! it is a NO Probe and without! is it an NC Probe
could this be?

Kind Regards from Austria

"Can't write to TMC SPI "stepper_x/y/extruder register, GLOBALSCALER error"

Getting this error..

Example of my configs

[stepper_x]
step_pin: PE11
dir_pin: PE10
enable_pin: !PE9
microsteps: 16
rotation_distance: 40
endstop_pin: PB14 # PA1 for X-max
position_endstop: 0
position_max: 485

[tmc5160 stepper_x]
spi_bus: spi4
cs_pin: PE7
diag1_pin: PB14
run_current: 1
hold_current: 0.8
stealthchop_threshold: 0
interpolate: True

Tried different steppers in X leaving the others blank s (alternative 5160's) . This was working fine in my S6 V2.

Trying to do anything with the stepper driver with TMC5160 drivers causes Klipper to shutdown.

4 jumpers in the bottom positions on the driver slot, as per Spider Github.

Z motor output

Why are there only 2 z motor outputs when you need 4? Also will you be posting a wiring diagram soon?

Cant connect to Klipper anymore

Hello maybe one of you can help me?

I bought a board on 2021 -06 -28 directly from the official FYSTEC store at Ali. It should have a 32kb bootloader.

I was able to flash klipper.bin with 64k bootloader offset onto the board by using an SD-Card. (so it was equiped with the old bootloader?)

Since I often had "internal server" erros I decided to rebuilt my system. I made the mistake of using the STMCubeprogrammer this time.
I flashed the 32kb bootloader and the corresponding 32K-Uart-Klipper.bin (bootloaderoffset 0x08008000). After that I can no longer connect to Klipper.
I tried the old bootloader( 0x10000) with 64k-uart-klipper.bin (0x08010000).
I tried with no bootloader (-> offset 0x08000000)

The result is always the same. Klipper does not connect to the board. See Klippy.log --> klippy.txt

What can I do??????

Unable to read tmc uart 'stepper_z2' register IFCNT - Issue

Hello, I just finished my voron 2.4 built and went through the initial startup testing. When I was trying all the motors ("STEPPER_BUZZ STEPPER=stepper_x") and went through all the motors. I had an issue with the z2 motor. I replaced the driver (bigtreetech tmc2209 v1.2) but same problem again. Then I checked if the wiring was corretly on every motor, so I plugged every motor on the x connector and every single on worked fine. Afterwards I did the same with the drivers, the on that got replaced did not work, so I ended up with 7 working drivers. So I put every driver and motor where it should be, but same problem again. Then I changed the z2 Motor from E2 Motor to E4 Motor (maybe there is an issue on the board). But same problem again. Everytime it shuts down, the LEDs from fan0 and fan2 light up (I don´t know if that information is helpful but maybe it is). The jumpers are where they supposed to be, I even changed them. Now I think my problem could be in the config file. The Board is the spider V1.0. Klippy.log and config is here:
klippy (4).log
printer.txt

X+ y+ voltage selector

Hi,

On the pinout it says 3.3v default/5v for the X+ and y+ voltage pins.
How is that set? So far I could not find any info on that. Am I missing something? Just want to make sure I don't fry anything when I try to repurpose those ports for a runout Sensor.

BigTreeTech TFT70 screen compatibility with RS232 port

I am looking at getting the Fysetc Spider 1.1 as a replacement for my BTT SKR 1.4 Turbo, and would like to find out if the board is compatible with my screen (BTT TFT70) with the RS232 connector from the screen, or if the EXP ports have to be used instead?

How to enable mosfet outputs with a 12V power supply (only for testing)

I have a problem with PWM enabled mosfet outputs (1 for HotBed, 3 for Heat-End, 3 for fans). I checked with a meter and there is no voltage on any of them. The only thing that comes to mind is too low voltage to drive the mosfet because I use a 12V power supply. I was able to get all the stepper motors, limit sensors, temperature sensors and the display running. Everything works with this power supply. I also wonder how to properly connect the External MOS module V1.0

Having issues installing Marlin onto the Fysetc-Spider

I have flashed by board with the new bootloader functions (Bootloader-FYSETC_S6.hex) using STM32CubeProgrammer, and all went well, but I am getting and error where PlatformIO gives me an error of the board FYSETC_S6_8000 being undefined:

image

Am I being a complete idiot, or is this where I should be changing FYSETC_S6 to FYSETC_S6_8000
in the platformio.ini file. According to this https://github.com/FYSETC/FYSETC-SPIDER#41-marlin

But github says this:
You need to enable following define in configuration.h file

#define MOTHERBOARD BOARD_FYSETC_SPIDER
default_envs = FYSETC_S6 (For old bootloader,boot address is 0x10000, see below)
default_envs = FYSETC_S6_8000 (For new bootloader,boot address is 0x8000, see below)

So upon searching for default_envs in Configuration.h I have not found it

I Believe the board is not damaged as when I bridge Boot0 and 3.3V the board goes into DFU mode and STM32CubeProgrammer connects successfully.

Since FYSETC_S6_8000 is not available, and I am getting an error I went back to the old bootloader Bootloader-FYSETC_S6_10000, I have compiled my code, and have uploaded through STM32CubeProgrammer using the old bootloader with default_envs = FYSETC_S6 instead.

When I exit DFU mode and try turning on the board, the board turns on fine, but windows does not detect the board as a device in device manager, and the board's LCD does not light up. I am using the pre-provided firmware from the Fysetc-Spider Github Repo, but have changed the LCD to RepRapDiscount Full Graphic Smart Controller.

Thank you in advance for any help you offer, I will try to reply with any more important information you may need as fast as possible!

USB communication with Pi

Can't get my Spider V1.1 to communicate with my Pi via USB or UART (following the GitHub guide)..

Flashes Bootloader and compiled firmware fine from STM32 Programmer but still won't talk to my Pi4.

Sensorless homing instructions on pinout diagram

The instructions in the green box on the pinout diagram located here are not written in good English.

They currently read "If need the Sensor-less homing, the corresponding jumper here should be install."

image

I suggest the following wording which I think is better, "If sensorless homing is required on an axis, install a jumper on the corresponding pins here"

I also notice that the green box only covers the X and Y pins, not the Z pins. Is this incorrect or is the board not capable of Z-axis sensorless homing?

Custom software not running with Platformio

I am trying to build my own software on the Fystec-spider

I want to blink the flash LED as a test.

#include <Arduino.h>

void setup()
{
    pinMode(PD3, OUTPUT);
}

void loop()
{
    digitalWrite(PD3, LOW);
    delay(1000);
    digitalWrite(PD3, HIGH);
    delay(1000);
}

I can upload with success using ST-LINK
but it won't run.

Do I have to make a "special platformio.ini?
Mine is :

[env:fysetc_s6]
platform = ststm32
board = fysetc_s6

framework = arduino

; change MCU frequency
board_build.f_cpu = 168000000L

Thanks a lot !

BL Touch / 3D Touch configuration

What is the minimum BLTouch configuration in Marlin? I connected it according to the Spider 1.0 diagram (to PA0, PA2 and PA3). The power supply is correct 5V. I uncommented #define BLTOUCH and #define Z_SAFE_HOMING. But even Self-Test doesn't work. Does the microswitch have to be connected to PA0?

TMC2208 Klipper Unable to read tmc uart 'stepper_x' register IFCNT

Good afternoon, faced with problem drivers tmc2208 bt fysetc

https://aliexpress.ru/item/32848553467.html?spm=a2g39.orderlist.0.0.4b8b4aa68oAwrM&_ga=2.102432385.1279670221.1630433926-2024624615.1628585182&_gac=1.258551672.1628608684.CjwKCAjwx8iIBhBwEiwA2quaq1s9TrKFMzMXaR9MgGZCyCCvbFw1T3gEdR303A7xuWOkJI_QkSBpDhoC-oUQAvD_BwE

After setting up the configuration when testing the motors with the command
STEPPER_BUZZ STEPPER = stepper_x
Cooler hotend starts spinning 100%
And the printer falls out into an error:
Recv: // Unable to read tmc uart 'stepper_x' register IFCNT
Recv: // Once the underlying issue is corrected, use the
Recv: // "FIRMWARE_RESTART" command to reset the firmware, reload the
Recv: // config, and restart the host software.
Recv: // Printer is shutdown
Recv: // Klipper state: Not ready
Recv: !! Unable to read tmc uart 'stepper_x' register IFCNT

klipper.log
printer.txt
I also use Raspberry 3b + connected via UART

please help!!!

Error in PinOut.SVG

InkedSpider_V1 0_Pinout_LI
'X+ ENDSTOP' and 'E2-DIAG' should share PA1
'Z+ ENDSTOP' and 'E0-DIAG' should share PA3

% Complete does not update on my mini 12864 LCD Display

Am I missing something in my printer.cfg that my % complete does not update on the LCD screen.
It does update in Octoprint just fine.

All other functions work correctly on screen. Using Spider V1.0 board with my Voron 2.4 setup.

Recommend Projects

  • React photo React

    A declarative, efficient, and flexible JavaScript library for building user interfaces.

  • Vue.js photo Vue.js

    🖖 Vue.js is a progressive, incrementally-adoptable JavaScript framework for building UI on the web.

  • Typescript photo Typescript

    TypeScript is a superset of JavaScript that compiles to clean JavaScript output.

  • TensorFlow photo TensorFlow

    An Open Source Machine Learning Framework for Everyone

  • Django photo Django

    The Web framework for perfectionists with deadlines.

  • D3 photo D3

    Bring data to life with SVG, Canvas and HTML. 📊📈🎉

Recommend Topics

  • javascript

    JavaScript (JS) is a lightweight interpreted programming language with first-class functions.

  • web

    Some thing interesting about web. New door for the world.

  • server

    A server is a program made to process requests and deliver data to clients.

  • Machine learning

    Machine learning is a way of modeling and interpreting data that allows a piece of software to respond intelligently.

  • Game

    Some thing interesting about game, make everyone happy.

Recommend Org

  • Facebook photo Facebook

    We are working to build community through open source technology. NB: members must have two-factor auth.

  • Microsoft photo Microsoft

    Open source projects and samples from Microsoft.

  • Google photo Google

    Google ❤️ Open Source for everyone.

  • D3 photo D3

    Data-Driven Documents codes.