![]()
These programs are a part of the system used for the LIQUID EDGE PRIN 2017 project demonstrator.
A Python 3, OpenCV 4, Docker & Kubernetes microservices-powered inference framework to be used in the demonstrator of WP6, which is focused on mobile edge computing in multi-RAT scenarios.
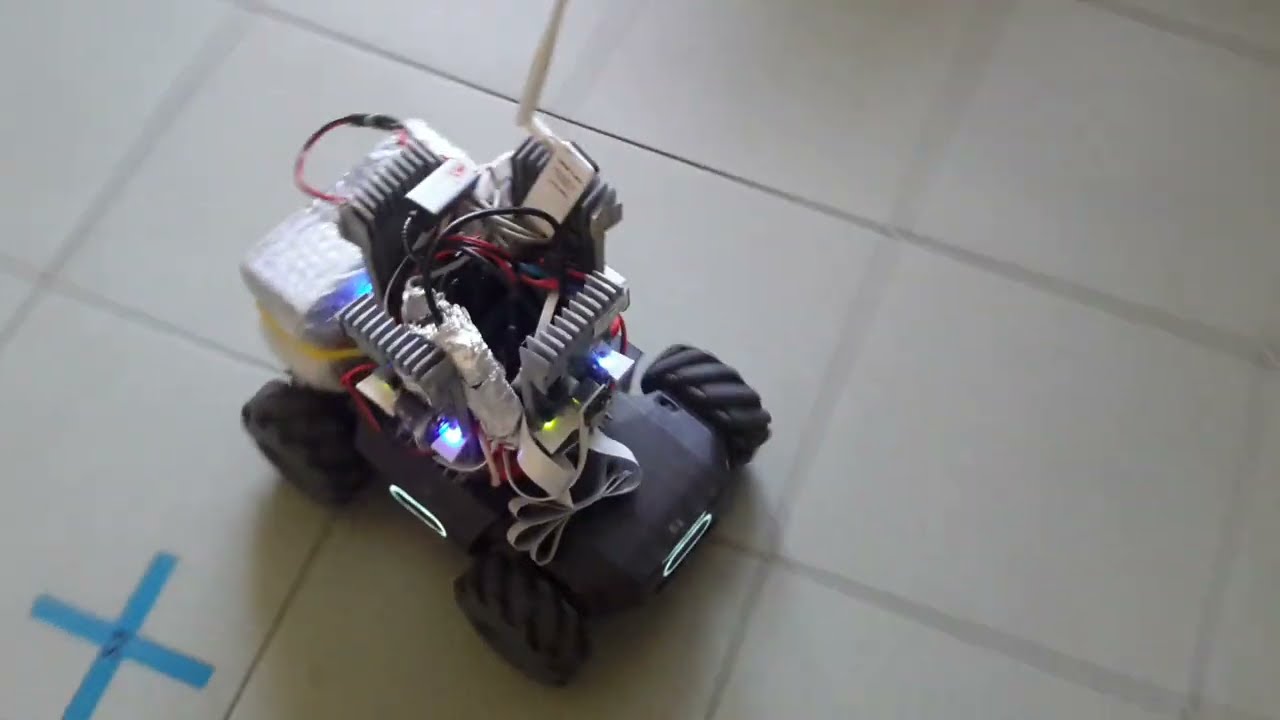
The Robomaster S1 from DJI is modified with a custom communication turret (uses WiGig links at 60 GHz) and a custom finite state machine (FSM) implemented in a Raspberry 4 CPU, with a Raspicam for video capture. The purpose is to follow any object in the FOV of the Raspicam: in our case, it follows the cameraman. Processing is performed on a (local) edge data center equipped with GPUs. The different led colors denote a different EdgeRAN used for the computer vision tasks offloading, while the different blink rates refer to a particular status (solid = following, fast blinking = searching, etc.).
For more details, please read (and cite!) the associated scientific paper
G. Baruffa, G. Costante, F. Crocetti, L. Rugini, P. Valigi, P. Banelli, A. Detti, "AI-driven Ground Robots: Mobile Edge Computing and mmWave Cellular Networks at Work," submitted to IEEE Open Journal of the Communications Society, 2023
Abstract - AI-driven ground robots are gaining attention for their potential to transform urban life in areas like transportation, public safety, and environmental monitoring. The daily growth of AI technologies is paving the way for complex and computation-intensive tasks that these robots could perform, a vision that, however, clashes with the need for plenty of computing power and energy available in the robot, which is only sometimes possible. In these contexts, using cloud/edge computing services in conjunction with very high-speed communication systems can allow the workload to be offloaded out of the robot and consequently make the use of low-power robots feasible for complex tasks. This paper combines contemporary cloud and communication technologies in an architectural framework designed to provide ground robot applications with the ability to offload part of their tasks to cloud/edge data centers connected by cellular networks. The resulting architecture is meant for microservice applications and uses Kubernetes, Istio service mesh, OpenFlow, and IEEE 802.11ad mmWave (60 GHz) Wi-Fi access points. The architecture is validated through a testbed in which a ground robot autonomously tracks a moving object through AI algorithms and whose microservices are deployed on the robot and on the edge/cloud data centers it can exploit during its movements in different cells of a cellular network. Overall, the proposed network and cloud platform is generic and can be used for many other mobile applications that need to offload some of their tasks to back-end cloud/edge microservices.
You can also watch a short video showing the robot in action.
The microservices are written in Python 3 and use the Google Protocol Buffers for remote procedure calls (gRPC). The exchanged messages convey pictorial information in the form of a JPEG-compressed video frame, and return inference results in the form of a list of detected objects in the submitted video. OpenCV 4 is used throughout to acquire, compress, decompress, and infer.
The main web service can be implemented with a Docker/Kubernetes cluster, and consists of four different parts:
objectdetection.py: the main ingress point, acts as an aggregator of the other services described below;facedetection.py: this service performs face detection in the incoming images using the Haar classifier method;yolodetection.py: this service implements Yolo v3 object detection in the image, using the Darknet engine of OpenCV 4. If enabled and available, CUDA (cuDNN, in particular) is used to accelerate the detection with NVIDIA GPUs.
A client, robotclient.py, can connect to the network service for performing object detection on a live (or recorded) video stream. It is obviously capable to track detected objects and pilot a Robomaster S1 robot to follow the wanted target.
To install docker (and to let it work well with kubernetes) on Ubuntu 20.04, you might want to to follow these steps
$ curl -fsSL https://download.docker.com/linux/ubuntu/gpg | sudo apt-key add -
$ sudo add-apt-repository "deb [arch=amd64] https://download.docker.com/linux/ubuntu $(lsb_release -cs) stable"
$ sudo apt update
$ sudo apt install -y docker-ce=5:20.10.7~3-0~ubuntu-$(lsb_release -cs)
$ sudo apt-mark hold docker-ce
$ sudo systemctl start docker
$ sudo systemctl enable docker
$ cat > daemon.json <<EOF
{
  "exec-opts": ["native.cgroupdriver=systemd"],
  "log-driver": "json-file",
  "log-opts": {
    "max-size": "100m"
  },
  "storage-driver": "overlay2"
}
EOF
$ sudo mv daemon.json /etc/docker/daemon.json
$ sudo mkdir -p /etc/systemd/system/docker.service.d
$ sudo systemctl daemon-reload
$ sudo systemctl restart docker
We are building a container for each of the services described before: every service has its own Dockerfile provided.
$ docker build . -f src/objectdetection/Dockerfile-kube -t objectdetection
$ docker build . -f src/facedetection/Dockerfile-kube -t facedetection
$ docker build . -f src/yolodetection/Dockerfile-kube -t yolodetection
$ docker build . -f src/yolodetection/Dockerfile-cuda-kube -t yolodetection-cuda
The Yolo container, normally, does not use any GPU present on the computing host. Thus, a special-purpose container can be built for that. First, you need to create a container with Python, OpenCV, CUDA, and cuDNN; then, you must install the NVIDIA Docker support package for your version of Docker and OS. Finally, you can build it with the Dockerfile-python-cuda provided in the docker folder (instructions).
The containers make use of a dedicated virtual network to communicate, so it must be created first.
$ docker network create liquidedgeservices
Then, you can start the containers to set-up the service on the localhost interface.
$ docker run --rm -p 192.168.0.140:50051:50051/tcp --network liquidedgeservices -it --name objectdetection -e FACEDETECTION_HOST=facedetection:50053 -e YOLODETECTION_HOST=yolodetection:50055 objectdetection
$ docker run --rm -p 192.168.0.140:50053:50053/tcp --network liquidedgeservices -it --name facedetection facedetection
$ docker run --rm -p 192.168.0.140:50055:50055/tcp --network liquidedgeservices -it --name yolodetection yolodetection
You may notice, from the above instructions, how the port re-directions can be established: those may change, depending on the actual use of the ports by other pre-existing services.
Note also that you can switch to the CUDA-enabled container by starting this one instead of the non-enabled one, and assigning to it the same name: the --gpus all switch is mandatory to virtualize the GPU inside the container.
$ docker run --rm -p 192.168.0.140:50055:50055/tcp --gpus all --network liquidedgeservices -it --name yolodetection yolodetection-cuda
The containers above are all stored on the localhost registry, but they can also be made available to other computers on the network. This is also mandatory if you will need the Kubernetes usage.
One obvious solution is to use the official Docker registry, but you have to register for accessing it, has a limited storage space, and maybe slow during uploads and downloads. Instead, you may set up a private registry to keep your containers near and secure.
On the chosen registry server host (in our case, 192.168.0.140) you must first enable the official Docker registry container, with automatic startup at boot, possibility to delete directly the stored containers, and on the folder of your preference.
$ docker run -d -p 5000:5000 --restart=always --name registry -e REGISTRY_STORAGE_DELETE_ENABLED=true -v full_path_to_existing_host_folder:/var/lib/registry registry:2
Then, on every client that will make use of this registry, edit the Docker configuration,
$ sudo nano /etc/docker/daemon.json
add the following line in the main JSON body,
{
  "insecure-registries" : ["192.168.0.140:5000"]
}
and restart the Docker service.
$ sudo service docker restart
Finally, you can push the containers in the new registry. First, tag them to be in the selected registry.
$ docker tag objectdetection 192.168.0.140:5000/liquidedge/objectdetection:kube
$ docker tag facedetection 192.168.0.140:5000/liquidedge/facedetection:kube
$ docker tag yolodetection 192.168.0.140:5000/liquidedge/yolodetection:kube
$ docker tag yolodetection-cuda 192.168.0.140:5000/liquidedge/yolodetection-cuda:kube
Then, push them to the registry.
$ docker push 192.168.0.140:5000/liquidedge/objectdetection:kube
$ docker push 192.168.0.140:5000/liquidedge/facedetection:kube
$ docker push 192.168.0.140:5000/liquidedge/yolodetection:kube
$ docker push 192.168.0.140:5000/liquidedge/yolodetection-cuda:kube
You can also clean the locally cached copies.
$ docker image remove 192.168.0.140:5000/liquidedge/objectdetection
$ docker image remove 192.168.0.140:5000/liquidedge/facedetection
$ docker image remove 192.168.0.140:5000/liquidedge/yolodetection
$ docker image remove 192.168.0.140:5000/liquidedge/yolodetection-cuda
To run them, use directly those in the registry.
$ docker run --rm -p 50051:50051/tcp --network liquidedgeservices -it --name objectdetection -e FACEDETECTION_HOST=facedetection:50053 -e YOLODETECTION_HOST=yolodetection:50055 192.168.0.140:5000/liquidedge/objectdetection:kube
$ docker run --rm -p 50053:50053/tcp --network liquidedgeservices -it --name facedetection 192.168.0.140:5000/liquidedge/facedetection:kube
$ docker run --rm -p 50055:50055/tcp --network liquidedgeservices -it --name yolodetection 192.168.0.140:5000/liquidedge/yolodetection:kube
$ docker run --rm -p 50055:50055/tcp --network liquidedgeservices -it --gpus all --name yolodetection 192.168.0.140:5000/liquidedge/yolodetection-cuda:kube
For the support of the NVIDIA GPUs, you need to install the correct NVIDIA driver and the NVIDIA container runtime (search online for the many tutorials available). After that, your daemon.json file should resemble this one
{
    "default-runtime": "nvidia",
    "exec-opts": [
        "native.cgroupdriver=systemd"
    ],
    "insecure-registries": [
        "192.168.0.140:5000"
    ],
    "log-driver": "json-file",
    "log-opts": {
        "max-size": "100m"
    },
    "storage-driver": "overlay2",
    "runtimes": {
        "nvidia": {
            "path": "/usr/bin/nvidia-container-runtime",
            "runtimeArgs": []
        }
    }
}
Do not proceed further until you get a starting and running Docker daemon.
$ systemctl status docker.service
● docker.service - Docker Application Container Engine
     Loaded: loaded (/lib/systemd/system/docker.service; enabled; vendor preset: enabled)
     Active: active (running) since Tue 2023-09-26 15:04:04 CEST; 1 months 26 days ago
TriggeredBy: ● docker.socket
       Docs: https://docs.docker.com
   Main PID: 985269 (dockerd)
      Tasks: 39
     Memory: 13.6G
     CGroup: /system.slice/docker.service
             └─985269 /usr/bin/dockerd -H fd:// --containerd=/run/containerd/containerd.sock
Kubernetes is an orchestrator with far more capabilities than the simple Docker. It is used in production environments to keep and sustain the services during updates, peak loads, etc.
To install Kubernetes, you may follow one of the many tutorials available on the Internet. Do not forget also to install a communication network for your cluster (I use flannel).
Under Ubuntu 20.04, I usually follow these steps on the master and on the client nodes
$ sudo apt-get update
$ sudo apt-get install -y apt-transport-https ca-certificates curl
$ sudo curl -fsSLo /usr/share/keyrings/kubernetes-archive-keyring.gpg https://packages.cloud.google.com/apt/doc/apt-key.gpg
$ echo "deb [signed-by=/usr/share/keyrings/kubernetes-archive-keyring.gpg] https://apt.kubernetes.io/ kubernetes-xenial main" | sudo tee /etc/apt/sources.list.d/kubernetes.list
$ sudo apt-get update
$ sudo apt install -qy kubeadm=1.21.3-00 kubelet=1.21.3-00 kubectl=1.21.3-00 kubernetes-cni
$ sudo apt-mark hold kubelet kubeadm kubectl
$ echo "net.bridge.bridge-nf-call-iptables=1" | sudo tee -a /etc/sysctl.conf
$ sudo sysctl -p
Once you have installed Kubernetes in your cluster nodes and you have set up a control machine, you can add the nodes to your cluster with the command given in the instructions at the end of the Kubernetes install procedure. In our case, the command to run in each node of the cluster is
$ kubeadm join 192.168.0.140:6443 --token ****************** --discovery-token-ca-cert-hash sha256:**************************
The token above expires after 24 hours, so in case you add a node later, regenerate a new token with
$ kubeadm token create --print-join-command
Generally, all the nodes except the master are by default of worker type. To see the nodes in your cluster type
$ kubectl get nodes
The answer is like this one
NAME           STATUS   ROLES                         AGE     VERSION
node01         Ready    control-plane,master,worker   11d     v1.21.3
node02-gpu     Ready    worker                        3m17s   v1.21.3
node03-gpu     Ready    worker                        11d     v1.21.3
Remember that any node in the cluster must have access to the private insecure registry server, as explained in the sections above, in order to pull the images of the containers.
Istio is fundamental to provide the smart routing capabilities requested by our demonstrator. You must first install Istio using one of the many examples available on the web. Then, enable Istio in the demo namespace
$ kubectl get ns --show-labels=true
$ kubectl label ns robodemo istio-injection=enabled
The folder kube contains the required manifests to start the pod with the microservices containers. To start and stop them, just type
$ kubectl apply -f kube
$ kubectl delete -f kube
Connect to the Raspberry of the Robomaster using the control Wi-Fi link at 2.4 GHz and start the tracker
$ PYTHONPATH=/home/pi/robomaster-standalone/src OBJECTDETECTION_HOST="192.168.0.140:30844" python3 ./src/robotclient/robotclient.py -i raspicam -n -c -k -t person -j
and watch it tracking as you move along. Concurrently, in another shell terminal on the Raspberry, you can run the programs that manage the handovers between the base station and the relevant edge computers.
Note: for the static tests with samplevideo, please use the client named robotclient-videoclip.
- Dan Hipschman, "Python Microservices With gRPC", realpython.com, Feb. 2021
- "Protocol buffers", google.com, Jul. 2021
- Akshay Sinha, "How To Detect and Extract Faces from an Image with OpenCV and Python", Digital Ocean, Mar. 2019
- "Cascade Classifier ", OpenCV
- Young Kim, Savic, "How To Set Up a Private Docker Registry on Ubuntu 20.04", Digital Ocean, Mar. 2021
- Veselin Stoyanov, "Pushing Docker images to a private registry with Docker Compose", Medium, May 2019
- Naveen, "Kubernetes Installation on Ubuntu 20.04," GitHub, 2021
- Grisson (Zhaomin) Wang, "Fix [WARNING IsDockerSystemdCheck]: detected 'cgroupfs' as the Docker cgroup driver. The recommended driver is 'systemd'. Please follow the guide at https://kubernetes.io/docs/setup/cri/", GitHub Gist, 2021
- "Installing kubeadm," Kubernetes, 2021
- "Test an insecure registry", Docker, 2021
- "Deploy a registry server," Docker, 2021
- David Ding, "How to push a docker image to a private repository," StackOverflow, 21 May 2018
- M. Simons, "Retrieving Docker Image Sizes," GitHub, December 2021
- Mohit Saxena, "How To Install Kubernetes On Ubuntu 20.04 – Kubeadm And Minikube", Knoldus, June 2021
- Asynchronbous gRPC calls with future
- "How to build OpenCV from source with python binding?", StackOverflow
- "How to gracefully remove a node from Kubernetes?", StackOverflow
- "Enabling Istio in a namespace", StackOverflow
