Face recognition using dlib and optimized kNN classification in ROS.

Hello , I'm Ahmadreza Zibaei from MRL@Home vision group. Here is my report of face recognition !
- Face detection
- Face tracker
- Face descriptor and face landmarks
- Gender detection
- Classification using kNN
- ROS module
In our program , We use dlib to detect faces in each frame. This is a simple part of our program.
from face_api.py module.
import dlib
...
_detector = dlib.get_frontal_face_detector()
...
def detect_faces(img, min_score=2, max_idx=2):
    output = []
    # The third argument to run is an optional adjustment to the detection threshold,
    # where a negative value will return more detections and a positive value fewer.
    # Also, the idx tells you which of the face sub-detectors matched.  This can be
    # used to broadly identify faces in different orientations.
    dets, scores, idx = _detector.run(img, 1, -1)
    for i, d in enumerate(dets):
        if scores[i] >= min_score and max_idx >= idx[i]:
            output.append([d, scores[i]])
    return output
_detector is created using the scan_fhog_pyramid object from dlib , it's an instance of object_detector. This object is a tool for detecting the positions of objects (in our case , face) in an image. ( read more )
According to dlib notes :
This face detector is made using the now classic Histogram of Oriented Gradients (HOG) feature combined with a linear classifier, an image pyramid, and sliding window detection scheme. This type of object detector is fairly general and capable of detecting many types of semi-rigid objects in addition to human faces.
With dlib face detector , We can find bounding rectangle of faces in each frames.

After we found faces in image , It's time to track faces.
If you have ever played with OpenCV face detection, you know that it works in real time and you can easily detect the face in every frame. So, why do you need tracking in the first place? Let’s explore the different reasons you may want to track objects in a video and not just do repeated detections.
1. Tracking is faster than Detection
Usually tracking algorithms are faster than detection algorithms. The reason is simple. When you are tracking an object that was detected in the previous frame, you know a lot about the appearance of the object. You also know the location in the previous frame and the direction and speed of its motion. So in the next frame, you can use all this information to predict the location of the object in the next frame and do a small search around the expected location of the object to accurately locate the object. A good tracking algorithm will use all information it has about the object up to that point while a detection algorithm always starts from scratch. Therefore, while designing an efficient system usually an object detection is run on every nth frame while the tracking algorithm is employed in the n-1 frames in between. Why don’t we simply detect the object in the first frame and track subsequently? It is true that tracking benefits from the extra information it has, but you can also lose track of an object when they go behind an obstacle for an extended period of time or if they move so fast that the tracking algorithm cannot catch up. It is also common for tracking algorithms to accumulate errors and the bounding box tracking the object slowly drifts away from the object it is tracking. To fix these problems with tracking algorithms, a detection algorithm is run every so often. Detection algorithms are trained on a large number of examples of the object. They, therefore, have more knowledge about the general class of the object. On the other hand, tracking algorithms know more about the specific instance of the class they are tracking.
2. Tracking can help when detection fails
If you are running a face detector on a video and the person’s face get’s occluded by an object, the face detector will most likely fail. A good tracking algorithm, on the other hand, will handle some level of occlusion. In the video below, you can see Dr. Boris Babenko, the author of the MIL tracker, demonstrate how the MIL tracker works under occlusion.
3. Tracking preserves identity
The output of object detection is an array of rectangles that contain the object. However, there is no identity attached to the object. For example, in the video below, a detector that detects red dots will output rectangles corresponding to all the dots it has detected in a frame. In the next frame, it will output another array of rectangles. In the first frame, a particular dot might be represented by the rectangle at location 10 in the array and in the second frame, it could be at location 17. While using detection on a frame we have no idea which rectangle corresponds to which object. On the other hand, tracking provides a way to literally connect the dots!
From Object Tracking using OpenCV
Here is a example of BOOSTING tracker in OpenCV , face_follower :
import cv2
import dlib

camera = cv2.VideoCapture(0)
detector = dlib.get_frontal_face_detector()

old_faces = []

while True:
    ret, image = camera.read()
    if not ret:
        break

    image = cv2.resize(image, (0, 0), fx=0.5, fy=0.5)

    faces = detector(image, 1)
    if len(old_faces) < len(faces):
        old_faces = []
        for face in faces:
            tracker = cv2.Tracker_create('BOOSTING')
            box = (face.left(), face.top(), face.width(), face.height())
            tracker.init(image, box)
            old_faces.append(tracker)
    else:
        for i, tracker in enumerate(old_faces):
            ok, bbox = tracker.update(image)
            if ok:
                cv2.rectangle(image, (int(bbox[0]), int(bbox[1])), (int(bbox[0] + bbox[2]), int(bbox[1] + bbox[3])),
                              (100, 200, 100))
            else:
                old_faces.pop(i)

    cv2.imshow("image", image)
    key = cv2.waitKey(1) & 0xFF
    if key == ord('q'):
        break


camera.release()
cv2.destroyAllWindows()
In this example , If you run it , And move your face fastly , moving in depth or many other motions , Tracker will fail !
After dlib 18.13 Davis King implemented a tracker method , This was a method described in the paper:
Danelljan, Martin, et al. "Accurate scale estimation for robust visual tracking." Proceedings of the British Machine Vision Conference BMVC. 2014.
We use correlation tracker in our Robot ( We named it Robina ) but why we choose it instead of OpenCV trackers ?
Correlation tracker has these features :
- Fast
- Trustworthy
- High accuracy ( winner of VOT2014 )
Here is an example of correlation tracker implemented in dlib :
import cv2
import dlib

camera = cv2.VideoCapture(0)
detector = dlib.get_frontal_face_detector()

old_faces = []

while True:
    ret, image = camera.read()
    if not ret:
        break

    image = cv2.resize(image, (0, 0), fx=0.5, fy=0.5)

    faces = detector(image, 1)
    if len(old_faces) < len(faces):
        old_faces = []
        for face in faces:
            tracker = dlib.correlation_tracker()
            tracker.start_track(image, face)
            old_faces.append(tracker)
    else:
        for i, tracker in enumerate(old_faces):
            quality = tracker.update(image)
            if quality > 7:
                pos = tracker.get_position()
                pos = dlib.rectangle(
                    int(pos.left()),
                    int(pos.top()),
                    int(pos.right()),
                    int(pos.bottom()),
                )
                cv2.rectangle(image, (pos.left(), pos.top()), (pos.right(), pos.bottom()),
                              (100, 200, 100))
            else:
                old_faces.pop(i)

    cv2.imshow("image", image)
    key = cv2.waitKey(1) & 0xFF
    if key == ord('q'):
        break

camera.release()
cv2.destroyAllWindows()
Now , Time to see differences :
| Dlib correlation tracker | OpenCV BOOSTING tracker |
|---|---|
 |
 |
You can read about Adaptive Correlation Filters on this paper.
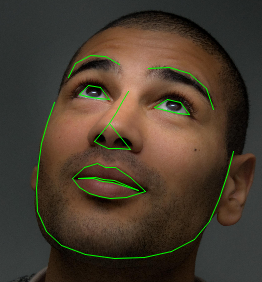
Facial landmarks are used to localize regions of the face, such as:
- Eyes
- Nose
- ...
Face landmarks are key facial structures on the face ROI.
The facial landmark detector included in the dlib library is an implementation of the One Millisecond Face Alignment with an Ensemble of Regression Trees paper by Kazemi and Sullivan (2014).
Given a training data, an ensemble of regression trees are trained to estimate the facial landmark positions directly from the pixel intensities themselves (i.e., no “feature extraction” is taking place).
For more information and details on this specific technique, be sure to read the paper by Kazemi and Sullivan linked to above, along with the official dlib announcement.
The last 3 paragraphs are from pyimagesearch with some changes , read this.
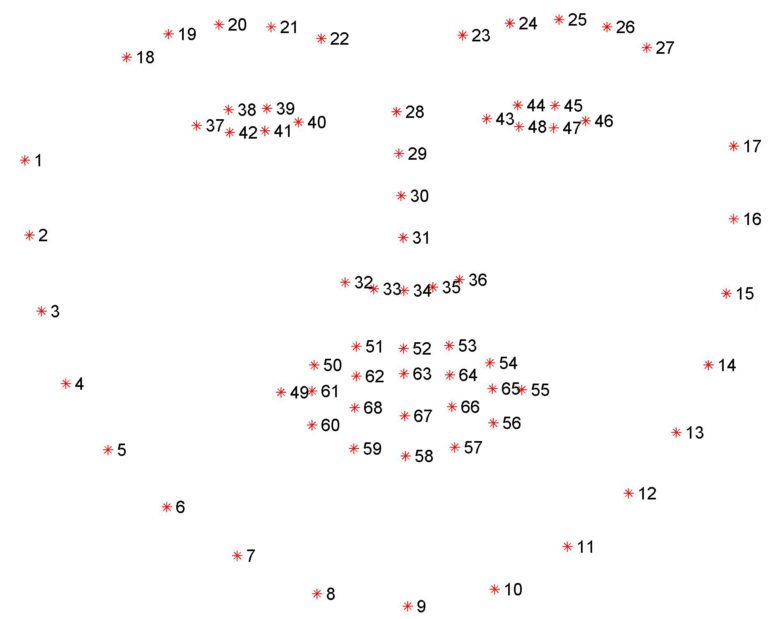
Dlib has two pre-trained facial landmark detector , and we can use it to estimate the location of (68 or 5) (x, y)-coordinates that map to facial structures on the face.
Dlib pre-trained facial landmark detectors are :
- shape_predictor_5_face_landmarks.dat.bz2
- This model is designed to work well with dlib's HOG face detector.
- This is a 5 point landmarking model which identifies the corners of the eyes and bottom of the nose.
- It is trained on the dlib 5-point face landmark dataset, which consists of 7198 faces. ( created by dlib's author , see here )
- Trained with
shape_predictor_trainerin dlib
- shape_predictor_68_face_landmarks.dat.bz2
- This is trained on the ibug 300-W dataset.
C. Sagonas, E. Antonakos, G, Tzimiropoulos, S. Zafeiriou, M. Pantic. 300 faces In-the-wild challenge: Database and results. Image and Vision Computing (IMAVIS), Special Issue on Facial Landmark Localisation "In-The-Wild". 2016.
- This model file is designed for use with dlib's HOG face detector.
- The indexes of the 68 coordinates can be visualized on the image below :
Dlib has a tool to get description of the face from landmarks. It's a pre-trained model , same as other dlib models. The model has an accuracy of 99.38% on the standard Labeled Faces in the Wild benchmark. This is comparable to other state-of-the-art models and means that, given two face images, it correctly predicts if the images are of the same person 99.38% of the time.
For those interested in the model details, this model is a ResNet network with 29 conv layers. It's essentially a version of the ResNet-34 network from the paper Deep Residual Learning for Image Recognition by He, Zhang, Ren, and Sun with a few layers removed and the number of filters per layer reduced by half.
The network was trained from scratch on a dataset of about 3 million faces.
From dlib face recognition example comments :
This tool maps an image of a human face to a 128 dimensional vector space where images of the same person are near to each other and images from different people are far apart. Therefore, you can perform face recognition by mapping faces to the 128D space and then checking if their Euclidean distance is small enough.
We use a binary classification to separate female faces as male faces. To train this classification , we need a dataset , I wrote a scraper ! A bot that can download faces from imdb. Here is script of scraper :
import requests
import bs4
import urllib2

base = "http://www.imdb.com"
gender = "female"

for start in range(200, 4000, 100):
    print "Sending GET request ..."

    url = '{}/search/name?gender={}&count=100&start={}'.format(base, gender, start)
    r = requests.get(url)
    html = r.text
    soup = bs4.BeautifulSoup(html, 'html.parser')

    for img in soup.select('.lister-item .lister-item-image'):
        link = img.find('a').get('href')
        name = img.find('img').get('alt')

        print "Going to {} profile ...".format(name)

        r = requests.get(base + link)
        html = r.text
        soup = bs4.BeautifulSoup(html, 'html.parser')
        selector = soup.find('time')
        if selector is None:
            continue
        date = selector.get('datetime')

        selector = soup.find('img', {"id": "name-poster"})
        if selector is None:
            continue
        image = selector.get('src')

        print "Downloading profile picture ..."
        image_file = urllib2.urlopen(image)
        with open("{}_{}_{}.jpg".format(gender, start, date), 'wb') as output:
            output.write(image_file.read())
We can run this script for both genders , males and females. After retrieving more than 300 images for each gender , It's time to train our classifier.
Note : We used imdb-datasets , The file scanner.py may not work with new imdb front-end ! BTW , Repository contains more than 800 images.
We used dlib binary classificationthat worked with SVM.
Here is how we trained our SVM model ,
Following this algorithm :
- Read image file.
- Adjust gamma of image.
- Find faces using dlib face detector.
- Extract face landmarks.
- Create 128D vector of face ( face descriptor )
- If image file is from females category , label it
-1 - Else label it
+1( male ) - Set SVM's C parameter to
10 - Train using
svm_c_trainer_radial_basis - If result was not good , change C parameter and goto step
9 - Else , save classifier using
picklemodule.
face.py :
import dlib


detector = dlib.get_frontal_face_detector()
predictor = dlib.shape_predictor("./data/shape_predictor_68_face_landmarks.dat")
face_model = dlib.face_recognition_model_v1("./data/dlib_face_recognition_resnet_model_v1.dat")
and train.py :
import glob
import dlib
import cv2
import pickle
import random
import face
import numpy as np


def adjust_gamma(input_image, gamma=1.0):
    table = np.array([((iteration / 255.0) ** (1.0 / gamma)) * 255
                      for iteration in np.arange(0, 256)]).astype("uint8")
    return cv2.LUT(input_image, table)


def read_image(path, gamma=0.75):
    output = cv2.imread(path)
    return adjust_gamma(output, gamma=gamma)


def face_vector(input_image):
    faces = face.detector(input_image, 1)
    if not faces:
        return None

    f = faces[0]
    shape = face.predictor(input_image, f)
    face_descriptor = face.face_model.compute_face_descriptor(input_image, shape)
    return face_descriptor


max_size = 340
male_label = +1
female_label = -1

print "Retrieving males images ..."
males = glob.glob("./imdb-datasets/images/males/*.jpg")
print "Retrieved {} faces !".format(len(males))

print "Retrieving females images ..."
females = glob.glob("./imdb-datasets/images/females/*.jpg")
print "Retrieved {} faces !".format(len(females))

females = females[:max_size]
males = males[:max_size]

vectors = dlib.vectors()
labels = dlib.array()

print "Reading males images ..."
for i, male in enumerate(males):
    print "Reading {} of {}\r".format(i, len(males))
    face_vectors = face_vector(read_image(male))
    if face_vectors is None:
        continue
    vectors.append(dlib.vector(face_vectors))
    labels.append(male_label)

print "Reading females images ..."
for i, female in enumerate(females):
    print "Reading {} of {}\r".format(i, len(females))
    face_vectors = face_vector(read_image(female))
    if face_vectors is None:
        continue
    vectors.append(dlib.vector(face_vectors))
    labels.append(female_label)

svm = dlib.svm_c_trainer_radial_basis()
svm.set_c(10)
classifier = svm.train(vectors, labels)

print "Prediction for male sample:  {}".format(classifier(vectors[random.randrange(0, max_size)]))
print "Prediction for female sample: {}".format(classifier(vectors[max_size + random.randrange(0, max_size)]))

with open('gender_model.pickle', 'wb') as handle:
    pickle.dump(classifier, handle)
then , open terminal and run these commands:
	# create a directory
	# paste codes from train and face module in train.py and face.py
	git clone https://github.com/mrl-athomelab/imdb-datasets
	mkdir data
	cd data
	# download shape_predictor_68_face_landmarks.dat and
	# dlib_face_recognition_resnet_model_v1.dat in this place
	cd ..
	python train.py
for test your model , you can use gender_model.pickle like this :
classifier = pickle.load(open('gender_model.pickle', 'r'))
# face_descriptor from compute_face_descriptor function
prediction = classifier(compute_face_descriptor)
result of classifier is a float number , you can make it logical with following code :
def is_male(p, thresh=0.5):
	return p > thresh

def is_female(p, thresh=-0.5):
	return p < thresh
Credits to Shahrzad series.
We created a kNN classification , You can read source code in knn.py module.
The key is about finding best neighbors.
        for x in range(len(self._samples)):
            dist = self.euclidean_distance(target, self._samples[x], length)
            if dist < self.thresh:
                distances.append((self._samples[x], dist, self._labels[x]))
From official dlib example , If Euclidean distance of two vectors is less than 0.6 , they are from same face.
In general, if two face descriptor vectors have a Euclidean distance between them less than 0.6 then they are from the same person, otherwise they are from different people. Here we just print the vector to the screen.
Thresh value in Classifier python class is maximum value of Euclidean distance between samples.
Labels , samples and distances will extended to same list , then the list will sort with distance key. Now we can predict label of input sample using there k nearest neighbors.
I used a limit for classification. It will limit samples of each labels that will help to prevent overlapping.


