Giter VIP home page Giter VIP logo

gordicaleksa / stable_diffusion_playground Goto Github PK

View Code? Open in Web Editor NEW
206.0 7.0 25.0 688 KB

Playing around with stable diffusion. Generated images are reproducible because I save the metadata and latent information. You can generate and then later interpolate between the images of your choice.

Home Page: https://youtube.com/c/TheAIEpiphany

License: MIT License

Python 100.00%
diffusion-models image-generation stable-diffusion latent-diffusion-models stable-diffusion-tutorial

stable_diffusion_playground's Introduction

Stable Diffusion Playground | ๐Ÿ’ป + ๐ŸŽจ = โค๏ธ

Welcome to stable diffusion playground! Use this repo to generate cool images!

Also - you get reproducibility for free! You'll know exactly how you created all of your images.

The metadata and latent information is stored inside of the image and into a npy file respectively.

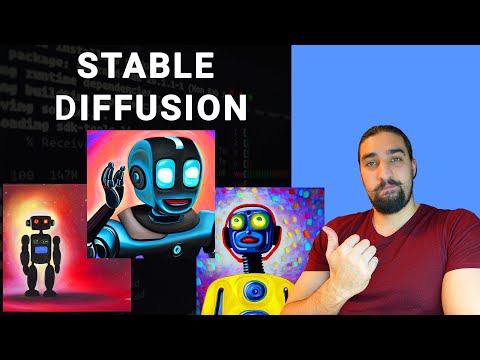
Here are some images I generated using the prompt: a painting of an ai robot having an epiphany moment:

If you generate something cool, tag me on Twitter ๐Ÿฆ @gordic_aleksa - I'd love to see what you create.

Setup

Follow the next steps to run this code:

  1. git clone https://github.com/gordicaleksa/stable_diffusion_playground
  2. Open Anaconda console and navigate into project directory cd path_to_repo
  3. Run conda env create from project directory (this will create a brand new conda environment).
  4. Run activate sd_playground (for running scripts from your console or setup the interpreter in your IDE)
  5. Run huggingface-cli login before the first time you try to use it to access model weights.

That's it! It should work out-of-the-box executing environment.yml file which deals with dependencies.

Important note: you have to locally patch the pipeline_stable_diffusion.py file from the diffusers 0.2.4 lib using the code from the main branch. The changes I rely (having latents as an argument) on still haven't propagated to the pip package.

How to use this code

The script can be run using an IDE (such as vscode, PyCharm, etc.) but it can also be run via command line thanks to fire package. fire makes things much more concise than using argparse! E.g. if there is an argument in the generate_images function with name <arg_name> then you can call python generate_images.py --<arg_name> <arg_value>.

Next up - a brief explanation of certain script arguments.

output_dir_name is the name of the output directory.

  • Your images will be stored at output/<output_dir_name>/imgs.
  • Your latents will be stored at output/<output_dir_name>/latents.
  • Your metadata will be stored inside of the user_comment exif tag if save_metadata_to_img==True otherwise it'll be saved to output/<output_dir_name>/metadata.

All of this relative to from where you're running the code.

prompt, guidance_scale, seed, num_inference_steps are the main knobs you have at your disposal to control image generation. Check out the code comments for more info.

Finally, the script has 3 modes of execution - let me explain each of them below.

GENERATE_DIVERSE mode

Set execution_mode=ExecutionMode.GENERATE_DIVERSE.

It will generate num_imgs images (of widthxheight resolution) and store them (as well as other info as described above) into the output file structure.

Use the main knobs as described above to control the content and quality of the image.

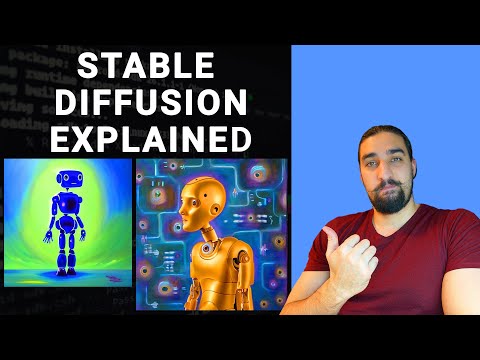
Here are some images I generated using this mode:

INTERPOLATE mode

Set execution_mode=INTERPOLATE.

There are 2 ways to run this mode:

  1. Run GENERATE_DIVERSE and pick the 2 images you like. Grab paths to their latents (you'll find them under output/<output_dir_name>/latents) and specify them inside of src_latent_path and trg_latent_path. After this the code will spherically interpolate num_imgs between them and by doing that generate a (mostly) smooth transition from source image into the target one.
  2. Don't specify the latents - they will be generated on the fly so you won't know how your source and target image look like upfront. Everything else remains the same.

As an example I'll take the 2 images from above and interpolate between them here is the resulting grid:

Note: I generated 200 images but had to subsample to only 32 for this grid image. But in general there are always sudden jumps in the decoded image space unless you move with very fine steps through the latent space.

REPRODUCE mode

Set execution_mode=REPRODUCE.

This one is more for debugging purposes.

Specify src_latent_path and metadata_path. For metadata_path specify either the actual metadata .json file path or simply the image path if it contains the metadata (this depends on save_metadata_to_img flag).

After this the script will reconstruct the original image - showcasing the reproducibility.

Hardware requirements

You need a GPU that has at least 8 GBs of VRAM to run this at 512x512 in fp16 precision.

If you wish to run it in fp32 precision you will need ~16 GBs of VRAM (unless you're willing to sacrifice resolution).

fp16 flag controls whether you load the fp16 or fp32 weights.

Learning material

Here is a video walk-through of this repo:

Getting started with Stable Diffusion

(the commit I used in the video is this one)

And here is a deep dive video going through the stable diffusion codebase:

How does Stable Diffusion work

Connect With Me

๐Ÿ’ผ LinkedIn ๐Ÿฆ Twitter ๐Ÿ‘จโ€๐Ÿ‘ฉโ€๐Ÿ‘งโ€๐Ÿ‘ฆ Discord

๐Ÿ“บ YouTube ๐Ÿ“š Medium ๐Ÿ’ป GitHub ๐Ÿ“ข AI Newsletter - one day heh

Acknowledgements

Took inspiration from Karpathy's gist.

Licence

License: MIT

stable_diffusion_playground's People

Contributors

gordicaleksa avatar

Stargazers

 avatar  avatar  avatar  avatar  avatar  avatar  avatar  avatar  avatar  avatar  avatar  avatar  avatar  avatar  avatar  avatar  avatar  avatar  avatar  avatar  avatar  avatar  avatar  avatar  avatar  avatar  avatar  avatar  avatar  avatar  avatar  avatar  avatar  avatar  avatar  avatar  avatar  avatar  avatar  avatar  avatar  avatar  avatar  avatar  avatar  avatar  avatar  avatar  avatar  avatar  avatar  avatar  avatar  avatar  avatar  avatar  avatar  avatar  avatar  avatar  avatar  avatar  avatar  avatar  avatar  avatar  avatar  avatar  avatar  avatar  avatar  avatar  avatar  avatar  avatar  avatar  avatar  avatar  avatar  avatar  avatar  avatar  avatar  avatar  avatar  avatar  avatar  avatar  avatar  avatar  avatar  avatar  avatar  avatar  avatar  avatar  avatar  avatar  avatar  avatar

Watchers

 avatar  avatar  avatar  avatar  avatar  avatar  avatar

stable_diffusion_playground's Issues

Can you also provide a demo for text guided inpainting please?

I try to use the code provided by https://github.com/huggingface/diffusers for text guided inpainting(under the same environment as this repo, I think it should also work for inpainting)

from io import BytesIO

from torch import autocast
import torch
import requests
import PIL

from diffusers import StableDiffusionInpaintPipeline

def download_image(url):
    response = requests.get(url)
    return PIL.Image.open(BytesIO(response.content)).convert("RGB")

img_url = "https://raw.githubusercontent.com/CompVis/latent-diffusion/main/data/inpainting_examples/overture-creations-5sI6fQgYIuo.png"
mask_url = "https://raw.githubusercontent.com/CompVis/latent-diffusion/main/data/inpainting_examples/overture-creations-5sI6fQgYIuo_mask.png"

init_image = download_image(img_url).resize((512, 512))
mask_image = download_image(mask_url).resize((512, 512))

device = "cuda"
model_id_or_path = "CompVis/stable-diffusion-v1-4"
pipe = StableDiffusionInpaintPipeline.from_pretrained(
    model_id_or_path,
    revision="fp16", 
    torch_dtype=torch.float16,
    use_auth_token=True
)
# or download via git clone https://huggingface.co/CompVis/stable-diffusion-v1-4
# and pass `model_id_or_path="./stable-diffusion-v1-4"` without having to use `use_auth_token=True`.
pipe = pipe.to(device)

prompt = "a cat sitting on a bench"
with autocast("cuda"):
    images = pipe(prompt=prompt, init_image=init_image, mask_image=mask_image, strength=0.75)["sample"]

images[0].save("cat_on_bench.png")

but got stuck just in the right beginning as follows:

Traceback (most recent call last):
  File "inpainting.py", line 7, in <module>
    from diffusers import StableDiffusionInpaintPipeline
ImportError: cannot import name 'StableDiffusionInpaintPipeline' from 'diffusers' (/home/xx/anaconda3/envs/sd_playground/lib/python3.8/site-packages/diffusers/__init__.py)

Any suggestion would be very appreciated!

Easy fix - width and height

right now the width and height don't behave properly.
For example, it throws an error on 640x512

Problem is simply that you didn't put the arguments in the pipelines
So,
width=width,
height=height,

put these ^ arguments in each call to 'pipe'

Fixed on my local, but I am too lazy to open a PR just now.

Fix interpolate()

Hi! I found an error in interpolate(). It will break when fed numpy arrays, because the variable inputs_are_torch will not have been defined when we reach the line with if inputs_are_torch:

I would make a pull request, but I'm not sure how (I've already forked this repo for another purpose, and won't be merging that because I've made changes that are irrelevant to this repo in it. Is there a way to fork twice?)

def interpolate(t, v0, v1, DOT_THRESHOLD=0.9995):
    """Helper function to (spherically) interpolate two arrays v1 v2.
    
    Taken from: https://gist.github.com/karpathy/00103b0037c5aaea32fe1da1af553355
    """

    if not isinstance(v0, np.ndarray):
        inputs_are_torch = True
        input_device = v0.device
        v0 = v0.cpu().numpy()
        v1 = v1.cpu().numpy()

    dot = np.sum(v0 * v1 / (np.linalg.norm(v0) * np.linalg.norm(v1)))
    if np.abs(dot) > DOT_THRESHOLD:
        v2 = (1 - t) * v0 + t * v1
    else:
        theta_0 = np.arccos(dot)
        sin_theta_0 = np.sin(theta_0)
        theta_t = theta_0 * t
        sin_theta_t = np.sin(theta_t)
        s0 = np.sin(theta_0 - theta_t) / sin_theta_0
        s1 = sin_theta_t / sin_theta_0
        v2 = s0 * v0 + s1 * v1

    if inputs_are_torch:
        v2 = torch.from_numpy(v2).to(input_device)

    return v2

Should become

def interpolate(t, v0, v1, DOT_THRESHOLD=0.9995):
    """Helper function to (spherically) interpolate two arrays v1 v2.
    
    Taken from: https://gist.github.com/karpathy/00103b0037c5aaea32fe1da1af553355
    """

    inputs_are_torch = False
    if not isinstance(v0, np.ndarray):
        inputs_are_torch = True
        input_device = v0.device
        v0 = v0.cpu().numpy()
        v1 = v1.cpu().numpy()

    dot = np.sum(v0 * v1 / (np.linalg.norm(v0) * np.linalg.norm(v1)))
    if np.abs(dot) > DOT_THRESHOLD:
        v2 = (1 - t) * v0 + t * v1
    else:
        theta_0 = np.arccos(dot)
        sin_theta_0 = np.sin(theta_0)
        theta_t = theta_0 * t
        sin_theta_t = np.sin(theta_t)
        s0 = np.sin(theta_0 - theta_t) / sin_theta_0
        s1 = sin_theta_t / sin_theta_0
        v2 = s0 * v0 + s1 * v1

    if inputs_are_torch:
        v2 = torch.from_numpy(v2).to(input_device)

    return v2

Problem logging into HuggingFace, and changing output dimensions doesn't work?

Hey thankyou for this amazing script. I had a problem using 'huggingface-cli login' which wouldn't let me paste my token, but I got around it by changing line 154 of generate_images.py to add my token.

Everything works great but I can't seem to change the output dimensions, it either continues doing 512,512 or has an error about mismatch? (sorry I'm very new to Python scripting, but your video was really helpful)

Only powers of 2 work for width/height, not multiples of 8

Hi there,

I am having trouble generating images with width/heights other than powers of 2. Using the fix mentioned in #1, I can generate images with different dimensions than 512x512, but only 256x256 and 128x128 have worked for me so far.

When I use 248x248 (a multiple of 8) as the width/height, I get the following error:

Generating 1. image.
0it [00:01, ?it/s]
Traceback (most recent call last):
...
File "C:\...\Anaconda3\envs\sd_playground\lib\site-packages\diffusers\models\unet_blocks.py", line 1034, in forward
hidden_states = torch.cat([hidden_states, res_hidden_states], dim=1)
RuntimeError: Sizes of tensors must match except in dimension 1. Expected size 32 but got size 31 for tensor number 1 in the list.

For 224x224 (a multiple of 32), I get a similar error but ending in this instead:

RuntimeError: Sizes of tensors must match except in dimension 1. Expected size 8 but got size 7 for tensor number 1 in the list.

Any help would be greatly appreciated.

Also, I keep getting NSFW content detected at low resolutions (especially 128x128), even with the default prompt. Is there a way to disable the NSFW filter?

Recommend Projects

  • React photo React

    A declarative, efficient, and flexible JavaScript library for building user interfaces.

  • Vue.js photo Vue.js

    ๐Ÿ–– Vue.js is a progressive, incrementally-adoptable JavaScript framework for building UI on the web.

  • Typescript photo Typescript

    TypeScript is a superset of JavaScript that compiles to clean JavaScript output.

  • TensorFlow photo TensorFlow

    An Open Source Machine Learning Framework for Everyone

  • Django photo Django

    The Web framework for perfectionists with deadlines.

  • D3 photo D3

    Bring data to life with SVG, Canvas and HTML. ๐Ÿ“Š๐Ÿ“ˆ๐ŸŽ‰

Recommend Topics

  • javascript

    JavaScript (JS) is a lightweight interpreted programming language with first-class functions.

  • web

    Some thing interesting about web. New door for the world.

  • server

    A server is a program made to process requests and deliver data to clients.

  • Machine learning

    Machine learning is a way of modeling and interpreting data that allows a piece of software to respond intelligently.

  • Game

    Some thing interesting about game, make everyone happy.

Recommend Org

  • Facebook photo Facebook

    We are working to build community through open source technology. NB: members must have two-factor auth.

  • Microsoft photo Microsoft

    Open source projects and samples from Microsoft.

  • Google photo Google

    Google โค๏ธ Open Source for everyone.

  • D3 photo D3

    Data-Driven Documents codes.