polaris-sync用于北极星和其他注册中心/网关服务之间的数据同步,用于以下2种场景:
- 北极星与其他注册中心的服务数据同步:用于服务实例在注册中心之间平滑迁移。
- 北极星服务数据同步到网关:用于网关无缝对接到注册中心服务发现场景。
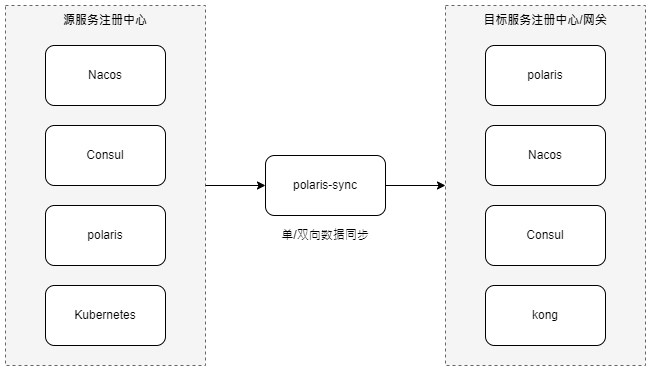
- 支持任意注册中心之间的双向服务数据同步。
- 支持对接主流网关,无需对网关做任何改动即可让网关对接任意注册中心。
- 基于插件化设计,可方便扩展其他注册中心实现。
-
执行所有安装之前,需要下载源码包,可以从以下2个地址下载单机版软件包,请选择最新的release版本:
-
Github下载:polaris-sync-release
-
解压后,执行部署
cd deploy/kubernetes
kubectl apply -f polaris-sync-config.yaml
kubectl apply -f polaris-sync.yaml
在注册中心迁移的过程中,往往需要双向访问,迁移到新注册中心的服务,需要访问未迁移的服务。同时未迁移的服务,也需要访问已迁移的服务。
为了不对应用程序做任何的改造,注册中心之间需要进行实时的双向数据同步,才能达成热迁移的目标。
下面以nacos到北极星的服务数据迁移为例,讲解如何使用polaris-sync实现注册中心之间的数据双向同步。
我们需要给polaris-sync配置2个同步任务,一个是nacos到北极星的同步任务,另外一个是北极星到nacos的同步任务。
需要修改polaris-sync-config.yaml中的json配置,添加任务的配置。
{
	"tasks": [
	    //第一个任务是从nacos单向同步到北极星
		{
			"name": "nacos1-to-polaris1",  //任务标识,需唯一
			"enable": true,
			"source": {                    //定义来源注册中心
					"name": "nacos1",      //注册中心名,需唯一
					"type": "nacos",       //注册中心类型
					"addresses": [
						"127.0.0.1:8848"   //nacos地址
					],
					"user": "nacos",       //登录凭据,如果未开启鉴权,可不填
					"password": "nacos"
			},
			"destination": {              //定义目标注册中心
					"name": "polaris1",
					"type": "polaris",
					"addresses": [
						"127.0.0.1:8090"  //北极星地址,使用HTTP端口
					],
					"token": "123456"     //访问凭据,如果未开启鉴权,可不填
			},
			"match": [                    // 指定哪些服务需要进行同步
				{
					"namespace": "empty_ns",                  //命名空间ID,nacos默认命名空间填empty_ns
					"service": "DEFAULT_GROUP__nacos.test.3", // 需要进行同步的服务名,格式为分组名__服务名
				}
			]
		},
		//第二个任务是从北极星单向同步到nacos
		{
			"name": "polaris1-to-nacos1",  //任务标识,需唯一
			"enable": true,
			"source": {                    //定义来源注册中心
					"name": "polaris1",
					"type": "polaris",
					"addresses": [
						"127.0.0.1:8090"  //北极星地址,使用HTTP端口
					],
					"token": "123456"     //访问凭据,如果未开启鉴权,可不填
			},
			"destination": {              //定义目标注册中心
					"name": "nacos1",      //注册中心名,需唯一
					"type": "nacos",       //注册中心类型
					"addresses": [
						"127.0.0.1:8848"   //nacos地址
					],
					"user": "nacos",       //登录凭据,如果未开启鉴权,可不填
					"password": "nacos"
			},
			"match": [                    // 指定哪些服务需要进行同步
				{
					"namespace": "empty_ns",                  //命名空间ID,nacos默认命名空间填empty_ns
					"service": "DEFAULT_GROUP__nacos.test.3", // 需要进行同步的服务名,格式为分组名__服务名
				}
			]
		}
	],
	"methods": [
		{
			"type": "watch",
			"enable": true
		},
		{
			"type": "pull",
			"enable": true,
			"interval": "60s"
		}
	],
	"health_check": {
		"enable": true
	},
	"report": {
		"interval" : "1m",
		"targets": [
			{
				"type": "file",
				"enable": true
			}
		]
	}
}
编辑完规则后,直接通过kubectl apply -f polaris-sync-config.yaml,polaris-sync监听到配置变更后,会进行任务的热加载,启动同步事项。
应用的地址信息往往注册到注册中心,当用户使用网关想直接访问注册中心的地址时,往往有2个方案:
第一种是使用网关插件,对接注册中心的服务发现机制。这种方式,用户需要在网关加载对应的注册中心的插件,存在一定的侵入性,且存在插件冲突管理的问题。
第二种是通过同步工具,将服务数据从注册中心同步到网关,然后走网关原生的路由能力进行寻址。这种方式对网关无侵入,与网关现有的插件不冲突,更符合网关的原生使用场景。
下面讲解如何使用polaris-sync实现北极星的服务数据同步到Kong网关,实现Kong网关直通北极星注册中心的场景。
需要修改polaris-sync-config.yaml中的json配置,添加任务的配置。
{
	"tasks": [
	{
			"name": "polaris1",
			"enable": true,
			"source": {
					"name": "ins-3ad0f6e6",
					"type": "polaris",
					"addresses": [
						"127.0.0.1:8090"
					],
					"token": "123456"
			},
			"destination": {
					"name": "kong",
					"type": "kong",
					"addresses": [
						"127.0.0.1:8001"  //这里填写kong的admin地址
					]
			},
			"match": [
				{
					"namespace": "default",
					"service": "test.service.3",
					"groups": [ //需要同步的分组信息,分组会成为kong的upstream,默认会有一个default的upstream,包含全部的实例
						{
							"name": "version-1",    //分组名
							"metadata": {
								"version": "1.0.0" //分组过滤的元数据
							}
						},
						{
							"name": "version-2",
							"metadata": {
								"version": "2.0.0"
							}
						}
					]
				}
			]
		}
	],
	"methods": [
		{
			"type": "watch",
			"enable": true
		},
		{
			"type": "pull",
			"enable": true,
			"interval": "60s"
		}
	],
	"health_check": {
		"enable": true
	},
	"report": {
		"interval" : "1m",
		"targets": [
			{
				"type": "file",
				"enable": true
			}
		]
	}
}
编辑完规则后,直接通过kubectl apply -f polaris-sync-config.yaml,polaris-sync监听到配置变更后,会进行任务的热加载,启动同步事项。
同步后,在kong中会创建1个service,以及3个upstream(分别是default, version-1, version-2),每个upstream里面的target和对应的过滤后的实例对应。
polaris-sync是一个配置驱动的同步工具,用户所有的任务下发都通过配置完成。
配置文件的定义可以参考polaris-sync-protobuf工程中的registry.proto的协议定义。
其中根对象为Registry。