前言
这是一个很小型的发布订阅库 https://github.com/developit/mitt。
是的它很小只有 200b,既然小当然功能简洁。作者为了压缩后文件大小绝对不能大于 200b 所以社区提的功能请求并没有解决,这次除了看源码外,再尝试解决一下未实现的功能请求 Async extension for mitt。
环境
依赖包内置了 ts-node 如果想直接运行 ts 的文件了使用 npx ts-node xxx.ts。
源码
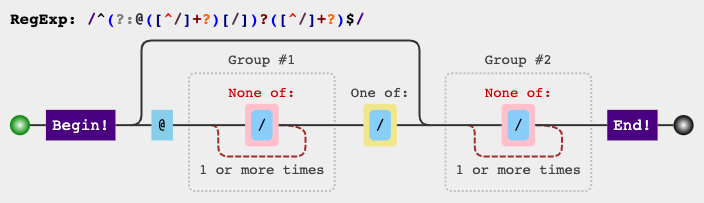
类型声明
从类型声明就可以大概看出存储的什么结构,有一个总集合 Map,Map 的一个 Key 对应多个回调函数。
// 事件类型
export type EventType = string | symbol;

// 基础回调函数
export type Handler<T = unknown> = (event: T) => void;
// 通配符回调函数
export type WildcardHandler<T = Record<string, unknown>> = (
  type: keyof T,
  event: T[keyof T]
) => void;

// 基础回调集合
export type EventHandlerList<T = unknown> = Array<Handler<T>>;
// 通配符的回调集合
export type WildCardEventHandlerList<T = Record<string, unknown>> = Array<WildcardHandler<T>>;

// 事件类型和回调的映射 { foo: [fn1, fn2] }
export type EventHandlerMap<Events extends Record<EventType, unknown>> = Map<
  keyof Events | "*",
  EventHandlerList<Events[keyof Events]> | WildCardEventHandlerList<Events>
>;

// Emitter 实例类型
export interface Emitter<Events extends Record<EventType, unknown>> {
  all: EventHandlerMap<Events>;

  // 函数重载 "on"
  // 类型约束 Key extends keyof Events
  // 索引类型查询操作符 keyof Events
  // 索引访问操作符 Events[Key]
  on<Key extends keyof Events>(type: Key, handler: Handler<Events[Key]>): void;
  on(type: "*", handler: WildcardHandler<Events>): void;

  off<Key extends keyof Events>(type: Key,handler?: Handler<Events[Key]>): void;
  off(type: "*", handler: WildcardHandler<Events>): void;

  emit<Key extends keyof Events>(type: Key, event: Events[Key]): void;
  emit<Key extends keyof Events>(type: undefined extends Events[Key] ? Key : never): void;
}
功能实现
on
on 的作用就是以 type 为键和分类把回调收集起来。
export default function mitt<Events extends Record<EventType, unknown>>(): Emitter<Events> {
  all = all || new Map();
  return {
    on<Key extends keyof Events>(type: Key, handler: GenericEventHandler) {
      // 获取到对应类型集合
      const handlers: Array<GenericEventHandler> | undefined = all!.get(type);
      // 如果已存在,直接 push 追加
      if (handlers) {
        handlers.push(handler);
      } else {
        // 反之,创建一个新的集合
        all!.set(type, [handler] as EventHandlerList<Events[keyof Events]>);
      }
    },
  };
}
off
off 的作用就是根据 type 找到对应的函数从集合中删除,如果没传入回调则全部删除。
关于 handlers.indexOf(handler) >>> 0,这有一遍文章 https://segmentfault.com/a/1190000014613703。
export default function mitt<Events extends Record<EventType, unknown>>(): Emitter<Events> {
  all = all || new Map();
  return {
    off<Key extends keyof Events>(type: Key, handler?: GenericEventHandler) {
      // 获取到对应类型集合
      const handlers: Array<GenericEventHandler> | undefined = all!.get(type);
      if (handlers) {
        if (handler) {
          // 回调存在,找到对应的函数删除,只删除一个。
          // 关于 -1 >>> 0 : https://segmentfault.com/a/1190000014613703
          handlers.splice(handlers.indexOf(handler) >>> 0, 1);
        } else {
          // 不存在清空此类型收集的回调
          all!.set(type, []);
        }
      }
    },
  };
}
emit
emit 的作用就是以 type 获取到对应的集合,依次运行对应的函数。
关于为什么要用一次 slice developit/mitt#109。
export default function mitt<Events extends Record<EventType, unknown>>(): Emitter<Events> {
  all = all || new Map();
  return {
    emit<Key extends keyof Events>(type: Key, evt?: Events[Key]) {
      let handlers = all!.get(type);
      if (handlers) {
        (handlers as EventHandlerList<Events[keyof Events]>)
          // Why use slice: https://github.com/developit/mitt/pull/109
          .slice()
          // 执行对应类型的所有回调
          .map((handler) => {
            handler(evt!);
          });
      }

      // 每次派发都执行通配符的回调
      handlers = all!.get("*");
      if (handlers) {
        (handlers as WildCardEventHandlerList<Events>)
          .slice()
          .map((handler) => {
            handler(type, evt!);
          });
      }
    },
  };
}
功能扩展
在翻看 Issues 的时候发现有两个功能讨论的比较多(也有给出方案但感觉不完善),有用也是有用就是作者不想大小不想超过预期。所以啊作者不实现的我们就得根据自己的需要去改。所以我对这两个功能尝试在不改动源码的情况下去解决,现在用不到以后不一定了。
once
once 是只触发一次。所以实现就是触发一次之后立刻解除监听。实现方式为对原始的功能进行包装。
import mitt from "../src/index";
import type { EventType, EventHandlerMap, Emitter, Handler } from '../src/index';

// 继承 Emitter 基础接口
export interface EmitterOnce<Events extends Record<EventType, unknown>> extends Emitter<Events> {
  once<Key extends keyof Events>(type: Key,handler: Handler<Events[Key]>): void;
}

export default function mittOnce<Events extends Record<EventType, unknown>>(
  all?: EventHandlerMap<Events>
): EmitterOnce<Events> {
  const emitter = mitt<Events>(all);

  return {
    // 原始方法
    ...emitter,

    // 扩展 once
    once<Key extends keyof Events>(type: Key, handler: Handler<Events[Key]>) {
      const fn = (arg: Events[Key]) => {
        // 执行一次,立刻解除监听
        emitter.off(type, fn);
        handler(arg);
      };
      emitter.on(type, fn);
    },
  };
}
测试示例和结果如下。
import mittOnce from "./once";

type Events = {
  foo?: string;
};

const emitter = mittOnce<Events>();

function A() {
  console.log("A");
}

function B() {
  console.log("B");
}

emitter.on("foo", A);
emitter.once("foo", B);
emitter.emit("foo"); // A B
emitter.emit("foo"); // A
async
比如我要 emit 事件,我还想知道触发的事件是否全部执行完毕了。这里我扩展了两个 api 分别是 串行(emitSerial) 和并行(emitParallel)。这两个功能都是对原始的函数使用 Promise 去执行。
import mitt from "../src/index";
import type { EventType, EventHandlerMap, Emitter, EventHandlerList, WildCardEventHandlerList } from '../src/index';

// 继承 Emitter 基础接口
export interface EmitterAsync<Events extends Record<EventType, unknown>>
  extends Emitter<Events> {
  emitSerial<Key extends keyof Events>(type: Key, event: Events[Key]): Promise<void>;
  emitSerial<Key extends keyof Events>(type: undefined extends Events[Key] ? Key : never): Promise<void>;

  emitParallel<Key extends keyof Events>(type: Key, event: Events[Key]): Promise<void>;
  emitParallel<Key extends keyof Events>(type: undefined extends Events[Key] ? Key : never): Promise<void>;
}

export default function mittAsync<Events extends Record<EventType, unknown>>(
  all?: EventHandlerMap<Events>
): EmitterAsync<Events> {
  const emitter = mitt<Events>(all);

  return {
    // 原始方法
    ...emitter,

    // 串行  Promise.then().then()
    async emitSerial<Key extends keyof Events>(type: Key, evt?: Events[Key]) {
      let handlers = emitter.all!.get(type);
      if (handlers) {
        const callbacks = (handlers as EventHandlerList<Events[keyof Events]>).slice();
        // compose run
        await callbacks.reduce(
          (promise, callback) => promise.then(() => callback(evt!)),
          Promise.resolve()
        );
      }

      // 每次派发都执行通配符的回调
      handlers = emitter.all!.get("*");
      if (handlers) {
        const callbacks = (handlers as WildCardEventHandlerList<Events>).slice();
        // compose run
        await callbacks.reduce(
          (promise, callback) => promise.then(() => callback(type, evt!)),
          Promise.resolve()
        );
      }
    },

    // 并行  Promise.all
    async emitParallel<Key extends keyof Events>(type: Key, evt?: Events[Key]) {
      let handlers = emitter.all!.get(type);
      if (handlers) {
        const callbacks = (handlers as EventHandlerList<Events[keyof Events]>).slice();
        // Promise.all run
        await Promise.all(
          callbacks.map((handler) => Promise.resolve(handler(evt!)))
        );
      }

      // 每次派发都执行通配符的回调
      handlers = emitter.all!.get("*");
      if (handlers) {
        const callbacks = (handlers as WildCardEventHandlerList<Events>).slice();
        // Promise.all run
        await Promise.all(
          callbacks.map((handler) => Promise.resolve(handler(type, evt!)))
        );
      }
    },
  };
}
测试示例和结果如下。
import mittAsync from "./async";

type Events = {
  foo?: string;
};

const emitter = mittAsync<Events>();

async function A() {
  await new Promise((reslove) => {
    setTimeout(() => {
      console.log("A");
      reslove("A");
    }, 2000);
  });
}

function B() {
  return new Promise((reslove) => {
    setTimeout(() => {
      console.log("B");
      reslove("B");
    }, 1000);
  });
}

function C() {
  console.log("C");
}

emitter.on("foo", A);
emitter.on("foo", B);
emitter.on("foo", C);

// 原始 C D B A
emitter.emit("foo");
console.log("D");

// 串行 A B C D
(async () => {
  await emitter.emitSerial("foo");
  console.log("D");
})();

// 并行 C B A D
(async () => {
  emitter.emitParallel("foo").then(() => {
    console.log("D");
  });
})();
总结
-
高级类型平常用业务的不多,一般也就类库中应用的多,也学也忘了刚好回顾下。
-
扩展功能中用到了 compose 刚好是对前几期源码的应用。