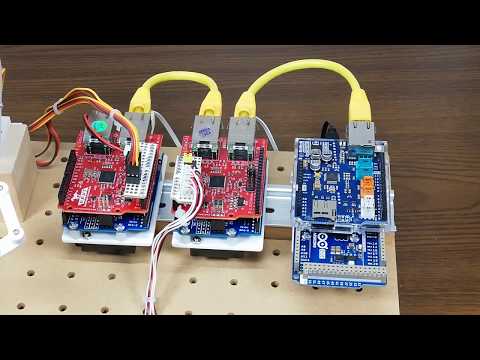
マスターもスレーブもArduonoで作ったEtherCATネットワークのデモ。
4つのノブで4軸のアームロボットをコントロールする。


- ハードウェア: Arduino Due + Ethernet Shield 2
- 依存ライブラリ: SOEM4Arduino
- スケッチ: ec_master/ec_master.ino
スレーブ1から4個のポテンショメータの値を取得し、スレーブ2へ4個のマイクロサーボの指令値を設定する。
- ハードウェア: Arduino Uno + EasyCAT Shield
- 依存ライブラリ: EasyCAT Library V2.0
- スケッチ: ec_slave1/ec_slave1.ino
- 入力デバイス: ポテンショメータ(可変抵抗 B型 10kΩ) × 4個
ノブを取り付けた4個のポテンショメータで0~5Vのアナログ信号を4つ作り、Arduino UnoのA0~A3に入力する。それらがスレーブ2のアームロボットの肩、肘、手首、指の関節の指令値となる。
- ハードウェア: Arduino Uno + EasyCAT Shield
- 依存ライブラリ: EasyCAT Library V2.0
- スケッチ: ec_slave2/ec_slave2.ino
- 出力デバイス: マイクロサーボSG90 × 4個
4個のマイクロサーボSG90をArduino Dueの3,4,5,6番ピンに接続する。サーボの電源はArduinoの5Vからは取らず別途供給すること。マイクロサーボはアームロボットに組付けて、肩、肘、手首、指の関節を駆動する。アームロボットは下記のキットを用いた。
※このキットではいちばんトルクを要する肘関節にはSG92Rを用いるように書かれているが、SG92を用いると著しい振動が見られたのですべての関節にSG90を用いた。(ロットによるかもしれない。)
オーバースペックにもほどがある制御系である。

EtherCATの通信周期は実測で約1.3msecであった。本気のEthernetはこんなものではないはずだが、ジッタは数usec以下に抑えられている。そもそもマイクロサーボの制御パルスは20msec周期であるから、通信周期1.3msecでも速すぎて宝の持ち腐れである。
マスターのスケッチは、Arduino Due + Ethernet Shield 2 の他に下記のハードウェアでも動作確認できている。
- GR-SAKURA
- GR-ROSE
また、Mbed版のマスターとして下記のものも動作確認できている。
- ハードウェア: GR-PEACH
- 依存ライブラリ: SOEM4Mbed
- ソース: ec_master_mbed/main.cpp
また、スレーブのスケッチは、Arduino Uno の他に下記のハードウェアでも動作確認できている。
- GR-SAKURA
