hujiaohj / blog Goto Github PK
View Code? Open in Web Editor NEWღ( ´・ᴗ・` ) 我的个人博客,喜欢的小伙伴可以点star ⭐️
ღ( ´・ᴗ・` ) 我的个人博客,喜欢的小伙伴可以点star ⭐️


网上 React Native 的 icon 实现大都是使用iconfont方案,即:react-native-vector-icons
此方案存在一个问题:强依赖客户端打包,即每新增图标,就需要客户端重新打包,资源管理上不能做到 RN 与客户端解耦
为了避免这个问题,使用了SVG方案:react-native-svg 来实现Icon
接下来将从三个方面进行分享:
此文会涉及部分 React Native 转 web 的知识,使用的是 react-native-web 方案,可以看看我之前写的文章:react native转web方案:react-native-web
npm install react-native-svg --savereact-native link react-native-svg以上操作,其实就是将 react-native-svg 的依赖安装到客户端中,进行了上面的操作,基本已自动完成安装依赖,但是在部分IOS上会存在问题,如遇到问题可以去 react-native-svg 查看解决方案
react-native-svg-uri 支持在RN中通过一个URL或者静态文件渲染svg,同时也支持传入svg字符串,将其渲染
使用如下:
// 安装
npm install react-native-svg-uri --save
// 确保已在客户端中安装了 react-native-svg 依赖,若未安装依赖,执行:
react-native link react-native-svg
下面将使用 react-native-svg-uri 来实现Icon组件,这个库源码只有两个js文件,有兴趣的小伙伴可以自行了解~
上面我们有提到,react-native-svg-uri 支持传入svg字符串来渲染svg,所以可以将多个svg文件通过脚本的形式转换成一个js对象或者一个json文件,其格式如下:
svg.js
export default {
    "arrow-left": "<svg t=\"1533091848499\" class=\"icon\" style=\"\" viewBox=\"0 0 1024 1024\" version=\"1.1\" xmlns=\"http://www.w3.org/2000/svg\" p-id=\"579\" xmlns:xlink=\"http://www.w3.org/1999/xlink\" width=\"32\" height=\"32\"><defs><style type=\"text/css\"></style></defs><path d=\"M769.405 977.483a68.544 68.544 0 0 1-98.121 0L254.693 553.679c-27.173-27.568-27.173-72.231 0-99.899L671.185 29.976c13.537-13.734 31.324-20.652 49.109-20.652s35.572 6.917 49.109 20.652c27.173 27.568 27.173 72.331 0 99.899L401.921 503.681l367.482 373.904c27.074 27.568 27.074 72.231 0 99.899z\" fill=\"\" p-id=\"580\"></path></svg>"
}
在使用时,可以通过获取对应 key 的 value 传给 react-native-svg-uri 渲染
上面的转换脚本可以参考:svg2json,代码:https://github.com/HuJiaoHJ/svg2json
做好文件转换之后,我们可以开发Icon组件啦
index.js
import createIconSet from './create-icon-set';
// 即上面转换得到的 svg.js
import svg from './svg';

const Icon = createIconSet(svg, 'rn_components');

export default Icon;

export { createIconSet };
creact-icon-set.native.js
import React, { Component } from 'react';
import SvgUri from 'react-native-svg-uri';

export default function createIconSet(svg, fontName) {
    return class Icon extends Component {
        render () {
            const { icon, color, size, style } = this.props;
            let svgXmlData = svg[icon];

            if (!svgXmlData) {
                let err_msg = `no "${icon}"`;
                throw new Error(err_msg);
            }
            return (
                <SvgUri width={size} height={size} svgXmlData={svgXmlData} fill={color} style={style} />
            );
        }
    };
}
以上就是Icon组件的实现
对RN2web感兴趣的小伙伴可以看看:react native转web方案:react-native-web
在此基础上,我们需要对我们Icon组件支持2web,由于没有对应的web组件,所以需要我们自行实现对应web的组件
web端我们使用iconfont来做Icon组件(注意:iconfont不支持多色icon,多色的icon只能选择svg或者img)
还是svg文件转换的问题,我们需要先将svg文件转换成iconfont,即

这样我们就能向常规web一样使用iconfont啦
上面的转换工具可以参考:svg2iconfont,代码:https://github.com/HuJiaoHJ/svg2iconfont
当然,要注意记得将生成的iconfont.css文件引入页面html中,接下来看看2web的Icon组件实现,不需要额外新建文件夹,只需在相同文件夹下新增 creact-icon-set.js 文件(注意到上面RN的文件是 creact-icon-set.native.js),这在实际使用过程中,会自动识别这两个文件
creact-icon-set.js
import React, { Component } from 'react'
import { createElement, StyleSheet } from 'react-native'

export default function createIconSet(svgs, fontName) {
  return class Icon extends Component {
    render() {
      const { icon, color, size, style } = this.props
      const styles = StyleSheet.create({
        iconStyle: {
          color,
          fontSize: size,
        },
      })
      const props = {
        className: `${fontName ? fontName + '-' : 'icon-'}${icon}`,
        style: StyleSheet.compose(
          style,
          styles.iconStyle
        ),
      }
      return createElement('i', props)
    }
  }
}
如果看了 react native转web方案:react-native-web ,应该就能知道 import { createElement, StyleSheet } from 'react-native' 实际上是 import { createElement, StyleSheet } from 'react-native-web',没错,就是直接使用的 react-native-web 的 API 来开发转web之后的组件
以上就完成了Icon组件的2web支持
我们怎么使用呢?有两种情况:
Icon组件会自带一些常用的icon,在使用这些icon时,使用较为简单,直接引入,如下使用:
// 引入
import Icon from 'Icon';

// 使用
<Icon icon={'arrow-left'} size={30}/>
注意:如果需要支持2web,需要将对应的 iconfont.css 引入到页面html中
如果需要添加业务icon,有如下两步:
这部分就不详细讲了,可以参考上面的内容
代码如下:
import React from 'react'
// 引入Icon组件的 createIconSet 方法
import { createIconSet } from 'Icon'
// 包含业务svg的js文件
import svgs from './svgs'

// 传入业务svg的js对象,生成CIcon组件
const CIcon = createIconSet(svgs)

export default function () {
  return Object.keys(svgs).map((item, index) => (
    // 使用
    <CIcon icon={item} color={'#000'} size={50} key={index} />
  ))
}以上所有代码可在个人开发的RN组件库的项目中查看到:rn_components Icon,组件库现在才刚开始建设,后续会不断完善
以上就是我对 React Native Icon方案:react-native-svg 的分享,希望能对有需要的小伙伴有帮助~~~
喜欢我的文章的小伙伴可以点star ⭐️
在日常开发过程中,前端工程工作流程规范主要包括代码检查规范以及代码提交规范。而代码检查主要两个部分:语法检查及类型检查;代码提交规范主要是Git Commit Log规范。
本文主要分享日常工作中,实现自动化工作流规范的几种工具:
1、JavaScript语法检查 - ESLint
2、JavaScript类型检查 - Flow
3、自动化代码检查规范 - husky + lint-staged
4、自动化代码提交规范 - husky + commitlint
文档:https://cn.eslint.org/docs/user-guide/configuring
安装ESLint
npm install eslint --dev安装其他依赖
// babel-eslint 是对babel解析器的包装,使其能与ESLint兼容,支持对babel编译的代码进行检查
npm install babel-eslint -dev

// eslint-config-react-app 此插件包括了使用Create React App创建的项目中默认的ESLint配置
npm install eslint-config-react-app --dev

// eslint-plugin-react 此插件是与React语法相关的检查规则
npm install eslint-plugin-react --dev

// eslint-plugin-jsx-a11y 此插件是与JSX语法相关的检查规则
npm install eslint-plugin-jsx-a11y --dev

// eslint-plugin-import 此插件用于支持ES6的import/export语法检查
npm install eslint-plugin-import --dev

// eslint-plugin-flowtype 此插件是与flow相关的检查规则,使用了flow的项目,需要引入
npm install eslint-plugin-flowtype --dev.eslintrc.js
module.exports = {
    parser: 'babel-eslint',
    extends: ['react-app', 'plugin:flowtype/recommended'],
    plugins: ['react', 'flowtype', 'jsx-a11y', 'import'],
    rules: {
        // 【error】使用单引号
        quotes: ['error', 'single'],
        // 句末不加分号
        semi: ['error', 'never'],
        // 【warn】禁止未使用过的变量
        'no-unused-vars': [
            'warn',
            {
              vars: 'all',
              args: 'none',
            },
        ],
        ...
    }
}命令行
npx eslint srcpackage.json
{
    "scripts": {
        "lint": "eslint src"
    }
}
npm run lint// 注意:对于使用react-native init创建的项目,flow-bin版本应使用 0.76.0
npm install flow-bin --dev.flowconfig 使用react-native init默认的配置即可
命令行
npx flow checkpackage.json
{
    "scripts": {
        "staged_flow": "flow focus-check"
    }
}
npm run staged_flow上面介绍了通过eslint对JavaScript语法进行检查,通过flow对JavaScript静态类型检查,而在实际开发过程中,为了提高开发效率,应该只对本次提交所修改的文件进行检查,而不是每次都对所有文件进行检查。
这就需要使用 lint-staged 来实现。使用如下:
// 安装
$ npm install --save-dev lint-staged
// 配置 package.json
{
"lint-staged": {
"src/**/{*.js,*.jsx}": [
"yarn run lint",
"yarn run staged_flow"
]
},
}而我们使用 husky 来更方便的使用 Git Hooks。使用如下:
// 安装
$ npm install husky --save-dev
// 配置 package.json
{
"husky": {
"hooks": {
"pre-commit": "lint-staged"
}
}
}以上就是配置 pre-commit Git Hook,支持每次提交前,执行 lint-staged,即对此次提交所修改的文件进行代码检查。从而实现了代码流程的自动化。
开发过程中,需要规范不仅仅只有代码上的规范,还有很重要的一部分则是Git Commit Log规范。
Git Commit Log规范最为流行的则是Angular规范。使用 commitlint 自动化规范流程,使用如下:
// 安装
$ npm install --save-dev @commitlint/config-conventional @commitlint/cli

// 添加配置文件
$ echo "module.exports = {extends: ['@commitlint/config-conventional']}" > commitlint.config.js
通过配合 husky 配置 Git Hooks。如下:
// 配置 package.json
{
    "husky": {
        "hooks": {
            "commit-msg": "commitlint -e $GIT_PARAMS"
        }
    }
}
以上,就能实现 Git Commit Log 规范流程自动化,非常方便。规范了 Git Commit Log,就能直接使用 Git Commit Log 来自动生成 changelog,使用 conventional-changelog-cli,如下:
// 安装
$ npm install --save-dev conventional-changelog-cli

// 使用
$ npx conventional-changelog -p angular -i CHANGELOG.md -s本文分享的内容都是我在平时工作中用到的,希望能对有需要的小伙伴有帮助~~~
喜欢我的文章的小伙伴可以点star ⭐️
在我们平时的开发工作中,chrome开发者工具是我们必不可少的工具,除了Chrome原生的工具之外,还有比如:
本文主要分享的就是这些开发者工具怎么与页面进行消息通信的。
首先,先看一个例子:
这个开发者工具源码:https://github.com/HuJiaoHJ/ec-devtools,这个工具是一个支持canvas库 ( easycanvas , https://github.com/chenzhuo1992/easycanvas ) 的chrome调试工具,能对canvas的元素的样式、物理属性等进行修改,达到所见即所得的效果,提高调试效率。感兴趣的小伙伴可以自行了解下~
本文主要是通过这个工具,分享一下 chrome devtools 通信相关的知识(chrome devtools的基础开发在这里就不介绍了,不熟悉的小伙伴可以去官网看看~)当然,没有接触过chrome devtools开发的小伙伴,也可以通过这篇文章了解到chrome devtools的基本组成,了解其基本的通信方式,对平时的工作也能有一些借鉴和帮助哒~
chrome devtools 主要分为三部分:
下面会详细介绍各部分,下面这张图是这三部分之间的通信全景图:
我们根据这张图,来详细的看看每个部分的具体实现吧~
内容脚本(Content Script)是在网页的上下文中运行的js文件,可以通过此js文件获取DOM和捕获DOM事件。
网页不能直接与开发者工具(DevTools Page)进行通信,需要通过在内容脚本中监听网页事件,通过chrome.runtime API将消息传递到后台页面中,从而传递到开发者工具中。
内容脚本可以监听网页的DOM事件或者window.postMessage事件,如下:
window.postMessage({
    name: 'hello wolrd'
}, '*');window.addEventListener('message', e => {
if (e.source === window) {
chrome.runtime.sendMessage(e.data);
}
});后台页面,虽然叫页面,其实是在后台的js脚本。
内容脚本监听的事件触发之后,通过chrome.runtime.sendMessage()方法将消息传递到后台页面(Background Page)中。
后台脚本通过chrome.runtime.onMessage.addListener()方法监听消息,如下:
chrome.runtime.onMessage.addListener((message, sender, sendResponse) => {
    if (sender.tab) {
        const tabId = sender.tab.id;
        ......
    } else {
        console.log("sender.tab not defined.");
    }
    return true;
});后台页面与开发者工具通过长连接进行通信。(chrome.runtime API)如下:
// 与后台页面消息通信-长连接
const port = chrome.runtime.connect({name: 'devtools'});
// 监听后台页面消息
port.onMessage.addListener((message) => {
    ......
});
// 往后台页面发送消息
port.postMessage({
    name: 'original',
    tabId: chrome.devtools.inspectedWindow.tabId
});chrome.runtime.onConnect.addListener(function (port) {
const extensionListener = function (message, sender, sendResponse) {
if (message.name == 'original') {
......
}
};
port.onMessage.addListener(extensionListener);
port.onDisconnect.addListener(function(port) {
port.onMessage.removeListener(extensionListener);
});
});以上,就介绍了网页与内容脚本、内容脚本与后台页面、后台页面与开发者工具之间的通信,所以可以发现,网页的消息是通过内容脚本、后台页面,最后到达开发者工具,那么达到内容脚本的消息怎么传递到开发工具的呢?
显而易见,其实就是通过后台页面作为桥,将内容脚本的消息传递到开发者工具中。具体代码如下:
// 作为content script 与 devtool 通信的桥
const connections = {};

chrome.runtime.onConnect.addListener(function (port) {

    const extensionListener = function (message, sender, sendResponse) {
        if (message.name == 'original') {
            connections[message.tabId] = port;
        }
    };
    port.onMessage.addListener(extensionListener);

    port.onDisconnect.addListener(function(port) {
        port.onMessage.removeListener(extensionListener);

        const tabs = Object.keys(connections);
        for (let i = 0, len = tabs.length; i < len; i++) {
            if (connections[tabs[i]] == port) {
                delete connections[tabs[i]];
                break;
            }
        }
    });
});

// 接收内容脚本的消息,并发送到devtool的消息
chrome.runtime.onMessage.addListener((message, sender, sendResponse) => {
    if (sender.tab) {
        const tabId = sender.tab.id;
        if (tabId in connections) {
            connections[tabId].postMessage(message);
        } else {
            console.log("Tab not found in connection list.");
        }
    } else {
        console.log("sender.tab not defined.");
    }
    return true;
});
以上,就完成了网页的消息传递到开发者工具的过程,那么开发者工具的消息怎么传递到网页?
开发者工具的消息传递到网页主要有两种方法:
1、直接使用chrome.devtools.inspectedWindow.eval()方法,在网页的上下文中执行js代码,如下:
chrome.devtools.inspectedWindow.eval('console.log(window)');2、开发者工具通过长连接将消息传递到后台页面,在后台页面中,通过调用chrome.tab.excuteScript()方法,在网页中执行js代码,如下:
chrome.tab.excuteScript(tabId, {
    code: 'console.log(window)'
});
推荐使用第一种方法~
以上,就介绍了网页与开发者工具之间的通信全过程啦~~~
以上通信方式在文章一开始提到的工具都用到了,仓库:https://github.com/HuJiaoHJ/ec-devtools,其实也基本涵盖了 chrome 开发者工具的所有通信方式~
学习了 chrome devtools 的通信方式之后,就能愉快的开发自己的开发者工具啦,希望能对有需要的小伙伴有帮助~~~
喜欢我的文章的小伙伴可以点star ⭐️
本文源码是2018年8月10日拉取的React仓库master分支上的代码
React源码分析内容非常多,本文专注在以下两个问题:
在开始源码分析之前,首先先简单介绍一下React的一些基础概念
React定位是一个构建用户界面的JavaScript类库,使用JavaScript开发UI组件,支持多种方式渲染组件,输出用户界面。
React常见的三种应用类型:
这三种应用分别对应三种不同的渲染方式:
下面,以 React Web应用 为例,介绍下React三个主要组成部分:

在开始 Reconciliation 模块之前,先简单介绍各个模块:
const React = {
  Children: {...},

  createRef,
  Component,
  PureComponent,

  createContext,
  forwardRef,

  Fragment: REACT_FRAGMENT_TYPE,
  StrictMode: REACT_STRICT_MODE_TYPE,
  unstable_AsyncMode: REACT_ASYNC_MODE_TYPE,
  unstable_Profiler: REACT_PROFILER_TYPE,

  createElement,
  cloneElement,
  createFactory,
  isValidElement,

  version: ReactVersion,

  __SECRET_INTERNALS_DO_NOT_USE_OR_YOU_WILL_BE_FIRED: ReactSharedInternals,
};
从上面的源码可以看到,React基础模块只包括了基础的API和组件相关的定义。如:createRef、Component等。
其中可以重点关注的两点:
在平时的开发中,我们使用的JSX语法,所以我们并没有直接接触到 React.creatElement 方法
大家都知道,JSX语法会被babel编译成调用 React.creatElement 方法,如下:

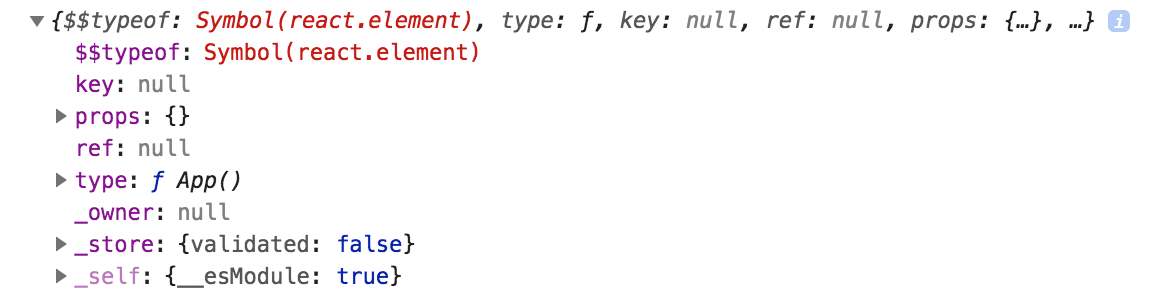
而 React.creatElement 最终返回的是 React Element,数据结构如下:
{
    $$typeof: REACT_ELEMENT_TYPE,
    type: type,
    key: key,
    ref: ref,
    props: props,
    _owner: owner,
}
可以在页面中把 <App/> 打印出来,如下:
组件是我们开发使用最多的,我们可以简单的看下源码:
function Component(props, context, updater) {
  this.props = props;
  this.context = context;
  // If a component has string refs, we will assign a different object later.
  this.refs = emptyObject;
  // We initialize the default updater but the real one gets injected by the
  // renderer.
  this.updater = updater || ReactNoopUpdateQueue;
}
Component.prototype.isReactComponent = {};
Component.prototype.setState = function(partialState, callback) {
  this.updater.enqueueSetState(this, partialState, callback, 'setState');
};
Component.prototype.forceUpdate = function(callback) {
  this.updater.enqueueForceUpdate(this, callback, 'forceUpdate');
};
从Component的定义上可以看到,我们常用的 setState 方法是调用了 updater.enqueueSetState,以 react-dom 为例,此 updater 对象会调用该组件构造函数时(这块会在后面的生命周期函数调用中讲到),赋值为classComponentUpdater,源码如下:
const classComponentUpdater = {
  isMounted,
  enqueueSetState(inst, payload, callback) {
    ...
  },
  enqueueReplaceState(inst, payload, callback) {
    ...
  },
  enqueueForceUpdate(inst, callback) {
    ...
  },
};
可以知道,组件中调用 setState 其实是调用的 classComponentUpdater.enqueueSetState 方法,这里就是开始 setState 的入口
至此,就简单的介绍了React基础模块,下面开始介绍渲染模块:react-dom
const ReactDOM: Object = {
  createPortal,
  findDOMNode(
    componentOrElement: Element | ?React$Component<any, any>,
  ): null | Element | Text {
    ...
  },
  hydrate(element: React$Node, container: DOMContainer, callback: ?Function) {
    return legacyRenderSubtreeIntoContainer(null, element, container, true, callback,);
  },

  render(element: React$Element<any>, container: DOMContainer, callback: ?Function,) {
    return legacyRenderSubtreeIntoContainer(null, element, container, false, callback,);
  },
  ...
};
这里我们可以关注下 render 方法,所有 react web应用入口都会调用 ReactDOM.render(),本文也会从 ReactDOM.render() 开始进行源码的分析
在进行源码分析之前,先介绍下本文的核心:Reconciliation模块
Reconciliation模块又叫协调模块,而我们题目上说的 React Fiber 则是在这个模块中使用一种调度算法
React Fiber调度算法又叫 Fiber Reconciler,是 React 16 启用的一种新的调度算法,是对核心调度算法(Stack Reconciler)的重构
React 16版本之前使用的 Stack Reconciler 调度算法,它通过递归的形式遍历 Virtual DOM,存在难以中断和恢复的问题,如果react更新任务运行时间过长,就会阻塞布局、动画等的运行,可能导致掉帧。它的调用栈如下:

允许渲染过程分段完成,而不必须一次性完成,中间可以返回至主进程控制执行其他任务,它有如下新特性:
它的调用栈如下:

关于React新老调度算法的对比,大家可以看看:https://zhuanlan.zhihu.com/p/37095662
关于React Fiber概念的再详细的介绍,大家可以看看:http://www.ayqy.net/blog/dive-into-react-fiber/
以上,就对React的基本概念进行了介绍,接下来开始源码分析~
React Fiber架构引入了新的数据结构:Fiber节点
Fiber节点数据结构如下:
export type Fiber = {|
  // Tag identifying the type of fiber.
  tag: TypeOfWork,
  // Unique identifier of this child.
  key: null | string,
  // The function/class/module associated with this fiber.
  type: any,
  // The local state associated with this fiber.
  stateNode: any,
  // Remaining fields belong to Fiber
  return: Fiber | null,
  // Singly Linked List Tree Structure.
  child: Fiber | null,
  sibling: Fiber | null,
  index: number,
  // The ref last used to attach this node.
  ref: null | (((handle: mixed) => void) & {_stringRef: ?string}) | RefObject,
  // Input is the data coming into process this fiber. Arguments. Props.
  pendingProps: any, // This type will be more specific once we overload the tag.
  memoizedProps: any, // The props used to create the output.
  // A queue of state updates and callbacks.
  updateQueue: UpdateQueue<any> | null,
  // The state used to create the output
  memoizedState: any,
  // A linked-list of contexts that this fiber depends on
  firstContextDependency: ContextDependency<mixed> | null,
  mode: TypeOfMode,
  // Effect
  effectTag: TypeOfSideEffect,
  // Singly linked list fast path to the next fiber with side-effects.
  nextEffect: Fiber | null,
  firstEffect: Fiber | null,
  lastEffect: Fiber | null,

  expirationTime: ExpirationTime,
  childExpirationTime: ExpirationTime,

  alternate: Fiber | null,
  actualDuration?: number,
  actualStartTime?: number,
  selfBaseDuration?: number,
  treeBaseDuration?: number,
|};
Fiber树结构图(链表结构)如下:

我们看张图:

React组件渲染分为两个阶段:reconciler、render。从图上可以看到:
在上面的基础概念介绍中有提到,react-dom模块负责react web应用的渲染工作,那么Reconciliation模块(协调模块)具体做了什么工作呢?
Reconciliation模块的工作可以分为两部分:
1、reconciliation
简单来说就是找到需要更新的工作,通过 Diff Fiber Tree 找出要做的更新工作,这是一个js计算过程,计算结果可以被缓存,计算过程可以被打断,也可以恢复执行
所以,上面介绍 Fiber Reconciler 调度算法时,有提到新算法具有可拆分、可中断任务的新特性,就是因为这部分的工作是一个纯js计算过程,所以是可以被缓存、被打断和恢复的
2、commit
提交更新并调用对应渲染模块(react-dom)进行渲染,为了防止页面抖动,该过程是同步且不能被打断
下面我们来看看这两个阶段具体的函数调用流程
我们以 ReactDOM.render() 方法为入口,来看看reconciliation阶段的函数调用流程:
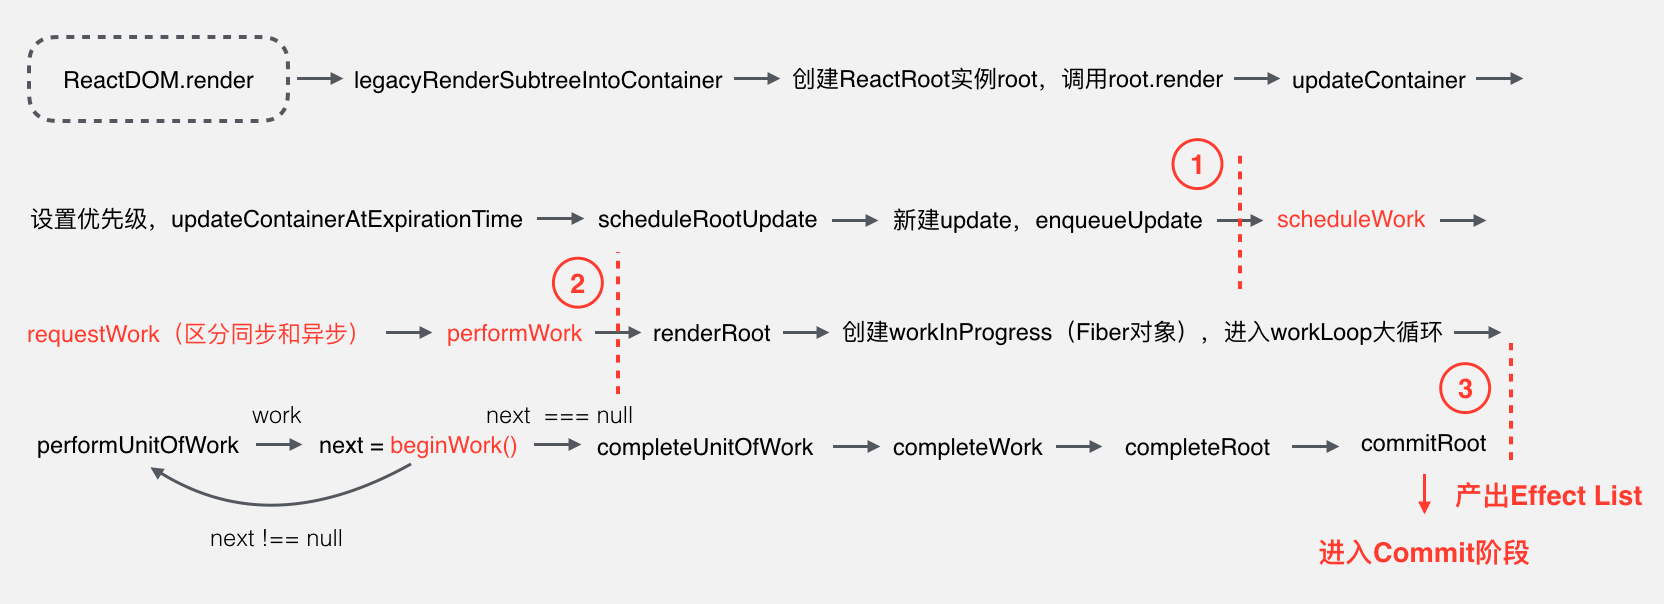
从图中可以看到,我把此阶段分为三部分,分别以红线划分。简单的概括下三部分的工作:
1、第一部分从 ReactDOM.render() 方法开始,把接收的React Element转换为Fiber节点,并为其设置优先级,记录update等。这部分主要是一些数据方面的准备工作。
2、第二部分主要是三个函数:scheduleWork、requestWork、performWork,即安排工作、申请工作、正式工作三部曲。React 16 新增的异步调用的功能则在这部分实现。
3、第三部分是一个大循环,遍历所有的Fiber节点,通过Diff算法计算所有更新工作,产出 EffectList 给到commit阶段使用。这部分的核心是 beginWork 函数。
第一部分较为简单,这里就不详细介绍了,小伙伴们可自行阅读源码~
三部曲:scheduleWork、requestWork、performWork(安排工作、申请工作、正式工作)

在三部曲中的 requestWork函数中,会判断当前任务是同步还是异步(暂时React的异步调用功能还在开发中,未开放使用,本文后续内容是以同步任务为例),然后通过不同的方式调用任务。同步任务直接调用performWork函数立即执行,而异步任务则会在后面的某一时刻被执行,那么异步任务是怎么被调度的呢?
异步任务调度有两种方式,主要是通过该任务的优先级进行判断,主要有两种:
1、animation(动画):则会调用 requestAnimationFrame API 告诉浏览器,在下一次重绘之前调用该任务来更新动画
2、其他异步任务:则会调用 requestIdleCallback API 告诉浏览器,在浏览器空闲时期依次调用任务,这就可以让开发者在主事件循环中执行后台或低优先级的任务,而且不会对像动画和用户交互等关键的事件产生影响
以上两个API都是原生API,想深入了解的可以看看:requestAnimationFrame、requestIdleCallback
而原生requestIdleCallback存在兼容性问题,所以React本身开发了 ReactScheduler模块 来实现这个功能
后续会以同步任务为例,所以我们开始介绍第三部分的核心函数:beginWork
从上面的函数调用流程图可以看到,beginWork在大循环中被调用,返回当前节点的子节点。
function beginWork(
  current: Fiber | null,
  workInProgress: Fiber,
  renderExpirationTime: ExpirationTime,
): Fiber | null {
  const updateExpirationTime = workInProgress.expirationTime;
  if (!hasLegacyContextChanged() && (updateExpirationTime === NoWork || updateExpirationTime > renderExpirationTime)) {
    switch (workInProgress.tag) {
      case HostRoot:
        ...
      case HostComponent:
       ...
      case ClassComponent:
        pushLegacyContextProvider(workInProgress);
        break;
      case HostPortal:
        ...
      case ContextProvider:
        ...
      case Profiler:
        ...
    }
    return bailoutOnAlreadyFinishedWork(current, workInProgress, renderExpirationTime,);
  }

  // Before entering the begin phase, clear the expiration time.
  workInProgress.expirationTime = NoWork;

  switch (workInProgress.tag) {
    case IndeterminateComponent:
      return mountIndeterminateComponent(current, workInProgress, renderExpirationTime,);
    case FunctionalComponent:
      return updateFunctionalComponent(current, workInProgress, renderExpirationTime,);
    case ClassComponent:
      return updateClassComponent(current, workInProgress, renderExpirationTime,);
    case HostRoot:
      return updateHostRoot(current, workInProgress, renderExpirationTime);
    case HostComponent:
      return updateHostComponent(current, workInProgress, renderExpirationTime);
    case HostText:
      return updateHostText(current, workInProgress);
    case PlaceholderComponent:
      return updatePlaceholderComponent(current, workInProgress, renderExpirationTime,);
    case HostPortal:
      return updatePortalComponent(current, workInProgress, renderExpirationTime,);
    case ForwardRef:
      return updateForwardRef(current, workInProgress, renderExpirationTime);
    case Fragment:
      return updateFragment(current, workInProgress, renderExpirationTime);
    case Mode:
      return updateMode(current, workInProgress, renderExpirationTime);
    case Profiler:
      return updateProfiler(current, workInProgress, renderExpirationTime);
    case ContextProvider:
      return updateContextProvider(current, workInProgress, renderExpirationTime,);
    case ContextConsumer:
      return updateContextConsumer(current, workInProgress, renderExpirationTime,);
    default:
      ...
  }
}
首先,先介绍一下React Fiber架构的双缓冲技术:

从上图可以看到有两颗 Fiber Tree:current、workInProgress,它们之间是通过每个Fiber节点上的alternate属性联系在一起,可以查看源码ReactFiber.js中的 createWorkInProgress 方法,如下:
export function createWorkInProgress(
  current: Fiber,
  pendingProps: any,
  expirationTime: ExpirationTime,
): Fiber {
  let workInProgress = current.alternate;
  if (workInProgress === null) {
    workInProgress = createFiber(current.tag, pendingProps, current.key, current.mode,);
    ...
    workInProgress.alternate = current;
    current.alternate = workInProgress;
  } else {
    workInProgress.effectTag = NoEffect;
    workInProgress.nextEffect = null;
    workInProgress.firstEffect = null;
    workInProgress.lastEffect = null;
    ...
  }
  ...
  return workInProgress;
}
以上代码为简化之后的,可以发现,current与workInProgress互相持有引用。而从上图可以发现,所有更新都是在workInProgress上进行操作,等更新完毕之后,再把current指针指向workInProgress,从而丢弃旧的Fiber Tree
从beginWork源码来看,主要分为两部分,一部分是对Context的处理,一部分是根据fiber对象的tag类型,调用对应的update方法。在这里我们重点关注第二部分。而在第二部分中,我们以 ClassComponent类型 为例,讲讲 updateClassComponent函数 中做了什么呢?
主要有两部分:生命周期函数的调用及Diff算法
流程图如下:

current为null,意味着当前的update是组件第一次渲染
1、调用 constructClassInstance 构造组件实例,主要是调用 constructor 构造函数,并注入classComponentUpdater(这块就是文章一开始介绍React Component时提到的updater注入)
2、mountClassInstance 则是调用 getDerivedStateFromProps 生命周期函数(v16) 及 UNSAFE_componentWillMount 生命周期函数
current不为null,调用 updateClassInstance 方法
1、如果新老props不一致,则会调用 UNSAFE_componentWillReceiveProps 生命周期函数
2、然后调用 shouldComponentUpdate 生命周期函数,获得shouldUpdate值,若未定义此生命周期函数,默认为true(是否重新渲染),如果shouldUpdate为true,则会调用 UNSAFE_componentWillUpdate 生命周期函数
最后调用 finishClassComponent 方法,那么 finishClassComponent函数 中做了什么呢?流程图如下:

如果 shouldUpdate 为false,表示不需要更新,直接返回
如果 shouldUpdate 为true,调用实例的 render 方法,返回新子节点
如果是首次渲染,调用 mountChildFibers 创建子节点的Fiber实例
否则,调用 reconcileChildFibers 对新老子节点进行Diff
执行到了这,updateClassComponent函数主要是执行了组件的生命周期函数,下面讲讲需要对新老子节点进行Diff时使用的Diff算法
reconcileChildFibers函数 中,源码如下:
function reconcileChildFibers(
    returnFiber: Fiber,
    currentFirstChild: Fiber | null,
    newChild: any,
    expirationTime: ExpirationTime,
    ): Fiber | null {
    const isUnkeyedTopLevelFragment = typeof newChild === 'object' && newChild !== null && newChild.type === REACT_FRAGMENT_TYPE && newChild.key === null;
    if (isUnkeyedTopLevelFragment) {
        newChild = newChild.props.children;
    }
    const isObject = typeof newChild === 'object' && newChild !== null;
    if (isObject) {
        switch (newChild.$$typeof) {
        case REACT_ELEMENT_TYPE:
            return placeSingleChild(
                reconcileSingleElement(returnFiber, currentFirstChild, newChild, expirationTime,),
            );
        case REACT_PORTAL_TYPE:
            return placeSingleChild(
                reconcileSinglePortal(returnFiber, currentFirstChild, newChild, expirationTime,),
            );
        }
    }
    if (typeof newChild === 'string' || typeof newChild === 'number') {
        return placeSingleChild(
            reconcileSingleTextNode(returnFiber, currentFirstChild, '' + newChild, expirationTime,),
        );
    }
    if (isArray(newChild)) {
        return reconcileChildrenArray(returnFiber, currentFirstChild, newChild, expirationTime,);
    }
    if (getIteratorFn(newChild)) {
        return reconcileChildrenIterator(returnFiber, currentFirstChild, newChild, expirationTime,);
    }
    if (isObject) {
        throwOnInvalidObjectType(returnFiber, newChild);
    }
    // Remaining cases are all treated as empty.
    return deleteRemainingChildren(returnFiber, currentFirstChild);
}
reconcileChildFibers函数中主要是根据newChild类型,调用不同的Diff算法:
1、单个元素,调用reconcileSingleElement
2、单个Portal元素,调用reconcileSinglePortal
3、string或者number,调用reconcileSingleTextNode
4、array(React 16 新特性),调用reconcileChildrenArray
前三种情况,在新子节点上添加 effectTag:Placement,标记为更新操作,而这些操作的标记,将用于commit阶段。下面以单个元素为例,讲讲具体的Diff算法
reconcileSingleElement函数源码如下:
function reconcileSingleElement(
    returnFiber: Fiber,
    currentFirstChild: Fiber | null,
    element: ReactElement,
    expirationTime: ExpirationTime,
    ): Fiber {
    const key = element.key;
    let child = currentFirstChild;
    while (child !== null) {
        // 判断key是否相等
        if (child.key === key) {
            if (child.tag === Fragment ? element.type === REACT_FRAGMENT_TYPE : child.type === element.type) {
                // key相等且type相等,删除旧子节点的兄弟节点,复用旧节点并返回
                deleteRemainingChildren(returnFiber, child.sibling);
                const existing = useFiber(child, element.type === REACT_FRAGMENT_TYPE ? element.props.children : element.props, expirationTime,);
                existing.ref = coerceRef(returnFiber, child, element);
                existing.return = returnFiber;
                return existing;
            } else {
                // key相等但type不相等,删除旧子节点及兄弟节点,跳出循环
                deleteRemainingChildren(returnFiber, child);
                break;
            }
        } else {
            // key不相等,删除此旧子节点,继续循环
            deleteChild(returnFiber, child);
        }
        // 继续遍历此旧子节点的兄弟节点
        child = child.sibling;
    }
    // 不能复用,则直接新建Fiber实例,并返回
    if (element.type === REACT_FRAGMENT_TYPE) {
        const created = createFiberFromFragment(element.props.children, returnFiber.mode, expirationTime,
        element.key,);
        created.return = returnFiber;
        return created;
    } else {
        const created = createFiberFromElement(element, returnFiber.mode, expirationTime,);
        created.ref = coerceRef(returnFiber, currentFirstChild, element);
        created.return = returnFiber;
        return created;
    }
}
具体过程在代码的注释中写的比较清楚,在这就不详细展开。不过我们可以看看 deleteChild(删除子节点)中,具体做了什么,源码如下:
function deleteChild(returnFiber: Fiber, childToDelete: Fiber): void {
    if (!shouldTrackSideEffects) {
        return;
    }
    const last = returnFiber.lastEffect;
    if (last !== null) {
        last.nextEffect = childToDelete;
        returnFiber.lastEffect = childToDelete;
    } else {
        returnFiber.firstEffect = returnFiber.lastEffect = childToDelete;
    }
    childToDelete.nextEffect = null;
    childToDelete.effectTag = Deletion;
}
可以看到,deleteChild 删除子节点并不是真的删除这个对象,而是通过 firstEffect、lastEffect、nextEffect 属性来维护一个 EffectList(链表结构),通过 effectTag 标记当前删除操作,这些信息都会在 commit 阶段使用到
以上,就是beginWork函数的整个过程,可以知道遍历完Fiber树之后,通过Diff算法,可以产出 EffectList,给commit阶段使用
函数调用流程图如下:

commit阶段做的事情是拿到reconciliation阶段产出的EffectList,即所有更新工作,提交这些更新工作并调用渲染模块(react-dom)渲染UI。
在前面也提到,commit阶段会通过 effectTag标记 识别操作类型,所以我们先来看看 effectTag 有哪些类型:
// Don't change these two values. They're used by React Dev Tools.
export const NoEffect = /*              */ 0b00000000000;
export const PerformedWork = /*         */ 0b00000000001;
// You can change the rest (and add more).
export const Placement = /*             */ 0b00000000010;
export const Update = /*                */ 0b00000000100;
export const PlacementAndUpdate = /*    */ 0b00000000110;
export const Deletion = /*              */ 0b00000001000;
export const ContentReset = /*          */ 0b00000010000;
export const Callback = /*              */ 0b00000100000;
export const DidCapture = /*            */ 0b00001000000;
export const Ref = /*                   */ 0b00010000000;
export const Snapshot = /*              */ 0b00100000000;
// Update & Callback & Ref & Snapshot
export const LifecycleEffectMask = /*   */ 0b00110100100;
// Union of all host effects
export const HostEffectMask = /*        */ 0b00111111111;
export const Incomplete = /*            */ 0b01000000000;
export const ShouldCapture = /*         */ 0b10000000000;
可以看到:
1、effectTag类型是使用二进制位表示,可以多个叠加
2、通过位运算匹配effectTag类型
从上面的流程图,可以看到commit阶段有比较重要的三个函数:
此函数主要是保存当前DOM的一个快照,执行 getSnapshotBeforeUpdate 生命周期函数
提交所有更新并渲染,源码如下:
function commitAllHostEffects() {
  while (nextEffect !== null) {
    recordEffect();
    const effectTag = nextEffect.effectTag;
    if (effectTag & ContentReset) {
      commitResetTextContent(nextEffect);
    }
    if (effectTag & Ref) {
      const current = nextEffect.alternate;
      if (current !== null) {
        commitDetachRef(current);
      }
    }
    let primaryEffectTag = effectTag & (Placement | Update | Deletion);
    switch (primaryEffectTag) {
      case Placement: {
        commitPlacement(nextEffect);
        nextEffect.effectTag &= ~Placement;
        break;
      }
      case PlacementAndUpdate: {
        commitPlacement(nextEffect);
        nextEffect.effectTag &= ~Placement;
        const current = nextEffect.alternate;
        commitWork(current, nextEffect);
        break;
      }
      case Update: {
        const current = nextEffect.alternate;
        commitWork(current, nextEffect);
        break;
      }
      case Deletion: {
        commitDeletion(nextEffect);
        break;
      }
    }
    nextEffect = nextEffect.nextEffect;
  }
}
从源码可以看到,此函数主要是遍历EffectList,根据effectTag,调用对应commit方法,进而调用react-dom提供的操作DOM的方法,渲染UI,操作DOM的方法有:
{
  getPublicInstance,
  supportsMutation,
  supportsPersistence,
  commitMount,
  commitUpdate,
  resetTextContent,
  commitTextUpdate,
  appendChild,
  appendChildToContainer,
  insertBefore,
  insertInContainerBefore,
  removeChild,
  removeChildFromContainer,
  replaceContainerChildren,
  createContainerChildSet,
}
注意,在调用删除操作的commit方法时,会执行 componentWillUnmount 生命周期函数
在这个方法中,基本完成了将更新提交并渲染UI的工作
此函数主要是根据fiber节点类型,执行相应的处理,以 ClassComponent 为例,完成UI渲染之后,会执行后续的生命周期函数:
1、判断是否首次渲染,是则执行 componentDidMount 生命周期函数
2、否则,执行 componentDidUpdate 生命周期函数
以上就是commit阶段的全过程
至此,我们源码等的全过程也完成了,我们再总结一下整个函数调用流程:

最后,我们回到一开始的那两个问题:
现在,是不是觉得整个过程都很清晰了呢~~~
附上,生命周期函数汇总表:

以上就是我对React16源码的分享,希望能对有需要的小伙伴有帮助~~~
喜欢我的文章的小伙伴可以点star ⭐️
在前后端分离的大环境下,【T-Pub】服务支持后端自行发布需要的前端测试环境,解决FE工作被打断的问题,同时通过设置git hook,支持当指定分支代码更新时,自动发布测试环境,减少重复发布工作,提高FE工作效率,提升FE工作幸福感
提供【T-Pub】服务,提供以下功能:

通过 RabbitMQ 将 API Server 和 Pub Server 解耦,方便服务扩展
本文源码是2018年9月12日拉取的React仓库master分支上的代码
React.PureComponent 官方文档:https://reactjs.org/docs/react-api.html#reactpurecomponent
React.PureComponent is similar to React.Component. The difference between them is that React.Component doesn’t implement shouldComponentUpdate(), but React.PureComponent implements it with a shallow prop and state comparison.
React.PureComponent 和 React.Component 几乎相同,区别在于 React.PureComponent 会 浅比较 props、state是否发生变化从而决定是否更新组件(这里的浅比较在后面的源码分析中会提到)
使用 React.PureComponent 也是React应用优化的一种方式,当然也能使用 React.Component 定义shouldComponentUpdate生命周期函数来实现一样的功能,但是直接使用 React.PureComponent 能更加直观和简便
看一个简单的例子:
使用React.Component
class CounterButton extends React.Component {
    state = {
        count: 1
    }
    shouldComponentUpdate(nextProps, nextState) {
        if (this.props.color !== nextProps.color) {
            return true;
        }
        if (this.state.count !== nextState.count) {
            return true;
        }
        return false;
    }
    render() {
        return (
            <button
                color={this.props.color}
                onClick={() => this.setState(state => ({count: state.count + 1}))}>
                Count: {this.state.count}
            </button>
        );
    }
}
使用React.PureComponent
class CounterButton extends React.PureComponent {
    state = {
        count: 1
    }
    render() {
        return (
            <button
                color={this.props.color}
                onClick={() => this.setState(state => ({count: state.count + 1}))}>
                Count: {this.state.count}
            </button>
        );
    }
}
上面两段代码都能避免不必要的组件更新,优化性能
ReactBaseClasses.js
const emptyObject = {};
/**
 * Base class helpers for the updating state of a component.
 */
function Component(props, context, updater) {
  this.props = props;
  this.context = context;
  // If a component has string refs, we will assign a different object later.
  this.refs = emptyObject;
  // We initialize the default updater but the real one gets injected by the
  // renderer.
  this.updater = updater || ReactNoopUpdateQueue;
}

Component.prototype.isReactComponent = {};

Component.prototype.setState = function(partialState, callback) {
  this.updater.enqueueSetState(this, partialState, callback, 'setState');
};

Component.prototype.forceUpdate = function(callback) {
  this.updater.enqueueForceUpdate(this, callback, 'forceUpdate');
};

function ComponentDummy() {}
ComponentDummy.prototype = Component.prototype;

/**
 * Convenience component with default shallow equality check for sCU.
 */
function PureComponent(props, context, updater) {
  this.props = props;
  this.context = context;
  // If a component has string refs, we will assign a different object later.
  this.refs = emptyObject;
  this.updater = updater || ReactNoopUpdateQueue;
}

const pureComponentPrototype = (PureComponent.prototype = new ComponentDummy());
pureComponentPrototype.constructor = PureComponent;
// Avoid an extra prototype jump for these methods.
Object.assign(pureComponentPrototype, Component.prototype);
pureComponentPrototype.isPureReactComponent = true;

export {Component, PureComponent};
从源码来看,Component 和 PureComponent 基本一样,唯一区别在于 PureComponent 定义了 isPureReactComponent 为 true,这是为了方便在React应用运行过程中区分 Component 和 PureComponent
在分析后续的源码之前,建议小伙伴去看下我的文章:React16源码之React Fiber架构,这篇文章分析了React应用整体的执行流程
本文重点分析 reconciliation阶段 beginWork函数中的 updateClassComponent函数的调用(这一部分在 React16源码之React Fiber架构 中重点分析了)
beginWork函数主要有两部分工作:
1、对Context进行处理
2、根据Fiber节点的tag类型,调用对应的update方法
而tag类型为ClassComponent的Fiber节点会调用updateClassComponent函数,我们来看看updateClassComponent函数的核心源码
function updateClassComponent(
  current: Fiber | null,
  workInProgress: Fiber,
  Component: any,
  nextProps,
  renderExpirationTime: ExpirationTime,
) {
  ...
  let shouldUpdate;
  if (current === null) {
    if (workInProgress.stateNode === null) {
      // In the initial pass we might need to construct the instance.
      constructClassInstance(
        workInProgress,
        Component,
        nextProps,
        renderExpirationTime,
      );
      mountClassInstance(
        workInProgress,
        Component,
        nextProps,
        renderExpirationTime,
      );
      shouldUpdate = true;
    } else {
      // In a resume, we'll already have an instance we can reuse.
      shouldUpdate = resumeMountClassInstance(
        workInProgress,
        Component,
        nextProps,
        renderExpirationTime,
      );
    }
  } else {
    shouldUpdate = updateClassInstance(
      current,
      workInProgress,
      Component,
      nextProps,
      renderExpirationTime,
    );
  }
  return finishClassComponent(
    current,
    workInProgress,
    Component,
    shouldUpdate,
    hasContext,
    renderExpirationTime,
  );
}
执行流程如下:
current为null,表示当前组件第一次渲染
判断当前组件是否需要初始化
workInProgress.stateNode === null表示需要初始化,调用constructClassInstance、mountClassInstance两个函数resumeMountClassInstance函数复用初始化过的实例(React源码也在不断更新,所以这块逻辑比React16源码之React Fiber架构讲的逻辑多了一个复用逻辑)
current不为null,调用updateClassInstance
constructClassInstance、mountClassInstance做的工作:
constructClassInstance主要是初始化组件实例,即调用constructor构造函数,并注入classComponentUpdatermountClassInstance则是调用getDerivedStateFromProps生命周期函数(v16)及UNSAFE_componentWillMount生命周期函数从上面的源码可以看到,resumeMountClassInstance函数和updateClassInstance函数都会将返回值赋值给shouldUpdate变量,而shouldUpdate变量是布尔类型,在后面的流程中,决定是否执行render函数
这里以updateClassInstance函数为例来看看源码
function updateClassInstance(
  current: Fiber,
  workInProgress: Fiber,
  ctor: any,
  newProps: any,
  renderExpirationTime: ExpirationTime,
): boolean {
  // 如果新老props不一致,则会调用 UNSAFE_componentWillReceiveProps 生命周期函数
  ...
  let updateQueue = workInProgress.updateQueue;
  if (updateQueue !== null) {
    processUpdateQueue(
      workInProgress,
      updateQueue,
      newProps,
      instance,
      renderExpirationTime,
    );
    newState = workInProgress.memoizedState;
  }
  // 执行 getDerivedStateFromProps 生命周期函数
  ...
  const shouldUpdate =
    checkHasForceUpdateAfterProcessing() ||
    checkShouldComponentUpdate(
      workInProgress,
      ctor,
      oldProps,
      newProps,
      oldState,
      newState,
      nextLegacyContext,
    );

  if (shouldUpdate) {
    ...
  } else {
    ...
  }
  ...
  return shouldUpdate;
}重点关注checkShouldComponentUpdate函数
function checkShouldComponentUpdate(
  workInProgress,
  ctor,
  oldProps,
  newProps,
  oldState,
  newState,
  nextLegacyContext,
) {
  const instance = workInProgress.stateNode;
  if (typeof instance.shouldComponentUpdate === 'function') {
    startPhaseTimer(workInProgress, 'shouldComponentUpdate');
    const shouldUpdate = instance.shouldComponentUpdate(
      newProps,
      newState,
      nextLegacyContext,
    );
    stopPhaseTimer();

    return shouldUpdate;
  }

  if (ctor.prototype && ctor.prototype.isPureReactComponent) {
    return (
      !shallowEqual(oldProps, newProps) || !shallowEqual(oldState, newState)
    );
  }

  return true;
}
执行流程如下:
1、是否有shouldComponentUpdate生命周期函数,有则调用此生命周期函数并返回结果(shouldUpdate)
2、判断此组件是否为PureComponent,是则执行shallowEqual对新老props、新老state进行浅比较,并返回比较结果
3、默认返回true
shallowEqual函数:
const hasOwnProperty = Object.prototype.hasOwnProperty;
function is(x, y) {
  // SameValue algorithm
  if (x === y) {
    // Steps 1-5, 7-10
    // Steps 6.b-6.e: +0 != -0
    // Added the nonzero y check to make Flow happy, but it is redundant
    return x !== 0 || y !== 0 || 1 / x === 1 / y;
  } else {
    // Step 6.a: NaN == NaN
    return x !== x && y !== y;
  }
}
/**
 * Performs equality by iterating through keys on an object and returning false
 * when any key has values which are not strictly equal between the arguments.
 * Returns true when the values of all keys are strictly equal.
 */
function shallowEqual(objA: mixed, objB: mixed): boolean {
  if (is(objA, objB)) {
    return true;
  }
  if (
    typeof objA !== 'object' ||
    objA === null ||
    typeof objB !== 'object' ||
    objB === null
  ) {
    return false;
  }
  const keysA = Object.keys(objA);
  const keysB = Object.keys(objB);
  if (keysA.length !== keysB.length) {
    return false;
  }
  // Test for A's keys different from B.
  for (let i = 0; i < keysA.length; i++) {
    if (
      !hasOwnProperty.call(objB, keysA[i]) ||
      !is(objA[keysA[i]], objB[keysA[i]])
    ) {
      return false;
    }
  }

  return true;
}

export default shallowEqual;可以看到,shallowEqual真的就是浅比较,所以对于props、state是复杂数据结构如果使用 PureComponent 往往会导致更新问题
当props、state是简单数据结构的组件适合使用 PureComponent,或者使用 forceUpdate() 来更新复杂数据结构,或者考虑结合 immutable objects 使用,或者直接使用 Component,自定义shouldComponentUpdate生命周期函数
说到 forceUpdate()可以顺便看下源码,首先看看 forceUpdate函数定义,在前面也说过在给组件初始化时,会给组件实例注入classComponentUpdater,而调用forceUpdate其实就是调用classComponentUpdater.enqueueForceUpdate,来看看定义
const classComponentUpdater = {
  ...
  enqueueForceUpdate(inst, callback) {
    ...
    const update = createUpdate(expirationTime);
    // !!!
    update.tag = ForceUpdate;

    if (callback !== undefined && callback !== null) {
      update.callback = callback;
    }

    enqueueUpdate(fiber, update);
    scheduleWork(fiber, expirationTime);
  },
};可以看到,在将update放入队列之前,执行了update.tag = ForceUpdate;,这个标记将在后面用于标识更新是否为ForceUpdate,后面的流程与正常更新流程一直,可以参考React16源码之React Fiber架构
我们再回到updateClassInstance函数,在执行checkShouldComponentUpdate函数之前,执行了processUpdateQueue函数及进行了checkHasForceUpdateAfterProcessing函数判断
processUpdateQueue函数主要是遍历updateQueue,调用getStateFromUpdate函数
getStateFromUpdate函数源码如下:
function getStateFromUpdate<State>(
  workInProgress: Fiber,
  queue: UpdateQueue<State>,
  update: Update<State>,
  prevState: State,
  nextProps: any,
  instance: any,
): any {
  switch (update.tag) {
    case ReplaceState: {
      ...
    }
    case CaptureUpdate: {
      ...
    }
    // Intentional fallthrough
    case UpdateState: {
      ...
    }
    case ForceUpdate: {
      hasForceUpdate = true;
      return prevState;
    }
  }
  return prevState;
}我们可以看到,此函数是判断update的tag类型,对于ForceUpdate类型会将hasForceUpdate变量设置为true
checkHasForceUpdateAfterProcessing函数则是返回hasForceUpdate变量,代码如下:
export function checkHasForceUpdateAfterProcessing(): boolean {
  return hasForceUpdate;
}当调用了forceUpdate函数,无论是否存在shouldComponentUpdate生命周期函数,无论此组件是否为 PureComponent,都会强制更新,所以应该谨慎使用
以上就是我对React PureComponent的源码的分享,希望能对有需要的小伙伴有帮助~~~
喜欢我的文章的小伙伴可以点star ⭐️
wd 是Appium服务器的JavaScript语言的客户端程序库,支持使用node编写Appium测试用例
在编写测试用例前,确保电脑已搭建好Appium环境,若未搭建,参考:Mac系统下appium环境搭建
$ mkdir appium-wd-example
$ cd appium-wd-example
$ npm init$ npm install wd # wd是Appium服务器的JavaScript语言的客户端程序库$ npm install mocha # 测试框架
$ npm install chai
$ npm install chai-as-promised
$ npm install colors进入微信首页(未登录状态),检查是否存在登录按钮
Android机(安装了微信)、数据线(将手机通过数据线与电脑连接)
$ adb devices
# List of devices attached
# U2TDU15904014013 device在测试机上,打开微信,执行以下脚本:
$ adb shell dumpsys window windows | grep mFocusedApp
# mFocusedApp=AppWindowToken{1c6b43b3 token=Token{49ad22 ActivityRecord{35092aed u0 com.tencent.mm/.ui.LauncherUI t224}}}
从输出可以获取到 appPackage: "com.tencent.mm"; appActivity: ".ui.LauncherUI"
配置:Appium Desired Capabilities
sample.js
require("../helpers/setup");

const wd = require("wd");

const serverConfig = {
    host: 'localhost',
    port: 4723
};

describe("sample test", function () {
    this.timeout(300000);

    let driver;
    let allPassed = true;

    before(function () {

        driver = wd.promiseChainRemote(serverConfig);
        require("../helpers/logging").configure(driver);

        var desired = {
            platformName: 'Android',
            deviceName: 'U2TDU15904014013',
            appPackage: 'com.tencent.mm',
            appActivity: '.ui.LauncherUI',
            fullReset: false,
            fastReset: false,
            noReset: true,
        };
        return driver
            .init(desired)
            .setImplicitWaitTimeout(8000);
    });

    after(function () {
        return driver
            .quit();
    });

    afterEach(function () {
        allPassed = allPassed && this.currentTest.state === 'passed';
    });

    it("进入微信首页", function () {
        return driver
            .elementByXPath("//*[@text='登录']")
            .should.eventually.exist;
    });
});
setup.js
const wd = require("wd");

require('colors');
const chai = require("chai");
const chaiAsPromised = require("chai-as-promised");
chai.use(chaiAsPromised);
const should = chai.should();
chaiAsPromised.transferPromiseness = wd.transferPromiseness;

exports.should = should;
logging.js
exports.configure = function (driver) {
    driver.on('status', function (info) {
        console.log(info.cyan);
    });
    driver.on('command', function (meth, path, data) {
        console.log(' > ' + meth.yellow, path.grey, data || '');
    });
    driver.on('http', function (meth, path, data) {
        console.log(' > ' + meth.magenta, path, (data || '').grey);
    });
};在package.json中添加以下脚本:
{
    ...
    "scripts": {
        "sample": "mocha ./test/sample.js"
    }
    ...
}
执行测试用例:
$ appium # 启动Appium服务
$ npm run sample # 运行测试用例
执行结果如下:

以上就是使用 wd 编写简单 Appium 测试用例的过程了~
使用 wd 编写复杂测试用例,参考:使用 Appium 进行微信小程序自动化测试
本文将从以下几个方面分享如何搭建一个npm包,在搭建过程中需要注意的事项
在项目根目录下执行:npm init 创建 package.json 文件,这也是npm包的核心配置文件
package.json 中可以通过下面两个字段来指定入口文件:
这里,可以展开介绍一下 umd、commonjs、es module 模块类型的区别
<script>标签引入,写法如下:(function (global, factory) {
typeof exports === 'object' && typeof module !== 'undefined' ? module.exports = factory() :
typeof define === 'function' && define.amd ? define(factory) :
(global['xxx'] = factory());
}(this, (function () { 'use strict';
...
})));module.exports定义模块对外输出的接口,使用require加载模块export、import语法而一般npm包都需要支持以上三种模块规范,以下列出通用的rollup配置:
import path from 'path';
import babel from 'rollup-plugin-babel';
import cleanup from 'rollup-plugin-cleanup';
import replace from 'rollup-plugin-replace';
import { uglify } from 'rollup-plugin-uglify';
import nodeResolve from 'rollup-plugin-node-resolve';
import commonjs from 'rollup-plugin-commonjs';
import pkg from './package.json';

const { version, name, author } = pkg;

const banner = `/*!
* ${name} v${version}
* (c) ${new Date().getFullYear()} ${author}
*/`;

const resolve = p => {
    return path.resolve(__dirname, p);
}

const pluginsCommon = [
    commonjs({
        // polyfill async/await
        'node_modules/@babel/runtime/helpers/asyncToGenerator.js': ['default']
    }),
    nodeResolve({
        module: false,
    }),
    babel({
        runtimeHelpers: true,
    }),
]

export default [
    {
        input: resolve('src/index.js'),
        plugins: pluginsCommon.concat([
            cleanup(),
        ]),
        output: {
            file: resolve(`dist/npmpackage-name-${version}.js`),
            format: 'umd',
            name: 'npmpackage-name',
            banner,
        }
    },
    {
        input: resolve('src/index.js'),
        plugins: pluginsCommon.concat([
            uglify(),
        ]),
        output: {
            file: resolve(`dist/npmpackage-name-${version}.min.js`),
            format: 'umd',
            name: 'npmpackage-name',
            banner,
        }
    },
    {
        input: resolve('src/index.js'),
        plugins: pluginsCommon.concat([
            cleanup(),
        ]),
        output: [
            {
                file: resolve(`dist/npmpackage-name.es.js`),
                format: 'es',
                banner,
            },
            {
                file: resolve(`dist/npmpackage-name.js`),
                format: 'cjs',
                banner,
            }
        ]
    },
];
再附上对应的babel配置:
{
    "presets": [
        ["@babel/preset-env", {
            "targets": {
                "browsers": ["Android >= 4", "iOS >= 8"]
            },
            "modules": false,
            "loose": true
        }]
    ],
    "plugins": [
        "@babel/plugin-external-helpers",
        [
            "@babel/plugin-transform-runtime",
            {
                "regenerator": true
            }
        ]
    ]
}
以上,配置则能构建出满足以上三种模块规范的文件
相应的package.json文件中,也需要通过不同的字段,来指定对应模块规范的入口文件,如下:
{
    ...
    "main": "dist/npmpackage-name.js",
    "module": "dist/npmpackage-name.es.js",
    ...
}而dist/npmpackage-name-${version}.js的文件,则可以直接通过<script>标签引入
注意:不要将入口文件指定为未过babel的文件,这往往会导致使用了此包的项目出现兼容问题
package.json中跟npm包依赖相关的字段主要有:
我们在开发npm包过程中,需要注意安装依赖的类型。
对于那些对版本有强要求的依赖,为了避免因依赖版本不一致导致问题,需要将此类依赖安装在 peerDependencies 中
一个npm包一般包括源文件、构建产出的文件、demo文件、测试文件等文件,而为了减小npm包大小,加快下载速度,发布时应该将无用的文件剔除掉,有两种方式:
package.json 中的 files 指定需要发布的文件.npmignore 文件中指定需要提出的文件每发布一个版本,版本号需要相应的升级(不要手动在package.json中维护)
应该通过npm version 来对版本号进行管理,版本号有以下几种类型:
版本号管理策略如下:
而升级对应的版本号的命令则如下:
npm version [<newversion> | major | minor | patch | premajor | preminor | prepatch | prerelease [--preid=<prerelease-id>] | from-git]package.json配置如下:
{
    "scripts": {
        "build": "rm -rf dist && rollup --config",
        "release_major": "npm version major",
        "release_minor": "npm version minor",
        "release_patch": "npm version patch",
        "postversion": "npm publish",
        "prepublishOnly": "npm run build"
    },
}直接通过执行对应的release_命令来进行发布即可
以上就是一个npm包通常会用到基本事项,后续会不断更新一些进阶的用法~
希望能对有需要的小伙伴有帮助~~~
喜欢我的文章的小伙伴可以点star ⭐️
前期准备:
使用npm安装:
$ npm install -g appium # get appium安装成功之后,执行:
$ appium # start appium使用npm安装
$ npm install -g appium-doctor安装完成之后,执行 appium-doctor 检查 appium 环境,如下:

可以看到,当前环境还没有完全搭建完成,常见问题解决:

解决:
$ xcode-select --install # 按照提示安装即可
解决:
$ brew install carthage
解决 JAVA_HOME is NOT set! Bin directory for $JAVA_HOME is not set 问题:
$ vi ~/.bash_profile添加以下配置:
export JAVA_HOME=$(/usr/libexec/java_home)
export PATH=$PATH:${JAVA_HOME}/bin
解决 $ANDROID_HOME 一系列问题:
安装 android-sdk
使用brew安装:
$ brew cask install android-sdk
$ brew cask install android-platform-tools
$ /usr/local/Caskroom/android-sdk/3859397/tools/android update sdk --use-sdk-wrapper # 3859397 是安装的 android-sdk 的版本
检测是否安装成功:
$ cd /usr/local/Caskroom/android-sdk/ # 检测该目录是否存在
$ cd 3859397/ # 去到 android-sdk/ 目录下的子目录,不同版本文件夹名称不同
$ ll # 改目录下要存在 tools、platform-tools、build-tools 三个文件夹,否则这个环境还是会存在问题的;如果没有 platform-tools 文件夹,可以将 /usr/local/Caskroom/android-platform-tools/27.0.1/ 目录下的 platform-tools 文件夹复制过来
安装成功之后,在 ~/.bash_profile 中添加以下配置:
export ANDROID_HOME=/usr/local/Caskroom/android-sdk/3859397
export PATH=$PATH:$ANDROID_HOME/tools:$ANDROID_HOME/platform-tools
最后,~/.bash_profile 文件配置如下:
export JAVA_HOME=$(/usr/libexec/java_home)
export ANDROID_HOME=/usr/local/Caskroom/android-sdk/3859397
export PATH=$PATH:$ANDROID_HOME/tools:$ANDROID_HOME/platform-tools:${JAVA_HOME}/bin
执行:
$ source ~/.bash_profile再次执行 appium-doctor 检查 appium 环境,如下:

以上,appium 环境就搭建完成~
使用 node(wd)编写 Appium 测试用例 介绍了使用 wd 编写简单的 Appium 测试用例
本文主要介绍使用 Appium 进行微信小程序自动化测试,涉及使用 wd 编写复杂 Appium 测试用例以及微信 webview 自动化测试。
测试项目搭建及简单前期准备参考使用 node(wd)编写 Appium 测试用例
其实微信小程序就是webview,所以可以使用webview测试方式进行小程序的测试
用微信打开http://debugx5.qq.com页面,或者直接打开二维码:

勾选【打开TBS内核Inspector调试功能】,如下:

设置好之后,就可以在chrome浏览器中打开chrome://inspect/页面查看当前微信中打开的H5页面了
安装Appium时,会自动安装chromedriver,但是在使用默认安装的chromedriver时,对于一些老设备会存在一些问题,报类似下面这样的错误:
An unknown server-side error occurred while processing the command.
Original error: unknown error: Chrome version must be >= 55.0.2883.0
解决办法可以参考官方文档
我使用的测试机chrome版本是59.0.3071.0,所以直接下载 v2.32 版本的 chromedriver 到 /usr/local/ 目录下,在启动Appium时,通过 --chromedriver-executable 指定使用此chromedriver,如下:
$ appium --chromedriver-executable /usr/local/chromedriver以测试【美团酒店+】小程序为例,测试代码如下:( setup.js、logging.js 参考使用 node(wd)编写 Appium 测试用例)
weapp.js
require("../helpers/setup");

const wd = require("wd");

const serverConfig = {
    host: 'localhost',
    port: 4723
};

describe("sample test", function () {
    this.timeout(300000);

    let driver;
    let allPassed = true;

    before(function () {

        driver = wd.promiseChainRemote(serverConfig);
        require("../helpers/logging").configure(driver);

        let desired = {
            platformName: 'Android',
            deviceName: 'U2TDU15904014013',
            appPackage: 'com.tencent.mm',
            appActivity: '.ui.LauncherUI',
            fullReset: false,
            fastReset: false,
            noReset: true,
            chromeOptions: {
                androidProcess: 'com.tencent.mm:appbrand0',
            }
        };
        return driver
            .init(desired)
            .setImplicitWaitTimeout(8000);
    });

    after(function () {
        return driver
            .quit();
    });

    afterEach(function () {
        allPassed = allPassed && this.currentTest.state === 'passed';
    });

    it("enter 小程序", function () {
        return driver
            .elementByXPath("//*[@text='发现']")
            .click()
            .elementByXPath("//*[contains(@text, '朋友圈')]")
            .then(function () {
                let action = new wd.TouchAction(driver);
                action.press({x: 20, y: 0}).moveTo({x: 20, y: 20}).wait(200).release().perform();
                return driver.performTouchAction(action);
            })
            .elementByXPath("//*[@text='小程序']")
            .click()
            .elementByXPath("//*[contains(@text, '美团酒店+')]")
            .click()
            .elementByXPath("//*[contains(@text, '美团酒店')]")
            .should.eventually.exist
            .context('WEBVIEW_com.tencent.mm:appbrand0')
            .sleep(5000)
            .elementsByCssSelector('.cell', function (err, els) {
                els[0].click();
            })
            .sleep(5000);
    });
});在package.json中添加以下脚本:
{
    ...
    "scripts": {
        "weapp": "mocha ./test/weapp.js"
    }
    ...
}
执行测试用例:
$ appium --chromedriver-executable /usr/local/chromedriver # 启动Appium服务且指定chromedriver
$ npm run weapp # 运行测试用例
执行结果如下:

以上就是使用 Appium 进行微信小程序自动化测试~
完整代码:https://github.com/HuJiaoHJ/appium-wd-example
1、微信在6.5.23版本之后在使用 driver.context(WEBVIEW_com.tencent.mm:appbrand0) 时,获取的 https://servicewechat.com/{appid}/{version}/page-frame.html 中body为空,而页面内容都包含在 https://servicewechat.com/preload/page-frame.html ,而在切换时,随机获取两个html中一个,所以会存在获取到空内容的情况,导致测试流程走不通(微信社区问题:https://developers.weixin.qq.com/blogdetail?action=get_post_info&lang=zh_CN&token=1707682624&docid=a85a5892193727a1954ccf55198c77d2&comment_lvl=1 )
2、在小程序内部进行页面跳转之后,webview之间的相互切换暂时是存在问题的,原因还是上面提到的两个html的原因,暂时没有找到解决办法。(社区问题:https://testerhome.com/topics/7769 )
所以,大概在17年12月更新的版本之后,还是不要再考虑使用 Appium 进行微信小程序的自动化测试了,网上很多教程都是在17年12月之前的,所以能走通整个流程,但是现在是存在问题的
欢迎找到解决办法的小伙伴分享一下~~~
写在最后:从调研到得出最终结论,花了差不多一周的时间,中间还经历了一个春节。虽然最后此方案没能用在实际开发中,有点遗憾,不过整个过程还是收获不少~~~
CocoaPods 是专门为iOS工程提供对第三方库的依赖的管理工具。
在安装 CocoaPods 时,会接触几个名词:ruby、rvm、gem、bundle,首先来看看这些都是什么
ruby 是一种开源的面向对象程序设计的服务器端脚本语言。
rvm 是一个命令行工具,可以提供一个便捷的多版本 Ruby 环境的管理和切换。
mac os 本身自带 ruby,可以通过 ruby -v 查看当前安装版本,如需更新,可以通过 rvm 进行更新
# 安装 rvm
$ \curl -sSL https://get.rvm.io | bash -s stable
$ source ~/.bashrc
$ source ~/.bash_profile

# 列出已知的ruby版本
$ rvm list known
# 安装特定版本ruby
$ rvm install 2.5.0
# 切换ruby版本
$ rvm use 2.5.0
# 列出已安装的ruby版本
$ rvm list
# 卸载已安装版本
$ rvm remove 2.5.0
RubyGems 是 Ruby 的一个包管理器,它提供一个分发 Ruby 程序和库的标准格式,还提供一个管理程序包安装的工具。RubyGems 旨在方便地管理 gem 安装的工具,以及用于分发 gem 的服务器。
Gem 是 Ruby 模块 (叫做 Gems) 的包管理器。其包含包信息,以及用于安装的文件。其功能跟npm等包管理器类似。
# 安装
$ gem install mygem
# 卸载
$ gem uninstall mygem
# 列出已安装的gem
$ gem list --local
# 列出可用的gem
$ gem list --remote
# 为所有的gems创建RDoc文档
$ gem rdoc --all
# 下载一个gem,但不安装
$ gem fetch mygem
#从可用的gem中搜索
$ gem search STRING --remote
为了加快下载安装速度,可以修改为国内源
# 查看当前源
$ gem sources -l
# 删除默认源
$ gem sources --remove https://rubygems.org/
# 添加国内淘宝源
$ gem sources -a https://gems.ruby-china.org/
bundler 则是一个Gem包。相等于多个RubyGems批处理运行。在配置文件gemfile里声明应用依赖的第三方包,会自动下载安装多个包,并且会下载这些包依赖的包。
# 使用gem安装bundler
$ gem install bundler
# 在应用根目录下执行,生成 Gemfile
$ bundle init
# 在 Gemfile 中声明依赖的第三方包,执行以下命令进行安装,会生成一个版本快照文件 Gemfile.lock
$ bundle install
# 或
$ bundle
CocoaPods 是一个Gem包,是为iOS工程提供对第三方库的依赖的管理工具。所以可以直接通过gem进行安装,也可以使用bundle进行管理。
# 直接通过gem安装
$ sudo gem install cocoapods
# 将 cocoapods 在 Gemfile 文件中进行声明,使用 bundle 进行安装
$ bundle install

# 在项目根目录下执行,生成 Podfile 文件,用于声明工程依赖的第三方库
$ pod init
Podfile 格式如下:
platform :ios, '8.0'
use_frameworks!

target 'MyApp' do
  pod 'AFNetworking', '~> 2.6'
  pod 'ORStackView', '~> 3.0'
  pod 'SwiftyJSON', '~> 2.3'
end
在 Podfile 中声明所依赖的第三方库,执行:pod install,执行完之后,会生成 Podfile.lock 文件,用于锁定当前各依赖的版本。多次执行 pod install 不会更改版本,只有执行 pod update 才会更新 Podfile.lock 文件
# 搜索第三方库
$ pod search json
添加第三方库,可以直接修改 Podfile 文件,执行:
# 更新依赖
$ pod updatecocoapods的配置文件就是一个 *.podspec的文件,通过如下命令初始化一个podspec文件:
pod spec create your_pod_spec_nameCocoaPods 会生成一个名为your_pod_spec_name.podspec的文件,然后我们修改其中的相关内容即可。
具体可以参考:《Cocoapods 入门》
希望能对有需要的小伙伴有帮助~~~
喜欢我的文章的小伙伴可以点star ⭐️
web移动端布局范畴很广,其中比较基础的几个话题:
本文主要分享这三个话题
提起移动端适配,大家想到的肯定是rem、flexible.js,本文要分享的方案是 vw + rem
对移动端适配不熟悉的同学,可以看看:
vw 是基于视图(Viewport)的长度单位,而与Viewport相关四个单位有:

常规的 rem 的适配方案(包括flexible),其实就是通过 js 动态计算,模拟 vw 的效果,过去使用这种方案主要原因是 vw 存在一定的兼容问题,不过对于现在而言,vw 也基本能满足对兼容性的要求

可以看到,Android 4.4 以上及 IOS 8.0 以上均已支持,所以现在我们可以直接使用 vw 来做移动端适配啦
html {
    font-size: 10vw;
}.head {
width: 750px;
}require('postcss-pxtorem')({
rootValue: 75,
unitPrecision: 5,
propList: ['*'],
selectorBlackList: [],
replace: true,
mediaQuery: false,
minPixelValue: 0
})以上,就可以使用了 vw + rem 方案实现了移动端适配
为了保证在低版本的机型也能正常显示页面,可以引入 viewport-units-polyfill 来处理 vw 的兼容问题。
viewport-units-polyfill 其实是 viewport-units-buggyfill 的简化版。
简单介绍下 viewport-units-buggyfill 的实现思路:通过引入一段js,对于存在兼容问题的版本,遍历页面中所有的css,找到用到Viewport单位的css,将Viewport单位计算为 px 单位,并将新的css规则插到head或body中。
viewport-units-polyfill 则是在 viewport-units-buggyfill 基础上做了些修改,主要是把大量的遍历工作去掉,只针对 html font-size 做兼容处理(此适配方案只在 html font-size 中使用到vw)。去掉遍历工作,大大优化了性能。
用法:直接将此 js 脚本放在页面的 head 中即可
网上对 1px border 问题的解决方案很多,可以看看:再谈Retina下1px的解决方案
本文分享的方案则是在使用 vw + rem 的适配方案基础上,使用视图缩放(Viewport scale)来解决 1px border 问题
(function () {
    var dpr = window.devicePixelRatio;
    var scale = 1 / dpr;

    var metaEl = document.querySelector('meta[name="viewport"]') || document.createElement('meta');
    metaEl.setAttribute('name', 'viewport');
    metaEl.setAttribute('content', 'width=device-width, initial-scale=' + scale + ', maximum-scale=' + scale + ', minimum-scale=' + scale + ', user-scalable=no, viewport-fit=cover');

    if (document.documentElement.firstElementChild) {
        document.documentElement.firstElementChild.appendChild(metaEl);
    } else {
        var wrap = document.createElement('div');
        wrap.appendChild(metaEl);
        document.write(wrap.innerHTML);
    }
})();
思路很简单,就是讲视图缩放(Viewport scale)设置为 1/dpr(设备像素比),从而解决 1px border 的问题
注意:此脚本是简单版,经过对各种品牌、机型进行测试之后发现,此方案基本表现良好,只有对于魅族几款手机,会存在border过细的问题。原因主要是魅族的手机 dpr 是3,但是屏幕真实分辨率并不高(我个人的理解,并未得到数据上的证实,感兴趣的小伙伴可以去验证),从而视图缩放过多,导致border过细,解决方式则是通过hack的方式(暂时没有想到比较好的,有其他方式的小伙伴欢迎评论交流~)
(function () {
    // 1px
    var dpr = window.devicePixelRatio;
    var isIPhone = window.navigator.appVersion.match(/iphone/gi);
    var UA = window.navigator.userAgent;
    // 对 meizu 某型号进行hack,主要原因是 dpr为3,但是手机屏幕分辨率不够,会出现 1px border 过细的问题,这种问题主要出现在部分魅族手机上
    var hacks = ['m1 note'];
    var flag = false;
    hacks.forEach(function (item) {
        if (UA.indexOf(item) >= 0) {
            flag = true;
            return;
        }
    });
    if (!isIPhone && flag) {
        dpr = dpr >= 2 ? 2 : dpr;
    }
    var scale = 1 / dpr;
    var metaEl = document.querySelector('meta[name="viewport"]') || document.createElement('meta');
    metaEl.setAttribute('name', 'viewport');
    metaEl.setAttribute('content', 'width=device-width, initial-scale=' + scale + ', maximum-scale=' + scale + ', minimum-scale=' + scale + ', user-scalable=no, viewport-fit=cover');

    if (document.documentElement.firstElementChild) {
        document.documentElement.firstElementChild.appendChild(metaEl);
    } else {
        var wrap = document.createElement('div');
        wrap.appendChild(metaEl);
        document.write(wrap.innerHTML);
    }
})();
将上面的脚本放在页面head中,在开发 1px border 时,可以直接如下:
.border {
    border-bottom: 1PX solid #eee;
}
注意:如果使用了 postcss-pxtorem 类似插件,需要注意不能将此 1px 单位转换成 rem,我使用的方法是不需要转换的 px 使用大写 PX,这样 postcss-pxtorem 就不会转换
基础布局其实涵盖很多方面,如:
H5页面比较常见的布局是页面分为三部分:head、body、foot,其中head、foot会有吸顶、吸底的效果,常规的使用 fixed布局 会存在些问题,推荐将页面整体使用flex布局,将head、foot固定,body可滚动,如下:
<div id="page">
    <div id="hd">
        <!-- head -->
    </div>
    <div id="bd">
        <!-- body -->
    </div>
    <div id="ft">
        <!-- foot -->
    </div>
</div>
#page {
display: flex;
flex-direction: column;
position: relative;
height: 100%;
overflow: hidden;
}
#hd {
z-index: 999;
}
#bd {
flex-grow: 1;
overflow-y: scroll;
-webkit-overflow-scrolling: touch;
&::-webkit-scrollbar {
display: none;
}
}注意:iconfont不支持多色icon,所以多色icon可以考虑使用svg或者img
实现方案很多:https://css-tricks.com/centering-css-complete-guide/,建议使用flex布局
<div class="box">
<span>文案与icon垂直居中,水平对齐</span>
<span class="icon-span">
<i class="icons"></i>
</span>
</div>.box {
height: 92px;
font-size: 32px;
line-height: 1;
padding: 0 20px;
display: flex;
align-items: center;
.icon-span {
font-size: 24px;
line-height: 1;
.icons {
color: red;
margin-left: 8px;
}
}
}规范 z-index 的使用,防止因滥用导致在页面展示问题,分层使用:
$z-layers: (
    'below': -1,
    'default': 1,
    'content': (
        'base': 100
    ),
    'fixed': 990,
    'mask': 1000,
    'modal': 1020,
    'toast': 1040
);
为了方便使用,使用以下 scss 方法:
$z-layers: (
    'below': -1,
    'default': 1,
    'content': (
        'base': 100
    ),
    'fixed': 990,
    'mask': 1000,
    'modal': 1020,
    'toast': 1040
);
@function map-has-nested-keys($map, $keys...) {
    @each $key in $keys {
        @if not map-has-key($map, $key) {
            @return false;
        }
        $map: map-get($map, $key);
    }
    @return true;
}

@function map-deep-get($map, $keys...) {
    @each $key in $keys {
        $map: map-get($map, $key);
    }
    @return $map;
}

@function z($layers...) {
    @if not map-has-nested-keys($z-layers, $layers...) {
        @warn "No layer found for `#{inspect($layers...)}` in $z-layers map. Property omitted.";
    }
    @return map-deep-get($z-layers, $layers...);
}
具体使用如下:
.head {
    z-index: z('fixed');
}
以上讲的布局,可以去 DEMO页看看,二维码:

代码:https://github.com/HuJiaoHJ/h5-layout
以上说的方案,我在现在几款主流的手机上都进行了测试,基本表现良好
本文分享的方案都是我在平时工作中用到的,希望能对有需要的小伙伴有帮助~~~
喜欢我的文章的小伙伴可以点star ⭐️
在写个人博客时,经常需要使用到图片,为了优化文章的阅读体验,需要对图片进行压缩,现在有很多好用的图片压缩网站,比如:https://tinypng.com/
但是每次压缩都手动的去上传下载,还挺麻烦的,于是想着写一个node脚本来做图片压缩工作
本文介绍的方法真的很简单快捷,使用的是 https://tinypng.com/ 提供的Node API,文档:https://tinypng.com/developers/reference/nodejs
在使用之前,需要去申请一个API Key,入口:https://tinypng.com/developers,注意一个API Key一个月只能免费压缩500个图片,不过我觉得还是够用的
具体使用方式可以参考官方文档,下面介绍如何批量的对图片进行压缩,直接上代码:
tinify.js
const tinify = require('tinify');
const apiKey = require('./api_key');
const fs = require('fs');
const path = require('path');
// API Key
tinify.key = apiKey;

// 执行图片压缩任务,返回promise对象
const task = file => {
    const source = tinify.fromFile(file.fromFile);
    source.toFile(file.toFile);
    return source._url;
}
// 通过输入文件夹和输出文件夹,返回一个数组
const fromDir = (inDir, outDir, _files = []) => {
    const files = fs.readdirSync(inDir);
    for (let file of files) {
        const filePath = `${inDir}/${file}`;
        const toFilePath = `${outDir}/${file}`;
        if (fs.statSync(filePath).isDirectory()) {
            fromDir(filePath, toFilePath, _files)
        } else {
            try {
                fs.accessSync(toFilePath);
            } catch (err) {
                _files.push({
                    fromFile: filePath,
                    toFile: toFilePath,
                });
            }
        }
    }
    return _files;
}

const rootDir = fs.realpathSync(process.cwd());
const screenshotDir = path.resolve(rootDir, './screenshotin');
const screenshotOutDir = path.resolve(rootDir, './screenshot');

const files = fromDir(screenshotDir, screenshotOutDir);

// 遍历数组,顺序执行各任务
if (files.length === 0) {
    return;
}
let current = task(files[0]);
for (let i = 1; i < files.length; i++) {
    current = current.then(task(files[i]));
}
执行 node tinify.js,即可批量压缩 ./screenshotin 文件夹下的图片啦
这个脚本是用于压缩我的博客中的图片,基本能满足我的个人需求,其他情况并未考虑,希望能对有需要的小伙伴有帮助~~~
喜欢我的文章的小伙伴可以点star ⭐️
React Native页面出现错误时:
1、开发模式下,会出现红色背景的页面,展示当前代码错误信息,如下:

2、bundle模式下,则会出现白屏或者闪退,如下:

在生产环境下,因RN页面异常导致整个APP白屏或者闪退,用户体验并不好,所以应该对异常进行捕获并处理,提高用户体验
主要使用两种方法对RN页面的异常进行捕获并处理:
1、React Error Boundaries (异常边界组件)
2、React Native ErrorUtils 模块
React Error Boundaries (异常边界组件)是React 16 引入的新概念,为了避免React的组件内的UI异常导致整个应用的异常
对React的异常边界组件不熟悉的小伙伴可以看看我的文章:从源码看React异常处理
这里简单介绍下:
Error Boundaries(异常边界)是React组件,用于捕获它子组件树种所有组件产生的js异常,并渲染指定的兜底UI来替代出问题的组件
它能捕获子组件生命周期函数中的异常,包括构造函数(constructor)和render函数
而不能捕获以下异常:
所以可以通过异常边界组件捕获组件生命周期内的所有异常并渲染兜底UI,防止APP白屏或闪退,提高用户体验,也可在兜底UI中指引用户反馈截图反馈问题,方便问题的排查和修复
直接上代码:
...
function withErrorBoundary(
    WrappedComponent: React.ComponentType <CatchCompProps> ,
    errorCallback: Function,
    allowedInDevMode: boolean,
    opt: Object = {}) {
    return class extends React.Component <CatchCompProps, CatchCompState> {
        state = {
            error: null,
            errorInfo: false,
            visible: false,
        }
        componentDidCatch(error: Error, errorInfo: any) {
            this.setState({
                error,
                errorInfo,
                visible: true,
            })
            errorCallback && errorCallback(error, errorInfo)
        }
        handleLeft = () => {
            ...
        }
        render() {
            const { title = 'Unexpected error occurred', message = 'Unexpected error occurred' } = opt
            return (
                this.state.visible && (allowedInDevMode ? true : process.env.NODE_ENV !== 'development') ? (
                <Modal
                    visible
                    transparent
                    animationType={'fade'}>
                    <View style={styles.container}>
                        <View style={styles.header}>
                        <NavBar
                            title={title}
                            leftIcon={'arrow-left'}
                            handleLeft={this.handleLeft}/>
                        </View>
                        <View style={styles.info}>
                            <Text>{message}</Text>
                        </View>
                        <ScrollView style={styles.content}>
                            <Text> { this.state.error && this.state.error.toString()} </Text>
                            <Text> { this.state.errorInfo && this.state.errorInfo.componentStack } </Text>
                        </ScrollView>
                    </View>
                </Modal>
                ) : <WrappedComponent {...this.props} />
            );
        }
    }
}

export default withErrorBoundary;上面是一个React高阶组件,返回的组件定义了componentDidCatch生命周期函数,当其子组件出现异常时,会执行此componentDidCatch生命周期函数,渲染兜底UI
...
import withErrorBoundary from 'rn_components/exception_handler/with_error_boundary.js';
...
class ExceptionHandlerExample extends React.Component {
    state = {
        visible: false,
    }
    catch = () => {
        console.log('catch');
        this.setState({
            visible: true,
        });
    }
    render () {
        if (this.state.visible) {
            const a = d
        }
        return (
            <View style={styles.container}>
                <Navbar
                    title={'Exception Handler'}
                    handleLeft={() => this.props.history.go(-1)}/>
                <View style={styles.content}>
                    <TouchableOpacity onPress={this.catch}>
                        <View>
                            <Text>Click me</Text>
                        </View>
                    </TouchableOpacity>
                </View>
            </View>
        );
    }
}
// 异常边界组件的使用
export default withErrorBoundary(ExceptionHandlerExample, (error, errorInfo) => {
    console.log('errorCallback', error, errorInfo);
}, true);
上面我们也说过,异常边界组件能捕获子组件生命周期函数中的异常,包括构造函数(constructor)和render函数
而不能捕获以下异常:
所以需要使用 React Native ErrorUtils 模块对这些异常进行捕获并处理
React Native ErrorUtils 是负责对RN页面中异常进行管理的模块,功能很类似Web页面中的 window.onerror
首先我们看看怎么利用 React Native ErrorUtils 进行异步捕获和处理,直接上代码:
const noop = () => {};

export const setJSExceptionHandler = (customHandler = noop, allowedInDevMode = false) => {
    if (typeof allowedInDevMode !== "boolean" || typeof customHandler !== "function") {
        return;
    }
    const allowed = allowedInDevMode ? true : !__DEV__;
    if (allowed) {
        // !!! 关键代码
        // 设置错误处理函数
        global.ErrorUtils.setGlobalHandler(customHandler);
        // 改写 console.error,保证报错能被 ErrorUtils 捕获并调用错误处理函数处理
        console.error = (message, error) => global.ErrorUtils.reportError(error);
    }
};

export const getJSExceptionHandler = () => global.ErrorUtils.getGlobalHandler();

export default {
    setJSExceptionHandler,
    getJSExceptionHandler,
};
上面关键的代码就两行,在注释中已标明
import { setJSExceptionHandler } from './error_guard';
import { Alert } from 'react-native';

setJSExceptionHandler((e, isFatal) => {
    if (isFatal) {
        Alert.alert(
            'Unexpected error occurred',
            `
            ${e && e.stack && e.stack.slice(0, 300)}...
            `,
            [{
                text: 'OK',
                onPress: () => {
                    console.log('ok');
                }
            }]
        );
    } else {
        console.log(e);
    }
}, true);
使用很简单,下面我们来看看 ErrorUtils 模块的源码
本文源码是2018年9月10日拉取的React Native仓库master分支上的代码
首先看看 ErrorUtils 的定义,源码位置:Libraries/polyfills/error_guard.js
let _inGuard = 0;

let _globalHandler = function onError(e) {
  throw e;
};

const ErrorUtils = {
  setGlobalHandler(fun) {
    _globalHandler = fun;
  },
  getGlobalHandler() {
    return _globalHandler;
  },
  reportError(error) {
    _globalHandler && _globalHandler(error);
  },
  reportFatalError(error) {
    _globalHandler && _globalHandler(error, true);
  },
  ...
};

global.ErrorUtils = ErrorUtils;
上面只展示了我们使用了的方法,我们可以看到我们改写的 console.error,即 (message, error) => global.ErrorUtils.reportError(error) ,最终是执行的 _globalHandler
所以通过这种方法可以捕获到所有使用了 console.error 的异常,我们来看看 React Native 源码中什么地方使用了 ErrorUtils 来做异常捕获和处理
来到 MessageQueue 源码,位置:Libraries/BatchedBridge/MessageQueue.js
__guard(fn: () => void) {
    if (this.__shouldPauseOnThrow()) {
        fn();
    } else {
        try {
            fn();
        } catch (error) {
            ErrorUtils.reportFatalError(error);
        }
    }
}我们可以看到上面这个__guard方法中使用了try...catch...对函数的执行进行守护,当发生异常时,会调用 ErrorUtils.reportFatalError(error); 对错误进行处理
使用了__guard的地方这里就不一一列举了,我们可以看看 MessageQueue 这个模块在RN中处于什么位置

因为没有系统的看过RN的源码,在网上找了个介绍 Native 和 JS 之间通信的图,我们可以看到 MessageQueue 在 Native 和 JS 之间通信是很重要的模块
来到 BatchedBridge 源码,位置:Libraries/BatchedBridge/BatchedBridge.js
'use strict';

const MessageQueue = require('MessageQueue');

const BatchedBridge = new MessageQueue();

Object.defineProperty(global, '__fbBatchedBridge', {
  configurable: true,
  value: BatchedBridge,
});

module.exports = BatchedBridge;熟悉RN的同学应该知道,BatchedBridge是 Native 和 JS 之间通信的关键模块,从上面的源码我们可以知道,BatchedBridge实际就是MessageQueue实例
所以在 MessageQueue 模块中使用 ErrorUtils 能捕获到所有通信过程中的异常并调用_globalHandler处理
以上所有代码可在个人开发的RN组件库的项目中查看到:rn_components ExceptionHandler,组件库现在才刚开始建设,后续会不断完善
以上就是我对 React Native 异常处理分享,希望能对有需要的小伙伴有帮助~~~
喜欢我的文章的小伙伴可以点star ⭐️
本文源码是2018年8月30日拉取的React仓库master分支上的代码
本文涉及的源码是React16异常处理部分,对于React16整体的源码的分析,可以看看我的文章:React16源码之React Fiber架构
React16引入了 Error Boundaries 即异常边界概念,以及一个新的生命周期函数:componentDidCatch,来支持React运行时的异常捕获和处理
对 React16 Error Boundaries 不了解的小伙伴可以看看官方文档:Error Boundaries
下面从两个方面进行分享:
A JavaScript error in a part of the UI shouldn’t break the whole app. To solve this problem for React users, React 16 introduces a new concept of an “error boundary”.
Error boundaries are React components that catch JavaScript errors anywhere in their child component tree, log those errors, and display a fallback UI instead of the component tree that crashed. Error boundaries catch errors during rendering, in lifecycle methods, and in constructors of the whole tree below them.
从上面可以知道,React16引入了Error Boundaries(异常边界)的概念是为了避免React的组件内的UI异常导致整个应用的异常
Error Boundaries(异常边界)是React组件,用于捕获它子组件树种所有组件产生的js异常,并渲染指定的兜底UI来替代出问题的组件
它能捕获子组件生命周期函数中的异常,包括构造函数(constructor)和render函数
而不能捕获以下异常:
接下来我们来写一个异常边界组件,如下:
class ErrorBoundary extends React.Component {
  constructor(props) {
    super(props);
    this.state = { hasError: false };
  }

  componentDidCatch(error, info) {
    // Display fallback UI
    this.setState({ hasError: true });
    // You can also log the error to an error reporting service
    logErrorToMyService(error, info);
  }

  render() {
    if (this.state.hasError) {
      // You can render any custom fallback UI
      return <h1>Something went wrong.</h1>;
    }
    return this.props.children;
  }
}
使用如下:
<ErrorBoundary>
  <MyWidget />
</ErrorBoundary>
当 MyWidget组件在构造函数、render函数以及所有生命周期函数中抛出异常时,异常将会被 ErrorBoundary异常边界组件捕获,执行 componentDidCatch函数,渲染对应 fallback UI 替代MyWidget组件
接下来,我们从源码的角度来看看异常边界组件是怎么捕获异常,以及为什么只能捕获到子组件在构造函数、render函数以及所有生命周期函数中抛出异常
先简单了解一下React整体的源码结构,感兴趣的小伙伴可以看看之前写的文章:React16源码之React Fiber架构 ,这篇文章包括了对React整体流程的源码分析,其中有提到React核心模块(Reconciliation,又叫协调模块)分为两阶段:(本文不会再详细介绍了,感兴趣的小伙伴自行了解哈~)
reconciliation阶段
函数调用流程如下:
这个阶段核心的部分是上图中标出的第三部分,React组件部分的生命周期函数的调用以及通过Diff算法计算出所有更新工作都在第三部分进行的,所以异常处理也是在这部分进行的
commit阶段
函数调用流程如下:
这个阶段主要做的工作拿到reconciliation阶段产出的所有更新工作,提交这些工作并调用渲染模块(react-dom)渲染UI。完成UI渲染之后,会调用剩余的生命周期函数,所以异常处理也会在这部分进行
而各生命周期函数在各阶段的调用情况如下:

下面我们正式开始异常处理部分的源码分析,React异常处理在源码中的入口主要有两处:
1、reconciliation阶段的 renderRoot 函数,对应异常处理方法是 throwException
2、commit阶段的 commitRoot 函数,对应异常处理方法是 dispatch
首先看看 renderRoot 函数源码中与异常处理相关的部分:
function renderRoot(
  root: FiberRoot,
  isYieldy: boolean,
  isExpired: boolean,
): void {
  ...
  do {
    try {
      workLoop(isYieldy);
    } catch (thrownValue) {
      if (nextUnitOfWork === null) {
        // This is a fatal error.
        didFatal = true;
        onUncaughtError(thrownValue);
      } else {
        ...
        const sourceFiber: Fiber = nextUnitOfWork;
        let returnFiber = sourceFiber.return;
        if (returnFiber === null) {
          // This is the root. The root could capture its own errors. However,
          // we don't know if it errors before or after we pushed the host
          // context. This information is needed to avoid a stack mismatch.
          // Because we're not sure, treat this as a fatal error. We could track
          // which phase it fails in, but doesn't seem worth it. At least
          // for now.
          didFatal = true;
          onUncaughtError(thrownValue);
        } else {
          throwException(
            root,
            returnFiber,
            sourceFiber,
            thrownValue,
            nextRenderExpirationTime,
          );
          nextUnitOfWork = completeUnitOfWork(sourceFiber);
          continue;
        }
      }
    }
    break;
  } while (true);
  ...
}可以看到,这部分就是在workLoop大循环外套了层try...catch...,在catch中判断当前错误类型,调用不同的异常处理方法
有两种异常处理方法:
1、RootError,最后是调用 onUncaughtError 函数处理
2、ClassError,最后是调用 componentDidCatch 生命周期函数处理
上面两种方法处理流程基本类似,这里就重点分析 ClassError 方法
接下来我们看看 throwException 源码:
function throwException(
  root: FiberRoot,
  returnFiber: Fiber,
  sourceFiber: Fiber,
  value: mixed,
  renderExpirationTime: ExpirationTime,
) {
  ...
  // We didn't find a boundary that could handle this type of exception. Start
  // over and traverse parent path again, this time treating the exception
  // as an error.
  renderDidError();
  value = createCapturedValue(value, sourceFiber);
  let workInProgress = returnFiber;
  do {
    switch (workInProgress.tag) {
      case HostRoot: {
        const errorInfo = value;
        workInProgress.effectTag |= ShouldCapture;
        workInProgress.expirationTime = renderExpirationTime;
        const update = createRootErrorUpdate(
          workInProgress,
          errorInfo,
          renderExpirationTime,
        );
        enqueueCapturedUpdate(workInProgress, update);
        return;
      }
      case ClassComponent:
      case ClassComponentLazy:
        // Capture and retry
        const errorInfo = value;
        const ctor = workInProgress.type;
        const instance = workInProgress.stateNode;
        if (
          (workInProgress.effectTag & DidCapture) === NoEffect &&
          ((typeof ctor.getDerivedStateFromCatch === 'function' &&
            enableGetDerivedStateFromCatch) ||
            (instance !== null &&
              typeof instance.componentDidCatch === 'function' &&
              !isAlreadyFailedLegacyErrorBoundary(instance)))
        ) {
          workInProgress.effectTag |= ShouldCapture;
          workInProgress.expirationTime = renderExpirationTime;
          // Schedule the error boundary to re-render using updated state
          const update = createClassErrorUpdate(
            workInProgress,
            errorInfo,
            renderExpirationTime,
          );
          enqueueCapturedUpdate(workInProgress, update);
          return;
        }
        break;
      default:
        break;
    }
    workInProgress = workInProgress.return;
  } while (workInProgress !== null);
}
throwException函数分为两部分:
1、遍历当前异常节点的所有父节点,找到对应的错误信息(错误名称、调用栈等),这部分代码在上面中没有展示出来
2、第二部分就是上面展示出来的部分,可以看到,也是遍历当前异常节点的所有父节点,判断各节点的类型,主要还是上面提到的两种类型,这里重点讲ClassComponent类型,判断该节点是否是异常边界组件(通过判断是否存在componentDidCatch生命周期函数等),如果是找到异常边界组件,则调用 createClassErrorUpdate函数新建update,并将此update放入此节点的异常更新队列中,在后续更新中,会更新此队列中的更新工作
我们来看看 createClassErrorUpdate的源码:
function createClassErrorUpdate(
  fiber: Fiber,
  errorInfo: CapturedValue<mixed>,
  expirationTime: ExpirationTime,
): Update<mixed> {
  const update = createUpdate(expirationTime);
  update.tag = CaptureUpdate;
  ...
  const inst = fiber.stateNode;
  if (inst !== null && typeof inst.componentDidCatch === 'function') {
    update.callback = function callback() {
      if (
        !enableGetDerivedStateFromCatch ||
        getDerivedStateFromCatch !== 'function'
      ) {
        // To preserve the preexisting retry behavior of error boundaries,
        // we keep track of which ones already failed during this batch.
        // This gets reset before we yield back to the browser.
        // TODO: Warn in strict mode if getDerivedStateFromCatch is
        // not defined.
        markLegacyErrorBoundaryAsFailed(this);
      }
      const error = errorInfo.value;
      const stack = errorInfo.stack;
      logError(fiber, errorInfo);
      this.componentDidCatch(error, {
        componentStack: stack !== null ? stack : '',
      });
    };
  }
  return update;
}
可以看到,此函数返回一个update,此update的callback最终会调用组件的 componentDidCatch生命周期函数
大家可能会好奇,update的callback最终会在什么时候被调用,update的callback最终会在commit阶段的 commitAllLifeCycles函数中被调用,这块在讲完dispatch之后会详细讲一下
以上就是 reconciliation阶段 的异常捕获到异常处理的流程,可以知道此阶段是在workLoop大循环外套了层try...catch...,所以workLoop里所有的异常都能被异常边界组件捕获并处理
下面我们看看 commit阶段 的 dispatch
我们先看看 dispatch 的源码:
function dispatch(
  sourceFiber: Fiber,
  value: mixed,
  expirationTime: ExpirationTime,
) {
  let fiber = sourceFiber.return;
  while (fiber !== null) {
    switch (fiber.tag) {
      case ClassComponent:
      case ClassComponentLazy:
        const ctor = fiber.type;
        const instance = fiber.stateNode;
        if (
          typeof ctor.getDerivedStateFromCatch === 'function' ||
          (typeof instance.componentDidCatch === 'function' &&
            !isAlreadyFailedLegacyErrorBoundary(instance))
        ) {
          const errorInfo = createCapturedValue(value, sourceFiber);
          const update = createClassErrorUpdate(
            fiber,
            errorInfo,
            expirationTime,
          );
          enqueueUpdate(fiber, update);
          scheduleWork(fiber, expirationTime);
          return;
        }
        break;
      case HostRoot: {
        const errorInfo = createCapturedValue(value, sourceFiber);
        const update = createRootErrorUpdate(fiber, errorInfo, expirationTime);
        enqueueUpdate(fiber, update);
        scheduleWork(fiber, expirationTime);
        return;
      }
    }
    fiber = fiber.return;
  }

  if (sourceFiber.tag === HostRoot) {
    // Error was thrown at the root. There is no parent, so the root
    // itself should capture it.
    const rootFiber = sourceFiber;
    const errorInfo = createCapturedValue(value, rootFiber);
    const update = createRootErrorUpdate(rootFiber, errorInfo, expirationTime);
    enqueueUpdate(rootFiber, update);
    scheduleWork(rootFiber, expirationTime);
  }
}
dispatch函数做的事情和上部分的 throwException 类似,遍历当前异常节点的所有父节点,找到异常边界组件(有componentDidCatch生命周期函数的组件),新建update,在update.callback中调用组件的componentDidCatch生命周期函数,后续的部分这里就不详细描述了,和 reconciliation阶段 基本一致,这里我们看看commit阶段都哪些部分调用了dispatch函数
function captureCommitPhaseError(fiber: Fiber, error: mixed) {
  return dispatch(fiber, error, Sync);
}
调用 captureCommitPhaseError 即调用 dispatch,而 captureCommitPhaseError 主要是在 commitRoot 函数中被调用,源码如下:
function commitRoot(root: FiberRoot, finishedWork: Fiber): void {
  ...
  // commit阶段的准备工作
  prepareForCommit(root.containerInfo);

  // Invoke instances of getSnapshotBeforeUpdate before mutation.
  nextEffect = firstEffect;
  startCommitSnapshotEffectsTimer();
  while (nextEffect !== null) {
    let didError = false;
    let error;
    try {
        // 调用 getSnapshotBeforeUpdate 生命周期函数
        commitBeforeMutationLifecycles();
    } catch (e) {
        didError = true;
        error = e;
    }
    if (didError) {
      captureCommitPhaseError(nextEffect, error);
      if (nextEffect !== null) {
        nextEffect = nextEffect.nextEffect;
      }
    }
  }
  stopCommitSnapshotEffectsTimer();

  // Commit all the side-effects within a tree. We'll do this in two passes.
  // The first pass performs all the host insertions, updates, deletions and
  // ref unmounts.
  nextEffect = firstEffect;
  startCommitHostEffectsTimer();
  while (nextEffect !== null) {
    let didError = false;
    let error;
    try {
        // 提交所有更新并调用渲染模块渲染UI
        commitAllHostEffects(root);
    } catch (e) {
        didError = true;
        error = e;
    }
    if (didError) {
      captureCommitPhaseError(nextEffect, error);
      // Clean-up
      if (nextEffect !== null) {
        nextEffect = nextEffect.nextEffect;
      }
    }
  }
  stopCommitHostEffectsTimer();

  // The work-in-progress tree is now the current tree. This must come after
  // the first pass of the commit phase, so that the previous tree is still
  // current during componentWillUnmount, but before the second pass, so that
  // the finished work is current during componentDidMount/Update.
  root.current = finishedWork;

  // In the second pass we'll perform all life-cycles and ref callbacks.
  // Life-cycles happen as a separate pass so that all placements, updates,
  // and deletions in the entire tree have already been invoked.
  // This pass also triggers any renderer-specific initial effects.
  nextEffect = firstEffect;
  startCommitLifeCyclesTimer();
  while (nextEffect !== null) {
    let didError = false;
    let error;
    try {
        // 调用剩余生命周期函数
        commitAllLifeCycles(root, committedExpirationTime);
    } catch (e) {
        didError = true;
        error = e;
    }
    if (didError) {
      captureCommitPhaseError(nextEffect, error);
      if (nextEffect !== null) {
        nextEffect = nextEffect.nextEffect;
      }
    }
  }
  ...
}可以看到,有三处(也是commit阶段主要的三部分)通过try...catch...调用了 captureCommitPhaseError函数,即调用了 dispatch函数,而这三个部分具体做的事情注释里也写了,详细的感兴趣的小伙伴可以看看我的文章:React16源码之React Fiber架构
刚刚我们提到,update的callback会在commit阶段的commitAllLifeCycles函数中被调用,我们来看下具体的调用流程:
1、commitAllLifeCycles函数中会调用commitLifeCycles函数
2、在commitLifeCycles函数中,对于ClassComponent和HostRoot会调用commitUpdateQueue函数
3、我们来看看 commitUpdateQueue 函数源码:
export function commitUpdateQueue<State>(
  finishedWork: Fiber,
  finishedQueue: UpdateQueue<State>,
  instance: any,
  renderExpirationTime: ExpirationTime,
): void {
  ...
  // Commit the effects
  commitUpdateEffects(finishedQueue.firstEffect, instance);
  finishedQueue.firstEffect = finishedQueue.lastEffect = null;

  commitUpdateEffects(finishedQueue.firstCapturedEffect, instance);
  finishedQueue.firstCapturedEffect = finishedQueue.lastCapturedEffect = null;
}

function commitUpdateEffects<State>(
  effect: Update<State> | null,
  instance: any,
): void {
  while (effect !== null) {
    const callback = effect.callback;
    if (callback !== null) {
      effect.callback = null;
      callCallback(callback, instance);
    }
    effect = effect.nextEffect;
  }
}我们可以看到,commitUpdateQueue函数中会调用两次commitUpdateEffects函数,参数分别是正常update队列以及存放异常处理update队列
而commitUpdateEffects函数就是遍历所有update,调用其callback方法
上文提到,commitAllLifeCycles函数中是用于调用剩余生命周期函数,所以异常边界组件的 componentDidCatch生命周期函数也是在这个阶段调用
我们现在可以知道,React内部其实也是通过 try...catch... 形式是捕获各阶段的异常,但是只在两个阶段的特定几处进行了异常捕获,这也是为什么异常边界只能捕获到子组件在构造函数、render函数以及所有生命周期函数中抛出的异常
细心的小伙伴应该注意到,throwException 和 dispatch 在遍历节点时,是从异常节点的父节点开始遍历,这也是为什么异常边界组件自身的异常不会捕获并处理
我们也提到了React内部将异常分为了两种异常处理方法:RootError、ClassError,我们只重点分析了 ClassError 类型的异常处理函数,其实 RootError 是一样的,区别在于最后调用的处理方法不同,在遍历所有父节点过程中,如果有异常边界组件,则会调用 ClassError 类型的异常处理函数,如果没有,一直遍历到根节点,则会调用 RootError 类型的异常处理函数,最后调用的 onUncaughtError 方法,此方法做的事情很简单,其实就是将 hasUnhandledError 变量赋值为 true,将 unhandledError 变量赋值为异常对象,此异常对象最终将在 finishRendering函数中被抛出,而finishRendering函数是在performWork函数的最后被调用,这块简单感兴趣的小伙伴可以自行看代码~
本文涉及很多React其他部分的源码,不熟悉的小伙伴可以看看我的文章:React16源码之React Fiber架构
以上就是我对React16异常处理部分的源码的分享,希望能对有需要的小伙伴有帮助~~~
喜欢我的文章的小伙伴可以点star ⭐️
Android物理返回键的点击事件,一般webview的默认行为是 window.history.go(-1) ,但是在实际需求场景下,简单的页面回退并不能满足需求,所以需要H5页面监听Android物理返回键从而自定义处理方法。
本方案的代码都在 h5_android_back 仓库中
主要是运用 HTML5 History API 实现。所以,首先简单介绍下 HTML5 History API
history.length

history.state
history.back()

history.forward()

history.go()history.pushState()或history.replaceState()不会触发此事件window.addEventListener('popstate', handlePopstate);hash值发生改变时触发window.addEventListener('hashchange', handleHashChange);// index.js
(function (pkg) {
var STATE = '_android_back';
// 维护处理方法的栈
var _android_back_handles = [];
// 触发一次popstate方法,则调用最新处理方法
var handlePopstate = function () {
var handle = _android_back_handles.pop();
handle && handle();
};
// 通过调用listen方法添加处理方法
var listen = function (handle) {
_android_back_handles.push(handle);
};
// 通过调用push方法,新增一条历史记录,并添加对应处理方法
var push = function (state, handle) {
if (handle) {
history.pushState(state, null, location.href);
handle && _android_back_handles.push(handle);
}
};
const init = function () {
// 通过调用 history.pushState() 方法添加一条历史记录
history.pushState(STATE, null, location.href);
// 监听 popstate 事件,当点击Android物理返回键时,会触发该事件
window.addEventListener('popstate', handlePopstate);
this.listen = listen;
this.push = push;
};
init.call(window[pkg] = window[pkg] || {});
})('AndroidBack');此实现参考了 https://github.com/iazrael/xback ,在此基础上,根据需要修改和添加了一部分代码
此外,封装了一个React高阶组件,方便React项目使用,代码如下:
import * as React from 'react';

export default (Target, handleBack) => {
    return class AndroidBack extends React.Component {
        _handles = []
        back = () => {
            window.history.go(-1);
        }
        componentDidMount () {
            // 通过调用 history.pushState() 方法添加一条历史记录
            history.pushState('_android_back', null, location.href);
            // 监听 popstate 事件,当点击Android物理返回键时,会触发该事件
            window.addEventListener('popstate', this.handlePopstate);
            if (handleBack) {
                // 添加自定义处理方法
                this._handles.push(handleBack);
            } else {
                // 如果没有自定义处理方法,默认调用 window.history.go(-1);
                this._handles.push(this.back);
            }
        }
        componentWillUnmount () {
            window.removeEventListener('popstate', this.handlePopstate);
        }
        // 触发一次popstate方法,则调用最新处理方法
        handlePopstate = () => {
            const handle = this._handles.pop();
            handle && handle();
        }
        // 通过调用push方法,新增一条历史记录,并添加对应处理方法
        push = (state, handle) => {
            if (handle) {
                history.pushState(state, null, location.href);
                this._handles.push(handle);
            }
        }
        render () {
            return (
                <Target {...this.props} _android_back_push={this.push}/>
            );
        }
    };
};
实现原理基本在注释中注明,在这就不详细叙述了,所有代码在 h5_android_back 仓库中
两种方式:
1、将对象挂在window上,支持任意页面接入,使用如下:
index.js
// 监听Android物理返回键,自定义处理方法
window.AndroidBack.listen(() => {
    console.log('back');
});
// 新增Android物理返回键监听事件,使用场景,比如:页面内弹出浮层,点击Android物理返回键,不是回退页面,而是关闭浮层
window.AndroidBack.push('close_modal', () => {
    // 关闭弹窗
    console.log('close_modal');
});
2、封装了React高阶组件,支持React项目接入,使用如下:
index_react.js
import * as React from 'react';
import AndroidBack from 'h5_android_back/index_react.js';

class App extends React.Component {
    // ...
    openModal = () => {
        // 新增Android物理返回键监听事件,使用场景,比如:页面内弹出浮层,点击Android物理返回键,不是回退页面,而是关闭浮层
        this.props._android_back_push('close_modal', () => {
            // 关闭弹窗
            console.log('close_modal');
        });
    }
}

// 监听Android物理返回键,自定义处理方法
export default AndroidBack(App, () => {
    console.log('back');
})注:此方案使用于所有浏览器及默认行为是页面回退的webview
此方案在我平时工作中使用正常,希望能对有需要的小伙伴有帮助~~~
喜欢我的文章的小伙伴可以点star ⭐️
本文将从三个方面分享 react native 转 web 方案:react-native-web
react-native-web:https://github.com/necolas/react-native-web
yarn add react react-dom react-native-web如果使用了 ART,需要安装 react-art(比如,使用了 react-native-svg 来做RN端icon方案,这就是基于 react-art)
yarn add react-art安装好之后,使用主要分一下两步:
webpack配置就跟普通 React web 应用配置一致即可,然后新增alias配置,如下:
// webpack.config.js
module.exports = {
  // ...the rest of your config
  resolve: {
    alias: {
      'react-native$': 'react-native-web'
    }
  }
}有两种方式:
在新增配置之前,首先看看RN的入口文件:
// index.js
import { AppRegistry } from 'react-native';
import App from './App';

AppRegistry.registerComponent('rn_web', () => App);
新增配置之后,如下:
// index.web.js
import { AppRegistry } from 'react-native';
import App from './App';

AppRegistry.registerComponent('rn_web', () => App);

AppRegistry.runApplication('rn_web', {
    rootTag: document.getElementById('react-root')
});
使用 render 方法如下:
import { render } from 'react-native';
import App from './App';

render(<App/>, rootTag: document.getElementById('react-root'));
可以看到,AppRegistry API 更贴近RN的写法,render 方法跟 ReactDOM.render 是一个意思。
以上,就能够将现有RN页面转成web页面了
接下来,以 AppRegistry API 为入口,看看 react-native-web 做了什么
从三部分来对源码进行分析:
入口文件代码:
// index.web.js
import { AppRegistry } from 'react-native';
import App from './App';

AppRegistry.registerComponent('rn_web', () => App);

AppRegistry.runApplication('rn_web', {
    rootTag: document.getElementById('react-root')
});
那我们来来看看这两个 API 都做了什么
const runnables = {};
static registerComponent(appKey: string, componentProvider: ComponentProvider): string {
    runnables[appKey] = {
        getApplication: appParameters => getApplication(componentProviderInstrumentationHook(componentProvider), appParameters ? appParameters.initialProps : emptyObject, wrapperComponentProvider && wrapperComponentProvider(appParameters)),
        run: appParameters => renderApplication(componentProviderInstrumentationHook(componentProvider), appParameters.initialProps || emptyObject, appParameters.rootTag, wrapperComponentProvider && wrapperComponentProvider(appParameters), appParameters.callback)
    };
    return appKey;
}
以例子代码为例,此方法就是定义了 runnables['rn_web'] 对象,此对象有 getApplication、run 两个方法
static runApplication(appKey: string, appParameters: Object): void {
    runnables[appKey].run(appParameters);
}
以例子代码为例,此方法就是调用了
runnables['rn_web'].run({
    rootTag: document.getElementById('react-root')
})
这里的 appParameters 数据结构如下:
{
    initialProps, // 初始props
    rootTag, // root DOM节点
    callback, // 回调函数
}import { render } from 'react-dom';
const renderFn = render;
function renderApplication<Props: Object>(RootComponent: ComponentType<Props>, initialProps: Props, rootTag: any, WrapperComponent?: ?ComponentType<*>, callback?: () => void) {
renderFn(
<AppContainer WrapperComponent={WrapperComponent} rootTag={rootTag}>
<RootComponent {...initialProps} />
</AppContainer>,
rootTag,
callback
);
}实际调用的是:
ReactDOM.render(
    <AppContainer WrapperComponent={WrapperComponent} rootTag={rootTag}>
        <App {...initialProps} />
    </AppContainer>,
    rootTag,
    callback
);export default class AppContainer extends Component<Props, State> {
state = { mainKey: 1 };
static childContextTypes = {
rootTag: any
};
static propTypes = {
WrapperComponent: any,
children: node,
rootTag: any.isRequired
};
getChildContext(): Context {
return {
rootTag: this.props.rootTag
};
}
render() {
const { children, WrapperComponent } = this.props;
let innerView = (
<View
children={children}
key={this.state.mainKey}
pointerEvents="box-none"
style={styles.appContainer}
/>
);
if (WrapperComponent) {
innerView = <WrapperComponent>{innerView}</WrapperComponent>;
}
return (
<View pointerEvents="box-none" style={styles.appContainer}>
{innerView}
</View>
);
}
}
const styles = StyleSheet.create({
appContainer: {
flex: 1
}
});以 StyleSheet 为例,分析 react-native-web API 源码
我们都知道,RN中使用的样式表是CSS的子集,我们来看看 react-native-web 对样式表的处理
const StyleSheet = {
  absoluteFill,
  absoluteFillObject,
  compose(style1, style2) {
    ...
  },
  create(styles) {
    ...
  },
  flatten: flattenStyle,
  hairlineWidth: 1
};
RN的StyleSheet模块有以下几个方法和常量:
1、方法:
2、常量:
可以发现,react-native-web 中 StyleSheet 定义了除 setStyleAttributePreprocessor(此方法存在风险)方法之外的所有方法和常量。此外,还新增了 compose 方法,此方法在 react-native-web 的组件中使用
首先来看看 StyleSheet.create 方法
create(styles) {
  const result = {};
  Object.keys(styles).forEach(key => {
    const id = styles[key] && ReactNativePropRegistry.register(styles[key]);
    result[key] = id;
  });
  return result;
}
代码比较简单,主要就是遍历styles,对所有styles调用 ReactNativePropRegistry.register 获取对应的id,返回对应 key-id 的对象。我们先看个例子:
const styles = StyleSheet.create({
  container: {
    flex: 1,
    justifyContent: 'center',
    alignItems: 'center',
    backgroundColor: '#F5FCFF',
  },
  welcome: {
    fontSize: 20,
    textAlign: 'center',
    margin: 10,
  },
  instructions: {
    textAlign: 'center',
    color: '#333333',
    marginBottom: 5,
  },
  ellipsis: {
    width: 200,
  }
});

console.log(styles);
我们来看看打印出来的styles是什么?
{container: 78, welcome: 79, instructions: 80, ellipsis: 81}接着来看看 ReactNativePropRegistry.register 做了什么
const emptyObject = {};
const objects = {};
const prefix = 'r';
let uniqueID = 1;

const createKey = id => `${prefix}-${id}`;

export default class ReactNativePropRegistry {
  static register(object: Object): number {
    const id = uniqueID++;
    if (process.env.NODE_ENV !== 'production') {
      Object.freeze(object);
    }
    const key = createKey(id);
    objects[key] = object;
    return id;
  }

  static getByID(id: number): Object {
    if (!id) {
      return emptyObject;
    }
    const key = createKey(id);
    const object = objects[key];
    if (!object) {
      return emptyObject;
    }
    return object;
  }
}
这个模块,定义了两个方法:register、getByID,register 是将样式对象存入 objects 对象中,并返回对应的 id;getByID 则是通过 id 获取对应的样式对象
在react-native-web整个样式转换过程中,除了StyleSheet.create,还需要关注一下 StyleSheet.flatten 方法,即 flattenStyle
function getStyle(style) {
  if (typeof style === 'number') {
    return ReactNativePropRegistry.getByID(style);
  }
  return style;
}

function flattenStyle(style: ?StyleObj): ?Object {
  if (!style) {
    return undefined;
  }

  if (!Array.isArray(style)) {
    return getStyle(style);
  }

  const result = {};
  for (let i = 0, styleLength = style.length; i < styleLength; ++i) {
    const computedStyle = flattenStyle(style[i]);
    if (computedStyle) {
      for (const key in computedStyle) {
        const value = computedStyle[key];
        result[key] = value;
      }
    }
  }
  return result;
}
flattenStyle 方法接受的 styles 参数是存有样式表id的数组或变量,通过递归遍历 styles,调用上一部分提到的 ReactNativePropRegistry.getByID 方法,通过id获取对应的样式对象,并返回。
以上,我们以 StyleSheet 为例分析了 react-native-web 实现 RN API 的源码。
以 View 组件为例,分析 react-native-web 组件的源码
const calculateHitSlopStyle = hitSlop => {
  const hitStyle = {};
  for (const prop in hitSlop) {
    if (hitSlop.hasOwnProperty(prop)) {
      const value = hitSlop[prop];
      hitStyle[prop] = value > 0 ? -1 * value : 0;
    }
  }
  return hitStyle;
};

class View extends Component<ViewProps> {
  static displayName = 'View';

  static contextTypes = {
    isInAParentText: bool
  };

  static propTypes = ViewPropTypes;

  render() {
    const hitSlop = this.props.hitSlop;
    const supportedProps = filterSupportedProps(this.props);

    const { isInAParentText } = this.context;

    supportedProps.style = StyleSheet.compose(
      styles.initial,
      StyleSheet.compose(isInAParentText && styles.inline, this.props.style)
    );

    if (hitSlop) {
      const hitSlopStyle = calculateHitSlopStyle(hitSlop);
      const hitSlopChild = createElement('span', { style: [styles.hitSlop, hitSlopStyle] });
      supportedProps.children = React.Children.toArray([hitSlopChild, supportedProps.children]);
    }

    return createElement('div', supportedProps);
  }
}

const styles = StyleSheet.create({
  // https://github.com/facebook/css-layout#default-values
  initial: {
    alignItems: 'stretch',
    borderWidth: 0,
    borderStyle: 'solid',
    boxSizing: 'border-box',
    display: 'flex',
    flexDirection: 'column',
    margin: 0,
    padding: 0,
    position: 'relative',
    zIndex: 0,
    // fix flexbox bugs
    minHeight: 0,
    minWidth: 0
  },
  inline: {
    display: 'inline-flex'
  },
  // this zIndex-ordering positions the hitSlop above the View but behind
  // its children
  hitSlop: {
    ...StyleSheet.absoluteFillObject,
    zIndex: -1
  }
});

export default applyLayout(applyNativeMethods(View));
View 组件就是一个简单的React组件,首先关注一下:
export default applyLayout(applyNativeMethods(View));其中,applyNativeMethods 方法是将native的方法转换为对应的DOM方法;applyLayout 方法是对组件的生命周期函数进行重写。这部分感兴趣的小伙伴自行了解~
接下来关注一下 View 组件的 render 方法,主要是对组件的 props 做些处理,包括校验 props 是否支持、style 处理,最后调用 createElement 方法
const createElement = (component, props, ...children) => {
  // use equivalent platform elements where possible
  let accessibilityComponent;
  if (component && component.constructor === String) {
    accessibilityComponent = AccessibilityUtil.propsToAccessibilityComponent(props);
  }
  const Component = accessibilityComponent || component;
  const domProps = createDOMProps(Component, props);
  adjustProps(domProps);
  return React.createElement(Component, domProps, ...children);
};
最终是调用了 React.createElement 方法创建 React Element,在此之前,主要做的事情就是调用 createDOMProps 方法,得到 domProps
const createDOMProps = (component, props, styleResolver) => {
  ...
  const {
    ...
    ...domProps
  } = props;

  // GENERAL ACCESSIBILITY
  ...

  // DISABLED
  ...

  // FOCUS
  // Assume that 'link' is focusable by default (uses <a>).
  // Assume that 'button' is not (uses <div role='button'>) but must be treated as such.
  ...

  // STYLE
  // Resolve React Native styles to optimized browser equivalent
  const reactNativeStyle = [
    component === 'a' && resetStyles.link,
    component === 'button' && resetStyles.button,
    role === 'heading' && resetStyles.heading,
    component === 'ul' && resetStyles.list,
    role === 'button' && !disabled && resetStyles.ariaButton,
    pointerEvents && pointerEventsStyles[pointerEvents],
    providedStyle,
    placeholderTextColor && { placeholderTextColor }
  ];
  const { className, style } = styleResolver(reactNativeStyle);
  if (className && className.constructor === String) {
    domProps.className = props.className ? `${props.className} ${className}` : className;
  }
  if (style) {
    domProps.style = style;
  }

  // OTHER
  // Link security and automation test ids
  ...
  return domProps;
};
createDOMProps 方法代码较长,这里就不全部粘贴,从几个注释可以知道,此方法主要是将各 props 转换成对应的 web 端的props,这里我们以 style 为例,看看是如何做转换的。
样式转换工作量主要在 styleResolver 方法,即调用 ReactNativeStyleResolver 实例的 resolve 方法。此方法最后会返回 className 和 style,最后会赋值到 domProps 中
resolve(style) {
  // fast and cachable
  // style: id
  if (typeof style === 'number') {
    this._injectRegisteredStyle(style);
    const key = createCacheKey(style);
    return this._resolveStyleIfNeeded(style, key);
  }
  // resolve a plain RN style object
  // style: 样式对象
  if (!Array.isArray(style)) {
    return this._resolveStyleIfNeeded(style);
  }
  // flatten the style array
  // cache resolved props when all styles are registered
  // otherwise fallback to resolving
  // style: 存储id的数组
  const flatArray = flattenArray(style);
  let isArrayOfNumbers = true;
  for (let i = 0; i < flatArray.length; i++) {
    const id = flatArray[i];
    if (typeof id !== 'number') {
      isArrayOfNumbers = false;
    } else {
      this._injectRegisteredStyle(id);
    }
  }
  const key = isArrayOfNumbers ? createCacheKey(flatArray.join('-')) : null;
  return this._resolveStyleIfNeeded(flatArray, key);
}
接下来看看 _injectRegisteredStyle 和 _resolveStyleIfNeeded
_injectRegisteredStyle(id) {
  const { doLeftAndRightSwapInRTL, isRTL } = I18nManager;
  const dir = isRTL ? (doLeftAndRightSwapInRTL ? 'rtl' : 'rtlNoSwap') : 'ltr';
  if (!this.injectedCache[dir][id]) {
    // 根据id获取对应的样式对象
    const style = flattenStyle(id);
    // 对样式对象格式化:各样式属性排序;添加长度单位;颜色值处理;特定属性处理;返回格式化之后的样式对象
    const domStyle = createReactDOMStyle(i18nStyle(style));
    Object.keys(domStyle).forEach(styleProp => {
      const value = domStyle[styleProp];
      if (value != null) {
        // 将样式插入 WebStyleSheet(domStyleElement.sheet)中
        this.styleSheetManager.injectDeclaration(styleProp, value);
      }
    });
    // 将此样式标记为已插入
    this.injectedCache[dir][id] = true;
  }
}其中,styleSheetManager.injectDeclaration 是基于 domStyleElement.sheet 对页面样式进行插入操作,我们可以看看转出来的web页面的样式:

_resolveStyleIfNeeded 方法即是调用 _resolveStyle 方法,源码如下:
_resolveStyle(style) {
  // 获取对应id的样式对象
  const flatStyle = flattenStyle(style);
  // 对样式对象格式化:各样式属性排序;添加长度单位;颜色值处理;特定属性处理;返回格式化之后的样式对象
  const domStyle = createReactDOMStyle(i18nStyle(flatStyle));

  const props = Object.keys(domStyle).reduce(
    (props, styleProp) => {
      const value = domStyle[styleProp];
      if (value != null) {
        // 获取 WebStyleSheet 中特定样式属性及值对应的className
        // 通过 StyleSheet.create 创建的样式,会插入到 WebStyleSheet
        const className = this.styleSheetManager.getClassName(styleProp, value);
        if (className) {
          // 将此className放入props.classList中
          props.classList.push(className);
        } else {
          // Certain properties and values are not transformed by 'createReactDOMStyle' as they
          // require more complex transforms into multiple CSS rules. Here we assume that StyleManager
          // can bind these styles to a className, and prevent them becoming invalid inline-styles.
          // 单条样式属性,如果不是特殊属性,则直接放进props.style中
          // 单条样式属性是指未通过 StyleSheet.create 创建的样式
          if (
            styleProp === 'pointerEvents' ||
            styleProp === 'placeholderTextColor' ||
            styleProp === 'animationName'
          ) {
            const className = this.styleSheetManager.injectDeclaration(styleProp, value);
            if (className) {
              props.classList.push(className);
            }
          } else {
            if (!props.style) {
              props.style = {};
            }
            // 4x slower render
            props.style[styleProp] = value;
          }
        }
      }
      return props;
    },
    { classList: [] }
  );

  props.className = classListToString(props.classList);
  if (props.style) {
    props.style = prefixInlineStyles(props.style);
  }
  return props;
}
此方法主要是获取所有样式对应的 className 或者 style,并存入props中返回
以上,我们以 View 组件为例分析了 react-native-web 实现 RN 组件的源码。
我们做完源码分析之后,我们看看如何基于 react-native-web 做一些修改
以 Text 组件为例,RN Text组件可以设置 numberOfLines,来实现单行或多行省略,但是react-native-web只实现了单行省略,所以我们要把多行省略的功能加上,代码如下:
class Text extends Component<*> {
  ...
  render() {
    ...
    // allow browsers to automatically infer the language writing direction
    otherProps.dir = dir !== undefined ? dir : 'auto';
    otherProps.style = [
      styles.initial,
      this.context.isInAParentText === true && styles.isInAParentText,
      style,
      selectable === false && styles.notSelectable,
      numberOfLines === 1 && styles.singleLineStyle,
      onPress && styles.pressable
    ];
    // 支持多行省略
    if (numberOfLines > 1) {
      otherProps.style.push({
        display: '-webkit-box',
        WebkitBoxOrient: 'vertical',
        WebkitLineClamp: numberOfLines,
        overflow: 'hidden',
        textOverflow: 'ellipsis',
      });
    }
    const component = isInAParentText ? 'span' : 'div';
    return createElement(component, otherProps);
  }
  ...
}
举的这个例子比较简单,想表达的是我们通过看react-native-web源码,在开发过程中,遇到了转换web的问题,我们可以通过修改源码、或者使用它提供的API来解决
具体代码可以参考示例项目:rn_web,包括源码注释和实例代码
以上就是我对 react-native-web 源码的分享,希望能对有需要的小伙伴有帮助~~~
喜欢我的文章的小伙伴可以点star ⭐️
A declarative, efficient, and flexible JavaScript library for building user interfaces.
🖖 Vue.js is a progressive, incrementally-adoptable JavaScript framework for building UI on the web.
TypeScript is a superset of JavaScript that compiles to clean JavaScript output.
An Open Source Machine Learning Framework for Everyone
The Web framework for perfectionists with deadlines.
A PHP framework for web artisans
Bring data to life with SVG, Canvas and HTML. 📊📈🎉
JavaScript (JS) is a lightweight interpreted programming language with first-class functions.
Some thing interesting about web. New door for the world.
A server is a program made to process requests and deliver data to clients.
Machine learning is a way of modeling and interpreting data that allows a piece of software to respond intelligently.
Some thing interesting about visualization, use data art
Some thing interesting about game, make everyone happy.
We are working to build community through open source technology. NB: members must have two-factor auth.
Open source projects and samples from Microsoft.
Google ❤️ Open Source for everyone.
Alibaba Open Source for everyone
Data-Driven Documents codes.
China tencent open source team.