hwadn / neteasecloudmv Goto Github PK
View Code? Open in Web Editor NEW网易云MV在线交流
Home Page: http://chd1994.club:3000
网易云MV在线交流
Home Page: http://chd1994.club:3000


用户先输入用户名,密码进行,经过格式验证后再调用第三方开放API获取图形验证码。用户输入验证码后,点击提交按钮时先进行验证码异步验证,若验证成功则提交表单,否则重新验证。
<IdentifyCode ref="verifyCode" @update="msgUpdate">
<template>
    <div class="identifyCode">
        <input type="text" placeholder="验证码" v-model="inputValue" @input="updateMsg">
        <img v-bind:src="imgSrc" alt="点击刷新" @click="refresh">
    </div>
</template>
<script>
    import myAjax from '../fns/ajax.js'
    export default{
        data: ()=>{
            return {
                imgSrc: '', // 验证码图像url
                captcha_id: '', // 验证码id
                inputValue: '', // 用户输入
            };
        },
        created(){
            // 验证码初始化
            this.refresh();
        },
        methods:{
            // 更新校验提醒
            updateMsg(){
                // 更新父组件提示信息
                this.$emit('update', '');
            },
            // 验证码刷新
            refresh(){
                const url = "http://hn216.api.yesapi.cn/?s=App.Captcha.Create&app_key=65C1298539FD9D8D9E6C2908F1AC7231&return_format=data";
                let that = this;
                // 图片刷新
                myAjax(url).then(res=>{
                    let obj = JSON.parse(res);
                    that.captcha_id = obj.data.captcha_id;
                    let base64 = obj.data.captcha_img;
                    that.imgSrc=`data:image/png;base64,${base64}`;
                });
                // 更新校验提醒
                this.updateMsg();
            },
            // 提交按钮触发验证码校验。父组件通过refs调用
            verify(){
                let that = this;
                // 校验请求
                return new Promise((resolve,reject)=>{
                    let url = `http://hn216.api.yesapi.cn/?s=App.Captcha.Verify&app_key=65C1298539FD9D8D9E6C2908F1AC7231&captcha_id=${this.captcha_id}&captcha_code=${this.inputValue}`;
                    // 开始校验
                    myAjax(url).then(res=>{
                        let obj = JSON.parse(res);
                        let answer = obj.data.err_code;
                        let msg = ''; // 验证信息
                        // 0,校验成功,1验证码过期,2验证码错误
                        if(answer == 0){
                            msg = '正确';
                            // 校验成功
                            resolve();
                        }else if(answer == 1){
                            msg = '验证码过期';
                        }else if(answer == 2){
                            msg = '验证码错误';
                            that.refresh();
                        }
                        // 失败,返回校验信息
                        reject(msg);
                    });
                });
            }
        }
    }
</script>
<style scoped>
    .identifyCode{
        text-align: left;
    }
    input{
        box-sizing: border-box;
        width: 50%;
        height: 100%;
        vertical-align: top;
    }
    img{
        vertical-align: top;
        float: right;
        width: 40%;
        height: 100%;
    }
</style>页面如下图:

// 校验对象
function Test(){

}
// 长度校验
Test.prototype.isLength = function(str,minLen,maxLen){
    if(str.length < minLen)return [false, '长度不够'];
    if(str.length > maxLen)return [false, '长度超出限制'];
    return [true, ''];
}
// 字符校验。只是数字和字母
Test.prototype.isCharacter = function(str){
    if(str.length == 0)return [false, '请输入用户名'];
    const regExp = /^(\d|[a-zA-Z])+$/;
    let isTrue = regExp.test(str);
    if(isTrue)return [true, ''];
    return [false, '含有非法字符'];
}

export default new Test();<template>
<div class="register">
<Cross @click.native="closeCur"></Cross>
<div class="form">
<div class="item">
<input class="ipt" type="text" v-model="userName.inputValue" @input="userNameTest" placeholder="用户名:5-10位,仅限字母或数字组合">
<div class="warn">{{userName.msg}}</div>
</div>
<div class="item">
<input class="ipt" type="password" v-model="password.inputValue" @input="passwordTest" placeholder="密码:4-20位,仅限字母或数字组合">
<div class="warn">{{password.msg}}</div>
</div>
<div class="item">
<input class="ipt" type="password" v-model="identify.inputValue" @input="identifyTest" placeholder="确认密码">
<div class="warn">{{identify.msg}}</div>
</div>
<div class="item">
<IdentifyCode ref="verifyCode" @update="msgUpdate"></IdentifyCode>
<div class="warn">{{verify.msg}}</div>
</div>
<div class="register-btn" @click="submit">注册</div>
</div>
</div>
</template>
<script>
import Cross from './Cross.vue'
import IdentifyCode from './IdentifyCode.vue'
import test from '../fns/Test.js'
export default {
data:()=>{
return {
// 用户名校验信息
userName: {
inputValue: '',
isOk: false,
msg: '', // 错误提示
},
// 密码校验信息
password: {
inputValue: '',
isOk: false,
msg: '',
},
// 确认密码校验信息
identify: {
inputValue: '',
isOk: false,
msg:'',
},
// 图形验证码校验信息
verify:{
// 校验提醒
msg: '',
}
};
},
components: {
Cross, // 右上角打叉
IdentifyCode // 图像验证码
},
methods:{
// 关闭页面
closeCur(){
this.$emit('closeCur');
},
// 验证用户名
userNameTest(){
// 字符限制
let characterRes = test.isCharacter(this.userName.inputValue);
this.userName.isOk = characterRes[0];
this.userName.msg = characterRes[1];
if(characterRes[0]){
// 长度限制
let lengthRes = test.isLength(this.userName.inputValue, 5, 10);
this.userName.isOk = lengthRes[0];
this.userName.msg = lengthRes[1];
}
},
// 验证密码
passwordTest(){
// 字符限制
let characterRes = test.isCharacter(this.password.inputValue);
this.password.isOk = characterRes[0];
this.password.msg = characterRes[1];
if(characterRes[0]){
// 长度限制
let lengthRes = test.isLength(this.password.inputValue, 4, 20);
this.password.isOk = lengthRes[0];
this.password.msg = lengthRes[1];
}
},
// 确认密码
identifyTest(){
if(this.password.inputValue == this.identify.inputValue){
this.identify.isOk = true;
this.identify.msg = '';
}else{
this.identify.isOk = false;
this.identify.msg = '密码不一致';
}
},
// 获得验证结果
msgUpdate(res){
this.verify.msg = res;
},
// 提交表单
submit(){
let that = this;
// 格式信息是否都正确
if(this.userName.isOk && this.password.isOk && this.identify.isOk){
// 等着验证码校验成功
this.$refs.verifyCode.verify().then(res=>{
/////////////////////////////////
// 这里做表单提交
////////////////////////////////
window.console.log('注册');
},errmsg=>{
that.verify.msg = errmsg;
});
}else{
window.alert('请输入完整');
}
}
}
}
</script>
<style scoped>
.register{
position: fixed;
padding: 42px 20px 20px;
left:50%;
top:50%;
transform: translateX(-50%) translateY(-50%);
background-color: white;
}
.form{
text-align: center;
padding: 20px;
}
.form .ipt{
box-sizing: border-box;
height:40px;
width:240px;
}
.form .identifyCode{
height:40px;
width:240px;
}
.form .register-btn{
box-sizing: border-box;
width: 100%;
height: 40px;
line-height: 40px;
color: white;
background-color: rgb(0,100,250);
}
.form .register-btn:hover{
cursor: pointer;
background-color: rgb(0,120,250);
}
.form .register-btn:active{
background-color: rgb(0,200,250);
}
.item{
margin-bottom: 5px;
}
.item:last-child{
margin-top: 10px;
margin-bottom: 0;
}
.item .warn{
padding: 5px;
font-size: 10px;
height: 12px;
line-height: 12px;
color: red;
text-align: left;
}
</style>类似于注册组件。页面如下

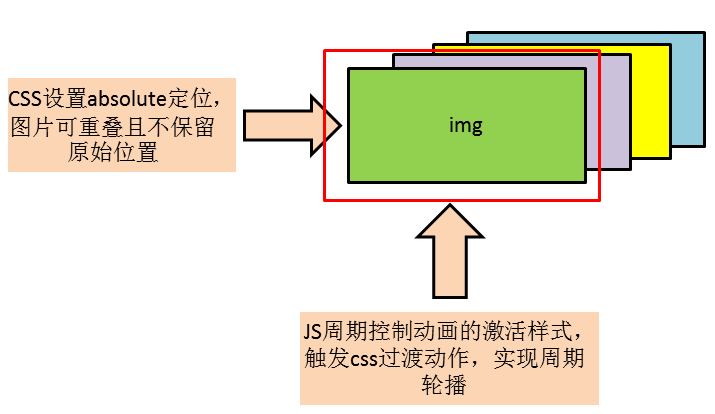
CSS设置图片绝对定位,使图片重叠在一个位置。再使用1个div作为播放视口,设置为overflo: hidden; 隐藏图片过渡时的溢出。然后用setInterval做周期的定时用setAttribute()设置图片的class属性,触发transition过渡效果。
具体实现比较复杂,下面是对1张图片做轮播的代码。具体用vue框架的v-show和过渡动画比较好实现
html,css
<div>
		<img id="first" src="./1.jpg" alt="">
</div>
<style>
	div{
		margin: auto;
		position: relative;
		width: 300px;
		height: 200px;
		overflow: hidden;
		border: 1px solid red;
	}
	img{
		position: absolute;
		width: 100%;
		height: 100%;
		transform: translateX(100%);
	}
	img.enter{
		transform: translateX(0);
		transition: transform 0.5s;
	}
	img.leave{
		transform: translateX(-100%);
		transition: transform 0.5s;
	}
</style>
javascript
<script type="text/javascript">
	var img1 = document.querySelector('#first');
	// 进入
	function enter(img){
		img.setAttribute('class','enter');
	}
	// 离开
	function leave(img){
		img.setAttribute('class','leave');
	}
	// 初始化
	function init(img){
		img.removeAttribute('class');
	}
	// 停留时间
	function lunbo(time){
		// 一个周期时间=进入时间inTime+停留时间stayTime+离开时间leaveTime
		let delay = time+1000;
		setInterval(function(){
			// 进入
			enter(img1);
			// 进入后开始停留,需要inTime+stayTime后开始离开
			setTimeout(function(){
				leave(img1);
			},time+500);
			// 进入开始到离开结束共1个周期时间
			setTimeout(function(){
				init(img1);
			},time + 1000);
		},2*time + 100);
	}
	lunbo(2000);
</script>其他组件通过eventBus给播放组件传递视频地址。也就是一个订阅发布模式。原理图如下:
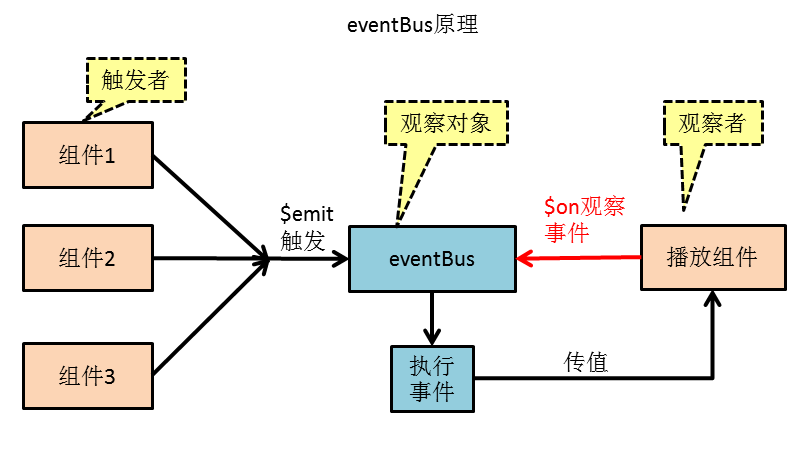
代码如下(模仿Vue):
// import Vue from 'vue'
// const eventBus = new Vue();
function EventBus(){
	// 观察者集合
	this.watchers = {};
}
// 加入监听
EventBus.prototype.$on = function(eventName, fn){
	if(!this.watchers[eventName])this.watchers[eventName] = [];
	this.watchers[eventName].push(fn);
}
// 触发事件
EventBus.prototype.$emit = function(eventName){
	let args = Array.prototype.slice.call(arguments, 1);
	this.watchers[eventName].forEach(fn=>{
		fn.apply(null,args);
	});
}
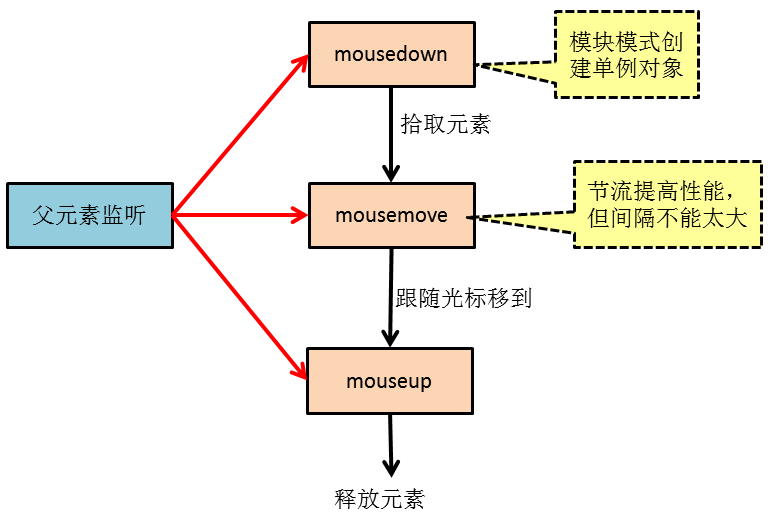
export default new EventBus;通过鼠标的mousedown事件拾取元素,mousemove事件拖动元素,mouseup事件释放元素。
原理图如下:
// 节流
function throttle(fn, wait){
	let timeId = null;
	return function(){
		let event = arguments[0];
		if(timeId) return;
		timeId = setTimeout(function(){
			fn(event);
			timeId = null;
		}, wait);
	};
}
// 模块模式,点击时单例模式,只观察点击的那一个
function DragControl(){
	// 点击目标
	let current = null;
	// 偏差修缮
	let diffX = 0;
	let diffY = 0;
	// 可拖动元素列表
	const elements = [];
	// 全局监听点击事件,若点击的元素可拖动
	const handlers = {
		// 按下
		mousedown(event){
			if(elements.indexOf(event.target) != -1){
				// 抓取元素
				current = event.target;
				// 相对浏览器初始位置,防止首次点击跳动
				let rectObj = current.getBoundingClientRect();
				// 鼠标距离元素左上角位置
				let left = rectObj.left;
				let top = rectObj.top;
				diffX = event.clientX - left;
				diffY = event.clientY - top;
			}
		},
		// 移动,节流
		mousemove : throttle(function(event){
			// 已点下了
			if(current !== null){
				// 元素跟随鼠标位置
				current.style.left = (event.clientX - diffX) + 'px';
				current.style.top = (event.clientY - diffY) + 'px';
			}
		}, 20),
		// 弹起
		mouseup(){
			// 拖动结束,释放元素
			current = null;
		}
	};
	// 设置在哪个元素里拖动
	function setMouseEvent(fatherEle){
		fatherEle.addEventListener('mousedown',handlers.mousedown);
		// 拖动。节流
		fatherEle.addEventListener('mousemove',handlers.mousemove);
		// 拖动结束
		fatherEle.addEventListener('mouseup',handlers.mouseup);
	}
	// 移除拖动监听
	function removeMouseEvent(fatherEle){
		fatherEle.removeEventListener('mousedown',handlers.mousedown);
		// 拖动。节流
		fatherEle.removeEventListener('mousemove',handlers.mousemove);
		// 拖动结束
		fatherEle.removeEventListener('mouseup',handlers.mouseup);
	}
	// 公共调用接口
	return {
		// 加入可拖动列表
		addElement: function(fatherEle, ele){
			if(elements.length == 0){
				// 设置拖放区域父元素
				setMouseEvent(fatherEle);
			}
			// 当前元素
			elements.push(ele);
		},
		// 移除可拖动元素
		removeElement: function(fatherEle, ele){
			let index = elements.indexOf(ele);
			if(index != -1){
				elements.splice(index, 1);
			}
			// 无要拖放的元素,清楚事件
			if(elements.length == 0){
				removeMouseEvent(fatherEle);
			}
		},
	};
}

export default DragControl();<template>
<div class="video-play" v-show="isShow">
<video id="video" :src="currentUrl" :poster="currentPoster" controls preload autoplay controlslist="nodownload"></video>
<span class="state" v-show="!canplay && currentUrl">{{error}}</span>
<Cross :class="{white: true}" @click.native="close"></Cross>
<div class="zoom">
<span @click="amplify">+</span> 缩放 <span @click="reduce">-</span>
</div>
</div>
</template>
<script>
import Cross from '../multiplex/Cross.vue'
import eventBus from '../../api/eventBus.js'
import urls from '../../api/urls.js'
import myAjax from '../../api/ajax.js'
import dragMove from '../../api/dragMove.js'
export default {
data: ()=>{
return {
currentUrl: '',
currentPoster: '',
canplay: false,
error: '',
isShow: true,
};
},
components: {
Cross,
},
mounted(){
// 拖动事件
let videoPlay = document.querySelector('.video-play');
// 设置videozaidocument内拖动
dragMove.addElement(document, videoPlay);
// 监听其他组件传来的播放事件
eventBus.$on('play', (id,cover)=>{
this.isShow = true;
this.setUrlById(id);
this.currentPoster = cover;
});
// 定时监听网络状态
let video = document.getElementById("video");
// 设置音量
video.volume = 0.2;
let that = this;
video.oncanplay = function(){
// 是否可以播放
that.canplay = true;
};
// 出现错误
video.onerror = function(){
that.canplay = false;
let code = video.error.code;
switch(code){
case 1:
that.error = '取回过程被中止';
break;
case 2:
that.error = '下载发生错误';
break;
case 3:
that.error = '解码发生错误';
break;
default:
}
};
},
methods: {
// 获取视频地址并设置
setUrlById(id){
let url = `${urls.nodeUrl}/mv/url?id=${id}`;
myAjax(url).then((str)=>{
let obj = JSON.parse(str);
if(obj.code == 200){
this.currentUrl = obj.data.url;
}
});
},
// 右上角的叉
close(){
this.isShow = false;
// 不再播放
this.currentUrl = '';
},
// 放大
amplify(){
let videoPlay = document.querySelector('.video-play');
let rect = videoPlay.getBoundingClientRect();
let width = rect.width;
if(width >= window.innerWidth)return;
videoPlay.style.width = Math.floor(width*1.1) + 'px';
},
// 缩小
reduce(){
let videoPlay = document.querySelector('.video-play');
let rect = videoPlay.getBoundingClientRect();
let width = rect.width;
if(width < 200)return;
videoPlay.style.width = Math.floor(width*0.9) + 'px';
},
},
}
</script>
<style scoped>
.video-play{
font-size: 0;
padding-top: 1.5rem;
background: linear-gradient(black, gray 1.5rem);
}
#video{
width: 100%;
}
#video:hover{
cursor: pointer;
}
.video-play:hover{
cursor: move;
}
.video-play:hover .cross{
display: block;
}
.state{
font-size: 1rem;
display: inline-block;
position: absolute;
top: 0;
left: 50%;
transform: translateX(-50%);
color: red;
}
.cross{
font-size: 1rem;
display: none;
}
.zoom{
display: none;
font-size: 1rem;
position: absolute;
top: 0;
left: 10px;
color: white;
user-select: none;
}
.zoom:hover{
cursor: default;
user-select: none;
}
.zoom span{
cursor: pointer;
display: inline-block;
width: 1rem;
background-color: rgb(0,100,255);
text-align: center;
border-radius: 50%;
}
.zoom span:hover{
background-color: rgba(10,150,255);
}
.zoom span:active{
color: black;
}
.video-play:hover .zoom{
display: inline-block;
}
</style>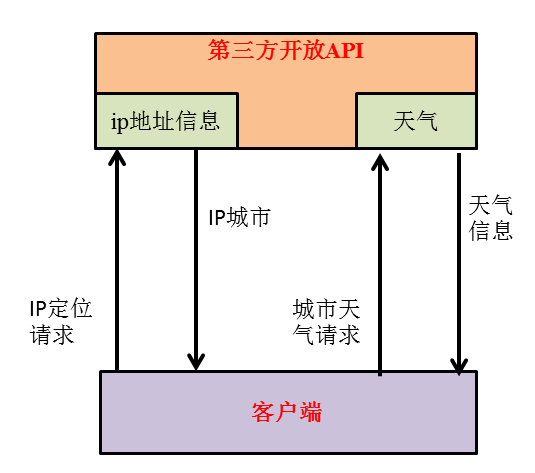
用户访问页面时会向个人网站服务器发送天气请求,服务器读取用户的ip,请求第三方的ip查询API获取用户的城市,再通过城市作为参数,请求第三方的天气API,获得用户所在城市的天气情况,然后将结果响应给用户。
第三方接口参考:小白开放接口
function myAjax(url){
    return new Promise((resolve,reject)=>{
        let xhr = new XMLHttpRequest();
        xhr.onreadystatechange = function(){
            if(xhr.readyState == 4){
                if(xhr.status == 200){
                    resolve(xhr.responseText);
                }
            }
        }
        xhr.open('get',url,true);
        xhr.send(null);
    });
}<template>
<div class="weather">
<span class="city">{{city}}</span>:
<span class="temperature">{{temperature}}℃</span>
<span class="state" v-bind:class="{fine:isFine,cloudy:isCloudy,rain:isRain}">{{state}}</span>
</div>
</template>
<script>
import myAjax from '../ajax/ajax.js'
export default{
data: ()=>{
return {
city: '广州',
temperature: '21',
state: '晴',
isFine: false,
isCloudy: false,
isRain: false
}
},
created(){
myAjax('/weather').then((wea)=>{
console.log(wea);
// 返回数据是json字符串
let weather = JSON.parse(wea);
this.city = weather.city;
this.temperature = weather.tem;
this.state = weather.state;
});
// 样式初始化
let state = this.state;
if(state == '晴' || state == '多云'){
this.isFine = true;
}else if(state == '阴'){
this.isCloudy = true;
}else{
this.isRain = true;
}
}
};
</script>
<style scoped>
.state.fine{
color: black;
background-color: orange;
}
.state.cloudy{
color: white;
background-color: gray;
}
.state.rain{
color: white;
background-color: blue;
}
</style>// 引入天气请求包装
const getWeather = require('./httpGet.js');
// 天气接口
app.get('/weather', function (req, res) {
// 获取浏览器客户的ip地址
let browserIP = req.ip;
getWeather('183.63.97.94').then(str=>{
// `{city:${ipCity},tem:${tem},state:${state}}`
res.send(str);
});
});// 代理请求,结合promise
function httpGet(url){
// http模块
const http = require('http');
return new Promise((resolve,reject)=>{
let str = '';
http.get(url, (msg)=>{
if(msg.statusCode == 200){
msg.setEncoding('utf8');
msg.on("data",function(chunk){
str+=chunk;//监听数据响应,拼接数据片段
})
// 接收完成
msg.on("end",function(){
// 返回消息字符串
resolve(str);
});
}else{
reject(msg.statusCode);
}
});
});
}
async function getWeather(ipAddress){
// IP地址
let ip = ipAddress;
// 网站会员id
const app_key = 'xxxxx';
// 根据ip查询城市
let url = `http://xxx...xx&app_key=${app_key}&ip=${ip}`;
let ipCity = '';// 城市
await httpGet(url).then(str=>{
// 解析str
let ipMsg = JSON.parse(str);
if(ipMsg.ret == 200){
ipCity = ipMsg.data.data.city;
}else{
throw new Error('请求失败'+ipMsg.ret);
}
},errStatus=>{
throw new Error('请求失败'+errStatus);
});
ipCity = ipCity.slice(0,-1);
// 根据城市查询天气
url = `http://xxx&app_key=${app_key}&city=${ipCity}`;
let tem = ''; // 温度
let state = ''; // 天气状况
await httpGet(url).then(str=>{
// 解析
let weatherMsg = JSON.parse(str);
if(weatherMsg.ret == 200){
tem = weatherMsg.data.weather.tem;
state = weatherMsg.data.weather.weather;
}else{
throw new Error('请求失败'+ipMsg.ret );
}
},errStatus=>{
throw new Error('请求失败'+errStatus);
});
let res = {
city:ipCity,
tem,
state
};
return JSON.stringify(res);
}
module.exports = getWeather;如下图:


<template>
	<div class="lists">
		<ul id="mvs">
			<li v-for="(mv, index) in currentMvs" :key="index">
				<Cover :img-url="mv.cover" :play-count="mv.playCount" :duration="mv.duration"></Cover>
				<div class="name">
					{{mv.name}}
				</div>
				<div class="artists">{{artists2Str(mv.artists)}}</div>
			</li>
		</ul>
		<div class="pageSelector">
			<button>上一页</button>
			<input type="text" v-model="currentPage"><span>/{{this.pageNumber}}</span>
			<button>下一页</button>
		</div>
	</div>
</template>
<script>
	import Cover from './Cover.vue'
	import MyAjax from '../../api/ajax.js'
	import urls from '../../api/urls.js'
	import deepCopy from '../../api/deepCopy.js'
	import ms2Time from '../../api/ms2Time.js'
	import {throttle} from '../../api/debounce.js'
	import Vue from 'vue'
	import artists2Str from '../../api/artists2str.js'

	export default {
		components: {
			Cover
		},
		props: {
			// 首次加载mv数量, 默认4
			firstLoadNumber: {
				type: String,
				default: 4
			},
			// 懒加载位置:距离浏览器底部距离,(单位:px。默认0)
			lazyLoadHeight: {
				type: String,
				default: 0
			},
			// 单页面mv数量,默认30
			singlePageNumber: {
				type: String,
				default: 30
			},
		},
		data: ()=>{
			return {
				// mv总数量,分组用到
				total: 0,
				// 当前页
				currentPage: 1,
				// 存放已加载的mv信息
				currentMvs: [],
			};
		},
		created(){
			// 首次加载初始化
			this.loadInit(this.singlePageNumber, this.firstLoadNumber);
		},
		mounted(){
			// 懒加载处理函数,节流,最快100ms执行1次
			const lazyLoadHandler = throttle(()=>{
				// 懒加载监听
				this.lazyLoad();
				console.log('滚动触发');
				// 如果都替换完,移除滚动监听,提高性能
				if(this.findUnload().length == 0){
					console.log('所有图片加载完毕,滚动事件移除');
					window.removeEventListener('scroll', lazyLoadHandler);
				}
			}, 100);
			// 监听滚动事件
			window.addEventListener('scroll', lazyLoadHandler);
		},
		computed: {
			// 计算多少页
			pageNumber(){
				return Math.ceil(this.total / Number(this.singlePageNumber));
			}
		},
		methods: {
			// 作者转换
			artists2Str,
			// mv加载初始化。单页mv多少个,加载多少个
			loadInit(singlePageNumber, firstLoadNumber){
				singlePageNumber = Number(singlePageNumber);
				firstLoadNumber = Number(firstLoadNumber);
				// mv数据初始模板
				const mvMsg = {
					id: '',
					realCover: '', // 真正url
					cover: '/placeholder.gif', // 占位图
					playCount: 0,
					duration: '',
					name: '',
					artists: []
				};
				// 1次请求单页所有mv信息,img用占位图表示,防止未浏览就请求多次
				// 偏移量(当页mv在总mv中的位置)=(当前页数-1)*单页个数
				let offset = (this.currentPage - 1) * singlePageNumber;
				const mvUrl = `${urls.nodeUrl}/mv/all?limit=${singlePageNumber}&offset=${offset}`;
				MyAjax(mvUrl).then(mvsStr=>{
					// 解析
					let mvs = JSON.parse(mvsStr).data;
					// 初始加载个数
					for( let i = 0; i < mvs.length; i++){
						let mv = mvs[i];
						// 深拷贝初始数据对象
						let curMv = deepCopy(mvMsg);
						// 给数据赋值
						curMv.id = mv.id;
						// 首次加载初始化
						if(i < firstLoadNumber){
							curMv.cover = mv.cover
						}
						curMv.realCover = mv.cover;
						curMv.playCount = mv.playCount;
						curMv.duration = ms2Time(mv.duration);
						curMv.name = mv.name;
						curMv.artists = mv.artists;
						Vue.set(this.currentMvs, i, curMv);
					}
				},err=>{
					window.console.log('mv请求失败: ' + err);
				});
			},
			/* 懒加载方法 */
			// 找出未加载的mv索引
			findUnload(){
				let indexArr = [];
				this.currentMvs.forEach((mv,index)=>{
					// 仍是占位图的img
					if(/(\/placeholder.gif)$/.test(mv.cover))indexArr.push(index);
				});
				return indexArr;
			},
			// 懒加载,计算图片列表元素li顶部距浏览器底部距离计算,达到视口位置就替换
			lazyLoad(){
				// ul的子元素
				let lis = document.getElementById('mvs').children;
				// 找到未加载的图片下标数组
				let unLoadArr = this.findUnload();
				// 遍历符合位置条件的,替换url进行加载
				Array.from(lis).forEach((li, index)=>{
					// 找到未加载的li
					if(unLoadArr.indexOf(index) != -1){
						let offsetBottom = this.topWindowBottom(li);
						// 如果图片出现在浏览器视口内,就替换其中的url
						if((this.lazyLoadHeight - window.innerHeight) < offsetBottom && offsetBottom < this.lazyLoadHeight){
							// 把cover换成真实url
							let currentMv = this.currentMvs[index];
							currentMv.cover = currentMv.realCover;
						}
					}
				});
			},
			// 计算元素顶部距浏览器底部距离
			topWindowBottom(ele){
				let rectObject = ele.getBoundingClientRect();
				let bottomToWindowTop = rectObject.top;
				// 元素距浏览器底部懒加载线位置。>0超过,<0不到。
				return (bottomToWindowTop - window.innerHeight);
			},
		}
	}
</script>
<style scoped>
	ul{
		list-style-type: none;
		padding: 10px 10px 0;
		margin: 0;
		background-color: white;
		font-size: 0;
	}
	li{
		font-size: 1rem;
		box-sizing: border-box;
		margin-bottom: 1.2rem;
		background-color: white;
		display: inline-block;
		width: 50%;
	}
	li:nth-child(even){
		padding-left: 5px;
	}
	li:nth-child(odd){
		padding-right: 5px;
	}
	li img{
		width: 100%;
	}
	li .name{
		margin-top: 0.3rem;
		font-size: 0.8rem;
		height: 1rem;
		line-height: 1rem;
		white-space:nowrap;
		overflow: hidden;
		text-overflow: ellipsis;
	}
	li .artists{
		color: gray;
		font-size: 0.6rem;
		height: 0.8rem;
		line-height: 0.8rem;
		white-space:nowrap;
		overflow: hidden;
		text-overflow: ellipsis;
	}
	.lists .pageSelector{
		padding: 5px;
		background-color: red;
		text-align: center;
	}
	.lists input{
		width: 30px;
		text-align: center;
		vertical-align: text-bottom;
	}
	.lists button{
		margin: 0 20px;
	}
</style>A declarative, efficient, and flexible JavaScript library for building user interfaces.
🖖 Vue.js is a progressive, incrementally-adoptable JavaScript framework for building UI on the web.
TypeScript is a superset of JavaScript that compiles to clean JavaScript output.
An Open Source Machine Learning Framework for Everyone
The Web framework for perfectionists with deadlines.
A PHP framework for web artisans
Bring data to life with SVG, Canvas and HTML. 📊📈🎉
JavaScript (JS) is a lightweight interpreted programming language with first-class functions.
Some thing interesting about web. New door for the world.
A server is a program made to process requests and deliver data to clients.
Machine learning is a way of modeling and interpreting data that allows a piece of software to respond intelligently.
Some thing interesting about visualization, use data art
Some thing interesting about game, make everyone happy.
We are working to build community through open source technology. NB: members must have two-factor auth.
Open source projects and samples from Microsoft.
Google ❤️ Open Source for everyone.
Alibaba Open Source for everyone
Data-Driven Documents codes.
China tencent open source team.