Giter VIP home page Giter VIP logo

nexrender's Introduction

GitHub Release Date Made in Ukraine Discord server

Automate your Adobe After Effects rendering workflows. Create data-driven and template based videos.
Built with love using nodejs โ€ข Brought to you by @inlife and other contributors

Table of contents

Introduction

nexrender is a simple, small, carefully designed application with the main goal of rendering automation for Adobe After Effects based rendering workflows.

At this point in time, the project is mainly targeted at people at least somewhat comfortable with scripting or development, and that have basic knowledge of javascript language and json formats.

Features

  • data-driven, dynamic, personalized video rendering
  • automated video management, processing, and delivery
  • network-oriented project structure, render farm
  • highly modular nature, extensive plugin support
  • works only in cli mode, never launches After Effects GUI application
  • does not require licenses for Adobe After Effects on any worker machine
  • free to use and open source

How it works

  • rendering: It uses Adobe After Effects' aerender command-line interface application.
  • compositing: It creates a temporary folder, copies project and replaces assets with provided ones.
  • personalization: It uses AE's expressions, scripting, and compositing (noted above).
  • scheduling: It stores projects in a local database, managed from anywhere using http api.
  • network: It renders project per machine, and can be used to render several projects simultaneously.
  • farm: Can be used to render a single project on several machines via Multi-Machine Sequence.

Alternatives

Among the alternatives, there is Plainly, a tool built on Nexrender infrastructure that offers cloud rendering. Another noteworthy option currently available is Dataclay's Templater bot edition.

Installation

You can download binaries directly from the releases section, or install them using npm, whichever option works better for you.

However, please note: the npm version of the binaries doesn't include all optional plugin packages that are covered in the usage section. If you wish to install them as well, please do so by providing each one individually:

npm i -g @nexrender/cli @nexrender/action-copy @nexrender/action-encode ...

Usage

We will be using nexrender-cli binary for this example. It's recommended to download/install it if you haven't already.

Also, check out these example/tutorial videos made by our community:

โš  If using WSL check out wsl support

Job

A job is a single working unit in the nexrender ecosystem. It is a json document, that describes what should be done, and how it should be done. Minimal job description always should contain a pointer onto Adobe After Effects project, which is needed to be rendered, and a composition that will be used to render.

The pointer is src (string) field containing a URI pointing towards specified file, followed by composition (string) field, containing the name of the composition that needs to be rendered.

Note: check out supported protocols for src field.

// myjob.json
{
    "template": {
        "src": "file:///users/myuser/documents/myproject.aep",
        "composition": "main"
    }
}

or for remote file accessible via http

// myjob.json
{
    "template": {
        "src": "http://example.com/myproject.aep",
        "composition": "main"
    }
}

Submitting this data to the binary will result in start of the rendering process:

$ nexrender-cli '{"template":{"src":"file:///home/documents/myproject.aep","composition":"main"}}'

Note: on MacOS you might need to change the permissions for downloaded file, so it would be considered as an executable.
You can do it by running: $ chmod 755 nexrender-cli-macos

or more conveniently using the --file option

$ nexrender-cli --file myjob.json

Note: its recommended to run nexrender-cli -h at least once, to read all useful information about available options.

More info: @nexrender/cli

After Effects 2023

Please not that for After Effects 2023, it's vital to set up an Output Module, even if you want to rely on the default output module. After Effects 2023 rendering binary (aerender) in a lot of cases will not render a composition unless it has a configured output module. Additionally, AE2023 now allows rendering directly to mp4, so consider setting up a custom value for outputExt as well. To do that, take a look at following example:

// myjob.json
{
    "template": {
        "src": "file:///users/myuser/documents/myproject_ae2023.aep",
        "composition": "main",
        "outputModule": "H.264 - Match Render Settings - 15 Mbps",
        "outputExt": "mp4",
        "settingsTemplate": "Best Settings"
    }
}

Assets

We've successfully rendered a static project file using nexrender, however, there is not much point doing that unless we are going to add some dynamic data into the mix.

A way to implement something like that is to add an asset to our job definition:

// myjob.json
{
    "template": {
        "src": "file:///d:/documents/myproject.aep",
        "composition": "main"
    },
    "assets": [
        {
            "src": "file:///d:/images/myimage.png",
            "type": "image",
            "layerName": "background.png"
        }
    ]
}

What we've done there is we told nexrender to use a particular asset as a replacement for something that we had defined in our aep project. More specifically, when rendering is gonna happen, nexrender will copy/download this asset file, and attempt to find and replace footage entry by specified layer name.

Check out: detailed information about footage items.

Actions

You might've noticed that unless you added --skip-cleanup flag to our command, all rendered results will be deleted, and a big warning message will be shown every time you attempt to run the nexrender-cli with our job.

The reason is that we haven't defined any actions that we need to do after we finished actual rendering. Let's fix that and add a simple one, copy.

// myjob.json
{
    "template": {
        "src": "http://example.com/assets/myproject.aep",
        "composition": "main"
    },
    "assets": [
        {
            "src": "http://example.com/assets/myimage.png",
            "type": "image",
            "layerName": "background.png"
        }
    ],
    "actions":{
        "postrender": [
            {
                "module": "@nexrender/action-encode",
                "preset": "mp4",
                "output": "encoded.mp4"
            },
            {
                "module": "@nexrender/action-copy",
                "input": "encoded.mp4",
                "output": "d:/mydocuments/results/myresult.mp4"
            }
        ]
    }
}

We've just added a postrender action, that will occur right after we finished rendering. A module that we described in this case, is responsible for copying result file from a temp folder to the output folder.

There are multiple built-in modules within nexrender ecosystem:

Every module might have his own set of fields, however, module field is always there.

Also, you might've noticed that actions is an object, however, we described only one (postrender) field in it. And there are more:

  • predownload - can be used to modify the job before the assets are downloaded
  • postdownload - can be used to modify the job after the assets are downloaded
  • prerender - can be used to process data/assets just before the actual render will start.

Also, if you are planning on having more than one action, please note: actions are order-sensitive, that means if you put let's say some encoding action after upload, the latter one might not be able to find a file that needs to be generated by the former one, since the ordering was wrong.

If you have at least some experience with Node.js, you might've noticed that the module definition looks exactly like a package name. And well, yes it is. When nexrender stumbles upon a module entry, it will try to require this package from internal storage, and then if no module has been found, it will attempt to look for globally installed Node.js modules with that name.

That means if you are comfortable with writing Node.js code, you can easily create your own module, and use it by providing either absolute/relative path (on a local machine), or publishing the module and installing it globally on your target machine.

npm i -g my-awesome-nexrender-action

And then using it:

{
    "actions":{
        "postrender": [
            {
                "module": "my-awesome-nexrender-action",
                "param1": "something big",
                "param2": 15
            }
        ]
    }
}

Also, you can checkout packages made by other contributors across the network:

Details

Job structure has more fields, that we haven't checked out yet. The detailed version of the structure looks like this:

{
    "tags": String,
    "priority": Number,
    "template": {
        "src": String,
        "composition": String,

        "frameStart": Number,
        "frameEnd": Number,
        "incrementFrame": Number,

        "continueOnMissing": Boolean,
        "settingsTemplate": String,
        "outputModule": String,
        "outputExt": String,

        "renderSettings": String,
        "outputSettings": String,
    },
    "assets": [],
    "actions": {
        "predownload": [],
        "postdownload": [],
        "prerender": [],
        "postrender": [],
    },
    "onChange": Function,
    "onRenderProgress": Function,
    "onRenderError": Function
}

Majority of the fields are just proxied to the aerender binary, and their descriptions and default values can be checked here.

  • tags (optional) (example primary,plugins : comma delimited ) is a piece of information that describes the job that it is assigned to. It can be used by the worker(s) / or api client(s) to pickup the job with specific tags (see tagSelector here ). Tags name must be an alphanumeric.

  • priority (default 0) is a number of priority. Jobs are selected based on their priority field by the worker, in case of a collision it will choose the oldest one.

  • onChange is a callback which will be triggered every time the job state is changed (happens on every task change).

  • onRenderProgress is a callback which will be triggered every time the rendering progress has changed.

  • onRenderError is a callback which will be triggered when arender encounters an error during its runtime. So far known errors are (please contribute):

    • Errors from nexrender.jsx - most likely issue in the assets section within the job.
    • No comp was found with the given name. - Composition from template.composition not present in the AE file.
    • After Effects error: file is damaged. - AE file is broken and could not be opened (caused by incomplete transfer/download)

Note: Callback functions are only available via programmatic use. For more information, please refer to the source code.

Job States

Note: Job states are mainly used for network rendering. If you are using nexrender-cli you can skip this section.

Job can have state field (job.state) be set to one of those values:

  • created (default)
  • queued (when pushed to the nexrender-server)
  • picked (when somebody picked up job on nexrender-server)
  • started (when worker started preparing and running the job)
  • render:setup (bunch of states that are specific to each render step)
  • render:predownload
  • render:download
  • render:postdownload
  • render:prerender
  • render:script
  • render:dorender
  • render:postrender
  • render:cleanup
  • finished (when worker successfully finished rendering the job)
  • error (when worker got an error at any step starting from started state)

Programmatic

In case you are building your own application and just need to use a rendering part, or you wanna manually trigger jobs from your code, there is a way to use nexrender programmatically:

Install the @nexrender/core

$ npm install @nexrender/core --save

And then load it, and run it

const { render } = require('@nexrender/core')

const main = async () => {
    const result = await render(/*myJobJson*/)
}

main().catch(console.error);

Or you can go more advanced, and provide some settings as your 2nd argument to the render function:

const { render } = require('@nexrender/core')

const main = async () => {
    const result = await render(/*myJobJson*/, {
        workpath: '/Users/myname/.nexrender/',
        binary: '/Users/mynames/Apllications/aerender',
        skipCleanup: true,
        addLicense: false,
        debug: true,
    })
}

main().catch(console.error);

Information

The module returns 2 methods, init and render. render calls init internally, if it sees that there were some options provided to render as 2nd argument.

First one is responsible for setting up the env, checking if all needed patches for AE are in place, automatically adding render-only license file for a free usage of Adobe's product (unless disabled), and a few other minor things.

Second one is responsible for mainly job-related operations of the full cycle: downloading, rendering, processing, and uploading.

init accepts an object, containing additional options:

  • workpath - string, manually set path to working directory where project folder will be created, overrides default one in system temp folder
  • binary - string, manually set path pointing to the aerender(.exe) binary, overrides auto found one
  • debug - boolean, enables or disables debug mode, false by default
  • skipCleanup - boolean, providing true will prevent nexrender from removing the temp folder with project (false by default)
  • skipRender - boolean, providing true will prevent nexrender from running actual rendering, might be useful if you only want to call scripts
  • multiFrames - boolean, providing true will attmpt to use aerender's built-in feature of multi frame rendering (false by default)
  • multiFramesCPU - integer between 1-100, the percentage of CPU used by multi frame rendering, if enabled (90 by default)
  • reuse - boolean, false by default, (from Adobe site): Reuse the currently running instance of After Effects (if found) to perform the render. When an already running instance is used, aerender saves preferences to disk when rendering has completed, but does not quit After Effects. If this argument is not used, aerender starts a new instance of After Effects, even if one is already running. It quits that instance when rendering has completed, and does not save preferences.
  • maxMemoryPercent - integer, undefined by default, check original documentation for more info
  • imageCachePercent - integer, undefined by default, check original documentation for more info
  • addLicense - boolean, providing false will disable ae_render_only_node.txt license file auto-creation (true by default)
  • forceCommandLinePatch - boolean, providing true will force patch re-installation
  • noAnalytics - boolean, enables or disables built-in fully-anonymous analytics, false by default
  • wslMap - String, set WSL drive map, check wsl for more info
  • maxRenderTimeout - Number, set max render timeout in seconds, will abort rendering if it takes longer than this value (default: 0 - disabled)
  • cache - boolean or string. Set the cache folder used by HTTP assets. If true will use the default path of ${workpath}/http-cache, if set to a string it will be interpreted as a filesystem path to the cache folder.

More info: @nexrender/core

Using the ${workPath} mask in @nexrender/action-encode

The output of @nexrender/action-encode is always prepended by the working path of the job, so you don't have to guess paths. However if you want to use the working path of the job for something else such as encoding in multiple bitrates it is necessary to use the ${workPath} mask. This is especially useful for HLS encoding

//HLS encoding
{
    "module": "@nexrender/action-encode",
    "output": "encoded_playlist_%v.m3u8",
    "params": {
        "-acodec": "aac",
        "-vcodec": "libx264",
        "-pix_fmt": "yuv420p",
        "-map": [
            "0:0",
            "0:0",
            "0:0"
        ],
        "-b:v:0": "2000k",
        "-b:v:1": "1000k",
        "-b:v:2": "500k",
        "-f": "hls",
        "-hls_time": "10",
        "-hls_list_size": "0",
        "-var_stream_map": "v:0,name:high v:1,name:medium v:2,name:low",
        "-master_pl_name": "master.m3u8",
        "-hls_segment_filename": "${workPath}\\encoded%d_%v.ts"
    }
}

The -hls_segment_filename flag requires the absolute paths or else it would save on the working path of the nexrender application hence the use of ${workPath}

Template rendering

One of the main benefits of using nexrender is an ability to render projects using data other than what has been used while the project has been created. Data means any sort of source/footage material, it can be images, audio tracks, video clips, text strings, values for colors/positions, even dynamic animations using expressions. All of those things can be replaced for every job without even opening a project file or starting After Effects.

Note: Also this process can be called in other ways: templated, data-driven or dynamic video generation.

This approach allows you to create a .aep file once, and then reuse it for as many target results as you need to. However, what is needed to get started?

Footage items

Footage item replacement is what briefly has been covered in the Job section of this document. The idea is quite simple, you describe which asset will replace existing described footage item in a specific layer, by specifying src, and one of the layerName or layerIndex options.

Fields

  • src: string, a URI pointer to the specific resource, check out supported protocols
  • type: string, for footage items, is one of (image, audio, video)
  • layerName: string, target layer name in the After Effects project
  • layerIndex: integer, can be used instead of layerName to select a layer by providing an index, starting from 1 (default behavior of AE jsx scripting env)
  • composition: string, composition where the layer is. Useful for searching layer in specific compositions. If none is provided, it uses the wildcard composition "*", that will result in a wildcard composition matching, and will apply this data to every matching layer in every matching composition. If you want to search in a nested composition you can provide a path to that composition using "->" delimiter. For example, "FULL_HD->intro->logo comp" matches a composition named logo comp that is used in composition intro which in turn is used in composition FULL_HD. Note, that FULL_HD doesn't have to be the root composition. Make sure to specify a composition name, not a layer name.
  • name: string, an optional filename that the asset will be saved as. If not provided the layerName or the basename of the file will be used
  • extension: string, an optional extension to be added to the filename before it is sent for rendering. This is because After Effects expects the file extension to match the content type of the file. If none is provided, the filename will be unchanged.
  • useOriginal: boolean, an optional feature specific to the file:// protocol that prevents nexrender from copying an asset to a local temp folder, and use original instead
  • sequence : boolean, an optional feature that allows you to specify that the asset is a sequence of images. If set to true, the asset will be treated as a sequence of images and will be imported as such in After Effects. (default: false) For more information on how to use sequences, check out the Adobe After Effects documentation
  • removeOld: boolean, an optional feature that allows you to specify that the old asset should be removed from the project. If set to true, the old asset will be removed from the project. (default: false). Please note that removing the old asset will remove all instances of the asset from the project, (including all layers it was added to), not just the one that was replaced.

The specified asset from src field will be downloaded/copied to the working directory, and just before rendering will happen, a footage item with specified layerName or layerIndex in the original project will be replaced with the freshly downloaded asset.

This way you (if you are using network rendering) can not only deliver assets to the target platform but also dynamically replace them.

Note: if layerName is used for footage file asset, it should always contain the extension in the name as well.

Example

{
    "assets": [
        {
            "src": "https://example.com/assets/image.jpg",
            "type": "image",
            "layerName": "MyNicePicture.jpg"
        },
        {
            "src": "https://example.com/assets/jpeg-without-extension",
            "type": "image",
            "layerName": "MyOtherNicePicture.jpg",
            "extension": "jpg"
        },
        {
            "src": "file:///home/assets/audio.mp3",
            "type": "audio",
            "name": "music.mp3",
            "layerIndex": 15
        }
    ]
}

HTTP caching

When using the http or https protocol, you can utilize local caching to minimize the amount of data that have to be transferred over a network and speed up project/assets download. To use HTTP caching, the server serving your assets must support the relevant HTTP caching semantics.

The simplest way to enable caching is to use the setting wide cache option (setting--cache flag if using CLI or worker CLI, setting cache: true when using programmatically). This will enable HTTP based caching for all your assets and project files if they are requested over HTTP from a server that supports the relevant headers.

You can also control caching on a more granular level if desired. For each asset's setting if a params property is set, it will be passed directly to make-fetch-happen which includes the cachePath property that you can set to a custom folder path (or null if you want to disable caching for a particular asset only).

Note: caches are not cleared automatically so you may need to monitor the cache folder size if you are using a lot of large assets over time. Assets, if they have been cached, will always resolve even if they are stale and the server is not available.

Example

{
    "assets": [
        {
            "src": "https://example.com/assets/image.jpg",
            "type": "image",
            "layerName": "MyNicePicture.jpg",
            "params": {
                "cachePath": "/tmp/my-nexrender-cache"
            }
        },
        {
            "src": "https://example.com/assets/jpeg-without-extension",
            "type": "image",
            "layerName": "MyOtherNicePicture.jpg",
            "extension": "jpg",
            "params": {
                "cachePath": "/tmp/my-nexrender-cache"
            }
        }
    ]
}

Original source

For file protocol based assets (assets coming from the local filesystem/shared network), you can provide an additional option, useOriginal, that would force nexrender to use an original file rather than creating a local copy inside of the temp rendering folder. That could be useful for large asset files, that would otherwise take a long time to copy.

Example

{
    "assets": [
        {
            "src": "file:///D:/assets/MyBigAsset.wav",
            "type": "audio",
            "useOriginal": true,
            "layerIndex": 15
        }
    ]
}

Static assets

There is also a plain asset type that allows you to simply provide a src, and that file will be downloaded in the folder with the project. No additional automated actions will happen with that asset, unless you manually use scripting to do something with those. Might be useful for some static data-based injections, or some other use cases.

Example:

{
    "assets": [
        {
            "src": "http://example.com/assets/something.json",
            "type": "static"
        },
        {
            "src": "http://example.com/assets/something_else.csv",
            "name": "mydata.csv",
            "type": "static"
        }
    ]
}

Data Assets

The second important point for the dynamic data-driven video generation is the ability to replace/change/modify non-footage data in the project. To do that, a special asset of type data can be used.

Fields

  • type: string, for data items, is always data
  • layerName: string, target layer name in the After Effects project
  • layerIndex: integer, can be used instead of layerName to select a layer by providing an index, starting from 1 (default behavior of AE jsx scripting env)
  • property: string, indicates which layer property you want to change
  • value: mixed, optional, indicates which value you want to be set to a specified property
  • expression: string, optional, allows you to specify an expression that can be executed every frame to calculate the value
  • composition: string, composition where the layer is, useful for searching layer in specific compositions. If none is provided, it uses the wildcard composition "*", that will result in a wildcard composition matching, and will apply this data to every matching layer in every matching composition. If you want to search in a nested composition you can provide a path to that composition using "->" delimiter.
    For example, "FULL_HD->intro->logo comp" matches a composition named logo comp that is used in composition intro which in turn is used in composition FULL_HD. Note, that FULL_HD doesn't have to be the root composition. Make sure to specify a composition name, not a layer name.
  • continueOnMissing: boolean (default false), optional, allows you to bypass an error exception if couldn't find any layers. Probably should not be used by users, unless they know what are they doing.

Since both value and expression are optional, you can provide them in any combination, depending on the effect you want to achieve. Providing value will set the exact value for the property right after execution, and providing an expression will make sure it will be evaluated every frame.

Note: If you are not sure what expressions are, and how to use them, please refer to this page

And if you are not sure what a property is or where to get it, you can refer to this image:

Property Example

As you can see there are a few Property Groups like Text, Masks, Transform that include actual properties. Those properties are what can be used as a target.

In case you need to change some deep properties, as shown on this image...

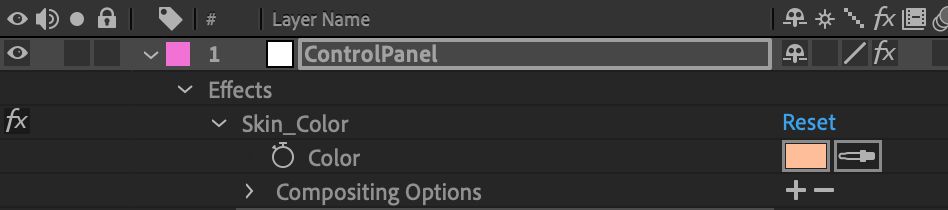
... you can do that by providing the property name using a dot . separator (e.g. "Effects.Skin_Color.Color"). In case your property already has . in the name, and you are sure it will lead to a collision while parsing, you can instead use an arrow symbol ->.

You can also change the deeper attributes of properties, for example the font of a text layer, using "Source Text.font" or the font size by "Source Text.fontSize".

Example

{
    "assets": [
        {
            "type": "data",
            "layerName": "MyNicePicture.jpg",
            "property": "Position",
            "value": [500, 100]
        },
        {
            "type": "data",
            "layerName": "my text field",
            "property": "Source Text",
            "expression": "time > 100 ? 'Bye bye' : 'Hello world'"
        },
        {
            "type": "data",
            "layerName": "my text field",
            "property": "Source Text.font",
            "value": "Arial-BoldItalicMT"
        },
        {
            "type": "data",
            "layerName": "background",
            "property": "Effects.Skin_Color.Color",
            "value": [1, 0, 0]
        },
        {
            "type": "data",
            "layerIndex": 15,
            "property": "Scale",
            "expression": "[time * 0.1, time * 0.1]"
        },
    ]
}

Note: any error in expression will prevent the project from rendering. Make sure to read error messages reported by After Effects binary carefully.

Script Asset

๐Ÿš€ NEW: Now you can pass arguments to JSX dynamically! Read below for more information ๐Ÿš€

The last and the most complex and yet the most powerful is an ability to execute custom jsx scripts just before the rendering will start. This approach allows you to do pretty much anything that is allowed for scripting, like creating/removing layers, adding new elements, restructuring the whole composition, and much more.

With some basic knowledge of ExtendScript Toolkit, you can write custom scripts that nexrender will pass through to the underlying CLI (or render network) to execute before rendering. You'll just need to provide a src pointing towards the script resource and a type of "script".

Fields

  • src: string, a URI pointer to the specific resource, check out supported protocols
  • type: string, for script items, is always script
  • keyword: (optional) string, name for the configuration object holding all the dynamically injected parameters. Defaults to NX
  • parameters: (optional) object, object where all the dynamically injected parameters are defined. Script variables that are not included in this list default to null.
  • globalDefaultValue (optional) any, An override for the default value of any unknown or undefined NX (or the keyword value, if set) config values. Use caution when overriding defaults like this. It is suggested to leave it as is and check for null values in your JSX code.

Dynamic Parameters

With dynamic parameters, you can set a parameter in your Job declaration to be used on a JSX Script!

Each parameter object must have the following:

  • key (required) : The key of the variable. Example: Key = dog => NX.dog.
  • value (required) : The target value for the variable. Example: Key = dog, Value = "doggo" => NX.dog = "doggo". See Supported Parameter Types.

Supported Parameter Types

We currently support all standard JSON Parameters with the addition of javascript functions, which can be named, anonymous or self-invoking.

Parameter Types examples

String

    "parameters" : [
        {
            "key" : "fullName",
            "value": "John Doe"
        }
    ]

Number

    "parameters" : [
        {
            "key" : "orangeAmount",
            "value": 37
        }
    ]

Array

    "parameters" : [
        {
            "key" : "officesList",
            "value": ["Santiago", "London", "Paris", "Kyoto", "Hong-Kong"]
        }
    ]

Object

    "parameters" : [
        {
            "key" : "carDetails",
            "value": {
                "model" : "Tesla Model S",
                "maxBatteryLife" : 500000,
                "color" : "vermilion"
            }
        }
    ]

Null

This is the default value for parameters used on any given JSX script that are not initializated.

    "parameters" : [
        {
            "key" : "carDetails"
        }
    ]

NX.get("carDetails") will be equal to null.

Functions

Functions are useful if you need some dynamic calculation of specific values. You can use them in conjuction with other dynamic parameters as well. Currently we support Self-invoking Functions, Named Functions and Anonymous Functions. After Effects ExtendedScript does not support arrow functions at the moment (cc 2020).

Warnings
  • You must only use one function per parameter; If there's more than one function defined in the parameter value the job will crash due to limitations in function detection and parsing.
  • Use well-formed functions and be aware of the computational weight of your functions. Malformed functions will cause the script to fail and subsequently the job to crash.
Self-Invoking Functions Example

Self-invoking functions are useful when concatenating strings, or in places where you want the function output without redeclaring it.

    "parameters" : [
        {
            "key" : "onePlusOne",
            "value": "(function() { return 1+1; })()"
        }
    ]

The above function could be use in a string concatenation such as

    alert("Miss, what's the mathematical operation required to compute the number" + NX.get("onePlusOne") + " ?"); // A typical second grade question.
    "parameters" : [
        {
            "key" : "invitees",
            "value": ["Steve", "Natasha", "Tony", "Bruce", "Wanda", "Thor", "Peter", "Clint" ]
        },
        {
            "key" : "eventInvitation",
            "value": "(function (venue) { alert( 'This years\' Avengers Gala is on the prestigious ' + venue.name + ' located at ' + venue.location + '. Our special guests ' + NX.get('invitees').value.map(function (a, i) { return (i == NX.get('invitees').value.length - 1) ? ' and ' + a + ' (whoever that is)' : a + ', '; }).join('') + '  going to be present for the ceremony!');
    })({ name: NX.arg('venue'), location: NX.arg('location') })",
            "arguments": [
                {
                    "key" : "venue",
                    "value" : "Smithsonian Museum of Natural History"
                },
                {
                    "key" : "location",
                    "value": "10th St. & Constitution Ave."
                }
            ]
        }
    ]

This convoluted function would return a lovely invitation string to an event using a dynamic parameter set on the json Job, as well as having additional required parameters with their defaults and could be used as follows:

    alert(NX.get("eventInvitation"));

    // Output:

    /*
        This years' Avengers Gala is on the prestigious Smithsonian Museum of Natural History located at 10th St. & Constitution Ave. Our special guests Steve, Natasha,Tony, Wanda, Thor, Peter and Clint (whoever that is) are going to be present for the ceremony! 
    */

Named Functions

    "parameters" : [
        {
            "key" : "sum",
            "value": "function namedSumFunction(a, b) { return a + b; }"
        }
    ]
    var result = NX.call("sum", [400, 20]); // 420

Note that the usage of the named method is sum and not namedSumFunction due to JS' hoisting, so named functions are implemented and used the same way as anonymous functions.

Anonymous Functions

    "parameters" : [
        {
            "key" : "sumValues",
            "value": "function (a, b) { return a + b; }"
        }
    ]
    var result = NX.call("sumValues", [400, 20]); // 420

Complete functions example

{
    "template": {
        "src": "file:///template.aep",
        "composition": "BLANK_COMP"
    },
    "assets": [
        {
            "src": "file:///sampleParamInjection.jsx",
            "type": "script",
            "parameters": [
                {
                    "type": "array",
                    "key" : "dogs",
                    "value": [ "Captain Sparkles", "Summer", "Neptune"]
                },
                {
                    "type" : "number",
                    "key" : "anAmount"
                },
                {
                    "type": "function",
                    "key": "getDogsCount",
                    "value" : "function() { return NX.get('dogs').length; }"
                },
                {
                    "type": "function",
                    "key": "exampleFn",
                    "value": "function ( parameter ) { return parameter; }"
                },
                {
                    "type" : "function",
                    "key" : "dogCount",
                    "value" : "(function(length) { return length })(NX.arg('dogCount'))",
                    "arguments": [
                        {
                            "key" : "dogCount",
                            "value": ["NX.call('exampleFn', [NX.call('getDogsCount') + NX.get('anAmount')])"]
                        }
                    ]
                }
            ]
        }
    ]
}

Examples

No dynamic parameters.

{
    "assets": [
        {
            "src": "http://example.com/scripts/myscript.jsx",
            "type": "script"
        }
    ]
}

Dynamic variable - Array type parameter

"assets": [
    {
        "src": "file:///C:/sample/sampleParamInjection.jsx",
        "type": "script",
        "parameters": [
            {
                "key": "name",
                "value": "Dilip"
            }
        ]
    }
]
Default Dynamic Variable Keyword Parameter

The value could be a variable or a function, but beware that there is no sanitization nor validation so if the input is malformed it could crash the job

By default the keyword is set to NX, so you would call your variables or methods like NX.get("foo") or NX.call("bar", ["sampleStringParameter"]). To change this keyword simply set "keyword" as shown below:

"assets": [
    {
        "src": "file:///C:/sample/sampleParamInjection.jsx",
        "type": "script",
        "keyword": "_settings",
        "parameters": [
            {
                "key": "name",
                "value": "Dilip"
            }
        ]
    }
]

This way instead of NX.get("foo") it would be _settings.get("foo")

All dynamic parameters used in the script should have a JSX default

Example JSX Script with defaults:

{
    return "Hello " + NX.get("name") || "John";
}

The code above will output either:

  1. "Hello John" if no parameter defined on the JSON parameters array or this parameter is missing.
  2. "Hello NAME" if parameter name has a value of NAME on the JSON parameters array.

Example JSX Script without defaults:

{
    // The code below will crash if it's executed directly in After Effects. See documentation on how to enable cross environment fault tolerance.
    return "There are " + NX.get("beerBottlesAmount") + " beer bottles ready to drink!"
}

The code above will output either:

  1. "There are null beer bottles ready to drink!" if no parameter defined on the JSON parameters array.
  2. "There are 20 beer bottles ready to drink!" if parameter beerBottlesAmount has a value of 20 on the JSON parameters array.

But don't you worry about missing any of the examples above. If you use a variable in your JSX with the default keyword and no initialization whatsoever, the console will output a handy initialization code snippet for both JSON and JSX for you to copy and modify with your own values!

That pretty much covers basics of templated rendering.

Network rendering

We've covered basics on how to set up a minimal rendering flow using local cli machine rendering. Now, what if you want to start rendering on a remote machine, to reduce load while you are working on your local machine? Or maybe you need to render several videos at once, requiring a fleet of nodes running on some cloud cluster.

With nexrender, you can quickly and easily spin up your own rendering cluster.

Using binaries

You can download compiled versions of binaries directly from the releases section, or install them using npm, whichever option works better for you.

nexrender-server

Description:

A CLI application which is responsible for job management, worker node cooperation, communications with the nexrender-worker instances, serves mainly as a producer in the nexrender network model.

Technically speaking, its a very tiny HTTP server with minimal REST API support.

Optional support for external databases can be added (like Redis, MongoDB, MySQL, etc.), with some of them already in place. Please check modules for more info.

Supported platforms:

Windows, macOS, Linux

Requirements:

None

Example

$ nexrender-server \
        --port=3050 \
        --secret=myapisecret

More info: @nexrender/server

nexrender-worker

Description:

A CLI application which is responsible mainly for actual job processing and rendering, communication with the nexrender-server, and serves mainly as a consumer in the nexrender network model.

Supported platforms:

Windows, macOS

Requirements:

Installed licensed/trial version of Adobe After Effects

Example

$ nexrender-worker \
        --host=https://my.server.com:3050 \
        --secret=myapisecret

Note: its recommended to run nexrender-worker -h at least once, to read all useful information about available options.

More info: @nexrender/worker

Using API

Now, after you've loaded up your worker and server nodes, they will need some jobs to be submitted to the server to start actual rendering. There are 2 main ways to do that. You can send a direct POST request:

curl \
    --request POST \
    --header "nexrender-secret: myapisecret" \
    --header "content-type: application/json" \
    --data '{"template":{"src":"http://my.server.com/assets/project.aep","composition":"main"}}' \
    http://my.server.com:3050/api/v1/jobs

Or you can use the javascript API client:

npm install @nexrender/api --save
const { createClient } = require('@nexrender/api')

const client = createClient({
    host: 'http://my.server.com:3050',
    secret: 'myapisecret',
})

const main = async () => {
    const result = await client.addJob({
        template: {
            src: 'http://my.server.com/assets/project.aep',
            composition: 'main',
        }
    })

    result.on('created', job => console.log('project has been created'))
    result.on('started', job => console.log('project rendering started'))
    result.on('progress', (job, percents) => console.log('project is at: ' + percents + '%'))
    result.on('finished', job => console.log('project rendering finished'))
    result.on('error', err => console.log('project rendering error', err))
}

main().catch(console.error);

More info: @nexrender/api

Tested with

Current software was successfully tested on:

  • Adobe After Effects CS 5.5 [OS X 10.14.2]
  • Adobe After Effects CC (version 12.1.168) [OS X 10.11.2, Windows 10 64bit]
  • Adobe After Effects CC 2015 (version 13.6.0) [OS X 10.11.2]
  • Adobe After Effects CC 2018.3 [Windows 2012 Server R2 Datacenter]
  • Adobe After Effects CC 2019 [OS X 10.14.2, Windows Server 2019 (AWS)]

Additional Information

Protocols

src field is a URI string, that describes path pointing to the specific resource. It supports a few different protocols:

  • Built-in:

    • file:// - file on a local file system, may include environment variables identified by a preceding $ sign (possibly a pipe? need testing)
    • http:// - file on remote http server
    • https:// - file on remote http server served via https
    • data:// - URI encoded data, can be a base64 or plain text
  • External:

Examples

Here are some examples of src paths:

file:///home/assets/image.jpg
file:///d:/projects/project.aep
file://$ENVIRONMENT_VARIABLE/image.jpg

http://somehost.com:8080/assets/image.jpg?key=foobar
https://123.123.123.123/video.mp4

data:image/png;base64,iVBORw0KGgoAAAANSUhEUgAAAAUAAAAFCAYAAACNbyblAAAAHElEQVQI12P4//8/w38GIAXDIBKE0DHxgljNBAAO9TXL0Y4OHwAAAABJRU5ErkJggg==
data:text/plain;charset=UTF-8,some%20data:1234,5678

WSL

If running WSL (Windows Subsystem for Linux) you will need to configure your project a bit differently in order for it to render correctly.

Linux Mapping

You will need to pass in which drive letter Linux is mapped to in Windows. This is the Drive Letter in which you can access your Linux file system from Windows.

โš  Note: Drive mapping is setup when configuring WSL You can do this through the CLI like so assuming Linux is mapped to Z.

$ nexrender-cli -f mywsljob.json -m "Z"

or

$ nexrender-cli -f mywsljob.json -wsl-map "Z"

And you can do this Programmatically like

const { render } = require('@nexrender/core')
const main = async () => {
    const result = await render(/*myWSLJobJson*/, {
        skipCleanup: true,
        addLicense: false,
        debug: true,
        wslMap: "Z"
    })
}
main().catch(console.error);

Windows Pathing

When referencing windows file system you will need to use /mnt/[DRIVE YOU WANT TO ACCESS]/[PATH TO YOUR FILE].

like so

/mnt/d/Downloads/nexrender-boilerplate-master/assets/nm.png

CLI Example

nexrender-cli -f mywsljob.json -m "Z" -w /mnt/d/Downloads/tmp/nexrender

Job Example

{
    "template": {
        "src": "file:///mnt/d/Downloads/nexrender-boilerplate-master/assets/nm05ae12.aepx",
        "composition": "main",
    },
    "assets": [
        {
            "src": "file:///mnt/d/Downloads/nexrender-boilerplate-master/assets/2016-aug-deep.jpg",
            "type": "image",
            "layerName": "background.jpg"
        }
    ],
    "actions": {
        "postrender": [
            {
                "module": "@nexrender/action-encode",
                "output": "output.mp4",
                "preset": "mp4"
            }
        ]
    }
}

โš  Note: nexrender does not currently support custom root pathing

WSL Binary

If After Effects is installed into the default location nexrender should auto detected it. Otherwise you will need to provide its location following the Windows Pathing Guide.

Example for if you installed After Effect onto your D drive.

nexrender-cli -f mywsljob.json -b "/mnt/d/Program Files/Adobe/Adobe After Effects 2020/Support Files/aerender.exe"

WSL Workpath

By default nexrender will use your Linux /tmp folder to render out the jobs.

We suggest changing this to a secondary drive as rendering can eat up disk space causing an issue where WSL does no release disk space back to Windows.

Example under Windows Pathing Guide.

Github Issue: WSL 2 should automatically release disk space back to the host OS

WSL Memory

It's also suggested that you create a .wslconfig file in your Windows user folder and limit the memory that can be used by WSL. Otherwise your rendering will crash on large projects.

.wslconfig Example

[wsl2]
memory=4GB
swap=0
localhostForwarding=true

Github Issue: WSL 2 consumes massive amounts of RAM and doesn't return it

Analytics

Product collects fully anonymous analytics. This is done to allow us to understand how our customers use the product, and to improve it. We do not collect any personal information. The analytics/telemetry data does not contain any Personally Identifiable Information or anything that could be used to identify a user, organiztion or any other entity.

Only identifier used to distinct between users is a unique random 32-character hash.

Data that is collected:

  • nexrender process status
    • initialization succeeded/not
    • did any errors happen, if so how many
    • did render start and end successfully
    • how long did render take
    • what was the after effects version
    • etc
  • some of nexreder configuration options
    • is wsl enabled yes/no
    • was workpath changed yes/no
    • was the skip cleanup enabled yes/no
    • etc
    • this is done to better understand usage of key parameters and combiation of options
  • a few general-level points on the system
    • what is the OS name and version (Windows/macOS/Linux)
    • what is the CPU and GPU models
    • what is the amount of memory
    • is nexrender being run within a docker yes/no
    • this is done to better understand capabilities of hardware the nexrender is typically being run on

Data is IS NOT being collected:

  • any personal identifiable information
    • no email/name/ip address
    • no os user names
    • no system/hardware indentifiers
    • no location/country data
  • any project related data
    • no project/template names
    • no server/host names
    • no asset names or urls
    • no script, expression or textual data
    • no credentials or any other configuration parameters

Analytics can be disabled by either using option: noAnalytics: true, or setting binary flag: --no-analytics.

Problems

There might be a lot of problems creeping around, since this tool works as an intermediary and coordinator for a bunch of existing complex technologies, problems is something inescapable. However, we will try our best to expand and keep this section up to date with all possible caveats and solutions for those problems.

  1. macOS access: there might be issues with nexrender accessing the aerender binary within the Adobe library folder, or accessing /tmp folders. For more details refer to #534

Development

If you wish to contribute by taking an active part in development, you might need this basic tutorial on how to get started:

  1. clone the repo
  2. run npm install
  3. run npm start

The last command will run lerna bootstrap action to setup dependencies for all packages listed in the packages/ folder, and link them together accordingly to their dependency relations.

After that, you can start the usual development flow of writing code and testing it with npm start in a specific package.

Why this multi-package structure has been chosen? It seemed like a much smarter and easier way to achieve a few things:

  1. separation of concerns, every module is responsible for a limited set of things
  2. modularity and plugin-friendly nature, which allows external packages to be used instead, or alongside built-in ones
  3. minimal dependency, as you might've noticed, packages in nexrender try to have as little dependencies as possible making it much easier to maintain and develop

The recommended approach is to add only needed things as dependencies, it's better to take some time to research module that is being added to the project, to see how many its own dependencies it will introduce, and possibly find a better and smaller one, or even extract some specific feature into a new micro module.

And of course, the main thing about development is that it should be fun. :)

Project Values

This project has a few principle-based goals that guide its development:

  • Do our thing really well. Our thing is data-based automating of the rendering, and handling other interactive related components of that task set. It is not meant to be a replacement for specific corporate tools templater bot, rendergarden, etc. that have lots of features and customizability. (Some customizability is OK, but not to the extent that it becomes overly complicated or error-prone.)

  • Limit dependencies. Keep the packages lightweight.

  • Pure nodejs. This means no native module or other external/system dependencies. This package should be able to stand on its own and cross-compile easily to any platform -- and that includes its library dependencies.

  • Idiomatic nodejs. Keep modules small, minimal exported names, promise based async handling.

  • Be elegant. This package should be elegant to use and its code should be elegant when reading and testing. If it doesn't feel good, fix it up.

  • Well-documented. Use comments prudently; explain why non-obvious code is necessary (and use tests to enforce it). Keep the docs updated, and have examples where helpful.

  • Keep it efficient. This often means keep it simple. Fast code is valuable.

  • Consensus. Contributions should ideally be approved by multiple reviewers before being merged. Generally, avoid merging multi-chunk changes that do not go through at least one or two iterations/reviews. Except for trivial changes, PRs are seldom ready to merge right away.

  • Have fun contributing. Coding is awesome!

Awesome External Packages

Here you can find a list of packages published by other contributors:

Since nexrender allows to use external packages installed globally from npm, its quite easy to add your own modules

Awesome Related Projects

  • Jeewes/nerc - NERC: Tool for filling nexrender config templates with CSV data.
  • newflight-co/createvid - A fully functional, full-stack web app built in Vue. Actively looking for community support.

Custom Actions

To add a custom pre- or post-render action, all you need to do is to create at least a single file, that is going to return a function with promise.

// mymodule.js
module.exports = (job, settings, action, type) => {
    console.log('hello from my module: ' + action.module);
    return Promise.resolve();
}

To use that action locally you can then require it by either using relative or global path. Additionally you can create a private npm module and link it, so it would become visible globally or even publish it to npm/your own private repo and use it.

// example 1
{
    "module": "d:/myprojects/mymodule/index.js",
    "somearg1": "hello world",
    "somearg2": 123456
}
// example 2
{
    "module": "my-super-cool-module",
    "somearg1": "hello world",
    "somearg2": 123456
}
// example 3
{
    "module": "@myorg/mymodule",
    "somearg1": "hello world",
    "somearg2": 123456
}

From there you can build pretty much any module that could process downloaded data before starting rendering, or doing tranformations on data after, or just simply sending an email when rendering is finished.

Note: both job and settings are mutable structures, any modifications made to them will reflect onto the flow of the next calls. Hence they can be used to store state between actions.

Migrating from v0.x

First version of nexrender was published in 2016, and it has been used by many people for quite some time since then. Even though version v1.x is based on the same concepts, it introduces major breaking changes that are incompatible with older version.

However, majority of those changes were made to allow new, previously unimaginable things.

Naming

  1. Nexrender Project -> Nexrender Job
  2. Nexrender Rendernode -> Nexrender Worker
  3. Nexrender API Server -> Nexrender Server

Referring to project was confusing since it could be applied for both aep project and nexrender project. And rendernode name was quite too long, and unconvinient to use.

Structure

The structure of the job has changed, majority of the fields were moved from the root namespace, into "template" namespace, merging it with old "project.settings" namespace. Assets structure remained pretty much similar. A new object actions has been introduced.

Assets

Replaced http and file only assets to a URI based links, theoretically extendable without any limits. Many new other protocols and implementations can be added in a decentrilized manner.

Strict division between asset types:

  • [image, audio, video] - footage items, behave like files
  • [data] - dynamic data assets, for direct value setting and expressions
  • [script] - files allowing full scripting limitless scripting support

Rendering

The biggest change that happened, is removal of old hacky way of replacing assets and patching aepx file to write custom expressions.

Instead it has been replaced with brand new, recently discovered ExtendScript based injection. It allows to do a few quite important things:

  1. Import and replace footage items via scripting, making it very reliable. (No more bugs related to same-system existing path override for aep project)
  2. Set/Replace text, expressins and other types of data via scripting. (No more bugs related to changes in aepx structure, and no need to use aepx format at all)
  3. Ability to run custom ExtendScript jsx scripts, which is limitless and revolutionary compared to previous version.

CLI

Project has been devided onto multiple subprojects, and mutiple cli applications as a result. Every cli application is auto-compiled to a platform specific executable on publish and auto-uploaded to the releases section.

This allows anyone to use nexrender cli without installing a nodejs runtime onto target system.

New CLI tool allows to run render directly from console for a local job, without need to start whole cluster.

Worker, and CLI apps include minor QoL improvments, such as auto creation of the ae_render_only_node.txt file that allows free licensing, and After Effects folder auto detection.

All tools include better help screen, and a lot of customization from command line arguments.

Customers

Technically, since the tool is free, customers should be called users. In any case this section describes a list of users or companies that are proud users of nexrender. If you've used nexrender, and you like it, please feel free to add yourself into the list.

Plans

Features for next major release (v2.0.0):

  1. Ability to switch renderers for a job (none, aerender, media-encoder)
  2. Ability to push a job onto a server with ability to auto-split and render parts independently on the network
  3. API for tracking/managing active workers in the network
  4. Algo of splitting based on time & amount of workers
  5. New job type (partitioned), which would be excluded from some general API responses
  6. Mechanism of selecting a single node to be the "finisher", that would await and merge results of other jobs
  7. Possible names: @nexrender/action-merge-parent, @nexrender/action-merge-child
  8. Extend current scripting capabilities with an advanced real-time communication with the internal environment via TCP connection
  9. Define a general abstract inteface for the actions, and a general package that would contain basic funcitonality like input/output arguments, etc.
  10. Re-design networking layer, as well as server database layer, to count in cases where the jobs can be huge json objects.
  11. Create automated footage detection and asset generator

Contributors

Code Contributors

This project exists thanks to all the people who contribute. [Contribute].

Financial Contributors

Become a financial contributor and help us sustain our community. [Contribute]

Individuals

Organizations

Support this project with your organization. Your logo will show up here with a link to your website. [Contribute]

nexrender's People

Contributors

backbeatmedia avatar bezbac avatar chrisapplegate avatar dependabot[bot] avatar devbram97 avatar dukuo avatar dylangarcia avatar eirikeikaas avatar franeko avatar harrylafranc avatar inlife avatar ivansenic avatar jamesbotterill avatar k-jboon avatar klastic avatar lazerjesus avatar limzykenneth avatar max-kovpak avatar mohali-id avatar morreski avatar nihey avatar olekristensen avatar pdkn avatar pilskalns avatar smukkejohan avatar southernsun avatar thiago-dantas avatar velocitysystems avatar yon-kyle avatar zuntah avatar

Stargazers

 avatar  avatar  avatar  avatar  avatar  avatar  avatar  avatar  avatar  avatar  avatar  avatar  avatar  avatar  avatar  avatar  avatar  avatar  avatar  avatar  avatar  avatar  avatar  avatar  avatar  avatar  avatar  avatar  avatar  avatar  avatar  avatar  avatar  avatar  avatar  avatar  avatar  avatar  avatar  avatar  avatar  avatar  avatar  avatar  avatar  avatar  avatar  avatar  avatar  avatar  avatar  avatar  avatar  avatar  avatar  avatar  avatar  avatar  avatar  avatar  avatar  avatar  avatar  avatar  avatar  avatar  avatar  avatar  avatar  avatar  avatar  avatar  avatar  avatar  avatar  avatar  avatar  avatar  avatar  avatar  avatar  avatar  avatar  avatar  avatar  avatar  avatar  avatar  avatar  avatar  avatar  avatar  avatar  avatar  avatar  avatar  avatar  avatar  avatar  avatar

Watchers

 avatar  avatar  avatar  avatar  avatar  avatar  avatar  avatar  avatar  avatar  avatar  avatar  avatar  avatar  avatar  avatar  avatar  avatar  avatar  avatar  avatar  avatar  avatar  avatar  avatar  avatar  avatar  avatar  avatar  avatar  avatar  avatar  avatar  avatar  avatar  avatar  avatar  avatar  avatar  avatar  avatar  avatar  avatar  avatar  avatar  avatar  avatar  avatar  avatar  avatar  avatar  avatar  avatar  avatar  avatar  avatar

nexrender's Issues

Render network

Hey,

Running nexrender and having such error:

=========[RENDERNODE]=========

nexrender.renderer is starting


making request for projects...
looking for suitable projects...
[rkLqeGuh] setting up project...
[rkLqeGuh] downloading assets...
[rkLqeGuh] renaming assets...
[rkLqeGuh] filtering image assets...
[rkLqeGuh] patching project...
[rkLqeGuh] rendering project...
[rkLqeGuh] verifying project...
[rkLqeGuh] applying actions: moving result file...

[rkLqeGuh] cleaning up...

[rkLqeGuh] project finished

My problem is that output file is created but he renders again (and again) and not stop.
You know why?

Do you recommend any kind of cloud service/render farm?

Hi,
Great piece of work! I'm considering to use it for a personalised video service.
Due to seasonal high load (not whole year), I was wondering if you would recommend some kind of scaleable cloud service or render farm? For example something from Amazon AWS? Do you have experience with such a setup?

I'm asking because I want to minimize the work required for setting up and maintaining servers. :)

Thanks!

Migrating from Mac to Windows

I am trying to set my project up on a windows computer. I had it working fine in windows but am starting to have trouble in windows. I keep getting the following error when it is in the renaming process, it moves the files to the temp folder fine. I'm guessing it is something to do with the filepaths? I have been stuck on this all day.

C:\Users\ak7\Desktop\nexrender-boiler>node start.js
Started local static server at port: 23234
Project {
uid: 'r1DBTRJTx',
state: 'queued',
template: 'project.aepx',
composition: '6 Nations',
type: 'default',
assets:
[ { type: 'image',
name: 'fileHome.ai',
src: 'http://localhost:23234\assets\teams\ScotlandHome.ai' },
{ type: 'image',
name: 'fileAway.ai',
src: 'http://localhost:23234\assets\teams\ItalyAway.ai' },
{ type: 'project',
name: 'project.aepx',
src: 'http://localhost:23234\assets\Nations.aepx' },
{ type: 'script',
name: 'data.js',
src: 'http://localhost:23234\assets\teamSetup.js' } ],
actions: [],
settings: { outputModule: 'h264', outputExt: '.mov', startFrame: 0 },
errorMessage: null,
callbacks: {},
ticker: null,
api: null,
error: null }
[r1DBTRJTx] setting up project...
[r1DBTRJTx] downloading assets...
[r1DBTRJTx] renaming assets...

[r1DBTRJTx] project failed

Error message: ENOENT: no such file or directory, link 'C:\Users\ak7\Desktop\nexrender-boiler\temp\r1DBTRJTx\localhost:23234\assets\teams\ScotlandHome.ai' -> 'C:\Users\ak7\Desktop\nexrender-boiler\temp\r1DBTRJTx\fileHome.ai'
{ Error: ENOENT: no such file or directory, link 'C:\Users\ak7\Desktop\nexrender-boiler\temp\r1DBTRJTx\localhost:23234\assets\teams\ScotlandHome.ai' -> 'C:\Users\ak7\Desktop\nexrender-boiler\temp\r1DBTRJTx\fileHome.ai'
at Error (native)
errno: -4058,
code: 'ENOENT',
syscall: 'link',
path: 'C:\Users\ak7\Desktop\nexrender-boiler\temp\r1DBTRJTx\localhost:23234\assets\teams\ScotlandHome.ai',
dest: 'C:\Users\ak7\Desktop\nexrender-boiler\temp\r1DBTRJTx\fileHome.ai' }

C:\Users\ak7\Desktop\nexrender-boiler>

aerender path

Hello

I can't enter the aerender path

nexrender --renderer -- host=localhost:3000 \ --aerender="c:/Program Files/Adobe/Adobe After Effects CC 2015/Support Files/aerender.exe"

                               | |

_ __ _____ ___ __ ___ _ __ | | ___ _ __
| '_ \ / _ \ / / '
/ _ \ '_ \ / ` |/ _ \ '__|
| | | | **/> <| | | __/ | | | (
| | / |
|| ||**//_| **|| ||**,|
|_|

              VERSION: 0.4.5

For support and information, please visit:
http://github.com/Inlife/nexrender

[error] provide --aerender=PATH for aerender binary file

Thanks

Multiple comp rendering

Hi,

First of all, fantastic job with this app, It's really easy to use and super efficient!
I was wondering if it is possible to render multiple comp within a same AE project?
Let's say I have a project with two comps using the same assets. the only difference would be the resolution: ex 1920x1080 (comp1) and 1080x1920 (comp2). Could I queue up both comps at the same time or do I need to create separate start.js files?

If you have any idea about the way to to that let me know! cheers

log: project failed, but video is created

Hi!
Running nexrender and having such error:

=========[RENDERNODE]=========

nexrender.renderer is starting


making request for projects...
looking for suitable projects...
[H1YhHOaw] setting up project...
[H1YhHOaw] downloading assets...
[H1YhHOaw] renaming assets...
[H1YhHOaw] filtering image assets...
[H1YhHOaw] patching project...
[H1YhHOaw] rendering project...

[H1YhHOaw] verifying project...

[H1YhHOaw] project failed

But output file is created and looks like correct.
Any suggestions?

php exec

I currently have a website that allows a user to add text which then uses php to create the txt file and calls php.exec to call the nexrender start.js (and uses the text file as data for the project)

However if 2 people use this concurrently it breaks it as i don't think it is capable of running php exec multiple times at once on the command line. Would you recommend creating a server instead?

I'm not really sure where to start in setting this up...

I need the video returned back to the user on the server once it is rendered which is proving quite difficult. Any help would be greatly appreciated.

AE CC render much faster than AeRender

Hey guys,

I am pretty new for AE CC but with the help of nexrender, I am successfully to setup my custom video auto-render service, thanks @inlife for this great tool!

However, I noticed a difference performance issue between using AE CC 2015 (GUI) and AeRender, Rendering the aepx in AE CC is much faster than using AeRender. For same one .aepx file, Using Ae CC manually adding into render queue only takes less 10 seconds but using AeRender in command line will take around 60 seconds. Plus, Using multi-thread in AeRender will make things more worse.

My perference output module is using QuickTime and H.264 as video encoding format. Also select the Web Video size 320*240. The two kinds output videos's details are almost same except the rendering time. A stupid question is do you guys know where the rendering setting of AeRender is in? Does it will use the same setting as Ae CC (GUI)?

Here is my command-line arguments:

aerender.exe -project "E:\Git\auto-generate-ae-video\AeRender.Test\output\Troy\main.aepx" -output "E:\Git\auto-generate-ae-video\AeRender.Test\output\Troy\main.mp4" -comp main -OMtemplate H264 -mp -continueOnMissingFootage

Thanks in advanced.

Troy

Audio program!

The phenomenon of audio is broken and continued after rendering.Do you Know
this question?

Render failed at render.js

Hello! I faced an issue on rendering video dynamically on Windows Server 2012, After Effects CC 2017. When I use nexrender in nodejs, the error log file (.txt) generated shows the text below.

aerender version 14.2.1x34

But when I run in the command prompt with the following command, it shows some text at the beginning of processing (look at the quote) and still it manage to produce a mov file.

.\aerender.exe -project "C:\Program Files\project.aepx" -comp "Composition" -OMtemplate "H.264" -output "C:\testing\testing.mov"

aerender version 14.2.1x34
Using DXGI: Device: "Microsoft Basic Render Driv
has video RAM(MB): 0
LoadLibrary "n" failed!
PROGRESS: Adding specified comp to Render Queue
...
PROGRESS: 5/7/2018 6:22:38 PM: Finished composition "Composition"
PROGRESS: Total Time Elapsed: 1 Min, 28 Sec

Thus, I tried to add some logging in render.js file.

ae.stdout.on('data', (data) => { console.log("On Data"); console.log(data.toString()); aedata.push(data.toString()); });

ae.on('close', (code) => { console.log("Code"); console.log(code); console.log(aedata); return (code !== 0) ? reject( aedata.join('') ) : resolve( project ); });

The return is as below:

[S1AsOoTaf] setting up project...
[S1AsOoTaf] downloading assets...
[S1AsOoTaf] renaming assets...
[S1AsOoTaf] filtering image assets...
[S1AsOoTaf] patching project...
[S1AsOoTaf] rendering project...
Spawn Process
[ '-comp',
'!Main',
'-project',
'C:\Program Files\iisnode\www\temp\S1AsOoTaf\project.aepx',
'-output',
'C:\Program Files\iisnode\www\temp\S1AsOoTaf\result.mov',
'-OMtemplate',
'H.264' ]
On Data
aerender version 14.2.1x34
Code
3221226505
[ 'aerender version 14.2.1x34\r\n' ]


[S1AsOoTaf] project failed

Error message: aerender version 14.2.1x34

Do you have any idea on this?

Injecting scripts does not work in AE 2018

Hey there, following new updates for 2018 AE the problems also follows. Injecting scripts using AE 2018 does not work anymore. Probably it could be due to AE changes. Hope this is bug and this is only informative goal post.

Unable to render JPEG sequence

When I render JPEG sequence from nexrender, it is throwing error stating "ENOENT No such file or directory" and showing \path\to\result,jpg

This is happening because jpeg result frames are appended with 000 in the file name.
Help me with this issue.

[external] google docs integration

This feature is an external (possibly made as separate binary).
Main idea is to sync data from google docs spreadsheet to an api server.

Sample spreadsheet can look something like that:

image

I suppose best way to do this is to combine google docs api and nexrender api in one app, that will be running in a background and will be constantly checking for changes in the docs, and publish changes there (updates of render status).

This feature/application was described there as a prototype-concept, and can be developed by anyone who wants to help this project. :p
Currently, I don't have plant to work on this feature in the nearest future.

Calling rest API without node wrapper

I am trying to send project setting to API server with javascript (no node js) here is my code
var project = { template: 'template.aepx', composition: 'main', settings: { outputModule: 'mine', outputExt: 'mov', startFrame: 0, endFrame: 600 }, assets: [ { type: 'project', src: 'http://localhost/nexTest/assets/template.aepx', name: 'template.aepx' }, { type: 'image', src: 'http://localhost/nexTest/assets/nm.png', name: 'nm.jpg' }, { type: 'image', src: 'http://localhost/nexTest/assets/2016-aug-deep.jpg', name: 'background.jpg', filters: [{ name: 'cover', params: [1280, 720] }], }, { type: 'audio', src: 'http://localhost/nexTest/assets/deep_60s.mp3', name: 'track.mp3' }, { type: 'script', src: 'http://localhost/nexTest/assets/2016-aug-deep.js', name: 'script.js' } ] }

    $.ajax({
        type: "POST",
        url: "http://localhost:3000/projects",
        dataType:'json',
        form: JSON.stringify(project),
        success: function(result){
            console.log(result);
        }, 
        error: function(error) {
            console.log(error);
        }
    });`

but every time i get 404 from API server, what am i doing wrong ?

Code that changes paths to new images

Hi,

First of all thanks for this very cool project.

I added a breakpoint just before running the aerender process in AE, and I look at the project.aepx in the /temp dir that nexrender creates, and still see the paths to the old (default) images in the fileReference element.

But, it still works and it manages to render 3 different versions of the same video with the new images instead of the default ones.

I'm trying to understand how come it works and where is the code that replaces the paths. I found code that replaces the script/data paths, but not the images ones.

I'm using AE 2018.

Thanks!

Support for downloading assets from private S3 buckets

First of all, thank you for the excellent work on this project! It has been an immense help on my current project and I've found it very easy to understand and modify/extend to meet my needs.

One of the requirements for my current project is to download assets from a private bucket on S3 (using IAM access key credentials). While using asset type url works fine for public buckets, as far as I can tell there is no way to get that working with private buckets. However, I've been working on adding support for downloading assets from a private bucket using the aws-sdk package which will use local AWS credentials to authorize the download.

I am wondering if you are interested in this feature being added to the project? Right now I have a small POC working and it does not add much code (~15 lines in renderer/tasks/download.js), but if you're interested I would be glad to spend the time to polish it up and write some docs for the feature.

Thanks again for sharing this project! I hope I can contribute to making it even better.

Slow Render

Hey there,

Thanks so much for making this. Having heaps of fun using it, i have a quick question about the rendering process though. When the process gets to rendering in the command line it seems to take much longer than usual.

If i use the render queue inside afyer effects it takea about 5 seconds to render with the h264 module, although it seems to take about 30seconds in nexrender. Is this normal? Its the rendering that tales time in the commandline, moving/renaming/downloading of files is quick.

Thanks!

Cannot render an MP4 through aerender commandline

Cannot render an MP4 through aerender commandline, AfterEffects 2017 version
Nexrender says as output MP4, but aerender does not support it by default, I tried work arounds but they dont work. Can any one help?

Tracking on Rendering Progress

Thank you so much for making this library open source! It's super useful for personalised video rendering and I can also generate image thumbnail from your library.

However, I would like to ask if is there any functions / callback that I can use to keep track on the progress of rendering? For example, I would like to know how many percent left for the rendering process to be completed once I run renderer.render . Or do you have any suggestions on this?

Btw. I'm very new to After Effects CC and aerender. Hope you understand.

Dynamic images

Hi,

I could not find any docs or ways to have dynamic images or dynamic image urls after checking out the boilerplate. The dynamic text portion is well documented and covered as well.

TIA

Customizing nexrender-node

I want to try to make some changes/improvements to nexrender-node, but I'm not too familiar with globally installed CLI node applications. After installing nexrender to a directory and making some changes (to i.e. tasks), how do I get nexrender-node to use my changes? I don't necessarily need to globally install my changed version.

[support] Help to config.

I have some question about config.
Here is my config:

var api = require('nexrender').api;

// Configure api connection
api.config({
    host: "localhost",
    port: 3000
});

// Define project properties
var assets = [{
    'type': 'image',
    'src': 'http://assets.pokemon.com/assets/cms2/img/pokedex/full/004.png',
    'name': '001.png'
},{
    'type': 'image',
    'src': 'http://assets.pokemon.com/assets/cms2/img/pokedex/full/005.png',
    'name': '002.png'
},{
    'type': 'image',
    'src': 'http://assets.pokemon.com/assets/cms2/img/pokedex/full/006.png',
    'name': '003.png'
}];

// Create project
api.create({
    template: 'pokemon.aep',
    composition: 'main',
    assets: assets
}).then((project) => {

    console.log('project saved');

    project.on('rendering', function(err, project) {
        console.log('project rendering started');
    });

    project.on('finished', function(err, project) {
        console.log('project rendering finished')
    });

    project.on('failure', function(err, project) {
        console.log('project rendering error')
    });
});

But after run code. AE show a dialog to select composition. after that, the rended video the same with the template. btw, the template is aet not aepx. I don't know why.
please help. Or give me an sample.
Thanks

Adding post rendering tasks?

First of all, thank you for such a great application. This is exactly what I was looking for. I appreciate it so much and I would like to contribute this project in the future.

I have a question. After following your instructions, I was able to render my project with render node & the api-server with a request from front-end. From the description #9 on wiki, it says that I could add post rendering tasks after rendering node finishes its job. I would like to upload the video on youtube after rendering. How can I do that? Should I modify the render node code? Can you help me navigate where that is? Thank you!

Adobe After Effects CC 2017

Hey There,

I'm trying to use nexrender with AE CC 2017, however i keep getting the error

"aerender ERROR: No output module template was found with the given name" which i believe is because it now expects you to use Adobe Media Encoder now, is there anyway to link nexrender into this?

Thanks,

Aaron

aepx template

Hey man, i do really appreciate your work. The potential of it is huge and since i'm working in automatisation development field, this is a really good piece of code. Anyways, i'm not itself super familiar with AE. Could you please explain how to properly create .aepx template in order to make "variables" and how to connect them. I have deeply analysed the package itself, but there is nothing about the project file itself. Thank you!

P.s. I'm trying to use this code i made accordingly to your boilerplate, but i'm getting 1mb files which are not able to open (used your template and it worked).

'use strict';


let background  = '2016-aug-deep.jpg';
let duration    = 600; //video duration in secs.

let aepxfile  = 'test.aepx';


const aebinary  = '/Applications/Adobe\ After\ Effects\ CC\ 2017/aerender';
const port      = 23234;


const http      = require('http');
const url       = require('url');
const path      = require('path');
const fs        = require('fs');

const Project   = require('nexrender').Project;
const renderer  = require('nexrender').renderer;


let server = http.createServer((req, res) => {

    let uri         = url.parse(req.url).pathname;
    let filename    = path.join(process.cwd(), uri);

    fs.exists(filename, (exists) => {
        if(!exists) {
            res.writeHead(404, {"Content-Type": "text/plain"});
            res.write("404 Not Found\n");
            
            return res.end();
        }

        fs.readFile(filename, "binary", function(err, file) {
            if(err) {    
                res.writeHead(500, {"Content-Type": "text/plain"});
                res.write(err + "\n");
                return res.end();
            }

            // send 200
            res.writeHead(200);
            res.write(file, "binary");
            return res.end();
        });
    });
});


server.listen(port, () => {

    console.log('Started local static server at port:', port);

    // addtional info about configuring project can be found at:
    // https://github.com/Inlife/nexrender/wiki/Project-model
    let project = new Project(
        {
        "template": "test.aepx",
        "composition": "main",
        "type": "default",
        "settings": {
            // dont forget to setup the right output module; info:
            // https://helpx.adobe.com/after-effects/using/basics-rendering-exporting.html#output_modules_and_output_module_settings
            "outputModule": "Lossless", //h264
            "startFrame": 0, //this option let's us to cut the whole project in smaller pieces, like time based sprites.
            "endFrame": duration
        },
        "assets": [
            { "type": "project", "name": "project.aepx",  "src": `http://localhost:${port}/assets/${aepxfile}`}, 
            { "type": "image",   "name": "testas.jpg",  "src": `http://localhost:${port}/assets/${background}`, "filters": [ {"name":"cover", "params": [1280, 720] }] } //for more info about customization: https://github.com/oliver-moran/jimp
        ]
    }
);

    console.log(project);

    // start rendering
    renderer.render(aebinary, project).then(() => {
        // success
        server.close();
        console.log('rendering finished');
    }).catch((err) => {
        // error
        console.error(err);
        server.close();
    });

});

Project Object

Getting it like this:

{ uid: 'shivy8r828dfjg6s4u02',
  state: 'queued',
  template: 'PROJECT_TEST_05.aepx',
  composition: 'PROJECT_TEST_05',
  type: 'default',
  assets:
   [ { type: 'project',
       src: '//MAC_05/share/assets/PROJECT_TEST_05.aepx',
       name: 'PROJECT_TEST_05.aepx' },
     { type: 'image',
       src: '//MAC_05/share/assets/001.jpg',
       name: '001.jpg' },
     { type: 'image',
       src: '//MAC_05/share/assets/002.jpg',
       name: '002.jpg' },
     { type: 'image',
       src: '//MAC_05/share/assets/003.jpg',
       name: '003.jpg' },
     { type: 'image',
       src: '//MAC_05/share/assets/004.jpg',
       name: '004.jpg' },
     { type: 'image',
       src: '//MAC_05/share/assets/005.jpg',
       name: '005.jpg' },
     { type: 'image',
       src: '//MAC_05/share/assets/006.jpg',
       name: '006.jpg' },
     { type: 'image',
       src: '//MAC_05/share/assets/007.jpg',
       name: '007.jpg' },
     { type: 'image',
       src: '//MAC_05/share/assets/008.jpg',
       name: '008.jpg' },
     { type: 'image',
       src: '//MAC_05/share/assets/009.jpg',
       name: '009.jpg' },
     { type: 'image',
       src: '//MAC_05/share/assets/010.jpg',
       name: '010.jpg' },
     { type: 'image',
       src: '//MAC_05/share/assets/011.jpg',
       name: '011.jpg' },
     { type: 'image',
       src: '//MAC_05/share/assets/012.jpg',
       name: '012.jpg' },
     { type: 'image',
       src: '//MAC_05/share/assets/013.jpg',
       name: '013.jpg' },
     { type: 'image',
       src: '//MAC_05/share/assets/014.jpg',
       name: '014.jpg' },
     { type: 'image',
       src: '//MAC_05/share/assets/015.jpg',
       name: '015.jpg' },
     { type: 'image',
       src: '//MAC_05/share/assets/016.jpg',
       name: '016.jpg' },
     { type: 'image',
       src: '//MAC_05/share/assets/017.jpg',
       name: '017.jpg' },
     { type: 'image',
       src: '//MAC_05/share/assets/018.jpg',
       name: '018.jpg' },
     { type: 'image',
       src: '//MAC_05/share/assets/019.jpg',
       name: '019.jpg' },
     { type: 'image',
       src: '//MAC_05/share/assets/020.jpg',
       name: '020.jpg' },
     { type: 'image',
       src: '//MAC_05/share/assets/021.jpg',
       name: '021.jpg' },
     { type: 'image',
       src: '//MAC_05/share/assets/022.jpg',
       name: '022.jpg' },
     { type: 'image',
       src: '//MAC_05/share/assets/023.jpg',
       name: '023.jpg' },
     { type: 'image',
       src: '//MAC_05/share/assets/024.jpg',
       name: '024.jpg' },
     { type: 'image',
       src: '//MAC_05/share/assets/025.jpg',
       name: '025.jpg' },
     { type: 'image',
       src: '//MAC_05/share/assets/026.jpg',
       name: '026.jpg' },
     { type: 'image',
       src: '//MAC_05/share/assets/027.jpg',
       name: '027.jpg' },
     { type: 'image',
       src: '//MAC_05/share/assets/028.jpg',
       name: '028.jpg' },
     { type: 'image',
       src: '//MAC_05/share/assets/029.jpg',
       name: '029.jpg' },
     { type: 'image',
       src: '//MAC_05/share/assets/030.jpg',
       name: '030.jpg' },
     { type: 'image',
       src: '//MAC_05/share/assets/031.jpg',
       name: '031.jpg' },
     { type: 'image',
       src: '//MAC_05/share/assets/032.jpg',
       name: '032.jpg' },
     { type: 'image',
       src: '//MAC_05/share/assets/033.jpg',
       name: '033.jpg' },
     { type: 'image',
       src: '//MAC_05/share/assets/034.jpg',
       name: '034.jpg' },
     { type: 'image',
       src: '//MAC_05/share/assets/035.jpg',
       name: '035.jpg' },
     { type: 'image',
       src: '//MAC_05/share/assets/036.jpg',
       name: '036.jpg' },
     { type: 'image',
       src: '//MAC_05/share/assets/037.jpg',
       name: '037.jpg' },
     { type: 'image',
       src: '//MAC_05/share/assets/038.jpg',
       name: '038.jpg' },
     { type: 'image',
       src: '//MAC_05/share/assets/039.jpg',
       name: '039.jpg' },
     { type: 'image',
       src: '//MAC_05/share/assets/040.jpg',
       name: '040.jpg' },
     { type: 'image',
       src: '//MAC_05/share/assets/041.jpg',
       name: '041.jpg' },
     { type: 'image',
       src: '//MAC_05/share/assets/042.jpg',
       name: '042.jpg' },
     { type: 'image',
       src: '//MAC_05/share/assets/043.jpg',
       name: '043.jpg' },
     { type: 'image',
       src: '//MAC_05/share/assets/044.jpg',
       name: '044.jpg' },
     { type: 'image',
       src: '//MAC_05/share/assets/045.jpg',
       name: '045.jpg' },
     { type: 'image',
       src: '//MAC_05/share/assets/046.jpg',
       name: '046.jpg' },
     { type: 'image',
       src: '//MAC_05/share/assets/047.jpg',
       name: '047.jpg' },
     { type: 'image',
       src: '//MAC_05/share/assets/048.jpg',
       name: '048.jpg' },
     { type: 'image',
       src: '//MAC_05/share/assets/049.jpg',
       name: '049.jpg' },
     { type: 'image',
       src: '//MAC_05/share/assets/050.jpg',
       name: '050.jpg' },
     { type: 'image',
       src: '//MAC_05/share/assets/051.jpg',
       name: '051.jpg' },
     { type: 'image',
       src: '//MAC_05/share/assets/052.jpg',
       name: '052.jpg' },
     { type: 'image',
       src: '//MAC_05/share/assets/053.jpg',
       name: '053.jpg' },
     { type: 'image',
       src: '//MAC_05/share/assets/054.jpg',
       name: '054.jpg' },
     { type: 'image',
       src: '//MAC_05/share/assets/055.jpg',
       name: '055.jpg' },
     { type: 'image',
       src: '//MAC_05/share/assets/056.jpg',
       name: '056.jpg' },
     { type: 'image',
       src: '//MAC_05/share/assets/057.jpg',
       name: '057.jpg' },
     { type: 'image',
       src: '//MAC_05/share/assets/058.jpg',
       name: '058.jpg' },
     { type: 'image',
       src: '//MAC_05/share/assets/059.jpg',
       name: '059.jpg' },
     { type: 'image',
       src: '//MAC_05/share/assets/060.jpg',
       name: '060.jpg' },
     { type: 'image',
       src: '//MAC_05/share/assets/061.jpg',
       name: '061.jpg' },
     { type: 'image',
       src: '//MAC_05/share/assets/062.jpg',
       name: '062.jpg' },
     { type: 'image',
       src: '//MAC_05/share/assets/063.jpg',
       name: '063.jpg' },
     { type: 'image',
       src: '//MAC_05/share/assets/064.jpg',
       name: '064.jpg' },
     { type: 'image',
       src: '//MAC_05/share/assets/065.jpg',
       name: '065.jpg' },
     { type: 'image',
       src: '//MAC_05/share/assets/066.jpg',
       name: '066.jpg' },
     { type: 'image',
       src: '//MAC_05/share/assets/067.jpg',
       name: '067.jpg' },
     { type: 'image',
       src: '//MAC_05/share/assets/068.jpg',
       name: '068.jpg' },
     { type: 'image',
       src: '//MAC_05/share/assets/069.jpg',
       name: '069.jpg' },
     { type: 'image',
       src: '//MAC_05/share/assets/070.jpg',
       name: '070.jpg' },
     { type: 'image',
       src: '//MAC_05/share/assets/071.jpg',
       name: '071.jpg' },
     { type: 'image',
       src: '//MAC_05/share/assets/072.jpg',
       name: '072.jpg' },
     { type: 'image',
       src: '//MAC_05/share/assets/073.jpg',
       name: '073.jpg' },
     { type: 'image',
       src: '//MAC_05/share/assets/074.jpg',
       name: '074.jpg' },
     { type: 'image',
       src: '//MAC_05/share/assets/075.jpg',
       name: '075.jpg' },
     { type: 'image',
       src: '//MAC_05/share/assets/076.jpg',
       name: '076.jpg' },
     { type: 'image',
       src: '//MAC_05/share/assets/077.jpg',
       name: '077.jpg' },
     { type: 'image',
       src: '//MAC_05/share/assets/078.jpg',
       name: '078.jpg' },
     { type: 'image',
       src: '//MAC_05/share/assets/079.jpg',
       name: '079.jpg' },
     { type: 'image',
       src: '//MAC_05/share/assets/080.jpg',
       name: '080.jpg' },
     { type: 'image',
       src: '//MAC_05/share/assets/081.jpg',
       name: '081.jpg' },
     { type: 'image',
       src: '//MAC_05/share/assets/082.jpg',
       name: '082.jpg' },
     { type: 'image',
       src: '//MAC_05/share/assets/083.jpg',
       name: '083.jpg' },
     { type: 'image',
       src: '//MAC_05/share/assets/084.jpg',
       name: '084.jpg' },
     { type: 'image',
       src: '//MAC_05/share/assets/085.jpg',
       name: '085.jpg' },
     { type: 'image',
       src: '//MAC_05/share/assets/086.jpg',
       name: '086.jpg' },
     { type: 'image',
       src: '//MAC_05/share/assets/087.jpg',
       name: '087.jpg' },
     { type: 'image',
       src: '//MAC_05/share/assets/088.jpg',
       name: '088.jpg' },
     { type: 'image',
       src: '//MAC_05/share/assets/089.jpg',
       name: '089.jpg' },
     { type: 'image',
       src: '//MAC_05/share/assets/090.jpg',
       name: '090.jpg' },
     { type: 'image',
       src: '//MAC_05/share/assets/091.jpg',
       name: '091.jpg' },
     { type: 'image',
       src: '//MAC_05/share/assets/092.jpg',
       name: '092.jpg' },
     { type: 'image',
       src: '//MAC_05/share/assets/093.jpg',
       name: '093.jpg' },
     { type: 'image',
       src: '//MAC_05/share/assets/094.jpg',
       name: '094.jpg' },
     { type: 'image',
       src: '//MAC_05/share/assets/095.jpg',
       name: '095.jpg' },
     { type: 'image',
       src: '//MAC_05/share/assets/096.jpg',
       name: '096.jpg' },
     { type: 'image',
       src: '//MAC_05/share/assets/097.jpg',
       name: '097.jpg' },
     { type: 'image',
       src: '//MAC_05/share/assets/098.jpg',
       name: '098.jpg' },
     { type: 'image',
       src: '//MAC_05/share/assets/099.jpg',
       name: '099.jpg' },
     ... 1 more item ],
  actions: [],
  settings:
   { outputModule: 'TEST_06',
     outputExt: 'jpg',
     startFrame: 231,
     endFrame: 461 },
  errorMessage: null,
  callbacks: {},
  ticker: null,
  api: { registered: true },
  error: null }


Want it like this:


Project {
  uid: 'shivy8r828dfjg6s4u02',
  state: 'queued',
  template: 'PROJECT_TEST_05.aepx',
  composition: 'PROJECT_TEST_05',
  type: 'default',
  assets:
   [ { type: 'project',
       src: '//MAC_05/share/assets/PROJECT_TEST_05.aepx',
       name: 'PROJECT_TEST_05.aepx' },
     { type: 'image',
       src: '//MAC_05/share/assets/001.jpg',
       name: '001.jpg' },
     { type: 'image',
       src: '//MAC_05/share/assets/002.jpg',
       name: '002.jpg' },
     { type: 'image',
       src: '//MAC_05/share/assets/003.jpg',
       name: '003.jpg' },
     { type: 'image',
       src: '//MAC_05/share/assets/004.jpg',
       name: '004.jpg' },
     { type: 'image',
       src: '//MAC_05/share/assets/005.jpg',
       name: '005.jpg' },
     { type: 'image',
       src: '//MAC_05/share/assets/006.jpg',
       name: '006.jpg' },
     { type: 'image',
       src: '//MAC_05/share/assets/007.jpg',
       name: '007.jpg' },
     { type: 'image',
       src: '//MAC_05/share/assets/008.jpg',
       name: '008.jpg' },
     { type: 'image',
       src: '//MAC_05/share/assets/009.jpg',
       name: '009.jpg' },
     { type: 'image',
       src: '//MAC_05/share/assets/010.jpg',
       name: '010.jpg' },
     { type: 'image',
       src: '//MAC_05/share/assets/011.jpg',
       name: '011.jpg' },
     { type: 'image',
       src: '//MAC_05/share/assets/012.jpg',
       name: '012.jpg' },
     { type: 'image',
       src: '//MAC_05/share/assets/013.jpg',
       name: '013.jpg' },
     { type: 'image',
       src: '//MAC_05/share/assets/014.jpg',
       name: '014.jpg' },
     { type: 'image',
       src: '//MAC_05/share/assets/015.jpg',
       name: '015.jpg' },
     { type: 'image',
       src: '//MAC_05/share/assets/016.jpg',
       name: '016.jpg' },
     { type: 'image',
       src: '//MAC_05/share/assets/017.jpg',
       name: '017.jpg' },
     { type: 'image',
       src: '//MAC_05/share/assets/018.jpg',
       name: '018.jpg' },
     { type: 'image',
       src: '//MAC_05/share/assets/019.jpg',
       name: '019.jpg' },
     { type: 'image',
       src: '//MAC_05/share/assets/020.jpg',
       name: '020.jpg' },
     { type: 'image',
       src: '//MAC_05/share/assets/021.jpg',
       name: '021.jpg' },
     { type: 'image',
       src: '//MAC_05/share/assets/022.jpg',
       name: '022.jpg' },
     { type: 'image',
       src: '//MAC_05/share/assets/023.jpg',
       name: '023.jpg' },
     { type: 'image',
       src: '//MAC_05/share/assets/024.jpg',
       name: '024.jpg' },
     { type: 'image',
       src: '//MAC_05/share/assets/025.jpg',
       name: '025.jpg' },
     { type: 'image',
       src: '//MAC_05/share/assets/026.jpg',
       name: '026.jpg' },
     { type: 'image',
       src: '//MAC_05/share/assets/027.jpg',
       name: '027.jpg' },
     { type: 'image',
       src: '//MAC_05/share/assets/028.jpg',
       name: '028.jpg' },
     { type: 'image',
       src: '//MAC_05/share/assets/029.jpg',
       name: '029.jpg' },
     { type: 'image',
       src: '//MAC_05/share/assets/030.jpg',
       name: '030.jpg' },
     { type: 'image',
       src: '//MAC_05/share/assets/031.jpg',
       name: '031.jpg' },
     { type: 'image',
       src: '//MAC_05/share/assets/032.jpg',
       name: '032.jpg' },
     { type: 'image',
       src: '//MAC_05/share/assets/033.jpg',
       name: '033.jpg' },
     { type: 'image',
       src: '//MAC_05/share/assets/034.jpg',
       name: '034.jpg' },
     { type: 'image',
       src: '//MAC_05/share/assets/035.jpg',
       name: '035.jpg' },
     { type: 'image',
       src: '//MAC_05/share/assets/036.jpg',
       name: '036.jpg' },
     { type: 'image',
       src: '//MAC_05/share/assets/037.jpg',
       name: '037.jpg' },
     { type: 'image',
       src: '//MAC_05/share/assets/038.jpg',
       name: '038.jpg' },
     { type: 'image',
       src: '//MAC_05/share/assets/039.jpg',
       name: '039.jpg' },
     { type: 'image',
       src: '//MAC_05/share/assets/040.jpg',
       name: '040.jpg' },
     { type: 'image',
       src: '//MAC_05/share/assets/041.jpg',
       name: '041.jpg' },
     { type: 'image',
       src: '//MAC_05/share/assets/042.jpg',
       name: '042.jpg' },
     { type: 'image',
       src: '//MAC_05/share/assets/043.jpg',
       name: '043.jpg' },
     { type: 'image',
       src: '//MAC_05/share/assets/044.jpg',
       name: '044.jpg' },
     { type: 'image',
       src: '//MAC_05/share/assets/045.jpg',
       name: '045.jpg' },
     { type: 'image',
       src: '//MAC_05/share/assets/046.jpg',
       name: '046.jpg' },
     { type: 'image',
       src: '//MAC_05/share/assets/047.jpg',
       name: '047.jpg' },
     { type: 'image',
       src: '//MAC_05/share/assets/048.jpg',
       name: '048.jpg' },
     { type: 'image',
       src: '//MAC_05/share/assets/049.jpg',
       name: '049.jpg' },
     { type: 'image',
       src: '//MAC_05/share/assets/050.jpg',
       name: '050.jpg' },
     { type: 'image',
       src: '//MAC_05/share/assets/051.jpg',
       name: '051.jpg' },
     { type: 'image',
       src: '//MAC_05/share/assets/052.jpg',
       name: '052.jpg' },
     { type: 'image',
       src: '//MAC_05/share/assets/053.jpg',
       name: '053.jpg' },
     { type: 'image',
       src: '//MAC_05/share/assets/054.jpg',
       name: '054.jpg' },
     { type: 'image',
       src: '//MAC_05/share/assets/055.jpg',
       name: '055.jpg' },
     { type: 'image',
       src: '//MAC_05/share/assets/056.jpg',
       name: '056.jpg' },
     { type: 'image',
       src: '//MAC_05/share/assets/057.jpg',
       name: '057.jpg' },
     { type: 'image',
       src: '//MAC_05/share/assets/058.jpg',
       name: '058.jpg' },
     { type: 'image',
       src: '//MAC_05/share/assets/059.jpg',
       name: '059.jpg' },
     { type: 'image',
       src: '//MAC_05/share/assets/060.jpg',
       name: '060.jpg' },
     { type: 'image',
       src: '//MAC_05/share/assets/061.jpg',
       name: '061.jpg' },
     { type: 'image',
       src: '//MAC_05/share/assets/062.jpg',
       name: '062.jpg' },
     { type: 'image',
       src: '//MAC_05/share/assets/063.jpg',
       name: '063.jpg' },
     { type: 'image',
       src: '//MAC_05/share/assets/064.jpg',
       name: '064.jpg' },
     { type: 'image',
       src: '//MAC_05/share/assets/065.jpg',
       name: '065.jpg' },
     { type: 'image',
       src: '//MAC_05/share/assets/066.jpg',
       name: '066.jpg' },
     { type: 'image',
       src: '//MAC_05/share/assets/067.jpg',
       name: '067.jpg' },
     { type: 'image',
       src: '//MAC_05/share/assets/068.jpg',
       name: '068.jpg' },
     { type: 'image',
       src: '//MAC_05/share/assets/069.jpg',
       name: '069.jpg' },
     { type: 'image',
       src: '//MAC_05/share/assets/070.jpg',
       name: '070.jpg' },
     { type: 'image',
       src: '//MAC_05/share/assets/071.jpg',
       name: '071.jpg' },
     { type: 'image',
       src: '//MAC_05/share/assets/072.jpg',
       name: '072.jpg' },
     { type: 'image',
       src: '//MAC_05/share/assets/073.jpg',
       name: '073.jpg' },
     { type: 'image',
       src: '//MAC_05/share/assets/074.jpg',
       name: '074.jpg' },
     { type: 'image',
       src: '//MAC_05/share/assets/075.jpg',
       name: '075.jpg' },
     { type: 'image',
       src: '//MAC_05/share/assets/076.jpg',
       name: '076.jpg' },
     { type: 'image',
       src: '//MAC_05/share/assets/077.jpg',
       name: '077.jpg' },
     { type: 'image',
       src: '//MAC_05/share/assets/078.jpg',
       name: '078.jpg' },
     { type: 'image',
       src: '//MAC_05/share/assets/079.jpg',
       name: '079.jpg' },
     { type: 'image',
       src: '//MAC_05/share/assets/080.jpg',
       name: '080.jpg' },
     { type: 'image',
       src: '//MAC_05/share/assets/081.jpg',
       name: '081.jpg' },
     { type: 'image',
       src: '//MAC_05/share/assets/082.jpg',
       name: '082.jpg' },
     { type: 'image',
       src: '//MAC_05/share/assets/083.jpg',
       name: '083.jpg' },
     { type: 'image',
       src: '//MAC_05/share/assets/084.jpg',
       name: '084.jpg' },
     { type: 'image',
       src: '//MAC_05/share/assets/085.jpg',
       name: '085.jpg' },
     { type: 'image',
       src: '//MAC_05/share/assets/086.jpg',
       name: '086.jpg' },
     { type: 'image',
       src: '//MAC_05/share/assets/087.jpg',
       name: '087.jpg' },
     { type: 'image',
       src: '//MAC_05/share/assets/088.jpg',
       name: '088.jpg' },
     { type: 'image',
       src: '//MAC_05/share/assets/089.jpg',
       name: '089.jpg' },
     { type: 'image',
       src: '//MAC_05/share/assets/090.jpg',
       name: '090.jpg' },
     { type: 'image',
       src: '//MAC_05/share/assets/091.jpg',
       name: '091.jpg' },
     { type: 'image',
       src: '//MAC_05/share/assets/092.jpg',
       name: '092.jpg' },
     { type: 'image',
       src: '//MAC_05/share/assets/093.jpg',
       name: '093.jpg' },
     { type: 'image',
       src: '//MAC_05/share/assets/094.jpg',
       name: '094.jpg' },
     { type: 'image',
       src: '//MAC_05/share/assets/095.jpg',
       name: '095.jpg' },
     { type: 'image',
       src: '//MAC_05/share/assets/096.jpg',
       name: '096.jpg' },
     { type: 'image',
       src: '//MAC_05/share/assets/097.jpg',
       name: '097.jpg' },
     { type: 'image',
       src: '//MAC_05/share/assets/098.jpg',
       name: '098.jpg' },
     { type: 'image',
       src: '//MAC_05/share/assets/099.jpg',
       name: '099.jpg' },
     ... 1 more item ],
  actions: [],
  settings:
   { outputModule: 'TEST_06',
     outputExt: 'jpg',
     startFrame: 231,
     endFrame: 461 },
  errorMessage: null,
  callbacks: {},
  ticker: null,
  api:
   { registered: true,
     config: [Function: config],
     create: [Function: create],
     get: [Function: get],
     update: [Function: update],
     remove: [Function: remove] },
  error: null }

How can I?

Importing a Vector File

Hey There,

I was wondering if it is possible to import a vector image file with nexrender? I have tried using the same technique as importing an image file but it doesn't seem to work like the other image files do.
It copies it to the temp folder but the original vector files are not updated in the actual after effects image file.

Any help would be greatly appreciated.

Dynamic videos sequencing

I am trying to create dynamic video sequences. Basically to put a number of videos one after another.
The idea is to start a video after its predecesor finishes.The videos have variable length.
I umderstand that this could be achieved with ae scripts. I tried adding some code on the assets/js file (i am using the boilerplate) but I really donโ€™t know were to start. My js skills are good but I donโ€™t have any experience with ae scripting api.
I named my videos: video1, video2, video3
Name of the comp: main
Any help is much appreciated.

API Server + Node: No such file or directory template.aep / result.mp4

I'm trying to render a simple project, without any custom data. using the API Server with a render node (same machine).

I run the API server and send a POST request to it containing the following Project model:

{
    template: 'template1.aepx',
    composition: 'mainComp',
    type: 'default',
    settings: {
        outputModule: 'Lossless',
        outputExt: 'avi',
        startFrame: 0,
        endFrame: 100
    }
}

I have a render node directory which has the directory templates, containing template1.aepx.

When I run the render node with this data, I get the following error:
Error message: ENOENT: no such file or directory, lstat 'D:\Web\nexrender-node\templates\template.aep'

So I tried saving a copy of the .aepx project as template.aep in templates. This results in:
Error message: ENOENT: no such file or directory, stat 'D:\Web\nexrender-node\temp\HJ9-diFh\result.mp4'

The output module and extension are correct (tested in nexrender-boilerplate).

What am I doing wrong?

shake down dependency tree

Currently, nexrender has a very deep and big dependency tree.
Installation of nexrender takes a while, especially on HDD.

Most of the "leaves" of the dep. tree caused by request, download, and express.js npm modules.

I have a plan to either search for some more lightweight alternatives or to rewrite those parts natively (this option opens up a whole new world for bugs).

Guys, if you have any thoughts/suggestions, just post 'em there. :)

Multi-MachineRendering.

I have successfully made it possible to render via multiple nodes and get the rendered files back to the api server but I need the IP of a particular render-node through which the particular frames has been rendered, so that I can fetch files from that node using that node IP. Is it possible to get that node IP on render finish?

Question: add/remove clips in timeline

We would like to use nexrender in a project, I have a question.

Is it possible to add/remove video clips in the timeline at a specific point in time? If it's not possible right now in nexrender, do you think it is a feature that is possible to add in the current way this project is set up? (we would love to contribute)

Proper error message when verification fails.

Hi,

the verify task had me dumbfounded for a while as i was checking the results in the db.json errorMessage field and couldn't find anything going wrong. The problem was that the output file had a different extension then the default. Perhaps the "return reject(logs);" can be extended with a clear message that the resulting file couldn't be found with a path to the filename. I was looking how to implement this on my own and provide a changeset, but I didn't quite know what the best solution was to fit in your framework. Probably it is as simple as adding a string to the 'logs' variable. If that's fine with you i could even provide a changeset for merging.

Forward Slash getting replaced with filepath

I'm using some Forward Slashes (/) in my expression for divide operation. When I save this project as .aepx file and render using nexrender, the new .aep file created by nexrender in nexrender\temp replaced with some default file path.
For the time being I'm converting my divide operations with multiplication using Math.pow(val,exp) in AfterEffects.

Kindly resolve this bug :)

Thanks

Tested it!

I tested render node & api server on MacOS Sierra 10.12.6 and Windows Server 2016 with AE CC 2018 Version 15.0.0 (Build 180). Works fine ๐Ÿ‘

Error message: ENOENT: no such file or directory, stat 'D:\Web\nexpost\temp\Byt2O9uh\result.mp4'

Cross-posting from inlife/nexrender-boilerplate#2 (issue also appears with base nexrender)

Running the nexrender command with a project in queue causes the following results returned in the CLI:

looking for suitable projects...
[Byt2O9uh] setting up project...
[Byt2O9uh] downloading assets...
[Byt2O9uh] renaming assets...
[Byt2O9uh] filtering image assets...
[Byt2O9uh] patching project...
[Byt2O9uh] rendering project...
[Byt2O9uh] verifying project...
--------------------------
[Byt2O9uh] project failed
--------------------------

Error message: ENOENT: no such file or directory, stat 'D:\Web\nexrend\temp\Byt2O9uh\result.mp4'

Multiple Machine Rendering

Hi! How can I configure it to render one project in a network?
I tried to create a API server on a machine, and when I started a render node, to look for the ip in another machine, I'm getting this error: connect ECONNREFUSED 127.0.0.1:23234

Auto repo update

It seems that when modifying nexrender's code, the repo is automatically updated, making me loose my changes? is it me or?

ability to operate required assets without downloading (local fs)

I think that if nexrender is run locally, usage of http server may be slightly pain-in-the-ass-able.

Would be more convenient if you can set some asset paths as your fs paths (relative or absolute);

e.g:

 "assets": [
            {  "type": "project", "name": "project.aepx", "src": `http://localhost:2323/prj.aep`}, 
            { "type": "image",   "name": "bg.jpg", "src": `../images/bg.jpg` },
            { "type": "image",   "name": "2.png", "src": `/Users/Username/pngs/2.png` },

To make this dream come true some changes must be done to tasks/download.js or even add a new task, tasks/copier.js, (it will be called either just before download or right after download) that will try to copy local fs assets (if they exists) and pass control to next module.

Maybe someone has some thoughts about this one ?

Project uploading and managing interface

Create an interface to upload and manage existing projects.
Can be used along side POSTing projects via API.

Interface may be inserted into existing api-server implementation.

All project assets can be uploaded via simple interface.
Wont need to start an external http server to serve assets.

This can be called an admin panel

Recommend Projects

  • React photo React

    A declarative, efficient, and flexible JavaScript library for building user interfaces.

  • Vue.js photo Vue.js

    ๐Ÿ–– Vue.js is a progressive, incrementally-adoptable JavaScript framework for building UI on the web.

  • Typescript photo Typescript

    TypeScript is a superset of JavaScript that compiles to clean JavaScript output.

  • TensorFlow photo TensorFlow

    An Open Source Machine Learning Framework for Everyone

  • Django photo Django

    The Web framework for perfectionists with deadlines.

  • D3 photo D3

    Bring data to life with SVG, Canvas and HTML. ๐Ÿ“Š๐Ÿ“ˆ๐ŸŽ‰

Recommend Topics

  • javascript

    JavaScript (JS) is a lightweight interpreted programming language with first-class functions.

  • web

    Some thing interesting about web. New door for the world.

  • server

    A server is a program made to process requests and deliver data to clients.

  • Machine learning

    Machine learning is a way of modeling and interpreting data that allows a piece of software to respond intelligently.

  • Game

    Some thing interesting about game, make everyone happy.

Recommend Org

  • Facebook photo Facebook

    We are working to build community through open source technology. NB: members must have two-factor auth.

  • Microsoft photo Microsoft

    Open source projects and samples from Microsoft.

  • Google photo Google

    Google โค๏ธ Open Source for everyone.

  • D3 photo D3

    Data-Driven Documents codes.