This project is a simple Flask web app that returns a random popular movie suggestion from The Movie Database’s (TMDB) API. https://www.themoviedb.org/movie?language=en-GB
A serverless architecture is being used to deploy the app. The main reason being the app is a very small application that just makes a single API call to TMDB API each time the page is refreshed, so the compute power needed is low.
Containerising the app gives it the advantages of being lightweight and portable and then using the Amazon Elastic Container Service containers can quickly be ran with lower compute costs and it also removes the overhead of managing any infrastructure.
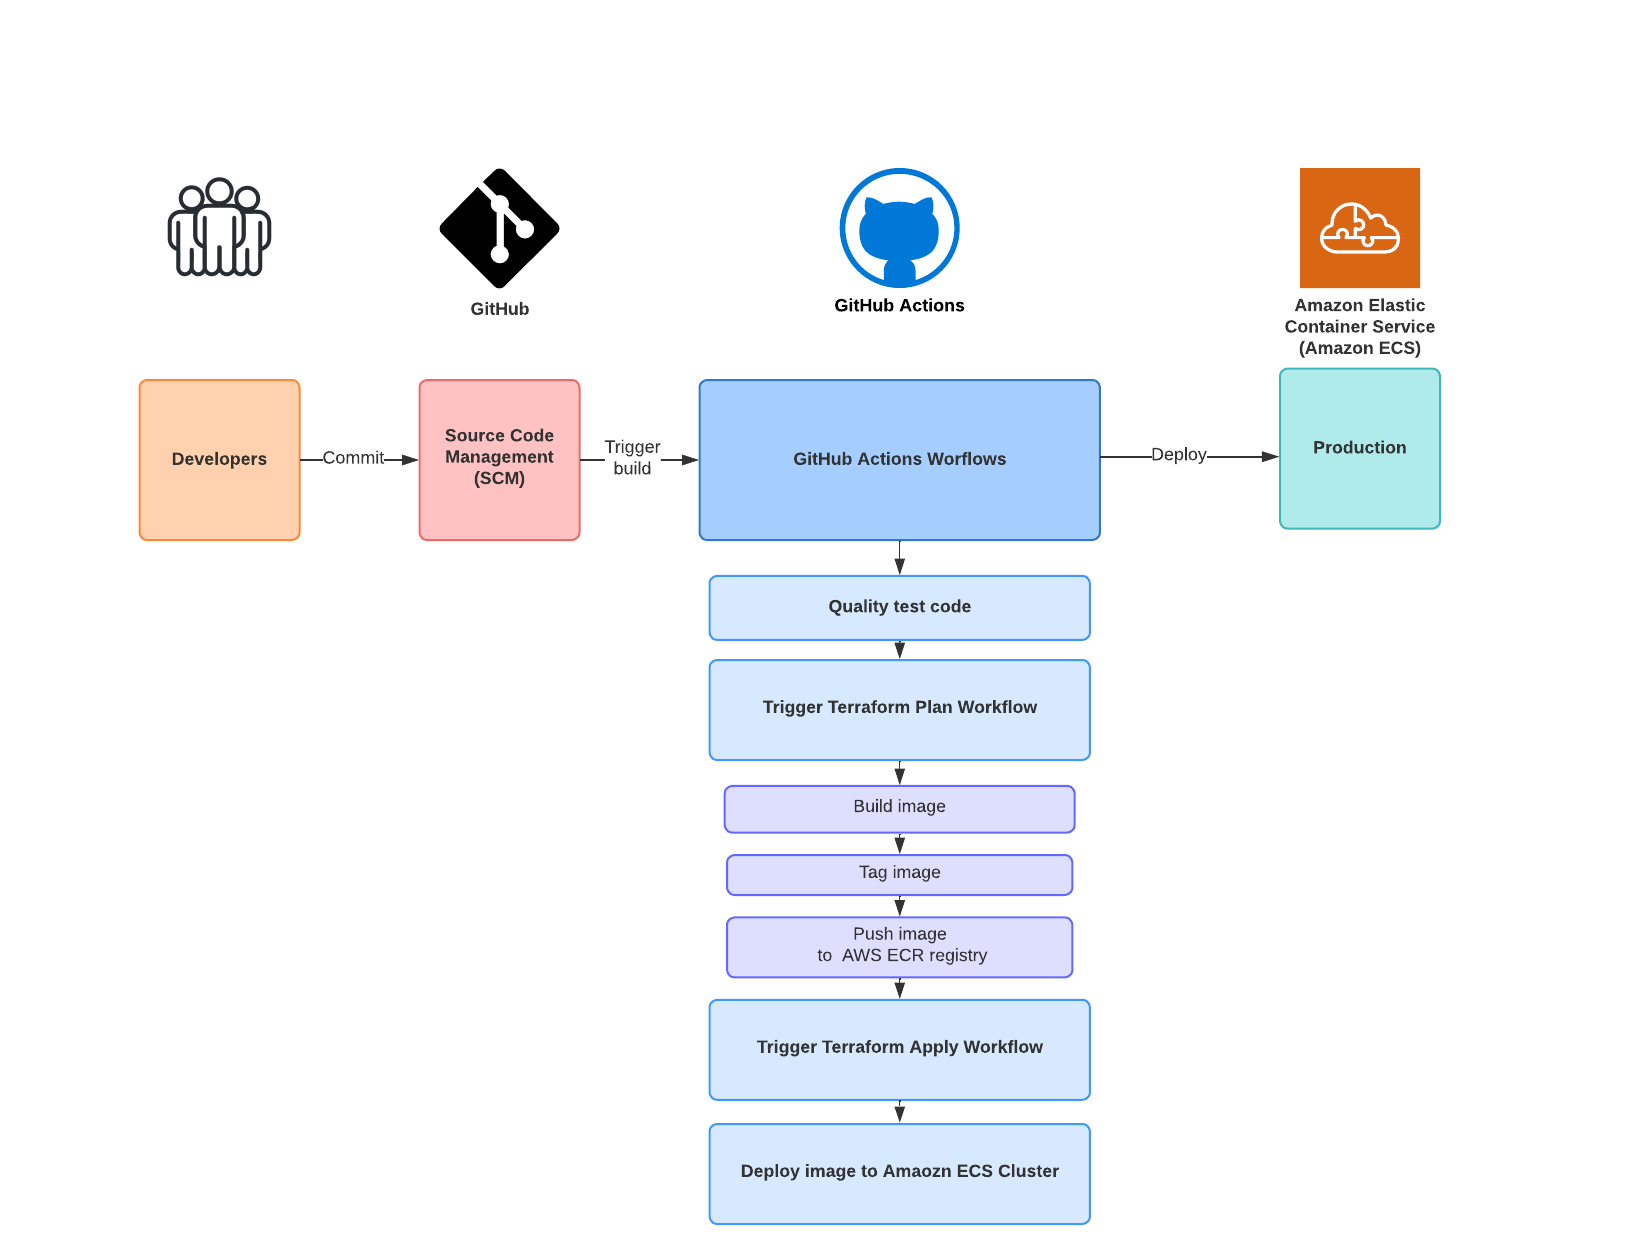
For future releases I’ve created a full CI/CD pipeline using GitHub actions workflows. The CI/CD workflow automates code pushes from GitHub, builds the new image, using the Terraform files it deploys any AWS infrastructure changes and finally the new image is deployed.
The solution is completely re-usable for deploying different container images, from different container registeries (that Amazon ECS supports) and you can change how many containers you'd like to spin up. This is mainly achieved by not hardcoding values, GitHub Actions workflows, Github Secrets and Terraform for the Infrastructure as the variables can easyily be changed from the CLI.
- Simple Flask Movie Suggester 💡
- Table of contents 🔖

The Terraform files with this GitHub Repository folder terraform will deploy the following AWS Infrastructure:
- Networking: VPC, NAT Gateway, 3 Public Subnets, Route tables and associations for the public subnets and 2 security groups (For the ALB and one for the traffic from container to ALB)
- Application Load Balancer: The configuration for the ALB using each of the 3 Public Subnets, ALB target group, ALB listener for the ALB target groups.
- Amazon Elastic Container Service (Amazon ECS): The ECS cluster is deployed, the required role for the ECS cluster is created, ECS Task Definition with the configuration and the ECS service which maintains the desired amount of containers in the cluster. The ECS service runs behind the above Load balancer to distribute traffic across and in the end the containers in the cluster are deployed with the below configuration:
- Fargate as the Compute Service
- CPU: 256 # .25 vCPU
- Memory: 512 # 0.5 GB
- Container image url and name is pulled from Amazon ECR
- Port mappings for the container (Port 80)
For this project I've not used a main.tf file or modules but instead split the different AWS components into different Terraform .tf files as shown below.
Directory structure:
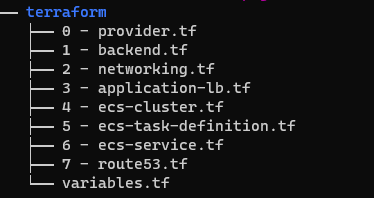
The first file Terraform will read is the 0 - provider.tf file, which tells Terraform which provider to use and the AWS region is also declared.
0 - provider.tf

terraform {
  required_providers {
    aws = {
      source  = "hashicorp/aws"
      version = "~> 3.0"
    }
  }
}

provider "aws" {
  region = "eu-west-2"
}
The Terraform state is being stored remotely in an Amazon S3 bucket, so here we define this and the DynamoDB table for Terraform's state locking feature. State locking helps if you're making changes to the infrastructure, the state file is locked for you and it'll prevent others from making any changes to the infrastructure at the same time.
1 - backend.tf

terraform {
  backend "s3" {
    bucket         = "bucket-name"
    key            = "terraform.tfstate"
    region         = "eu-west-2"
    dynamodb_table = "dynamo-table"

  }
}
The 2 - networking.tf Terraform file first declares the VPC resource to be created. Three Public Subnets are created with each having Public IP addresses assigned to them. Each public subnet has a route table association assigned to route traffic to the Internet Gateway. The internet gateway resource allows access to the internet.
Lastly, two security groups are created. The first security group is for allowing the container deployed on the ECS cluster, it's inbound traffic will be allowed to reach the Application Load Balancer. The second security group allows inbound port 80 traffic from anywhere and later in the 3 - application-lb.tf this will be applied to the Application Load Balancer.
2 - networking.tf

# Creating VPC

resource "aws_vpc" "web-app" {
  cidr_block = "10.0.0.0/16"

  tags = {
    name = "${var.application_tag} - VPC"
    env  = var.env_tag
  }
}

#NAT Gateway
resource "aws_internet_gateway" "main" {
  vpc_id = aws_vpc.web-app.id

  tags = {
    name = "${var.application_tag} - IGW"
    env  = var.env_tag
  }

}


# Public Subnets
resource "aws_subnet" "public-eu-west-2a" {
  vpc_id                  = aws_vpc.web-app.id
  cidr_block              = "10.0.1.0/24"
  availability_zone       = "eu-west-2a"
  map_public_ip_on_launch = true

  tags = {
    name = "${var.application_tag} - Public Subnet eu-west-2a"
    env  = var.env_tag
  }

}

resource "aws_subnet" "public-eu-west-2b" {
  vpc_id                  = aws_vpc.web-app.id
  cidr_block              = "10.0.2.0/24"
  availability_zone       = "eu-west-2b"
  map_public_ip_on_launch = true

  tags = {
    name = "${var.application_tag} - Public Subnet eu-west-2b"
    env  = var.env_tag
  }
}

resource "aws_subnet" "public-eu-west-2c" {
  vpc_id                  = aws_vpc.web-app.id
  cidr_block              = "10.0.3.0/24"
  availability_zone       = "eu-west-2c"
  map_public_ip_on_launch = true

  tags = {
    name = "${var.application_tag} - Public Subnet eu-west-2c"
    env  = var.env_tag
  }

}

resource "aws_route_table" "public" {
  vpc_id = aws_vpc.web-app.id

  tags = {
    name = "${var.application_tag} - Public VPC route"
    env  = var.env_tag
  }

}

A route table is created and assigned to the VPC. A routb

resource "aws_route" "public" {
  route_table_id         = aws_route_table.public.id
  destination_cidr_block = "0.0.0.0/0"
  gateway_id             = aws_internet_gateway.main.id


}

resource "aws_route_table_association" "public-eu-west-2a" {
  subnet_id      = aws_subnet.public-eu-west-2a.id
  route_table_id = aws_route_table.public.id

}

resource "aws_route_table_association" "public-eu-west-2b" {
  subnet_id      = aws_subnet.public-eu-west-2b.id
  route_table_id = aws_route_table.public.id

}

resource "aws_route_table_association" "public-eu-west-2c" {
  subnet_id      = aws_subnet.public-eu-west-2c.id
  route_table_id = aws_route_table.public.id

}


resource "aws_security_group" "container-sg" {
  name        = "ContainerFromAlb-SG"
  description = "Allows inbound traffic from the ALB security group"
  vpc_id      = aws_vpc.web-app.id

  ingress {
    protocol         = "tcp"
    from_port        = 80
    to_port          = 80
    security_groups  = [aws_security_group.alb.id]
    ipv6_cidr_blocks = ["::/0"]
  }

  egress {
    protocol         = "-1"
    from_port        = 0
    to_port          = 0
    cidr_blocks      = ["0.0.0.0/0"]
    ipv6_cidr_blocks = ["::/0"]
  }

  tags = {
    name = "${var.application_tag} - ALB Inbound Secuirty Group"
    env  = var.env_tag
  }
}

resource "aws_security_group" "alb" {
  name        = "ApplicationLoadBalancer-SG"
  description = "Allows inbound port 80 traffic from anywhere"
  vpc_id      = aws_vpc.web-app.id

  ingress {
    protocol         = "tcp"
    from_port        = 80
    to_port          = 80
    cidr_blocks      = ["0.0.0.0/0"]
    ipv6_cidr_blocks = ["::/0"]
  }

  egress {
    protocol         = "-1"
    from_port        = 0
    to_port          = 0
    cidr_blocks      = ["0.0.0.0/0"]
    ipv6_cidr_blocks = ["::/0"]
  }

  tags = {
    name = "${var.application_tag} - ALB Inbound Traffic Securiy Group"
    env  = var.env_tag
  }

}
The 3 - application-lb.tf Terraform file is where the Application Load Balancer will be created. The Amazon ECS service where the container will be deployed will utilise this to distribute traffic evenly across the number of containers that are running.
The distribution of the traffic will work by first creating a listener resource for inbound public HTTP traffic, this is then forwarded to target groups. The target groups have the Amazon ECS containers registered to them so traffic can be distributed between them.
3 - application-lb.tf

resource "aws_lb" "main" {
  name               = var.aws_alb_name
  internal           = false
  load_balancer_type = "application"
  security_groups    = [aws_security_group.alb.id]
  subnets            = [aws_subnet.public-eu-west-2a.id, aws_subnet.public-eu-west-2b.id, aws_subnet.public-eu-west-2c.id]

  enable_deletion_protection = false

  tags = {
    name = "${var.application_tag} - Application Load Balancer"
    env  = var.env_tag
  }

}

resource "aws_alb_target_group" "main" {
  name        = var.aws_alb_target_group_name
  port        = 80
  protocol    = "HTTP"
  vpc_id      = aws_vpc.web-app.id
  target_type = "ip"

  tags = {
    name = "${var.application_tag} - ALB Target Group A"
    env  = var.env_tag
  }


}

resource "aws_alb_listener" "http" {
  load_balancer_arn = aws_lb.main.id
  port              = 80
  protocol          = "HTTP"
  default_action {
    type             = "forward"
    target_group_arn = aws_alb_target_group.main.id
  }

  tags = {
    name = "${var.application_tag} - ALB Listener"
    env  = var.env_tag
  }

}
The 4 - ecs-cluster.tf Terraform file first declares the ECS Cluster resource to be created. For the management of containers in the ECS cluster it needs to AssumeRole two IAM Roles. The first IAM role we'll need is the ECS Task Execution Role, so we can pull the image that's being stored in the Amazon Elastic Container Registry (ECR). The next role we need is the EcsTaskPolicy to create the tasks in the Amazon ECS cluster.
4 - ecs-cluster.tf

resource "aws_ecs_cluster" "main" {
  name = var.ecs_cluster_name

  tags = {
    name = "${var.application_tag} - ECS Cluster"
    env  = var.env_tag
  }


}

data "aws_iam_policy_document" "ecs_task_policy" {
  statement {
    sid = "EcsTaskPolicy"

    actions = [
      "ecr:BatchCheckLayerAvailability",
      "ecr:GetDownloadUrlForLayer",
      "ecr:BatchGetImage"
    ]

    resources = [
      "*"
    ]
  }
  statement {

    actions = [
      "ecr:GetAuthorizationToken"
    ]

    resources = [
      "*"
    ]
  }

  statement {

    actions = [
      "logs:CreateLogGroup",
      "logs:CreateLogStream",
      "logs:PutLogEvents"
    ]

    resources = [
      "*"
    ]
  }

}

resource "aws_iam_role" "Execution_Role" {
  name               = "ecsExecution-1"
  assume_role_policy = data.aws_iam_policy_document.role_policy.json

  inline_policy {
    name   = "EcsTaskExecutionPolicy"
    policy = data.aws_iam_policy_document.ecs_task_policy.json
  }


}


data "aws_iam_policy_document" "role_policy" {
  statement {
    actions = ["sts:AssumeRole"]

    principals {
      type        = "Service"
      identifiers = ["ecs-tasks.amazonaws.com"]
    }
  }
}
In the - ecs-task-definition.tf file this is where we create the Amazon ECS Task Definition, which is required for running containers in the ECS cluster.The Task Definition for this project defines the following parameters:
- The launch type being is AWS Fargate
- The networking mode for the containers
- The CPU and Memory each container will use in this task
- The Flask application runs on port 80, so a port mapping is required between the container and the host.
5 - ecs-task-definition.tf

# Creating the ECS task definition


resource "aws_ecs_task_definition" "main" {
  family                   = "service"
  network_mode             = "awsvpc"
  requires_compatibilities = ["FARGATE"]
  cpu                      = var.ecs_task_definition_cpu_allocation    #.25 vCPU
  memory                   = var.ecs_task_definition_memory_allocation # 0.5 GB
  task_role_arn            = aws_iam_role.Execution_Role.arn
  execution_role_arn       = aws_iam_role.Execution_Role.arn
  container_definitions = jsonencode([{
    name      = "${var.ecs_container_name}"
    image     = "${var.ecr_container_image_url}"
    cpu       = "${var.ecs_task_definition_cpu_allocation}"    #.25 vCPU
    memory    = "${var.ecs_task_definition_memory_allocation}" # 0.5 GB
    essential = true
    portMappings = [
      {
        containerPort = 80
        hostPort      = 80
      }
    ]
    }
  ])

  tags = {
    name = "${var.application_tag} - ECS Fargate Task"
    env  = var.env_tag
  }
}
The 6 - ecs-service.tf Terraform file creates the Amazon ECS Service that will run using the previous Task Definition. The desired_amount line will allow us to define how many containers to run. It's responsible for maintaining the desired amount of containers using the REPLICA scheduling strategy. The ECS service also will spread the containers across the three public subnets that were previously declared in the VPC Terraform file. The ECS Service also configures the container to the Application Load Balancer target group.
6 - ecs-service.tf

resource "aws_ecs_service" "main" {
  name                = var.aws_ecs_service_name
  cluster             = aws_ecs_cluster.main.id
  task_definition     = aws_ecs_task_definition.main.id
  desired_count       = var.aws_ecs_service_desired_count
  launch_type         = "FARGATE"
  scheduling_strategy = "REPLICA"

  network_configuration {
    security_groups  = [aws_security_group.container-sg.id]
    subnets          = [aws_subnet.public-eu-west-2a.id, aws_subnet.public-eu-west-2b.id, aws_subnet.public-eu-west-2c.id]
    assign_public_ip = true
  }

  load_balancer {
    target_group_arn = aws_alb_target_group.main.id
    container_name   = var.ecs_container_name
    container_port   = "80"
  }

  lifecycle {
    ignore_changes = [task_definition, desired_count]
  }

  tags = {
    name = "${var.application_tag} - ECS Service"
    env  = var.env_tag
  }

}
The 7 - route53.tf file points the Application Load Balancer to a domain name. For the purpose of demonstrating the Project I've already created a domain name and created a Hosted Zone on AWS. The Terraform file retrieves this Hosted Zone.
Next, an AWS Route 53 record (A) is created to point the ALB to the domain name.
var.aws_route53_domain & var.aws_route53_subdomain. If you'd like to use a domain name you can uncomment the 7 - route53.tf file, next you'll need to created hosted zone for your domain name within the AWS Route 53 console, and provide the values to both the variables in the 7 - variables.tf file or via the console.
7 - route53.tf

# First retrieving the AWS Route 53 domain zone ID

data "aws_route53_zone" "main" {
  name         = var.aws_route53_domain
  private_zone = false
}


# Creating the AWS Route 53 A Record

resource "aws_route53_record" "www" {
  zone_id = data.aws_route53_zone.main.zone_id
  name    = var.aws_route53_subdomain
  type    = "A"

  alias {
    name                   = aws_lb.main.dns_name
    zone_id                = aws_lb.main.zone_id
    evaluate_target_health = true
  }
}
The below 7 - variables.tf variables file holds all variables that have been assigned. All the variables have default values while the following below have values that must be declared.
- ecs_container_name
- ecr_container_image_url
The purpose of this is to allow new container images or container registries to be used. Also, other variables could also be added to make improvements to the solution.
7 - variables.tf

variable "env_tag" {
  description = "Prod Environment tag"
  type        = string
  default     = "Prod"
}

variable "application_tag" {
  description = "Application tag"
  type        = string
  default     = "Movie App"
}

variable "aws_alb_name" {
  description = "Application Load Balancer Name"
  type        = string
  default     = "web-app-alb"

}

variable "aws_alb_target_group_name" {
  description = "Application Load Balancer Target Group Name"
  type        = string
  default     = "alb-target-group"

}


variable "ecs_container_name" {
  description = "Container name for ECS task definition"
  type        = string

}

variable "ecr_container_image_url" {
  description = "Amazon ECR container image url"
  type        = string
}


variable "ecs_task_definition_cpu_allocation" {
  description = "Amazon ECR container image url"
  type        = number
  default     = 256
}

variable "ecs_task_definition_memory_allocation" {
  description = "Amazon ECR container image url"
  type        = number
  default     = 512
}

variable "ecs_cluster_name" {
  description = "Amazon ECS Cluster Name"
  type        = string
  default     = "app-cluster"

}

variable "aws_ecs_service_name" {
  description = "Amazon ECS Service Name"
  type        = string
  default     = "app-service"

}

variable "aws_ecs_service_desired_count" {
  description = "Amazon ECS Service Name"
  type        = number
  default     = 2

}
Version used: v1.3.5
Follow the instructions here to install Terraform here
An AWS account, an IAM User with Programmatic access, Access key ID and a Secret access key are required.
This can created by following the instructions here
Only for the purpose of demonstration I've created an IAM user with full AdministratorAccess access.
Version used: aws-cli/2.9.0
Refer to the following guide to install the AWS CLI here
Once the AWS CLI is installed run the below command within a terminal and follow the on-screen prompts to enter your Access Key ID, Secret Key, choose default region and the default output format.
aws configure
Python 3.10.6
Depending on what OS your running the instructions will be different. However if you already have Python installed locally and a different version it's recommened to run use the pyenv tool, which allows you to manage multiple Python versions.
Refer to the instructions here on installing for Windows, Linux or Mac.
Once installed you'll be prompted to add the pyenv executable to your local Shell profile e.g. ~/.bashrc ~/.zshrc
Next, the below command will list all the Python packages you can install.
pyenv install --list
For this Project install version 3.10.6
pyenv install 3.10.6
Lastly, use the global option to sets the global version on Python.
pyenv global 3.10.6
Note:* The app has been tested to work on Python 3.8, 3.9 or 3.10
If pip is not installed by default, then refer to the instructions here to install.
Version used: 20.10.19
Again, depending on what OS you're using the instructions will be different.Refer to the instructions here
For this project the The Movie Database (TMDB) API is being used to retrieve the list of popular movies.
To obtain an API Key it's free and easy. First create an an account here
Then you can obtain your API key from here
The Terraform config is setup to use a S3 bucket to store the state file and use a DynamoDB table for Terraforms state locking feature. To create the bucket run the below command in the AWS CLI and changing the values to your own.
Note: For this project I've chosen to host all AWS infrastructure in eu-west-2, hence the LocationConstraint parameter is being declared as this is required for creating buckets in eu-west-2.
aws s3api create-bucket --bucket <value> --region <value> --create-bucket-configuration LocationConstraint=eu-west-2 --acl private
Run the below command to create a DynamoDB table
To use the Terraform state locking feature, which locks the state file and prevents it from being written too by another user a DynamoDB must be created. Navigate to the here. Click create table and setup the table as shown below:

Run the below command to create an Amazon ECR Repository. Change the image-repo and eu-west-2 values as required.
aws ecr create-repository \
    --repository-name image-repo \
    --region eu-west-2 \
Using a domain name is completely optional.
For the purpose of demonstrating the Project I've created a domain name and created a Hosted Zone on AWS.
For reference, below are the AWS guides to follow for registering a domain and creating a hosting zone:
First start by cloning this GitHub Repo:
git clone [email protected]:itsham-sajid/flask-web-app.git
The folder structure for the Flask project is as follows:

Before the app can be run The Movie Database (TMDB) API key must be saved as environment variable, so the app can use the API key to retrieve the list of movies:
Run the below command to save the API Key to a .env file
echo API_KEY=<YOUR-API-KEY> > .env
Next, run the below command to install the required packages for the web app
pip install -r requirements.txt
Now, you can run the Flask app from within the flask-web-app folder and run the below command
python3 -m flask run --host=0.0.0.0
This will start the Flask development server on the local address: http://127.0.0.1:5000
To build and push the docker image, Amazon has a list of the commands you need to run and to access these commands you just have to login into the AWS Console > Navigate to Amazon ECR > Select your repository > and select the button "View push commands"
Below is a screenshot as an example:

Once the image is built and successfully pushed to the ECR repository the AWS Infrastructure can be provisioned via Terraform.
Note: As explained previously, sensitive values are not hardcoded within this GitHub project so you must declare this manually via the Terraform CLI. However, for the CI/CD workflow they will need to be added to GitHub secrets, as the GitHub secrets variables are declared within the CI/CD workflow files for automation.
First, you'll need to run the below command and replace the values with your own. This intiliases the Terraform backend, stores the Terraform state remotely within a S3 bucket, knows which DynamoDB table to use for state locking and the AWS region.
terraform init -backend-config='bucket=<value>' -backend-config='key=<value>' -backend-config='region=<value>' -backend-config='dynamodb_table=<value>'
Next, there are two more values that are needed: ecr_container_image_url and ecs_container_name. The reason for this is again so these values can be changed and aren't hard coded e.g. if you want to use a different image registry like Docker or want to use another container name.
We can declare these values together while running a terraform plan:
terraform plan -var 'ecr_container_image_url=<value>' -var 'ecs_container_name=<value>'
Lastly, review the output and run a terraform apply
terraform apply
Once complete this will bring up the AWS infrastructure and you can access the app by accessing the Application Load Balancers DNS Name as shown below. However, ideally this would be pointing to a domain name for clients to access.

GitHub Secrets allows for secure secret management and these can also be declared within GitHub Actions Workflow.
Where a variable that starts with ${{ secrets. Example: ${{ secrets.AWS_ACCESS_KEY_ID }} it's being referenced directly from the repositories GitHub Secrets.
GitHub secrets can be assigned by going to Settings on the repository > Actions > New repository secret
Below is the list of the total GitHub Secrets that are required to successfully run the CI/CD pipeline:
| Name | Purpose |
|---|---|
| API_KEY | The movie database API key |
| AWS_ACCESS_KEY_ID | AWS Access Key ID |
| AWS_DYNAMODB_TABLE | DynamoDB table name |
| AWS_ECR_CONTAINER_IMAGE_URL | Amazon ECR Container Image URL |
| AWS_ECS_CONTAINER_NAME | Amazon ECS Container Name |
| AWS_IMAGE_TAG | The Image tag for buidling the image |
| AWS_REGION | AWS Region |
| AWS_SECRET_ACCESS_KEY | AWS Secret Access Key |
| BUCKET_TF_STATE | Name of the S3 Bucket |
| ECR_REPOSITORY | Name of the ECR Repository |
| TF_STATE_KEY | The Terraform State key name |
Below is an example of the Github Secrets are references within the GitHub Actions workflow. Where the terrafom init command runs to setup the backend, instead of hard coding these values to the workflow file, they reference the GitHub secret with the require values.
name: "Terraform Plan"

on:
  pull_request:

env:
  TF_LOG: INFO
  AWS_ACCESS_KEY_ID: ${{ secrets.AWS_ACCESS_KEY_ID }}
  AWS_SECRET_ACCESS_KEY: ${{ secrets.AWS_SECRET_ACCESS_KEY }}

jobs:
 terraform:
   name: "Terraform Plan"
   runs-on: ubuntu-latest
   defaults:
     run:
      working-directory: ./terraform

   steps:
   - name: Checkout the repository to the runner
     uses: actions/checkout@v2

   - name: Setup Terraform with specified version on the runner
     uses: hashicorp/setup-terraform@v2
     with:
      terraform_version: 1.3.0

   - name: Terraform init
     id: init
     run: terraform init -backend-config='bucket=${{ secrets.BUCKET_TF_STATE}}' -backend-config='key=${{ secrets.TF_STATE_KEY }}' -backend-config='region=${{ secrets.AWS_REGION }}' -backend-config='dynamodb_table=${{ secrets.AWS_DYNAMODB_TABLE }}'
The next section explains the CI/CD pipeline and what action each workflow takes.
Below is an explanation of how the CI/CD pipeline works. The GitHub Actions workflow files are stored within the .github/workflows folder.
-
Developer pushes code to GitHub Repository. Git Hub Actions will trigger the first workflow:
-
Quality check code (using pylint)
-
-
Developer next creates a Pull request to merge changes, the next workflow that will trigger:
-
Terraform plan: This is to report any changes to the infrastructure. The output of the Terraform plan is saved to a file which will be used later for the Terraform Apply workflow. The engineer will also see on the pull request of the Terraform plan output to observe any changes to the AWS infrastructure before merging.
Example:

-
-
Once code is merged to the main branch the following workflows will be triggered only on the condition the Terraform Plan was a success
-
Terraform Apply: This workflow will update the AWS infrastructure before the new container image is built and deployed.
-
-
The next workflow will build the new container image. This workflow will only build the image on the condition the Terraform Apply workflow was a success
-
Image is built using the Dockerfile, the image is tagged and pushed to the Amazon ECR Registry
-
-
The final workflow will run on the Condition the previous build image workflow was a success:
-
Deploy image to Amazon ECS Cluster
-

Below is a diagraming explain the flow of the CI/CD pipeline
To destroy the Terraform AWS Infrastructure simply run a Terraform destroy while in the terraform folder and manually approve the deletion.
terraform destroy
To delete the Amazon resources run the below commands via the CLI.
The below command will delete the respository and all images in the repository
aws ecr delete-repository \
    --repository-name <name> \
    --force
Run the below command with the bucket-name. This command will empty the bucket contents and delete the bucket
aws s3 rb s3://bucket-name --force
Delete the Dynamo DB table
aws dynamodb delete-table \
    --table-name <table-name>
