


Craftbeerpi3 sensor for measuring ph values.
The mash can be between 4.5pH and 5.8pH.
The target pH for the mash usually should be between 5.3pH and 5.7pH
Therefore we should know the pH of the mash
German link to ph in Beer
I got all my knowledge from these links:
-
https://learn.adafruit.com/raspberry-pi-analog-to-digital-converters/mcp3008
Used this for the libs and classes
-
https://forum.arduino.cc/index.php?topic=336012.0
last post first page, for understanding probe in general
-
wiring the probe-board and the levelshifter
-
https://www.botshop.co.za/how-to-use-a-ph-probe-and-sensor/
additional info
-
https://raspberrypi.stackexchange.com/questions/96653/calibrate-ph-4502c-ph-meter
at ebay
but there are same in Aliexpress. Search for this: "Liquid PH Value Erkennung Detect Modul +BNC Electrode Probe for Arduino"

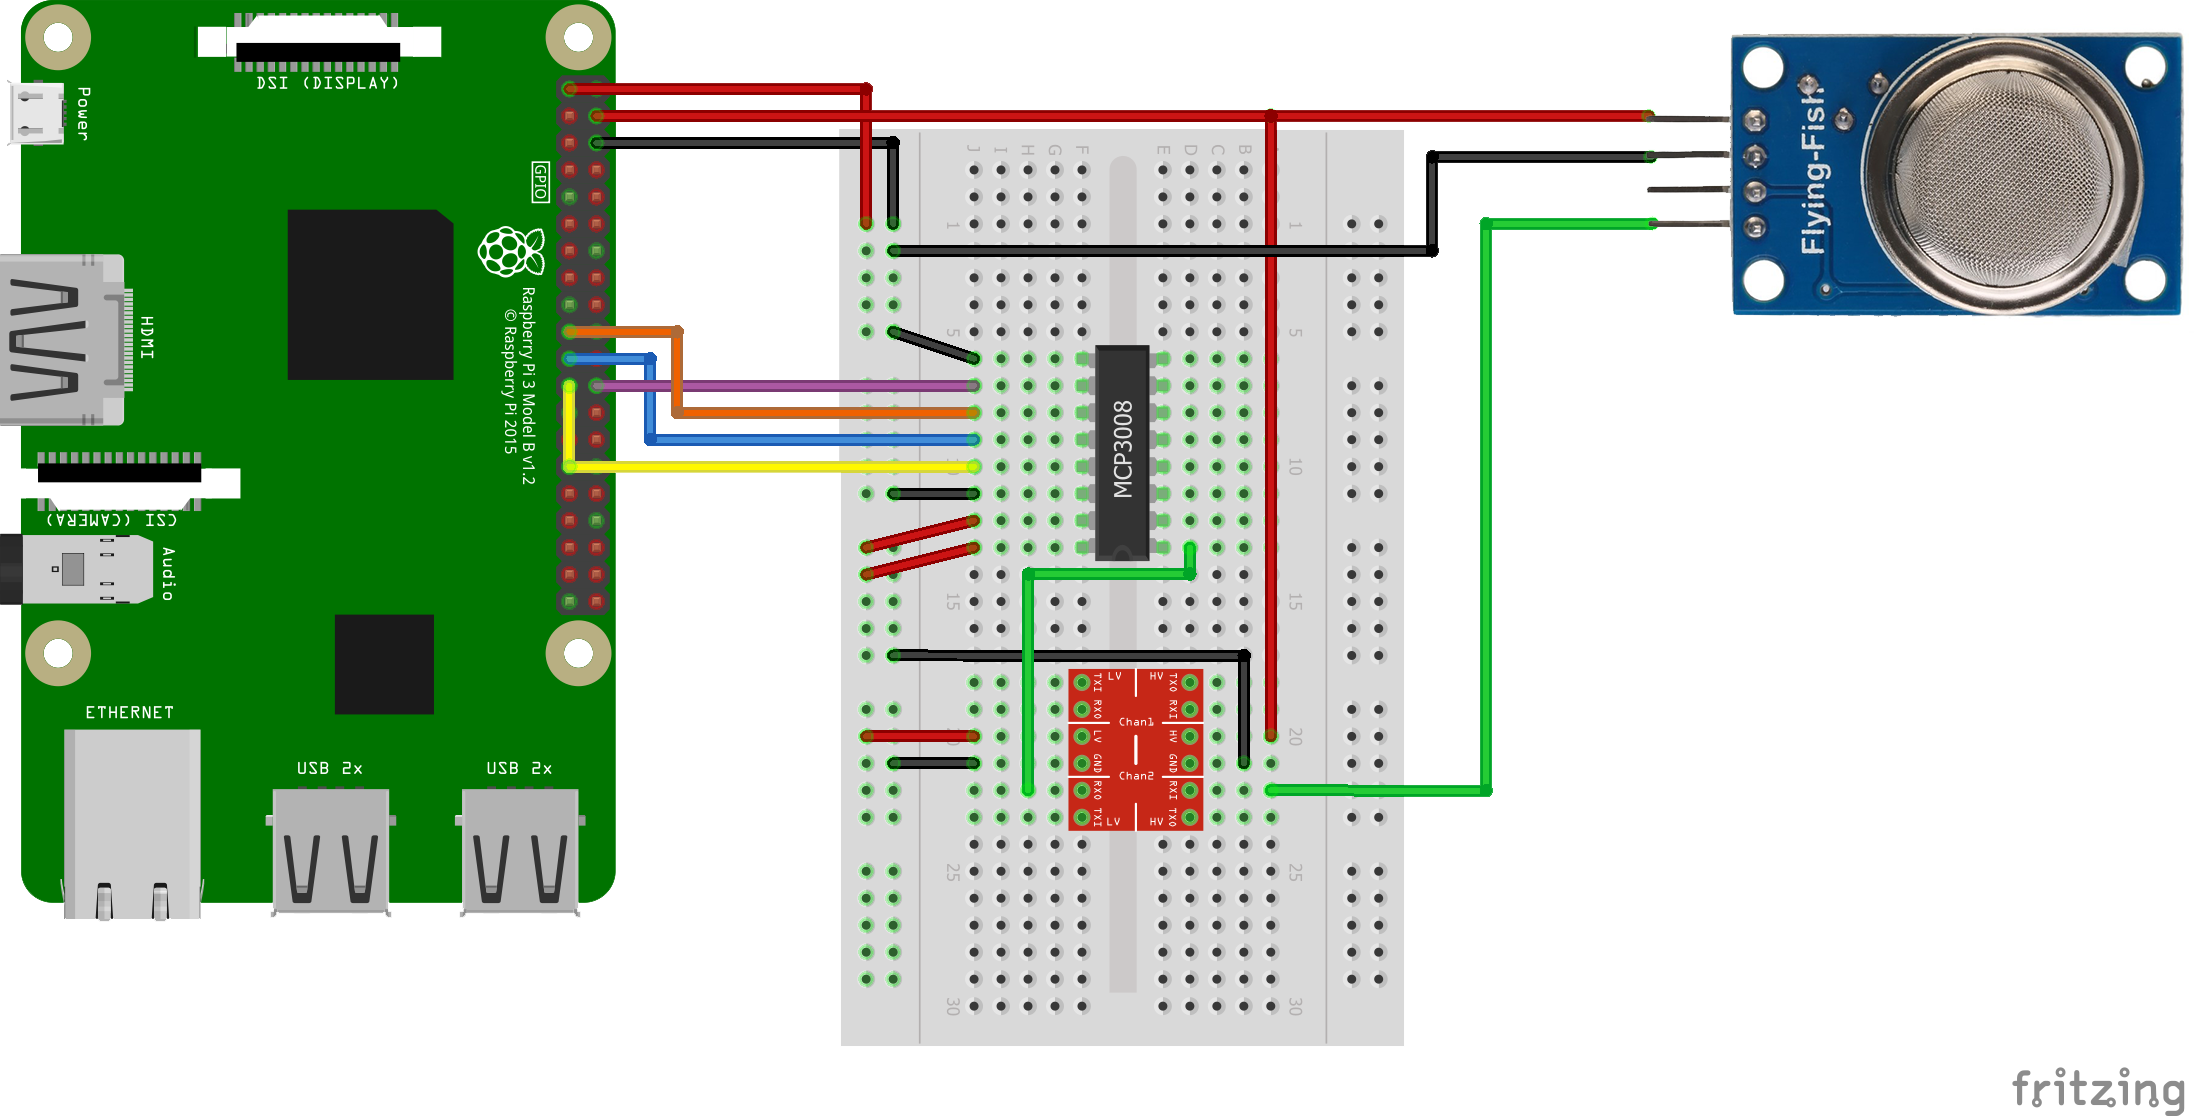
The probe board is an analog sensor. RaspberryPi can read only digital sensors. Therefore you need an analog/digital converter like the MCP3008 (10Bit)


In this picture channel 0 is connected
To connect the MCP3008 to the Raspberry Pi with a software SPI connection you need to make the following connections:
- MCP3008 VDD to Raspberry Pi 3.3V
- MCP3008 VREF to Raspberry Pi 3.3V
- MCP3008 AGND to Raspberry Pi GND
- MCP3008 DGND to Raspberry Pi GND
- MCP3008 CLK to Raspberry Pi BCM GPIO 6
- MCP3008 DOUT to Raspberry Pi BCM GPIO 13
- MCP3008 DIN to Raspberry Pi BCM GPIO 19
- MCP3008 CS/SHDN to Raspberry Pi BCM GPIO 26

Note that you can swap the MCP3008 CLK, DOUT, DIN, and CS/SHDN pins to any other free digital GPIO pins on the Raspberry Pi. You'll just need to modify the code to use your pins. The pin number is the GPIO Nr. in this case.
CLK  = 6
MISO = 13
MOSI = 19
CS   = 26
mcp = Adafruit_MCP3008.MCP3008(clk=CLK, cs=CS, miso=MISO, mosi=MOSI)
- I recommend software SPI as it's easier to setup and more flexible.
To use hardware SPI first make sure you've enabled SPI using the raspi-config tool. Be sure to answer yes to both enabling the SPI interface and loading the SPI kernel module, then reboot the Pi. Check you can see a /dev/spidev0.0 and /dev/spidev0.1 device when you run the ls -l /dev/spi* command before continuing.
Now wire the MCP3008 to the Raspberry Pi as follows:
- MCP3008 VDD to Raspberry Pi 3.3V
- MCP3008 VREF to Raspberry Pi 3.3V
- MCP3008 AGND to Raspberry Pi GND
- MCP3008 DGND to Raspberry Pi GND
- MCP3008 CLK to Raspberry Pi SCLK
- MCP3008 DOUT to Raspberry Pi MISO
- MCP3008 DIN to Raspberry Pi MOSI
- MCP3008 CS/SHDN to Raspberry Pi CE0
Key in each line
(1) sudo apt-get update
(2) sudo apt-get install build-essential python-dev python-smbus git
(3) cd /home/pi/craftbeerpi3
(4) git clone https://github.com/adafruit/Adafruit_Python_MCP3008.git
(5) cd Adafruit_Python_MCP3008
(6) sudo python setup.py install
install PHMeasure as addon in Cbpi 3
install PHMeasure as addon in Cbpi 3
open commandline
key in
sudo chown -R pi /home/pi/craftbeerpi3/modules/plugins/PHMeasure
than key in
cd /home/pi/craftbeerpi3/modules/plugins/PHMeasure
than key in
./install.sh
Wait until everything is installed. Reboot Raspi

-
BNC plug: Where you put the probe. It seems to work with any probe with a calibration difference.
-
Pin To: Should be the temperature but I can't make it works.
-
Pin Do: High/Low 3.3v adjustable limit.
-
Pin G/GND: Probe ground. It may be useful when the ground is not the same as your Raspi. In fact I use the ground of the Raspi. In some circumstances the ground voltage of the liquid to measure can be different.
-
Pin G/GND: Power ground (ex. Raspi).
-
Pin V+/VCC: Input power 5V DC (direct from Raspi).
-
Blue potentiometer close to BNC: pH offset.
-
Blue potentiometer close to pins: limit adjustment.
-
Black component with 103 printed (not the one between potentiometers): thermistor for temperature compensation.
The offset is the shifting of all pH values to a specific voltage range. If a pH 7 output a voltage of 2.2v and pH 8 a voltage of 2.1v, then a shift of +0.3v move the pH 7 to 2.5v and the pH 8 to 2.4v.
This can be done on the board or via software but it's probably easyer on the board because it's probe independant and there are less programming to do.
Connect GND (both) to Raspi GND and and Vcc to Raspi 5v. Please use a levelshifter to avoid damage at the GPIO which only support 3.3v.
Remove the probe and do a short circuit between the the small BNC hole and the external part of BNC.
Put a voltmeter to measure the voltage between GND and Po. Adjust the pot (close BNC) until the output is 2.5v.
Now the pH 7 have an exact value of 2.5v (511 with analogRead function) because the probe will output 0 millivolt.
Now you need one or more buffer solutions depending the range and precision you want. Ideally you should know the range of the measure you want to do with your system.
I use water (upcoming beer) between pH 5 and pH 7, then I choose the buffer 4.01 (and 6.86 to verify my stuff). If you usually measure pH between 8 and 10 choose buffer 9.18 (eventually 6.86 also).
Connect the (clean) probe and put it in the buffer then let it stabilize for a minute. You know it's stable when it goes up and down (3.04 then 3.05 then 3.03 then 3.04). Take note of the voltmeter value, in my example it's 3.05v.
The PH_step calculation is quite simple. You take the difference between the two known voltage, in my example 2.5v@pH7 and [email protected] which is -0.55v.
It's the voltage range equivalent of the pH range from 7 to 4.01, which is 2.99 pH units. A small division of the voltage by pH units gives you a volts per pH number (0,1839... in my case).
The PH_probe is calculated by taking the known pH 7 voltage (2.5v) where we add some PH_step to match the probe voltage. This means that a pH of 8 have a voltage value of 2.5v (pH 7) + 0.1839 (1 unit/step); pH 9 then is 2.5v + 0.1839 + 0.1839 = 2.87v.
To determine the Unit per Step (=PH_step in formula) is important to know.
voltage = 5 / 1024.0 * measure; //classic digital to voltage conversion
// PH_step = (voltage@PH7 - voltage@PH4) / (PH7 - PH4) = (2.5-3.05) / (7-4) = (-.55/2.99) = -0.1839....
// PH_probe = PH7 - ((voltage@PH7 - voltage@probe) / PH_step)
phvalue = 7 + ((2.5 - voltage) / 0.1839 )
Use this sensor as any other sensor in Craftbeerpi 3. The Digit and Voltage values can help to calibrate. They are not needed for pH measurement. The main calibaration is already described above.
Keep in mind that it takes several minutes to get the right pH value.
When using in the rotating mash no stable values are shown but in a probe of mash (ex. a glass) it was very stable. Values matched with a other pH measurement tool.
Please do changes of the formula in the code of the file "init.py". It is situated in the folder
home/pi/craftbeerpi3/modules/plugins/PHMeasure/
According the parameters of the probe it can be situated in max 80°C liquid but not for longtime. I never tryed that until now.
There are 3 parameter to select:
This shows the value of the MCP 3008 and runs from 0-1024. This is the basic of all measurement.
This shows the calculated value of the Voltage measurement. Voltage = 5 / 1024.0 * Digit 5 is the basic voltage of the Board This means 1024 digit is equal to 5V.
This shows the calculated value of the pH measurment. phvalue = 7 + ((2.532 - voltage) / 0.1839 ) As discribed above the 0.1839 has to be adopted in the code.
Maybe the 2.532 has to be adopted to the voltage value you measure with the short circuit between the the small BNC hole and the external part of BNC.
You can easily change the addon for different analog sensors.
There are only some lines to change.
-
When using in the rotating mash no stable values are shown
-
Wrong spelling
-
no temperature calibration
-
tryed to may use this but I could never make this one work. https://de.aliexpress.com/item/33014998723.html?spm=a2g0o.detail.1000014.1.54b57547AYykrh&gps-id=pcDetailBottomMoreOtherSeller&scm=1007.13338.136569.000000000000000&scm_id=1007.13338.136569.000000000000000&scm-url=1007.13338.136569.000000000000000&pvid=b6a0ab9b-ab55-4e76-9700-2467f4266b62
-
ADS1115: have a look at my ADS1115 Addon. This one works even better and more stable
Report issues either in this Git section or at Facebook at the Craftbeerpi group


