This is the template for the team project of the Software Design course at the Vrije Universiteit Amsterdam.
The first steps of your team project are to:
- create your own private repository
- invite all team members ase collaborators
- download all contents of this repository (
software-design-vu) and copy them into the root folder of your repository
All subsequent work will be on your repository.
Each assignment requires the creation of a dedicated branch and all the work must be done only on that branch (in your repository). The name of the branch must be Assignment<NUMBER OF THE ASSIGNMENT (1, 2, or 3)>
During the course you will be asked to add an additional contributor to your repository. The collaborator must be the TA that has been assigned to your team on this spreadsheet.
After finalizing your assignment, you can submit it by:
- creating a single pull request from the branch of your assignment to the master branch of your repository;
- creating a submission in Canvas where you will provide the unique URL of your pull request.
-
Open your git repository
-
Click on Pull requests, then click on the green button that says “new pull request”. You’ll come to a page that says “Compare changes”.
-
Choose branches. To create a pull request, you want to set the base and compare branches to the following:
- base:
master - compare: the branch where you are currently working (e.g.,
Assignment1)
-
Once you have selected your branches, GitHub will ask you to write a title and a comment for the Pull Request. The title of the Pull Request should follow the following pattern:
<Team name>-Assignment<Number of assignment>. You will see a list of commits that have been made by you. If you have followed the steps correctly, GitHub will show a summary of your Pull Request. -
Do a submission in Canvas and provide the unique URL of your Pull Request. It has this structure:
https://github.com/<username>/<repo name>/pull/<digit>.
Before making the pull request for your assignments 2 and 3, you shall push also a fat Jar in your repository.
How to build a Jar file with Intellij:
- Go to File -> Project Structure and click Artifacts.
- Click the Add button (+), point to JAR, and select From modules with dependencies.
- To the right of the Main Class field, click the Browse button, select Search By Name and search for your class in the dialog that opens (for example, if the name of your class is Main, then search for Main).
- Apply the changes and close the dialog.
You can find your jar file in /out/artifacts/filename.jar.
If you are still having troubles, check out this link.
There are two categories of libraries. Those available on Maven and those not. Below you will find steps for each.
All major Java libraries (and possibly most of the ones you will be using) are on Maven. A Maven library will have something similar to the following on its website/github:
<dependency>
  <groupId> ... </groupId>
  <artifactId> ... </artifactId>
  <version> ... </version>
</dependency>
To install such a library you simply need to insert an entry
implementation group : '...' , name : '...' , version : '...'under dependencies in build.gradle
As an example we will use Google's Guava.
From Guava's website we get:
<dependency>
  <groupId>com.google.guava</groupId>
  <artifactId>guava</artifactId>
  <version>28.2-jre</version>
</dependency>
We then update Gradle dependencies as follows:
dependencies {
    implementation group: 'com.google.guava', name: 'guava', version: '28.2-jre'
    ...
}Note: Many libraries will provide the above Gradle line on their website, so you can just copy it.
Lesser known libraries may not be available on Maven. Or you may want to build the library on your machine. In such cases you have to add a Gradle dependency to a a local jar. Perform the following steps:
- Create a
libsdirectory in the root of your project. This directory will include all the non-Maven library JARs i.e Your project structure should look something like this:software-design-vu/ ├─ libs/ │ ├─ A.jar │ ├─ B.jar │ └─ ... ├─ ... └─ ... - Update
repositoriespart of your build.gradle file to:repositories { mavenCentral() flatDir { dirs 'libs' } } - For each jar
<libname>.jarunderlibs/add a lineimplementation name : '<libname>'inside thedependenciesblock of your build.gradle file.
After you save (CTRL-s) the updated build.gradle, Intellij with pop up a small window on the bottom right corner:
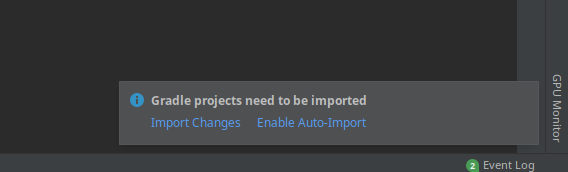
Select Import Changes. If you select Enable Auto-Import, next time you update build.gradle changes will be automatically imported.
If you don't see a popup appearing, you can go to the top right corner and click on the "Gradle" button:
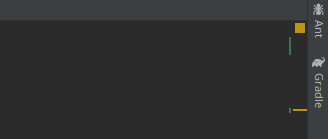
Then, on the window that appears select Reimport All Gradle Projects. i.e the first (leftmost) option in that list:

After updating the project, Intellij automatically adds the new libraries to the classpath. This means that all symbols can be
resolved and the editor should provide appropriate code completion.
If in any case the editor is complaining, you can put your mouse in the error and there will be be an option "Add library X to the classpath". Selecting that should solve the issue.


