A tool that can do a screenshot with a fixed size, image augment, and image annotation
Library: PyQt5, Numpy, Opencv, Cython, pywin32
Interpreter: Python 3.10 or above
Operating system: windows
- Take full or fixed-size screenshots.
- Image processing. Flip, mirror, rotation, and shifting.
- Image annotation. Support rectangular shape so far.
- Random Image augmentation.
- Traning and validation dataset splitting.
- Screenshot.
You can either press Key_Minus or click the create button. If you want to cut the image, left-click after the red box shows up. Right-click to undo the cropping. Press Key_Escape to exit the cropping. Press Key_Return to save the cropped image. If you want to save a full screenshot, directly press Key_Return when a red rect appears.

- Setting window
See the notes down below. The label file name would be the same as the image file just with a different format. Annotation file location function is not supported yet, currently, the label file will be saved in the same directory with the same name as the image file's.

- Random augmentation

- Annotation(single file)
Click the annotation button in the main window will popup a new window. You can drag a folder or an image to it. Click confirm will enter the annotation mode. In the labeling mode, a dialog box will pop up after the mouse release event is triggered and then you can either type a new name or click an item inside the list box. On the right-hand side, you will see a list of annotation information.

Double-click can select a specific box then you will only be able to resize it. Double-click again can cancel the selection. You can delete any boxes by right click items in the list.


When you are done in single file annotation mode, press Key_Return or Key_Plus will exit the annotation mode and a JSON file will be generated in the same directory of the image file.

- Annotation(Multi-file)
For multi-image file annotation, the operation is similar to how you do for a single file. You just need to drag a folder instead of an image. If you want to continue labeling, simply click confirm directly and then click the OK button. Click Cancel if you don't want and the software will read the image you provided.

Note: After entering the annotation mode, press Key_Arrowleft can go to the next image without saving the annotation file, press Key_Plus can go to the next file and generate a labeling file, or press Key_Return can exit the software and generate a labeling file.
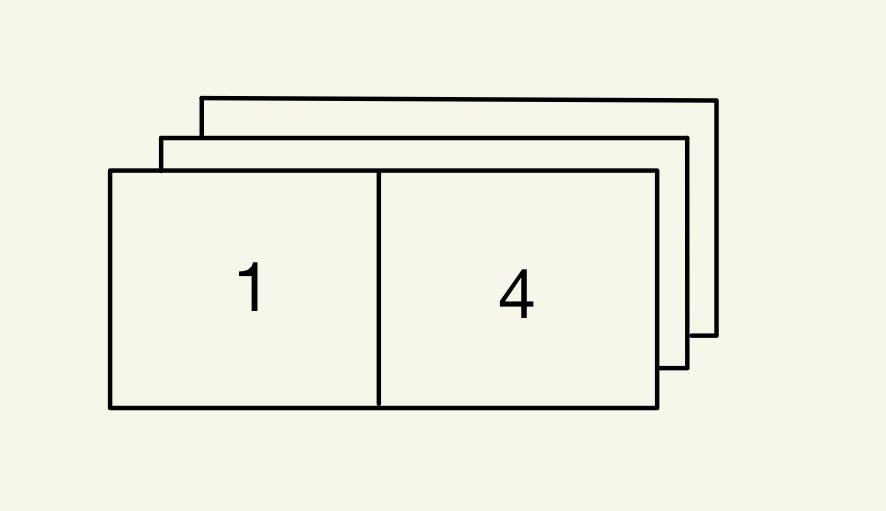
The image is three dimension array(three dimension tensor). For example, we have the shape of an array
In: image = np.array([[[1, 1, 1],
                       [4, 4, 4]],
                      [[1, 1, 1],
                        [4, 4, 4]]])
In: image.shape

Out: (2, 2, 3)
2 x 2 means the image has both width and height with 2 pixels. 3 means the number of color channels(RGB normally). It means an image consists of three 2x2 matrices. We can treat each whole column as one image with one color channel.

1   1   1
4   4   4

1   1   1
4   4   4
If we want to crop an image with color. we will simply combine the three big columns into a whole thing and do slicing only along the first and the second axis. The example below shows us how we can crop the upper half of the image.
In: image[0: 1, 0: 2]

Out: array([[[1, 1, 1],
        [4, 4, 4]]])
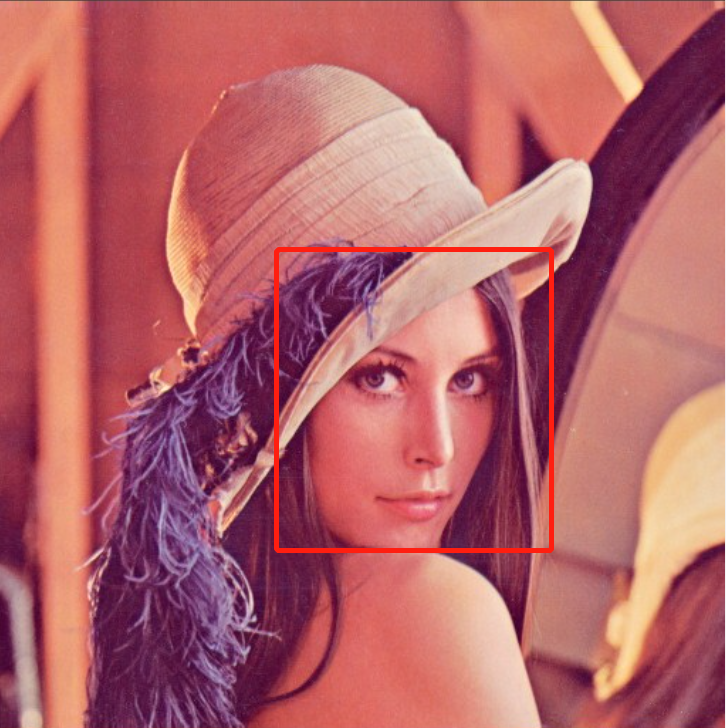
In this software, a red rectangular will be displayed and its dimension represents the slicing area when you are doing image cropping.
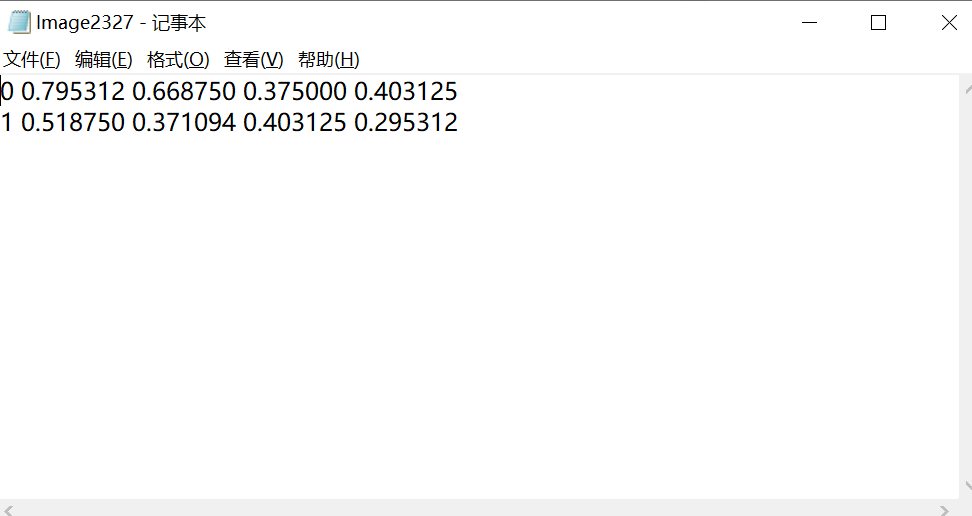
In the Dataset_manipulation_example/dataset_manipulation.py file, I provided an example to do this. Functions are 'convert' and 'convert_json2label'
The first number represents the class name. The second and the third represent the center point of the bounding box relative to the image. The fourth and the fifth represent the width and height of the bounding box relative to the image.
JSON file this software generates includes two points of the bounding box, image width, image height, and class name. Thus we can do some calculations to convert them to meet Yolo's requirement.
In Python, we can easily convert a JSON file to a dictionary by using JSON library.
import json
jsonfile_path = '......'
with open(jsonfile_path) as fp:
    dictionary = json.load(fp)
After we get the information from the JSON file, we first get all the info from the dictionary.
width = int(dic['Image_width'])
height = int(dic['Image_height'])
points = ((item['Init Pos'], item['final Pos'], item['Name']) for item in dic['Label'])
Then, we create a dictionary containing the class name and corresponding number. Later, we use a for loop to store all the calculation results in a list.
dictionary = {
    'sdv': 1,
    'DT': 0
}
lis = []
for initpt, finalpt, name in points:
    initpoint = initpt
    finalpoint = finalpt
    initx = float(initpoint[0])
    inity = float(initpoint[1])
    finalx = float(finalpoint[0])
    finaly = float(finalpoint[1])
    label_width = abs(finalx - initx)
    label_height = abs(finaly - inity)
    center_x = format(abs(((finalx + initx)/2)/width), '.6f')
    center_y = format(abs(((finaly + inity) / 2) / height), '.6f')
    relative_width = format(label_width/width, '.6f')
    relative_height = format(label_height/height, '.6f')
    lis.append(f'{dictionary[name]} {center_x} {center_y} {relative_width} {relative_height}\n')
However, instead of using for loop directly, we will use List comprehension to make the performance higher and make the code cleaner. First, we define a function called calculate and let it return the string. Then we use List comprehension.
def calculate(initpt, finalpt, name, width, height, classdict):
   initpoint = initpt
   finalpoint = finalpt
   initx = float(initpoint[0])
   inity = float(initpoint[1])
   finalx = float(finalpoint[0])
   finaly = float(finalpoint[1])
   label_width = abs(finalx - initx)
   label_height = abs(finaly - inity)
   center_x = format(abs(((finalx + initx) / 2) / width), '.6f')
   center_y = format(abs(((finaly + inity) / 2) / height), '.6f')
   relative_width = format(label_width / width, '.6f')
   relative_height = format(label_height / height, '.6f')
   return f'{classdict[name]} {center_x} {center_y} {relative_width} {relative_height}\n'
The final code would be pretty clean with high performance
dic = {
    'sdv': 1,
    'DT': 0
}
width = int(dic['Image_width'])
height = int(dic['Image_height'])
points = ((item['Init Pos'], item['final Pos'], item['Name']) for item in dic['Label'])
final_list = [calculate(initpt, finalpt, name, width, height, classdict) for initpt, finalpt, name in points]
Finally, we convert the list to a string and then write the result to a file.
string = ''.join(final_list)
with open(path, mode='w') as fp:
    fp.write(string)
First, Opencv gives us a way to rotate an image.
import cv2

image_path = '......'
image = cv2.imread(image_path)    # read image
rotate_angle = 90                 # define rotate angle
rows, cols, colors = image.shape  # get shape of image, here is 3D tensor
scale_factor = 1                        # define scaling factor
Matrix = cv2.getRotationMatrix2D(((cols-1)/2, (rows-1)/2), rotate_angle, scale_factor)   # get the transform matrix
final_image = cv2.warpAffine(image, Matrix, (cols, rows))                               # rotate image
However, it could easily cause content loss by using scale_factor with 1. To avoid this happening, we need to assign a correct factor value no matter what the rotation angle is. Sadly. OpenCV seems doesn't provide a function to get this scale factor value. Thus, we need to do some simple geometrical analysis.
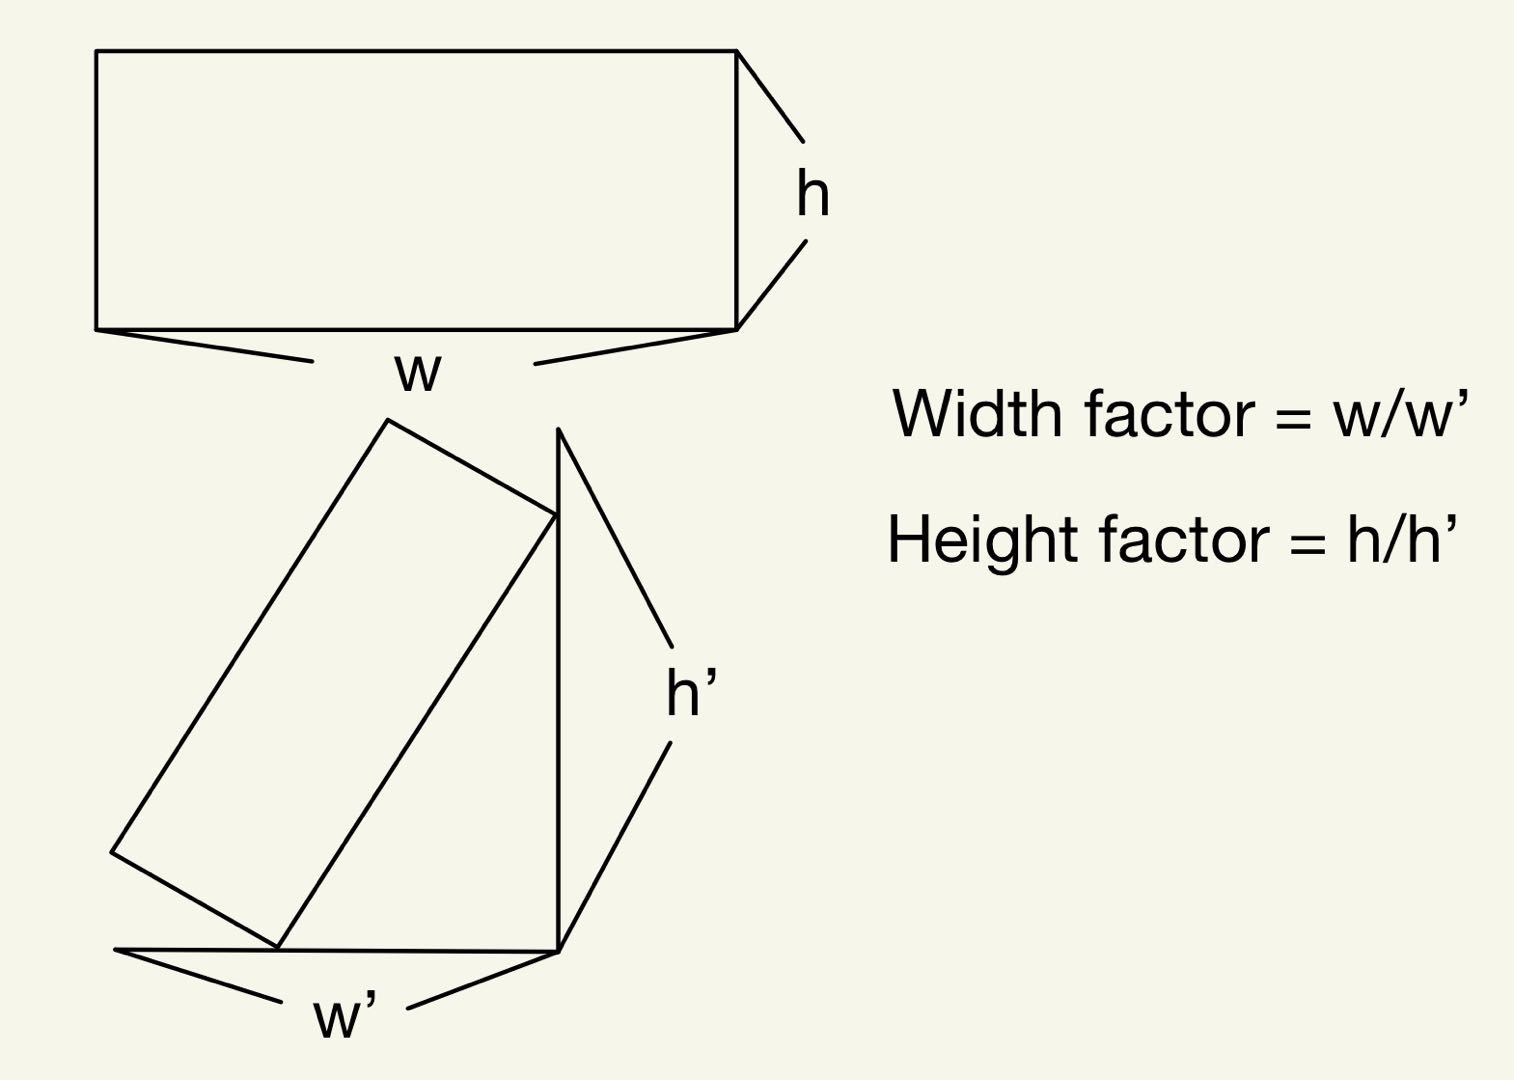 We first need to get the new width and new height. Then, we can calculate the scale factor for the corresponding edge. We pick the smallest factor by comparing these two values. The source code can be found at functions/calculation.py. Thus, we change some code.
import cv2
from functions import calculation

image_path = '......'
image = cv2.imread(image_path)    # read image
rotate_angle = 90                 # define rotate angle
rows, cols, colors = image.shape  # get shape of image, here is 3D tensor
new_height = calculation.new_height(rotate_angle, rows, cols)     # calculate new height
new_width = calculation.new_width(rotate_angle, rows, cols)       # calculate new width
scale_factor = calculation.compare(new_height, new_width, rows, cols)                     # calculate scale factor
Matrix = cv2.getRotationMatrix2D(((cols-1)//2, (rows-1)//2), rotate_angle, scale_factor)   # get the transform matrix
final_image = cv2.warpAffine(image, Matrix, (cols, rows))                               # rotate image
First, Use a list to store the rect and draw all the rect in paintevent. Store all the rect info into different lists every time a new rect is created. During MousemoveEvent, track and use for loop to check if the mouse is close to the edges. The function can be found at functions/Draw.py and cython_pyx/Find_edge.pyx.
def paintEvent(self, event):
  super().paintEvent(event)
  qp = QPainter(self)
  br2 = self.brush
  pen = QPen()
  draw.drawcurrentrect(self.pressed, self.edge, pen, qp,
                             br2, self.width, self.rectbrushcolor,
                             self.begin, self.end)
  draw.drawhisrect(pen, qp, self.rectlist, self.storecolor, self.storewidth,
                         self.storerectbrushcolor, self.storecirclewidth, self.storecirclebrushcolor,
                         self.storebegin, self.storecircleradius, self.storeend)
In the functions/dataset_manipulation.py file, the function called 'print_result' can perform such a functionality.
First, we create a list with 18 space strings and 1 bracket [ or ] at both ends of the list
In: lis = ['[' if i == 0 else ']' if i == 19 else ' ' for i in range(20)]
In: print(''.join(lis))
Out: [                  ]
Second, change the first and second space string to u'\u25A0' which is a Unicode will get the output shown below
In: lis = ['[' if i == 0 else ']' if i == 19 else ' ' for i in range(20)]
In: lis[1] = u'\u25A0'
In: lis[2] = u'\u25A0'
In: print(''.join(lis))
Out: [■■                ]
The final code would be
In: print_result(40, 100)
Out: [■■■■■■            ] 40.00%
Such a function can be found in the functions/dataset_manipulation.py file. First, we get the list containing all the image file ending with '.png'
list = [file.name for file in os.scandir(origi_dir) if file.name.endswith('.png')]
Second, we iterate through the list and get the source path of JSON file and image file then move to the destination folder. stop once the train/Val ratio is reached. progress can be printed by providing the total number of files we need to process and the current file number. use a similar for loop to move the rest of the file to the validation folder.
list = [file.name for file in os.scandir(origi_dir) if file.name.endswith('.png')]
length = len(list)
limit = (1-ratio)*length        # get the total file numbers we need to process
for index, name in enumerate(list):
    if index <= limit:
        basename = os.path.splitext(name)[0]
        newname = f'{basename}{label_suffix}'
        label_file_path = os.path.join(origi_dir, newname)
        src = os.path.join(origi_dir, name)
        try:
            shutil.move(src, dist_trainimg_dir)
            shutil.move(label_file_path, dist_trainlabel_dir)
        except Exception as e:
            print(e)
            break
        print_result(index, limit)
Finally, you can simply perform this splitting by calling 'split_dataset_2_train_val' function, where 0.8 is training data and (1-0.8) would be the validation data. '.png' is the image format and '.txt' is the labeling file format.
split_dataset_2_train_val(0.8, r'C:\Users\Public\Pictures\data\DATASET',
                          r'C:\Users\Public\Pictures\VOCdevkit\images\Train',
                          r'C:\Users\Public\Pictures\VOCdevkit\labels\Train',
                          r'C:\Users\Public\Pictures\VOCdevkit\images\Val',
                          r'C:\Users\Public\Pictures\VOCdevkit\labels\Val',
                          '.png', '.txt')

