Recommendation engines are one of the most well known, widely used and highest value use cases for applying machine learning. Despite this, while there are many resources available for the basics of training a recommendation model, there are relatively few that explain how to actually deploy these models to create a large-scale recommender system.
This Code Pattern demonstrates the key elements of creating such a system, using Apache Spark and Elasticsearch.
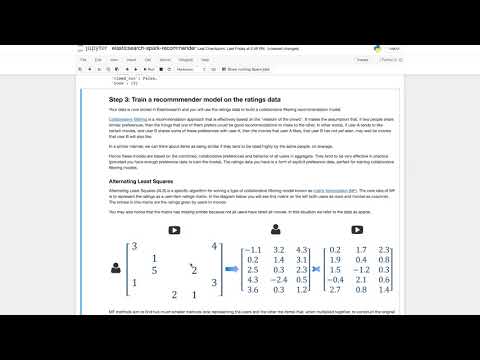
This repo contains a Jupyter notebook illustrating how to use Spark for training a collaborative filtering recommendation model from ratings data stored in Elasticsearch, saving the model factors to Elasticsearch, and then using Elasticsearch to serve real-time recommendations using the model. The data you will use comes from MovieLens and is a common benchmark dataset in the recommendations community. The data consists of a set of ratings given by users of the MovieLens movie rating system, to various movies. It also contains metadata (title and genres) for each movie.
When you have completed this Code Pattern, you will understand how to:
- Ingest and index user event data into Elasticsearch using the Elasticsearch Spark connector
- Load event data into Spark DataFrames and use Spark's machine learning library (MLlib) to train a collaborative filtering recommender model
- Export the trained model into Elasticsearch
- Using a custom Elasticsearch plugin, compute personalized user and similar item recommendations and combine recommendations with search and content filtering

- Load the movie dataset into Spark.
- Use Spark DataFrame operations to clean up the dataset and load it into Elasticsearch.
- Using Spark MLlib, train a collaborative filtering recommendation model.
- Save the resulting model into Elasticsearch.
- Using Elasticsearch queries and a custom vector scoring plugin, generate some example recommendations. The Movie Database API is used to display movie poster images for the recommended movies.
- Apache Spark: An open-source, fast and general-purpose cluster computing system
- Elasticsearch: Open-source search and analytics engine
- Jupyter Notebooks: An open-source web application that allows you to create and share documents that contain live code, equations, visualizations and explanatory text.
- Data Science: Systems and scientific methods to analyze structured and unstructured data in order to extract knowledge and insights.
- Artificial Intelligence: Artificial intelligence can be applied to disparate solution spaces to deliver disruptive technologies.
- Python: Python is a programming language that lets you work more quickly and integrate your systems more effectively.
Follow these steps to create the required services and run the notebook locally.
- Clone the repo
- Set up Elasticsearch
- Download the Elasticsearch Spark connector
- Download Apache Spark
- Download the data
- Launch the notebook
- Run the notebook
Clone the elasticsearch-spark-recommender repository locally. In a terminal, run the following command:
$ git clone https://github.com/IBM/elasticsearch-spark-recommender.git
This Code Pattern currently depends on Elasticsearch 5.3.0. Go to the downloads page and download the appropriate package for your system.
For example on Linux / Mac you can download the TAR archive and unzip it using the commands:
$ wget https://artifacts.elastic.co/downloads/elasticsearch/elasticsearch-5.3.0.tar.gz
$ tar xfz elasticsearch-5.3.0.tar.gz
Change directory to the newly unzipped folder using:
$ cd elasticsearch-5.3.0
Next, you will need to install the Elasticsearch vector scoring plugin. You can do this by running the following command (Elasticsearch will download the plugin file for you):
$ ./bin/elasticsearch-plugin install https://github.com/MLnick/elasticsearch-vector-scoring/releases/download/v5.3.0/elasticsearch-vector-scoring-5.3.0.zip
Next, start Elasticsearch (do this in a separate terminal window in order to keep it up and running):
$ ./bin/elasticsearch
You should see some start up logs displayed. Check that the elasticsearch-vector-scoring-plugin is successfully loaded:
$ ./bin/elasticsearch
[2017-09-08T15:58:18,781][INFO ][o.e.n.Node               ] [] initializing ...
...
[2017-09-08T15:58:19,406][INFO ][o.e.p.PluginsService     ] [2Zs8kW3] loaded plugin [elasticsearch-vector-scoring]
[2017-09-08T15:58:20,676][INFO ][o.e.n.Node               ] initialized
...
Finally, you will need to install the Elasticsearch Python client. You can do this by running the following command (you should do this in a separate terminal window to the one running Elasticsearch):
$ pip install elasticsearch
The Elasticsearch Hadoop project provides connectors between Elasticsearch and various Hadoop-compatible systems, including Spark. The project provides a ZIP file to download that contains all these connectors. You will need to run your PySpark notebook with the Spark-specific connector JAR file on the classpath. Follow these steps to set up the connector:
- Download the
elasticsearch-hadoop-5.3.0.zipfile, which contains all the connectors. You can do this by running:
$ wget http://download.elastic.co/hadoop/elasticsearch-hadoop-5.3.0.zip
- Unzip the file by running:
$ unzip elasticsearch-hadoop-5.3.0.zip
- The JAR for the Spark connector is called
elasticsearch-spark-20_2.11-5.3.0.jarand it will be located in thedistsubfolder of the directory in which you unzipped the file above.
This Code Pattern should work with any Spark 2.x version, however it is recommended that you download the latest version of Spark (currently 2.2.0) from the downloads page. Once you have downloaded the file, unzip it by running:
$ tar xfz spark-2.2.0-bin-hadoop2.7.tgz
Note if you download a different version, adjust the relevant command used above and elsewhere in this Code Pattern accordingly

You will also need to install Numpy in order to use Spark's machine learning library, MLlib. If you don't have Numpy installed, run:
$ pip install numpy
You will be using the Movielens dataset of ratings given by a set of users to movies, together with movie metadata. There are a few versions of the dataset. You should download the "latest small" version.
Run the following commands from the base directory of the Code Pattern repository:
$ cd data
$ wget http://files.grouplens.org/datasets/movielens/ml-latest-small.zip
$ unzip ml-latest-small.zip
The notebook should work with Python 2.7 or 3.x (and has been tested on 2.7.11 and 3.6.1)
To run the notebook you will need to launch a PySpark session within a Jupyter notebook. If you don't have Jupyter installed, you can install it by running the command:
$ pip install jupyter
Remember to include the Elasticsearch Spark connector JAR from step 3 on the classpath when launching your notebook.
Run the following command to launch your PySpark notebook server locally. For this command to work correctly, you will need to launch the notebook from the base directory of the Code Pattern repository that you cloned in step 1. If you are not in that directory, first cd into it.
PYSPARK_DRIVER_PYTHON="jupyter" PYSPARK_DRIVER_PYTHON_OPTS="notebook" ../spark-2.2.0-bin-hadoop2.7/bin/pyspark --driver-memory 4g --driver-class-path ../../elasticsearch-hadoop-5.3.0/dist/elasticsearch-spark-20_2.11-5.3.0.jar
This should open a browser window with the Code Pattern folder contents displayed. Click on the notebooks subfolder and then click on the elasticsearch-spark-recommender.ipynb file to launch the notebook.

Optional:
In order to display the images in the recommendation demo, you will need to access The Movie Database API. Please follow the instructions to get an API key. You will also need to install the Python client using the command:
$ pip install tmdbsimple
The demo will still work without this API access, but no images will be displayed (so it won't look as good!).
When a notebook is executed, what is actually happening is that each code cell in the notebook is executed, in order, from top to bottom.
Each code cell is selectable and is preceded by a tag in the left margin. The tag
format is In [x]:. Depending on the state of the notebook, the x can be:
- A blank, this indicates that the cell has never been executed.
- A number, this number represents the relative order this code step was executed.
- A
*, this indicates that the cell is currently executing.
There are several ways to execute the code cells in your notebook:
- One cell at a time.
- Select the cell, and then press the
Playbutton in the toolbar. You can also hitShift+Enterto execute the cell and move to the next cell.
- Select the cell, and then press the
- Batch mode, in sequential order.
- From the
Cellmenu bar, there are several options available. For example, you canRun Allcells in your notebook, or you canRun All Below, that will start executing from the first cell under the currently selected cell, and then continue executing all cells that follow.
- From the

The example output in the data/examples folder shows the output of the notebook after running it in full. View it it here.
Note: To see the code and markdown cells without output, you can view the raw notebook in the Github viewer.
- Error:
java.lang.ClassNotFoundException: Failed to find data source: es.
If you see this error when trying to write data from Spark to Elasticsearch in the notebook, it means that the Elasticsearch Spark connector (elasticsearch-spark-20_2.11-5.3.0.jar) was not found on the class path by Spark when launching the notebook.
Solution: First try the launch command from step 6, ensuring you run it from the base directory of the Code Pattern repo.
If that does not work, try to use the fully-qualified path to the JAR file when launching the notebook, e.g.:
PYSPARK_DRIVER_PYTHON="jupyter" PYSPARK_DRIVER_PYTHON_OPTS="notebook" ../spark-2.2.0-bin-hadoop2.7/bin/pyspark --driver-memory 4g --driver-class-path /FULL_PATH/elasticsearch-hadoop-5.3.0/dist/elasticsearch-spark-20_2.11-5.3.0.jarwhereFULL_PATHis the fully-qualified (not relative) path to the directory from which you unzippd theelasticsearch-hadoopZIP file.
- Error:
org.elasticsearch.hadoop.EsHadoopIllegalStateException: SaveMode is set to ErrorIfExists and index demo/ratings exists and contains data. Consider changing the SaveMode
If you see this error when trying to write data from Spark to Elasticsearch in the notebook, it means that you have already written data to the relevant index (for example the ratings data into the ratings index).
Solution: Try to continue working through the notebook from the next cell down. Alternatively, you can first delete all your indexes and re-run the Elasticsearch command to create index mappings (see the section Step 2: Load data into Elasticsearch in the notebook).
- Error:
ConnectionRefusedError: [Errno 61] Connection refused
You may see this error when trying to connect to Elasticsearch in the notebook. This likely means your Elasticsearch instance is not running.
Solution: In a new terminal window,
cdto the directory in which Elasticsearch is installed and run./bin/elasticsearchto start up Elasticsearch.
- Error:
Py4JJavaError: An error occurred while calling o130.save. : org.elasticsearch.hadoop.rest.EsHadoopNoNodesLeftException: Connection error (check network and/or proxy settings)- all nodes failed; tried [[127.0.0.1:9200]]
You may see this error when trying to read data from Elasticsearch into Spark (or writing data from Spark to Elasticsearch) in the notebook. This likely means your Elasticsearch instance is not running.
Solution: In a new terminal window,
cdto the directory in which Elasticsearch is installed and run./bin/elasticsearchto start up Elasticsearch.
- Error:
ImportError: No module named elasticsearch
If you encounter this error, it either means the Elasticsearch Python client is not installed, or cannot be found on the PYTHONPATH.
Solution: First try to install the client using
$ pip install elasticsearch(if running in a Python virtual environment e.g. Conda or Virtualenv) or$ sudo pip install elasticsearchotherwise. If that doesn't work, add your site-packages folder to your Python path (e.g. on Mac:export PYTHONPATH=/Library/Python/2.7/site-packagesfor Python 2.7). See this Stackoverflow issue for another example on Linux. Note: the same general solution applies to any other module import error that you may encounter.
- Error:
HTTPError: 401 Client Error: Unauthorized for url: https://api.themoviedb.org/3/movie/1893?api_key=...
If you see this error in your notebook while testing your TMDb API access, or generating recommendations, it means you have installed tmdbsimple Python package, but have not set up your API key.
Solution: Follow the instructions at the end of step 6 to set up your TMDb account and get your API key. Then copy the key into the
tmdb.API_KEY = 'YOUR_API_KEY'line in the notebook cell at the end of Step 1: Prepare the data (i.e. replacingYOR_API_KEYwith the correct key). Once you have done that, execute that cell to test your access to TMDb API.
- Demo on Youtube: Watch the video.
- Meetup video presentation: Watch the meetup presentation covering some of the background and technical details behind this pattern.
- Meetup deck: View the slides presented.
- ApacheCon Big Data Europe 2016: Check out an extended version of the meetup presentation.
- Data and Analytics: Learn how this Pattern fits into the Data and Analytics Reference Architecture.
- Data Analytics Code Patterns: Enjoyed this Code Pattern? Check out our other Data Analytics Code Patterns
- AI and Data Code Pattern Playlist: Bookmark our playlist with all of our Code Pattern videos
- Data Science Experience: Master the art of data science with IBM's Data Science Experience
- Spark on IBM Cloud: Need a Spark cluster? Create up to 30 Spark executors on IBM Cloud with our Spark service


