My personal site. Built with Astro
josefaidt / josef.dev Goto Github PK
View Code? Open in Web Editor NEWPersonal website built with Svelte-Kit
Home Page: https://josef.dev
Personal website built with Svelte-Kit
Home Page: https://josef.dev
My personal site. Built with Astro


description: 'Explore Svelte and theming solutions leveraging platform features like CSS Variables'
date: 2020-03-13
tags: ['svelte', 'css', 'theming', 'websites']
In React there are numerous theming solutions to choose from; styled-components, Emotion, styled-system, theme-ui – the list goes on. But in Svelte, a framework that feels like you have a front-row spot on The Platform™, those kinds of solutions don't exist. When I cracked open my brand new Svelte project I knew I wanted I knew I wanted to allow visitors to set (and persist) their preferred theme so they don't have to feel the pain of light mode if they don't want to.
Enter svelte-themer, a solution I originally implemented in as part of my website, but something I recently turned into an npm package.
Svelte has been labeled as the "new framework on the block", touted for being effective and efficient for building web applications quickly. Compared to the big players in the game — React, Angular, and Vue — it certainly brings a unique approach to the build process while also component-based.
First of all, it feels very close to the platform meaning fewer frills or abstractions than a framework like React; the platform being the web (plain HTML, CSS, JavaScript). It feels like what natively supported web modules should feel like. Svelte has a few frills; check out this small snippet:
<!-- src/components/Heading.svelte -->
<script>
  export let name = 'World'
</script>

<h1>Hello {name}</h1>

<style>
  h1 {
    color: green;
  }
</style>
That's it for a stateful heading component. There's a few things going on here:
<!-- src/components/Heading.svelte -->
<script>
  // define a prop, `name`, (just like React)
  // give it a default value of `World`
  export let name = 'World'
</script>

<!-- use curly braces to refer to `name` value -->
<h1>Hello {name}</h1>

<style>
  /* scoped style */
  h1 {
    color: green;
  }
</style>
Now when we want to use it, it'll feel like using any other React component:
<!-- src/App.svelte -->
<script>
  import Heading from './components/Heading.svelte'
</script>

<main>
  <Heading name="Hansel" />
</main>
For more information I highly recommend checking out the tutorial on Svelte's site.
Thinking about how we want to shape the theme structure we immediately think of two things:
This means we'll need a way to store the toggle function, provide it to the rest of our app, and consume it somewhere within the app.
Here this component will be a button. If you're coming from React this may seem all too familiar, and it is. We're going to be using two of Svelte's features:
Svelte's tutorial demonstrates their writable stores by separating the store into its own JavaScript file. This would be preferable if we were to later import the theme values to use in a component's <script> section and use the methods that come along with writable stores such as .set() and .update(), however the colors should not change and the current value will be toggled from the same file. Therefore we're going to include the store right in our context component.
<!-- src/ThemeContext.svelte -->
<script>
  import { setContext, onMount } from 'svelte'
  import { writable } from 'svelte/store'
  import { themes as _themes } from './themes.js'
</script>

<slot>
  <!-- content will go here -->
</slot>
Let's take a quick look at these imports:
setContext: allows us to set a context (key/value), here this will be themeonMount: function that runs on component mountwritable: function to set up a writable data store_themes: our themes!After the script block you'll notice the <slot> tag, and this is special to Svelte. Coming from React think of this as props.children; this is where the nested components will go.
A quick look at the preset colors for this demo.
// src/themes.js
export const themes = [
  {
    name: 'light',
    colors: {
      text: '#282230',
      background: '#f1f1f1',
    },
  },
  {
    name: 'dark',
    colors: {
      text: '#f1f1f1',
      background: '#27323a',
    },
  },
]<!-- src/ThemeContext.svelte -->
<script>
import { setContext, onMount } from 'svelte'
import { writable } from 'svelte/store'
import { themes as _themes } from './themes.js'
// expose props for customization and set default values
export let themes = [..._themes]
// set state of current theme's name
let _current = themes[0].name
// utility to get current theme from name
const getCurrentTheme = name => themes.find(h => h.name === name)
// set up Theme store, holding current theme object
const Theme = writable(getCurrentTheme(_current))
</script>
<slot>
<!-- content will go here -->
</slot>It's important to note that _current is prefixed with an underscore as it will be a value we use internally to hold the current theme's name. Similarly with _themes, they are used to populate our initial themes state. Since we'll be including the current theme's object to our context, it is unnecessary to expose.
<!-- src/ThemeContext.svelte -->
<script>
  import { setContext, onMount } from 'svelte'
  import { writable } from 'svelte/store'
  import { themes as _themes } from './themes.js'
  // expose props for customization and set default values
  export let themes = [..._themes]
  // set state of current theme's name
  let _current = themes[0].name

  // utility to get current theme from name
  const getCurrentTheme = name => themes.find(h => h.name === name)
  // set up Theme store, holding current theme object
  const Theme = writable(getCurrentTheme(_current))

  setContext('theme', {
    // provide Theme store through context
    theme: Theme,
    toggle: () => {
      // update internal state
      let _currentIndex = themes.findIndex(h => h.name === _current)
      _current =
        themes[_currentIndex === themes.length - 1 ? 0 : (_currentIndex += 1)]
          .name
      // update Theme store
      Theme.update(t => ({ ...t, ...getCurrentTheme(_current) }))
    },
  })
</script>

<slot>
  <!-- content will go here -->
</slot>
Now we have the context theme set up, all we have to do is wrap the App component and it will be accessible through the use of:
<!-- src/MyComponent.svelte -->
<script>
  import { getContext } from 'svelte'
  let theme = getContext('theme')
</script>
By doing so, providing access to the Theme store and our theme toggle() function.
Since Svelte feels close to The Platform™️ we'll leverage CSS Variables. In regards to the styled implementations in React, we will ignore the need for importing the current theme and interpolating values to CSS strings. It's fast, available everywhere, and pretty quick to set up. Let's take a look:
<!-- src/ThemeContext.svelte -->
<script>
  import { setContext, onMount } from 'svelte'
  import { writable } from 'svelte/store'
  import { themes as _themes } from './themes.js'
  // expose props for customization and set default values
  export let themes = [..._themes]
  // set state of current theme's name
  let _current = themes[0].name

  // utility to get current theme from name
  const getCurrentTheme = name => themes.find(h => h.name === name)
  // set up Theme store, holding current theme object
  const Theme = writable(getCurrentTheme(_current))

  setContext('theme', {
    // providing Theme store through context makes store readonly
    theme: Theme,
    toggle: () => {
      // update internal state
      let _currentIndex = themes.findIndex(h => h.name === _current)
      _current =
        themes[_currentIndex === themes.length - 1 ? 0 : (_currentIndex += 1)]
          .name
      // update Theme store
      Theme.update(t => ({ ...t, ...getCurrentTheme(_current) }))
      setRootColors(getCurrentTheme(_current))
    },
  })

  onMount(() => {
    // set CSS vars on mount
    setRootColors(getCurrentTheme(_current))
  })

  // sets CSS vars for easy use in components
  // ex: var(--theme-background)
  const setRootColors = theme => {
    for (let [prop, color] of Object.entries(theme.colors)) {
      let varString = `--theme-${prop}`
      document.documentElement.style.setProperty(varString, color)
    }
    document.documentElement.style.setProperty('--theme-name', theme.name)
  }
</script>

<slot>
  <!-- content will go here -->
</slot>
Finally we see onMount in action, setting our theme colors when the context component mounts, by doing so exposing the current theme as CSS variables following the nomenclature --theme-prop where prop is the name of the theme key, like text or background.
For the button toggle we'll create another component, ThemeToggle.svelte:
<!-- src/ThemeToggle.svelte -->
<script>
  import { getContext } from 'svelte'
  const { theme, toggle } = getContext('theme')
</script>

<button on:click="{toggle}">{$theme.name}</button>
And we're ready to put it all together! We've got our theme context, a toggle button, and presets set up. For the final measure I'll leave it up to you to apply the theme colors using the new CSS variables.
main {
  background-color: var(--theme-background);
  color: var(--theme-text);
}Themes are fun, but what about when a user chooses something other than the default set on mount? Try extending this demo by applying persisted theme choice with localStorage!
Svelte definitely brings a unique approach to building modern web applications. For a slightly more comprehensive codebase be sure to check out svelte-themer.
If you're interested in more Svelte goodies and opinions on web development or food check me out on Twitter @josefaidt.
tags: ['content']
date: 2022-01-21
You might have seen swyx's Twitter thread on moving his site to GitHub as the default CMS, and well, it was the motivation I needed to also make the move.
In the previous iteration of this site I was using Markdown files, local images, and a hand-rolled GraphQL layer to add static content. While the GraphQL layer was a lot of fun to write and implement, writing became tedious when I wanted to quickly nab a screenshot. Wanting to mitigate this impedance I explored a handful of different solutions:
While many of these choices cater to my immediate needs, the maintenance shifts and can even increase overhead. Given the GraphQL layer already used Markdown as a content source what solution would have the least amount of friction to adopt? In the end I settled on GitHub. It's a platform I spend a ton of time on and am no stranger to writing or responding to GitHub issues, plus the extensibility possibilities of adding comments and reactions or managing content types via labels seemed very enticing.
My existing architecture consisted of a package for parsing and transforming Markdown to HTML, a GraphQL Layer that read markdown files from a directory, and a preprocessor for the GraphQL Layer. Meaning I could export a query constant from a Svelte file, run it against the GraphQL API at build time, and replace the query string with the data returned from GraphQL. This looked something like the following to get the list of published posts:
<script context="module">
	export const query = [
    `
    query ALL_POSTS(
      $toLocaleDateStringOptions: LocaleDateStringOptions,
      $published: Boolean
    ) {
      allPosts(options:
        { toLocaleDateStringOptions: $toLocaleDateStringOptions, published: $published }
      ) {
        slug
        metadata {
          title
          date
          description
          tags
          readingTime {
            text
          }
        }
      }
    }
  `,
    {
      toLocaleDateStringOptions: {
        year: 'numeric',
        month: 'short',
        day: 'numeric',
      },
      published: true,
    },
  ]
</script>
Although this was a lot of fun to build, we're left with a few caveats:
import.meta.PROD to the query because the preprocessor runs before that value is available)Given we already had a dedicated package to parse markdown, the move really just needed to change where the markdown was coming from and map the new data points; instead of reading from the filesystem we'll be fetching from an API. By doing so, removing the need for the GraphQL Layer for content. Despite this I'm still keeping it around for global app metadata 😉
To answer the question "what the move required" succinctly, remove the GraphQL layer code from the frontend, set up endpoints to fetch data from GitHub, migrate the markdown package to parse frontmatter in a new way (YAML fenced code blocks vs typical frontmatter (---)), and set content types via GitHub labels. In the end we are left with a slick authoring experience that allows all the features we currently have plus the ability to paste images.
Between building the monorepo with a GraphQL API, preprocessor, Vite plugin, and package dedicated to markdown parsing, moving to GitHub issues took very little time. As stated above the bulk of the work was changing the content source and ensuring content was transformed in a familiar fashion.
While changing the data source was its own challenge I also learned:
As for the next steps we have still yet to leverage comments and reactions, but I'm not too sure I want to introduce comments to my site just yet. While I do get some traffic I do not find comments on posts in personal sites to add much value. In the immediate time frame managing post tags with GitHub labels seems like a viable choice as it adds the ability to filter post content based on tags in GitHub issues search. However this can also introduce skewed page view results as discussed in the next section: the caveats.
First and foremost, site analytics. With content written as markdown and committed to the repo there's nothing stopping folks from visiting the repo and viewing the raw markdown, however with GitHub issues this lowers that barrier where we can easily read the rendered markdown. Although this is a slight concern I think in the end it is negligible, and if we really wanted to chase a mitigation we could simply move the content to another repo and change the GitHub query to use the separate, private repo to read from.
We also have a lack of ability to process images. Previously I was using a plugin to upload local images to Cloudinary, which opens a few doors, though I wasn't doing any image processing in the first place so this isn't a massive concern for my use case.
Finally, dates. This was originally controlled by manually inputting and maintaining a date property in the post/page frontmatter, however now we can also lean on GitHub's published and last updated date. While migrating content this was still needed to retain the original publish date however in the future we can leverage the date property and fallback on issue creation or last updated date. Not the most pressing caveat but an interesting side effect.
This was yet again a lot of fun to implement and I feel will lower the barrier for content authoring by using a familiar platform, and hopefully improve authoring velocity. If you like writing Markdown and just wish you could paste images much like you could with many other editors then I suggest making the move to use GitHub as a CMS.
description: Quick note to demonstrate how to proxy requests using Vercel's Micro HTTP framework
date: 2021-10-12
tags: ['backend', 'serverless']When building a single-endpoint microservice often times we find ourselves needing only a subset of the request object. In this example, headers and body are the only necessary properties needed from the incoming request. Under the context of a service written with micro, endpoints typically look something like the following:
// index.js
export default function (request, response) {
  return `Hello, World!`
}
The familiarity of Express.js is present, and now we need a way to re-shape this request to include only the properties we need.
// proxy.js
import { json } from 'micro'

export function proxiedRequest(handler) {
  return async function (request, response) {
    const proxied = {
      headers: request.headers,
      body: {},
    }
    if (request.method === 'POST') {
      proxied.body = await json(request)
    }
    return handler(proxied, response)
  }
}
Which enables us to directly consume the request body without parsing first. We can think of this as a JSON body parsing middleware, but it also helps shape the request the way we want to consume it. The handler can then be modified:
// index.js
import { proxiedRequest } from './proxy.js'

export default proxiedRequest(function (request, response)) {
  return `Hello, ${request.body.name ?? 'World'}!`
}description: 'Notes on authenticating API endpoints in SvelteKit with Auth0'
date: 2021-12-09
tags: ['serverless', 'SvelteKit', 'auth0']References:
Continuing the last post -- for context -- we have a working SvelteKit app on Vercel with an API backed by Prisma and PlanetScale, but now we want to authenticate our SvelteKit endpoints.
There were a few findings I thought were notable while I was adding authentication:
audience when creating the Auth0 client in order to generate the JWT when calling client.getTokenSilently()audience in order to authenticate requests on the server side (our endpoints)With that, we will need three new environment variables to use within the app:
# .env
AUTH_DOMAIN=<tenant>.auth0.com
AUTH_CLIENT_ID=<client_id>
AUTH_AUDIENCE=http://localhost:3000/api # assumes we are writing endpoints in `src/routes/api`
AUTH_JWKS_URI=https://<tenant>.auth0.com/.well-known/jwks.json
AUTH_TOKEN_ISSUER=https://<tenant>.auth0.com/

# expose to the client by prefixing with "VITE_"
VITE_AUTH_DOMAIN=${AUTH_DOMAIN}
VITE_AUTH_CLIENT_ID=${AUTH_CLIENT_ID}
VITE_AUTH_AUDIENCE=${VALR_AUTH_AUDIENCE}
By exposing certain auth variables to the client we can access on import.meta.env:
import createAuth0Client from '@auth0/auth0-spa-js'

/**
 * Creates Auth0 client
 * @returns {import('@auth0/auth0-spa-js').Auth0Client}
 */
async function createClient() {
  let auth0Client = await createAuth0Client({
    domain: import.meta.env.VITE_AUTH_DOMAIN,
    client_id: import.meta.env.VITE_AUTH_CLIENT_ID,
    audience: import.meta.env.VITE_AUTH_AUDIENCE,
  })

  return auth0Client
}
And a sample API call to /api/player.json with the JWT:
import { onMount } from 'svelte'

let client
let data

onMount(async () => {
  client = await auth.createClient()
})

async function callAPI() {
  try {
    data = await (
      await fetch('/api/players.json', {
        headers: {
          Authorization: `Bearer ${await client.getTokenSilently()}`,
        },
      })
    ).json()
  } catch (error) {
    console.error('Error fetching player data')
  }
}
For our SvelteKit endpoints we can access secrets on process.env and create a helper as follows:
// src/routes/api/_verify.js
import { promisify } from 'util'
import jwksClient from 'jwks-rsa'
import jwt from 'jsonwebtoken'

export async function isAuthenticated(request) {
  const token = request.headers['authorization']?.match(/^Bearer (?<token>.*)$/)
    ?.groups?.token
  if (!token) return false

  const decoded = jwt.decode(token, { complete: true })
  if (!decoded || !decoded.header || !decoded.header.kid) {
    throw new Error('Invalid token')
  }

  const client = jwksClient({
    cache: true,
    rateLimit: true,
    jwksRequestsPerMinute: 10,
    jwksUri: process.env['AUTH_JWKS_URI'],
  })

  const jwtOptions = {
    audience: process.env['AUTH_AUDIENCE'],
    issuer: process.env['AUTH_TOKEN_ISSUER'],
  }

  const getSigningKey = promisify(client.getSigningKey)
  const key = await getSigningKey(decoded.header.kid)
  const signingKey = key.publicKey || key.rsaPublicKey

  return jwt.verify(token, signingKey, jwtOptions)
}
And update our endpoint to authenticate requests:
// src/routes/api/players.json.js
import { prisma } from '$lib/prisma'
import { isAuthenticated } from './_verify'

/** @type {import('@sveltejs/kit').RequestHandler} */
export async function get(request) {
  if (!(await isAuthenticated(request))) {
    return {
      status: 401,
      body: {
        error: {
          message: 'Unauthorized',
        },
      },
    }
  }

  let players
  try {
    players = await prisma.player.findMany()
  } catch (error) {
    console.error('Request error', error)
    return {
      status: 500,
      body: {
        error: {
          message: error.message,
          clientVersion: error.clientVersion,
        },
      },
    }
  }

  if (players) {
    return {
      body: {
        players,
      },
    }
  }
}
Finally, when we attempt to call callAPI() within our app while logged in we will receive a response and if we were to navigate directly to http://localhost:3000/api/players.json we will receive an unauthenticated error response!
description: 'Learn to build a custom theme toggle with React hooks and Context API, passing values dynamically to styled-components. Allowing users to cycle through preset themes'
date: 2020-02-25
tags: ['react', 'hooks', 'websites']
Nowadays plenty of sites have opted for a theme toggle allowing users to choose between light and dark modes. Typically we see those that hang out around screens often - developers - choosing dark modes since its a bit easier on the eyes. Other times we'll see a button that cycles through multiple themes other than light and dark like a Solarized theme; how cool! Here we'll walk through an implementation of this theme toggle with:
If you're unfamiliar with hooks or Context, don't worry! Kent C Dodds has an amazing blog post about using React Context effectively, and I find it to outline a great implementation pattern for Context. In fact, I use this pattern a lot, so even if you're familiar with hooks and Context it's worth the read.
Anyways, let's jump in. Or you can skip to the solution
Since we're just getting started we don't need anything too fancy, let's create a new React project with CodeSandbox or via the shell with:
npx create-react-app demo-theme-toggle
cd demo-theme-toggle
For this demo we'll be using styled-components so let's get that added as well:
yarn add styled-componentsNow we're ready to crack open the project. Open it in your favorite code editor
code .NOTE: We won't worry too much about directory structure in this demo, therefore all work will be done right in demo-theme-toggle/src/.
Providing our theme to the app is essential for us as developers to consume the theme — that is without providing something how can we consume it?
What we will be doing:
src/index.js)First, let's create our theme file
# demo-theme-toggle/
touch src/theme.js
Copy the prebuilt themes for this exercise
// demo-theme-toggle/src/theme.js
const theme = {
  themes: [
    {
      name: 'light',
      colors: {
        background: '#f5f5f5',
        text: '#5a535b',
      },
    },
    {
      name: 'dark',
      colors: {
        background: '#181818',
        text: '#f5f5f5',
      },
    },
    {
      name: 'solarized',
      colors: {
        background: '#073642',
        text: '#fdf6e3',
      },
    },
  ],
  _current: 0,
}

export default theme
It's important to note that the _current property is prepended with an underscore as we will use it internally, but not be exposed to the user.
Now we're ready to create our Contexts, let's create a new file. All further work in this section will be done within this new file.
touch src/ThemeContext.jsAnd in this new file we'll need our React and theme imports.
import React from 'react'
import theme from './theme'

const ThemeState = React.createContext()
const ThemeDispatch = React.createContext()
Here we've created Contexts for both the theme state (current theme values) and theme dispatch (used to update current theme). Let's continue by setting up the Provider component
import React from 'react'
import theme from './theme'

const ThemeState = React.createContext()
const ThemeDispatch = React.createContext()

const ThemeProvider = ({ children }) => {
  const [state, dispatch] = React.useReducer(() => {}, theme)
  return (
    <ThemeState.Provider value={state}>
      <ThemeDispatch.Provider value={dispatch}>
        {children}
      </ThemeDispatch.Provider>
    </ThemeState.Provider>
  )
}
Now we'll be able to export this ThemeProvider and use it at the root of our project, but we're not done just yet. Here we have used the built-in React hook useReducer, which takes two arguments:
You may have noticed we're passing an empty function into the first argument, let's change that. Above the ThemeProvider component we'll write our reducer
const ThemeReducer = (state, action) => {
  switch (action.type) {
    case 'toggle':
    default: {
      return {
        ...state,
        _current:
          state._current === state.themes.length - 1
            ? 0
            : (state._current += 1),
      }
    }
  }
}
Okay at first glance this may seem like overkill, and for our initial use case it kind of is, however what if we want to add additional features soon like default values such as font families or breakpoint values, and the ability to change those on-demand? Here we're building for a bit of growth. Either way it's concise and mildly performant.
What's happening here is that we're incrementing the _current value by 1, or if it's hit the length of the themes array we reset it to zero. The _current value is setting what theme in the themes array is currently being used.
Finally we can add it to our Provider
import React from 'react'
import theme from './theme'

const ThemeState = React.createContext()
const ThemeDispatch = React.createContext()

const ThemeReducer = (state, action) => {
  switch (action.type) {
    case 'toggle':
    default: {
      return {
        ...state,
        _current:
          state._current === state.themes.length - 1
            ? 0
            : (state._current += 1),
      }
    }
  }
}

const ThemeProvider = ({ children }) => {
  const [state, dispatch] = React.useReducer(ThemeReducer, theme)
  return (
    <ThemeState.Provider value={state}>
      <ThemeDispatch.Provider value={dispatch}>
        {children}
      </ThemeDispatch.Provider>
    </ThemeState.Provider>
  )
}After setting up our provider and mechanism to change the current theme, we're ready to write our own custom hooks to consume the current theme and toggler!
Here is where using the internal _current property comes in handy. Another built-in React hook, useContext is leveraged here to access ThemeState, which is a Context set up to store the current theme. If it is undefined, it is attempting to be used outside of our ThemeProvider.
const useTheme = () => {
  const context = React.useContext(ThemeState)
  if (context === undefined) {
    throw new Error('useTheme must be used inside a ThemeProvider')
  }
  return context.themes[context._current]
}
So if the current theme is light we will get the following value:
{
  name: "light",
  colors: {
    background: "#f5f5f5",
    text: "#5a535b"
  }
}The theme toggle is a bit more straightforward as we've set up our reducer with a default option of incrementing/resetting the current theme.
const useThemeToggle = () => {
  const context = React.useContext(ThemeDispatch)
  if (context === undefined) {
    throw new Error('useThemeToggle must be used inside a ThemeProvider')
  }
  return context
}
Similar, but with different error messages.
Combining all of the steps together into one file, src/ThemeContext.js we get:
import React from 'react'
import theme from './theme'

const ThemeState = React.createContext()
const ThemeDispatch = React.createContext()

const ThemeReducer = (state, action) => {
  switch (action.type) {
    case 'toggle':
    default: {
      return {
        ...state,
        _current:
          state._current === state.themes.length - 1
            ? 0
            : (state._current += 1),
      }
    }
  }
}

const ThemeProvider = ({ children }) => {
  const [state, dispatch] = React.useReducer(ThemeReducer, theme)
  return (
    <ThemeState.Provider value={state}>
      <ThemeDispatch.Provider value={dispatch}>
        {children}
      </ThemeDispatch.Provider>
    </ThemeState.Provider>
  )
}

const useTheme = () => {
  const context = React.useContext(ThemeState)
  if (context === undefined) {
    throw new Error('useTheme must be used inside a ThemeProvider')
  }
  return context.themes[context._current]
}

const useThemeToggle = () => {
  const context = React.useContext(ThemeDispatch)
  if (context === undefined) {
    throw new Error('useThemeToggle must be used inside a ThemeProvider')
  }
  return context
}

export { ThemeProvider, useTheme, useThemeToggle }With the ThemeProvider created and exported we're ready to wrap our application root in src/index.js
import React from 'react'
import ReactDOM from 'react-dom'
import { ThemeProvider } from './ThemeContext'

import App from './App'

const rootElement = document.getElementById('root')
ReactDOM.render(
  <ThemeProvider>
    <App />
  </ThemeProvider>,
  rootElement
)
By doing so we're allowing any component (pages, buttons, etc.) within the <App /> component to import and use our custom hooks. Fancy stuff.
Before we proceed, let's update the default CSS to make our App component cover the entire page
/* src/styles.css */
html,
body {
  margin: 0;
  padding: 0;
}

.App {
  font-family: sans-serif;
  text-align: center;
  padding: 5rem;
  height: 100vh;
}After all of our hard work we're ready to test out our themes. Let's head over to the App component.
import React from 'react'
import './styles.css'
import styled from 'styled-components'
import { useTheme, useThemeToggle } from './ThemeContext'

const StyledApp = styled.div`
  color: ${props => props.theme.colors.text || 'black'};
  background-color: ${props => props.theme.colors.background || 'white'};
`

export default function App() {
  const theme = useTheme()
  const themeToggle = useThemeToggle()
  return (
    <StyledApp className="App" theme={theme}>
      <h1>ThemeToggle</h1>
      <h2>Current theme: {theme.name}</h2>
      <button onClick={themeToggle}>Toggle Theme</button>
    </StyledApp>
  )
}
Now our hooks are imported, are being used in the App component, our styled App component set up to take theme props, and we've added a button to cycle through the themes. Phenomenal work!
With both hooks in the same component you may be wondering why we split them up in the first place. As the application grows, the theme will be used in several, if not all, components whereas the toggle is only needed in a few components (like a button in the header). This allows us to import only what we need for the component to be successful.
Demos are fun but I find I learn the most when I try to extend or break what I've created from a demo. Here are some ideas:
localStorageHow are you planning to extend this setup? Send me your ideas by tweeting @josefaidt
description: 'Adding middleware support and HTTP method file-system routing to the Express FileSystem Router'
date: 2020-06-01
tags: ['javascript', 'tooling', 'thoughts']
In my last post I talked about replicating Vercel's file-system routing for Express, and the reasoning behind the motivation.
For this iteration of express-fs-router there are two new notable features:
I took some time away from the package to think about how I would like to design and implement middleware support. To align with the rest of the routing utility I wanted the developer experience to be straightforward and extremely approachable. Before diving into the solution, let's take a look at what middleware is and the apparent challenges with the existing codebase.
First, middleware is a term used to describe modular pieces of logic that runs before the execution of the endpoint handler. Think of it as a single function or a collection of functions that are chained together in order of execution before ultimately executing the defined handler. It sits in the "middle".
What does this look like in Express?
// index.js
import express from 'express'
const app = express()

function myMiddleware(req, res, next) {
  console.log('hello from my middleware!')
  next()
}

app.get('/hello', myMiddleware, function (req, res) {
  res.json({ message: `Hello, ${req.query.name ?? 'World'}` })
})

app.listen(3000)
As you may have noticed the middleware function takes a third argument, next, and this is used to continue or go to the next function. Remember these functions are executed in the order they are added to the route. Middleware can be used for a lot of additional functionalities such as authentication, body parsing, and uploading a file.
For adding this support to express-fs-router — where routes respective files export a function — we needed a way to export a collection of functions where the order is preserved. What better way to do this than Arrays!
// api/hello.js
function myMiddleware(req, res, next) {
  console.log('hello from my middleware!')
  next()
}

// our handler
function get(req, res) {
  res.json({ message: `Hello, ${req.query.name ?? 'World'}` })
}

export default [myMiddleware, get]Before I started working on this feature the existing codebase was only expecting function exports and solving the remainder of the routing logic for us. One of the quirks with adding middleware via Arrays is that Arrays are not a primitive type in JavaScript, so if we try to check with typeof we're going to expect object to come back. Thanks to a handy Array method, isArray we can ensure what the utility will attempt to work with is in fact an Array.
The skeleton code looks something like this:
// express-fs-router/index.js
switch (typeof handler) {
  case 'function': {
    // export default function(req, res) {}
  }
  case 'object': {
    if (Array.isArray(handler) && handler.length) {
      // export default [function(req, res, next) {}, function(req, res) {}]
    }
  }
}
From here the logic is as straightforward as the existing function check, but we will be expecting the handler to be at the last position in the array:
// express-fs-router/index.js
switch (typeof handler) {
  case 'function': {
    // export default function(req, res) {}
  }
  case 'object': {
    if (Array.isArray(handler) && handler.length) {
      // export default [function(req, res, next) {}, function(req, res) {}]
      // get HTTP method from handler function name
      if (!method) method = handler[handler.length - 1].name
      // set to router
      router[method](route, ...handler)
    }
  }
}
Disclaimer this pseudo-code is to display the design of the new feature's implementation, for more details be sure to check out the source code.
And that's it! Middleware support is now fully functional for the Express routing utility. This next feature caused me to come back and refactor middleware support a little bit, but all for the better of the utility.
Not only can a user define what HTTP method a route should use via the function name, but now developers are enabled to create a directory with files using the naming convention :method; e.g. :get, :post:
|- api/
  |- methods/
    |- :get.js
    |- :post.js
    |- :put.js
    |- :delete.js
The implementation here was sort of challenging, and I learned that Express will add duplicate routes to the router, though it will only use the first handler added when called upon. Weird right? No problem, though, thankfully the router has a list of existing routes to check against. If we have a variable route that is derived from the relative file path we can verify whether a route already exists in Express Router:
// express-fs-router/index.js#L89
router.stack.some(layer => layer.route.path === route)
Past that there are a series of additional checks because the route can already exist, we just need to be sure we do not have clashing HTTP method files, or other files such as /api/methods/index.js and /api/methods.js that would potentially cause issues with routes added.
// express-fs-router/index.js#L90-L110
const existing = router.stack.find(layer => layer.route.path === route)
if (!method && (!handler?.name || handler?.name === 'all')) {
  // ensure an anonymous function with similar naming does not trump file-based methods (i.e. /methods/:get.js vs /methods.js)
  console.warn(
    `[FS-ROUTER] Duplicate entry detected: ${route} with implied method ALL. Consider deleting ${directory}/${path}.js. Skipping...`
  )
  continue
} else if (!method && Object.keys(existing.route.methods).length) {
  // don't allow users to add top-level `methods.js` with handler name of `put` and add to route with existing records'
  console.warn(
    `[FS-ROUTER] Duplicate entry detected: ${route} where file-system methods routes are enabled. Consider deleting ${directory}/${path}.js. Skipping...`
  )
  continue
} else if (
  Object.keys(existing.route.methods).includes(method || handler?.name)
) {
  // warn user of duplicate entries for same route and method
  console.warn(
    `[FS-ROUTER] Duplicate entry detected: ${route} with method ${
      method || handler?.name
    }. Consider deleting ${directory}/${path}.js. Skipping...`
  )
  continue
}
And there we have it! Now the developer is notified when they (accidentally) attempt to add files that would potentially cause issues, and those files are bypassed (i.e. not be processed nor added to the Express Router).
These two new features were previously thought to be a bit ambitious and opinionated, but then again file-system routing is opinionated to begin with. Though the implementation came with a set of unique challenges – and other than pushing a completely broken build to npm – I think the features came out quite nicely.
For my next trick I will explore the ability to retrieve the file path of where new FSRouter() is invoked, allowing users to always get away with passing a relative directory to the constructor.
tags: ['javascript']
date: 2022-06-15
When developing a browser extension -- in this case a Chrome extension -- we may begin developing using the same ES Modules approach we've used in the frontend, but then are presented with an error along the lines of Cannot use 'import.meta' outside a module.
In the following diff we can use the JSON schema to find a type property we can use to specify the service worker is an ES Module. Note, $schema is not actually a valid manifest property and will throw a warning upon loading the extension, however in instances like this it is helpful.
{
  "$schema": "https://json.schemastore.org/chrome-manifest",
  "name": "My super cool extension",
  "description": "",
  "version": "0.1",
  "manifest_version": 3,
  "background": {
    "service_worker": "worker.js",
+   "type": "module"
  },
  "action": {
    "default_popup": "index.html"
  }
}
Now add the following to the worker.js file:
console.log('import.meta.url is', import.meta.url)And finally after loading the extension we can view the value of import.meta.url without error.

date: 2019-11-03
tags: ['infrastructure', 'websites']
For a while now I've wanted to host a simple website that acted as a pretty front-end for my Plex server and the cluster of applications I use alongside Plex to enhance the experience. Applications like a request service (Ombi) and a metrics service (Tautulli). Originally I learned and built an NGINX-based container to use as the reverse proxy, though this was until I realized my new Linksys router reserved port 80 for Linksys SmartConnect. Ever since then I just kind of sat on the idea.
Over the course of a few days I scoured the web for references to ZEIT's Now platform looking for ways to use the routing capabilities as a proxy, and ended up with having my epiphany right there at their documentation. My question was could this be done? Using the platform to proxy requests to these exposed applications running at my house, just like I would have had with NGINX? Short answer, yes.
First off, what is ZEIT Now? When you type in "zeit now" on Google, the first link you'll see has the tagline "world class static hosting, All-in-one solution for static & JAMstack deployment for performance-obsessed teams." The keyword here is static, meaning you cannot run an always-on Node.js server, like Express.
Overall, ZEIT Now is a serverless platform that can serve a number of types of files using builders, thus being able to host a static site comprised of HTML, CSS, and JavaScript files, as well as defining routes to serve such files or - in our case - proxy to another application on the same domain.
Given our previous example we could run an Express application that proxies requests in the same fashion we're looking to accomplish with this guide locally or in a container on a server, however given the nature of ZEIT's Now v2 we'll need to get down to the platform and use its capabilities to our advantage.
Let's say we have the following application details:
| Application | Port | Location |
|---|---|---|
| Plex | 32400 | home |
| Request (Ombi) | 9001 | home |
| Metrics (Tautulli) | 9002 | home |
| existing front-end(?) | 80 & 443 | ZEIT Now |
| custom domain | - | Google Domains |
With a home (external) IP of 50.50.500.192 (disclaimer: this IP is fake and for demonstration purposes). We then set up our DNS via Google Domains with an A record for @ pointing at our home IP.
Now if we navigate out to myplexdomain.com:9001 we should see Ombi running. Same with Tautulli but with specifying port 9002. Great, right? Everything works as intended. But what if we as Plex server owners could give out this snazzy new domain without having our users specifying those ports? Users shouldn't have to remember or bookmark the address with the ports. Plus it's easier to remember something like myplexdomain.com/request than the port, right?
In comes ZEIT Now.
That's about it. I won't go over how to set these apps up or forward ports on your router, but assuming you have this done already and simply want to create a website to proxy the requests then I hope this article serves you well.
Now that we have all of these apps running, accessible from an external address, etc, let's go over setting up our frontend.
Before we get started, there is another pre-requisite to ensure application assets (like stylesheets) will be served over the proper prefix (ex: request/) rather than from the root. Edit Ombi and Tautulli to have the base routes of request and metrics respectively.
Next we'll need to add our new domain to ZEIT Now and point the nameservers to that of ZEIT. Something like this:
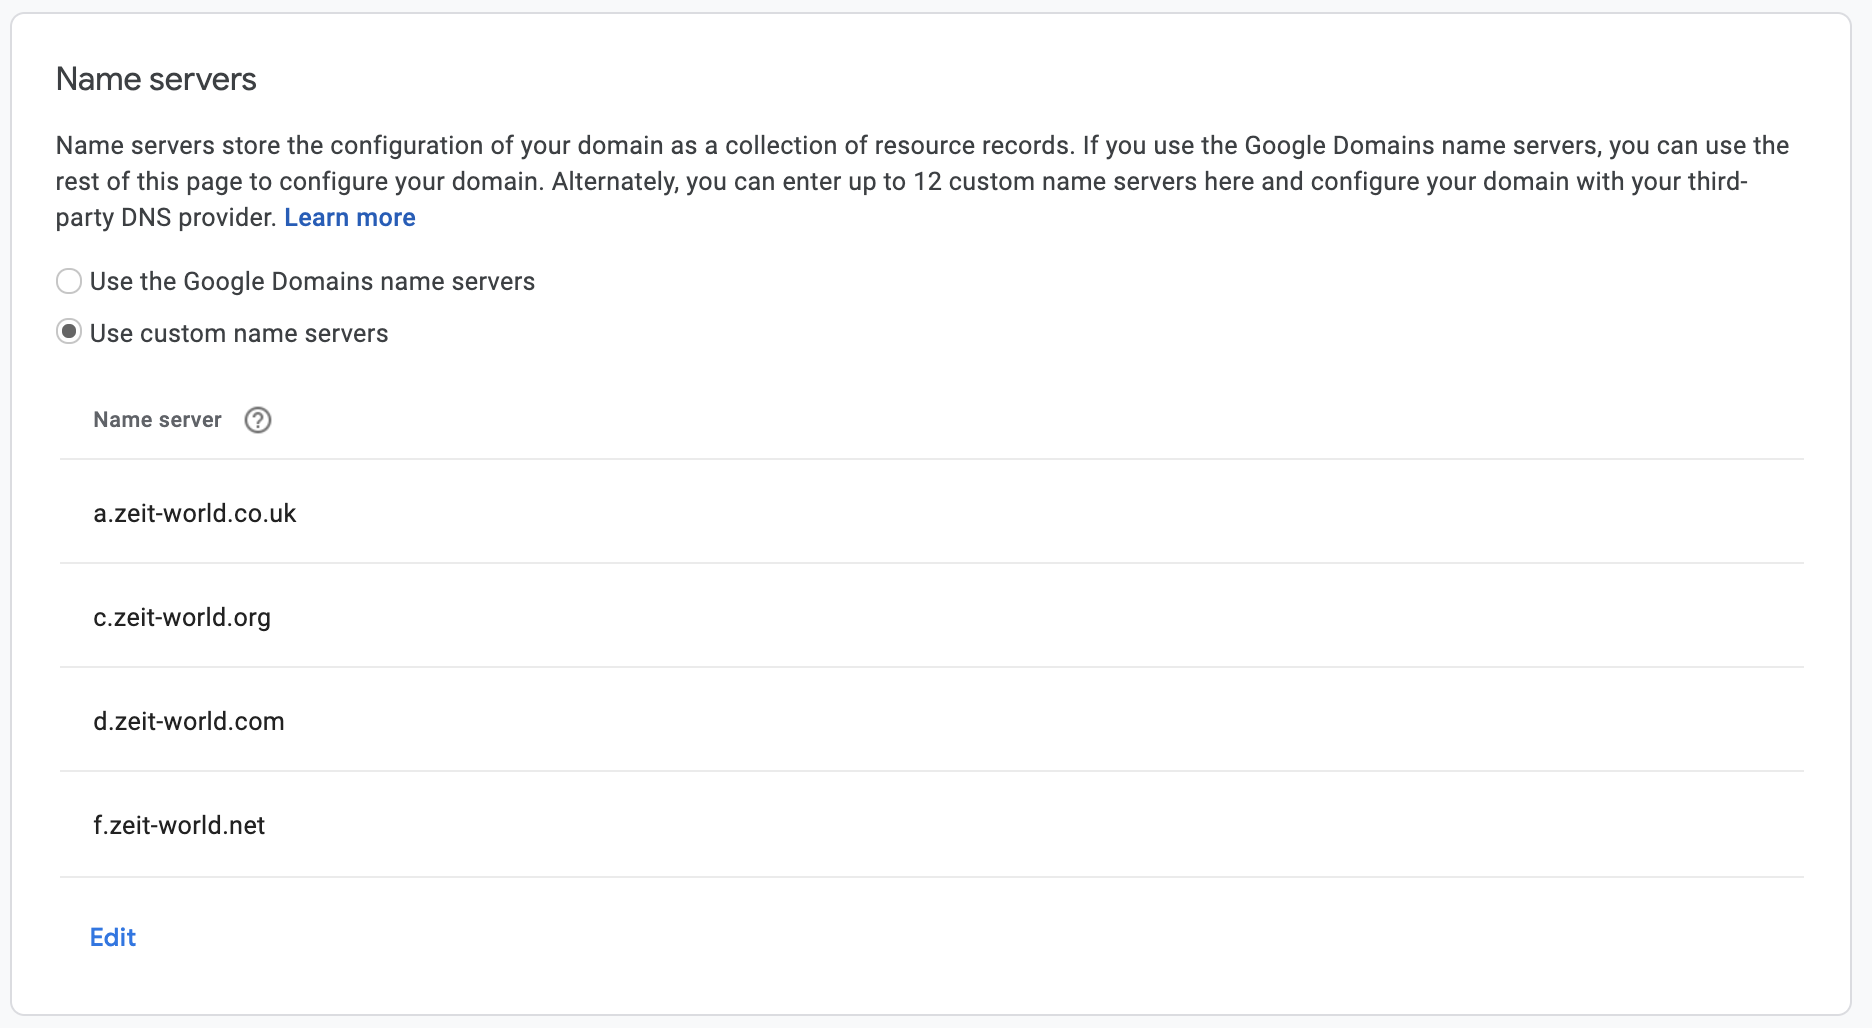
After a few hours or so the ZEIT Now domains panel should show that the domain is now verified. Great, we'll want to use the Now CLI to set up a new record.
Flip over to your terminal of choice and ensure you have the latest Now CLI installed with yarn global add now@next.
Remember our home IP? We'll need that to point the subdomain of home to that IP with now dns add myplexdomain.com home A 50.50.500.192. Once the change has propagated we should be able to access our applications by navigating to home.myplexdomain.com:9001/request. Fantastic.
Ignoring the frontend for now, let's take a look at setting up the routing for our new Now project.
# create a new directory for the project
mkdir now-myplexdomain

# create the new Node project
cd now-myplexdomain
yarn init -y
touch now.json

# open with VSCode
code now-myplexdomain
It is important to note that we will specify an empty build command since we don't need to actually build anything for the Now deployment. Pop open your package.json file and copy the following:
{
  "scripts": {
    "build": "echo 'No build required, skipping...'"
  }
}
Now we're ready to start the routing!
The routing capabilities with ZEIT Now are ridiculously powerful, and the reason I went with this platform. With our fresh now.json file, let's make a few edits:
{
  "public": false,
  "routes": [
    {
      "src": "/request/(.*)",
      "dest": "http://home.myplexdomain.com:9001/request/$1"
    },
    {
      "src": "/metrics/(.*)",
      "dest": "http://home.myplexdomain.com:9002/metrics/$1"
    }
  ]
}
A few important things to note here.
"public": false - this is needed for the Now deployment to show this project is not public. I suppose we could leave this open, however to tighten our security and the proxied requests, I leave this set to false."src": "/request/(.*)" - little RegEx to pass subsequent requests of all file types to our destination"dest": "http://home.myplexdomain.com:9001/request/$1" - the $1 is there to embed the capture group, passing the subsequent requests to appropriate target destination/request and not /request/ the request will fail. To fix this we can add a redirectTo fix the last item in the routing notes, let's set up a redirect:
{
  "public": false,
  "routes": [
    {
      "src": "/request/(.*)",
      "dest": "http://home.myplexdomain.com:9001/request/$1"
    },
    {
      "src": "/request",
      "status": 301,
      "headers": { "Location": "/request/" }
    },
    {
      "src": "/metrics/(.*)",
      "dest": "http://home.myplexdomain.com:9002/metrics/$1"
    },
    { "src": "/metric", "status": 301, "headers": { "Location": "/metrics/" } }
  ]
}
Now if we attempt to hit /metrics without the trailing slash, we should expect the behavior of redirecting the user to /metrics/. With these redirects we can also set up a sleek path to launch the Plex web application, which is external to our site.
{
  "public": false,
  "routes": [
    {
      "src": "/request/(.*)",
      "dest": "http://home.myplexdomain.com:9001/request/$1"
    },
    {
      "src": "/request",
      "status": 301,
      "headers": { "Location": "/request/login" }
    },
    {
      "src": "/metrics/(.*)",
      "dest": "http://home.myplexdomain.com:9002/metrics/$1"
    },
    { "src": "/metric", "status": 301, "headers": { "Location": "/metrics/" } },
    {
      "src": "/launch",
      "status": 301,
      "headers": { "Location": "https://app.plex.tv/" }
    }
  ]
}
With this update we can set up a /launch path in our frontend to easily send the user to Plex. You may also notice I added a /login to the request path, and this is because Ombi will not properly redirect. Instead we must force the user straight to the login page, which will then be redirected into the app's homepage if the auth token is present.
At this point, the frontend is trivial, though serving the content may not be. No worries, we'll take a quick look at a simple frontend implementation. Create a new file, public/index.html
<!DOCTYPE html>
<html lang="en">
  <head>
    <meta charset="UTF-8" />
    <meta name="viewport" content="width=device-width, initial-scale=1.0" />
    <meta http-equiv="X-UA-Compatible" content="ie=edge" />
    <title>myplexdomain</title>
  </head>
  <body>
    <main>
      <ul>
        <li><a href="/request">Request</a></li>
        <li><a href="/metrics">Metrics</a></li>
        <li><a href="/launch">Launch Plex</a></li>
      </ul>
    </main>
  </body>
</html>
It's really quite bare, however for this proof-of-concept implementation I'll leave the styling up to your own creativity. But now we need a root route and assign the appropriate builder for this new file, so let's pop back over to our now.json file.
{
  "public": false,
  "builds": [{ "src": "/public/**", "use": "@now/static" }],
  "routes": [
    { "src": "/", "dest": "/public/index.html" },
    {
      "src": "/request/(.*)",
      "dest": "http://home.myplexdomain.com:9001/request/$1"
    },
    {
      "src": "/request",
      "status": 301,
      "headers": { "Location": "/request/login" }
    },
    {
      "src": "/metrics/(.*)",
      "dest": "http://home.myplexdomain.com:9002/metrics/$1"
    },
    { "src": "/metric", "status": 301, "headers": { "Location": "/metrics/" } },
    {
      "src": "/launch",
      "status": 301,
      "headers": { "Location": "https://app.plex.tv/" }
    }
  ]
}
You'll notice the builder is using @now/static to serve static files from the public directory as well as a route at the root to serve our newly created HTML file. And that's it! If we run now dev we should see everything is functioning as intended.
The fun part, we've made it! Let's get this thing on the web.
# deploy to ZEIT Now, follow the prompts for naming
now

# once confirmed functional, deploy to production (to link the domain)
now --prod
Congratulations, you now have a functional frontend for your fancy Plex apps. Slap some CSS in there and go crazy.
Learning ZEIT Now to this extent has been a rewarding journey. I've used the platform in the past, though this effort took my appreciation to a whole new level. I thought I wouldn't be able to have a frontend for apps running at my home due to my router issue, though I am incredibly glad I was able to accomplish this with ZEIT Now.
date: 2020-09-04Sometimes I wonder what others' development environment looks like. What computer are they using? What OS do they like? What editor fits their needs? Well, here's a comprehensive list of my picks.
description: 'Documenting my experience with building npm:express-fs-router'
date: 2020-04-27
tags: ['javascript', 'tooling']
There is something magical about writing an API with Vercel's (previously known as ZEIT) API routing, where each file is an exposed route, and each file exports a default function that follows Express's handler nomenclature.
export default function (req, res) {}Since Vercel uses micro behind the scenes, adapting to Vercel's way of writing API routes where the Express familiarity is present makes micro much more approachable, but micro isn't necessarily the framework of choice for most Node projects. In comes express-fs-router, my latest package aimed at simplifying building API's with Express leveraging the file system.
When talking about adding file-system routing to Express you might be asking yourself "but why?", and that's a valid question. With Express we can easily import its router, create the route, export the router, and then roll it up in the routes.js or app.js file with the Express app. But with file-system routing we align with what Vercel offers: export a default function (the handler) and the route now exists and is exposed.
At the surface, file-system routing introduces several benefits to the development experience:
These benefits are a bit subjective, however building a utility like this I've found it's greatly improved my own velocity when building REST API's now that I no longer have to worry about adding the new route to the routes or app file; I hit save and it just works:tm:.
To highlight some of these benefits let's take a look at a sample endpoint:
// api/hello.js
/**
 * Say hello to our caller
 *
 * @name SayHello
 * @path {GET} /api/hello
 * @query {String} [name] - Name of the caller
 *
 */
export default function (req, res) {
  res.json({ message: `Hello, ${req.query.name || 'World'}!` })
}
As a developer we know that each file will export one handler, thus improving developer experience and ease of documentation, and in a sense reduces time for onboarding new developers to an existing codebase. Not only is the experience improved, but the modularity of our API is also drastically improved.
Enough with gushing over file-system routing. I know I may be a bit biased but let's take a look at some potential caveats – again, a bit subjective:
file-system routing isn't a new concept, but I can understand why some would choose to adopt a different strategy. Personally I liked the idea enough to replicate it for Express.
Noted earlier, express-fs-router is a utility I wrote to bring file-system routing to Express. It functions a lot like Vercel's API routes, but with a bit of added functionality.
only attempts to import JavaScript files (ex: index.js)
ignores JavaScript files prepended with an underscore (ex: _utility.js)
functions named with a request method will attach that handler using the defined method
export default function get(req, res) {}is then added to the Express router as
router.get('/hello', handler)by default routes are added with ALL methods
router.all('/hello', function (req, res) {})Adding the file system router is relatively straightfoward, and can be added to any existing Express application:
// app.js
import express from 'express'
import FSRouter from 'express-fs-router'
const app = express()

app.use('/api', new FSRouter('api'))

app.listen(3000, () => console.log('Listening at http://localhost:3000'))Overall I had a ton of fun building and replicating functionality from other projects to ultimately bring this utility to JavaScript's seemingly-default choice for HTTP server frameworks, Express. If you're interested in seeing what goes on under the hood be sure to stop by the GitHub Repository. The project is still fairly recent and I'm sure I haven't covered every use case, so if you try it out and run into any issues please submit an issue to help me improve the utility!
tags: ['svelte', 'css', 'theming']
date: 2022-01-23
As I was working on a few housekeeping updates for svelte-themer I was thinking of a way to write an action with the use directive that leverages the existing codebase to create scoped "themes", or in this case it would better be described as scoped CSS variables. While we can use themes created by themer by simply setting a theme prop to theme components, what if we wanted to disconnect from the wrapper and add variables directly. Perhaps these variables are specific to the component we're building and we just do not feel like writing the variables ourselves. Turns out this was relatively straightforward:
import { createCSSVariableCollection } from '../support/css'

/**
 * @typedef {Object} ActionReturn
 * @property {Function} [update]
 * @property {Function} [destroy]
 */

/**
 * use:theme
 * @param {HTMLElement} node
 * @param {Object.<string, string|number>} theme
 * @returns {ActionReturn}
 */
export async function theme(node, theme) {
  /**
   *
   * @param {string} name
   * @param {string} value
   * @returns {void}
   */
  function setProperty(name, value) {
    if (!node.style && node.document?.documentElement) {
      node.document.documentElement.style.setProperty(name, value)
      return
    }
    node.style.setProperty(name, value)
    return
  }

  function setProperties() {
    const variables = createCSSVariableCollection(theme)
    for (let [name, value] of variables) {
      setProperty(name, value)
    }
  }

  setProperties()

  return {
    update(newTheme) {
      theme = newTheme
      setProperties()
    },
  }
}
This allows us to then use this action in a component and pass a theme object, which is really just an object of variable names and values (not limited to color tokens).
Using this example on Stackblitz we're using the action above to add styles to the document root as well as using it to customize theming of a container component.
<script>
  import { theme as useTheme } from 'svelte-themer/use'
  import { presets } from 'svelte-themer'

  export let theme = {
    colors: {
      background: presets.dark.colors.background.contrast,
      text: presets.dark.colors.secondary
    }
  }
</script>

<div class="container-component" use:useTheme={theme}>
  <slot />
</div>

<style>
  div {
    padding: 2rem;
    border-radius: 0.5rem;
    background-color: var(--colors-background);
    color: var(--colors-text);
  }
</style>With Svelte's CSS custom properties we can apply CSS variables directly to a component:
<Container --colors-background={"#bbb"}>
  <p>Hello, World!</p>
</Container>
When doing so, Svelte creates a wrapper div element and applies these properties using inline styles:

In the screenshot above we can see the container-component class which signifies the container component itself, and when using the action inside the container component instead of creating an additional element with inlined styles the styles are inlined on the component's element where the action is used. While no functionality is lost either way, styles are applied inline.

In the end the implementation is not all that different, but the usage is different. Svelte CSS custom properties can be applied to components where actions are not. Similarly custom properties are not allowed on DOM elements since they are not valid attributes, but actions can be applied using the use directive.
With the same approach, let's say instead of inlining CSS we create a sort of "scoped" stylesheet. Although <style scoped> is deprecated, we have the information we need inside the action to create a selector for the element in which the action is applied:
/**
 * use:stylesheet
 * @param {HTMLElement} node
 * @param {Object.<string, string|number>} theme
 * @returns {ActionReturn}
 */
export async function stylesheet(node, theme) {
  const stylesheet = document.createElement('style')

  function setStylesheet() {
    const variables = createCSSVariableCollection(theme)
    const svelteClass = Array.from(node.classList).find(className =>
      className.startsWith('s-')
    )
    let innerHTML = `${node.localName}${svelteClass ? `.${svelteClass}` : ''}{`
    for (let [name, value] of variables) {
      innerHTML += `${name}:${value};`
    }
    innerHTML += '}'
    stylesheet.innerHTML = innerHTML
    node.prepend(stylesheet)
  }

  setStylesheet()

  return {
    update(newTheme) {
      theme = newTheme
      setStylesheet()
    },
  }
}
Here, we create a style element and add styles scoped to the parent element:

Again, no overall change in functionality but with the stylesheet action the outputted HTML will be easier to traverse as the action payload grows.
The new theme action in svelte-themer can be used to circumvent using the existing components like ThemeWrapper, and although the intention applies to different use cases both are powered by the same core library.
description: 'Discover Now serverless functions to expose an Apollo middleware on top of FaunaDB'
date: 2020-04-20
tags: ['serverless', 'infrastructure', 'graphql', 'fauna']
Getting started with databases and GraphQL has really never been easier. Previously I've gone through Wes Bos's Advanced React and GraphQL course and it was great despite the fact that I was not able to apply the backend knowledge professionally. My background is with relational databases such as Microsoft SQL and Oracle SQL on top of others like MySQL and MariaDB, and since I've only dabbled with MongoDB Atlas I decided to give another NoSQL database a try. Ultimately I ended up with FaunaDB, but it's not quite a NoSQL database, it's something... nicer.
The database built for serverless, featuring native GraphQL
We're looking to use GraphQL and don't want to host a database or a server ourselves. We want to focus on code.
The previously mentioned course from Wes Bos featured an Express GraphQL server with GraphQL Yoga and Prisma to build our schema with fancy mutations, resolvers, and the like. Although it was fun to see some of the grit, running our own server somewhere wasn't ideal. Fauna fills this role as our serverless database provider, which means we only have to call on it.
Let's take a stroll through setting up a database with FaunaDB, writing and importing a schema into the new database, and taking a look at the GraphQL endpoint to see how we can perform queries and mutations generated by Fauna.
To get started, go ahead and sign up for a Fauna account.
For this demo we are going to take a look at setting up a generic schema for users of an application. Create a new project directory and let's create our GraphQL schema file:
# /schema.graphql
# create an object to store user data
type User {
  # property `name` will be a String
  name: String!
}

# create queries to search for all users
#   and for user by name
type Query {
  allUsers: [User]!
  user(name: String): User
}
After taking the tour of FaunaDB, head on over to create a new database - demo - and import the new GraphQL schema to our Fauna database.
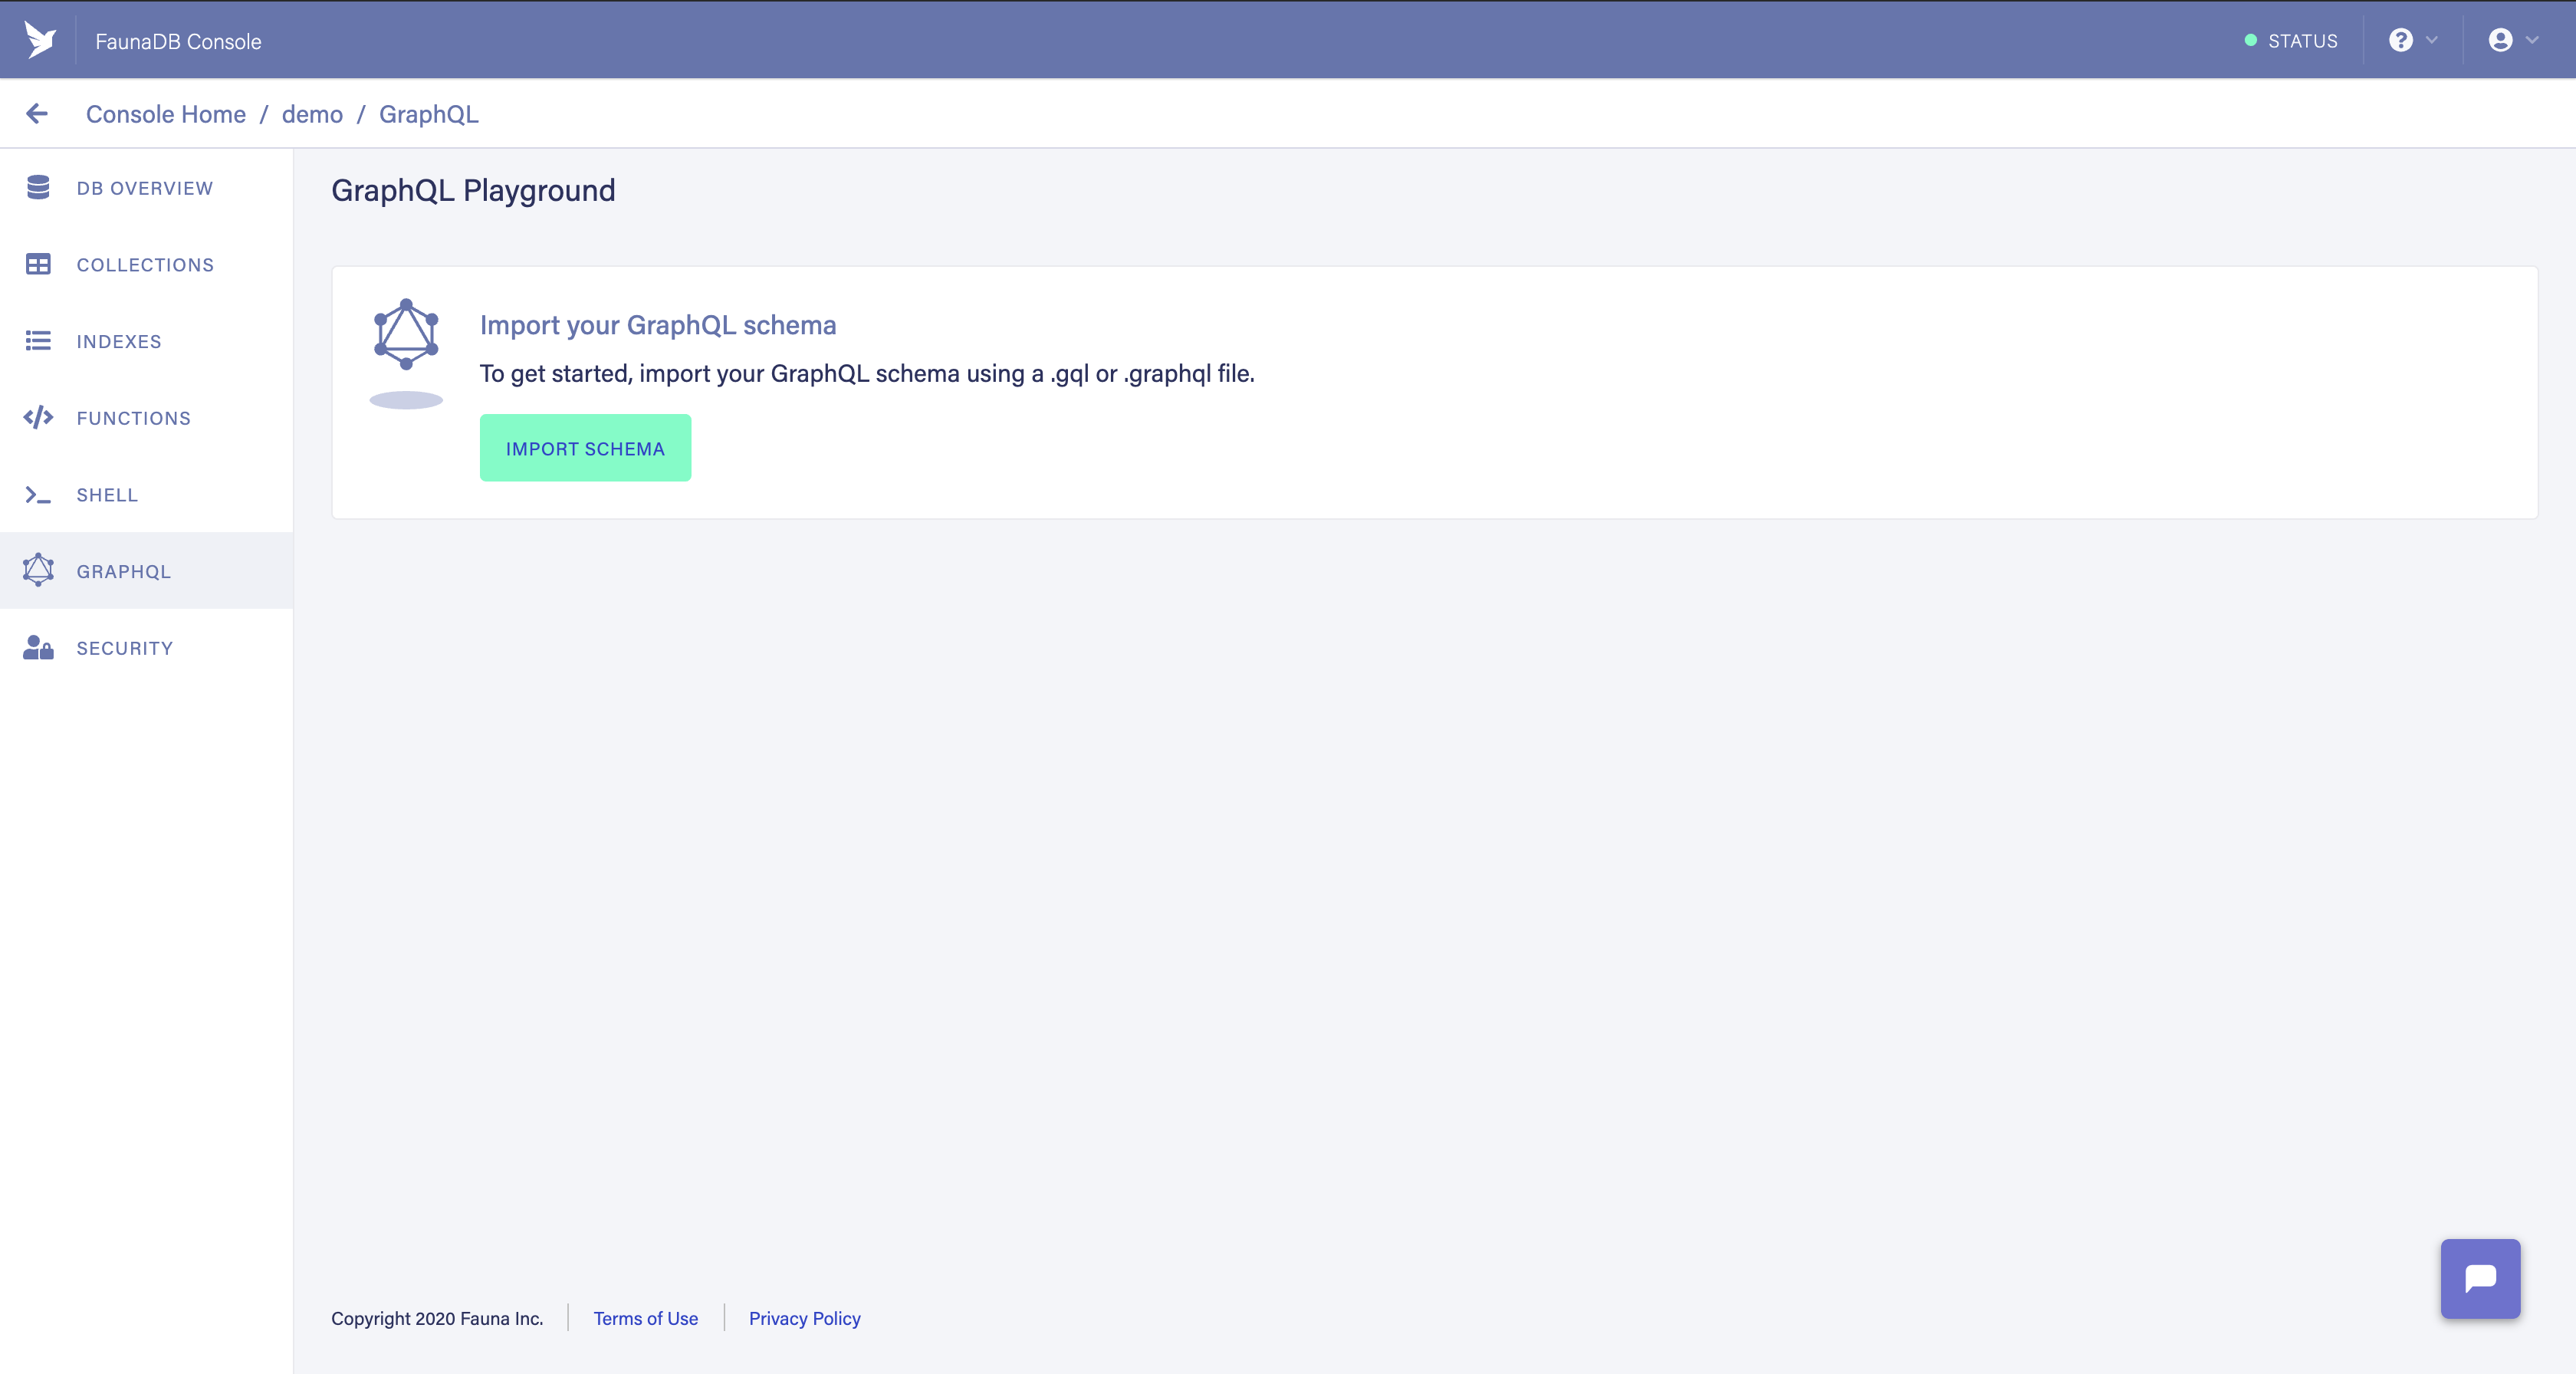
Once Fauna is done importing the schema use the playground to poke around at what has been generated for us to consume like createUser. All of our CRUD operations have been generated for us, and all we have to do is perform operations via GraphQL queries and mutations.
When the playground loads you'll notice it's pointing to https://graphql.fauna.com/graphql and has a header with Basic authentication, which is a base64 encoded string of username:password. It's good to know that it is authenticated, however we don't want to use our Fauna credentials to access the Fauna database so we'll need a token.
Head on over to the "Security" tab.
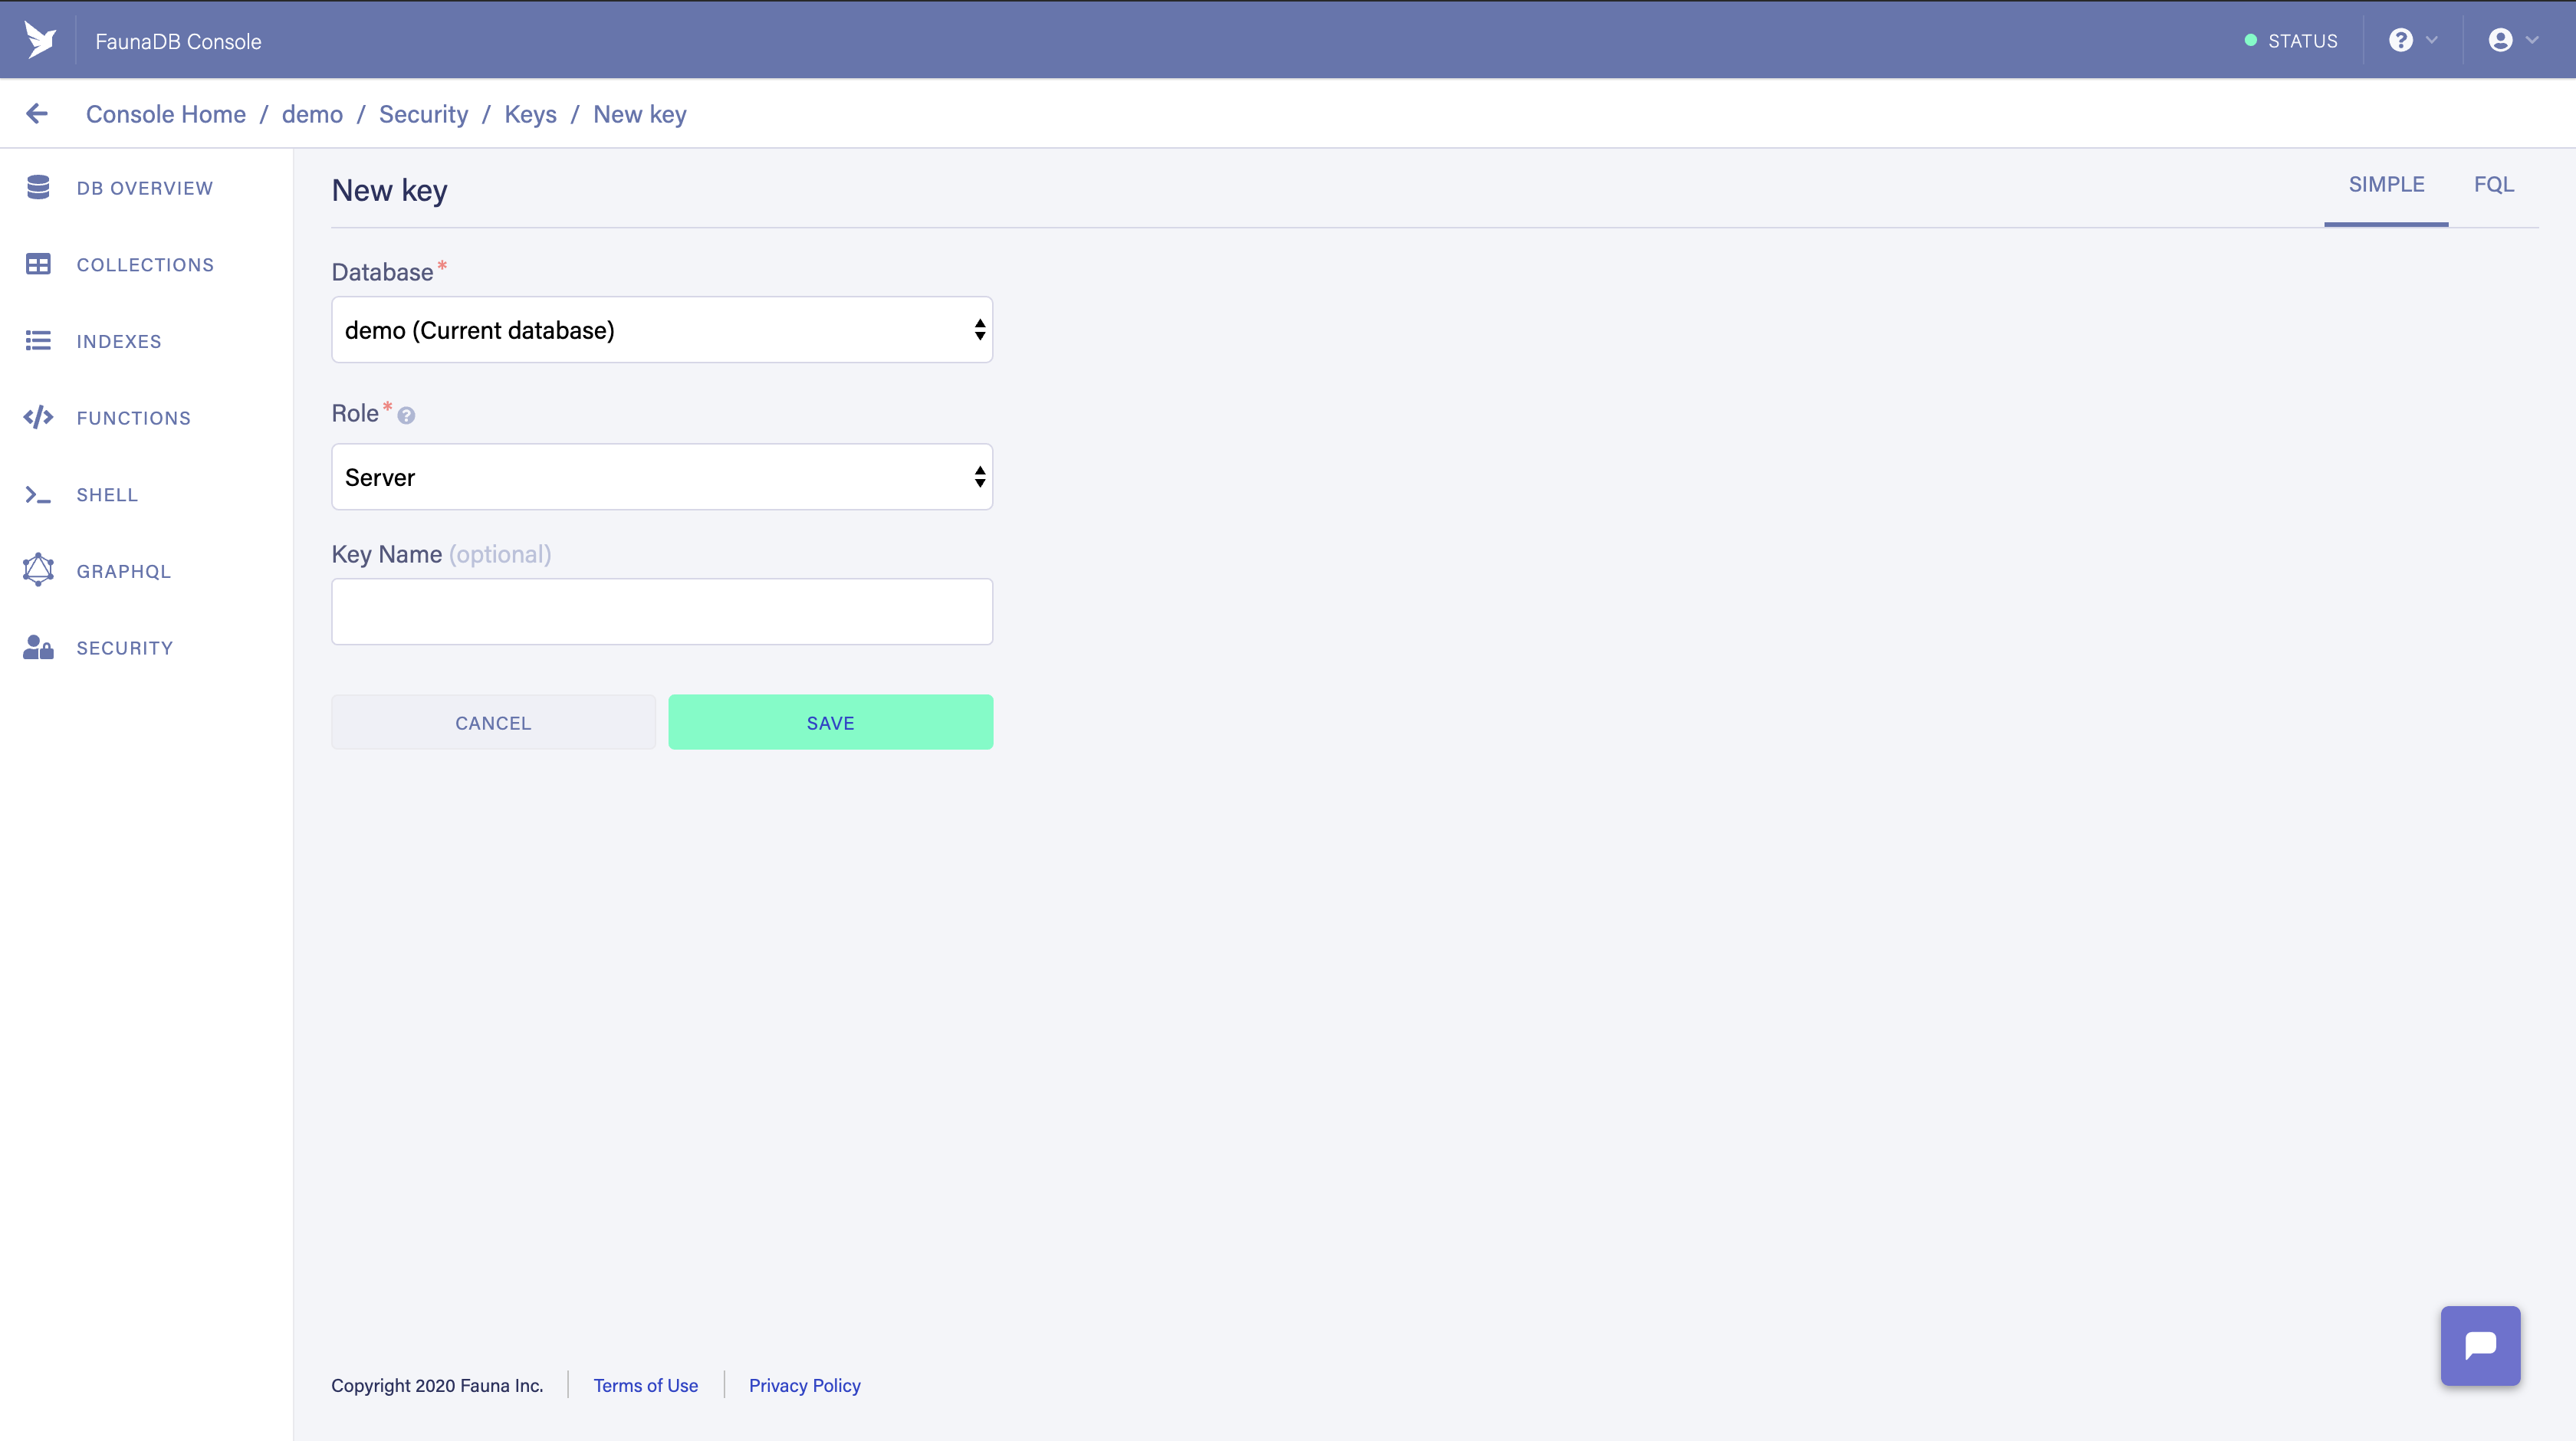
Give it a name like "serverless-demo" or something that makes sense to you, then hold on to that key. Create a new file, .env:
DB_TOKEN=<fauna-security-token>
Perfect. Let's head on over to set up our serverless project with ZEIT Now.
In our project directory, create a new ZEIT Now project:
nowFollow the prompts and continue on through accepting the defaults or changing the name. Create a new directory named api and spin up the new project with yarn init -y, after it should look something like:
| my-new-serverless-project
  |- api/
  |- schema.graphql
  |- .env
  |- package.json
In the package.json file let's include a few dependencies and install them with yarn
"dependencies": {
  "apollo-link-http": "^1.5.16",
  "apollo-server-micro": "^2.11.0",
  "graphql": "^14.6.0",
  "isomorphic-unfetch": "^3.0.0"
}
Before moving forward, remember how we created the environment file, .env, and populated our DB_TOKEN variable? We'll need to do something similar for Now to expose that variable to our API routes at runtime. This will be done in two steps:
In your terminal,
now secrets add db_token <fauna-security-token>Here we're defining the secret all lowercase, even if we defined it like we did our environment variable DB_TOKEN ZEIT Now changes it to the lowercase version, db_token. Now that we've got our secret added, let's map the secret by creating a new file in the project root, now.json:
{
  "env": {
    "DB_TOKEN": "@db_token"
  }
}
With our environment variable stored on ZEIT Now and mapped for runtime exposure our API routes can now consume the security token both locall with now dev and when deployed.
From my brief time with the Fauna community and seeing other's interpretations, the Apollo layer is not entirely necessary as you can connect to Fauna using the bearer token directly. The benefits of Apollo are that it allows you to integrate third party security and write additional resolvers to the connected application.
Let's start by creating a new file in the api/ directory, graphql.js, to create our Apollo Link:
The http link is a terminating link that fetches GraphQL results from a GraphQL endpoint over an http connection. The http link supports both POST and GET requests with the ability to change the http options on a per query basis. This can be used for authentication, persisted queries, dynamic uris, and other granular updates.
// api/graphql.js
import { createHttpLink } from 'apollo-link-http'
import fetch from 'isomorphic-unfetch'

const link = createHttpLink({
  uri: 'https://graphql.fauna.com/graphql',
  fetch,
  headers: {
    Authorization: `Bearer ${process.env.DB_TOKEN}`,
  },
})
This snippet creates a connection to our Fauna database, which will allow us to fetch our schema from the remote target (Fauna). Since we are getting our schema from Fauna there's no need to add typedefs or resolvers, however if we were to add additional resolvers not already available in our Fauna instance the logic would need to be written with FQL – Fauna Query Language. In this demo we are going to avoid doing so.
Let's set up our Apollo Server handler using the micro distribution:
// api/graphql.js
import { createHttpLink } from 'apollo-link-http'
import {
  ApolloServer,
  makeRemoteExecutableSchema,
  introspectSchema,
} from 'apollo-server-micro'
import fetch from 'isomorphic-unfetch'

// create Fauna link
const link = createHttpLink({
  uri: 'https://graphql.fauna.com/graphql',
  fetch,
  headers: {
    Authorization: `Bearer ${process.env.DB_TOKEN}`,
  },
})

let handler

const getHandler = async () => {
  // do nothing if handler is still valid (function's container still running)
  if (handler) return handler

  // make remote schema usable with Apollo
  const schema = makeRemoteExecutableSchema({
    // fetch schema from remote host
    schema: await introspectSchema(link),
    // provide link
    link,
  })

  // create Apollo Server with created schema
  // `introspection: true` allows us to see the schema when we connect using GraphQL Playground
  const server = new ApolloServer({ schema, introspection: true })
  // manually applying `/api/graphql` for demonstration purposes
  handler = server.createHandler({ path: '/api/graphql' })
  return handler
}

export default async (req, res) => {
  const handler = await getHandler()
  await handler(req, res)
}
There's a lot going on with this update so let's break it down by first taking a look at the very end, the default export of our file. ZEIT's emulated Express handler provides a familiar implementation pattern. This is where we'll use the Apollo handler.
Inside the getHandler function we are fetching our schema from Fauna and making it usable with Apollo, then creating the server instance with the ability to browse the schema when connecting using something like GraphQL Playground.
Another small item I want to point out is the initialization of our handler variable and the first line inside the getHandler function:
// do nothing if handler is still valid (function's container still running)
if (handler) return handler
At first you may be thinking if this function runs once when its called and exits, why is this necessary? Well, our functions are running on micro which is a ZEIT distribution for "Asynchronous HTTP microservices"; kind of like their own tiny version of Express built for small, containerized microservices. On Now, these functions are spun up in a container when called upon, and may still be active when subsequently called, thus our handler would still have an assigned value given our container hasn't exited.
Finally coming back to the default export, we're using our handler to pass in requests making the Apollo Server more of a middleware to our Fauna database.
We can go ahead and test out our work:
now devThis will run the Now development environment, enabling us to replicate the production environment locally to run our serverless functions.
Open GraphQL Playground and plug in the localhost URL appended with /api/graphql. You should now be able to perform queries, mutations, and browse the available schema. Awesome! But there is concern with the security. We're using our security token from Fauna to access the database with Apollo, but nothing is in place to prevent people from calling the publicly available ZEIT Now API.
Moving forward try to leverage Apollo Server's context to add the authentication check to block unauthorized calls. Next time we'll take a look at using Auth0 with Svelte to protect our API while also creating the frontend.
description: 'Introduction to enhancing development workflows with the help of Fish functions'
date: 2019-02-27
tags: ['tooling', 'cli', 'development', 'workflow', 'fishshell']
The tooling surrounding the JavaScript community is uncanny. There are so many useful tools out in the wild such as Webpack, Rollup, create-react-app, Gatsby, VSCode extensions, and let's not forget npm & Yarn! Despite this I feel we often overlook our most important tool, the command line.
Though daunting at first, the command line has proven its reliability and operability time after time with utilities like Homebrew and Git. Even the lower-level, out-of-the-box utilities like cat and grep are incredibly useful. If you're not the type of person that prefers point-and-click operations to do something as monotonous copying a file or peeking into a file's contents then you may already know the value bash functions provide to drastically improve your existing workflow. But utilities don't have to be intense to be useful in the smallest regards.
Typing commands such as yarn workspace someWorkspace run someScript can get tedious when you're in the middle of debugging an application. Or even specifying a configuration file in ESLint using eslint --config ~/.config/.eslintrc.js someDirectory if you're using a global config file. Some commands or words can be easily fumbled when typing (e.g. "components" and "workspace"). This is where functions come in to play.
Here we will be exploring functions in fish shell, specifically how we can use its functions to shorten our everyday commands such as the two noted above. The syntax is different compared to traditional bash aliases, but I hope to get you up and running in no time by guiding you through a few examples.
Let's start with yarn workspaces by using an alias that is as fluid to type as it is short. Open your Fish configuration file via code ~/.config/fish/config.fish and input the following:
function ywrs
  command yarn workspaces $argv
end
That's it! You have just created your first function! Let's break this down:
function: declaration keywordywrs: our alias, this is what we will be able to type in our terminalcommand yarn workspaces $argv
command: keyword needed to tell the shell to "execute" the following command, just as how you would normally type into the terminalyarn workspaces: the command we are wrapping$argv: pass the remaining arguments to the defined command
ywrs info will thus execute yarn workspaces infoTo test out your new function you will need to reload the fish configuration by reevaluating the config.fish file (this is also done when a new shell session is created): source ~/.config/fish/config.fish.
Now that you've got your feet wet, let's try a few more examples.
function ywr
  command yarn workspace $argv
end
Similar to the initial example, this will allow us to easily execute commands in a workspace via a keyword that is both short and easy to type.
function eslint
  command eslint --config ~/.eslintrc.js $argv
end
Here we are extending the existing, global eslint command by specifying a configuration file that can now be used throughout your projects without setting up a project-level ESLint dotfile. For additional learning regarding global ESLint and VSCode, check out my other blog post.
The ESLint example above allows you to use the eslint command with a single configuration file, but what about automating the project-level install? Below we will discover how we can leverage functions, internal functions, and a bit of bash logic to install all of our ESLint dependencies and copy our global configuration file to the working directory.
function yawn
    if test (count $argv) -lt 1; or test $argv[1] = "--help"
        printf "Don't yawn too loud now, I need a package name"
    else if test (count $argv) -eq 1
        switch $argv[1]
            case 'eslint'
                _install_eslint
            case '*'
                echo "Doesn't look like I have that package, try again."
        end
    else
        echo $argv
    end
end

function _install_eslint
    yarn add -D \
        eslint babel-eslint eslint-loader \
        prettier eslint-config-prettier eslint-plugin-prettier \
        eslint-config-standard eslint-plugin-standard \
        eslint-plugin-node \
        eslint-plugin-jsx-a11y \
        eslint-plugin-promise \
        eslint-plugin-import \
        eslint-plugin-react \
    ;and cp ~/.config/.eslintrc.js .
end
Though we won't dive too deep into this example, let's briefly go over what value this example brings to the workflow:
function yawn...: high-level alias that acts as a cli utility to route a subcommand (passed as an argument) and call its respective internal aliasfunction _install_eslint...: internal alias that will be called from yawn given the input is yawn eslint.
config.fish file more readableWith these new functions you are now able to dive into a new project and call yawn eslint to set up ESLint. Personally I use this all the time and love to automate monotonous tasks just like this example.
So far we've covered:
config.fishI hope I was able to convince you to start using this functionality, whether you use the examples provided or by creating your own. Speaking of, in the last example I provided the skeleton to add more subcommands to the yawn function, try setting up your own internal function that helps automate the tedious aspects of your workflow! I'd love to hear how Fish functions have enhanced your workflow, Tweet @garlicbred with your story!
My name is Josef. This site is built with Svelte-Kit, and content is written using GitHub issues.
description: 'this is a test description, hello world!'
date: 2021-01-12
keywords: ['some', 'keywords']
This is some content. Wow great post
console.log('hello, world!')Some ending content with a link

description: Thoughts driven by post-conference bliss on Mississippi's first ever JavaScript conference
date: 2019-04-19
tags: ['javascript', 'conferences', 'experiences']
Late 2018 I attended my first tech conference the Tableau Conference — a massive event full of workshops and sessions stretched across the New Orleans' convention center (about a 1/4 mile long). The covered topics were mostly data-related with a few gritty developer talks sprinkled throughout. I learned a ton of data analytics concepts and tools, but even though I sat in on the developer talks I didn't feel like I fit the mould. At the time my attendance made sense given my position as a developer focusing 50%+ of efforts on BI tasks, specifically SQL reports and Tableau visualizations.
After the conference I realized that I cared more about the JavaScript language and the way it was used to deliver Tableau reports rather than using Tableau or looking at data in that aspect.
Fast-forward to early 2019. I'm still relatively new at IBM and am now focusing solely on web development. I see on Twitter that @jchiatt was looking to plan a JavaScript conference in Jackson, Mississippi in a mere six weeks. Six weeks. On top of that it would end up as Mississippi's first conference of its kind! I had to go to the inaugural MagnoliaJS Conference.
Through a lot of hard work and sheer willpower, JC managed to pull it together and deliver an amazing event. The agenda was so smooth albeit a few Tornado warnings, and the talks were held in a single auditorium, ultimately creating an intimate experience with a lineup chock-full of incredible people. Even the talks were ordered in such a way that felt like a novel; such a defined arc in the subjects that left you feeling euphoric. You could truly feel the amount of sincere thought that went into planning, curating, and executing such an occasion.
I'll admit I was nervous to be going and talking to the people I draw inspiration from on all things JavaScript, but in the end it was all worth it. Meeting all of the people I've been following on Twitter IRL was so surreal and rewarding.
Sidebar, Twitter is a wonderful space to interact with the JavaScript community.
If you're thinking about attending MagnoliaJS 2020 I can't recommend it enough. Everyone was welcoming and expressed a certain level of candor when conversing. Already I can't wait to see what's in store given such a successful first year.
description: 'My first blog post regarding my experiences using Gatsby.js'
date: 2019-01-24
tags: ['websites', 'javascript', 'gatsby']
Well, I'm sure you've visited the rest of the site by this point. This is my first official site built using Gatsby.js, and I had a great time using it. I've helped set up a site in the past, I'd played around with templates, and I contributed technical documentation to the project, but I never quite finished my website. Started quite a few times, actually, and ended up moving back over to another project. Thus is the hobby of development, I guess.
Between my old site (github) and this iteration, I had set up a couple different prototypes; much of which included Express backends with React and React Router v4, however in the end I enjoyed the ease of use of using Gatsby and Netlify rather than managing a server. That wasn't the only speedbump, though. Gatsby offered me so much out of the box including offline support via service workers, GraphQL for querying page assets, and most importantly a blazing fast end product. If you're looking to rebuild your site soon, I can't recommend it enough.
I hope to continue using this blog as a space for me to talk about whatever I'm working on, tech, code, music, etc. Perhaps I will continue sharing bits and pieces of my work with Gatsby as I add new features to the site, or even my thoughts on web development in general.
If you'd like to learn more about the tech behind my site and hosting choice, stop by my Github or by my Trello board to see what's in store.
description: 'Notes on deploying SvelteKit, PlanetScale, and Prisma on Vercel'
date: 2021-12-06
tags: ['serverless', 'SvelteKit', 'planetscale', 'prisma', 'vercel']
References:
Okay, say we have a working SvelteKit application locally with an endpoint that connects Prisma to our PlanetScale connection, we are able to run Prisma Studio and CRUD sample data, but are running into an issue deploying using the SvelteKit Vercel adapter.
Using David Parks's blog post as our starting example, let's add a Player model to our Prisma schema:
generator client {
  provider        = "prisma-client-js"
  previewFeatures = ["referentialIntegrity"]
}

datasource db {
  provider             = "mysql"
  url                  = env("DATABASE_URL")
  shadowDatabaseUrl    = env("SHADOW_DATABASE_URL")
  referentialIntegrity = "prisma"
}

model Player {
  id        Int      @id @default(autoincrement())
  createdAt DateTime @default(now())
  updatedAt DateTime @updatedAt
  name      String   @db.VarChar(255)
}
Continuing the blog post mentioned above, we can run prisma studio and add a sample Player, successfully migrate the schema using prisma migrate ..., and merge changes to the primary branch of our PlanetScale database. Using the following two code snippets as an example, we can set up a Prisma client and SvelteKit endpoint to query our Players.
// src/lib/prisma.js
import { PrismaClient } from '@prisma/client'

export let prisma
if (import.meta.env.PROD) {
  prisma = new PrismaClient()
} else {
  if (!global.prisma) {
    global.prisma = new PrismaClient()
  }
  prisma = global.prisma
}
// src/routes/api/players.json.js
import { prisma } from '$lib/prisma'
/** @type {import('@sveltejs/kit').RequestHandler} */
export async function get(request) {
let players
try {
players = await prisma.player.findMany()
} catch (error) {
console.error('Request error', error)
return {
status: 500,
body: {
error: {
message: error.message,
code: error.errorCode,
clientVersion: error.clientVersion,
},
},
}
}
if (players) {
return {
body: {
players,
},
}
}
}Now, continuing the blog post we'll need to add a parameter to the MySQL connection string (thanks to the PlanetScale GitHub Discussion comment): sslaccept=strict.
In the end, our DATABASE_URL environment variable in Vercel will end up looking as follows:
mysql://<username>:<password>@<host-url>/<database-name>?sslmode=require&sslaccept=strict&ssclcert=/etc/pki/tls/certs/ca-bundle.crt
Finally, the last piece we'll need is necessary to copy the Prisma schema file and Prisma client engines' information to the location of the render function created by SvelteKit when we use the Vercel adapter. The following package.json snippet was derived from this wonderful SvelteKit & Prisma repository by Mike Nikles:
{
  "scripts": {
    // ...
    "vercel-postbuild": "cp node_modules/@prisma/engines/*query* .vercel_build_output/functions/node/render/;cp prisma/schema.prisma .vercel_build_output/functions/node/render/",
    "vercel-build": "prisma generate && pnpm build && pnpm vercel-postbuild"
  }
}
Two notes on the copy commands:
ENOENT: no such file or directory, open '/var/task/schema.prisma' when attempting to call the endpoint /api/players.jsonError: Query engine library for current platform "rhel-openssl-1.0.x" could not be found. You incorrectly pinned it to rhel-openssl-1.0.x This probably happens, because you built Prisma Client on a different platform.
Now we can deploy to Vercel and visit the URL of our SvelteKit endpoint (/api/players.json) to see the test player results!
description: 'A brief tutorial to show you how to install ESLint globally and integrate with VSCode'
date: 2019-01-29
tags: ['tooling', 'javascript']
Okay, when I say installing ESLint "globally", I mean using one ESLint config for all VSCode project. You might be wondering why this is useful if you can just load the same config file in every single project, and you can. Setting up a global config file isn't to supercede the benefits of project-level dotfiles, but enhance the times you don't want to set up another project.
Say you want to practice some interview questions or edit a quick file, but still have your code style for readability. You can. Here I will walk you through setting up your own global ESLint dotfile.
In this brief tutorial we will be using VSCode + ESLint extension to point our editor to wherever we decide to drop our ESLint config file. First things first, let's install ESLint! We will be using Yarn to install our packages. Open your terminal and input the following:
yarn global add eslint
Once the command completes its execution you should now see a package.json and node_modules/ folder in your global Yarn directory (tip: to find your directory you can run yarn global dir). Now that we have the essentials installed we can go ahead and create our ESLint dotfile:
touch ~/.config/.eslintrc.js
Open the newly created file and paste in the following:
module.exports = {
  extends: 'eslint:recommended',
}
Great, we have ESLint installed globally and our dotfile has been created and populated with some content. We can now move forward to integrating with VSCode.
First, install the ESLint extension for VSCode. This will give us access to settings available for ESLint in our editor.
If you created the ESLint dotfile elsewhere than the location noted above, don't worry, the location will not matter (seriously, you can put this thing anywhere if you wanted to, except the project directory - we'll get into that later). What will matter is the fact that VSCode will not be able to utilize environment variables to identify the location of your file, therefore you will need to use the full qualified path (example: /Users/josef/.config/ rather than ~/.config). Personally I drop mine in the .config/ folder instead of the home root to avoid clogging up the directory with a plethora of dotfiles (this is virtually unavoidable). Given this information your VSCode User Settings for ESLint look this:
{
  "editor.formatOnSave": false,
  "eslint.autoFixOnSave": true,
  "eslint.options": {
    "configFile": "/Users/josef/.config/.eslintrc.js"
  }
}
Okay. A couple things to note:
"editor.formatOnSave": false, — we need this turned off otherwise VSCode and ESLint will clash when saving"eslint.autoFixOnSave": true, — this will turn on ESLint's auto-fixing instead of using VSCode's formatting."eslint.options": { "configFile": "/Users/josef/.config/.eslintrc.js" } — here we pointed VSCode to our recently created dotfile"eslint.packageManager": "yarn", — this allows ESLint+VSCode to know where the globally installed packages are location, and is imperative if you are using Yarn. If you replicated our installation steps using npm you don't need to worry as that is the default value for this setting.We should be all set. Go ahead and open a fresh VSCode instance (or reload your current window), pop open a JavaScript file and type away! You should notice little red squiggles underneath affected code. This is good! For reference as to what the ruleset we used (eslint:recommended) you can check out the list of rules here.
If you'd like to dive further into ESLint, I recommend checking out Prettier. I don't use ESLint without Prettier because the formatting provided by Prettier out-of-the-box is amazing. Maybe try out some popular style guides like AirBnB or Standard (my personal favorite).
description: 'My thoughts on using MDX in general, and how I use MDX with Gatsby'
date: 2019-02-18
tags: ['javascript', 'mdx', 'gatsby', 'websites']
This.tech.is.too.cool.
Using Gatsby to write blog posts in Markdown is great, for the most part I don't feel the need to reach for anything more. Well, but it would be nice to write all of my pages in Markdown if only I could also use my JavaScript (React) components.
That was when I stumbled upon MDX.
MDX is a blend of Markdown and JSX, the language prominently known for its use in React. I came across MDX on the Gatsby livestream the other week and saw how they were using it to build their pages (with gatbsy-mdx). I thought that'd be great to use considering how tedious HTML can be to type even with the help of Emmet and a few trusty VSCode extensions. Maybe not just typing, but reading, too.
So I picked up and tried it out, and it is phenomenal to work with. The setup is much like setting up Markdown in Gatsby, and can use the same gatsby-remark-* plugins. Though I haven't quite fully implemented it here on my site, I can't wait to convert and further modularize pages like my Résumé.
If you're looking for a more customized version of Markdown, but don't want to overcomplicate things, try MDX.
A declarative, efficient, and flexible JavaScript library for building user interfaces.
🖖 Vue.js is a progressive, incrementally-adoptable JavaScript framework for building UI on the web.
TypeScript is a superset of JavaScript that compiles to clean JavaScript output.
An Open Source Machine Learning Framework for Everyone
The Web framework for perfectionists with deadlines.
A PHP framework for web artisans
Bring data to life with SVG, Canvas and HTML. 📊📈🎉
JavaScript (JS) is a lightweight interpreted programming language with first-class functions.
Some thing interesting about web. New door for the world.
A server is a program made to process requests and deliver data to clients.
Machine learning is a way of modeling and interpreting data that allows a piece of software to respond intelligently.
Some thing interesting about visualization, use data art
Some thing interesting about game, make everyone happy.
We are working to build community through open source technology. NB: members must have two-factor auth.
Open source projects and samples from Microsoft.
Google ❤️ Open Source for everyone.
Alibaba Open Source for everyone
Data-Driven Documents codes.
China tencent open source team.