junxnone / aiwiki Goto Github PK
View Code? Open in Web Editor NEWAI Wiki
Home Page: https://junxnone.github.io/aiwiki
AI Wiki
Home Page: https://junxnone.github.io/aiwiki
pip install netron
netron -b xxx.pb
netron xxx.onnx --port xxx_port --host xxx_host
access from http://xxx_host:xxx_port
| Name | 计算数据 | Description |
|---|---|---|
| Cost Function | 所有数据误差 | Total Loss |
| Loss Function | 单个数据或者 Batch数据 误差 | Batch Loss |
git clone https://github.com/tzutalin/labelImg.git
cd labelimg
sudo apt-get install pyqt4-dev-tools
sudo pip install lxml
make qt4py2
python labelImg.py
python labelImg.py [IMAGE_PATH] [PRE-DEFINED CLASS FILE]
<annotation>
	<folder>demo</folder>
	<filename>demo.jpg</filename>
	<path>/home/xxx/labelImg/demo/demo.jpg</path>
	<source>
		<database>Unknown</database>
	</source>
	<size>
		<width>576</width>
		<height>324</height>
		<depth>3</depth>
	</size>
	<segmented>0</segmented>
	<object>
		<name>flowers</name>
		<pose>Unspecified</pose>
		<truncated>0</truncated>
		<difficult>0</difficult>
		<bndbox>
			<xmin>136</xmin>
			<ymin>102</ymin>
			<xmax>292</xmax>
			<ymax>259</ymax>
		</bndbox>
	</object>
</annotation>
no module named libs.resourcesPyrcc5 -o resources.py resources.qrc
cp resources.py libs/
MNIST 数据集来自美国国家标准与技术研究所, National Institute of Standards and Technology (NIST). 训练集 (training set) 由来自 250 个不同人手写的数字构成, 其中 50% 是高中学生, 50% 来自人口普查局 (the Census Bureau) 的工作人员. 测试集(test set) 也是同样比例的手写数字数据.
| Datasets | Description | Images |
|---|---|---|
| train-images-idx3-ubyte.gz | Training images (9.9 MB, 解压后 47 MB) | 60000 |
| train-labels-idx1-ubyte.gz | Training labels(29 KB, 解压后 60 KB) | 60000 |
| train-images-idx3-ubyte.gz | Test images (1.6 MB, 解压后 7.8 MB) | 10000 |
| t10k-labels-idx1-ubyte.gz | Test labels(5KB, 解压后 10 KB) | 10000 |
TRAINING SET LABEL FILE (train-labels-idx1-ubyte):
[offset] [type]          [value]          [description]
0000     32 bit integer  0x00000801(2049) magic number (MSB first)
0004     32 bit integer  60000            number of items
0008     unsigned byte   ??               label
0009     unsigned byte   ??               label
........
xxxx     unsigned byte   ??               label
The labels values are 0 to 9.
TRAINING SET IMAGE FILE (train-images-idx3-ubyte):
[offset] [type]          [value]          [description]
0000     32 bit integer  0x00000803(2051) magic number
0004     32 bit integer  60000            number of images
0008     32 bit integer  28               number of rows
0012     32 bit integer  28               number of columns
0016     unsigned byte   ??               pixel
0017     unsigned byte   ??               pixel
........
xxxx     unsigned byte   ??               pixel
| Year | Description |
|---|---|
| ~ | 基于Torch |
| 2017 | 由 Facebook 发布 |
| 2018 | 兼并 Caffe2 |
The BIT-Vehicle dataset contains 9,850 vehicle images.
├── README.txt
├── vehicle_0000001.jpg
├      ...
├── vehicle_0009849.jpg
├── vehicle_0009850.jpg
└── VehicleInfo.mat ==> matlab annotation information.
Vector of Locally Aggregated Descriptors , 由Jegou et al.在2010年提出,其核心**是aggregated(积聚),主要应用于图像检索领域
在深度学习时代之前,图像检索领域以及分类主要使用的常规算法有BoW、Fisher Vector及VLAD等。
VLAD的优点:
其中步骤4、5可选,在步骤3得到残差累加向量后进行L2归一化即可用欧氏距离等计算两张图片的相似性从而实现图片检索
VLAD 实现
带有VLAD层的卷积神经网络结构
一种类似于BOVW词袋模型的一种编码方式,如提取图像的SIFT特征,通过矢量量化(KMeans聚类),构建视觉词典(码本),FV采用混合高斯模型(GMM)构建码本,但是FV不只是存储视觉词典的在一幅图像中出现的频率,并且FV还统计视觉词典与局部特征(如SIFT)的差异。
 |
- Tripelet Network由3个相同的前馈神经网络(彼此共享参数)组成 - 每次输入三个样本, 网络会输出两个值: 候选样本与同类样本,候选样本与异类样本,在embedding层的特征向量的L2距离 - 假设输入为: x, 候选样本: x− 异类样本: x+ - 这个网络对x− 和x+ 相对于x 的距离进行了编码 |
|---|
Triplet Loss,即三元组损失,用于训练差异性较小的数据集,数据集中标签较多,标签的样本较少。输入数据包括锚(Anchor)示例⚓️、正(Positive)示例和负(Negative)示例,通过优化模型,使得锚示例与正示例的距离小于锚示例与负示例的距离,实现样本的相似性计算。其中锚示例是样本集中随机选取的一个样本,正示例与锚示例属于同一类的样本,而负示例与锚示例属于不同类的样本。
triplet loss的优势在于细节区分,即当两个输入相似时,triplet loss能够更好地对细节进行建模,相当于加入了两个输入差异性差异的度量,学习到输入的更好表示,从而在上述两个任务中有出色的表现。当然,triplet loss的缺点在于其收敛速度慢,有时不收敛。
L=max(d(a,p)−d(a,n)+margin,0)
Normal Cell - 输入和输出的特征图维度相同Reduction Cell - 输出特征图长宽减半RL + Policy GradientModel = Normal Cell x N + Reduction Cell x MNormal/Reduction Cell = Block x B在 paper 中 B = 5
Block = hidden states x 2 + Operation x 3| Arch | Blocks |
|---|---|
 |
 |
Cell = B Block / Each Block predict 5 Steps |
|---|
 |
| Step 3/4 可选 Operations | Step 5 可选 Operation / Combine two hidden states |
|---|---|
| identity | element-wise addition |
| 1x3 then 3x1 convolution | concatenation |
| 1x7 then 7x1 convolution | |
| 3x3 dilated convolution | |
| 3x3 average pooling | |
| 3x3 max pooling | |
| 5x5 max pooling | |
| 7x7 max pooling | |
| 1x1 convolution | |
| 3x3 convolution | |
| 3x3 depthwise-separable conv | |
| 5x5 depthwise-seperable conv | |
| 7x7 depthwise-separable conv |
NASNet-A/B/C| Name | Description |
|---|---|
| NASNet-A | - B=5 |
| NASNet-B | - B=4 - 最后没有Concatenate - Layer Normalization & Instance Normalization |
| NASNet-C | - B=4 - Layer Normalization & Instance Normalization |
搜素到的相对比较好的 Normal Cell & Reduction Cell - NASNet-A |
|---|
 |
| NASNet-B | NASNet-C |
|---|---|
 |
 |
Layer Normalization
Instance Normalization
git clone https://github.com/pjreddie/darknet
cd darknet
make
vi Makefile
OPENCV=1
make
./darknet imtest data/eagle.jpg
wget https://pjreddie.com/media/files/yolov3.weights
./darknet detect cfg/yolov3.cfg yolov3.weights data/dog.jpg

wget https://pjreddie.com/media/files/yolov3-tiny.weights
./darknet detect cfg/yolov3-tiny.cfg yolov3-tiny.weights data/dog.jpg
| Gray | RGB |
|---|---|
 |
 |
计算 & 绘制函数
计算方法
 |
|---|
 |
 |
 |
|---|
| 原图 | cv.equalizeHist() - 全局直方图均衡 | cv.createCLAHE() - 自适应直方图均衡 |
|---|---|---|
 |
 |
 |
 |
 |
|---|
Google针对手机等嵌入式设备提出的一系列轻量级的深层神经网络,取名为MobileNet.
目前有三个版本:v1/v2/v3
| Name | Description |
|---|---|
| MobileNet V1 | 可分卷积 |
| MobileNet V2 | 线性 Bottlenecks & 反转残差模块 |
| MobileNet V3 | NAS |
@CVPR [Paper]21k Sub-Categories22k Sub-CategoriesYou Only Look Oncegraph TD
O(YOLO家谱)--> |Joseph Redmon| V1(2015 YOLOv1)
V1 --> V2(2016 YOLOv2)
V2 --> V3(2018 YOLOv3)
V3 --> |Alexey Bochkovskiy| V4(2020 YOLOv4)
V3 --> |百度| PP(2020 PP-YOLO)
V3 --> |旷世| VX(2021 YOLOX)
V4 --> V7(2022 YOLOv7)
V4 --> |Ultralytics LLC| V5(2021 YOLOv5)
V5 --> V8(2022 YOLOv8)
V4 --> |美团| V6(2022 YOLOv6)
V5 --> V6
V4 --> |ChienYaoWang| VR(2021 YOLOR)
| Tools | Description |
|---|---|
| gst-inspect-1.0 | 查看 elements 信息 - src/sink/pad/Capabilities/... |
| gst-launch-1.0 | 创建 pipeline |
| [gst-device-monitor-1.0] | 查看当前设备上的 Device |
| gst-discoverer-1.0 | 查看 media 相关信息 - codec/Channels/Sample rate/Bitrate/... |
| ges-launch-1.0 | 控制 timeline 开始时间/间隔/... |
xxx format -> yuv/pcmwget http://www.robots.ox.ac.uk/~vgg/data/pets/data/images.tar.gz
wget http://www.robots.ox.ac.uk/~vgg/data/pets/data/annotations.tar.gz
trimaps/ 	Trimap annotations for every image in the dataset
		Pixel Annotations: 1: Foreground 2:Background 3: Not classified
xmls/		Head bounding box annotations in PASCAL VOC Format

list.txt	Combined list of all images in the dataset
		Each entry in the file is of following nature:
		Image CLASS-ID SPECIES BREED ID
		ID: 1:37 Class ids
		SPECIES: 1:Cat 2:Dog
		BREED ID: 1-25:Cat 1:12:Dog
		All images with 1st letter as captial are cat images while
		images with small first letter are dog images.
trainval.txt	Files describing splits used in the paper.However,
test.txt	you are encouraged to try random splits.
(a) (b) (c)
german_shorthaired_9 15 2 9
 |                    | | |— BREED ID
 |                    | |— SPECIES: 1:Cat 2:Dog
 |                    |— Class ids
 |— SPECIES
德国短毛犬( German Shorthaired)
fine 指子类,coarse 指父类| Superclass | Classes |
|---|---|
| aquatic mammals | beaver, dolphin, otter, seal, whale |
| fish | aquarium fish, flatfish, ray, shark, trout |
| flowers | orchids, poppies, roses, sunflowers, tulips |
| food containers | bottles, bowls, cans, cups, plates |
| fruit and vegetables | apples, mushrooms, oranges, pears, sweet peppers |
| household electrical devices | clock, computer keyboard, lamp, telephone, television |
| household furniture | bed, chair, couch, table, wardrobe |
| insects | bee, beetle, butterfly, caterpillar, cockroach |
| large carnivores | bear, leopard, lion, tiger, wolf |
| large man-made outdoor things | bridge, castle, house, road, skyscraper |
| large natural outdoor scenes | cloud, forest, mountain, plain, sea |
| large omnivores and herbivores | camel, cattle, chimpanzee, elephant, kangaroo |
| medium-sized mammals | fox, porcupine, possum, raccoon, skunk |
| non-insect invertebrates | crab, lobster, snail, spider, worm |
| people | baby, boy, girl, man, woman |
| reptiles | crocodile, dinosaur, lizard, snake, turtle |
| small mammals | hamster, mouse, rabbit, shrew, squirrel |
| trees | maple, oak, palm, pine, willow |
| vehicles 1 | bicycle, bus, motorcycle, pickup truck, train |
| vehicles 2 | lawn-mower, rocket, streetcar, tank, tractor |
tensorflow.keras.datasets.cifar10.load_data() 下载数据集时特别慢~/.keras/datasets/cifar-10-batches-py.tar.gzDetection/Segmentationwget http://host.robots.ox.ac.uk/pascal/VOC/voc2012/VOCtrainval_11-May-2012.tar
tar -xvf VOCtrainval_11-May-2012.tar
| Year | Statistics | New developments | Notes |
|---|---|---|---|
| 2005 | Only 4 classes: bicycles, cars, motorbikes, people. Train/validation/test: 1578 images containing 2209 annotated objects. | Two competitions: classification and detection | Images were largely taken from exising public datasets, and were not as challenging as the flickr images subsequently used. This dataset is obsolete. |
| 2006 | 10 classes: bicycle, bus, car, cat, cow, dog, horse, motorbike, person, sheep. Train/validation/test: 2618 images containing 4754 annotated objects. | Images from flickr and from Microsoft Research Cambridge (MSRC) dataset | The MSRC images were easier than flickr as the photos often concentrated on the object of interest. This dataset is obsolete. |
| 2007 | 20 classes:Person: personAnimal: bird, cat, cow, dog, horse, sheepVehicle: aeroplane, bicycle, boat, bus, car, motorbike, trainIndoor: bottle, chair, dining table, potted plant, sofa, tv/monitorTrain/validation/test: 9,963 images containing 24,640 annotated objects. | Number of classes increased from 10 to 20Segmentation taster introducedPerson layout taster introducedTruncation flag added to annotationsEvaluation measure for the classification challenge changed to Average Precision. Previously it had been ROC-AUC. | This year established the 20 classes, and these have been fixed since then. This was the final year that annotation was released for the testing data. |
| 2008 | 20 classes. The data is split (as usual) around 50% train/val and 50% test. The train/val data has 4,340 images containing 10,363 annotated objects. | Occlusion flag added to annotationsTest data annotation no longer made public.The segmentation and person layout data sets include images from the corresponding VOC2007 sets. | |
| 2009 | 20 classes. The train/val data has 7,054 images containing 17,218 ROI annotated objects and 3,211 segmentations. | From now on the data for all tasks consists of the previous years' images augmented with new images. In earlier years an entirely new data set was released each year for the classification/detection tasks.Augmenting allows the number of images to grow each year, and means that test results can be compared on the previous years' images.Segmentation becomes a standard challenge (promoted from a taster) | No difficult flags were provided for the additional images (an omission).Test data annotation not made public. |
| 2010 | 20 classes. The train/val data has 10,103 images containing 23,374 ROI annotated objects and 4,203 segmentations. | Action Classification taster introduced.Associated challenge on large scale classification introduced based on ImageNet.Amazon Mechanical Turk used for early stages of the annotation. | Method of computing AP changed. Now uses all data points rather than TREC style sampling.Test data annotation not made public. |
| 2011 | 20 classes. The train/val data has 11,530 images containing 27,450 ROI annotated objects and 5,034 segmentations. | Action Classification taster extended to 10 classes + "other". | Layout annotation is now not "complete": only people are annotated and some people may be unannotated. |
| 2012 | 20 classes. The train/val data has 11,530 images containing 27,450 ROI annotated objects and 6,929 segmentations. | Size of segmentation dataset substantially increased.People in action classification dataset are additionally annotated with a reference point on the body. | Datasets for classification, detection and person layout are the same as VOC2011. |
GoogLeNet 是对 Yann LeCuns 的 LeNet 致敬
- 由于图像的突出部分可能有极大的尺寸变化
- 全局的信息应该使用大的内核卷积
- 局部的信息应该使用小内核卷积
Mini-network 替换 5x5 的卷积| Pipeline |
|---|
| R-CNN |
 |
| Fast R-CNN |
 |
| Faster R-CNN |
 |
1.在图像中确定约1000-2000个候选框 (使用选择性搜索)
2. 每个候选框内图像块缩放至相同大小,并输入到CNN内进行特征提取
3.对候选框中提取出的特征,使用分类器判别是否属于一个特定类
4.对于属于某一特征的候选框,用回归器进一步调整其位置
1.在图像中确定约1000-2000个候选框 (使用选择性搜索)
2.对整张图片输进CNN,得到feature map
3.找到每个候选框在feature map上的映射patch,将此patch作为每个候选框的卷积特征输入到SPP layer和之后的层
4.对候选框中提取出的特征,使用分类器判别是否属于一个特定类
5.对于属于某一特征的候选框,用回归器进一步调整其位置
1.对整张图片输进CNN,得到feature map
2.卷积特征输入到RPN,得到候选框的特征信息
3.对候选框中提取出的特征,使用分类器判别是否属于一个特定类
4.对于属于某一特征的候选框,用回归器进一步调整其位置
Model Optimizer 把各种框架训练的模型文件转换成 OpenVINO 可以识别的文件并优化模型Pytorch ==> ONNX ==> IR| Parameters | Description |
|---|---|
--reverse_input_channels |
当输入为 3 通道图像时, 转换通道顺序 RGB -> BGR |
| --input_shape | 输入的 Shape NCHW/NHWC |
| --mean_values | RGB Mean values ==> image - mean |
| --scale | 归一化 ==> image - mean) /scale |
python3 /opt/intel/openvino/deployment_tools/model_optimizer/mo.py \
        --input_model frozen_inference_graph.pb \
        --tensorflow_use_custom_operations_config /opt/intel/openvino/deployment_tools/model_optimizer/extensions/front/tf/ssd_v2_support.json \
        --tensorflow_object_detection_api_pipeline_config pipeline.config \
        --data_type FP16\
        --output_dir FP16
python3 /opt/intel/openvino/deployment_tools/model_optimizer/mo_tf.py -b 1 \
    --input_model ./frozen_darknet_yolov3_model.pb \
    --tensorflow_use_custom_operations_config ./yolo_v3.json \
    --data_type FP16\
    --output_dir ./FP16
python3 /opt/intel/openvino/deployment_tools/model_optimizer/mo_tf.py -b 1 \
   --input_model ./frozen_darknet_yolov3_model.pb \
    --tensorflow_use_custom_operations_config ./yolo_v3_tiny.json \
    --data_type FP16\
    --output_dir ./tiny_FP16
| Name | Description | Examples |
|---|---|---|
| 腐蚀 | 侵蚀前景对象的边界白色/高值 => 黑色/0 |
 => =>  |
| 膨胀 | 增加前景对象的边界黑色/0 => 白色/高值 |
 => => |
| 开运算 | 腐蚀后膨胀 |  |
| 闭运算 | 膨胀后腐蚀 |  |
| 形态梯度 | 膨胀腐蚀差值 |  |
| 顶帽 | 原图像和开运算的差值 |  |
| 黑帽 | 原图像和闭运算的差值 |  |
#coding=utf-8
import cv2
import numpy as np
import matplotlib.pyplot as plt

img = cv2.imread('t.png', 0)
#img = cv2.cvtColor(oimg, cv2.COLOR_BGR2RGB)

m1 = plt.imshow(img)
m1.set_cmap('gray')
plt.show()

kernel = np.ones((5, 5), np.uint8)
erosion = cv2.erode(img, kernel)  # 腐蚀
fig = plt.figure()
m1 = plt.imshow(erosion)
m1.set_cmap('gray')
plt.show()

kernel = np.ones((10, 10), np.uint8)
erosion = cv2.erode(img, kernel)  # 腐蚀
fig = plt.figure()
m1 = plt.imshow(erosion)
m1.set_cmap('gray')
plt.show()
| 原图 | 5x5 腐蚀 | 10x10 腐蚀 |
|---|---|---|
 |
 |
 |
kernel = cv2.getStructuringElement(cv2.MORPH_RECT, (10, 10))  # 矩形结构
erosion = cv2.erode(img, kernel)  # 腐蚀
fig = plt.figure()
m1 = plt.imshow(erosion)
m1.set_cmap('gray')
plt.show()

kernel = cv2.getStructuringElement(cv2.MORPH_ELLIPSE, (10, 10))  # 椭圆结构
erosion = cv2.erode(img, kernel)  # 腐蚀
fig = plt.figure()
m1 = plt.imshow(erosion)
m1.set_cmap('gray')
plt.show()

kernel = cv2.getStructuringElement(cv2.MORPH_CROSS, (10, 10))  # 十字形结构
erosion = cv2.erode(img, kernel)  # 腐蚀
fig = plt.figure()
m1 = plt.imshow(erosion)
m1.set_cmap('gray')
plt.show()
| 矩形结构腐蚀 | 椭圆结构腐蚀 | 十字结构腐蚀 |
|---|---|---|
 |
 |
 |
kernel = np.ones((5, 5), np.uint8)
dilation = cv2.dilate(img, kernel)  # 膨胀
fig = plt.figure()
m1 = plt.imshow(dilation)
m1.set_cmap('gray')
plt.show()

kernel = np.ones((10, 10), np.uint8)
dilation = cv2.dilate(img, kernel)  # 膨胀
fig = plt.figure()
m1 = plt.imshow(dilation)
m1.set_cmap('gray')
plt.show()
| 原图 | 5x5 膨胀 | 10x10 膨胀 |
|---|---|---|
 |
 |
 |
开运算 - 先腐蚀后膨胀(因为先腐蚀会分开物体,这样容易记住),其作用是:分离物体,消除小区域。
闭运算 - 先膨胀后腐蚀(先膨胀会使白色的部分扩张,以至于消除/"闭合"物体里面的小黑洞,所以叫闭运算)

kernel = cv2.getStructuringElement(cv2.MORPH_RECT, (5, 5))  # 定义结构元素

img = cv2.imread('t.png', 0)
plt.imshow(img, cmap='gray')
plt.show()

opening = cv2.morphologyEx(img, cv2.MORPH_OPEN, kernel)  # 开运算
fig = plt.figure()
plt.imshow(opening, cmap='gray')
plt.show()


closing = cv2.morphologyEx(img, cv2.MORPH_CLOSE, kernel)  # 闭运算
fig = plt.figure()
plt.imshow(closing, cmap='gray')
plt.show()
| 原图 | 开运算 | 闭运算 |
|---|---|---|
 |
 |
 |
img = cv2.imread('t.png', 0)
plt.imshow(img, cmap='gray')
plt.show()

gradient = cv2.morphologyEx(img, cv2.MORPH_GRADIENT, kernel)
plt.imshow(gradient, cmap='gray')
plt.show()

tophat = cv2.morphologyEx(img, cv2.MORPH_TOPHAT, kernel)
plt.imshow(tophat, cmap='gray')
plt.show()

blackhat = cv2.morphologyEx(img, cv2.MORPH_BLACKHAT, kernel)
plt.imshow(blackhat, cmap='gray')
plt.show()
| 原图 | 形态学梯度 | 顶帽 | 黑帽 |
|---|---|---|---|
 |
 |
 |
 |
Siamese也就是“暹罗”人或“泰国”人。Siamese在英语中是“孪生”、“连体”的意思
 |
- 孪生神经网络有两个输入 - 两个输入进入两个神经网络 - 输入映射到新空间形成新表示 - 计算Loss来评价输入相似度。 |
|---|
| Network | siamese network | pseudo-siamese network |
|---|---|---|
| Diff | 处理两个输入"比较类似"的情况 | 处理两个输入"有一定差别"的情况 |
| UseCase | - 比较两张图片 | - 验证标题与正文的描述是否一致 - 文字是否描述了一幅图片 |
BGR, 而其他很多工具(matplotlib/...)需要 RGB format Image, 可以使用 cv2.cvtColor() 转换Mat cv::imread(const String & filename, int flags = IMREAD_COLOR) retval = cv.imread( filename[, flags])cv2.imwrite()bool cv::imwrite( const String & filename, InputArray img, const std::vector< int > & params = std::vector< int >() )retval = cv.imwrite(filename, img[, params])Converts an image from one color space to another.
float32 --> int8Zero Point
Scale
最大值/最小值 映射到 [-128, 127]零,对应量化后的零最大值/最小值 映射到 [0, 255]Zero Point/ScaleZ/S 重复量化IP Camera: IPC-SR3321P-IP
#!/usr/bin/env python
# coding=utf-8
import cv2
cap = cv2.VideoCapture("rtsp://192.168.1.10:554/user=admin&password=&channel=1&stream=0.sdp?")
print (cap.isOpened())
while cap.isOpened():
        success,frame = cap.read()
        cv2.imshow("frame",frame)
        cv2.waitKey(1)
Content-based image retrieval - 基于内容的图像检索| Name | From | UI | Open Source |
|---|---|---|---|
| AIDE | Microsoft | √ | √ |
| VOTT | Microsoft | √ | √ |
| label-studio | Heartex | √ | √ |
| modAL | modAL | Jupyter notebook | √ |
| ALiPy | NUAA-AL | × | √ |
| PyTorch Active Learning | Robert Munro | × | √ |
| active-learning | × | √ | |
| EasyDL | Baidu | √ | × |
| ModelArts | HuaWei | √ | × |
Reinforcement Learning - 强化学习
cumulative discounted future reward |
 |
|---|
- 当环境可被完全观察到时,强化学习问题被称为马尔可夫决策过程(markov decision process)
- 当状态不依赖于之前的操作时,我们称该问题为上下文赌博机(contextual bandit problem)
- 当没有状态,只有一组最初未知回报的可用动作时,这个问题就是经典的多臂赌博机(multi-armed bandit problem)。
State 对应的 Action - 上下左右 的概率最大的那个| Algos | Description |
|---|---|
| MDP | |
| PG | Policy Gradient |
| Q-Learning | |
| DQN | |
| SARSA | State-Action-Reward-State-Action |
| DDPG | Deep Deterministic Policy Gradient |
| TRPO | Trust Region Policy Optimization |
| PPO | Proximal Policy Optimization |
| Name | Description |
|---|---|
| OpenAI Gym & Universe | |
| DeepMind lab |
Uesed Plugins
| PLUGIN | LIBRARY NAME FOR LINUX | DEPENDENCY LIBRARIES FOR LINUX |
|---|---|---|
| CPU | libMKLDNNPlugin.so | libmklml_tiny.so, libiomp5md.so |
| GPU | libclDNNPlugin.so | libclDNN64.so |
| FPGA | libdliaPlugin.so | libdla_compiler_core.so, libdla_runtime_core.so |
| MYRIAD | libmyriadPlugin.so | No dependencies |
| HDDL | libHDDLPlugin.so | libbsl.so, libhddlapi.so, libmvnc-hddl.so |
| GNA | libGNAPlugin.so | libgna_api.so |
| HETERO | libHeteroPlugin.so | Same as for selected plugins |
| MULTI | libMultiDevicePlugin.so | Same as for selected plugins |
| PLUGIN | LIBRARY NAME FOR WINDOWS | DEPENDENCY LIBRARIES FOR WINDOWS |
|---|---|---|
| CPU | MKLDNNPlugin.dll | mklml_tiny.dll, libiomp5md.dll |
| GPU | clDNNPlugin.dll | clDNN64.dll |
| FPGA | dliaPlugin.dll | dla_compiler_core.dll, dla_runtime_core.dll |
| MYRIAD | myriadPlugin.dll | No dependencies |
| HDDL | HDDLPlugin.dll | bsl.dll, hddlapi.dll, json-c.dll, libcrypto-1_1-x64.dll, libssl-1_1-x64.dll, mvnc-hddl.dll |
| GNA | GNAPlugin.dll | gna.dll |
| HETERO | HeteroPlugin.dll | Same as for selected plugins |
| MULTI | MultiDevicePlugin.dll | Same as for selected plugins |
| Steps | C++ Classes | Python Classes |
|---|---|---|
| 读取IR | CNNNetReader CNNNetwork |
|
| 指定 IO 格式 | CNNNetwork | |
| 创建 IE Core 对象 | Core | |
| 编译并载入 Network 到 Device | Core | |
| 设置输入 Data | ExecutableNetwork InferRequest |
|
| 执行 Inference | InferRequest | |
| 获取输出 | InferRequest |
Singular Value Decomposition - 奇异值分解| 定义 | Description |
|---|---|
| n x n 维矩阵 | |
| 特征向量和特征值关系 | |
| n 维向量 | |
| 矩阵 A 的 一个 特征值 | |
| 矩阵 A 的 特征值 |
|
| n 个特征值 | |
| $ \omega_{1}, \omega_{2},..., \omega_{n} $ | n 个特征值对应的特征向量 |
| n个特征值为主对角线的 n x n 矩阵 | |
| n 个特征向量组成的 n x n 矩阵 | |
| 矩阵 A 的 特征分解表示 | |
| W 的 n 个特征向量标准化 |
| 定义 | Description |
|---|---|
| m x n 矩阵 | |
| A 的 SVD 分解 | |
| m x m 矩阵 |
|
| m x n 矩阵 除主对角线外全是 0, 主对角线上的每个元素都称为奇异值 | |
| n x n 矩阵 |
|
| n x n 矩阵 |
|
| m x m 矩阵 |
|
| Steps | Calc |
|---|---|
| A 的定义,计算 |
$A = \begin{bmatrix} 0 & 1 \ 1 & 1 \ 1 & 0 \ \end{bmatrix}$ $A^T = \begin{bmatrix} 0 & 1 & 1 \ 1 & 1 & 0 \ \end{bmatrix}$ |
| 计算 |
$A^TA=\begin{bmatrix} 2 & 1 \ 1 & 2 \ \end{bmatrix} $ $AA^T= \begin{bmatrix} 1 & 1 & 0 \ 1 & 2 & 1 \ 0 & 1 & 1 \ \end{bmatrix}$ |
| 计算特征值$A^TA$ |
$(A-\lambda I)x=0 \Rightarrow \begin{vmatrix} 2-\lambda & 1 \ 1 & 2-\lambda \ \end{vmatrix} = 0 \Rightarrow (2-\lambda)^2 - 1=0 \Rightarrow \lambda_{1}=3, \lambda_{2}=1$ |
| 计算$A^TA$ 特征向量 |
$\Rightarrow v_{2} = \begin{bmatrix} \frac{1}{\sqrt{2}} \ \frac{1}{\sqrt{2}} \end{bmatrix}$ |
| ↑ |
$\Rightarrow v_{1} = \begin{bmatrix} -\frac{1}{\sqrt{2}} \ \frac{1}{\sqrt{2}} \end{bmatrix}$ |
特征向量标准化
$w^Tw=1 $
$\Rightarrow \begin{bmatrix} a_{1} & a_{2} \ \end{bmatrix} \begin{bmatrix} a_{1} \ a_{2} \end{bmatrix} = 1$
$\Rightarrow a_{1}^2 + a_{2}^2 = 1$
sigmoid 或 softmax 来实现二分类或多分类sigmoid 或 softmax 来实现二分类或多分类看到 divamgupta/image-segmentation-keras 中使用了vanilla_encoder, 然后查到一个英文梗:
- vanilla 的原意是香草,而香草口味的冰淇淋被吐槽和原味没什么区别,所以香草就有了原汁原味的意思
Microsoft COCO Datasets
curl https://sdk.cloud.google.com | bash
mkdir train2017
gsutil -m rsync gs://images.cocodataset.org/train2017 train2017
wget http://images.cocodataset.org/annotations/annotations_trainval2017.zip
| Tasks | Labels |
|---|---|
| Object Detection |  |
| Stuff Segmentation |  |
| Panoptic Segmentation |  |
| Keypoint Detection |  |
| Captioning |  |
annotation{
       "id" : int,
       "image_id" : int,
       "category_id" : int,
       "segmentation" : RLE or [polygon],
       "area" : float,
       "bbox" : [x,y,width,height],
       "iscrowd" : 0 or 1,
}

categories[{
       "id" : int,
       "name" : str,
       "supercategory" : str,
}]
iscrowd=1 是否是 semantic segmentation
| Name | Description | example |
|---|---|---|
| Top-Down | 目标检测 -> BBox -> 语义分割 -> Instance Seg |
Mask R-CNN |
| Bottom-Up | 语义分割 -> 聚类&度量学习 -> Instance Seg |
Discriminative Loss Function |
| Single Shot | YOLACT SOLO PolarMask AdaptIS BlendMask |
| Date | Name /paper |
|---|---|
| 2016.3 | InstanceFCN - Instance-sensitive Fully Convolutional Networks |
| 2016.11 | FCIS - Fully Convolutional Instance-aware Semantic Segmentation |
| 2019.4 | YOLACT/YOLACT++ - You Only Look At CoefficienTs |
| 2019.11 | CenterMask : Real-Time Anchor-Free Instance Segmentation |
| 2019.12 | SOLO: Segmenting Objects by Locations |
| 2020 | BlendMask - Top-Down Meets Bottom-Up for Instance Segmentation |
brisk = cv2.BRISK_create()
kp = brisk.detect(img, None)
kp, des = brisk.compute(img, kp)
out_img = img.copy()
out_img = cv2.drawKeypoints(img, kp, out_img)
fig = plt.figure(figsize=(5, 5))
plt.imshow(out_img)
matcher = cv2.BFMatcher()
matches = matcher.match(des, des_30)
out_img = cv2.drawMatches(img, kp, bk30_img, kp_30, matches[0:5], out_img,flags=cv2.DrawMatchesFlags_NOT_DRAW_SINGLE_POINTS)
plt.figure(figsize=(25, 15))
plt.imshow(out_img)
FLANN_INDEX_LSH = 6
index_params = dict(algorithm=FLANN_INDEX_LSH,
                                 table_number=6,
                                 key_size=12,
                                 multi_probe_level=1)
search_params = dict(checks=100)
flann = cv2.FlannBasedMatcher(index_params, search_params)
knn_matches = flann.knnMatch(des, des_30, k=2)

good_matches = []
lowe_ratio_test = 0.3
min_match_count = 10

for m, n in knn_matches:
    if m.distance < n.distance * lowe_ratio_test:
        good_matches.append(m)

    if len(good_matches) > min_match_count:
        src_pts = np.float32([kp[m.queryIdx].pt for m in good_matches]).reshape(-1, 1, 2)
        dst_pts = np.float32([kp_30[m.trainIdx].pt for m in good_matches]).reshape(-1, 1, 2)
    else:
        src_pts = None
        dst_pts = None
M, mask = cv2.findHomography(src_pts, dst_pts, method=cv2.RANSAC, ransacReprojThreshold=4.0)
matches_mask = mask.ravel().tolist()

        # Apply homography matrix.
h, w, c = img.shape
# ref image
pts = np.float32([[0, 0], [0, h - 1], [w - 1, h - 1], [w - 1, 0]]).reshape(-1, 1, 2)
# test image
dst = cv2.perspectiveTransform(pts, M)

test_img = cv2.polylines(img=img_30, pts=[np.int32(dst)], isClosed=True,
                                 color=255, thickness=3, lineType=cv2.LINE_AA)

img_matches = np.empty(
            shape=(max(img.shape[0], img_30.shape[0]),
                   img.shape[1] + img_30.shape[1],
                   3),
            dtype=np.uint8)
out_img = cv2.drawMatches(img, kp,
                        test_img, kp_30,
                        matches1to2=good_matches,
                        outImg=img_matches,
                        matchesMask=matches_mask,
                        flags=cv2.DrawMatchesFlags_NOT_DRAW_SINGLE_POINTS)

plt.figure(figsize=(10, 10))
plt.imshow(out_img)
im30 =  cv2.imread('t30.png',3)
(kp_i30, des_i30) = brisk.detectAndCompute(im30, None)
bk30_img = im30.copy()
o30_img = im30.copy()
o30_img = cv2.drawKeypoints(bk30_img, kp_i30, o30_img)
plt.figure(figsize=(15, 10))
plt.imshow(o30_img)


# test image
points = np.int32(dst).reshape(4, 2)
rect = np.zeros((4, 2), dtype="float32")
rect[0], rect[1], rect[2], rect[3] = points[0], points[3], points[2], points[1]
# ref image
destination = np.array([[0, 0], [w - 1, 0], [w - 1, h - 1], [0, h - 1]], dtype="float32")
# homography matrix
h_mat = cv2.getPerspectiveTransform(rect, destination)
frame_wrap = cv2.warpPerspective(src=im30, M=h_mat, dsize=(w, h))
# test image overlay
frame_overlay = frame_wrap.copy()

plt.figure(figsize=(15, 10))
plt.imshow(frame_overlay)
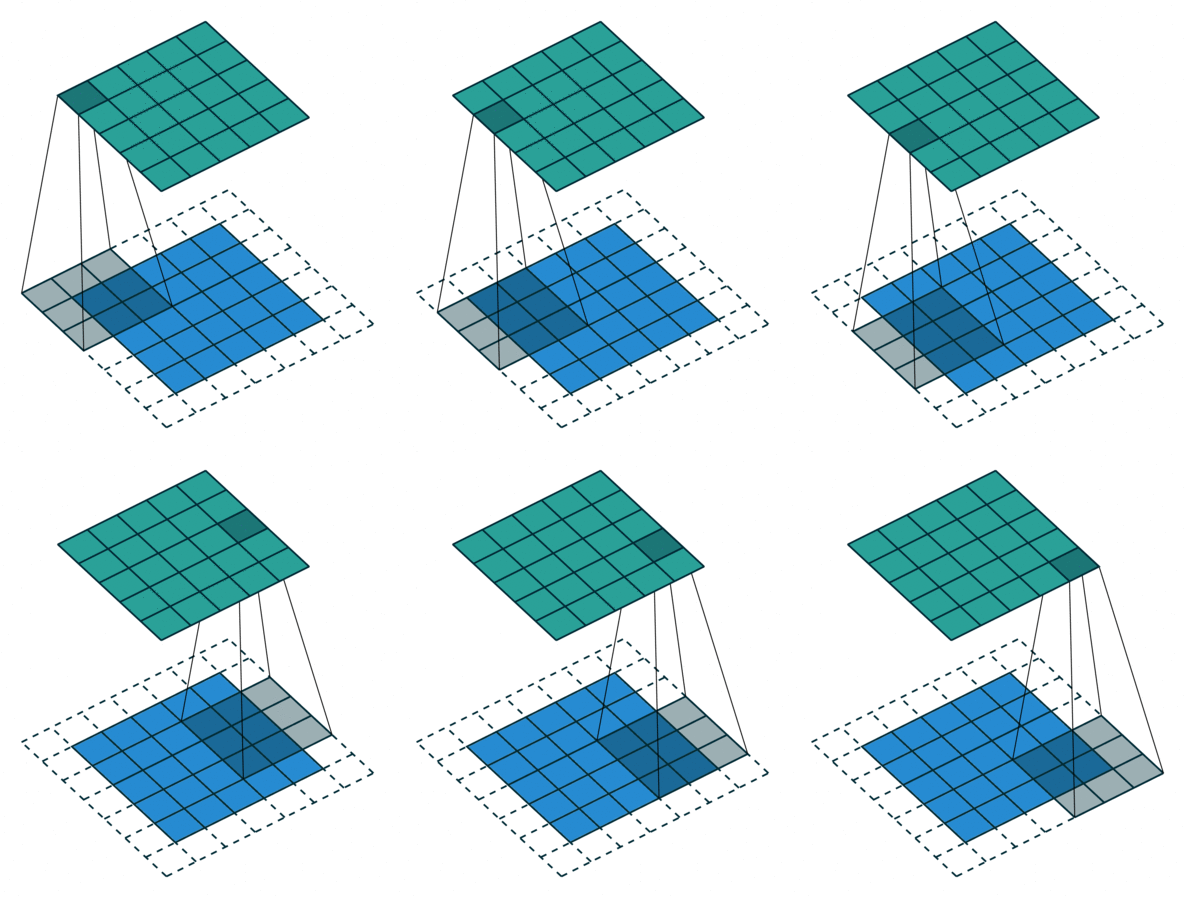
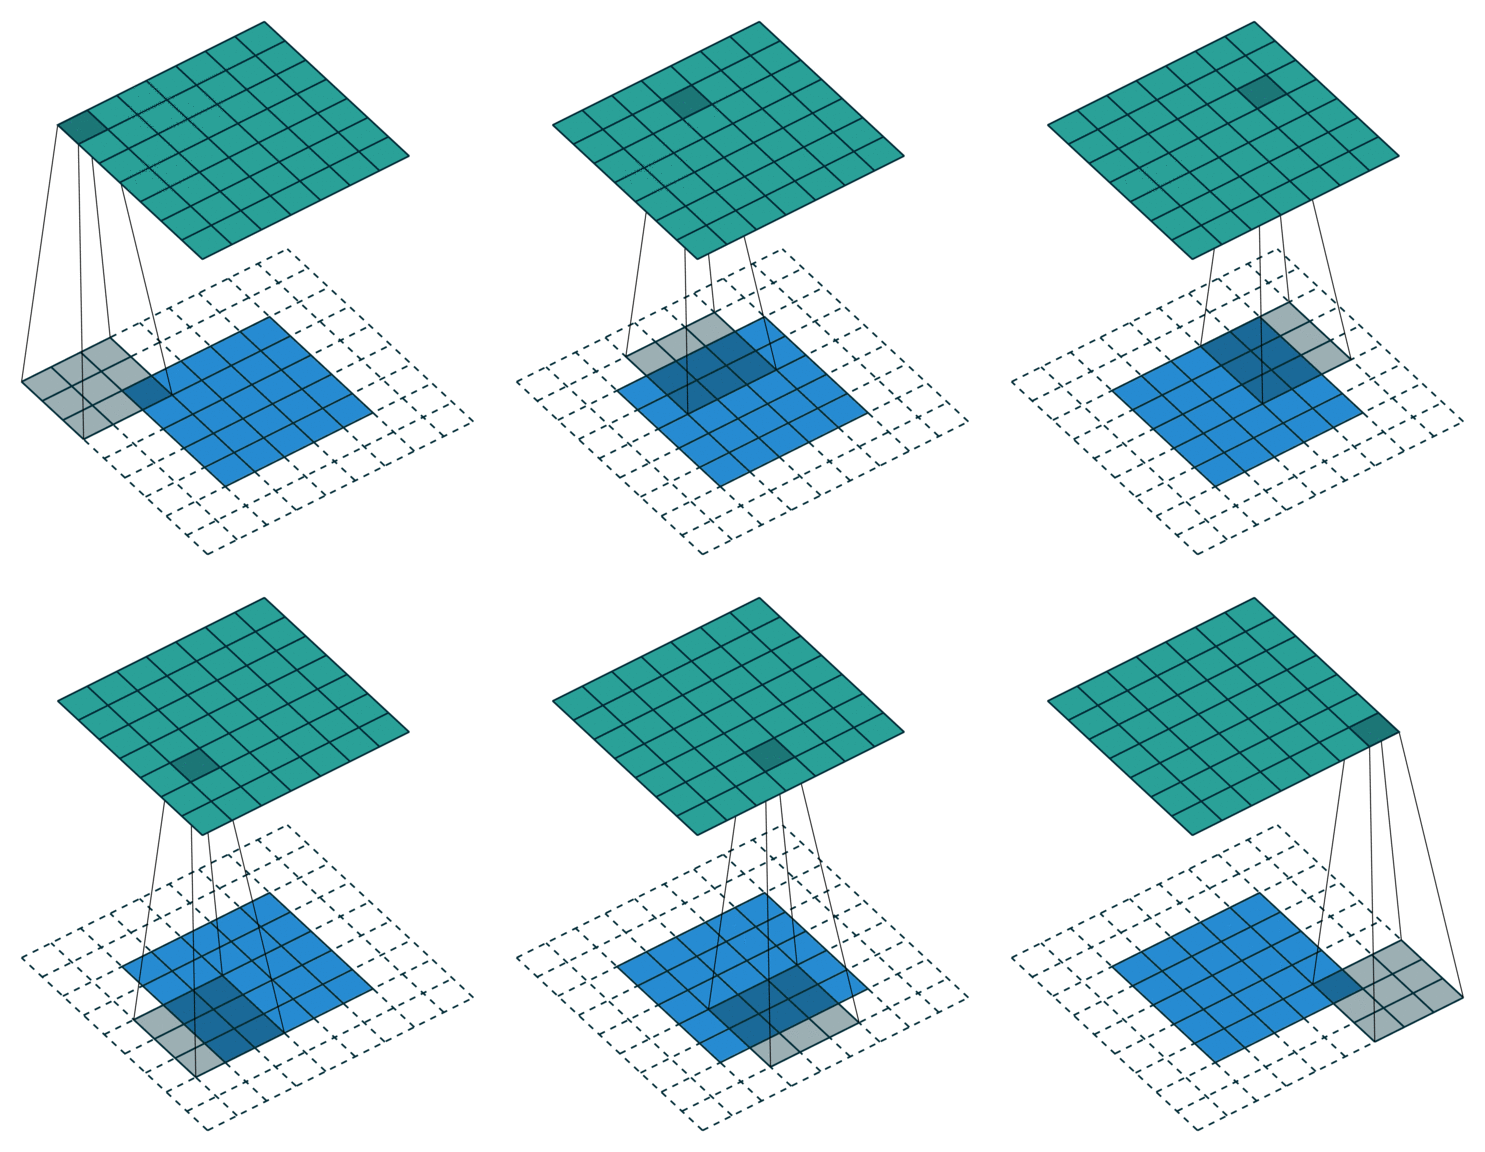
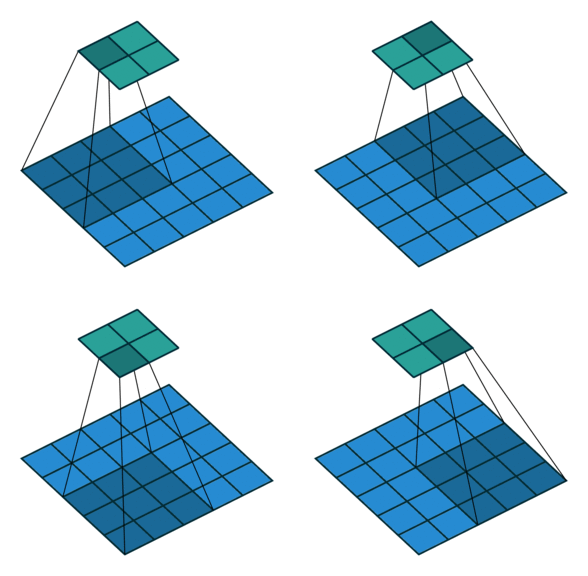
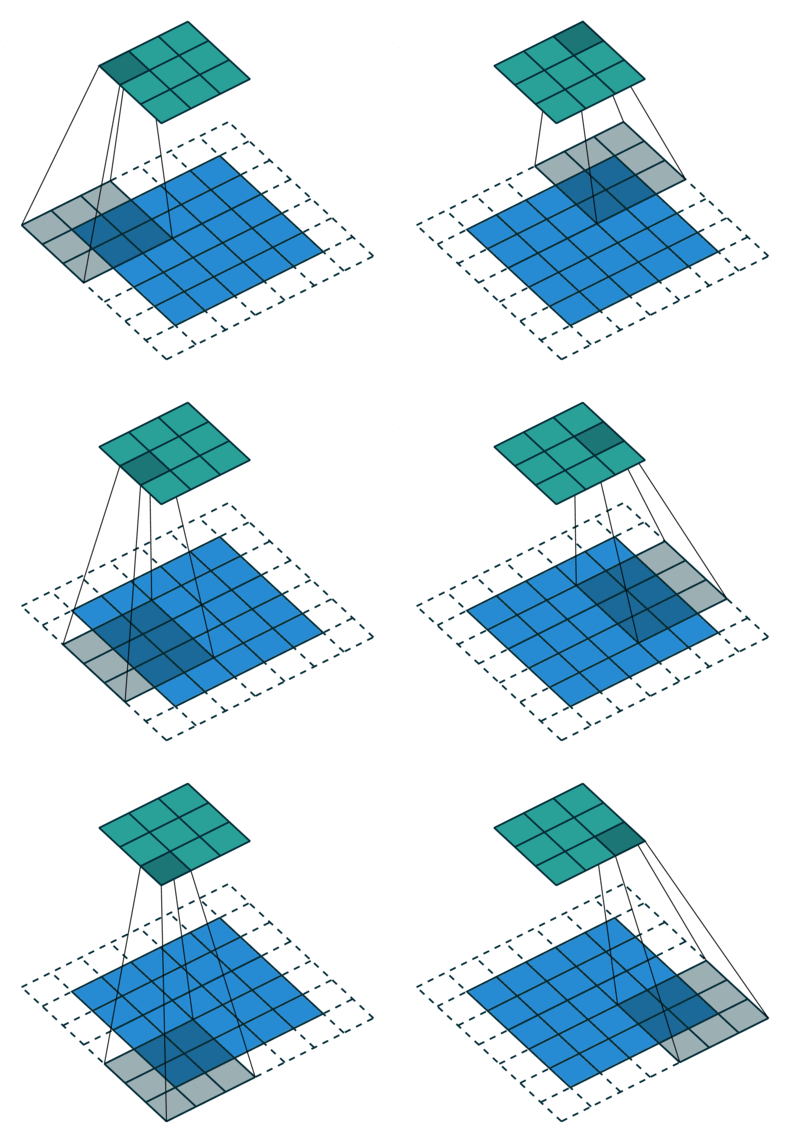
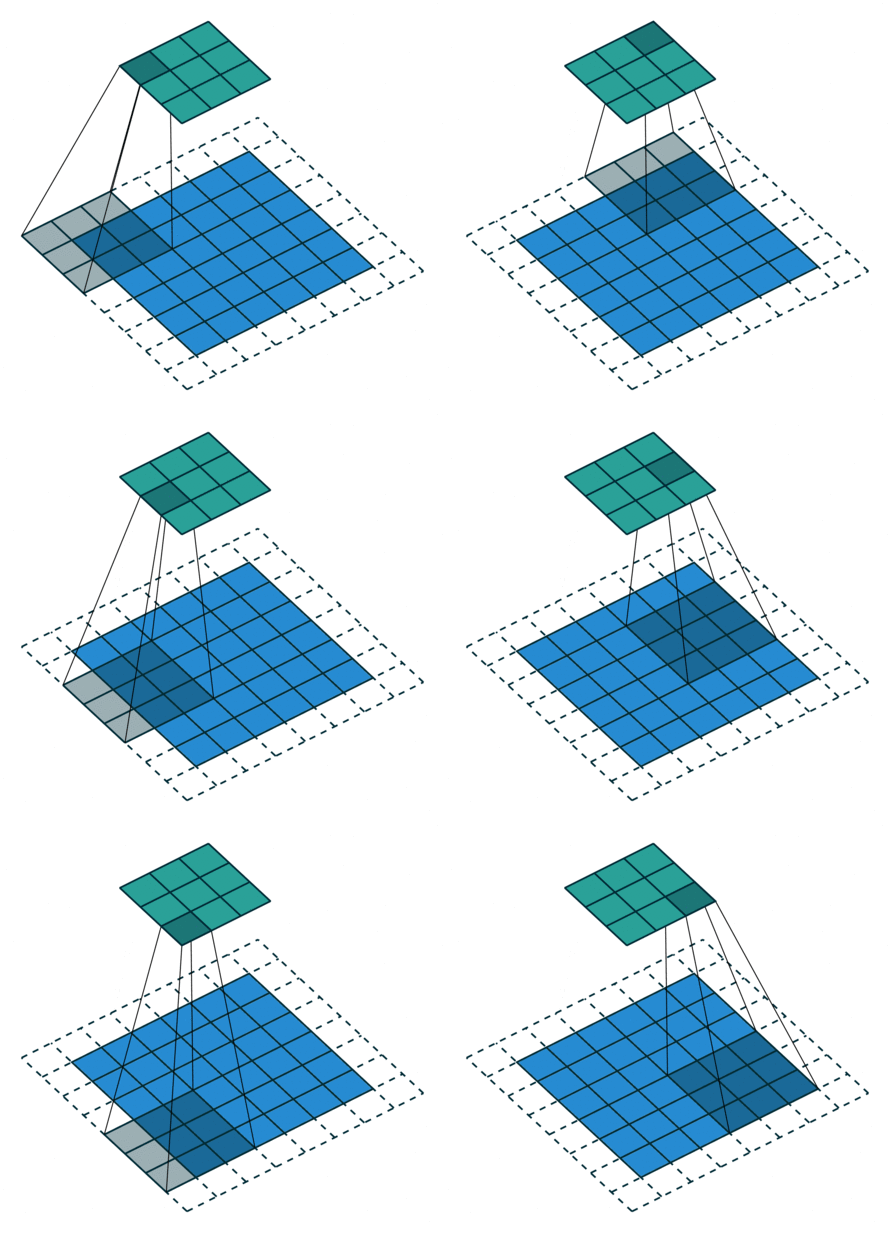
互相关 Cross-correlation, 过滤器不反转, 逐元素乘法和加法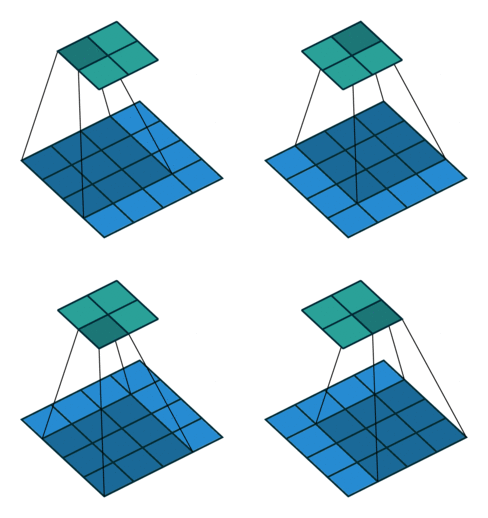 |
 |
 |
 |
| No padding, no strides | Arbitrary padding, no strides | Half padding, no strides | Full padding, no strides |
 |
 |
 |
|
| No padding, strides | Padding, strides | Padding, strides (odd) |
去卷积/反卷积膨胀卷积/空洞卷积/Atrous Convolutions(DeepLab)dilation rate:卷积核的点的间隔数量(扩张率表示我们希望将核加宽的程度) |
| No padding, no stride, dilation |
使用典型例子见 MobileNet
depthwise convolution 和 pointwise convolution 拼接起来,就是一个 depthwise separable convolution
ImageNet ILSVRC 2014 上,VGGNet paper 中提出:
This (stack of three 3 × 3 conv layers) can be seen as imposing a regularisation on the 7 × 7 conv. filters, forcing them to have a decomposition through the 3 × 3 filters (with non-linearity injected in between).
7 x 7 的卷积层的正则等效于 3 个 3 x 3 的卷积层的叠加
这样的设计的优点:
解决方案
| 梯度消失 精度下降 |
 |
|---|
ResNet 101 - 101 Layers = 1 + 33 x 3 + 1
101层网络仅仅指卷积或者全连接层,而激活层或者Pooling层并没有计算在内
ResNet 34

buildingblockbottleneck building block`
paper - Identity Mappings in Deep Residual Networks
Result
original 比较好点Result
Intersection over UnionTrue Positive RateFalse Positive RateAverage PrecisionMean Average PrecisonAverage Recallgraph TD
O(Object Detection \n Metrics History)--> |PASCAL VOC 2005| V1(TPR / FPR)
V1 --> |PASCAL VOC 2007| V2("11 Point Interpolation AP \n (IoU=0.5)")
V2 --> |PASCAL VOC 2010| V3("All Point Interpolation AP \n (IoU=0.5)")
V3 --> |MS COCO 2014| V4(" 101 Point Interpolation AP\n([email protected] mAP@[0.5:0.05:0.95])")
查全率, 即检测出来的样本/实际应该检测出的样本。数据的标准化(normalization)是将数据按比例缩放,使之落入一个小的特定区间。
因为我们得到的样本数据中可能一个特征向量的某几个元素的值非常大,使得特征数据不在一个数量级,因此必须限定在一个合适的范围内。归一化就是为了后面数据处理的方便,其次是保证程序运行时收敛加
快。
归一化和标准化的英文翻译是一致的,但是根据其用途(或公式)的不同去理解(或翻译)
也叫离差标准化,是对原始数据的线性变换,使结果落到[0,1]区间
该方法将某个变量的观察值减去该变量的最小值,然后除以该变量的离差,其标准化的数值落到[0,1]区间
x’=(x-min)/(max-min)
其中max为样本的最大值,min为样本的最小值。
该方法对原始数据进行线性变换,保持原始数据之间的联系,其缺陷是当有新数据加入时,可能导致max或min的变化,转换函数需要重新定义。
将某变量中的观察值减去该变量的平均数,然后除以该变量的标准差,标准化后的数据符合标准正态分布,即均值为0,标准差为1,转化函数为:
x’=(x-μ)/σ
其中μ为所有样本数据的均值,σ为所有样本数据的标准差。
该方法对离群点不敏感,当原始数据的最大值、最小值未知或离群点左右了Max-Min标准化时非常有用,Z-Score标准化目前使用最为广泛的标准化方法。
该方法通过移动数据的小数点位置来进行标准化。小数点移动多少位取决于变量取值中的最大绝对值。将某变量的原始值x使用小数定标标准化到x’的转换函数为:
x’=x/(10^j)
其中,j是满足使max(|x’|)<1成立的最小整数。假设变量X的值由-986到917,它的最大绝对值为986,为使用小数定标标准化,我们用1000(即,j=3)除以每个值,这样,-986被标准化为-0.986。
收集样本数据容易,但是给每个样本打标签 成本就很高。 因此出现了Semi-supervised Learning. 不同与 active learning,让学习过程不依赖外界的咨询交互,自动利用未标记样本所包含的分布信息的方法便是半监督学习(semi-supervised learning),即训练集同时包含有标记样本数据和未标记样本数据。
| Name | Active Learning | Semi-Supervised Learning |
|---|---|---|
| 人工标注 | ✅ | ❌ |
| 挑选高价值样例 | ✅ | ✅ |
| 优点 | 利用了未标注样本 | |
| 缺点 | 引入了噪声样本 | |
| Pipeline |  |
 |
CVAT is completely re-designed and re-implemented version of Video Annotation Toolgit clone https://github.com/opencv/cvat.git
cd cvat
docker-compose build
docker-compose up -d
touch docker-compose.override.yml
vi docker-compose.override.yml
添加如下内容后,重启compose
version: "2.3"

services:
 cvat:
  environment:
   ALLOWED_HOSTS: '*'
   CVAT_SHARE_URL: "Mounted from ~/works/cvat_task_file host directory"
  ports:
   - "80:8080"
  volumes:
          - /home/serverx/works/cvat_task_file/:/home/django/share/:ro
docker-compose -f docker-compose.yml -f docker-compose.override.yml build
docker exec -it cvat bash -ic '/usr/bin/python3 ~/manage.py createsuperuser'
docker exec -it cvat bash -ic '/usr/bin/python3 ~/manage.py changepassword xxx'
docker-compose -f docker-compose.yml \
  -f components/tf_annotation/docker-compose.tf_annotation.yml \
  -f components/analytics/docker-compose.analytics.yml \
  -f components/cuda/docker-compose.cuda.yml \
  -f components/openvino/docker-compose.openvino.yml  \
  -f docker-compose.override.yml build
docker-compose -f docker-compose.yml \
  -f components/tf_annotation/docker-compose.tf_annotation.yml \
  -f components/analytics/docker-compose.analytics.yml \
  -f components/cuda/docker-compose.cuda.yml \
  -f components/openvino/docker-compose.openvino.yml \
  -f docker-compose.override.yml  up -d
pillow 决定的, pillow open jpeg 时只能设置 1 - 95 的quality, 默认是75pip install quiver_engine
If you want the latest version from the repo
pip install git+git://github.com/keplr-io/quiver.git
model = Model(...)
quiver_engine.server.launch(model, classes=['cat','dog'], input_folder='./imgs')
import keras.applications as apps
from quiver_engine.server import launch

#model = apps.vgg16.VGG16()
model = apps.mobilenet.MobileNet()
launch(model, input_folder="./data")
mkdir -p data
mkdir -p tmp
copy your image to the data folder
python keras_mobilenet_quiver.py
in your brower:
localhost:5000
or
your_ip:5000
| images |
|---|
 |
 |
 |
N.B. quiver_engine.server 中有个
gevent.wsgi需要替换为gevent.pywsgi
直方图均衡化是图像处理领域中利用图像直方图对对比度进行调整的方法。通过这种方法,亮度可以更好地在直方图上分布。这样就可以用于增强局部的对比度而不影响整体的对比度,直方图均衡化通过有效地扩展常用的亮度来实现这种功能。
直方图均衡经典算法对整幅图像的像素使用相同的变换,对于像素值分布比较均衡的图像来说,经典算法的效果不错。但是如果图像中包括明显亮的或者暗的区域,在这些部分的对比度并不能得到增强。
AHE算法与经典算法的不同点在于它通过计算图像多个局部区域的直方图,并重新分布亮度,以此改变图像对比度。所以,该算法更适合于提高图像的局部对比度和细节部分。不过呢,AHE存在过度放大图像中相对均匀区域的噪音的问题。
CLAHE在AHE的基础上,对每个子块直方图做了限制,很好的控制了AHE带来的噪声。
CLAHE与AHE的不同主要在于其对于对比度的限幅,在CLAHE中,对于每个小区域都必须使用对比度限幅,用来克服AHE的过度放大噪音的问题。
在计算CDF前,CLAHE通过用预先定义的阈值来裁剪直方图以达到限制放大倍数的目的。该算法的优势在于它不是选择直接忽略掉那些超出限幅的部分,而是将这些裁剪掉的部分均匀分布到直方图的其他部分。
import numpy as np
import cv2
import matplotlib.pyplot as plt
from six import BytesIO
from PIL import Image

img = cv2.imread('t.png',3)
fig = plt.figure(figsize=(20, 15))
plt.grid(False)
plt.imshow(img)
lab = cv2.cvtColor(img, cv2.COLOR_BGR2LAB)
l, a, b = cv2.split(lab)
clahe = cv2.createCLAHE(clipLimit=3.0, tileGridSize=(8, 8))
cl = clahe.apply(l)
limg = cv2.merge((cl, a, b))
fig = plt.figure(figsize=(20, 15))
plt.grid(False)
plt.imshow(limg)
Visual Geometry GroupVGG16包含16层,VGG19包含19层。一系列的VGG在最后三层的全连接层上完全一样,整体结构上都包含5组卷积层,卷积层之后跟一个MaxPool。所不同的是5组卷积层中包含的级联的卷积层越来越多。
VGG16 是由13个卷积层+3个全连接层叠加而成。
import keras
model = keras.applications.vgg16.VGG16(include_top=True, weights='imagenet', input_tensor=None, input_shape=None, pooling=None, classes=1000)
model.summary()
Layer (type)                 Output Shape              Param #
=================================================================
input_1 (InputLayer)         (None, 224, 224, 3)       0
_________________________________________________________________
block1_conv1 (Conv2D)        (None, 224, 224, 64)      1792
_________________________________________________________________
block1_conv2 (Conv2D)        (None, 224, 224, 64)      36928
_________________________________________________________________
block1_pool (MaxPooling2D)   (None, 112, 112, 64)      0
_________________________________________________________________
block2_conv1 (Conv2D)        (None, 112, 112, 128)     73856
_________________________________________________________________
block2_conv2 (Conv2D)        (None, 112, 112, 128)     147584
_________________________________________________________________
block2_pool (MaxPooling2D)   (None, 56, 56, 128)       0
_________________________________________________________________
block3_conv1 (Conv2D)        (None, 56, 56, 256)       295168
_________________________________________________________________
block3_conv2 (Conv2D)        (None, 56, 56, 256)       590080
_________________________________________________________________
block3_conv3 (Conv2D)        (None, 56, 56, 256)       590080
_________________________________________________________________
block3_pool (MaxPooling2D)   (None, 28, 28, 256)       0
_________________________________________________________________
block4_conv1 (Conv2D)        (None, 28, 28, 512)       1180160
_________________________________________________________________
block4_conv2 (Conv2D)        (None, 28, 28, 512)       2359808
_________________________________________________________________
block4_conv3 (Conv2D)        (None, 28, 28, 512)       2359808
_________________________________________________________________
block4_pool (MaxPooling2D)   (None, 14, 14, 512)       0
_________________________________________________________________
block5_conv1 (Conv2D)        (None, 14, 14, 512)       2359808
_________________________________________________________________
block5_conv2 (Conv2D)        (None, 14, 14, 512)       2359808
_________________________________________________________________
block5_conv3 (Conv2D)        (None, 14, 14, 512)       2359808
_________________________________________________________________
block5_pool (MaxPooling2D)   (None, 7, 7, 512)         0
_________________________________________________________________
flatten (Flatten)            (None, 25088)             0
_________________________________________________________________
fc1 (Dense)                  (None, 4096)              102764544
_________________________________________________________________
fc2 (Dense)                  (None, 4096)              16781312
_________________________________________________________________
predictions (Dense)          (None, 1000)              4097000
=================================================================
Total params: 138,357,544
Trainable params: 138,357,544
Non-trainable params: 0
_________________________________________________________________
假设卷积层的最后输出是h × w × d 的三维特征图,具体大小为6 × 6 × 3,经过GAP转换后,变成了大小为 1 × 1 × 3 的输出值,也就是每一层 h × w 会被平均化成一个值。
GMP在本模型中表现太差,不值一提;而FC在前40次迭代时表现尚可,但到了40次后发生了剧烈变化,出现了过拟合现象(运行20次左右时的模型相对较好,但准确率不足70%,模型还是很差);三者中表现最好的是GAP,无论从准确度还是损失率,表现都较为平稳,抗过拟合化效果明显(但最终的准确度70%,模型还是不行)。
| VGG19 |  |
 |
|---|---|---|
| InceptionV3 |  |
 |
gst-launch-1.0 playbin uri=file:///home/xxx/xxx.mp4
gst-launch-1.0 videotestsrc ! videoconvert ! autovideosink
gst-launch-1.0 videotestsrc pattern=11 ! videoconvert ! autovideosink
gst-launch-1.0 videotestsrc ! videoconvert ! tee name=t ! queue ! autovideosink t. ! queue ! autovideosink
A declarative, efficient, and flexible JavaScript library for building user interfaces.
🖖 Vue.js is a progressive, incrementally-adoptable JavaScript framework for building UI on the web.
TypeScript is a superset of JavaScript that compiles to clean JavaScript output.
An Open Source Machine Learning Framework for Everyone
The Web framework for perfectionists with deadlines.
A PHP framework for web artisans
Bring data to life with SVG, Canvas and HTML. 📊📈🎉
JavaScript (JS) is a lightweight interpreted programming language with first-class functions.
Some thing interesting about web. New door for the world.
A server is a program made to process requests and deliver data to clients.
Machine learning is a way of modeling and interpreting data that allows a piece of software to respond intelligently.
Some thing interesting about visualization, use data art
Some thing interesting about game, make everyone happy.
We are working to build community through open source technology. NB: members must have two-factor auth.
Open source projects and samples from Microsoft.
Google ❤️ Open Source for everyone.
Alibaba Open Source for everyone
Data-Driven Documents codes.
China tencent open source team.