blog
blog's Introduction
blog's People
Contributors

Stargazers


Watchers
blog's Issues
向往的生活
身边有几个走不散的知心朋友
真正关心你的家人
温暖的家
这就是我向往的生活
Luckysheet 初体验
介绍
Luckysheet ,一款纯前端类似excel的在线表格,功能强大、配置简单、完全开源。
开始
下载vue示例
git clone https://github.com/hjwforever/luckysheet-vue3-vite.git
// 安装依赖
npm install
// 启动
npm run dev
运行后如下:

文件目录:
├── src
│   └── assets
|   └── components
|       └── LuckySheet.vue
├── ...
└── package.json
打开 LuckySheet.vue
为了看起来更简洁 移除暂时用不到的方法
<template>
  <div id="luckysheet"></div>
</template>

<script setup>
import {onMounted } from 'vue'

onMounted(() => {
  // 创建luckysheet 表格
  luckysheet.create({
    container: 'luckysheet'
  })
})
</script>

<style  scoped>
#luckysheet {
  margin: 0px;
  padding: 0px;
  position: absolute;
  width: 100%;
  left: 0px;
  top: 30px;
  bottom: 0px;
}
</style>
下载源码
版本: "2.1.13"
git clone https://github.com/mengshukeji/Luckysheet.git
// 安装依赖
npm install
// 启动
npm run dev
├── docs // vuepress 文档
├── src
| |── assets
| |── controllers
| |── css
| |── data
| └── ...
├── config.js // 表格配置文件
├── core.js // 入口
├── index.html
├── index.js
└── package.json前端曝光实现
title: 前端曝光实现
top_img: false
date: 2022-11-08
categories:
- 前端
tags: - 埋点
什么是曝光?
商品曝光人数:看到商品在首页、列表页、活动页面,以及在商品详情页下方的更多展现的人数。(不包括商品详情页的访客数量)
商品曝光次数:商品在店铺首页、列表页、活动页面,以及在商品详情页下方的更多展现的次数。(不包括商品详情页的浏览量)
通过商品曝光我们能得出商品在不同营销位的比重, 从而得出用户操作喜好
实现
曝光肯定是结合埋点一起使用, 通过采集某个商品是否出现在用户的可视区域内, 进行上报。
判断是否在用户可视区域内
1. getBoundingClientRect()
getBoundingClientRect 方法返回一个 对象,该 DOMRect 对象提供有关元素大小及其相对于视口的位置的信息。
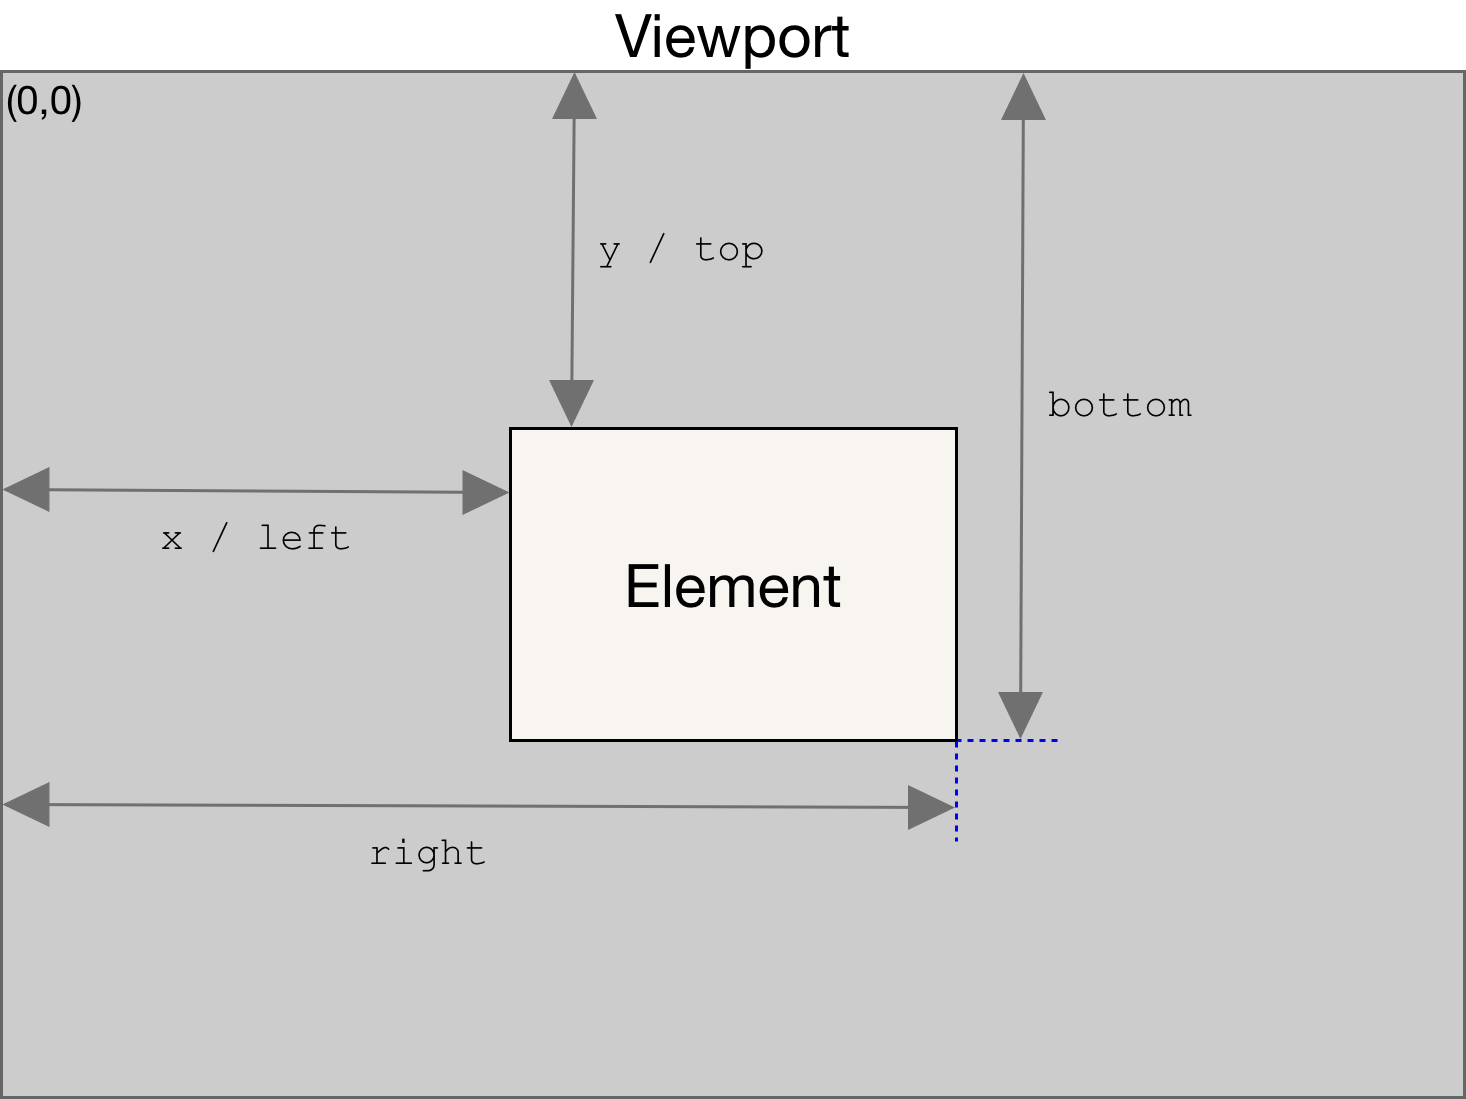
目标元素 rect 满足 top > 0 && left > 0 && bottom >= 视窗高度 && right <= 视窗宽度
便能得出元素完全在视窗内。 在长列表下 我们可以通过监听滚动条事件, 从而获取目标元素是否暴露在用户视窗内。
这种方法实现起来简单,兼容性相对较好,当监听的元素过多时,会造成性能问题,出现卡顿,影响使用体验。
<html>

<head>
    <title>getBoundingClientRect</title>
</head>

<body>
    <style>
        body {
            margin: 0;
        }

        .rect {
            margin-top: 50px;
            width: 100%;
            height: 200px;
            background: red;
            text-align: center;
            line-height: 200px;
        }
    </style>
    <div id="contents" style="width: 100%"></div>
    <script>
        // 最大渲染条数
        const renderNumber = 100;

        let i = 0;
        // 渲染列表
        const renderList = [];

        const contents = document.getElementById("contents");

        // 已曝光
        let inVpList = [];

        const unionArray = (arr1, arr2) => {
            const newSet = new Set(arr1)
            arr2.map(item => {
                newSet.add(item)
            })
            return [...newSet].sort((a, b) => {
                return a - b;
            })
        }
        // 节流
        const throttled = (fn, delay = 500) => {
            let timer = null
            let starttime = Date.now()
            return function () {
                let curTime = Date.now() // 当前时间
                let remaining = delay - (curTime - starttime)  // 从上一次到现在,还剩下多少多余时间
                let context = this
                let args = arguments
                clearTimeout(timer)
                if (remaining <= 0) {
                    fn.apply(context, args)
                    starttime = Date.now()
                } else {
                    timer = setTimeout(fn, remaining);
                }
            }
        }

        const createElement = (number) => {
            let div = document.createElement('div');
            let textNode = document.createTextNode(number);
            div.appendChild(textNode);
            div.style.color = "white";
            div.style.fontSize = "100px";
            div.style.fontWeight = 600;
            div.className = 'rect'
            div.setAttribute("id", `div_${number}`);
            contents.appendChild(div);
            return div;
        }

        // 判断可视区域内
        const isElementInViewport = (el) => {
            let rect = el.getBoundingClientRect();
            return (
                rect.top >= 0 &&
                rect.left >= 0 &&
                rect.bottom <=
                (window.innerHeight || document.documentElement.clientHeight) &&
                rect.right <= (window.innerWidth || document.documentElement.clientWidth)
            );
        };

        while (i < renderNumber) {
            renderList.push(createElement(i));
            i++;
        }

        const addInVpList = (arr) => {
            return unionArray(inVpList, arr);
        }


        const handleScrollChange = (e) => {
            const list = renderList.filter(item => isElementInViewport(item)).map(item => item.textContent);
            inVpList = addInVpList(list)

            console.log(`已曝光: ${inVpList}`)
        }

        document.addEventListener('scroll', throttled(handleScrollChange))

    </script>
</body>

</html>
Electron 启动动画实现
背景
Electron是通过Chromium和Node.js集成来达到这一开发体验的, 我们可以用React / Vue 很轻松的搭建一个桌面应用程序。应用启动时就避免不了短暂的白屏或者需要启动时加载基础数据。
那么怎样解决这一问题呢?
有APP开发经验的同学肯定立马就想到了 启动动画(开屏广告)。
思路
- 应用启动额外创建 Loading窗口 ,并且主窗口默认隐藏
- 主窗口加载完毕通过 ipcRenderer 通知主窗口显示, Loading窗口关闭
实现
-
准备开屏动画
-
配置主进程main.js文件
const createWindow = async () => {
  mainWindow = new BrowserWindow({
    minHeight: 600,
    minWidth: 1024, width: 1280, height: 720, titleBarStyle: 'hidden', frame: false, show: false
  });
    ……
};- 创建loading窗口
// loading
const createLoadingWindow = async () => {
  loadingWindow = new BrowserWindow({
    height: 260,
    width: 650,
    show: true,
    transparent: true,  // 透明窗口
    maximizable: false,  //禁止双击放大
    frame: false   // 去掉顶部操作栏
  })

  loadingWindow.loadURL(url.format({
    // loading.html 加载动画
    pathname: path.join(__dirname, './lib/loading/loading.html'),
    protocol: 'file:',
    slashes: true
  }))
    ……
}- 动画展示隐藏
import { ipcRenderer } from "electron";
const ipcMain = require('electron').ipcMain;

// 页面加载完毕时调用 通知关闭loading
ipcRenderer.send("close-loading-window");

app.on('ready', () => {
  // 创建加载动画
  createLoadingWindow();
  // 创建主窗口
  createWindow();
  // 监听页面加载完毕事件
  ipcMain.on('close-loading-window', () => {

    if(loadingWindow) {
      loadingWindow.close();
    }
    mainWindow.show();
  })

});
完成

不足
transparent: true, // 透明窗口
在win7下不起作用
解决方案: 禁用硬件加速(未尝试)
app.disableHardwareAcceleration();

app.on('ready', () => {
  setTimeout(() => {
    createWindow();
    autoUpdater.checkForUpdatesAndNotify();
    createMenu();
  }, 50);
});
CSS 通过子元素设置父元素
参考资料:
背景
某些特定场景下 我们希望通过子元素来判断从而修改父级属性。
除了JS控制之外是否有CSS实现这方面功能
查了大量资料发现css现阶段没有实现这块
原因如下:
由于它违反了CSS目前的“不回溯”的原则,因此一直没有被纳入规范
其实你从浏览器的角度来考虑这件事情,便不会有疑问了。假如浏览器支持父级或者前面兄弟元素选择器的话,就不得不在渲染到当前元素时,倒回去找到特定的元素,重新渲染。因为选择器是可以组合的,甚至还会造成很多其它元素也需要重新渲染(想象.someClass:parent div),这样带来的reflow和repaint会造成难以估量的性能问题,甚至计算盒模型的栈保不齐都要溢出。所以自然不会有类似的选择器出现了。
现在
Chrome 意图实验性支持 CSS :has() 选择器,可以用来选择父级元素。目前 Igalia 公司正在为 Chrome 实现该选择器,其团队成员 Brian Kardell 还发表了博文 Can I :has() 进行了详细介绍。
<style>
.parent:has(.red) { color: red } /* 将匹配 .red 的父元素 .parent */
.parent:has(.green) { color: green } /* 将匹配 .green 的父元素 .parent */
</style>
<div class="parent"> <!-- color: red -->
  <div class="red"></div>
</div>
<div class="parent"> <!-- color: green -->
  <div class="green"></div>
</div>
结论
还是用js吧~
ESLint 如何在Vue或React中使用?
vue或react都有对应的插件实现
由于 Vue 中的单个文件组件不是普通的 JavaScript,因此无法使用默认解析器,因此引入了新的文件组件。 通过表示模板语法的特定部分以及标签内的内容生成增强的 AST 节点。
以上面Vue文件报错为例子
我们可以通过eslint-plugin-vue来实现
首先项目根目录安装
npm install --save-dev eslint eslint-plugin-vue然后执行 npm run eslint-fix进行校验
前面所遇到的html标记已经得到解决 eslint能正确识别vue文件。
配合IDE食用更佳
在实际的开发过程中, 当然希望编辑器能即使反馈错误并提示
以VsCode为例
安装插件

预期效果

如果未生效
请确保EsLint开启
如遇报错 解决报错直至开启

前端业务埋点SDK实践
title: 前端业务埋点SDK实践
date: 2022-11-07
categories:
- 前端
tags: - 埋点采集
参考资料:
腾讯二面:现在要你实现一个埋点监控 SDK,你会怎么设计?
为什么通常在发送数据埋点请求的时候使用的是 1x1 像素的透明 gif 图片?
最近项目需要采集用户的行为数据, 从而进行分析得到页面点击量、访问量、访问路径等重要数据, 为运营和业务人员提供精准数据,为产品优化和精细化运营提供数据支持。

埋点方式选择
这里采用代码侵入式埋点的方式进行、 SDK 提供 点击事件、曝光事件、页面时长进行上报
- 点击事件(用户每点击一次按钮、商品、区块.. 就记录一次数据)
- 曝光事件(专区、活动、商品...用户可见)
- 页面时长(活动、页面 停留时间)
埋点方式实现
点击事件
如何让前端同事更轻松的捕获数据、这里实现了 dom 自定义事件实现自动上报, 在 vue 中也提供了指令 如有特殊业务场景也可以使用手动进行上报。
// 自动上报
// js

// vue
<button v-track:click="{
  'page_id': 1,
  'event_type': 12, // 事件类型
  'objs' // 业务数据
  }"
/>

<button v-track:keyup="{
  'page_id': 2,
  'event_type': 12, // 事件类型
  'objs' // 业务数据
  }"
/>

// 手动上报
trakerSDK.sendTracker({
  'page_id': 3,
  'event_type': 12,
  'object_ids': [1, 2, 3]
});
页面时长
页面时长统计, 我们可以用时间戳来算出用户停留的页面时长。
页面离开 - 页面进入 = 停留时长。
// 单页应用
router.beforeEach((to, from, next) => {
  // 获取当前时间
  const timestamp = new Date().getTime();
  // 上次时间
  const pretimestamp = getCache(LocalStoreEnum.PRE_TIMESTAMP);
  // 存入当前时间
  setCache(LocalStoreEnum.PRE_TIMESTAMP, timestamp);

  // 停留时间(s)
  let secound = (timestamp - pretimestamp) / 1000;
  next();
});
这样的话大多数场景都能够满足, 但是还有特殊场景无法满足。
如 PC 端 浏览器 Tab 选项卡切换、 APP 切换应用等。
这时候就需要另外的方案, Page Visibility API 能够解决这个问题
document.addEventListener("visibilitychange", () => {
  const state = document.visibilityState;
  let callbackData: any = null;
  if (state === "hidden") {
    // 页面不可见
  }
  if (state === "visible") {
    // 页面可见
  }

  // 如果业务需要 时间超过1小时 则算是新开页面 自行判断
});
曝光
... 未完待续
埋点上报
我们采集了埋点数据后, 就需要把采集的数据交给后端。
那么我们应该如何上报?
我们得考虑接口跨域、上报异常(正在进行上报时, 用户关闭了页面, 这样上报就会失败)、性能要求(不能应用应用使用)
基于以上要求, 提供了三种方式供用户自行选择
-
sendBeacon
浏览器引入的 sendBeacon 方法,发出的是异步请求,但是请求是作为浏览器任务执行的,
与当前页面是脱钩的。因此该方法不会阻塞页面卸载流程和延迟后面页面的加载,用户体验较好。
缺点: 浏览器存在支持问题 -
img
避免跨域
1x1 像素 img 对网页内容的影响几乎没有影响
图片请求不占用 Ajax 请求限额
不会阻塞页面加载,影响用户的体验
相比 XMLHttpRequest 对象发送 GET 请求,性能上更好
触发 GET 请求之后不需要获取和处理数据、服务器也不需要发送数据 -
post
超出 get 最大请求数、或者用户手动进行上报方式配置则会采用 post
默认情况下优先级 sendBeacon > img > post
// 判断上传长度 2000 个字符
const urlIsLong = (url: string) => {
  let totalLength = 0,
    charCode = 0;
  for (var i = 0; i < url.length; i++) {
    charCode = url.charCodeAt(i);
    if (charCode < 0x007f) {
      totalLength++;
    } else if (0x0080 <= charCode && charCode <= 0x07ff) {
      totalLength += 2;
    } else if (0x0800 <= charCode && charCode <= 0xffff) {
      totalLength += 3;
    }
  }
  return totalLength < 2000 ? false : true;
};

if (navigator.sendBeacon) {
  sendBeacon(url, params);
} else if (method === "POST" || urlIsLong(str)) {
  xmlRequest(url, params);
} else {
  const img = new Image();
  img.src = `${url}?${str}`;
}
初始化
参数
| 参数 | 必填 | 默认值 | 类型 | |
|---|---|---|---|---|
| debug | 否 | false | bool | 开启调试模式 |
| config | 否 | object | {} | 你的配置文件, 会在上报时传给后端 |
| url | 是 | '' | string | 请求地址 |
| method | 否 | img | string | 请求方式 GET、POST、SEND_BEACON |
| enableHeatMap | 否 | false | bool | 开启坐标上传 position |
| enableVisibilitychange | 否 | false | bool | 开启页面可见监听, 如开启此功能 registerVueRouterEvent 传参可能为 null |
方法
| 方法名 | 说明 | 参数 |
|---|---|---|
| setConfig | 设置全局参数 | Options |
| sendTracker | 手动上报 | {自定义} |
| initDirectives | 初始化 vue2 指令 | Vue |
| registerVueRouterEvent | 初始化 VueRouter 监听 | VueRouter, callback({to, from , secound,...}, callback) |
| registerErrorEvent | 全局异常报错 | vm: Vue 对象, errorCallback((errorMsg, pageInfo) => {}) 异常回调 |
import SimpleJsTracker from "simple-js-tracker";

const simpleJsTracker = new SimpleJsTracker({
  debug: true,
  url: "", // 服务地址
  enableHeatMap: true, // 开启热力图
  enableHashTracker: true,
  config: {
    ...
  }
});

// 更新传参
simpleJsTracker.setConfig(options);

// 自定义上传
simpleJsTracker.sendTracker(params);

// 初始化自定义vue2/3指令
simpleJsTracker.initDirectives(Vue);

// 初始化 VueRouter 监听
// 页面跳转监听, 上报的参数让用户自行提供 report
simpleJsTracker.registerVueRouterEvent(router, (res, report) => {
   const { to, from, secound } = res;
   // 页面进入
  if(to.meta.tracking) {
    const fromParams = {
      'event_type': 5,
      ...to.meta.tracking,
    }

    report(fromParams);
  }
  // 页面离开
  if(from.meta.tracking) {
    const fromParams = {
      'event_type': 6,
      ...from.meta.tracking,
    }
    report(fromParams);
  }
});
未完待续...
Flutter 启动页实现
前言
应用开启时, 会出现短暂白屏才会出现加载后页面, 给用户的感觉也不好
原生
...
Pub 插件
- 安装依赖
dependencies:
  flutter:
    sdk: flutter
  ...
flutter_native_splash: ^2.1.6- 设置 pubspec.yaml
- image: 图片
- color: 背景颜色 用于图片不能充满屏幕
- android: true 生成 andorid
- ios: true 生成 ios
- android_gravity: "fill" // 铺满
- ios_content_mode: "scaleAspectFit" // 铺满
- ...
flutter_native_splash:
  image: assets/images/splash.png
  color: "#ffffff"
  android: true
  ios: true
  android_gravity: "fill"
ios_content_mode: "scaleAspectFit"- 生成启动页
flutter pub pub run flutter_native_splash:create
[Android] Creating splash images
[Android] Creating dark mode splash images
[Android] Updating launch background(s) with splash image path...
[Android]  - android/app/src/main/res/drawable/launch_background.xml
[Android]  - android/app/src/main/res/drawable-v21/launch_background.xml
[Android] Updating styles...
[Android]  - android/app/src/main/res/values-v31/styles.xml
[Android] No android/app/src/main/res/values-v31/styles.xml found in your Android project
[Android] Creating android/app/src/main/res/values-v31/styles.xml and adding it to your Android project
[Android]  - android/app/src/main/res/values/styles.xml
[iOS] Creating images
[iOS] Creating dark mode images
[iOS] Updating LaunchScreen.storyboard with width, and height
[iOS] Updating ios/Runner/Info.plist for status bar hidden/visible
Web folder not found, skipping web splash update...
╔════════════════════════════════════════════════════════════════════════════╗
║                                 WHAT IS NEW:                               ║
╠════════════════════════════════════════════════════════════════════════════╣
║ You can now keep the splash screen up while your app initializes!          ║
║ No need for a secondary splash screen anymore. Just use the remove()       ║
║ method to remove the splash screen after your initialization is complete.  ║
║ Check the docs for more info.                                              ║
╚════════════════════════════════════════════════════════════════════════════╝

✅ Native splash complete.
Now go finish building something awesome! 💪 You rock! 🤘🤩
Like the package? Please give it a 👍 here: https://pub.dev/packages/flutter_native_splash
预览

当然flutter_native_splash也提供了方法让我们主动调用关闭,我们可以初始化数据等耗时操作执行完主动关闭
void main() async {
  WidgetsBinding widgetsBinding = WidgetsFlutterBinding.ensureInitialized();
  // 启动页设置手动关闭
  FlutterNativeSplash.preserve(widgetsBinding: widgetsBinding);
  runApp(App());
  // 模拟初始化数据等待5s
  await Future.delayed(Duration(seconds: 3));
  // 启动页设置关闭
  FlutterNativeSplash.remove();
}
完结
如果遇到改状态栏等 就需要原生解决了~
简单需求flutter_native_splash还是能满足的
ESLint 初体验
介绍
ESLint是一个用来识别 ECMAScript 并且按照规则给出报告的代码检测工具,使用它可以避免低级错误和统一代码的风格。如果每次在代码提交之前都进行一次eslint代码检查,就不会因为某个字段未定义为undefined或null这样的错误而导致服务崩溃,可以有效的控制项目代码的质量
好处
俗话说的好没有规矩不成方圆 代码规范是程序员的根本,入门第一步,从规范代码开始。
eslint根本目的是统一项目的代码风格规范,养成规范的写代码习惯,减少不必要的错误和隐患。
安装
    npm install -g eslint // 全局安装

    npm install --save-dev eslint // 项目安装
使用
项目根目录新建.eslintrc.js文件 配置eslint。
如果全局安装eslint可以在项目运行, 初始化配置文件。
可以根据个人喜好或团队选择
eslint --init

1 How would you like to use ESLint? (Use arrow keys)
To check syntax only   // 只检查语法
❯ To check syntax and find problems // 检查语法并找出问题
To check syntax, find problems, and enforce code style // 检查语法、发现问题并强制执行代码样式

2 What type of modules does your project use? (Use arrow keys)
❯ JavaScript modules (import/export)
  CommonJS (require/exports)
  None of these

3 Which framework does your project use?
  React
  Vue.js
❯ None of these

...- 初始化配置如下
module.exports = {
    "env": {
        "browser": true,
        "es6": true
    },
    "extends": "eslint:recommended",
    "globals": {
        "Atomics": "readonly",
        "SharedArrayBuffer": "readonly"
    },
    "parserOptions": {
        "ecmaVersion": 2018
    },
    "rules": {
    }
};- 接下来添加一条rule
"rules": {
	// if while function 后面的{ 必须与if在同一行。
	"brace-style": [2, "1tbs", { "allowSingleLine": true }],
}- 测试文件: util.js
var d = new Date()
var time = d.getHours()
if (time<10)
{
document.write("<b>Good morning</b>" )
}
else if (time>=10 && time<16)
{
document.write("<b>Good day</b>")
}
else
{
document.write("<b>Hello World!</b>")
}- 控制台执行
eslint src/util.js


...src/util.js

4:1  error  Opening curly brace does not appear on the same line as controlling statement  brace-style
   6:1  error  Closing curly brace does not appear on the same line as the subsequent block   brace-style
   9:1  error  Closing curly brace does not appear on the same line as the subsequent block   brace-style
  11:1  error  Opening curly brace does not appear on the same line as controlling statement  brace-style

✖ 4 problems (4 errors, 0 warnings)
  4 errors and 0 warnings potentially fixable with the `--fix` option.
eslint rule生效 结果自然是会报错
在当前场景大括号不能单独占一行
这时我们可以执行 eslint --fix
package中配置命令替代单个eslint --fix
eslint --fix util.js // 自行纠正

// 配置命令全局执行,省事
// package.js
"scripts": {
	"eslint-fix": "eslint src/**/*.*  --fix"
}
接下来在新建一个vue文件
src/index.vue
控制台执行
npm run eslint-fix
出现报错

::: warning
eslint此时不认识vue文件, 所以只能当成js文件进行处理,
正因为js外层不能包含html标记 所以会出现报错信息。
:::
使用Lottie 让动画更简单
介绍
Lottie 是Airbnb推出Library 它可将After Effects动画经由Bodymovi扩展插件输入成一个JSON动画文件格式, 适用于 Web、iOS、Android、Windows、QT、Tizen 和其他平台。

使用
如果你有After Effects动画, 可通过AE插件Bodymovi 生成JSON动画
没有After Effects动画可以让设计来制作, 或者学习制作~
当然也可以使用 Lottie Files 提供的免费动画

接着从Lottie Files下载一个动画任意动画
Flutter中使用
- lottie json 放入项目assets 目录下
- 安装 lottie
dependencies:
lottie: ^1.3.0 - 使用
import 'package:flutter/material.dart';
import 'package:lottie/lottie.dart';

void main() => runApp(const MyApp());

class MyApp extends StatelessWidget {
  const MyApp({Key? key}) : super(key: key);

  @override
  Widget build(BuildContext context) {
    return MaterialApp(
      home: Scaffold(
          body: Center(
        child: Container(child: Lottie.asset('assets/lottie/animation.json')),
      )),
    );
  }
}

我们可以使用AnimationController 控制动画
- forward() 启动
- stop() 停止
- reverse() 反向播放
import 'package:flutter/material.dart';
import 'package:lottie/lottie.dart';

void main() => runApp(LottieScreen());

class LottieScreen extends StatefulWidget {
  LottieScreen({Key? key}) : super(key: key);
  @override
  State<StatefulWidget> createState() => _LottieScreenState();
}

class _LottieScreenState extends State<LottieScreen>
    with SingleTickerProviderStateMixin {
  late AnimationController lottieController;

  @override
  void initState() {
    super.initState();

    lottieController = AnimationController(
      vsync: this,
    );

    lottieController.addStatusListener((status) async {
      if (status == AnimationStatus.completed) {
        lottieController.reset();
      }
    });
  }

  @override
  void dispose() {
    lottieController.dispose();
    super.dispose();
  }

  @override
  Widget build(BuildContext context) {
    return MaterialApp(
      home: Scaffold(
          body: Center(
        child: Column(children: [
          Lottie.asset("assets/lottie/animation.json",
              repeat: false,
              controller: lottieController, onLoaded: (composition) {
            lottieController.duration = composition.duration;
            lottieController.forward();
          }),
          const SizedBox(
            height: 24,
          ),
          Row(
            mainAxisAlignment: MainAxisAlignment.center,
            children: [
              RaisedButton(
                onPressed: () {
                  lottieController.forward();
                },
                child: Text("启动"),
              ),
              RaisedButton(
                onPressed: () {
                  lottieController.stop();
                },
                child: Text("停止"),
              ),
              RaisedButton(
                onPressed: () {
                  lottieController.reverse();
                },
                child: Text("反向播放"),
              ),
            ],
          )
        ]),
      )),
    );
  }
}

Vue中使用
Electron 自动更新/手动触发更新
背景
我们用Electron开发了桌面应用, 项目同时也在不断更新迭代。我们希望只要发布了最新的版本,用户就能够收到更新提示从而进行升级。调研了市面上的实现方式后决定采取electron-updater插件来实现更新功能。electron-updater只需要简单的文件托管,不需要专用的服务器就能实现更新。
开始
我们先用脚手架新建一个空项目(vue)
vue create electron-vue-demo // 新建项目
vue add electron-builder // 安装electron v11.0.0
npm run electron:serve // 运行项目
npm i electron-updater // 安装electron-updater
配置
publish 发布地址
"build": {
    "productName": "demo",
    "appId": "demo.fspace.com",
    "directories": {
      "output": "release"
    },
    "publish": [
      {
        "provider": "generic",  // 服务器提供商 也可以是GitHub等等
        "url": "http://114.115.142.127:8989/download/", // 更新文件存放位置
        "channel": "latest",
        "useMultipleRangeRequest": false
      }
    ],
}
如果是vue-cli-plugin-electron-builder打包则会报错如下:
Question||'build' in the application package.json is not supported since 3.0
因为3.0后不支持json的方式, 需要移除package.json “build”
vue.config.js 添加builderOptions
后续需要在vue中使用ipcRenderer(主进程与渲染进程通信)
所以需要设置
// nodeIntegration: true
module.exports = {
	...
  pluginOptions: {
    electronBuilder: {
    	nodeIntegration: true, // ipcRenderer
      builderOptions: {
        productName: "demo",
        appId: "demo.fspace.com",
        directories: {
          "output": "release"
        },
        publish: [
          {
            "provider": "generic",  // 服务器提供商 也可以是GitHub等等
            "url": "http://localhost:3006/", // 更新文件存放位置
            "channel": "latest",
            "useMultipleRangeRequest": false
          }
        ]
      }
    }
  }
}
background.js
初始化 autoUpdater
'use strict'

import { app, protocol, BrowserWindow, ipcMain } from 'electron'
import { createProtocol } from 'vue-cli-plugin-electron-builder/lib'
import installExtension, { VUEJS_DEVTOOLS } from 'electron-devtools-installer'
import * as path from 'path';
const fs = require('fs');
const { autoUpdater } = require('electron-updater');

const isDevelopment = process.env.NODE_ENV !== 'production';
const DOWNLOAD_URL = 'http://localhost:3006/';

var package_json = require('../package.json');
var mainWindow = null;


// Scheme must be registered before the app is ready
protocol.registerSchemesAsPrivileged([
  { scheme: 'app', privileges: { secure: true, standard: true } }
])

async function createWindow() {
  // Create the browser window.
  mainWindow = new BrowserWindow({
    width: 800,
    height: 600,
    webPreferences: {

      // Use pluginOptions.nodeIntegration, leave this alone
      // See nklayman.github.io/vue-cli-plugin-electron-builder/guide/security.html#node-integration for more info
      nodeIntegration: process.env.ELECTRON_NODE_INTEGRATION
    }
  })

  if (process.env.WEBPACK_DEV_SERVER_URL) {
    // Load the url of the dev server if in development mode
    await mainWindow.loadURL(process.env.WEBPACK_DEV_SERVER_URL)
    if (!process.env.IS_TEST) mainWindow.webContents.openDevTools()
  } else {
    createProtocol('app')
    // Load the index.html when not in development
    mainWindow.loadURL('app://./index.html')
  }
}

// Quit when all windows are closed.
app.on('window-all-closed', () => {
  // On macOS it is common for applications and their menu bar
  // to stay active until the user quits explicitly with Cmd + Q
  if (process.platform !== 'darwin') {
    app.quit()
  }
})

app.on('activate', () => {
  // On macOS it's common to re-create a window in the app when the
  // dock icon is clicked and there are no other windows open.
  if (BrowserWindow.getAllWindows().length === 0) createWindow()
})

// This method will be called when Electron has finished
// initialization and is ready to create browser windows.
// Some APIs can only be used after this event occurs.
app.on('ready', async () => {
  if (isDevelopment && !process.env.IS_TEST) {
    // Install Vue Devtools
    try {
      await installExtension(VUEJS_DEVTOOLS)
    } catch (e) {
      console.error('Vue Devtools failed to install:', e.toString())
    }
  }
  console.log('ready')
  createWindow()
  updateHandle();
})

// Exit cleanly on request from parent process in development mode.
if (isDevelopment) {
  if (process.platform === 'win32') {
    process.on('message', (data) => {
      if (data === 'graceful-exit') {
        app.quit()
      }
    })
  } else {
    process.on('SIGTERM', () => {
      app.quit()
    })
  }
}


function updateHandle() {
  autoUpdater.currentVersion = package_json.version;

  autoUpdater.setFeedURL(DOWNLOAD_URL);

  // 取消自动更新
  autoUpdater.autoDownload = false;

  autoUpdater.on('checking-for-update', (info) => {
    // 开始检查是否有新版本
    // 可以在这里提醒用户正在查找新版本
    console.log('checking-for-update')
  })

  autoUpdater.on('update-available', (info) => {
    // 检查到有新版本
    // 提醒用户已经找到了新版本
    console.log('检查到有新版本')
  })

  autoUpdater.on('error', (err) => {
    // 自动升级遇到错误
  })

}
打包测试
package.json
版本号 1.0.1
{
  "name": "electron-vue-demo",
  "version": "1.0.1",
  ...
}
执行打包
vue-cli-service electron:build打包后release目录 (当前为mac打包)
├── release
│   ├── demo-1.0.1-mac.zip
│   ├── demo-1.0.1.dmg 					 // 安装文件
│   ├── demo-1.0.1.dmg.blockmap // 用于差异更新, mac好像无效
│   ├── latest-mac.yml 					// 更新相关文件
│   └── mac
├── ...
└── package.json
搭建静态服务
这里使用koa koa-static 配置静态目录
├── server
│   ├── public  // 存放更新文件
│   └── server.js
├── ...
└── package.json
我们把demo-1.0.1-mac.zip / latest-mac.yml / 更新日志 放入更新目录public
{
  "version": "V1.0.1",
  "content": [
  "-🎉  v1.0.1版本盛大发布。"
  ]
}
server.js
const Koa = require('koa');
const app = new Koa();
const path = require('path');
const serve = require('koa-static');

const main = serve(path.join(__dirname+'/public'));
app.use(main);

app.listen(3006,function(){
  console.log("监听3006端口")
});
回到项目
background.js
import { ipcMain } from 'electron'

// ipcMain 监听渲染进程checkForUpdate 事件
ipcMain.on("checkForUpdate",() => {
  autoUpdater.currentVersion = package_json.version;
  //执行更新检查
  autoUpdater.checkForUpdates();
})

function updateHandle() {
	...
  autoUpdater.on('update-available', (info) => {
    // 检查到有新版本
    // 提醒用户已经找到了新版本
    console.log('检查到有新版本', info)
  })
  ...
}
app.vue
<template>
  <div id="app">
    <button @click="checkForUpdates">检查更新</button>
  </div>
</template>
<script>
import { ipcRenderer } from "electron";
export default {
  name: 'App',
  methods: {
    checkForUpdates() {
      // 通知主进程检查更新
      ipcRenderer.send('checkForUpdate')
    }
  }
}
</script>

<style>
#app {
  font-family: Avenir, Helvetica, Arial, sans-serif;
  -webkit-font-smoothing: antialiased;
  -moz-osx-font-smoothing: grayscale;
  text-align: center;
  color: #2c3e50;
  margin-top: 60px;
}
</style>
点击按钮, 控制台打印如下
检查到有新版本 {
  version: '1.0.1',
  files: [
    {
      url: 'demo-1.0.1-mac.zip',
      sha512: 'PJeIr6HilOlNrcR8HEimQQuJHjEiK7x2PHhOGnmul5tTI2n0R7+6PP8S5j3+bwfZzSkjBWWWYnlR8WNoQ17YBQ==',
      size: 77708593,
      blockMapSize: 82077
    },
    {
      url: 'demo-1.0.1.dmg',
      sha512: 'i++/bWJ7pxIkShS+WehKkP8rLMjbKtHvFV/aLmDDj8lEqeyKP8cnVpSSlNNbqOwcqbxSzR5t07QMIUIVf0AMYw==',
      size: 80015179
    }
  ],
  path: 'demo-1.0.1-mac.zip',
  sha512: 'PJeIr6HilOlNrcR8HEimQQuJHjEiK7x2PHhOGnmul5tTI2n0R7+6PP8S5j3+bwfZzSkjBWWWYnlR8WNoQ17YBQ==',
  releaseDate: '2021-04-21T05:38:20.929Z'
}
autoUpdater.downloadUpdate(); // 下载更新
autoUpdater.quitAndInstall(); // 执行推出安装更新
依次执行后实现了更新操作, 当然这对用户来说非常不友好,需要把更新流程交给用户去控制。
autoUpdater给我们提供 download-progress(更新进度)、update-downloaded(更新完成) 监听。
app.vue
<template>
  <div id="app">
    <a-button @click="checkForUpdates">检查更新</a-button>
    <!-- 更新提示框 -->
    <div class="main-container__upgrade-panel" v-if="show">
      <div class="main-container__upgrade-panel-title">
        {{`发现新版本${versionInfo.version}`}}
        <span @click="() => { show = !show }"><a-tooltip title="最小化" placement="top"><a-icon type="down-circle" /></a-tooltip></span>
      </div>
      <div class="main-container__upgrade-panel-body">
        <div class="main-container__pd1t">
          更新日志:
          </div>
          <div v-for="(item, index) in versionInfo.content" :key="index">{{item}}</div>
      </div>
      <div class="main-container__upgrade-panel-footer">
        <div style="width: 305px;">
          <a-progress
            :stroke-color="{
              from: '#108ee9',
              to: '#87d068',
            }"
            :percent="progress.percent"
            status="active"
          />
        </div>
        <a-button style="margin-right: 10px;" v-if="canInstall" type="primary" @click="() => icpSend('quitAndInstall')">安装</a-button>

        <a-button style="margin-right: 10px;" v-else type="primary" :loading="loading"  @click="() => { loading = true, icpSend('downloadUpdate') }"> <a-icon v-if="!loading" type="down-square" /> 更新</a-button>

        <a-button :disabled="progress.percent > 0" type="dashed" @click="() => { show = !show }">下次再说</a-button>

      </div>
    </div>

  </div>
</template>
<script>
import { ipcRenderer } from "electron";
export default {
  name: 'App',
  data() {
    return {
      DOWNLOAD_URL: 'http://localhost:3006/',
      canInstall: false,
      show: false,
      progress: {
        bytesPerSecond: 0,
        delta: 0,
        percent: 0,
        total: 0,
        transferred: 0
      },
      loading: false,
      versionInfo: {
        version: '',
        content: [
          '123',
          '456'
        ]
      }
    }
  },
  created() {
    // 版本有更新时提示
    ipcRenderer.on("updateAvailable", async (event, info) => {
      const verInfo = await this.getVersionInfo(info);
      if (verInfo) {
        try {
          this.versionInfo.version = JSON.parse(verInfo).version;
          this.versionInfo.content = JSON.parse(verInfo).content;
        } catch (e) {
          console.log(e)
        }
        this.show = true;
      }

    });
    // 下载进度条
    ipcRenderer.on("downloadProgress", (event, progressObj) => {
      progressObj.percent = Number(progressObj.percent.toFixed(1));
      this.progress = {
        ...progressObj
      };
    });

    ipcRenderer.on("isUpdateNow", () => {
      this.canInstall = true;
      this.show = true;
    });
  },
  methods: {
    async getVersionInfo(info) {
      return new Promise((resolve) => {
        let xhr = new XMLHttpRequest();
        xhr.open('get', this.DOWNLOAD_URL + info.version + '.json', true);
        xhr.send(null);
        xhr.onreadystatechange = function () {

          if (xhr.readyState == 4) {
            if (xhr.status == 200) {

              resolve(xhr.responseText)
            } else {
              resolve(null)
            }
          }
        };

      });
    },
    icpSend(name) {
      ipcRenderer.send(name);
    },
    checkForUpdates() {
      ipcRenderer.send('checkForUpdate')
    }
  }
}
</script>

<style lang="scss">
#app {
  font-family: Avenir, Helvetica, Arial, sans-serif;
  -webkit-font-smoothing: antialiased;
  -moz-osx-font-smoothing: grayscale;
  color: #2c3e50;
  margin-top: 60px;
}

.main-container {
  width: 100%;
  position: relative;
  // display: flex;
  background: #f7f7f7;

  &__drag {
    position: absolute;
    width: calc(100% - 100px);
    height: 25px;
    -webkit-app-region: drag;
    .overlay {
      pointer-events: none;
    }
  }

  &__controls {
    position: absolute;
    right: 0;
    -webkit-app-region: no-drag;
    top: 0;
    z-index: 200;
    border-radius: 0 0 3px 3px;
    padding: 0;
    background: #bfbfbf21;
    :hover {
      color: white;
      background: gray;
    }
    :nth-child(3):hover{
      background-color: red;
    }

    &-item {
      display: inline-block;
      padding: 5px 10px;
      color: #ccc;
      font-size: 12px;
      -webkit-app-region: no-drag;
    }
  }

  &__upgrade-panel {
    position: fixed;
    z-index: 9999;
    right: 10px;
    bottom: 25px;
    width: 340px;
    background-color: #34373c;
    color: white;
    border-radius: 3px;
    font-size: 12px;
    box-shadow: 0px 0px 5px 5px rgba(133,133,133,0.25);

    ::-webkit-scrollbar {
      display: none; /* Chrome Safari */
    }

    &-title {
      padding: 10px 15px;
      width: 100%;
      height: 40px;
      border-bottom: 1px solid white;

      span {
        position: absolute;
        font-size: 14px;
        right: 10px;
      }

      span:hover {
        color:#FFFFFF;
        background-color:#6dd214;
        text-shadow:none;
      }
    }

    &-body {
      overflow-y: auto;
      padding: 10px 15px;
      max-height: 100px;
    }
    &-footer {
      padding-left: 10px;
      padding-bottom: 10px;

      a-button {
        margin-right: 15px;
      }
    }
  }

  &__pd1t {
    padding-top: 5px;
  }
}

.ant-progress-text {
  color: white !important;
}
</style>
background.js
'use strict'

import { app, protocol, BrowserWindow, ipcMain } from 'electron'
import { createProtocol } from 'vue-cli-plugin-electron-builder/lib'
import installExtension, { VUEJS_DEVTOOLS } from 'electron-devtools-installer'
const fs = require('fs');
const { autoUpdater } = require('electron-updater');

const isDevelopment = process.env.NODE_ENV !== 'production';
const DOWNLOAD_URL = 'http://localhost:3006/';

var package_json = require('../package.json');
var mainWindow = null;


// Scheme must be registered before the app is ready
protocol.registerSchemesAsPrivileged([
  { scheme: 'app', privileges: { secure: true, standard: true } }
])

async function createWindow() {
  // Create the browser window.
  mainWindow = new BrowserWindow({
    width: 800,
    height: 600,
    webPreferences: {

      // Use pluginOptions.nodeIntegration, leave this alone
      // See nklayman.github.io/vue-cli-plugin-electron-builder/guide/security.html#node-integration for more info
      nodeIntegration: process.env.ELECTRON_NODE_INTEGRATION
    }
  })

  if (process.env.WEBPACK_DEV_SERVER_URL) {
    // Load the url of the dev server if in development mode
    await mainWindow.loadURL(process.env.WEBPACK_DEV_SERVER_URL)
    if (!process.env.IS_TEST) mainWindow.webContents.openDevTools()
  } else {
    createProtocol('app')
    // Load the index.html when not in development
    mainWindow.loadURL('app://./index.html')
  }
}

// Quit when all windows are closed.
app.on('window-all-closed', () => {
  // On macOS it is common for applications and their menu bar
  // to stay active until the user quits explicitly with Cmd + Q
  if (process.platform !== 'darwin') {
    app.quit()
  }
})

app.on('activate', () => {
  // On macOS it's common to re-create a window in the app when the
  // dock icon is clicked and there are no other windows open.
  if (BrowserWindow.getAllWindows().length === 0) createWindow()
})

// This method will be called when Electron has finished
// initialization and is ready to create browser windows.
// Some APIs can only be used after this event occurs.
app.on('ready', async () => {
  if (isDevelopment && !process.env.IS_TEST) {
    // Install Vue Devtools
    try {
      await installExtension(VUEJS_DEVTOOLS)
    } catch (e) {
      console.error('Vue Devtools failed to install:', e.toString())
    }
  }
  console.log('ready')
  createWindow()
  updateHandle();
})

// Exit cleanly on request from parent process in development mode.
if (isDevelopment) {
  if (process.platform === 'win32') {
    process.on('message', (data) => {
      if (data === 'graceful-exit') {
        app.quit()
      }
    })
  } else {
    process.on('SIGTERM', () => {
      app.quit()
    })
  }
}


const deleteFile = (path) => {
  var files = [];
  if( fs.existsSync(path) ) {
      files = fs.readdirSync(path);
      files.forEach(function(file){
          var curPath = path + "/" + file;
          if(fs.statSync(curPath).isDirectory()) {
              deleteFile(curPath);
          } else {
              fs.unlinkSync(curPath);
          }
      });
      fs.rmdirSync(path);
  }
};

function updateHandle() {
  autoUpdater.currentVersion = package_json.version;

  autoUpdater.setFeedURL(DOWNLOAD_URL);

  // 取消自动更新
  autoUpdater.autoDownload = false;

  autoUpdater.on('checking-for-update', (info) => {
    // 开始检查是否有新版本
    // 可以在这里提醒用户正在查找新版本
  })

  autoUpdater.on('update-available', (info) => {
    // 检查到有新版本
    // 提醒用户已经找到了新版本
    console.log(info)
    mainWindow.webContents.send('updateAvailable', info)
  })

  autoUpdater.on('update-not-available', (info) => {
    // 检查到无新版本
    // 提醒用户当前版本已经是最新版,无需更新
  })

  autoUpdater.on('download-progress', function (progressObj) {
    // 更新进度条
    mainWindow.webContents.send('downloadProgress', progressObj)
  })

  autoUpdater.on('error', (err) => {
    // 自动升级遇到错误
  })

  autoUpdater.on('update-downloaded', (ev, releaseNotes, releaseName) => {
    // 自动升级下载完成
    // 可以询问用户是否重启应用更新,用户如果同意就可以执行 autoUpdater.quitAndInstall()
    mainWindow.webContents.send('isUpdateNow')
  })
}

ipcMain.on("checkForUpdate",() => {
  console.log(autoUpdater.currentVersion)
  autoUpdater.currentVersion = package_json.version;
  //执行自动更新检查
  autoUpdater.checkForUpdates();
})

ipcMain.on("downloadUpdate",() => {
  try {
    // 更新前删除本地更新包
    deleteFile(autoUpdater.app.baseCachePath)
  }catch {

  }
  //执行自动更新检查
  autoUpdater.downloadUpdate();
})

ipcMain.on("quitAndInstall",() => {
  //执行自动更新检查
  autoUpdater.quitAndInstall();
})
最终效果

Flutter Andoird 返回键退出友好处理
背景
Android手机会有虚拟按键, 或者实体按键。 用户点击返回按键或误触时 如果刚打开或者路由栈没有更多页面则会退出应用
直接退出应用的话 用户体验就太差了, 所以大多数的做法是在一定时间内再按返回才进行退出操作
解决
在Flutter中我们可以通过 WillPopScope 来实现返回按钮拦截
const WillPopScope({
  ...
  required WillPopCallback onWillPop,
  required Widget child
})
onWillPop是回调函数, 当用户点击返回按钮时调用
import 'package:flutter/material.dart';
import 'package:get/get.dart';

class WillPopTest extends StatefulWidget {
  @override
  State<StatefulWidget> createState() => WillPopTestState();
}

class WillPopTestState extends State<WillPopTest> {
  DateTime? _lastClickTime; //上次点击时间

  @override
  Widget build(BuildContext context) {
    // TODO: implement build
    return GetMaterialApp(
      home: Scaffold(
        body: WillPopScope(
            onWillPop: () async {
              if (_lastClickTime == null ||
                  DateTime.now().difference(_lastClickTime!) >
                      Duration(seconds: 1)) {
                _lastClickTime = DateTime.now();
                Get.snackbar('提示', '再按一次退出',
                    margin: EdgeInsets.only(bottom: 10),
                    snackPosition: SnackPosition.BOTTOM);
                return false;
              }
              return true;
            },
            child: Container(
              child: Center(
                child: Text('点击两次返回退出app'),
              ),
            )),
      ),
    );
  }
}
心之所想
刚渡过了我的27岁生日
回顾这几年 似乎过的还不错
有坚持看书提升 也培养几个比较有意义的兴趣爱好
工作上 有互相帮助的同事 工作轻松 工资尚可
烟、槟榔这些不好的习惯也早戒了
遗憾的是晨跑的确是没能坚持下(尽力了... 有想互相监督的可以找我 )
身边的朋友也一直都在
有旧识 新识
无需敷衍,无需讨好
偶尔撸串 喝几杯 畅聊人生
真是再好不过了
谢谢你们
到了这个年纪 有个始终都绕不开的那便是情感这个话题
随着年龄的增长 身边结婚、有小孩的朋友是越来越多了
其实我真的是羡慕 , 羡慕他们的生活 当然身边也有婚后过的不是那么幸福的朋友啦
就如《围城》褚慎明说英国有句古话:
::: tip
“ 结婚仿佛金漆的鸟笼,笼子外面的鸟想住进去,笼内的鸟想飞出来;所以结而离,离而结,没有了局。”
:::
渐渐地我也接受了相亲(以前的我肯定瞧不起相亲, 最终小丑竟是我自己! )
遇见了各种各样的女生, 至于到现在都没个结果 根源肯定是我自己
经历了几次用尽全力最终却得到背叛 热情消耗殆尽且放一边 更多的是丢失了自信心
朋友也有介绍优秀的女生给我, 用他们的话说便是 她哪点不如她 人家还对你那么好
每每我都是简单的一句 不喜欢 敷衍了事
真的是不喜欢嘛, 真要形容的话 一句歌词再好不过了
“得不到的永远在*动,被偏爱的都有恃无恐”
好像从来便是如此, 正因此伤害过那些真正对我好的人, 好在她们现在都过的很好啦!
有时候想想这便是因果吧
愿大家
无所畏惧漫漫人生路,进取高唱潇潇岁月歌。
Recommend Projects
-
 React
React
A declarative, efficient, and flexible JavaScript library for building user interfaces.
-
Vue.js
🖖 Vue.js is a progressive, incrementally-adoptable JavaScript framework for building UI on the web.
-
 Typescript
TypeScript is a superset of JavaScript that compiles to clean JavaScript output.
-
TensorFlow
An Open Source Machine Learning Framework for Everyone
-
Django
The Web framework for perfectionists with deadlines.
-
 Laravel
A PHP framework for web artisans
-
D3
Bring data to life with SVG, Canvas and HTML. 📊📈🎉
-
Recommend Topics
-
javascript
JavaScript (JS) is a lightweight interpreted programming language with first-class functions.
-
web
Some thing interesting about web. New door for the world.
-
server
A server is a program made to process requests and deliver data to clients.
-
Machine learning
Machine learning is a way of modeling and interpreting data that allows a piece of software to respond intelligently.
-
Visualization
Some thing interesting about visualization, use data art
-
Game
Some thing interesting about game, make everyone happy.
Recommend Org
-
Facebook
We are working to build community through open source technology. NB: members must have two-factor auth.
-
Microsoft
Open source projects and samples from Microsoft.
-
Google
Google ❤️ Open Source for everyone.
-
Alibaba
Alibaba Open Source for everyone
-
D3
Data-Driven Documents codes.
-
Tencent
China tencent open source team.