Software Engineering Prep Final Project Setup Part I: Setting Up Your Repo
Learning Goals
- Set up your local and remote repositories for your final Software Engineering Prep project
Introduction
Now that you've learned about Git version control, it's time to put your new skills to use!
In the next section, as the final requirement for Software Engineering Prep, you'll be creating a personal website! In this lesson, you'll get some practice with Git and get set up for your final project at the same time.
Specifically, we'll go through the following steps:
- creating a local Git repository,
- creating a remote repository on GitHub,
- connecting the local and remote repos
- creating an initial commit, and
- pushing that work to the remote repo.
Create Your Local Repo
Let's review the process for setting up your local repo. Follow along with the steps below:
1. Choose a name for your project. You can call it anything you like - be
creative! For our example here, we'll use my-personal-website.
2. Make sure you're in the Development/code directory (or wherever you're
storing your code), then create your project directory and cd into it:
$ mkdir my-personal-website
$ cd my-personal-website
3. Initialize the directory as a Git repo (make sure you've cdd into the
directory first):
$ git initCheck your work: If you see the message "Initialized empty Git repository in /Users/your-username/Development/code/your-directory-name/.git/", you have successfully set up your directory as a Git repo.
The next step is to add some content.
Create Some Content
Go ahead and open your new project in VS Code. From inside the
my-personal-website directory (or whatever you've named yours), type code ..
Next, create a README file:
$ touch README.mdAnd add some content to it:
$ echo "# My Personal Website" >> README.mdOf course, if you prefer, you can add the new file and content in VS Code instead.
A Note about README files: The README.md file is an important piece of the documentation of your project. It is the first thing people will see when they visit your repo on GitHub. Generally, as you build your own projects, you'll want to get in the habit of creating a good README, including things like what your project does, how to install and run the code, etc. While filling out the content in your README is optional for the Software Engineering Prep project, you will need to create them for later projects. Check out the resources listed at the bottom of this lesson to learn more.
Check your work: In VS Code, make sure the README.md file is present and contains the header you just created before continuing with the instructions.
Make Your Initial Commit
Now that we've created our project repo and added some content, it's time to make our first commit. First, though, let's check the status of our repo:
$ git statusYou should see the following:
On branch main

No commits yet

Untracked files:
  (use "git add <file>..." to include in what will be committed)
  README.md

nothing added to commit but untracked files present (use "git add" to track)
This tells us that Git sees our new file but is not currently tracking it. So to add it to the list of tracked files, then create our first commit, we'll run:
$ git add README.md
$ git commit -m 'Initial commit'
You should see something similar to this:
[main (root-commit) d7c3189] Initial commit
 1 file changed, 1 insertion(+)
create mode 100644 README.mdReminder: We are not able to combine the
addandcommitcommands in this case because theREADME.mdfile is not being tracked yet. We could, however, usegit add .instead of spelling out the name of the file.
Check your work: If you saw the message shown above, you have successfully
made your first commit. You can also run git status to verify that there is
nothing to commit and the working tree is clean.
That's it! You now have your local repository created and set up to track your changes. Now let's create a remote and connect our local repo to it.
Create Your Remote Repo
To create a new GitHub repository, go to https://github.com/ and sign in (if you aren't already signed in). Then, click the + icon in the upper-right corner of the screen, and choose 'New repository' in the drop-down menu.

This will bring you to a page where you can give the new repository a name. There will be some other settings as well, which we'll leave as they are:
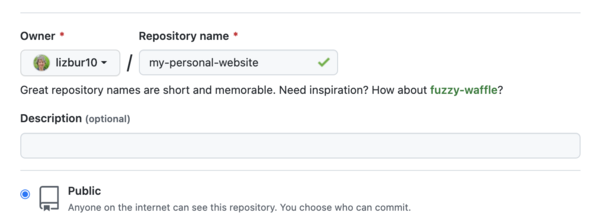
Enter the same name you used for your local repo. (Note: you aren't required to use the same name, but we recommend doing so to keep things simple.) Once the repository is given a name, go ahead and click the "Create repository" button.

An empty repository will be created.
Add The New Remote To Your Local Repository
When you click "Create repository", you should be taken to a new page that presents a set of different options for getting things started. It's worth getting familiar with those options; each of them is helpful in different circumstances.
Note that some of the commands shown here have information unique to the repository and GitHub user. Your commands will differ slightly from the examples because of this.
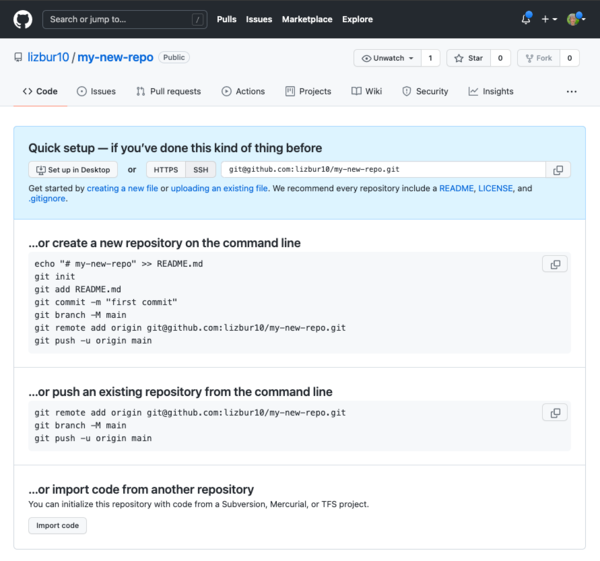
Which one of the options you choose will depend on your particular situation. The first option is the one we used in the previous lesson:

We copied the URL and then used the git remote add origin command to connect
our local repo to the remote repo.
Let's take a look at the other options that are provided. The second option listed should look like this:

This option contains a series of commands that you can copy and run in the terminal, either one at a time or all together. However if you take a look at the commands, you'll see that we've already done the first four:
echo "# example-repository" >> README.mdcreates aREADME.mdfile and adds some markdowngit initinitializes a local repository in the folder you're currently in on the command linegit add README.mdstages the newly createdREADME.mdfile, getting it ready to be committedgit commit -m "first commit"creates the repository's first commit, preserving the newly createdREADME.mdfile in the history of the repository
We don't want to repeat these commands, so let's move on to the next one:

This option basically consists of the last three steps from the option above, which is exactly what we want! In fact, if you take a closer look, you'll see that two of the three commands are exactly what we ran in the last lesson! The first three setup options listed are three different ways of doing the exact same thing; GitHub is just providing the commands for us as a shortcut, so we don't need to type them all out by hand.
Let's take a moment to review what each command does. As we mentioned above, two of the three should look familiar:
git remote add origin git@github...adds a new remote — calledorigin— to the local repository and associates it with the remote repository.git branch -M mainis the only command you haven't learned about yet — it renames the current branch of your repository tomain. (You should already be configured to usemainas the default branch; if so, running this command is unnecessary. You can verify the name of your branch by runninggit branch --show-current.)git push -u origin mainpushes the initial commit we did earlier to the remote repository; theuflag setsoriginas the default remote for themainbranch.
Go ahead and run these commands — you can run them one at a time or all together, as you prefer.
Check your work: When you run the commands above, the last thing you should see is the line:
"Branch 'main' set up to track remote branch 'main' from 'origin'."You can also check in GitHub by going to the repo and refreshing the page; you
should see that the README.md file now appears on GitHub.
Conclusion
That's it! Now that you've created both your remote and local repos and
configured Git to push to the main branch of your remote repo, you can start
working on your project. As you work, you should regularly commit your changes
and push them to GitHub with the following commands:
git add .
git commit -m "Some meaningful commit message"
git push
Recall that you only need to run git push -u origin main the first time; the
u flag tells Git that you always want to push to origin main, so you only
need to run git push moving forward.
In the next lesson, we'll get you set up with the other files you'll need for your project. You'll also learn how to deploy your new site to the Web using GitHub Pages.


