
If it's a good idea, go ahead and do it. It's much easier to apologize than it is to get permission. ~Grace Hopper
In this lesson, we'll cover segues and how they allow the user to move between views in an application.
- Explain how scenes represent individual view controllers
- Use segues to transition between scenes
- Pass data from one view controller to another
When I was a kid, I watched Good Morning America every day before school. I still remember when the Segway, that thing adored by mall security and tourists the world over, debuted. It was hyped on Good Morning America all week with the anchors reminding us to watch on Friday because they were going to reveal something that would change the world. I nearly trembled with excitement. What could it be? At the end of the week, I finally got to see this:

I was disappointed. I didn't even know what that was, let alone how it would change the world. Luckily, I was wrong. The Segway went on to cure cancer and bring about an era of peace and prosperity to the world.
Anyway, while we're on the subject of Segways, let's talk about segues in iOS.
So far, you've learned about storyboards and scenes within storyboards. You've learned about navigation controllers, too, and how they can manage scenes. You may have felt, though, that this knowledge didn't seem useful or interesting. All the apps you've created so far in these lessons have only consisted of one scene, and the navigation controller has been used solely to display a title at the top of your app's screen.
iOS apps are typically more complex than one scene, though. Consider the Settings app on your iPhone. When you initially launch it, it displays a number of items in a table view, divided into sections.
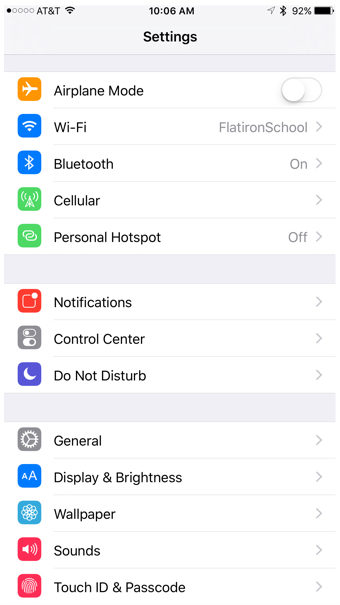
Pressing on an item causes another view to slide in from the right. This view has a number of settings for that section. Sometimes this view has even more views you can bring up. The nav bar also contains a back button so you can go back to a previous view.
This may seem pretty complex, but it's all managed by a navigation controller.
Let's think about scenes for a moment.
A scene consists of a view (and probably some subviews, but we won't worry about those for now). A view is backed by a view controller. You can think of a scene as an instance of a view controller.
An iOS app has an initial view controller—the scene that the user sees when they first launch your app.
A navigation controller manages the interaction between these scenes/view controllers. Think of an iOS app like a deck of cards. When you first launch the app, you put down a card (a scene, or view controller). When you press an item in that view and bring up another view, you're laying down another card. Every time you move to a new view, you're putting another card down. Eventually you'll have a stack of cards. The view you're looking at currently is always that top card in the stack.
When you move back to a previous view, you take a card off that stack and get rid of it. Now the top card on that stack is one you already saw, right? Eventually, you may move back in the stack enough that you end up with only that first card in the stack again.
A navigation controller manages that stack. It pushes new cards (or scenes) onto that stack as you select items, and pops cards (scenes) off as you move back. Conceptually, that navigation controller is managing an array of views.
Imagine you're trying to change the auto-lock settings on your iPhone. To do that, you'll have to move through three different scenes (or views) in the Settings app:
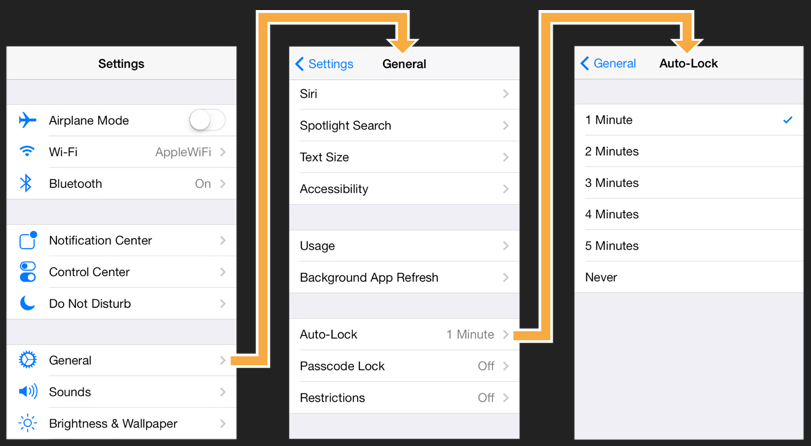
When you first launch the Settings app, you're on the leftmost screen. Selecting General brings up the view view. The navigation controller pushes that view to the top of the stack. Then, when you press Auto-Lock, the navigation controller pushes the rightmost view onto the top of the stack and displays it.
When you hit the back button, the opposite occurs: The navigation controller pops the current view (the rightmost view in the diagram above) off the stack, and displays the middle one. When you hit the back button again, that view gets popped off, and you arrive back where you started: The first view of the Settings app.
The navigation controller manages the navigation between scenes. The actual movement between scenes is controlled by segues.
In iOS, segues define how the user moves from one view to another (and back again). They're more effective, too, then both the Segway and the segue I used to lead into our discussion on segues.
Here is an example of the navigation of the Settings app with the individual view controllers highlighted:
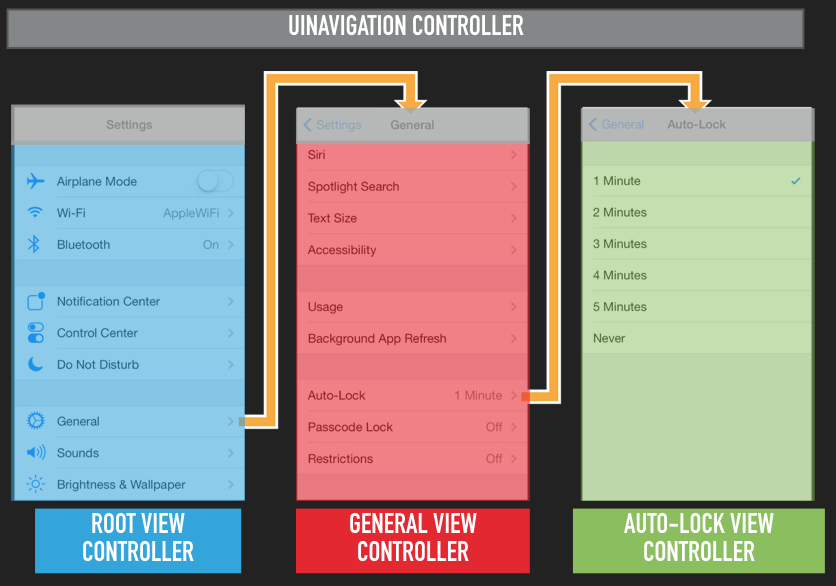
You can think of the orange lines as segues.
Segues are objects that facilitate the transition from one view to another (kind of like in real life, where a segue is a phrase that transitions from one thought to another). They are used to control the style of the transition (how one view actually moves onto the screen), and, perhaps most crucially, pass data from one view controller to another.
Open up the Xcode project included in this repo (at Fruits/Fruits.xcodeproj) to see an example of how segues are used. First, take a look at Main.storyboard. This is a more complicated storyboard than the ones you've seen in previous lessons. It consists of not one but two view controllers, labeled Fruits Scene and Fruit View Controller Scene, as well as a Navigation Controller Scene.
This app is fairly simple: On its main view, it lists a bunch of fruits (in emoji form, of course). Tapping on a fruit slides in a view that lets you see more details about that fruit.
The main view is Fruits Scene, and consists only of a table view, much like you've seen in the previous few lessons. Fruit View Controller Scene is fairly simple, too: It consists of two labels which, in the storyboard, contain the placeholder strings "<Fruit>" and "<Fruit Name>".
Remember that each scene represents a different view controller. Knowing that, you shouldn't be surprised to see that there are .swift files for two view controllers: FruitListingViewController.swift and FruitViewController.swift. Don't be overwhelmed by these! This app is a bit more complicated than ones you have seen before, but the concepts you already know remain pretty much the same. As you probably expect, the view controller for Fruits Scene is backed by FruitListingViewController, and the view controller for Fruit View Controller Scene is backed by FruitViewController.
Go ahead and build and run this app. Tap on an item in the main view. You'll see another view slide in from the right with some details about the fruit. You'll also see the title (in the nav bar) change to reflect the name of that fruit, and you'll also see a back button so you can go back to the main listing.
How are these views tied together?
Open Main.storyboard in Interface Builder again. Notice that there is a little icon connecting the two views together:
This icon represents a segue. You can click on it and view its attributes in Interface Builder's Attributes Inspector. In particular, note that its identifier has been set to "ShowFruitDetails". This string will be used to identify the segue in your Swift code. Later on, we'll cover in more detail how you create segues between views yourself in Interface Builder; for now, it's important to learn how you can identify segues and work with them.
You know that there's a segue between the FruitListingViewController (represented as Fruits Scene in the storyboard) and FruitViewController (represented as Fruit View Controller Scene in the storyboard). Open up FruitListingViewController.swift in Xcode's editor. If you scroll to the bottom of the file, you'll find a method called prepareForSegue(_:sender:) that looks like this:
    override func prepare(for segue: UIStoryboardSegue, sender: Any?) {
        if segue.identifier != "ShowFruitDetails" { return }
        if let dest = segue.destination as? FruitViewController,
               let indexPath = tableView.indexPathForSelectedRow {
            dest.fruit = fruits[(indexPath as NSIndexPath).row]
        }
    }
That's where the segue magic happens.
This method is called whenever your iOS app is transitioning from the main view (backed by FruitListingViewController) to another view. In other words, every time you tap an item in the fruit listing in the main view, this method is called. It gets passed a UIStoryboardSegue object, which represents the segue (the orange lines in the diagram shown earlier in this lesson). That segue object contains some important data that faciliates the transition from one view to another.
Our implementation of prepare(for:sender:) first checks to see if you're dealing with the segue from the main view to the fruits detail view. If you're not, the method does nothing and returns immediately. (You should always be dealing with that segue, since it's the only one you've set up, but it's good to get into the habit to check anyway.)
The next two lines are important. It is an if statement that unwraps two important pieces of data from the segue. The first line unwraps the destination view controller and casts it to a FruitViewController:
let dest = segue.destinationViewController as? FruitViewControllerLet's break this line down. A UIStoryboardSegue object contains a destinationViewController, which is the view controller class that will be presented to the user. In this case, it should be a FruitViewController. The destinationViewController is set when the segue is defined.
The second line gets the table view row that was tapped:
let indexPath = tableView.indexPathForSelectedRowThis lets your code know which cell actually triggered the transition.
With those two pieces of information, you can then set the fruit property on the destination view controller:
dest.fruit = fruits[indexPath.row]Now you see why the segue object is so important: It lets your code know what view controller is being presented, so you can set up that view controller. In this case, you're letting the FruitViewController know which fruit was selected.
The final piece of the puzzle is in the FruitViewController class. Open up FruitViewController.swift to see the code for FruitViewController. It looks like this:
class FruitViewController: UIViewController {
    @IBOutlet weak var fruitEmojiLabel: UILabel!
    @IBOutlet weak var fruitNameLabel: UILabel!

    var fruit: String?

    override func viewWillAppear(_ animated: Bool) {
        super.viewWillAppear(animated)
        if let fruit = fruit {
            fruitEmojiLabel?.text = fruit

            let fruitName = emojiToName(fruit)
            fruitNameLabel?.text = fruitName
            navigationItem.title = fruitName
        }
    }

    fileprivate func emojiToName(_ emoji: String) -> String {
        switch emoji {
        case "🍎":
            return "Apple"
        case "🍐":
            return "Pear"
        case "🍊":
            return "Tangerine"
        case "🍋":
            return "Lemon"
        case "🍌":
            return "Banana"
        case "🍉":
            return "Watermelon"
        case "🍇":
            return "Grapes"
        case "🍓":
            return "Strawberry"
        case "🍒":
            return "Cherries"
        case "🍍":
            return "Pineapples"
        default:
            return ""
        }
    }
}
There are a few important things going on in this class. First, you have the usual IB outlets; in this case, an outlet for both the emoji label and the label for the fruit's English name.
You also have a property called fruit, which is an optional String. Now you see the purpose of this line of code in FruitListingViewController:
dest.fruit = fruits[indexPath.row]This line sets the fruit property in FruitViewController, so that FruitViewController knows which fruit to display.
Why not set the fruit property in FruitViewController's init method? Well, your code doesn't actually initialize an instance of FruitViewController. It's actually the segue code that initializes FruitViewController. And it is important to know that you get a new instance of FruitViewController every time a segue occurs. By setting FruitViewController's fruit property, you're letting it know which fruit was tapped and should be displayed.
The final important piece of the FruitViewController puzzle is the viewWillAppear(_:) method. Remember this method is called when the user is about to see a view (but before they actually do). In this method, you can set up the look of the view that the user will soon see. In the case of FruitViewController, the emoji label is set to the value of the fruit property. Then, an English name is derived from the fruit property (using the emojiToName(_:) method, and the text label is set to that name. Finally, the title of the FruitViewController's navigation item it set to that English name, too.
Wait...what's the navigation item? Remember that the title shown in the nav bar is derived from the title of the view controller that is currently being shown to the user. The navigation item, set by the navigationItem property, is used to save that title. The navigation controller then uses the title set in the navigation item to display a title string in the nav bar.
Notice that you don't have to worry about creating and configuring a back button. That's taken care of for you by the navigation controller. When the user taps that back button, the current view is popped off of the navigation stack, and the user is shown the main view (the next view on the stack) again.
If this seems complicated, don't worry. As you work through some iOS projects, you'll quickly get a feel for scenes, segues, and navigation controllers. For now, build and run this project, and play around with the UI a bit to see how everything works from the user's perspective. Keep in mind what's going on under the hood!


