- 🌱 I’m currently working as frontend engineer
- ⚡ Keep coding & work out more!
![]()
記錄我的學習歷程及筆記


涉略至此,目前了解表單設計的要點有:
使用autocomplete屬性時,事實上可透過css pseudo class :autofill設定背景色。然而觀察實際上瀏覽器提供的預設樣式(這裡以chrome舉例),發現皆被設定為!important最高層級,無法輕易override background-color修改背景色
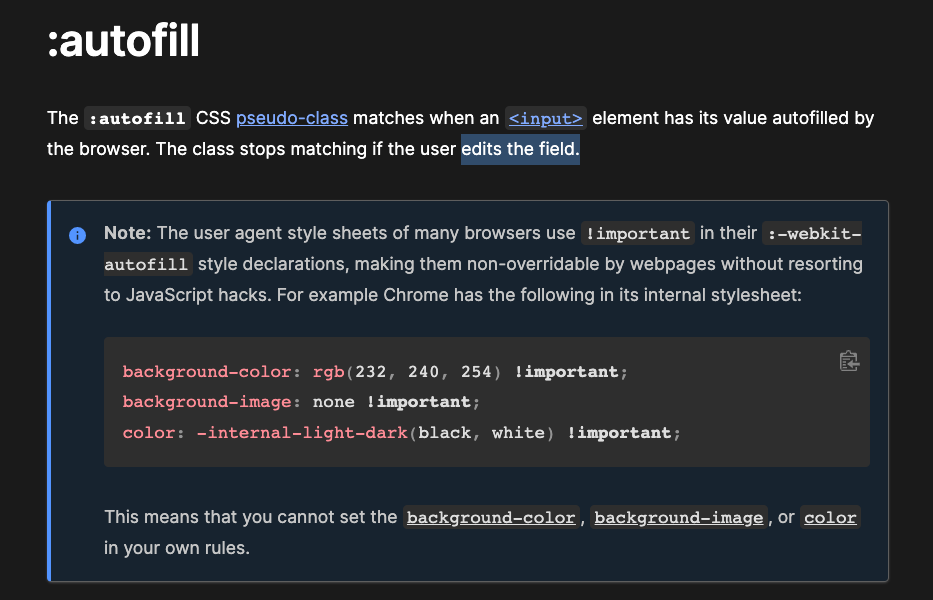

因此需要透過其他手段修改預設樣式,這邊紀錄幾個有效的方法:
input:-webkit-autofill {
    -webkit-box-shadow: 0 0 0px 1000px var(--main) inset;
    -webkit-text-fill-color: var(--text-primary); //文字顏色
}input:-webkit-autofill {
-webkit-text-fill-color: #fff !important;
transition: background-color 5000s ease-in-out 0s;
}寫CSS時,可能已經知道一開始可以按照reset css、撰寫共用樣式、撰寫custom樣式的方式去簡易分類,但如果專案規模變大,怎麼做才能更好的管理CSS檔案呢?
首先可以拆分檔案,此時會有個疑問,要怎麼分類比較好呢?
而這些目錄分別會放置那些內容?
sass/
|
|– base/
|   |– _reset.scss       # Reset/normalize
|   |– _typography.scss  # Typography rules
|   |– _base.scss  # 撰寫tag共用樣式、global var
|   |– _root.scss  # 共用變數: 顏色、框線、尺寸
|   ...   # Etc…
|
|– components/    # also name as "modules/",放置常用元件樣式
|   |– _buttons.scss     # Buttons
|   |– _carousel.scss    # Carousel
|   |– _cover.scss       # Cover
|   |– _dropdown.scss    # Dropdown
|   ...   # Etc…
|
|– layout/  # also name as "partials/"、網頁佈局
|   |– _navigation.scss  # Navigation
|   |– _grid.scss        # Grid system
|   |– _header.scss      # Header
|   |– _footer.scss      # Footer
|   |– _sidebar.scss     # Sidebar
|   |– _forms.scss       # Forms
|   ... # Etc…
|
|– pages/   #各頁面樣式,檔名建議與分頁名稱相同
|   |– _home.scss        # Home specific styles
|   |– _contact.scss     # Contact specific styles
|   ...# Etc…
|
|– themes/
|   |– _theme.scss       # Default theme
|   |– _admin.scss       # Admin theme
|   |– _dark.scss       # Dark theme
|   ... # Etc…
|
|– utils/     # also name as "helpers/ or abstracts/",此目錄內容不應compile成獨立CSS檔
|   |– _variables.scss   # Sass Variables
|   |– _functions.scss   # Sass Functions
|   |– _mixins.scss      # Sass Mixins or 計算公式
|   |– _helpers.scss     # Class & placeholders helpers
|   |– _placeholders.scss     # Class & placeholders helpers
|
|– vendors/  #放外部載入的套件、框架、library
|   |– _normalize.scss   # Bootstrap
|   |– _bootstrap.scss   # Bootstrap
|   |– _jquery-ui.scss   # jQuery UI
|   ... # Etc…
|
|– vendors-extensions/  #only exist if wish to override 外部套件
|   |– _bootstrap.scss   # Bootstrap override
|   ... # Etc…
|
|
`– main.scss             # Main Sass file
分類方法可依照專案需求客製化,而放在7個目錄下的檔案,通常production不會希望他們compile後也生成各自的css檔,因此會在檔名前加上前綴字下底線區分,如_header.scss。而main.scss則是最終我們希望被處理的檔案,因此檔名不會加上下底線
剛開始學webpack也不是很理解為什麼entry point會是js,以及什麼叫做所有的檔案都是透過bundle的方式打包,因此推薦先看完胡立大寫的此篇文後會對webpack工具有個基礎概念
webpack 新手教學之淺談模組化與 snowpack
💡 建置要點
這篇筆記主要是紀錄按照webpack官網Guide建置時,可能會遇到的問題
sass-loader
要處理SCSS檔案就需要SASS預處理器,才能成功編譯SCSS檔。而webpack透過loaders預處理檔案,因此需要安裝sass-loader
至於SASS的目錄架構,採用的是7-1 pattern
css-loader
css-loader則是為了讓CSS檔案在JS中可用module方式引入,而需要安裝的loader
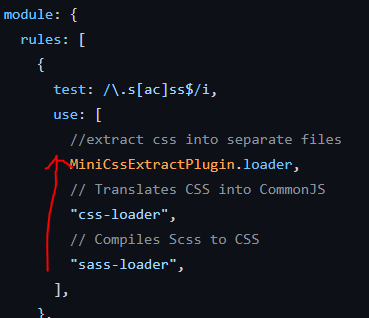
MiniCssExtractPlugin
MiniCssExtractPlugin的概念我認為是相對於style-loader的。
比較早期的開發可能會看到的狀況可能會看到用<style>撰寫CSS,而style-loader就是將遇到的CSS注入<style>中,見w3c internal css說明。
但現代網頁開發比較常使用的方式是將CSS寫在獨立的檔案進行管理,因此MiniCssExtractPlugin會將CSS抽取出並生成獨立的CSS檔案
節錄自webpack官網對於asset management的教學
webpack 5後使用asset module來管理圖片或是icon類的靜態資源,因此只要在設定檔中制定檔名相對應的處理方式,就可以透過webpack 5自動在build時把圖片加到dist/中。
這麼做的好處是當在CSS或是HTML中引用圖片(如 src或是background-image屬性),圖片經過asset module處理後會生成一個url。在src/中的scss檔案中引用圖片時,圖片原本的相對路徑經過css-loader處理後,會自動將原本的圖片路徑轉換為dist中圖片的路徑,就不需要再去手動處理最終靜態檔圖片路徑的問題。同理,html-loader也會自動轉換圖片路徑
//webpack.config.js
 const path = require('path');

 module.exports = {
   entry: './src/index.js',
   output: {
     filename: 'bundle.js',
     path: path.resolve(__dirname, 'dist'),
   },
   module: {
     rules: [
+      {
+        test: /\.(png|svg|jpg|jpeg|gif)$/i,  //regex
+        type: 'asset/resource',
+      },
     ],
   },
};剛開始的時候我也覺得奇怪,為何需要html-loader解析HTML檔,但實際上這個loader可以幫助我們自動解決html中圖檔的路徑。除此之外,也可以自動引入JS/CSS檔,省去手動修改的時間
當專案功能越多,原本手動將bundle.js及preprocess後的main.css引入index.html的作法可能並不實用,因為此時為了管理方便可能會使用以下機制:
對靜態檔名使用hash命名(以c的概念來說就是compile後的執行檔): 因為瀏覽器的cache機制,production中若使用相同檔名,即便code有改動,瀏覽器卻不一定會抓取最新的檔案。
因此通常會在每次build後,利用hash生成unique檔名,以確保瀏覽器所取得的靜態檔是最新的
可能有多個entry point
因此會衍伸下列議題 :
每次build後都會產生unique檔名,但如果不斷的下npm run build指令,dist/裡的檔案會不斷增加。因此會希望在產生最終靜態檔前,先清除舊檔案再build。webpack 4以前是透過安裝clean-webpack-plugin實現,不過webpack 5後可透過在設定檔中設置clean屬性的方式達成
//webpack.config.js
 const path = require('path');

 module.exports = {
   entry: './src/index.js',
   output: {
     filename: 'bundle.js',
     path: path.resolve(__dirname, 'dist'),
+    clean: true,
   },
 };
若以C語言的概念去理解的話,就是每次下make指令生成執行檔前,先刪除舊執行檔再compile,避免目錄size無限增長。
以系統概念來理解的話就是當偵測到code有異動,會自動重新compile並重啟服務。
若以網頁開發來說,希望可以達成自動偵測檔案異動->preprocesser->瀏覽器刷新頁面,這麼做的好處是不需要每次下npm run build後,還要F5刷新頁面才能看到修改後的結果。
webpack提供三種選項,不過最常見的是使用webpack-dev-server這個工具,以下紀錄設置時debug過程:
Cannot get / 錯誤發生原因:http:localhost:8080,會出現cannot get /錯誤
//package.json
 {
   "name": "webpack-demo",
   "version": "1.0.0",
   "description": "",
   "private": true,
   "scripts": {
     "test": "echo \"Error: no test specified\" && exit 1",
+    "start": "webpack serve --open",
     "build": "webpack"
   }
 }
透過觀察啟動時dev server顯示的log,找到發生原因為未載入已設置好參數的webpack.config.js檔


由此可見當所有設定被dev server視為未設定時,預設開發模式mode=production,且最終靜態檔目錄為~/public/
因此啟動webpack-dev-server的指令應修正如下
//package.json
{
   "name": "webpack-demo",
   "version": "1.0.0",
   "description": "",
   "private": true,
   "scripts": {
     "test": "echo \"Error: no test specified\" && exit 1",
+    "start": "webpack serve -c webpack.config.js --open", //add config
     "build": "webpack"
   }
 }
即可修正此問題
//webpack.config.js
 const path = require('path');

 module.exports = {
   entry: './src/index.js',
   output: {
     filename: 'bundle.js',
     path: path.resolve(__dirname, 'dist'),
+    clean: true,
   },
    devServer: {
        static: './dist',
+        hot: true,
   },
 };
到目前為止,設定完後應可達成
這邊要注意的是build與start的差異,雖然透過webpack-dev-server可即時看到code修改後的結果,但這不代表最終靜態檔也是修改後的狀態,仍然要下npm run build,才能保證dist/的靜態檔與http:localhost:8080看到的結果一致
因此可成功建立本機開發環境,最終的webpack.config.js與package.json檔案應如下
//webpack.config.js
const path = require('path');
const MiniCssExtractPlugin = require("mini-css-extract-plugin");
const HtmlWebpackPlugin = require('html-webpack-plugin');

module.exports = {
  mode: 'development',
  entry: './src/index.js',
  devtool: 'inline-source-map',
  devServer: {
    static: {
      directory: path.join(__dirname, './dist')
    },
    hot: true,
  },
  output: {
    filename: 'bundle.js',
    path: path.resolve(__dirname, 'dist'),
    //export images to specific dir
    assetModuleFilename: 'images/[hash][ext][query]',
    //clean up dist/ before each build
    clean: true,
  },
  module: {
    rules: [
      {
        test: /\.s[ac]ss$/i,
        use: [
          //extract css into separate files
          MiniCssExtractPlugin.loader,
          // Translates CSS into CommonJS
          "css-loader",
          // Compiles Scss to CSS
          "sass-loader",
        ],
      },
      {
        test: /\.(png|svg|jpg|jpeg|gif)$/i,
        type: 'asset/resource',
        generator: {
          filename: 'images/[hash][ext][query]'
        },
      },
      {
        //resolve img src problem
        test: /\.html$/i,
        loader: "html-loader",
        options: {},
      },
    ],
  },
  plugins: [new MiniCssExtractPlugin(),
  //hot reload html
  new HtmlWebpackPlugin(
    {
      template: 'src/template.html',
    }
  ),
  ],
  // add this if have > 1 entry point
  // optimization: {
  //   runtimeChunk: 'single',
  // },
};
//package.json
{
"main": "webpack.config.js",
"scripts": {
"start": "webpack serve -c webpack.config.dev.js --open",
"build": "webpack --config webpack.config.dev.js --mode development",
"test": "echo \"Error: no test specified\" && exit 1"
},
"keywords": [],
"author": "",
"license": "ISC",
"devDependencies": {
"css-loader": "^6.7.1",
"html-loader": "^3.1.2",
"html-webpack-plugin": "^5.5.0",
"mini-css-extract-plugin": "^2.6.1",
"node-sass": "^7.0.1",
"sass-loader": "^13.0.0",
"webpack": "^5.73.0",
"webpack-cli": "^4.10.0",
"webpack-dev-server": "^4.9.2"
},
}
A declarative, efficient, and flexible JavaScript library for building user interfaces.
🖖 Vue.js is a progressive, incrementally-adoptable JavaScript framework for building UI on the web.
TypeScript is a superset of JavaScript that compiles to clean JavaScript output.
An Open Source Machine Learning Framework for Everyone
The Web framework for perfectionists with deadlines.
A PHP framework for web artisans
Bring data to life with SVG, Canvas and HTML. 📊📈🎉
JavaScript (JS) is a lightweight interpreted programming language with first-class functions.
Some thing interesting about web. New door for the world.
A server is a program made to process requests and deliver data to clients.
Machine learning is a way of modeling and interpreting data that allows a piece of software to respond intelligently.
Some thing interesting about visualization, use data art
Some thing interesting about game, make everyone happy.
We are working to build community through open source technology. NB: members must have two-factor auth.
Open source projects and samples from Microsoft.
Google ❤️ Open Source for everyone.
Alibaba Open Source for everyone
Data-Driven Documents codes.
China tencent open source team.