HTML5 Canvas is a super-cool tool for drawing, animating, making games, and more. No Gems, no libraries, just straight up HTML and JavaScript to get things done. Keep your trusty cheat sheet nearby and let's get started with the setup:
<html>
    <head>

    </head>

    <body>
        <canvas id="my-canvas" width="500" height="500"></canvas>
        <script src="canvas.js"></script>
    </body>
</html>
You may wish to add a border around your canvas to clearly see it. In your javascript file, hook up a variable to the context of the canvas to begin drawing. We're going to use the "2d" context, though there is an experimental "webgl" context that is only on browsers running WebGL.
var canvas = document.getElementById('my-canvas');
var ctx = canvas.getContext('2d');
Now we're ready to begin drawing our first line! Paths all have a beginning, movement, and an end. They also have some options that must be set before drawing a line on the path. This includes things like a width, color, and style for a path end. In the javascript file continue writing:
ctx.lineWidth = 10;
ctx.strokeStyle = "#ff0000";
ctx.lineCap = 'round';
lineWidth sets the width, strokeStyle is the color, and lineCap sets the line end styling (round, square, and butt are the lineCap options). Now we will start the path at a point, move to a new point, and stroke on the line we just made. Continue writing:
ctx.beginPath();
ctx.moveTo(0, 0);
ctx.lineTo(250, 400);
ctx.stroke();
Yay a line! First beginPath() starts a new path. The starting location is defined with moveTo(x,y). It is important to note that y increases as you go down the page while x increases from left to right. lineTo(x,y) sets the way we draw a line and to which location we will draw. Finally we stroke the line we just set.
Next let us draw a second line of another color. To accomplish this, set a new stroke style and begin a new path in your brand new color. We'll draw a V back up to the top with a blue line (afterwards, play around with the lineCap property to see how they look with this setup)
ctx.strokeStyle = '#0000ff';
ctx.beginPath();
ctx.moveTo(250, 400);
ctx.lineTo(500, 0);
ctx.stroke();
Great! Two separate lines- but I what if I draw one line with an angle in it, not two separate lines? I'll need that to make the angle look nice. Let us all remember Bob Ross and put a happy little angle in our line. Continue writing:
ctx.strokeStyle = '#00ff00';
ctx.beginPath();
ctx.moveTo(150,150);
ctx.lineTo(250,50);
ctx.lineTo(350,150);
ctx.lineJoin = 'round';
ctx.stroke();
Here we see two consecutive lineTo(x,y) to draw our angle. Next is the new lineJoin property which accepts 'round', 'miter', and 'bevel'. Test each to see how they look then we'll move on.
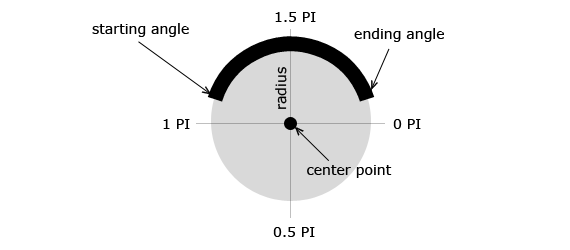
We're going to look at circular arcs. The arc method draws portions of a circle- let us draw one at the center of canvas. It takes a center x,y coordinate, a radius, a start and end angle, and a stroke direction. Since this is javascript, let us start passing variables into our method arguments to see what that looks like.
var x = canvas.width / 2;
var y = canvas.height / 2;
var radius = 75;
var startAngle = 1.1 * Math.PI;
var endAngle = 0.9 * Math.PI;
var counterClockwise = false;

ctx.lineWidth = 25;
ctx.strokeStyle = "red";
ctx.lineCap = "round";

ctx.beginPath();
ctx.arc(x, y, radius, startAngle, endAngle, counterClockwise);
ctx.stroke();
Notice how we can get the center of the canvas via canvas.width and canvas.height, and that the start and end angles are all based on radians. Radians measure angles starting at 0 and up to 2π, while degrees measure from 0 to 360. If you want a perfect circle, pass 0 and 2*Math.PI for your start and end angles. Change the multiplier for start and end angles between 0 and 2 to see the effect on the arc, playing with the direction boolean as you go.
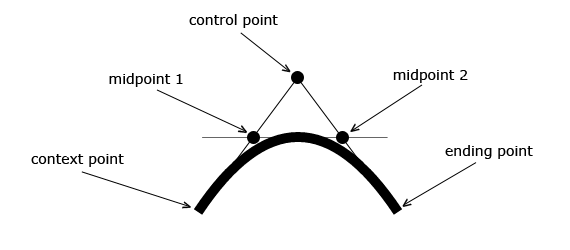
I don't want some circley shaped ne'er-do-well plebeian curve. I want to bend it any which way I want- so I'll need it to take a beginning point, a control point, and an end point to define my very own quadratic curve.
var contextX = 240;
var contextY = 50;
var controlX = 275;
var controlY = 220;
var endX = 310;
var endY = 50;

ctx.beginPath();
ctx.moveTo(contextX, contextY);
ctx.quadraticCurveTo(controlX, controlY, endX, endY);

ctx.lineWidth = 25;
ctx.strokeStyle = 'purple';
ctx.lineCap = 'round';
ctx.stroke();
Play around with the points to see how they work, then draw your own curve coming out of the first- don't forget to set the lineJoin.
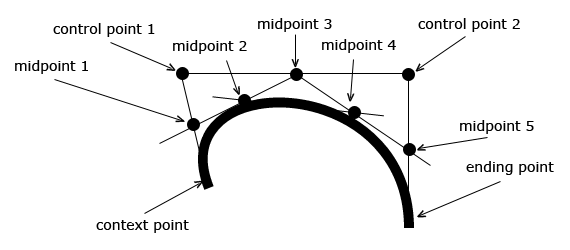
A single control point is alright. Pretty cool I guess. Two is where it is at, and that is precisely what bezierCurveTo takes- two control point coordinates and an ending point. This enables more nuanced curves with bubbles and contractions all over.
var contextX = 240;
var contextY = 50;
var controlOneX = 75;
var controlOneY = 220;
var controlTwoX = 475;
var controlTwoY = 420;
var endX = 310;
var endY = 25;

ctx.beginPath();
ctx.moveTo(contextX, contextY);
ctx.bezierCurveTo(controlOneX, controlOneY, controlTwoX, controlTwoY, endX, endY);

ctx.lineWidth = 25;
ctx.strokeStyle = '#cccccc';
ctx.lineCap = 'round';
ctx.stroke();
Try to use some bezier curves to create a familiar shape, like a tooth or an eye or a ping pong paddle.
Fills, Rects, and Other Shapes
Just as you can stroke a path, you can fill one too. I will demonstrate with a new method rect(x, y, width, height) that makes rectangles if given a starting coordinate, width, and height. Note that fillStyle sets a color while fill() does the coloring.
var x = 50;
var y = 50;
var width = 200;
var height = 100;

ctx.beginPath();
ctx.rect(x, y, width, height);
ctx.fillStyle = 'orange';
ctx.fill();
ctx.lineWidth = 7;
ctx.strokeStyle = 'yellow';
ctx.stroke();
How do you fill a funny shaped path? closePath() to the rescue! This method takes wherever your current context is located and draws a line to the very first context of your path. Here an arc is closed to form a semicircle:
var x = 100;
var y = 100;
var radius = 70;
var startAngle = Math.PI/2.5;

ctx.lineWidth = 5;
ctx.fillStyle = 'pink';
ctx.strokeStyle = '#550000';

ctx.beginPath();
ctx.arc(x, y, radius, startAngle, startAngle + Math.PI, false);
ctx.closePath();
ctx.fill();
ctx.stroke();
Let's show an example with a bezier curve connected to a quadratic curve that is closed shut and filled. Note the final context point of 50,75 drawing a vertical 25px line to the starting context point 50,50.
ctx.lineWidth = 30;
ctx.lineCap = 'round';
ctx.lineJoin = 'round';
ctx.strokeStyle = 'blue';
ctx.fillStyle = 'lightblue';

ctx.beginPath();
ctx.moveTo(50,50);
ctx.bezierCurveTo(400,200,150,150,460,30);
ctx.quadraticCurveTo(250,450,50,75);
ctx.closePath();
ctx.stroke();
ctx.fill();
Once you think you grasp how it works, create your own shape, anything you want to draw, then close and fill it.
'Why wouldn't you just give fillStyle a name like fillColor or something?' said me when I first used it. We don't because it can take variables which describe gradients or patterns, too. Let us see a gradient variable in action- first set a variable grd using the createLinearGradient context method. Pass two coordinates as arguments defining the line over which the gradient will change color. Set the colors with addColorStop, and assign your fillStyle to the grd variable.
ctx.rect(50, 50, 400, 400);

var grd = ctx.createLinearGradient(0, 0, canvas.width, canvas.height);
    grd.addColorStop(0, 'yellow');
    grd.addColorStop(1, 'red');
ctx.fillStyle = grd;
ctx.fill();
Pass different coordinate arguments for your createLinearGradient to change the direction of the gradient, then see what happens when you change that peculiar first number argument for the two addColorStop. Then check out what happens when you use createRadialGradient(250, 250, 20, 250, 250, 300); instead of the linear gradient context method (the arguments are two circles, x, y, radius, try to change the starting x coordinate of the second circle to 0).
You can also set patterns by loading an image prototype and using the context method createPattern to set your fillStyle.
var imageObject = new Image();
imageObject.onload = function() {
  var pattern = ctx.createPattern(imageObject, 'repeat');

  ctx.rect(0, 0, canvas.width, canvas.height);
  ctx.fillStyle = pattern;
  ctx.fill();
};
imageObject.src = 'http://1.bp.blogspot.com/-10uYQ232GmA/VB2cCRa0pDI/AAAAAAAAGgw/m9nRdE1d-Rg/s1600/checkerboard-tile-pattern.jpg';
onload is a useful method on Image prototypes as it allows you to render images only after they properly load. Don't forget to set your image sources!
You can animate canvas elements in a variety of ways- I'm going to show you a simple way involving setInterval(function, speed). Every time the function in our setInterval runs we will clear the drawing space, move some coordinates around, and redraw. Start by setting all our variables for the line- for now let us draw a vertical line that moves to the right. dx sets the rate of change.
var canvas = document.getElementById('my-canvas');
var ctx = canvas.getContext('2d');

ctx.lineWidth = 5;
ctx.strokeStyle = "#ff00ff";
ctx.lineCap = 'round';

var startX = 50;
var startY = 50;

var endX = 50;
var endY = 150;

var dx = 2;
Next we will set our initialize function which calls all once-only functions for the animation. Inside we put the setInterval which calls our drawCanvas function. The first step to animation is clearing the current frame out for the next one. clearRect accomplishes this feat by erasing everything drawn inside it.
var init = function(){
  setInterval(drawCanvas, 20)
};

var drawCanvas = function(){
  ctx.clearRect(0, 0, canvas.width, canvas.height)
};

init()
We still need to draw our line on the canvas. Put the actual line drawing into our drawCanvas function:
var drawCanvas = function(){
ctx.clearRect(0, 0, canvas.width, canvas.height);

ctx.beginPath();
ctx.moveTo(startX,startY);
ctx.lineTo(endX, endY);
ctx.stroke();
};
This is close, however we've got no movement on the screen yet. Since we are moving the object from left to right, we have to ensure that our X variables are increasing at our defined speed. Finish the drawCanvas method:
var drawCanvas = function(){
  ctx.clearRect(0, 0, canvas.width, canvas.height);
  ctx.beginPath();
  ctx.moveTo(startX,startY);
  ctx.lineTo(endX, endY);
  ctx.stroke();

  startX += dx;
  endX += dx;
};
You've made a cartoon! Ok so this example isn't the most impressive, however you have the skills now to animate absolutely any variable for any of the canvas tools available to you. So many possibilities!


