视频链接:
https://www.bilibili.com/video/BV1Wr4y1K7Sh
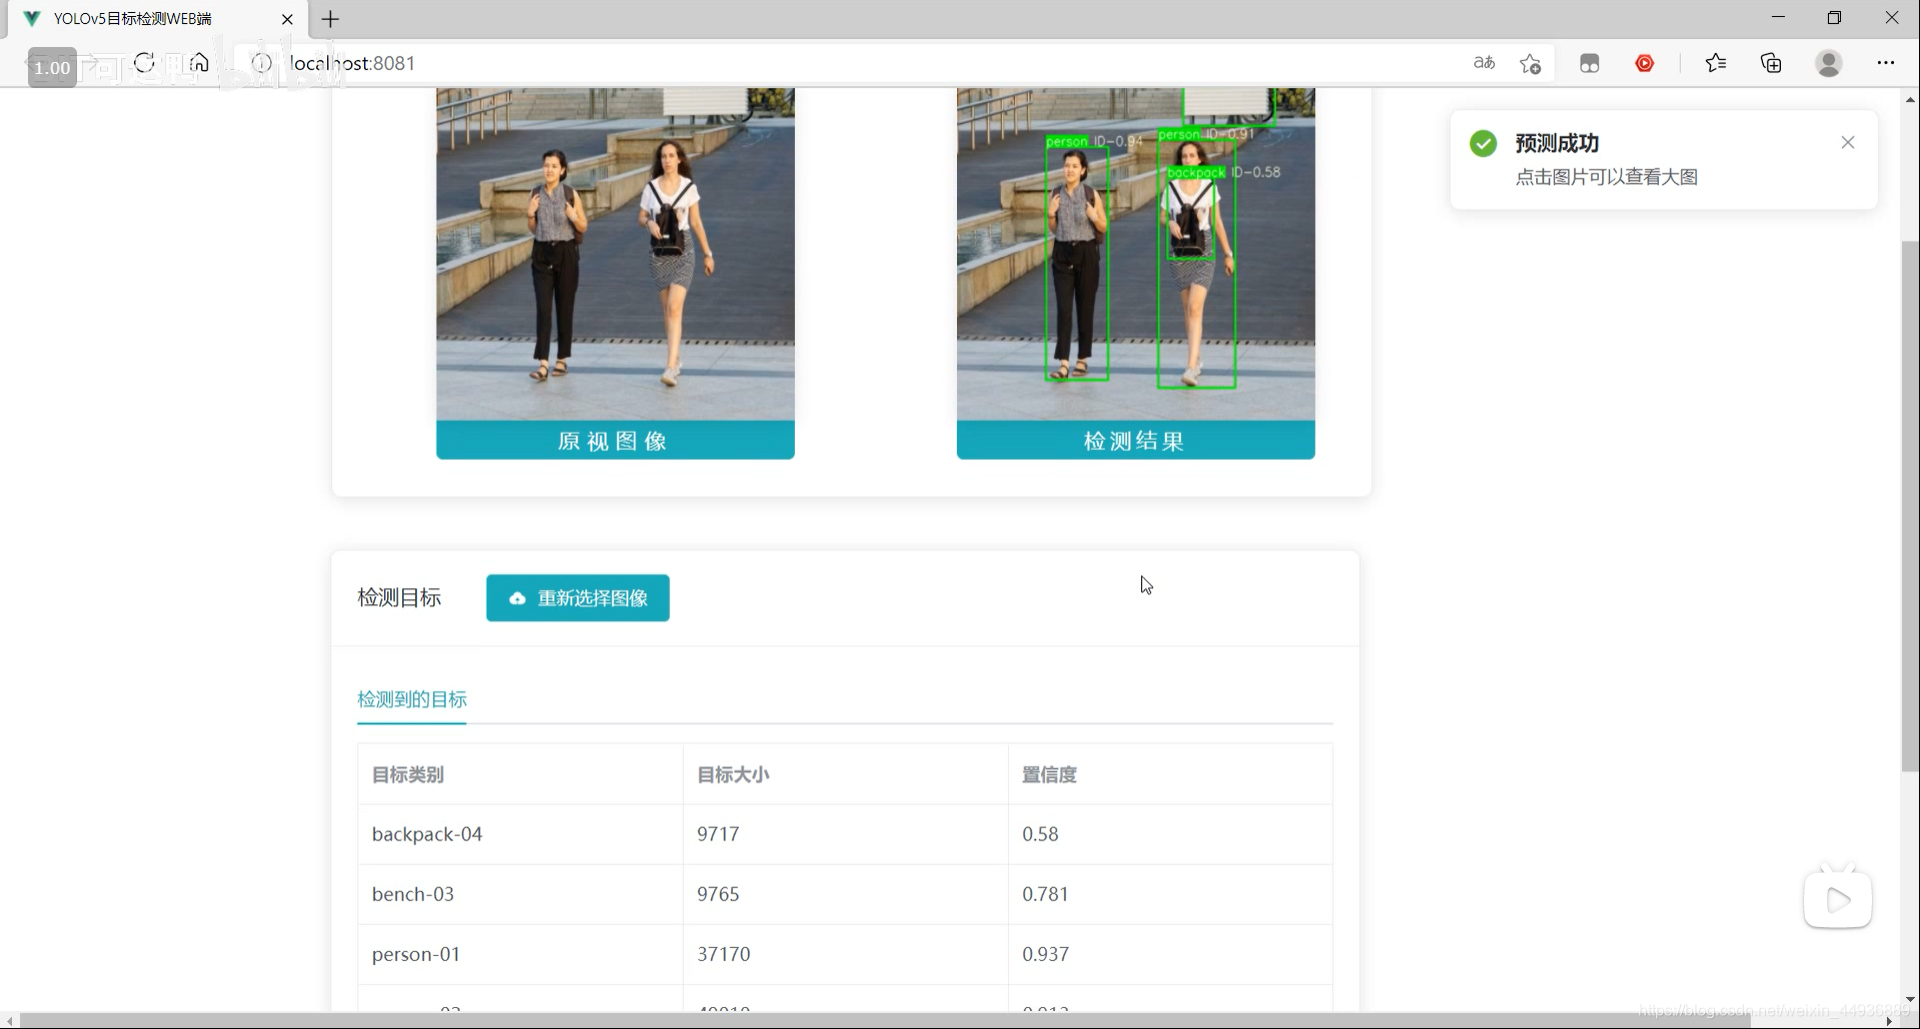
最终效果:
源码已经上传 Github:
https://github.com/Sharpiless/Yolov5-Flask-VUE
训练自己的数据集可以看我这篇博客:
【小白CV】手把手教你用YOLOv5训练自己的数据集(从Windows环境配置到模型部署)
这里演示的话我就用官方训练好的 yolov5m.pt 模型。
预测接口:
import torch
import numpy as np
from models.experimental import attempt_load
from utils.general import non_max_suppression, scale_coords, letterbox
from utils.torch_utils import select_device
import cv2
from random import randint


class Detector(object):

    def __init__(self):
        self.img_size = 640
        self.threshold = 0.4
        self.max_frame = 160
        self.init_model()

    def init_model(self):

        self.weights = 'weights/yolov5m.pt'
        self.device = '0' if torch.cuda.is_available() else 'cpu'
        self.device = select_device(self.device)
        model = attempt_load(self.weights, map_location=self.device)
        model.to(self.device).eval()
        model.half()
        # torch.save(model, 'test.pt')
        self.m = model
        self.names = model.module.names if hasattr(
            model, 'module') else model.names
        self.colors = [
            (randint(0, 255), randint(0, 255), randint(0, 255)) for _ in self.names
        ]

    def preprocess(self, img):

        img0 = img.copy()
        img = letterbox(img, new_shape=self.img_size)[0]
        img = img[:, :, ::-1].transpose(2, 0, 1)
        img = np.ascontiguousarray(img)
        img = torch.from_numpy(img).to(self.device)
        img = img.half()  # 半精度
        img /= 255.0  # 图像归一化
        if img.ndimension() == 3:
            img = img.unsqueeze(0)

        return img0, img

    def plot_bboxes(self, image, bboxes, line_thickness=None):
        tl = line_thickness or round(
            0.002 * (image.shape[0] + image.shape[1]) / 2) + 1  # line/font thickness
        for (x1, y1, x2, y2, cls_id, conf) in bboxes:
            color = self.colors[self.names.index(cls_id)]
            c1, c2 = (x1, y1), (x2, y2)
            cv2.rectangle(image, c1, c2, color,
                          thickness=tl, lineType=cv2.LINE_AA)
            tf = max(tl - 1, 1)  # font thickness
            t_size = cv2.getTextSize(
                cls_id, 0, fontScale=tl / 3, thickness=tf)[0]
            c2 = c1[0] + t_size[0], c1[1] - t_size[1] - 3
            cv2.rectangle(image, c1, c2, color, -1, cv2.LINE_AA)  # filled
            cv2.putText(image, '{} ID-{:.2f}'.format(cls_id, conf), (c1[0], c1[1] - 2), 0, tl / 3,
                        [225, 255, 255], thickness=tf, lineType=cv2.LINE_AA)
        return image

    def detect(self, im):

        im0, img = self.preprocess(im)

        pred = self.m(img, augment=False)[0]
        pred = pred.float()
        pred = non_max_suppression(pred, self.threshold, 0.3)

        pred_boxes = []
        image_info = {}
        count = 0
        for det in pred:
            if det is not None and len(det):
                det[:, :4] = scale_coords(
                    img.shape[2:], det[:, :4], im0.shape).round()

                for *x, conf, cls_id in det:
                    lbl = self.names[int(cls_id)]
                    x1, y1 = int(x[0]), int(x[1])
                    x2, y2 = int(x[2]), int(x[3])
                    pred_boxes.append(
                        (x1, y1, x2, y2, lbl, conf))
                    count += 1
                    key = '{}-{:02}'.format(lbl, count)
                    image_info[key] = ['{}×{}'.format(
                        x2-x1, y2-y1), np.round(float(conf), 3)]

        im = self.plot_bboxes(im, pred_boxes)
        return im, image_info
处理完保存到服务器本地临时的目录下:
import os

def pre_process(data_path):
    file_name = os.path.split(data_path)[1].split('.')[0]
    return data_path, file_name
import cv2
def predict(dataset, model, ext):
global img_y
x = dataset[0].replace('\\', '/')
file_name = dataset[1]
print(x)
print(file_name)
x = cv2.imread(x)
img_y, image_info = model.detect(x)
cv2.imwrite('./tmp/draw/{}.{}'.format(file_name, ext), img_y)
return image_infofrom core import process, predict
def c_main(path, model, ext):
image_data = process.pre_process(path)
image_info = predict.predict(image_data, model, ext)
return image_data[1] + '.' + ext, image_info
if __name__ == '__main__':
pass然后通过Flask框架写相应函数:
@app.route('/upload', methods=['GET', 'POST'])
def upload_file():
    file = request.files['file']
    print(datetime.datetime.now(), file.filename)
    if file and allowed_file(file.filename):
        src_path = os.path.join(app.config['UPLOAD_FOLDER'], file.filename)
        file.save(src_path)
        shutil.copy(src_path, './tmp/ct')
        image_path = os.path.join('./tmp/ct', file.filename)
        pid, image_info = core.main.c_main(
            image_path, current_app.model, file.filename.rsplit('.', 1)[1])
        return jsonify({'status': 1,
                        'image_url': 'http://127.0.0.1:5003/tmp/ct/' + pid,
                        'draw_url': 'http://127.0.0.1:5003/tmp/draw/' + pid,
                        'image_info': image_info})

    return jsonify({'status': 0})
这样前端发出POST请求时,会对上传的图像进行处理。
主要是通过VUE编写前端WEB框架。
核心前后端交互代码:
	// 上传文件
    update(e) {
      this.percentage = 0;
      this.dialogTableVisible = true;
      this.url_1 = "";
      this.url_2 = "";
      this.srcList = [];
      this.srcList1 = [];
      this.wait_return = "";
      this.wait_upload = "";
      this.feature_list = [];
      this.feat_list = [];
      this.fullscreenLoading = true;
      this.loading = true;
      this.showbutton = false;
      let file = e.target.files[0];
      this.url_1 = this.$options.methods.getObjectURL(file);
      let param = new FormData(); //创建form对象
      param.append("file", file, file.name); //通过append向form对象添加数据
      var timer = setInterval(() => {
        this.myFunc();
      }, 30);
      let config = {
        headers: { "Content-Type": "multipart/form-data" },
      }; //添加请求头
      axios
        .post(this.server_url + "/upload", param, config)
        .then((response) => {
          this.percentage = 100;
          clearInterval(timer);
          this.url_1 = response.data.image_url;
          this.srcList.push(this.url_1);
          this.url_2 = response.data.draw_url;
          this.srcList1.push(this.url_2);
          this.fullscreenLoading = false;
          this.loading = false;

          this.feat_list = Object.keys(response.data.image_info);

          for (var i = 0; i < this.feat_list.length; i++) {
            response.data.image_info[this.feat_list[i]][2] = this.feat_list[i];
            this.feature_list.push(response.data.image_info[this.feat_list[i]]);
          }

          this.feature_list.push(response.data.image_info);
          this.feature_list_1 = this.feature_list[0];
          this.dialogTableVisible = false;
          this.percentage = 0;
          this.notice1();
        });
    },
这段代码在点击提交图片时响应:
		<div slot="header" class="clearfix">
            <span>检测目标</span>
            <el-button
              style="margin-left: 35px"
              v-show="!showbutton"
              type="primary"
              icon="el-icon-upload"
              class="download_bt"
              v-on:click="true_upload2"
            >
              重新选择图像
              <input
                ref="upload2"
                style="display: none"
                name="file"
                type="file"
                @change="update"
              />
            </el-button>
</div>在 Flask 后端项目下启动后端代码:
python app.py在 VUE 前端项目下,先安装依赖:
npm install然后运行前端:
npm run serve然后在浏览器打开localhost即可:
感兴趣的同学关注我的公众号——可达鸭的深度学习教程: