![]()
Somewhat useful Swift code, somewhat tested.
That's nice, but what is SquidKit more specifically?
SquidKit is a collection of classes and related code that would often be useful in new iOS development projects. It is intended to relieve the developer of the task of building out some of the boring infrastructure that often needs to be built out for modern apps, especially ones that communicate with a server and receive responses in JSON format. SquidKit is a growing project, but already includes lots of rather useful stuff.
Versions
| Release | Supported OS | Notes |
|---|---|---|
| 1.2 | iOS 8.0 and up | Cache<T> now clears in response to UIApplicationDidReceiveMemoryWarningNotification Added clear method to Cache<T> Removed support for iOS 7.x. |
| 1.1 | iOS 7.1 and up | added image downloading, URLImageView, and caching removed built frameworks - don't see that it added any real benefit |
| 1.0 | iOS 7.1 and up |
Major functional components
Networking
SquidKit networking is built on top of the excellent Alamofire networking library written by Mattt Thompson. SquidKit takes networking abstraction a bit further by building upon the idea that most apps communicate with a set of endpoints, each with their own set of query or post parameters, and which return data as JSON. Thus, SquidKit introduces the Endpoint class, which is designed to be overridden by various endpoint configurations. SquidKit provides one such overriding class - JSONResponseEndpoint - which is an Endpoint that expects a JSON response format. Defining an endpoint is typically as simple as overriding 3 methods:
- override func host() -> String
- override func path() -> String
- override func params() -> ([String: AnyObject]?, SquidKit.Method)
Example
class TestEndpoint: JSONResponseEndpoint {

    override func host() -> String {
        return "httpbin.org"
    }

    override func path() -> String {
        return "get"
    }

    override func params() -> ([String: AnyObject]?, SquidKit.Method) {
        return (["foo": "bar"], .GET)
    }

}
Connecting to an endpoint is as simple as calling a connect function with a completion handler in the form of a closure. The JSONResponseEndpoint's connect function looks like this:
public func connect(completionHandler: ([String: AnyObject]?, ResponseStatus) -> Void)Example
MyEndpoint.connect {(JSON, status) -> Void in
    switch status {
    case .OK:
        Log.print("JSON: \(JSON)")
    case .HTTPError(let code, let message):
        Log.print("\(code): \(message)")
    case .NotConnectedError:
        Log.message("maybe turn on the internets")
    case .HostConnectionError:
        Log.message("can't find that host")
    case .ResourceUnavailableError:
        Log.message("can't find what you're looking for")
    case .UnknownError(let error):
        Log.print(error)
    default:
        break
    }
In the SquidKitExample project that is included with SquidKit, take a look at TestEndpoint.swift and EndpointTestTableViewController.swift for further examples of working with SquidKit networking.
Network host environments
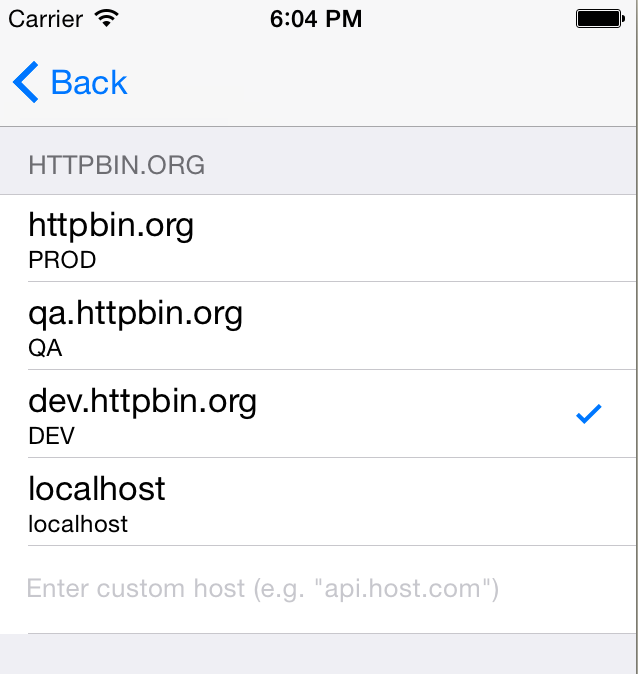
Typically in a development project, one is working with a variety of service environments for a collection of endpoints - production, QA and dev are common examples. SquidKit offers an elegant and complete solution for putting environment switching capabilities into your iOS application (note: it is often useful to leave such capabilities in your production app as well, especially if you want to test your production app against planned service modifications. We'll leave it to you as to how you might wish to hide the service configuration UI from your users). In SquidKit, providing an environment switcher is as easy as providing a JSON file that describes your various environments, and including SquidKit's HostConfigurationTableViewController that provides the UI for switching among the environments described in your JSON file.
JSON file example
{
    "configurations": [
       {
       "canonical_host": "httpbin.org",
       "canonical_protocol": "http",
       "prerelease_key": "DEV",
       "release_key": "PROD",
       "hosts":  [
                     {
                     "key": "PROD",
                     "host": "httpbin.org"
                     },
                     {
                     "key": "QA",
                     "host": "qa.httpbin.org",
                     "protocol": "https"
                     },
                     {
                     "key": "DEV",
                     "host": "dev.httpbin.org"
                     },
                     {
                     "key": "localhost",
                     "host": "localhost"
                     },
                     {
                     "key": "USER"
                     }
                 ]
       }
    ]
}
You can define as many configurations as you like. And note the "USER" key that lacks a "host" or "protocol" entry - this tells SquidKit to treat this key as a runtime defined environment field with a text entry field for inputting the host name.
SquidKit Endpoints automatically work with network host environments, no other endpoint management is required.
To use host environment configuration, add a line in your app's startup code that looks like this:
HostMapManager.sharedInstance.loadConfigurationMapFromResourceFile("MyHostMap.json")Once you've loaded the host map, you can set all environments to prerelease by doing this:
HostMapManager.sharedInstance.setPrereleaseConfigurations()and to release by doing this:
HostMapManager.sharedInstance.setReleaseConfigurations()Note that these methods set the environment to whatever is defined in your host map JSON file's "prerelease_key" and "release_key", respectively.
To show the configuration selection UI, add code to load SquidKit's HostConfigurationTableViewController:
let configurationViewController:HostConfigurationTableViewController = HostConfigurationTableViewController(style: .Grouped)

myNavigationController.pushViewController(configurationViewController, animated: true)
which will give you a table view that looks something like this:
Host environment settings remain in effect after application restarts, since by default the results are cached to NSUserDefaults. To clear the cache, you can do this:
HostMapManager.sharedInstance.hostMapCache?.removeAll()You can provide your own caching mechanism - for example, if you want to store to SharedUserDefaults if you're working on an app and an extension - by setting the HostMapManager's hostMapCache to a class that implements the HostMapCache protocol (defined in EndpointMap.swift). If you want no caching at all, just set the hostMapCache to nil:
HostMapManager.sharedInstance.hostMapCache = MyHostMapCache()
// OR
HostMapManager.sharedInstance.hostMapCache = nil
In the SquidKitExample project, see EndpointExampleViewController.swift, TestEndpoint.swift and HostMap.json for examples of all of the above.
Remote Image Handling
SquidKit offers and extension of the Alamofire Request class that provides for image (jpeg and png) serialization. Image serialization supports background thread decompression, using a port of AFNetworking's AFInflatedImageFromResponseWithDataAtScale method (as ported by Martin Conte Mac Donell). SquidKit also offers optional local caching of images downloaded through the Request extension. For more on caching, see the Caching section below.
Image requests are serviced by the responseImageCacheable and responseImage methods (the former does caching, the latter does not). Typical usage would like like this:
let url = NSURL(string: "http://static1.squarespace.com/static/52eea758e4b0fff11bf07129/52eeeda0e4b0fff11bf09db9/52eeee57e4b0cfc36d9583d1/1391390297091/DSCF0984.jpg")

SquidKit.request(.GET, url!).responseImageCacheable {
    (_, _, image:UIImage?) -> Void in
    if image != nil {
        // do something with it
    }
}
See Alamofire+Image.swift for the responseImage and related functions. See RemoteImageViewController.swift in the SquidKitExample project for usage examples.
URLImageView
SquidKit also offers a UIImageView subclass which handles the details of fetching and displaying remote images. URLImageView has a simple load and cancel interface. It can optionally display an activity indicator by setting it's activityIndicatorType member to the appropriate value:
public enum URLImageViewActivityIndicatorType {
    case None
    case Dark
    case Light
    case LightLarge
}

public var activityIndicatorType:URLImageViewActivityIndicatorType = .None
URLImageView has a set of simple appearance animation options - none, fade, and fade if not cached (URLImageView caches images by default):
public enum URLImageViewImageAppearanceType {
    case None
    case Fade(NSTimeInterval, Float, Float)
    case FadeIfNotCached(NSTimeInterval, Float, Float)
}

public var imageAppearanceType:URLImageViewImageAppearanceType = .None
The parameters to the two fade options are fade animation duration, initial alpha value and final alpha value, respectively.
Example usage:
// within a UIViewController...

@IBOutlet var imageView:URLImageView?

var urlString = "http://static1.squarespace.com/static/52eea758e4b0fff11bf07129/52eeeda0e4b0fff11bf09db9/52eeee41e4b0b43e3bb4e615/1391390276529/DSC_3729.jpg"

override func viewDidAppear(animated: Bool) {
    super.viewDidAppear(animated)

	self.imageView?.imageAppearanceType = .FadeIfNotCached(0.5, 0.0, 1.0)
    self.imageView?.urlString = urlString
    self.imageView?.activityIndicatorType = .Dark
    self.imageView?.load()
}
See URLImageViewController.swift in the SquidKitExample project for more details.
JSON parsing
While not quite a full on parser, SquidKit offers a utility for working with JSON response data that abstracts away some of the ugliness of directly dealing with Dictionary objects and extracting values therein. SquidKit handles JSON data with one public class: JSONEntity. JSONEntity is effectively a wrapper for a JSON element's key and value. Unlike walking through a Dictionary checking to see if particular keys exist, a JSONEntity is guaranteed to be non-nil, thus always directly inspectable without checking for nil optional values.
A JSONEntity can be constructed with a key/value pair, a JSON resource file, or a JSON dictionary:
public init(_ key:String, _ value:AnyObject)
public init(resourceFilename:String)
public init(jsonDictionary:NSDictionary)
JSON elements are extracted using common subscript syntax:
let json = JSONEntity(resourceFilename: "MyJSONFile.json")
let someItem = json["some_item"]
at this point you can extract the value of the JSON "some_item" entity using one of the JSONEntity value extraction methods listed below:
public func string() -> String?

public func array() -> NSArray?

public func dictionary() -> NSDictionary?

public func int() -> Int?

public func float() -> Float?

public func bool() -> Bool?
Because it is often quite useful and more succinct to specify a default value if a key can't be found in the JSON dictionary, each of the extraction methods has a "WithDefault" counterpart that takes a default value argument as well; for example:
public func stringWithDefault(defaultValue:String?) -> String?

// so we can do something like this:
let address = entity["address"].string()

// or this
let address = entity["address"].stringWithDefault("Address N/A")
JSONEntity supports two subscript operators: one that takes a String (for extracting key values) and one that takes an Int (for extracting array element values). The subscript operators return a non-nil JSONEntity that wraps the value. Of course, values don't always exist; this is way the value extraction methods all return optionals. One can also look at the "isValid" bool value of a JSONEntity to determine if it contains a valid value.
JSONEntity conforms to SequenceType, which means it supports iteration using for-in syntax:
let json = JSONEntity(myJSONDictionary)
let entities = json["entities_array"]
for entity in entities {
    let float = entity["float_item"].float()
    // etc...
}
JSONEntity is conceptually similar to the SwiftyJSON library - however, unlike SwiftyJSON, JSONEntity supports the quite useful default values and iteration mentioned above.
In the SquidKitExample project, see JSONEntityExampleViewController.swift for an example of using JSONEntity. Additionally, SquidKit itself uses JSONEntity to parse JSON theme files (ThemeLoader.swift in the SquidKit project).
Themes
SquidKit themes are simply a mechanism for expressing pretty much any attribute in an external file, rather than internally in source code. This theme model borrows heavily from Brent Simmons' DB5 theme work, however SquidKit themes use the more portable JSON format rather than plists for defining theme elements. Theme-able elements include colors (including alpha), strings, ints, floats, bools, or any Dictionary value.
Theme JSON looks like this:
{
    "themes":
    [
        {
            "name": "ExampleTheme",
            "attributes":
            {
				"myThemeText": "Hello themes",
				"defaultBackgroundColor": {
					"color": "0000FF(blue)",
					"alpha": 0.3
				},
				"defaultLabelTextColor": {
					"color": "FF0000(red)"
				}
            }
        }
    ]
}
You may include as many "attributes" as you like. The only explicitly "typed" attribute is color. A theme color's "color" value is a hexadecimal string, of the format [0x]NNNNNN[any text]; values in [] are optional; N is a hexadecimal character. Anything after the first 6 hex characters is ignored. There are currently two special key names for a color: defaultBackgroundColor and defaultLabelTextColor. These are used by ThemeViews, ThemeTableViews and ThemeLabels, as discussed below.
To load a theme, do this:
ThemeLoader.loadThemesFromResourceFile("MyTheme.json")

// and to make the first loaded theme the default theme
ThemeManager.sharedInstance.setDefaultTheme()
ThemeLabel, ThemeView and ThemeTableView
These are views that, given a key name for a theme color, will automatically load and use that theme color for their background colors, or for it's text color (for ThemeLabel). You set the key name for these views via a string property that, by default, is set to defaultBackgroundColor or, for the label, defaultLabelTextColor. Thus to get default theme behavior for labels and views, you need do nothing other than provide the appropriate color attributes in your theme file.
See ThemedViewController.swift and ExampleTheme.json in the SquidKitExample project for an example of using themes.
TableItem and TableSection
SquidKit's TableItem and TableSection classes provide a mechanism for modeling table data, especially in cases where there is no "natural" model otherwise available. A good example is the commonly used slide-out "left" menu found in many apps; these menus typically provide access to various non-hierarchical app views. There is typically no "natural" model for such a system. Alternatively, if you get a list of coffee shop locations from some API, then that list is the "natural" model, and would probably represent a better (or more efficient) modeling scheme than TableItem/Section. Or maybe not. You decide ;-)
TableItem
TableItem models a single row item UITableView. At it's most basic level, it has a name property which might be used to populate a cell's textLabel text. It also allows for a closure that will be called when the TableItem is selected (as long as you call the closure in your table view delegate's "didSelectRowAtIndexPath" method, or use a "TableItemBackedTableViewController" (see below)). In these ways, TableItem provides all of the functionality for a table row in once central place - no scattering of logic amongst table view delegates and data sources. Other TableItem properties include rowHeight and reuseIdentifier. All properties are optional (rowHeight is actually a computed property). A typical TableItem might look like this:
let myTableItem = TableItem("Hello", reuseIdentifier:"myCellIdentifier", selectBlock: { (item:TableItem, indexPath:NSIndexPath, actionsTarget:TableActions?) -> () in
            let myFooViewController:FooViewController = FooViewController()
            self.navigationController!.pushViewController(myFooViewController, animated: true)
})
TableActions is an optional protocol provider that may be passed back to the selectBlock by whomever is calling the block. TableItemBackedTableViewController (see below) implements this protocol, for example.
@objc public protocol TableActions {
    func deselect(indexPath:NSIndexPath)
    func reload()
    func pushViewController(storyboardName:String, storyboardID:String)
    func presentViewController(storyboardName:String, storyboardID:String)
}
The availability of this protocol allows your selectBlock to perform common actions when invoked - such as deselecting the cell, or reloading the underlying table.
You would typically provide your own subclass of TableItem to provider further model data for your own use cases. There is one subclass already provided by SquidKit - NavigatingTableItem. NavigatingTableItem provides exactly the functionality described in the TableItem example above: namely, it will push or present a view controller as long as it's selectBlock caller provides a valid TableActions object. Because NavigatingTableItem has a pre-defined selection action, it provides its own implementation of the select block - thus it's init method omits the selectBlock parameter:
public init(_ title:String, reuseIdentifier:String?, navigationType:NavigatingTableItemNavigationType)


// and the NavigatingTableItemNavigationType enum:

public enum NavigatingTableItemNavigationType {
    case Push(storyboardName:String, storyboardID:String)
    case Present(storyboardName:String, storyboardID:String)
}
See HomeViewController.swift in the Example project for a better understanding of how to use a NavigatingTableItem.
TableSection
A TableSection is simply an array of TableItems. TableSection models a section in a UITableView. It may also have a height and a title. By default, the height is nil if title is non-nil (which means: use the UITableView's default section height property for the height).
TableItemBackedTableViewController
TableItemBackedTableViewController makes working with TableItems and TableSections really simple. Just plop an array of TableSections into a TableItemBackedTableViewController, and this controller really does the rest: it handles calling a TableItem's selectBlock, it handles all of the rowCount, sectionCount, etc stuff. The only thing it doesn't do is implement cellForRowAtIndexPath; you are expected to override TableItemBackedTableViewController and provide cells.
All of the table view controllers in the SquidKitExample project use TableItemBackedTableViewController, TableItems and TableSections. Look at any or all of them for a comprehensive picture of how to make use of these simple yet powerful constructs.
Log
SquidKit provides a basic yet powerful and useful logging facility. I'm not big on logging "levels" (warning, debug, info, blah blah) - I find that the utility of "levels" is often compromised over time. In any event, SquidKit log eschews them. Instead, SquidKit offers a handful of logging methods and a way to enable or disable logging on both devices and simulators. Furthermore, the primary logging methods use autoclosures, which allows the entire log statement to be ignored when logging is disabled (in much the same way that assert conditions are typically ignored in C and C++ assert implementations).
The primary logging methods are:
public class func print<T>(output:@autoclosure() -> T?)
public class func message(output: @autoclosure() -> String?)

// setting log status
Log.setLogStatus(.Never)

// available log statuses (.Simulator is the default)
public enum LogStatus {
    case Always
    case Simulator
    case Never
}
the print method is used to log any object, while message is for strings only. I'm not sure about the utility of providing both mechanisms, but there they are.
a simple example:
Log.print(bar())
Log.message(foo())

func foo() -> String {
    NSLog("returning hello")
    return "hello"
}

func bar() -> AnyObject {
    NSLog("returning something")
    return Float(0.6)
}

// prints:
bar
0.6
foo
hello

// again with logging disabled, to illustrate that foo() and bar() are not called:

Log.setLogStatus(.Never)	// disable logging
Log.print(bar())
Log.message(foo())

func foo() -> String {
    NSLog("returning hello")
    return "hello"
}

func bar() -> AnyObject {
    NSLog("returning something")
    return Float(0.6)
}

// prints nothing
Both the example project and SquidKit itself use SquidKit logging, so poke around for further examples.
Caching
SquidKit offers a super-simple caching model built on a generic of NSObject and using NSCache underneath. See Cache.swift. Usage is trivial:
var myStringCache = Cache<NSString>()
var anotherStringCache = Cache<NSString>() // Note: same types use the same underlying NSCache object
var imageCache = Cache<UIImage>()

// add an item to a cache using insert:
Cache<UIImage>().insert(someImage, key: "foo")

// retrieve an item from a cache using get or the subscript operator:
let cachedImage = Cache<UIImage>()["foo"]
There are also versions of get and subscript that take a NSURLRequest; these simply use the NSURLRequest's URL member as the key.
Other stuff
There are various other classes and extensions scattered about. Look in the "Class Extensions" and "Utility" groups in the SquidKit project for these. Preferences, for example (in the Utility group) is a useful wrapper for NSUserDefaults.
Installation
The easiest way to use SquidKit is to drag the SquidKit project file into your app's project. Once you've done that, you will need to:
- Select your app target, go to Build Settings and add SquidKit to Target Dependencies
- In Link Binary with Libraries, add SquidKit.framework
You may also choose to only include individual source files from SquidKit. While there isn't an over abundance of interdependence amongst classes in SquidKit, there is some. Notably, Log is used by many other classes, as is JSONEntity. Source files that are logically grouped together in the same project file groups are likely to be interdependent.
Contact
Mike Leavy • [email protected] • @mleavysd
License
SquidKit is available under the MIT license. See the LICENSE file at the root level of this repository for further information.
Contribution
If you would like to contribute to SquidKit, please submit a pull request.


