Welcome to the JAX/Diffusers community sprint! The goal of this sprint is to work on fun and creative diffusion models using JAX and Diffusers.
In this event, we will create various applications with diffusion models in JAX/Flax and Diffusers using free TPU hours generously provided by Google Cloud.
This document is a walkthrough on all the important information to make a submission to the JAX/Diffusers community sprint.
Don't forget to fill out the signup form!
💡 Note: This document is still WIP and it only contains initial details of the event. We will keep updating this document as we make other relevant information available throughout the community sprint.
- Organization
- Important dates
- Communication
- Talks
- Data and Pre-processing
- Training ControlNet
- How to Make a Submission
- Creating our Space
Participants can propose ideas for an interesting project involving diffusion models. Teams of 3 to 5 will then be formed around the most promising and interesting projects. Make sure to read through the Communication section on how to propose projects, comment on other participants' project ideas, and create a team.
To help each team successfully finish their project, we will organize talks by leading scientists and engineers from Google, Hugging Face, and the open-source diffusion community. The talks will take place on 17th of April. Make sure to attend the talks to get the most out of your participation! Check out the Talks section to get an overview of the talks, including the speaker and the time of the talk.
Each team is then given free access to a TPU v4-8 VM from April 14 to May 1st. In addition, we will provide a training example in JAX/Flax and Diffusers to train ControlNets to kick-start your project. We will also provide examples of how to prepare datasets for ControlNet training. During the sprint, we'll make sure to answer any questions you might have about JAX/Flax and Diffusers and help each team as much as possible to complete their projects!
At the end of the community sprint, each submission will be evaluated by a jury and the top-3 demos will be awarded a prize. Check out the [How to submit a demo] (TODO) section for more information and suggestions on how to submit your project.
💡 Note: Even though we provide an example for performing ControlNet training, participants can propose ideas that do not involve ControlNets at all. But the ideas need to be centered around diffusion models.
- 29.03. Official announcement of the community week. Make sure to fill out the signup form.
- 31.03. Start forming groups in #jax-diffusers-ideas channel in Discord.
- 10.04. Data collection.
- 13.04. - 14.04. - 17.04. Kick-off event with talks on Youtube.
- 14.04. - 17.04. Start providing access to TPUs.
- 01.05. Shutdown access to TPUs.
- 08.05.: Project presentations and determining the prize winners.
💡 Note: We will be accepting applications throughout the sprint.
All important communication will take place on our Discord server. Join the server using this link. After you join the server, take the Diffusers role in #role-assignment channel and head to #jax-diffusers-ideas channel to share your idea as a forum post. To sign up for participation, fill out the signup form and we will give you access to two more Discord channels on discussions and technical support, and access to TPUs.
Important announcements of the Hugging Face, Flax/JAX, and Google Cloud team will be posted in the server.
The Discord server will be the central place for participants to post about their results, share their learning experiences, ask questions and get technical support in various obstacles they encounter.
For issues with Flax/JAX, Diffusers, Datasets or for questions that are specific to your project we will be interacting through public repositories and forums:
- Flax: Issues, Questions
- JAX: Issues, Questions
- 🤗 Diffusers: Issues, Questions
- 🤗 Datasets: Issues, Questions
- Project specific questions: Can be asked from each project's own post on #jax-diffusers-ideas channel on Discord.
- TPU related questions:
#jax-diffusers-tpu-supportchannel on Discord. - General discussion:
#jax-diffusers-sprint channelon Discord. You will get access to#jax-diffusers-tpu-supportand#jax-diffusers-sprintonce you are accepted to attend the sprint.
When asking for help, we encourage you to post the link to forum post to the Discord server, instead of directly posting issues or questions. This way, we make sure that the everybody in the community can benefit from your questions, even after the community sprint.
💡 Note: After 10th of April, if you have signed up on the google form, but you are not in the Discord channel, please leave a message on the official forum announcement and ping
@mervenoyan,@sayakpaul, and@patrickvonplaten. We might take a day to process these requests.
We have invited prominent researchers and engineers from Google, Hugging Face, and the open-source community who are working in the Generative AI space. We will update this section with links to the talks, so keep an eye here or on Discord in diffusion models core-announcements channel and set your reminders!
| Speaker | Topic | Time | Video |
|---|---|---|---|
| Emiel Hoogeboom, Google Brain | Pixel-Space Diffusion models for High Resolution Images | 4.00pm-4.40pm CEST / 7.00am-7.40am PST |  |
| Apolinário Passos, Hugging Face | Introduction to Diffusers library | 4.40pm-5.20pm CEST / 7.40am-08.20am PST | |
| Ting Chen, Google Brain | Diffusion++: discrete data and high-dimensional generation | 5.45pm-6.25pm CEST / 08.45am-09.25am PST | |
| Speaker | Topic | Time | Video |
|---|---|---|---|
| Tim Salimans, Google Brain | Efficient image and video generation with distilled diffusion models | 4.00pm-4.40pm CEST / 7.00am-7.40am PST | |
| Suraj Patil, Hugging Face | Masked Generative Models: MaskGIT/Muse | 4.40pm-5.20pm CEST / 7.40am-08.20am PST | |
| Sabrina Mielke, John Hopkins University | From stateful code to purified JAX: how to build your neural net framework | 5.20pm-6.00pm CEST / 08.20am-09.00am PST | |
| Speaker | Topic | Time | Video |
|---|---|---|---|
| Andreas Steiner, Google Brain | JAX & ControlNet | 4.00pm-4.40pm CEST / 7.00am-7.40am PST | |
| Boris Dayma, craiyon | DALL-E Mini | 4.40pm-5.20pm CEST / 7.40am-08.20am PST | |
| Margaret Mitchell, Hugging Face | Ethics of Text-to-Image | 5.20pm-6.00pm CEST / 08.20am-09.00am PST | |
In this section, we will cover how to build your own dataset for ControlNet training.
If you need extra space, you can follow this guide to create a persistent disk, attach it to your TPU VM, and create a directory to mount the disk. You can then use this directory to store your dataset.
As a side note, the TPU VM allocated to your team has a 3 TB persistent storage drive attached to it. To learn how to use it, check out this guide.
Here we demonstrate how to prepare a large dataset to train a ControlNet model with canny edge detection. More specifically, we provide an example script that:
- Selects 1 million image-text pairs from an existing dataset COYO-700M.
- Downloads each image and use Canny edge detector to generate the conditioning image.
- Create a metafile that links all the images and processed images to their text captions.
Use the following command to run the example data preprocessing script. If you've mounted a disk to your TPU, you should place your train_data_dir and cache_dir on the mounted disk
python3 coyo_1m_dataset_preprocess.py \
 --train_data_dir="/mnt/disks/persist/data" \
 --cache_dir="/mnt/disks/persist" \
 --max_train_samples=1000000 \
 --num_proc=16
Once the script finishes running, you can find a data folder at the specified train_data_dir with the below folder structure:
data
├── images
│   ├── image_1.png
│   ├── .......
│   └── image_1000000.jpeg
├── processed_images
│   ├── image_1.png
│   ├── .......
│   └── image_1000000.jpeg
└── meta.jsonl
To load a dataset from the data folder you just created, you should add a dataset loading script to your data folder. The dataset loading script should have the same name as the folder. For example, if your data folder is data, you should add a data loading script named data.py. We provide an example data loading script for you to use. All you need to do is to update the DATA_DIR with the correct path to your data folder. For more details about how to write a dataset loading script, refer to the documentation.
Once the dataset loading script is added to your data folder, you can load it with:
dataset = load_dataset("/mnt/disks/persist/data", cache_dir="/mnt/disks/persist" )Note that you can use the --train_data_dir flag to pass your data folder directory to the training script and generate your dataset automatically during the training.
For large datasets, we recommend generating the dataset once and saving it on the disk with
dataset.save_to_disk("/mnt/disks/persist/dataset")You can then reuse the saved dataset for your training by passing the --load_from_disk flag.
Here is an example to run a training script that will load the dataset from the disk
export MODEL_DIR="runwayml/stable-diffusion-v1-5"
export OUTPUT_DIR="/mnt/disks/persist/canny_model"
export DATASET_DIR="/mnt/disks/persist/dataset"
export DISK_DIR="/mnt/disks/persist"

python3 train_controlnet_flax.py \
 --pretrained_model_name_or_path=$MODEL_DIR \
 --output_dir=$OUTPUT_DIR \
 --train_data_dir=$DATASET_DIR \
 --load_from_disk \
 --cache_dir=$DISK_DIR \
 --resolution=512 \
 --learning_rate=1e-5 \
 --train_batch_size=2 \
 --revision="non-ema" \
 --from_pt \
 --max_train_steps=500000 \
 --checkpointing_steps=10000 \
--dataloader_num_workers=16 We provide a notebook () that shows you how to prepare a dataset for ControlNet training using MediaPipe and Hugging Face. Specifically, in the notebook, we show:
- How to leverage MediaPipe solutions to extract pose body joints from the input images.
- Predict captions using BLIP-2 from the input images using 🤗 Transformers.
- Build and push the final dataset to the Hugging Face Hub using 🤗 Datasets.
You can refer to the notebook to create your own datasets using other MediaPipe solutions as well. Below, we list all the relevant ones:
This is perhaps the most fun and interesting part of this document as here we show you how to train a custom ControlNet model.
💡 Note: For this sprint, you are NOT restricted to just training ControlNets. We provide this training script as a reference for you to get started.
For faster training on TPUs and GPUs you can leverage the Flax training example. Follow the instructions above to get the model and dataset before running the script.
Before proceeding with the rest of this section, you must ensure that the
email address you're using has been added to the hf-flax project on
Google Cloud Platform. If it's not the case, please let us know in the Discord server (you can tag @sayakpaul, @merve, and @patrickvonplaten).
In the following, we will describe how to do so using a standard console, but you should also be able to connect to the TPU VM via IDEs, like Visual Studio Code, etc.
-
You need to install the Google Cloud SDK. Please follow the instructions on https://cloud.google.com/sdk.
-
Once you've installed the Google Cloud SDK, you should set your account by running the following command. Make sure that corresponds to the gmail address you used to sign up for this event.
gcloud config set account <your-email-adress>
-
Let's also make sure the correct project is set in case your email is used for multiple gcloud projects:
gcloud config set project hf-flax -
Next, you will need to authenticate yourself. You can do so by running:
gcloud auth login
This should give you a link to a website, where you can authenticate your gmail account.
-
Finally, you can establish an SSH tunnel into the TPU VM! Please run the following command by setting
--zonetous-central2-band to the TPU name also sent to you via email from the Hugging Face team.gcloud alpha compute tpus tpu-vm ssh <tpu-name> --zone <zone> --project hf-flax
This should establish an SSH tunnel into the TPU VM!
💡 Note: You are NOT supposed to have access to the Google Cloud console. Also, you might not get an invitation link to join the
hf-flaxproject. But you should still be able to access the TPU VM following the above steps.
💡 Note: The TPU VMs are already attached to persistent storage drives (of 3 TB). This will be helpful in case your team wants to perform training on a large dataset locally. The disk name of the storage drive should also be present in the email you received. Follow this section for more details.
Let's first create a Python virtual environment:
python3 -m venv <your-venv-name>We can activate the environment by running:
source ~/<your-venv-name>/bin/activateNow, we can install JAX 0.4.5:
pip install "jax[tpu]==0.4.5" -f https://storage.googleapis.com/jax-releases/libtpu_releases.htmlTo verify that JAX was correctly installed, you can run the following command:
import jax
jax.device_count()
This should display the number of TPU cores, which should be 4 on a TPUv4-8 VM. If Python is not able to detect the TPU device, please take a look at this section for solutions.
Then install Diffusers and the library's training dependencies:
pip install git+https://github.com/huggingface/diffusers.gitThen clone this repository and install the other dependencies:
git clone https://github.com/huggingface/community-events
cd community-events/jax-controlnet-sprint/training_scripts
pip install -U -r requirements_flax.txt
If you want to use Weights and Biases logging, you should also install wandb now:
pip install wandb💡 Note: Weights & Biases is free for students, educators, and academic researchers. All participants of our event are qualified to get an academic Weights & Biases team account. To create your team, you can visit https://wandb.ai/create-team and choose the team type to be "Academic". For more information regarding creation and management of Weights & Biases team, you can checkout https://docs.wandb.ai/guides/app/features/teams.
Now let's download two conditioning images that we will use to run validation during the training in order to track our progress
wget https://huggingface.co/datasets/huggingface/documentation-images/resolve/main/diffusers/controlnet_training/conditioning_image_1.png
wget https://huggingface.co/datasets/huggingface/documentation-images/resolve/main/diffusers/controlnet_training/conditioning_image_2.png
We encourage you to store or share your model with the community. To use Hugging Face hub, please login to your Hugging Face account, or (create one if you don’t have one already):
huggingface-cli loginMake sure you have the MODEL_DIR,OUTPUT_DIR and HUB_MODEL_ID environment variables set. The OUTPUT_DIR and HUB_MODEL_ID variables specify where to save the model to on the Hub:
export MODEL_DIR="runwayml/stable-diffusion-v1-5"
export OUTPUT_DIR="runs/fill-circle-{timestamp}"
export HUB_MODEL_ID="controlnet-fill-circle"
And finally start the training (make sure you're in the jax-controlnet-sprint/training_scripts directory)!
python3 train_controlnet_flax.py \
 --pretrained_model_name_or_path=$MODEL_DIR \
 --output_dir=$OUTPUT_DIR \
 --dataset_name=fusing/fill50k \
 --resolution=512 \
 --learning_rate=1e-5 \
 --validation_image "./conditioning_image_1.png" "./conditioning_image_2.png" \
 --validation_prompt "red circle with blue background" "cyan circle with brown floral background" \
 --validation_steps=1000 \
 --train_batch_size=2 \
 --revision="non-ema" \
 --from_pt \
 --report_to="wandb" \
 --tracker_project_name=$HUB_MODEL_ID \
 --num_train_epochs=11 \
 --push_to_hub \
 --hub_model_id=$HUB_MODEL_ID
Since we passed the --push_to_hub flag, it will automatically create a model repo under your Hugging Face account based on $HUB_MODEL_ID. By the end of training, the final checkpoint will be automatically stored on the hub. You can find an example model repo here.
Our training script also provides limited support for streaming large datasets from the Hugging Face Hub. In order to enable streaming, one must also set --max_train_samples. Here is an example command (from this blog article):
export MODEL_DIR="runwayml/stable-diffusion-v1-5"
export OUTPUT_DIR="runs/uncanny-faces-{timestamp}"
export HUB_MODEL_ID="controlnet-uncanny-faces"

python3 train_controlnet_flax.py \
 --pretrained_model_name_or_path=$MODEL_DIR \
 --output_dir=$OUTPUT_DIR \
 --dataset_name=multimodalart/facesyntheticsspigacaptioned \
 --streaming \
 --conditioning_image_column=spiga_seg \
 --image_column=image \
 --caption_column=image_caption \
 --resolution=512 \
 --max_train_samples 100000 \
 --learning_rate=1e-5 \
 --train_batch_size=1 \
 --revision="flax" \
 --report_to="wandb" \
 --tracker_project_name=$HUB_MODEL_ID
Note, however, that the performance of the TPUs might get bottlenecked as streaming with datasets is not optimized for images. For ensuring maximum throughput, we encourage you to explore the following options:
When work with a larger dataset, you may need to run training process for a long time and it’s useful to save regular checkpoints during the process. You can use the following argument to enable intermediate checkpointing:
--checkpointing_steps=500This will save the trained model in subfolders of your output_dir. Subfolder names is the number of steps performed so far; for example: a checkpoint saved after 500 training steps would be saved in a subfolder named 500
You can then start your training from this saved checkpoint with
--controlnet_model_name_or_path="./control_out/500" We support training with the Min-SNR weighting strategy proposed in Efficient Diffusion Training via Min-SNR Weighting Strategy which helps to achieve faster convergence by rebalancing the loss. To use it, one needs to set the --snr_gamma argument. The recommended value when using it is 5.0.
We also support gradient accumulation - it is a technique that lets you use a bigger batch size than your machine would normally be able to fit into memory. You can use gradient_accumulation_steps argument to set gradient accumulation steps. The ControlNet author recommends using gradient accumulation to achieve better convergence. Read more here.
You can profile your code with:
--profile_steps==5Refer to the JAX documentation on profiling. To inspect the profile trace, you'll have to install and start Tensorboard with the profile plugin:
pip install tensorflow tensorboard-plugin-profile
tensorboard --logdir runs/fill-circle-100steps-20230411_165612/
The profile can then be inspected at http://localhost:6006/#profile
Sometimes you'll get version conflicts (error messages like Duplicate plugins for name projector), which means that you have to uninstall and reinstall all versions of Tensorflow/Tensorboard (e.g. with pip uninstall tensorflow tf-nightly tensorboard tb-nightly tensorboard-plugin-profile && pip install tf-nightly tbp-nightly tensorboard-plugin-profile).
Note that the debugging functionality of the Tensorboard profile plugin is still under active development. Not all views are fully functional, and for example the trace_viewer cuts off events after 1M (which can result in all your device traces getting lost if you for example profile the compilation step by accident).
VERY IMPORTANT - Only one process can access the TPU cores at a time. This means that if multiple team members are trying to connect to the TPU cores, you will get errors such as:
libtpu.so already in used by another process. Not attempting to load libtpu.so in this process.
We recommend every team member create her/his own virtual environment, but only one person should run the heavy training processes. Also, please take turns when setting up the TPUv4-8 so that everybody can verify that JAX is correctly installed.
If your team members are not currently using the TPU but you still get this error message. You should kill the process that is using the TPU with
kill -9 PID
you will need to replace the term “PID” with the PID of the process that uses TPU. In most cases, this information is included in the error message. For example, if you get
The TPU is already in use by a process with pid 1378725. Not attempting to load libtpu.so in this process.
you can do
kill -9 1378725
You can also use the below command to find processes using each of the TPU chips (e.g. /dev/accel0 is one of the TPU chips)
use sudo lsof -w /dev/accel0
To kill all the processes using /dev/accel0
sudo lsof -t /dev/accel0 | xargs kill -9
If Python is not able to detect your TPU device (i.e. when you do jax.device_count() and it outputs 0), it might be because you have no rights to access the tpu logs, or you have a dangling tpu lock file. Run these commands usually fix the issue
sudo rm -f /tmp/libtpu_lockfile
sudo chmod o+w /tmp/tpu_logs/
## How to Make a Submission
To make a full submission, you need to have the following on Hugging Face Hub:
- Model repository with model weights and model card,
- (Optional) Dataset repository with dataset card,
- A Hugging Face Space that lets others interact with your model.
If you are using the training script (train_controlnet_flax.py) provided in this directory
Enabling push_to_hub argument in the training arguments will:
- Create a model repository locally, and remotely on Hugging Face Hub,
- Create a model card and write it to the local model repository,
- Save your model to the local model repository,
- Push the local repository to Hugging Face Hub.
Your automatically generated model card will look like below 👇

You can edit the model card to be more informative. Model cards that are more informative than the others will carry more weight during evaluation.
If you have trained a custom model and not used the script
You need to authenticate yourself with huggingface-cli login as instructed above. If you are using one of the available model classes from diffusers, save your model with save_pretrained method of your model.
model.save_pretrained("path_to_your_model_repository")After saving your model to a folder, you can simply use below script to push your model to the Hub 👇
from huggingface_hub import create_repo, upload_folder

create_repo("username/my-awesome-model")
upload_folder(
    folder_path="path_to_your_model_repository",
    repo_id="username/my-awesome-model"
)
This will push your model to Hub. After pushing your model to Hub, you need to create the model card yourself.
You can use graphical interface to edit the model card.

Every model card consists of two sections, metadata and free text. You can edit metadata from the sections in graphical UI. If you have saved your model using save_pretrained, you do not need to provide pipeline_tag and library_name. If not, provide pipeline_tag, library_name and dataset if it exists on Hugging Face Hub. Aside from these, you need to add the jax-diffusers-event to tags section.
---
license: apache-2.0
library_name: diffusers
tags:
- jax-diffusers-event
datasets:
- red_caps
pipeline_tag: text-to-image
---

#### Writing our Application
We will use Gradio to build our applications. Gradio has two main APIs: Interface and Blocks. Interface is a high-level API that lets you create an interface with few lines of code, and Blocks is a lower-level API that gives you more flexibility over interfaces you can build. The code should be included in a file called app.py.
Let's try to create a ControlNet app as an example. The Interface API simply works like below 👇
import gradio as gr

# inference function takes prompt, negative prompt and image
def infer(prompt, negative_prompt, image):
    # implement your inference function here
    return output_image

# you need to pass inputs and outputs according to inference function
gr.Interface(fn = infer, inputs = ["text", "text", "image"], outputs = "image").launch()
You can customize your interface by passing title, description and examples to the Interface function.
title = "ControlNet on Canny Filter"
description = "This is a demo on ControlNet based on canny filter."
# you need to pass your examples according to your inputs
# each inner list is one example, each element in the list corresponding to a component in the `inputs`.
examples = [["a cat with cake texture", "low quality", "cat_image.png"]]
gr.Interface(fn = infer, inputs = ["text", "text", "image"], outputs = "image",
            title = title, description = description, examples = examples, theme='gradio/soft').launch()
Your interface will look like below 👇

With Blocks, you can add markdown, tabs, components under columns and rows and more. Assume we have two ControlNets and we want to include them in one Space. We will have them under different tabs under one demo like below 👇
import gradio as gr

def infer_segmentation(prompt, negative_prompt, image):
    # your inference function for segmentation control
    return im

def infer_canny(prompt, negative_prompt, image):
    # your inference function for canny control
    return im

with gr.Blocks(theme='gradio/soft') as demo:
    gr.Markdown("## Stable Diffusion with Different Controls")
    gr.Markdown("In this app, you can find different ControlNets with different filters. ")


    with gr.Tab("ControlNet on Canny Filter "):
        prompt_input_canny = gr.Textbox(label="Prompt")
        negative_prompt_canny = gr.Textbox(label="Negative Prompt")
        canny_input = gr.Image(label="Input Image")
        canny_output = gr.Image(label="Output Image")
        submit_btn = gr.Button(value = "Submit")
        canny_inputs = [prompt_input_canny, negative_prompt_canny, canny_input]
        submit_btn.click(fn=infer_canny, inputs=canny_inputs, outputs=[canny_output])

    with gr.Tab("ControlNet with Semantic Segmentation"):
        prompt_input_seg = gr.Textbox(label="Prompt")
        negative_prompt_seg = gr.Textbox(label="Negative Prompt")
        seg_input = gr.Image(label="Image")
        seg_output = gr.Image(label="Output Image")
        submit_btn = gr.Button(value = "Submit")
        seg_inputs = [prompt_input_seg, negative_prompt_seg, seg_input]
        submit_btn.click(fn=infer_segmentation, inputs=seg_inputs, outputs=[seg_output])

demo.launch()
Above demo will look like below 👇

After our application is written, we can create a Hugging Face Space to host our app. You can go to huggingface.co, click on your profile on top right and select “New Space”.

We can name our Space, pick a license and select Space SDK as “Gradio”.

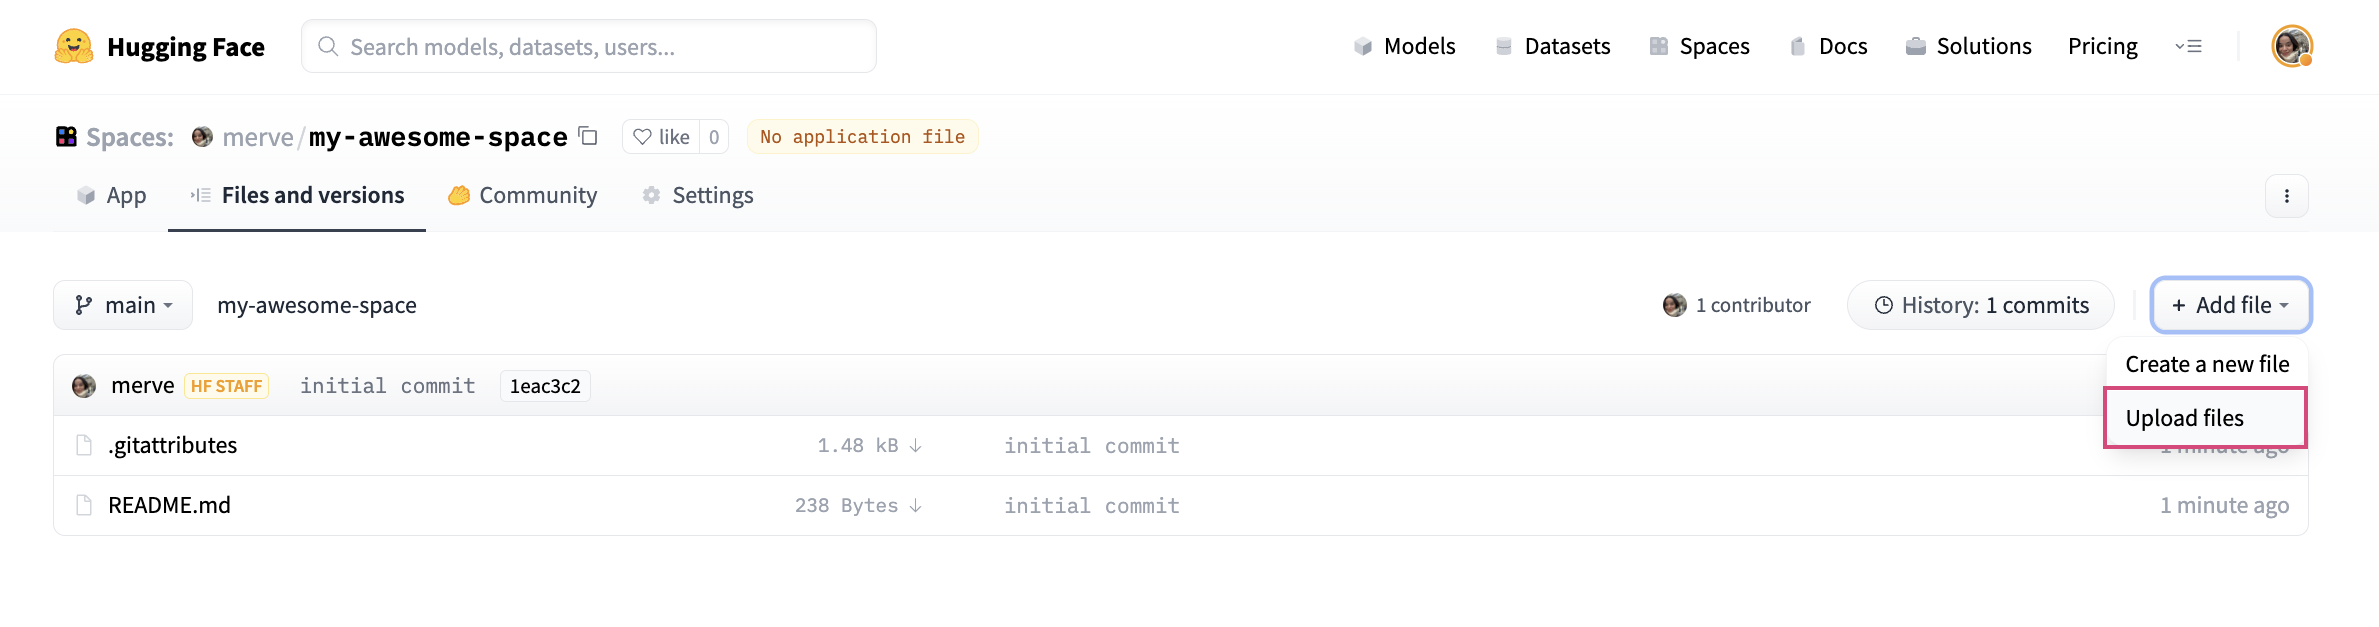
After creating the Space, you can either use the instructions below to clone the repository locally, add your files and push, or use the graphical interface to create the files and write the code in the browser.

To upload your application file, pick “Add File” and drag and drop your file.
Lastly, we have to create a file called requirements.txt and add requirements of our project. Make sure to install below versions of jax, diffusers and other dependencies like below.
-f https://storage.googleapis.com/jax-releases/jax_cuda_releases.html
jax[cuda11_cudnn805]
jaxlib
git+https://github.com/huggingface/diffusers@main
opencv-python
transformers
flax
We will give you GPU grant so your application can run on GPU.
We have a leaderboard hosted here and we will be distributing prizes from this leaderboard. To make your Space show up on the leaderboard, simply edit README.md of your Space to have the tag jax-diffusers-event under tags like below 👇
---
title: Canny Coyo1m
emoji: 💜
...
tags:
- jax-diffusers-event
---


