This PC manager will help you to adjust settings easily, and let you store on your PC different configurations so you can try different things without losing a specific setup.
Thanks to CrazyRedMachine that helped me A LOT on the USB Protocol to communicate with the controller easier.
(A LOT OF NEW TIPS AND HELP INFORMATIONS HAVE BEEN ADDED, PLEASE CHECK "HELP.TXT"
A "UPDATE LOG.TXT" IS ALSO AVAILABLE)
This repo is a fork from the fluffymadness/ATMega32U4-Switch-Fightstick repo made to create a custom Arcade Controller for Hatsune Miku: Project Diva Mega39's/MegaMix that use the Dedicated Arcade Controller mode like the official HORI controller.
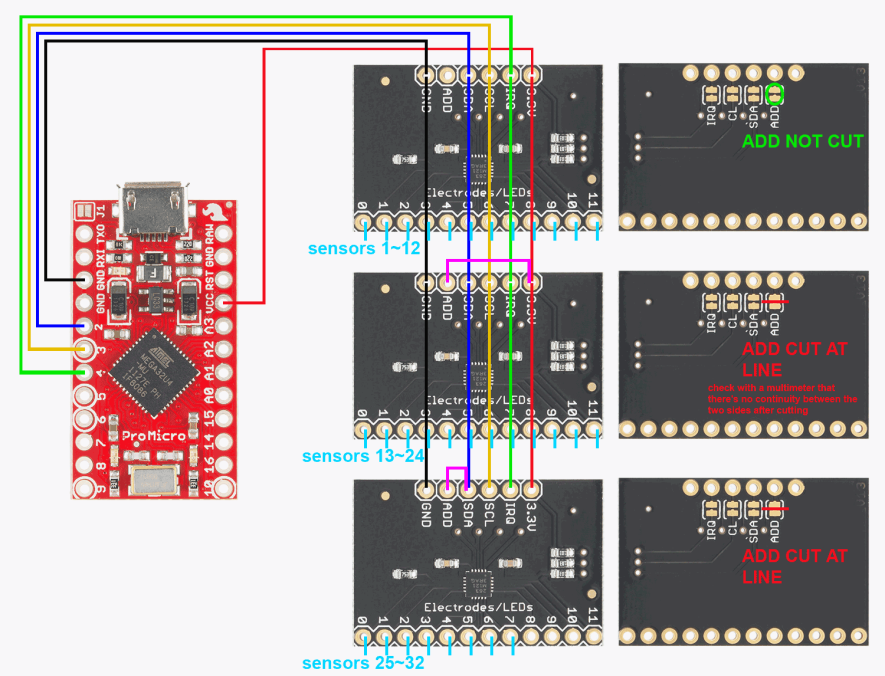
You'll need the exact same hardware and libraries as the original repo (+ The Quick MPR121 library, by SomewhatLurker ) , and a Slider using the MPR121 module. (should use 3 of them for 32 sensors.)
(Hatsune Miku: Project Diva Future Tone (Japanese ver only) is also supported if you can convert the controller Switch to PS4 using adapter or other solutions, even using Remote Play with DS4Emulator on both PS4 and PS5)
Thanks to Somewhatlurker, Dogtopus, TheCorrellRoyHD, Zedamex for all the needed datas, informations, and help on developping this project.
Note that HORI+Arcade have been replace by ARCADE, and FULL ARCADE is now available with even more effects from the original cab. Preview soon.

Please remember that LUFA change the way Arduino's USB is working. To flash code on a Arduino that is running LUFA code, you need to double press "Reset" on your Arduino. (if it don't have button Reset, you have to create your own button, connection RST to GND)
To use multiple MPR121s, here's this layout
It let you hold a button to change how the controller behave, it's useful if you don't have enough buttons on your controller. You can even map part of the slider to buttons.
If you update your code from now, your button mapping changed for buttons like HOME button. Please check and adapt this new mode to your desire. (Check the ControllerNavShortcut.jpg to see where, and how it act by default.)
-
Download Arduino IDE,
-
Download the Bounce2 Library inside the Arduino IDE
-
Add
https://github.com/CrazyRedMachine/Arduino-Lufa/raw/master/package_arduino-lufa_index.jsonas an Additional Board Manager URL (inFile -> Preferencesmenu) (check the repo readme for screencaps if you need more details) -
Install LUFA AVR Boards from the Board Manager
-
Select Arduino Leonardo (LUFA) as your board type
-
Build and Flash
-
Have Fun
Once your Arduino have been flashed with LUFA, you'll need to put your Arduino in Reset mode to accept a new flash. Create a button on your RST pin then when you try to flash your Arduino, you will see your IDE searching for a COM to upload... At that moment, press your RST button twice, it should put it into Reset mode, and your IDE should find it.
IF YOUR IDE DON'T FIND YOUR ARDUINO IN RESET MODE: PLEASE DON'T PANIC AND DO NOT PRESS RESET TWICE AGAIN! All you have to do is either waiting for your Arduino to come back at a normal controller state, then try again. Or you can just press the RST button again ONLY ONCE to make it go back to normal state, then try again.
IF YOUR ARDUINO IS LOCKED IN RESET MODE: Please, just let it plugged in, and wait. It will certainly happen if your press your RST button too much, Windows will not recognize it anymore, and you'll have to wait for your Arduino to get out of this mode. It can take up to minutes to do.
Here is the Pinnumbers to Button Mapping for Connecting the actual physical cables to a Pro Micro.
joystickLEFT.attach(1,INPUT_PULLUP); // Pin 1 -> LEFT
joystickRIGHT.attach(0,INPUT_PULLUP); // Pin 0 -> RIGHT
buttonA.attach(4,INPUT_PULLUP); // Pin 4 -> A / Circle
buttonB.attach(5,INPUT_PULLUP); // Pin 5 -> B / Cross
buttonX.attach(7,INPUT_PULLUP); // Pin 7 -> X / Triangle
buttonY.attach(6,INPUT_PULLUP); // Pin 6 -> Y / Square
buttonLB.attach(9,INPUT_PULLUP); // Pin 9 -> LB
buttonRB.attach(8,INPUT_PULLUP); // Pin 8 -> RB
buttonLT.attach(16,INPUT_PULLUP); // Pin 16 -> LT
buttonRT.attach(10,INPUT_PULLUP); // Pin 10 -> RT
buttonSTART.attach(15,INPUT_PULLUP); // Pin 15 -> plus
buttonSELECT.attach(14,INPUT_PULLUP); // Pin 14 -> minus
//buttonHOME.attach(18,INPUT_PULLUP); // Pin 18 -> Home
navModePin.attach(18,INPUT_PULLUP); // Pin 18 -> Navigation Mode Shortcut

switchModePin.attach(19,INPUT_PULLUP); // Pin 19 -> Switch Mode
This one is a working switch fightstick sketch flashable via Arduino IDE. I personally use it on a pro micro clone microcontroller that can be bought for 2-3$ on aliexpress. My motivation was to have a working solution for dirt-cheap easy source-able parts. Well here it is.
The Code itself has proper Button-Debounce, and 3 Modes of input.
You can switch seamlessly between the 3 modes by pressing START+SELECT.
- Digital Only
- Fake Analog (Digital Movement is mapped to L-Analog)
- Smash Ultimate Mode (Most-left button on the second row of a fight stick is used as a modifier key to decrease the range of the Analog stick, if held)
Special thanks to shinyquagsire's and progmem's reverseengineering work for the pokken tournament controller. (https://github.com/progmem/Switch-Fightstick)
Dean Camera for the LUFA Library
zlittell, msf-xinput was very helpful for starting.
thomasfredericks for the Bounce2Lib.


