-
III DevOps 系統需安裝在 Ubuntu 20.04 LTS 作業系統, 可採用虛擬機 virtual machine(VM) 或實體機來進行部署, 採用虛擬機系統可以依照之後使用狀況進行快速擴充
-
安裝的主機最小規格為 1 台 8 vCore, 16G RAM, 120G SSD , 正式使用的開發環境需要擴充至 3 台以上的主機, 且建議都使用 SSD 硬碟確保檔案存取速度於執行效能
-
在開始安裝之前, 您應該要先確認一下的安裝設定資訊
- 主機的網路與 IP 資訊
- 安裝部署的模式 IP 或 DNS
- IP 模式 : 直接透過 IP 存取 III DevOps 與相關服務, 不同服務會使用不同連接埠 Exp. GitLab 使用 Port:32080, Redmine 使用 Port:32748..
- DNS 模式: 提供 Domain names 對應到 III DevOps 與相關服務 Exp. GitLab 使用 gitlab.iiidevops.org, Redmine 使用 redmine.iiidevops.org..
- GitLab 的 root 密碼
- Harbor, Rancher, Redmine, Sonarqube 的 admin 密碼 (可以都和 GitLab 的 root 密碼相同)
- III Devops 第一位使用者 ( III DevOps 的系統管理者)
- 帳號 (不允許 'admin' 與 'root')
- 密碼 (可以和 GitLab 的 root 密碼相同)
- 一個 Github 的 access token (scopes 只需要 public_repo 即可, 請參考 https://docs.github.com/en/github/authenticating-to-github/creating-a-personal-access-token )
-
系統安裝之後可以依據實際建立專案的使用需要, 進行節點橫向擴充 (VM2, VM3, VM4, VM5...) 也可能需要針對 VM1 擴增硬碟大小
-
如果安裝環境外部有防火牆, 請增加防火牆規則讓使用者的來源 IP 能允許存取 III DevOps 主機與所有節點 IP (VM2, VM3, VM4, VM5...) 的 TCP port 80/443/30000~32767
- 需要使用 rekuser 來進行整體安裝程序
sudo useradd -s /bin/bash -d /home/rkeuser/ -m -G sudo rkeuser
sudo passwd rkeuser
su - rkeuser

wget -O iiidevops_install.pl https://raw.githubusercontent.com/iii-org/deploy-devops/master/bin/iiidevops_install.pl;
perl ./iiidevops_install.pl
- 如果一切安裝順利, 你應該可以看到如同以下對各項檢查都 OK 的訊息
rkeuser@iiidevops-71:~$ perl ./iiidevops_install.pl
:
:
-----Validation results-----
Install docker 19.03.14 ..OK!
Install kubectl v1.18 ..OK!
Install helm ..OK!
Install rke v1.2.7 ..OK!
~/deploy-devops/bin/generate_env.pl
在各項問題都輸入後, 請檢查輸入的項目是否都正確無誤. 你也可以直接編輯這個環境設定檔 env.pl 來進行環境設定資料的修正
vi ~/deploy-devops/env.pl
~/deploy-devops/bin/iiidevops_install_base.pl安裝開始, 會提示 ssh 登入本機驗證與輸入 rkeuser 密碼, 之後約 15-20 分鐘自動完成所有服務套件的部署, 你應該可以看到如同以下的 URL 資訊.
rkeuser@iiidevops-71:~$ ~/deploy-devops/bin/iiidevops_install_base.pl
:
:
The deployment of these services has been completed. The service URLs are:
Rancher - https://10.20.0.71:31443/
GitLab - http://10.20.0.71:32080/
Redmine - http://10.20.0.71:32748/
Harbor - https://10.20.0.71:32443/
Sonarqube - http://10.20.0.71:31910/
Rancher - https://10.20.0.71:31443/
請使用 Step 2.(~/deploy-devops/env.pl) 內所設定的 $rancher_admin_password 來輸入設定 Rancher 的 admin password
接著設定 Rancher Server URL (一般而言會顯示出正確 URL, 確認即可)
等 Cluster - local 完成匯入, 將 local 改成 iiidevops-k8s


- GitLab - http://10.20.0.71:32080/
- 使用 root 和 step 2.(~/deploy-devops/env.pl) 所設定的密碼進行登入
至 User/Administrator/User seetings, 產生 root personal access tokens 並將這個 token 複製出來.
Access Tokens / Name : 輸入 root-pat / Scopes : 選取全部 / Create personal access token
複製這個新產生的 Personal Access Token
設定 env.pl 內的 $gitlab_private_token
~/deploy-devops/bin/generate_env.pl gitlab_private_token [Personal Access Token]執行後, 你應該可以看到如同以下的訊息.
rkeuser@iiidevops-71:~$ ~/deploy-devops/bin/generate_env.pl gitlab_private_token 535wZnCJDTL5y22xYYzv
A4. Set GitLab Token OK!

Q21. Do you want to generate env.pl based on the above information?(Y/n)
The original env.pl has been backed up as /home/rkeuser/deploy-devops/bin/../env.pl.bak
-----
11c11
< $gitlab_private_token = '535wZnCJDTL5y22xYYzv'; # Get from GitLab Web
---
> $gitlab_private_token = 'skip'; # Get from GitLab Web
-----


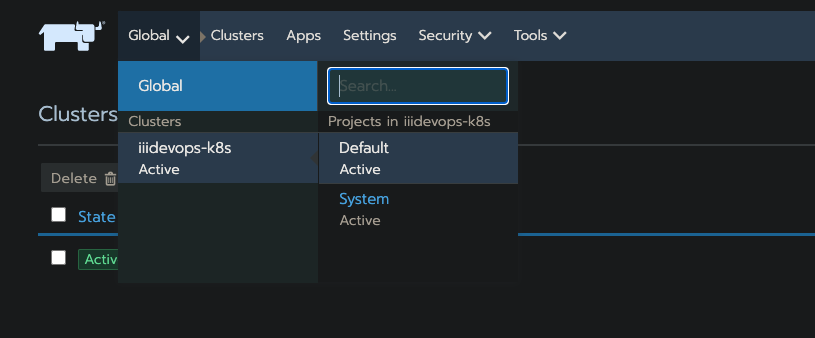
- 點選 Global/ Cluster(iiidevops-k8s)/ Project(Default)
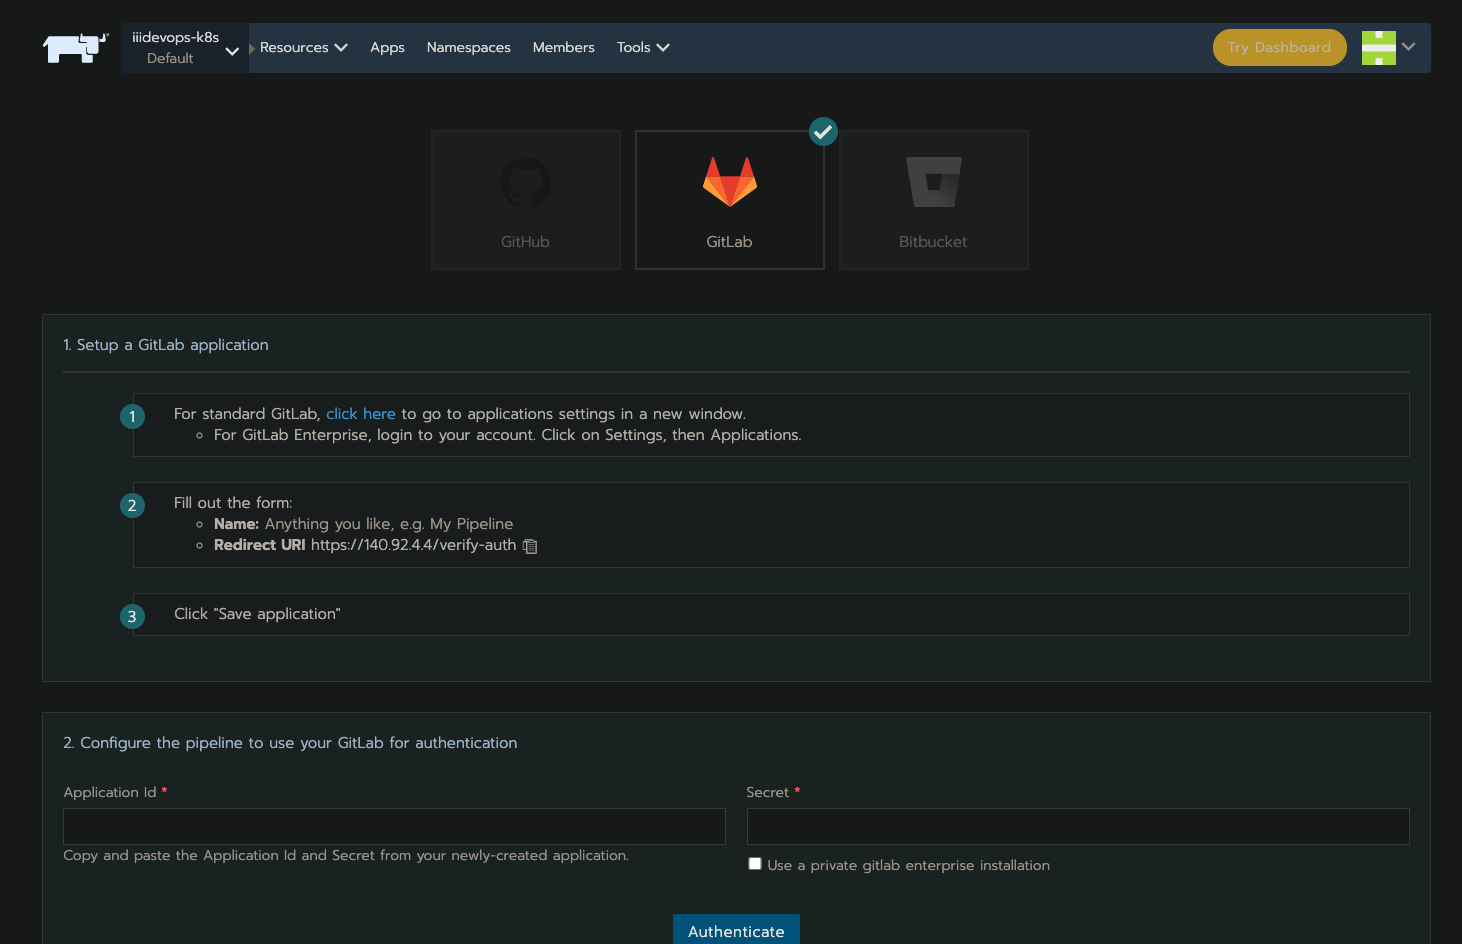
- 點選 Tools/Pipline, 選擇 Gitlab
- 複製 "Redirect URI"
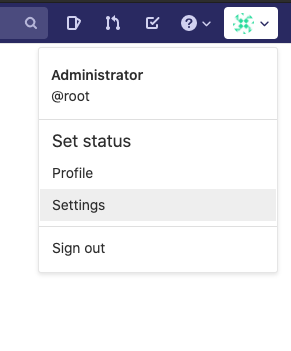
點選 root account/ settings/ Applications
設定 Applications Name: 輸入 iiidevops-k8s, Redirect URI: [貼上剛剛在 Rancher 上複製的值] 並且勾選所有的項目, 然後儲存這個 application.
取得這個 "Application ID" 和 "Secret"


點選 rancher pipeline, 貼上 application id 和 secret, 然後輸入 gitlab url. 例如 10.20.0.71:32080
點選進行授權
點選 Done 完成設定


~/deploy-devops/bin/iiidevops_install_core.pl你可能需要等 3 到 5 分鐘來完成部署與一些系統初始值的建立. 然後你應該可以看到如同以下的 URL 訊息.
:
:
The deployment of III-DevOps services has been completed. Please try to connect to the following URL.
III-DevOps - http://10.20.0.71:30775
- III DevOps URL - http://10.20.0.71:30775/
使用 Step 2.(~/deploy-devops/env.pl) 所設定的 $admin_init_login 管理者帳號與 $admin_init_password 密碼進行系統登入

III DevOps 維護熱門軟體開發使用框架與資料庫專案範本 - https://github.com/iiidevops-templates
請先申請個人在 github 上的 Token (scopes 只需要 public_repo 即可) - https://docs.github.com/en/github/authenticating-to-github/creating-a-personal-access-token
在 VM1 建立 cron.txt 內設定上班時間每 10 分鐘進行檢查同步範本
rkeuser@iiidevops-71:~$ vi cron.txt
----
*/10 7-20 * * * /home/rkeuser/deploy-devops/bin/sync-prj-templ.pl my_github_id:3563cxxxxxxxxxxxxxxxxxxxxxxxxxxxxxxf3ba4 >> /tmp/sync-prj-templ.log 2>&1
----
rkeuser@iiidevops-71:~$ crontab cron.txt
rkeuser@iiidevops-71:~$ crontab -l
*/10 7-20 * * * /home/rkeuser/deploy-devops/bin/sync-prj-templ.pl my_github_id:3563cxxxxxxxxxxxxxxxxxxxxxxxxxxxxxxf3ba4 >> /tmp/sync-prj-templ.log 2>&1
接下來就可以在 /tmp/sync-prj-templ.log 內看到同步紀錄, 類似如下的訊息
rkeuser@iiidevops-71:~$ tail /tmp/sync-prj-templ.log
----
:
:
[18].   name:flask-postgres-todo (2021-03-11T08:18:11Z)
        GitLab-> id:252 path:flask-postgres-todo created_at:2021-03-11T09:00:53.812Z
[19].   name:spring-maraidb-restapi (2021-03-11T08:13:26Z)
        GitLab-> id:253 path:spring-maraidb-restapi created_at:2021-03-11T09:01:00.607Z
[20].   name:flask-webpage-with-men (2021-03-11T08:10:06Z)
        GitLab-> id:254 path:flask-webpage-with-men created_at:2021-03-11T09:01:02.401Z
rkeuser@iiidevops-71:~$
- 在要擴增的 VM2, VM3.... 先安裝好 Ubuntu 20.04 後執行以下的語法加入 K8s cluster.
- 需要使用 rekuser 來進行整體安裝程序
sudo useradd -s /bin/bash -d /home/rkeuser/ -m -G sudo rkeuser
sudo passwd rkeuser
su - rkeuser

wget https://raw.githubusercontent.com/iii-org/deploy-devops/master/bin/join-k8s-node.pl;
perl ./join-k8s-node.pl <VM1 IP> <自己的 IP>
- 例如 VM1 IP 是 10.20.0.71 , 自己的 IP 是 10.20.0.72 , 所以語法如下:
perl ./join-k8s-node.pl 10.20.0.71 10.20.0.72
- 安裝過程 sudo 需要輸入 rkeuser 的密碼
2021-05-07 17:23:09 (30.8 MB/s) - ‘iiidevops_install.pl’ saved [8028/8028]

[sudo] password for rkeuser:
-----
- 需要輸入 yes 信任 10.20.0.71 的 fingerprint 與 [email protected] 的密碼
The authenticity of host '10.20.0.71 (10.20.0.71)' can't be established.
ECDSA key fingerprint is SHA256:dw+jgzw2Zop3mPIYrVtGM162r+J7ctEFI+aeGeZN6uc.
Are you sure you want to continue connecting (yes/no/[fingerprint])? yes
[email protected]'s password:
- 約等 3-10 分鐘就可以看到 10.20.0.72 加入 K8s Cluster 當 Worker Node
It takes 3 to 10 minutes for 10.20.0.72 to join the K8s cluster. Please wait..
.........................................
:
:
10.20.0.72   NotReady                   <none>                     7s      v1.18.17
:
10.20.0.72   NotReady                   worker                     59s     v1.18.17
10.20.0.72   NotReady                   worker                     64s     v1.18.17
10.20.0.72   NotReady                   worker                     79s     v1.18.17

--------------------------
Sat 08 May 2021 02:22:23 PM CST
10.20.0.46   Ready                      worker                     84s     v1.18.17


