SwiftとMagicalRecordを使って簡単なTodoアプリを作るチュートリアル
OS Xを作るためにAppleはObjective-Cという言語を作りましたが、ついにiOSアプリのための言語が発表されましたね! WWDC、前半はすごく眠かったのですが、後半は驚きと興奮の連続でした。 とりあえずSwift触ってみようということで、Xcode 6をさっそくダウンロードし、簡単なTodoアプリをチュートリアル形式で作っていこうと思います。 徹夜明けで眠いので説明がところどころ(というかほとんど)雑ですがお許しください。 割と中級者以上向けの内容です。
ゴール
サンプルファイル
このチュートリアルの完成形はGithubで公開しています。 SwiftTodo - Github
プロジェクト作成

Navigation ControllerとTableViewを使うので、Master-Detail Applicationで作り始めたいところですが、今回はMagical Recordを使いたいのでSingle View Applicationで作ります(結局大幅にソースを変更する必要があるので)。

もちろん、LanguageはSwift! Use Core Dataにもチェックを入れておきます。
CocoaPodsでMagicalRecordを導入
CocoaPodsの導入方法に関してはQiitaにも山ほど解説記事があると思うので割愛します。 MagicalRecordはCoreDataをRubyのActiveRecordのように扱えるようにする便利なライブラリです。 CoreDataでデータベースをいじるのは直感的ではなく、コード量も多くなるので、今回はMagicalRecordを使用します。
$ pod init でPodfileを生成して、PodfileにMagicalRecordを加えます。
platform :ios, "7.0"

target "SwiftTodo" do

pod 'MagicalRecord'

end

target "SwiftTodoTests" do

end
$ pod install
これでMagicalRecordを導入することができました。
以降プロジェクトファイルは SwiftTodo.xcodeproj ではなく、 SwiftTodo.xcworkspace を使用します。
StoryboardでUIを作る
UIの組み方は基本的に以前と同じです。

シミュレーターにResizable iPhoneという項目があったり、ViewControllerの初期の大きさがこんなんだったりするので、iPhone 6では画面サイズ変わるのほぼ確定ですかね(つらい)。
ViewControllerを選択したら、【Editor】→【Enable In】→【Navigation Controller】と選択して、NavigationControllerを追加します。 続いて、ViewControllerにTableViewを追加し、NavigationBarの右側にNaigationBarButtonItemを追加します。

Assistant Editorを開き、Outletを設定していきます。 以下を設定します。
- IBOutlet: TableView
- delegate: TableView -> ViewController
- data source: TableView -> ViewController
- IBAction: didTouchAddButton(先ほど追加した右上のボタン)


dataSourceとdelegateはTableViewからControl押しながらViewControllerにドラッグすることで簡単に設定できます。

Swiftからは @IBOutletとなったんですね。
IBActionに関しても同様です。

ConnectionをActionにすることで追加できます。 この辺は前とあまり変わらないですね。
とりあえずTableViewに何か表示してみる
まずはViewControllerにTableViewのプロトコルを設定します。
class ViewController: UIViewController {

以下にします。

class ViewController: UIViewController, UITableViewDelegate, UITableViewDataSource {
続いて、TableViewDataSouceを最低限実装します。
func tableView(tableView: UITableView!, numberOfRowsInSection section: Int) -> Int {
    return 10
}

func tableView(tableView: UITableView!, cellForRowAtIndexPath indexPath: NSIndexPath!) -> UITableViewCell! {
    let cell: UITableViewCell = UITableViewCell(style: UITableViewCellStyle.Subtitle, reuseIdentifier: "TodoCell")

    cell.text = "Row #\(indexPath.row)"
    cell.detailTextLabel.text = "Subtitle #\(indexPath.row)"

    return cell
}
実行結果です。
データベースモデルを作る
SwiftTodo.xcdatamodeld を選択し、Add Entityで Todo エンティティを作成します。
Attributesは以下にします。
- timeStamp (Date)
- title (String)

また、このTodoエンティティにクラス名を設定します。
Todo とします。

データベースモデルの設定は以上です。
それでは、データベースモデルが完成したので、mogeneratorを実行します。
こちらに関してもご存じ無い方は適宜調べてください。
とりあえず使いたいという方は
$ brew install mogenerator
でインストールできます。
プロジェクトフォルダに移動し(すでにCocoaPodsで移動済み)、以下のコマンドを実行します。
$ mogenerator -m SwiftTodo/SwiftTodo.xcdatamodeld/SwiftTodo.xcdatamodel -O Model/ --template-var arc=true
すると、プロジェクトフォルダ以下に Model というフォルダが生成されますので、中のファイルごとプロジェクトに追加してください。
かなり雑な説明なので、詰まった場合はWebで検索すると良いです。より詳細なやり方が出てきます。
MagicalRecordをSwiftコードから使えるようにする
MagicalRecordは当たり前ですがObjective-Cで書かれたライブラリですので、Swiftで使うにはObjective-C bridging headerというものを用意する必要があります。 このHeaderファイルにSwiftコードで使用したいObjective-Cのヘッダーファイルを記述することで、Swift側からObjective-Cの資産を使用することができます。
【File】→【New】→【File...】からHeader Fileを選択し、SwiftTodo-Bridging-Header.hというファイル名で追加し、以下を記述します。
#import "CoreData+MagicalRecord.h"
#import "Todo.h"
次にXcodeのターゲットの設定に先ほど作成したBridging Headerを読み込むように設定します。
【プロジェクトを選択】→【TARGETS】→【Build Settings】→【Objective-C Bridging Header】
に$(SRCROOT)/$(PROJECT)/SwiftTodo-Bridging-Header.hを追加します。

これで準備は整いました。 実際にMagicalRecordを使用して、CoreDataをいじっていきましょう!
とりあえず、データを挿入してみる
とりあえず、Todoの内容の設定などは考えず、Addボタンを押したらtitleに日付のStringを入れるだけのプログラムを作成します。
MagicalRecordの初期化
AppDelegate.swift の didFinishLaunchingWithOptions() にMagicalRecordの初期化処理を書きます。
func application(application: UIApplication, didFinishLaunchingWithOptions launchOptions: NSDictionary?) -> Bool {

    MagicalRecord.setupCoreDataStackWithAutoMigratingSqliteStoreNamed("SwiftTodo.sqlite")

    return true
}
追加ボタンを押したらエンティティを追加し、TableViewに表示する
結構一気に変更しています。
インスタンス変数に todoObjects (Array) を追加しています。
また、 reloadData() というインスタンスメソッドを追加していて、これを呼ぶことでデータベースからTodoエンティティを読み込み、TableViewに反映させることができます。
import UIKit

class ViewController: UIViewController, UITableViewDelegate, UITableViewDataSource {

    var todoObjects = [];
    @IBOutlet var tableView : UITableView

    override func viewDidLoad() {
        super.viewDidLoad()
        // Do any additional setup after loading the view, typically from a nib.
    }

    override func viewWillAppear(animated: Bool) {
        super.viewWillAppear(animated)

        reloadData()
    }


    func reloadData() {
        todoObjects = Todo.MR_findAll()
        tableView.reloadData()
    }


    @IBAction func didTouchAddButton(sender : AnyObject) {
        let sampleTodo: Todo = Todo.MR_createEntity() as Todo   // エンティティーを作成する
        sampleTodo.title = "title: \(NSDate.date())"            // 日付をタイトルにセット
        sampleTodo.timeStamp = NSDate.date()                    // 現在時刻をセット

        // CoreDataに保存する(永続化)
        sampleTodo.managedObjectContext.MR_saveToPersistentStoreAndWait()

        reloadData()
    }


    func tableView(tableView: UITableView!, numberOfRowsInSection section: Int) -> Int {
        return todoObjects.count
    }

    func tableView(tableView: UITableView!, cellForRowAtIndexPath indexPath: NSIndexPath!) -> UITableViewCell! {
        let cell: UITableViewCell = UITableViewCell(style: UITableViewCellStyle.Subtitle, reuseIdentifier: "TodoCell")

        cell.text = todoObjects[indexPath.row].title
        cell.detailTextLabel.text = "\(todoObjects[indexPath.row].timeStamp)"

        return cell
    }
}
findAll() は全てのエンティティを読み込むメソッドで、NSArrayで返してきます。 todoObjects には Todo のインスタンスが入っているので、TableViewDataSourceで todoObjects.count などが使えるわけです。
実行結果です。

任意のタイトルのTodoを追加する
先ほどは時刻をタイトルとしていたので、任意のタイトルのTodoを追加できるようにしましょう。
Todo追加用の画面を作成し、遷移させる
先ほどはAddボタンを押すとそのまま追加されましたが、今度はAddボタンを押すとTodo追加画面に遷移するようにしましょう。

画面遷移もいろいろ増えたんですね…

上記のようにTodo追加用のUIを作成しました。
InputDetailViewController クラスを作成し、 ViewController のAddボタンからAction Segueを show で画面遷移するようにStoryboardで設定しています。
InputDetailViewControllerには、 完了ボタン とタイトルを入力するための UITextField が配置されています。
これらのIBOutlet、IBActionを設定しましょう。
設定は以下の項目です。
- IBOutlet: titleTextField
- IBAction: didTouchDoneButton
以下が設定後のソースコードです。
import UIKit

class InputDetailViewController: UIViewController {

    @IBOutlet var titleTextField : UITextField


    override func viewDidLoad() {
        super.viewDidLoad()

        // Do any additional setup after loading the view.
    }

    @IBAction func didTouchDoneButton(sender : AnyObject) {
    }


    override func didReceiveMemoryWarning() {
        super.didReceiveMemoryWarning()
        // Dispose of any resources that can be recreated.
    }
}
任意のタイトルのTodoを追加する
基本的には完了ボタンを押したときに titleTextField の内容を取得して、それをEntity作成時の title Attributeに追加すれば完了です。
また、一応簡単なバリデーションを行っています。
import UIKit

class InputDetailViewController: UIViewController {

    @IBOutlet var titleTextField : UITextField


    override func viewDidLoad() {
        super.viewDidLoad()

        // Do any additional setup after loading the view.
    }

    @IBAction func didTouchDoneButton(sender : AnyObject) {

        if titleTextField.text.isEmpty {
            let alertView: UIAlertView = UIAlertView()
            alertView.title = "エラー"
            alertView.message = "タイトルが入力されていません"
            alertView.addButtonWithTitle("閉じる")
            alertView.show();

            return
        }

        // Entityを追加
        let sampleTodo: Todo = Todo.MR_createEntity() as Todo
        sampleTodo.title = titleTextField.text
        sampleTodo.timeStamp = NSDate.date()

        // CoreDataに保存する(永続化)
        sampleTodo.managedObjectContext.MR_saveToPersistentStoreAndWait()

        self.navigationController.popViewControllerAnimated(true)
    }


    override func didReceiveMemoryWarning() {
        super.didReceiveMemoryWarning()
        // Dispose of any resources that can be recreated.
    }
}
動作結果です。

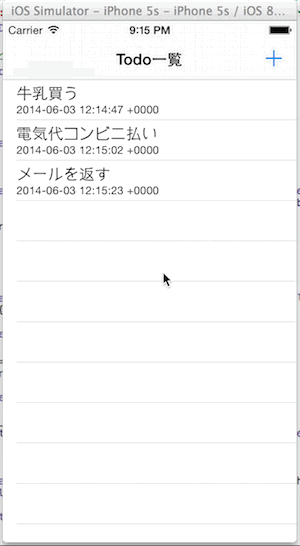
任意のタイトルでTodoが追加できました!
Todoを削除できるようにする
最後に、Todoを削除する機能をつけて終わりにしましょう。 Cellをスワイプすると削除ボタンが表示され、削除ボタンをタップすると該当Entityが削除された後、アニメーションしてCellが消えるようにします。
ViewController.swift に tableView(_:commitEditingStyle:forRowAtIndexPath:)と tableView(_:editingStyleForRowAtIndexPath:) を実装します。
func tableView(tableView: UITableView!, commitEditingStyle editingStyle: UITableViewCellEditingStyle, forRowAtIndexPath indexPath: NSIndexPath!) {

    if editingStyle == UITableViewCellEditingStyle.Delete {
        // Entityの削除
        let todoObject: Todo = todoObjects[indexPath.row] as Todo
        todoObject.MR_deleteEntity()

        todoObject.managedObjectContext.MR_saveToPersistentStoreAndWait()

        todoObjects = Todo.MR_findAll()
        tableView.deleteRowsAtIndexPaths([indexPath], withRowAnimation: UITableViewRowAnimation.Fade)
    }
}

func tableView(tableView: UITableView!, editingStyleForRowAtIndexPath indexPath: NSIndexPath!) -> UITableViewCellEditingStyle {

    return UITableViewCellEditingStyle.Delete;
}
動作結果です。

以上です!
まとめ
かなり急ぎ足でしたが、Swiftを使って、UI設計から画面遷移、外部ライブラリの使用、Objective-Cコード資産の活用、CoreDataの利用までしてみました。 説明を省略しまくったので所々読みにくいところがあったと思いますが、最後まで読んでいただきありがとうございます。 それにしても、Swift、いい感じですね。 実はこの記事ドキュメントをパラパラ見て、あとはPre-ReleaseのiOS Developer Libraryを見ながら書いたのですごく適当です。おそらく、いろいろと良くない箇所が多いとは思いますが、スピード重視ということで目をつぶってもらえたらと思います。 しかし逆に言えば言語発表から数時間でここまで作ることができました。 SwiftがこれからのiOSアプリ開発に大きく貢献することは間違えないでしょう。
補足
エンティティのフェッチ部分でArrayに直接フェッチデータを入れていますが、すごく良くないやり方です。 普通は、NSFetchedResultsControllerというものを使用します。 気になる方はこちらも併せてググるといいと思います。


