A web interface to remotely control/schedule 433MHz RF power switches, a DHT22 temperature and humdity sensor, a PIR sensor alarm (for a makeshift home security system), Orvibo S20 WiFi remote outlets, and a mechanism to record from foscam IP cameras, all through a Raspberry Pi. At the very least it needs a Raspberry Pi to function ;-) and some basic programming skills (Bash, PHP, HTML, Python, JS) if you wish to alter any part of the code.
This project was meant as a quick-and-dirty solution for a need I had. Consequently, the code may not be the most "cleanest" nor the most efficient. Suggestions / comments are always welcome. If this code in any way, shape, or form causes your living quarters to disintegrate and/or melt to the ground, I shall not be held accountable ;-) Kidding...
Check this article for instructions and for a more in depth explanation of the project.
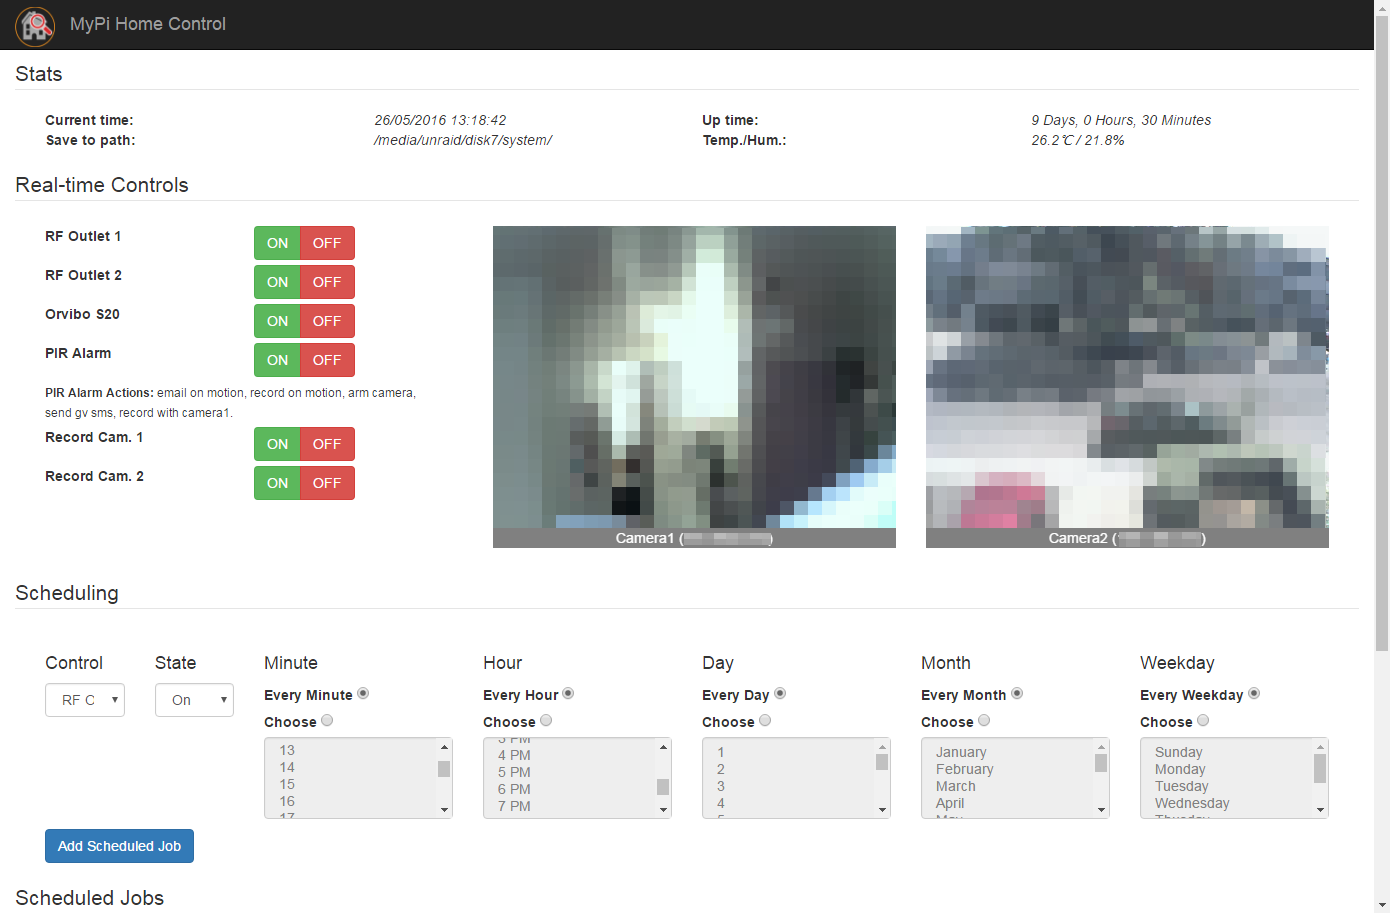
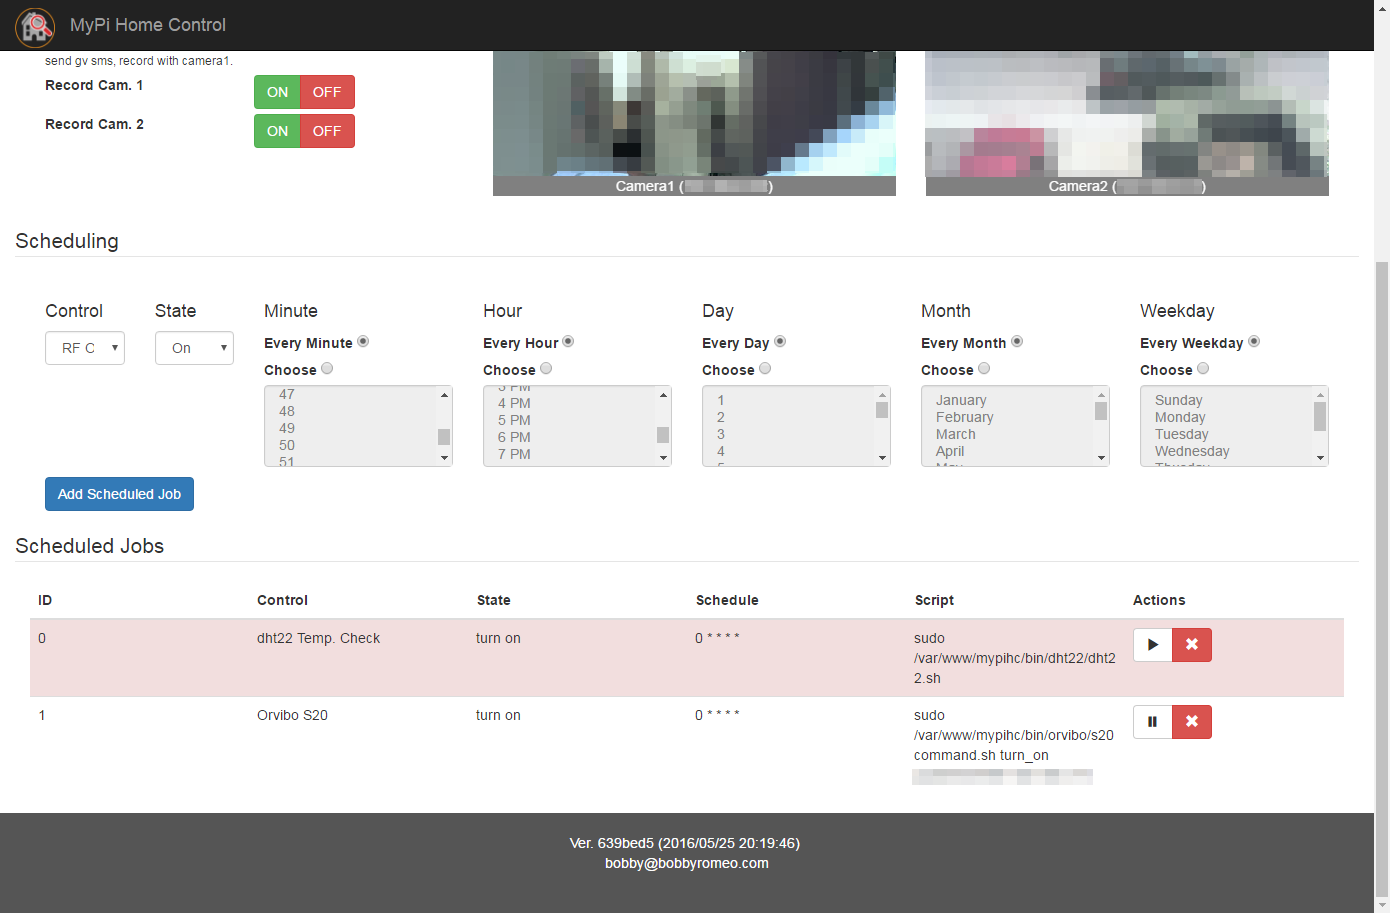
Ability to schedule jobs.
All configuration is handle in the file: config.ini. To enable a setting in the configuration file, use 1 e.g.: setting = 1.
I've created this code while using two Foscams cameras as they have a relatively simple API for things like snapshots and basic pan/tilt. Other cameras with different APIs may still work, however modification would need to be done. If you have Foscam cameras you shouldn't have any problems.
The code may still prove useful to you for other features, i.e. RF module, PIR sensor, Orvibo WiFi outlets, or Temp./humidity sensor.
So assuming you have Foscam cameras, do the following:
i) Follow the Basic Setup portion (below) so you may at the very least serve the project

ii) Configure your cameras in the appropriate sections [camera1], [camera2]

iii) Enable the camera module "use_camera_module=" in section [config]. Switches q, r handle
    the recording for the cameras and enable "enable=" for each to display switch on interface.

iv) Configure a save directory in the [config] section, "save_to_dir="

v) Alter the crontab so user www-data can modify crontabs under the user pi, also make sure the pi can use sudo w/o a password

www-data ALL=(pi) NOPASSWD: /usr/bin/crontab
pi ALL=(ALL) NOPASSWD:ALL

vi) Install ffmpeg (See below)

vii) Decide what extra modules you would to have working. Many of the extended modules require cheap hardware to get going. Please see my blog post for more information.
-
Install lighttpd and php5 from http://chris-labs.de/hardware/raspberrypi/2013/10/10/raspberrypi-433mhz-switch-control.html
i) sudo apt-get install lighttpd php5-common php5-cgi php5 php5-cli
ii) Tell lighttpd to use fastcgi-php and reload the server:
 sudo lighty-enable-mod fastcgi-php
 sudo service lighttpd force-reload
iii) Set permissions for the pi-user:
 sudo chown www-data:www-data /var/www
 sudo chmod 775 /var/www
 sudo usermod -a -G www-data pi
iv) sudo chmod -vR g+w /var/www/mypihc sudo chown -R www-data:www-data /var/www/mypihc
-
Install Crontab Manager https://github.com/TiBeN/CrontabManager
i) install composer: echo "" | php > composer.phar sudo mv composer.phar /usr/local/bin/composer sudo chmod +x /usr/local/bin/composer
ii) composer require tiben/crontab-manager ~1.0
-
Required Linux binaries
i) sudo apt-get install wget
ii) ffmpeg (needs to be compiled for latest release)
 git clone git://source.ffmpeg.org/ffmpeg.git ffmpeg
 cd ffmpeg
 ./configure
 make
 sudo make install
A 433Mhz TX/RX module will permit you to control wireless remote control electrical outlets via this interface. The more difficult aspects of this setup is capturing the specific codes for your particular mode. Please see my blog post (above) for a way to capture these codes.
(Cheap transmitter/receiver: http://www.ebay.ca/itm/5pcs-433Mhz-RF-transmitter-and-receiver-kit-for-Arduino-/251673838721?pt=LH_DefaultDomain_0&hash=item3a98ee0481)
i) Follow the instructions to install the wiringpi library. After that you can compile the example programs by executing make. Install WiringPi from https://projects.drogon.net/raspberry-pi/wiringpi/download-and-install//

ii) git clone git://github.com/ninjablocks/433Utils.git

iii) cd 433Kit/RPi_utils

iv) Change line "mySwitch.send(code, 26);" in codesend.cpp (I had to do this in my case as my codes were longer), execute make all

v) Copy codesend to {PATH_TO_WWW}/mypihc/bin

vi) **NOTE** You will need to use RFSniffer to get your specific codes and then enter them in the config.ini in the appropriate section.
    Switches a, b in the config file handle this.

    turn_on = /bin/codesend/codesend.sh <code>
    turn_off = /bin/codesend/codesend.sh <code>

vii) Enable the module "use_433mhz_module=" in section [config] and enable "enable=" for switches a,b to display switch on interface.

viii) For the 433mhz emitter if using it
    www-data ALL=NOPASSWD: {PATH_TO_WWW}/mypihc/bin/codesend/codesend.sh
A PIR Sensor, strategically place in your home, would permit you to be notified in the event there is movement when the "PIR Alarm" is armed, either for SMS or Email. More so, when tripped, a video will begin to record directly to your save to path. Also, you can arm a Foscam camera and use it's built-in email notifications to send you images via email, provided you set that up with it's own interface. Please see my blog for more info.
i) PIR setup instructions http://www.raspberrypi-spy.co.uk/2013/01/cheap-pir-sensors-and-the-raspberry-pi-part-1/

ii) Enable the module "use_pir_module=" in section [config] and enable "enable=" for switch p to display switch on interface.

iii) Configure the options in the [pir] section

    - "email_on_motion": will email you provided you fill out the [email] section
    - "record_on_motion": kicks off a recording from a give camera when motion is triggered (record_with_camera1)
    - "arm_camera": turns on the camera's built-in email images feature (of course you need to configure the camera appropriately)
    - "send_sms": sends an email to your phone (to the email set in "email_sms" configured in [email] section)
    - "send_gv_sms": sends a Google Voice SMS to <sms_num> provider you fill out the [gv] section and have pygooglevoice python library installed (see below)

iv) Grant sudo access
www-data ALL=NOPASSWD: /{PATH_TO_WWW}/mypihc/bin/pir/pir.sh
A DHT22 temperature and humdity sensor, when connected to you Pi, will permit you to capture temperature/humidity readings and send an SMS or email if the temperature exceeds a threshold value set in the configuration file, see the [dht22] section.
(Watch for more info: https://www.youtube.com/watch?v=IHTnU1T8ETk)
i) Pinout on the DHT22
PIN 1 --> VCC,
PIN 2 --> GPIO 4,
PIN 3 --> NOT USED,
PIN 4 --> GROUND

ii) Voltage divider need to protect GPIO pin

For DHT22 5V operation connect pin 1 to 5V and pin 4 to ground.

The following pin 2 connection works for me.  Use at YOUR OWN RISK.

    5V--5K_resistor--+--10K_resistor--Ground
                     |
    DHT22 pin 2 -----+
                     |
    gpio ------------+

iii) Compile instructions:
    cd ~
    git clone https://github.com/adafruit/Adafruit_Python_DHT.git
    cd Adafruit_Python_DHT
    sudo python setup.py install

iv) Enable the module "use_dht22_module=" in section [config] and enable "enable=" for switch s to display switch on interface.

v) Verify the switch s section (turn_off is empty)

    turn_on = /bin/dht22/dht22.sh
    turn_off =

vi) Grant sudo access
www-data ALL=NOPASSWD: /{PATH_TO_WWW}/mypihc/bin/dht22/dht22.sh

vii) Set "temp_threshold_alerts" to 1 and put a value for degrees celsius in "temp_threshold_cel" if you want to be notified via Email/GV if temperature exceeds this value.
Product description: http://www.gearbest.com/diy-parts-and-tools/pp_133571.html
First off, the S20 will need to be paired with your WiFi. Do to this you may use the iOS/Android app or this person's blog post who managed to reversed engineer the device (https://stikonas.eu/wordpress/2015/02/24/reverse-engineering-orvibo-s20-socket/comment-page-1/#comments) without the app. I perfer the latter approach. Please see my blog post for more info on how to do it.
At the very least you will need the MAC address and IP address of the device.
i) Enable the module "use_orvibo_module=" in section [config] and enable "enable=" for switch c to display switch on interface.

ii) Set the on/off script arguments in [switch-c] section

    turn_on = /bin/orvibo/s20command.sh turn_on <mac_address> <ip_address>
    turn_off = /bin/orvibo/s20command.sh turn_off <mac_address> <ip_address>

iii) Grant sudo access
www-data ALL=NOPASSWD: /{PATH_TO_WWW}/mypihc/bin/orvibo/s20command.sh
If you want to get Google Voice SMS working instead of using your cellular's SMS email gateway (provided you have a GV account), do the following:
i) PY Google Voice Installation
    cd /root
    git clone https://github.com/wardmundy/pygooglevoice
    cd pygooglevoice
    python setup.py install
    cp /root/pygooglevoice/bin/gvoice /usr/bin/

ii) Test it out
    gvoice -e USER_NAME -p PASSWORD send_sms SMS_NUMBER_RECIPIENT "Message"


