All components are readily available from various sources including online electronics stores, ebay, aliexpress...
This project is implemented on the NodeMCU V2 (also known as V1.0) and WeMos D1 Mini development boards on the ESP8266 platform flashed with Arduino core for ESP8266 WiFi chip V2.0 firmware. The solution can stream data securely directly to Azure IoT Hub or Azure Event Hub over HTTPS calling Azure REST APIs.
The ESP8266 is a great commodity priced platform that has really come to life with Arduino support. With "Arduino core for ESP8266 WiFi chip" Version 2.0 there is now Secure Client HTTPS (TLS) support making this a viable platform for secure IoT data streaming.
Thanks to Štěpán Bechynský "Proof of Concept – NodeMCU, Arduino and Azure Event Hub" project I've migrated my "Arduino NodeMCU ESP8266 MQTT" project and added IoT Hub support to stream data directly to Azure IoT Hub or Azure Event Hubs over HTTPS.
Check out the Publish.ino sketch, the main bit of magic is to create the Azure IoT Hub Shared Access Signature from the Azure IoT Hub Developer Guide. See function createIotHubSas.
String createIotHubSas(char *key, String url){
    String stringToSign = url + "\n" + expire;

    // START: Create signature
    // https://raw.githubusercontent.com/adamvr/arduino-base64/master/examples/base64/base64.ino

    int keyLength = strlen(key);

    int decodedKeyLength = base64_dec_len(key, keyLength);
    char decodedKey[decodedKeyLength];  //allocate char array big enough for the base64 decoded key

    base64_decode(decodedKey, key, keyLength);  //decode key

    Sha256.initHmac((const uint8_t*)decodedKey, decodedKeyLength);
    Sha256.print(stringToSign);
    char* sign = (char*) Sha256.resultHmac();
    // END: Create signature

    // START: Get base64 of signature
    int encodedSignLen = base64_enc_len(HASH_LENGTH);
    char encodedSign[encodedSignLen];
    base64_encode(encodedSign, sign, HASH_LENGTH);

    // SharedAccessSignature
    return "sr=" + url + "&sig="+ urlEncode(encodedSign) + "&se=" + expire;
    // END: create SAS
}
##Overview of steps to deploying the solution
- Setup your Azure IoT Hub. There is a free 8000 message a day subscription to get started.
- Register your device with Azure IoT Hub.
- Flash the EEPROM with Wifi, Geo location, plus ther Azure IoT Hub (or Event Hub) host, device id and key.
- Update the main AzureClient.ino sketch
- Define what platform you are targeting - NodeMCU or WeMos.
- What sensors you are using, if any - options are DemoMode, bmp180 or dht11 sensors.
- Deploy the solution to either your NodeMCU or WeMos devices.
- View data with Device Explorer
##Azure IoT Hub Setup
Creating an Azure IoT Hub (there is a free 8000 message/day limited subscription)
##Register your Device with IoT Hub
Register Devices for your newly created IoT Hub.
- Use the Device Explorer utility from the Azure IoT SDKs Tools directory
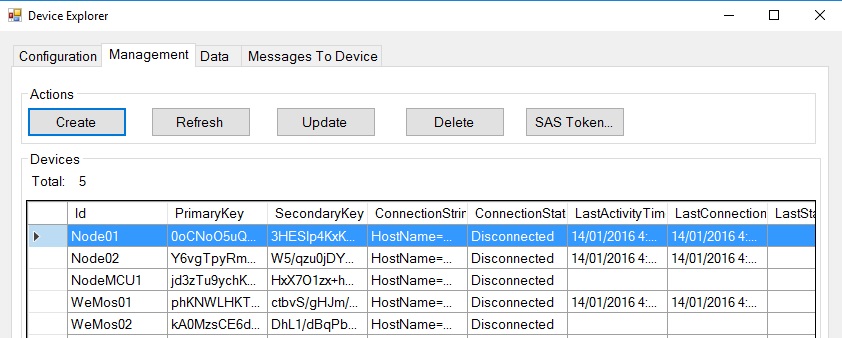
- or you can create your own utility by following the instructions in the Create an Azure IoT Hub link.
##NodeMCU or WeMos EEPROM Configuration
Before uploading the Azure.ino sketch to your NodeMCU or WeMos you first need to configure the SetEEPROMConfiguration.ino sketch with one or more Wifi SSIDs/Passwords and the device geo location. Upload this sketch to burn these settings to the device EEPROM. After this you deploy the AzureClient sketch which will read this configuration information from the EEPROM.
- SetEEPROMConfiguration.ino sets the following
- Wi-Fi SSID and password pairs, put in priority order.
- Wifi - Is the number of WiFi ssid and password pairs
- Azure IoT Hub or Event Bus Host name eg "MakerDen.azure-devices.net", Device ID, and Key. For IoT Hub get this information from the Device Explorer, for Event Hub, get from Azure Management Portal.
- Geo location of the device
- Deploy this app to the NodeMCU to write configuration settings to EEPROM
##Configure the main AzureClient.ino solution
You need to configure the following settings in the main section on the AzureClient.ino file.
// cloud configurations
CloudMode cloudMode = IoTHub;         // ClodeMode enumeration: IoTHub or EventHub

// device configuration
BoardType boardType = WeMos;          // BoardType enumeration: NodeMCU or WeMos
SensorMode sensorMode = DemoMode;    // OperationMode enumeration: DemoMode (if no sensors attached), Bmp180Mode (bmp085 and bmp180), Dht11Mode
DisplayMode displayMode = NoDisplay;  // DisplayMode enumeration: NoDisplay or LedMatrix
LightSensor lightSensor = None;       // LightSensor enumeration: None, Enabled
This upload the sketch to your device.
##Viewing Data
From Device Explorer, head to the Data tab, select your device, enable consumer group then click Monitor.
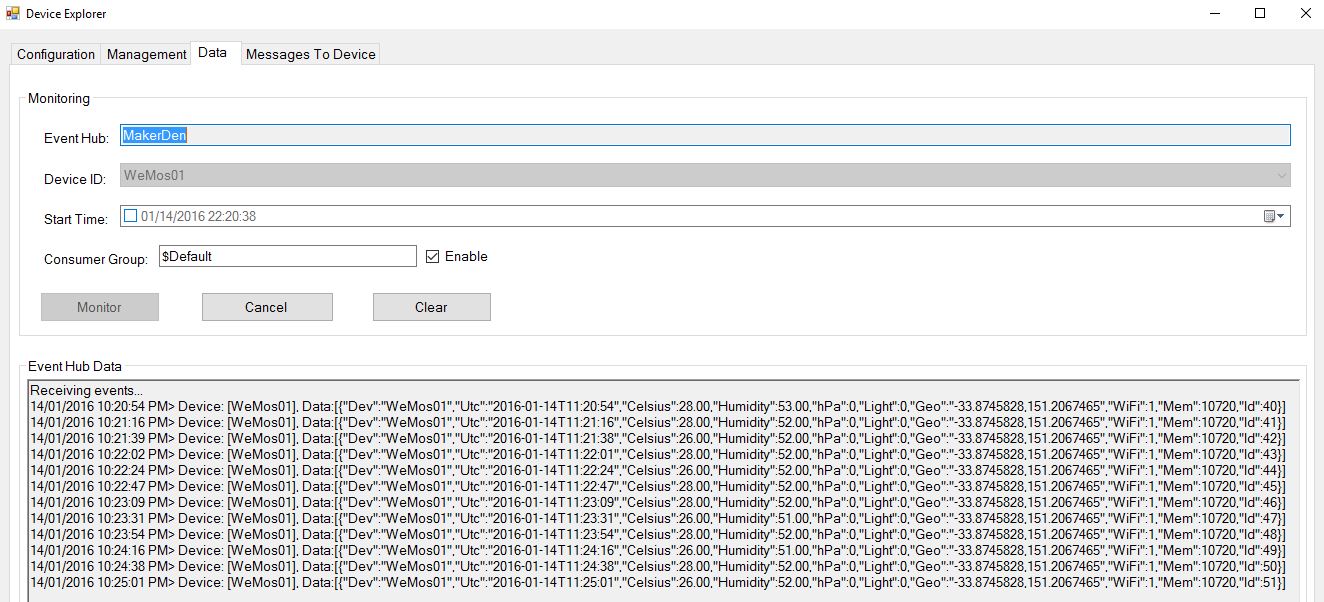
The AzureClient sketch streams data in the following JSON format, of course you can change this:)
{"Dev":"DeviceId","Geo":"2011","Celsius":27,"hPa":1016,"Humidity":50,"Light":99,"Utc":"2015-12-06T23:07:04","Id":103}
##Azure IoT Hub and Azure Event Hub
Ok, so you've read this far and you may be wondering what is Azure IoT Hub and Azure Event Hub.
IoT Hub is designed to "Connect, monitor, and control millions of IoT assets", Azure Event Hubs is designed for internet scale data ingestion. Unlock the value of that data with Stream Analytics, Power Bi and preconfigured IoT Hub solutions such as Remote monitoring .
##Physical Board
There are a number of ESP8266 based development boards available so be sure to check out this great article "Comparison of ESP8266 NodeMCU development boards".
The two dev boards that captured my interest are the NodeMCU V2 and the WeMos D1 Mini and this project supports both.
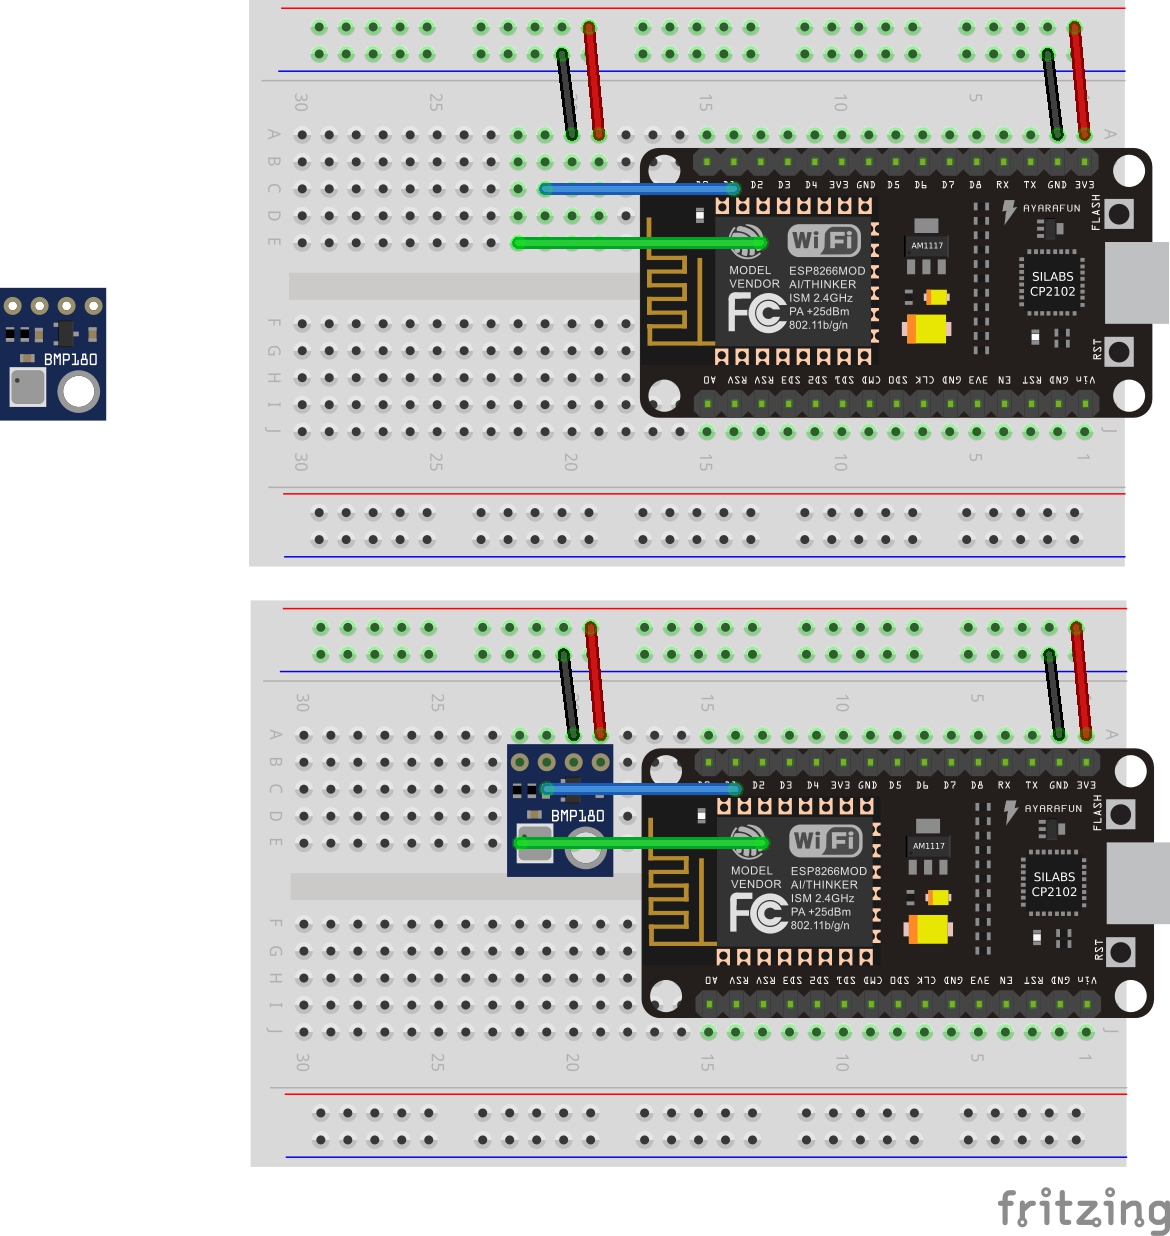
###NodeMCU V2 Hardware
- NodeMCU v2 - Lua based ESP8266 development kit
- BMP180 Barometric Pressure Sensor
- Adafruit Mini 8x8 LED Matrix w/I2C Backpack
- 1 x Light Dependent Resistor
- 1 x 10k resistor
- 1 x 400 Tie Point Interlocking Solderless Breadboard
###WeMos D1 Mini Hardware
- WeMos D1 Mini
- DHT Shield or the DHT Pro Shield.
No wiring required, just solder the supplied header pins for the WeMos and the DHT Sensor shield.

###Drivers
- NodeMCU - On Windows, Mac and Linux you will need to install the latest CP210x USB to UART Bridge VCP Drivers.
- WeMos - On Windows and Mac install the latest Ch340G drivers. No drivers required for Linux.
- Arduino IDE 1.6.5 As at Dec, 2015, Arduino 1.6.6 has several issues, so to stick with 1.6.5
- As at Dec 2015, ESP8266 Board Manager 2.0.0 or better required for HTTPS/TLS Secure Client support.
There an fantastic plugin for Visual Studio that adds Arduino support from Visual Micro. IntelliSence, auto complete, debugging, it doesn't get much better:)
###Installing ESP8266 support with the Arduino Boards Manager
Starting with 1.6.4, Arduino allows installation of third-party platform packages using Boards Manager. We have packages available for Windows, Mac OS, and Linux (32 and 64 bit).
- Install Arduino 1.6.5 from the Arduino website.
- Start Arduino and open Preferences window.
- Enter http://arduino.esp8266.com/stable/package_esp8266com_index.json into Additional Board Manager URLs field. You can add multiple URLs, separating them with commas.
- Open Boards Manager from Tools > Board menu and install esp8266 platform (and don't forget to select your ESP8266 board from Tools > Board menu after installation).
- Select NodeMUC or WeMos D1 Mini Board: Tools -> Board -> NodeMCU 1.0 (ESP-12E module) or WeMos D1 Mini
- Set Port and Upload Speed: Tools. Note, you may need to try different port speeds to successfully flash the device. Faster is better as each time you upload the code to your device you are re-flashing the complete ROM not just your code.
##ESP8266 Arduino Core Documentation
Be sure to read the ESP8266 Arduino Core Documentation - there are some minor gotchas.


