== DEPRECATED! THIS IS AN OLD VERSION OF NETYTAR. THE PROJECT HAS BEEN FORKED AND MOVED TO A NEW REPOSITORY. PLEASE REFER TO THAT ONE! ==
Netytar is a Virtual Digital Musical Instrument (Virtual DMI) specially designed to be played without hands, using an eye tracker sensor, and possibly some extra sensors. It's designed for accessibility, especially for people who cannot use/control their hands in order to play music.
The first version was produced as part of my Master Thesis to get the degree in Computer Engineering at University of Pavia (Italy), in 2018, and tested with able-bodied musicians.
In order to install and play Netytar, you need the following stuff:
- A Windows PC. Unfortunately, at the moment in which I'm writing, Tobii is releasing drivers only for Windows. Netytar is written in C#, part of the .NET Framework. I've tested Netytar only on Windows 10 at the moment.
- An eye tracker. At the moment, Netytar has been developed to work with Tobii's low cost eye trackers (sold at a price range between 100€ and 200€).
- A button/switch/sensor. It is required to "activate" notes. It can be operated with a keyboard button, but in order to control dynamics, it's better to have a dynamic button/sensor. I will include the instructions to build a breath sensor with Arduino (which I'm currently using). Otherwise, you can try the experimental "EyePos" function, which allows you to play Netytar using 3D eye position to control dynamics.
Netytar has been developed and tested on a laptop with the following characteristics:
- Intel(R) Core(TM) i7-8550U CPU @ 1.80 GHz (4 physical cores, 4 virtual cores)
- 8 GB RAM
- NVIDIA GeForce MX150 GPU
I prepared a package named "Netytar Demo Package", which contains all that's needed to install and play music with Netytar. Please consider that, even if fully working it may contain obsolete versions of the Tobii drivers, as well as an outdated version of Netytar and all the software included in the package. It can be downloaded following the link https://tinyurl.com/netytardemopackage.
Otherwise, to get the last version of everything, you need to do the following:
- Download/clone this repository somewhere in your PC. Please consider that you need both "NeeqDMIs" and "Netytar".
- Download and install the latest Tobii driver. You can find it on Tobii's official website.
- Download and install .NET Framework version 4.8, if not already present in your PC. You only need the Runtime version. It can be found on Microsoft's official website.
- Download and install the font Digital-7. It's not mandatory, but if you don't install it, Netytar's interface will not look in the right way. :) You can find it on Dafont.com.
Since Netytar is a MIDI controller, you'll need some sounds in order to play it. There's a MIDI port selector on the interface which you can use to route the messages to an external synthesizer connected to your PC. Otherwise, you can use a software synthesizer. My favourite way is to use free VST plugins (Steinberg's virtual instruments). You can do the following:
- Download and install LoopMIDI. It's a nice, free and lightweight software that you can use to create a virtual loopback MIDI cable. Just launch it and create a virtual MIDI port.
- Download and install VSThost. Another free software which can host VSTs. You'll find instructions and documentations in to use it on the website.
- Download some nice VST plugins. You can find a lot of free ones on vst4free.com. My favourites for Netytar are DVS Saxophone (altough it has a limited pitch range) and Mr Ray Rhodes piano.
First of all, launch LoopMIDI and VSThost, and load a VST plugin. Check in the MIDI options that VSThost has the LoopMIDI port as input.
Launch Netytar. You can find the executable in the folder Netytar/Netytar/bin/debug as Netytar.exe.
Press the "Start" button to draw the surface and start Netytar.
IMPORTANT: Press left CTRL key to activate the eye tracker and the autscrolling function: the mouse cursor will disappear. Press left SHIFT key to revert and set the cursor visible again.
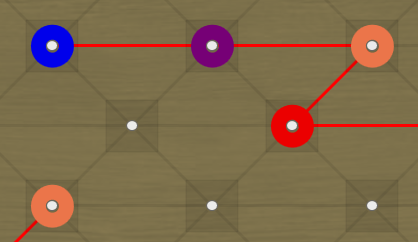
Keys surface. Notes on scale are drawn with dots and different colors. The red one is always the root note. A red line indicates a major scale, while a blue line indicates a minor scale. Off-scale notes do not have a colored dot around. Moving around with the gaze will cause the selected key to flash and a white line to appear and disappear, showing the gaze trace. Also, the surface will automatically scroll to put the selected note on the center of the screen.
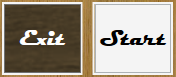
Start and Exit buttons. These two buttons are used to draw the Netytar surface and exit the program.

Scale selector. This can be used to select different scales to be drawn. IMPORTANT: The same thing can be done using only the eyes, keeping one eye closed for approx. one second while looking at one key. Closing the left eye a major scale will be drawn, while closing the right eye a minor scale will appear, both having the selected key as root note.

Dynamics bar. This bar indicates how much pressure you're applying on the sensor. This will result in a change of velocity (or pressure control change, if a note is actually being played). The white horizontal line indicates maximum velocity (127). The threshold between silence and a note being played is something between zero and that horizontal line.
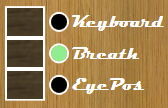
Sensor selector. This selector can be used to choose which sensor you're using to play.
- Keyboard activates the spacebar button to play (NoteOns and NoteOffs);
- Breath activates the USB breath sensor. Instructions to build it with Arduino will be included in this readme file;
- EyePos activates an experimental mode in which the player can use his/her 3D eye position to control sound dynamics and note execution. Still experimental, keep in mind.

COM selector. This can be used to select the USB port where the breath sensor is connected to. A green text indicates that a serial connection is initialized. A red one, that nothing is attached to that port, or no serial data is being received.
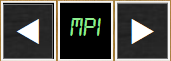
MIDI port selector. Used to select different MIDI port/devices. Netytar will always send messages on channel 1 of that port. Text should become green when the MIDI port is initialized, but that's still buggy. :( Don't trust red texts.
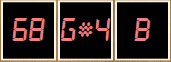
Note informations panel. From left to right: MIDI pitch and name of the currently selected key, and sound indicator. A "B" (blowing) indicates that some note is being played, while a "_" indicates that the instrument is silent.
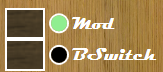
Control options. "Mod" activates modulation control. The more pressure from the breath controller, the more vibrato it will add. "BSwitch" can be used to control key-based instruments like piano: the breath sensor will become a simple on/off switch, ignoring pressure dynamics.
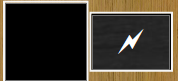
Eye position calibration. This must be used with the "EyePos" playing mode. Looking at the black area will cause Netytar to register the current 3D height of the eyes as the "silence" position. Raising the head over that threshold while looking at the keys surface will cause the dynamics bar to raise.
Blink. Blinking both eyes while playing a note will cause the same note to be repeated. It's the same as releasing and pressing again a piano button.
Please contact me for any question, feature request, collaboration proposal, problem report, etc.
My email address is nicola {-dot-} davanzo {-at-} unimi {-dot-} it
I am currently a PhD student in Laboratorio di Informatica Musicale, in University of Milan (Italy).
I will be very happy if someone helps me in developing and maintaining this software. It was written using Visual Studio 2017, and it's completely Open Source (released under GNU GPL 3.0 license, which you will find in the "license" file).
I will include as soon as possible the instructions to build a (very cheap [30€] but very effective) breath controlled switch using Arduino, which I'm currently using for demonstrations and stuff.
Enjoy!
Nicola

