Data Science Experience is now Watson Studio. Although some images in this code pattern may show the service as Data Science Experience, the steps and processes will still work.
Watson Conversation is now Watson Assistant. Although some images in this code pattern may show the service as Watson Conversation, the steps and processes will still work.
There is a technological revolution taking place in the service industry with the introduction of Robots. The Robots are powered by artifical intelligence and are able to perform the roles of a waiter, customer relationship executive, cognitive assistant etc. The capabilties of the robot can be enhanced exponentially by integrating with cloud capabilities.
This code pattern demonstrates a scenario where the robot can answer queries on financial data by integrating with IBM Watson Assistant service and IBM Watson Studio. We will take you through the end to end flow of steps in building an interactive interface between NAO Robot, Watson Assistant API & Watson Studio.
When the reader has completed this code pattern, they will understand how to:
- Establish the communication between NAO Robot and IBM Watson Studio with Watson Assistant.
- Create the Watson Assistant chat bot application.
- Perform statistical analysis on a financial dataset using Jupitor (Python) Notebook on IBM Watson Studio.
The intended audience for this code pattern are developers who want to develop a complete analytics solution on Watson Studio with a custom web user interface.

- The user asks the questions on the dataset to the NAO Robot.
- The NAO Robot will convert the speech to text, and will send the text to Node-RED Flow for further processing on the cloud. The results from the processing on the cloud is returned to the NAO Robot through the Node-RED flow.
- Node-RED flow sends the converted text to the Watson Assistant API.
- The Watson Assistant API takes the text input. The text is analyzed to determine the intent based on the training provided.
- The context and state of the conversation is saved to the Cloudant DB to track the conversation flow of the user.
- The dataset for analysis is stored in the Object storage.
- Data file is taken as input in csv format.
- The Jupyter notebook receives the Watson Assistant Service API output from Node-RED using Web Sockets. The notebook processes the data based on the question and generates insights. The insights are sent back to the Node-RED flow using Web Socket.
- The Jupyter notebook is powered by Spark.
- The Node-RED flow sends the insights to NAO Robot.
-
Nao-Robot Choregraphe Behaviour: The fruit of a unique combination of mechanical engineering and software, NAO is a character made up of a multitude of sensors, motors and software piloted by a made-to-measure operating system: NAOqi OS.
-
Node-RED: Node-RED is a programming tool for wiring together APIs and online services.
-
Watson-Assistant-API: Build, test and deploy a bot or virtual agent across mobile devices, messaging platforms, or even on a physical robot.
-
IBM Watson Studio: Analyze data using RStudio, Jupyter, and Python in a configured, collaborative environment that includes IBM value-adds, such as managed Spark.
-
IBM Cloud Object Storage: An IBM Cloud service that provides an unstructured cloud data store to build and deliver cost effective apps and services with high reliability and fast speed to market. This code pattern uses Object Storage (Swift API).
-
Jupyter Notebooks: An open-source web application that allows you to create and share documents that contain live code, equations, visualizations and explanatory text.
- Data Science: Systems and scientific methods to analyze structured and unstructured data in order to extract knowledge and insights.
- Analytics: Analytics delivers the value of data for the enterprise.
- Python: Python is a programming language that lets you work more quickly and integrate your systems more effectively.
- Jupyter Notebooks: An open-source web application that allows you to create and share documents that contain live code, equations, visualizations and explanatory text.
Follow these steps to setup and run this code pattern. The steps are described in detail below.
- Sign up for IBM Cloud
- Create IBM Cloud services
- Configure Watson Assistant Application
- View Watson Assistant Intents, Entities and Dialog
- Import the Node-RED flow
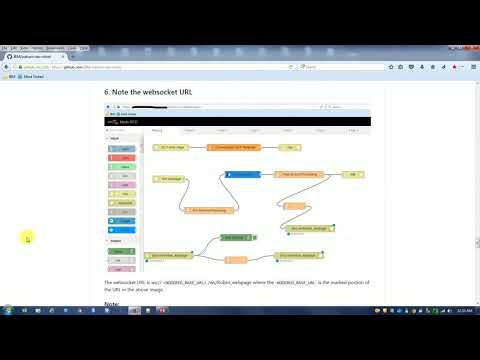
- Note the websocket URL
- Sign up for Watson Studio
- Create the notebook
- Add the data
- Update the notebook with service credentials
- Run the notebook
- Results sent to the Node Red Flow
- Update the NAO Robot Choregraphe Behaviour with service credentials and Node-RED URL
- Transfer the behaviour to NAO Robot
Sign up for IBM Cloud. By clicking on create a free account you will get 30 days trial account.
Create the IBM Cloud services by following the link to use the IBM Cloud UI.
Choose an appropriate name for the Node-RED application - App name:. Click on Create.

- On the newly created Node-RED application page, Click on
Visit App URLto launch the Node-RED editor once the application is inRunningstate. - On the
Welcome to your new Node-RED instance on IBM Cloudscreen, Click onNext - On the
Secure your Node-RED editorscreen, enter a username and password to secure the Node-RED editor and click onNext - On the
Browse available IBM Cloud nodesscreen, click onNext - On the
Finish the installscreen, click on Finish - Click on
Go to your Node-RED flow editor
Choose an appropriate name for the Speech to Text Service - App name:. Click on Create.

- On the newly created Speech to Text Service page, Click on
Service credentialsthenView credentialand note down the credentials for future use.

Choose an appropriate name for the Watson Assistant Service - App name:. Click on Create.

-
On the newly created Watson Assistant Service page, click on
Service credentialsthenView credentialand note down the credentials for future use.
-
On the same page, on the left side now click on
Manageicon then on the right side click onLaunch toolto launch the Assistant Workspaces.
Launch the Watson Assistant tool.
-
Navigate to workspace.json.
-
Click on the "up arrow" to import a workspace & make sure
Everythingoption is selected.

-
Click to choose a file, navigate to
workspace.jsondocument and selectImport -
Click on
Watson Assistantat the top to go back to workspace -
Find the
Workspace IDby clicking on the context menu (three vertical dots) of the new workspace and selectView details.

- Click on the
View details. Note down theWorkspace ID.

To view the conversation Intents, Entities and Dialog select the workspace and choose the Intents tab, Entities tab and Dialog tab.
Intents
Intents are purposes or goals expressed in a customer's input, such as answering a question or processing a bill payment. By recognizing the intent expressed in a customer's input, the Watson Assistant service can choose the correct dialog flow for responding to it.

Entities
Entities represent a class of object or a data type that is relevant to a user's purpose. By recognizing the entities that are mentioned in the user's input, the Watson Assistant service can choose the specific actions to take to fulfill an intent.
There are two types of the entities available under the Watson Assistant. One is My entities and another is System entities. Refer below for My Entities.

In this conversation two system entities have been used namely @sys-date and @sys-number. User has to switch on the button before using it.

Dialog
The dialog uses the intents and entities that are identified in the user's input, plus context from the application, to interact with the user and ultimately provide a useful response.

In this conversation, the slots feature under dialog has been used to gather multiple informations from the user. Slots for Max dialog is represented in the above image.
- Clone this repo.
- Navigate to Robotic_AI_Agent_workflow.json.
- Open the
NODERED_BASED_URLand click onGo To Your Node-RED flow editorto launch the Node-RED editor. - Update the Node-RED URL (replace
NODERED_BASE_URLwith the correct URL) under path in the json file. - Open the
Robotic_AI_Agent_workflow.jsonfile with a text editor and copy all the contents to Clipboard. - On the Node-RED flow editor, click the Menu and select
Import->Clipboard, select new flow and paste the contents from text editor & clickImport. - Components of Node-RED flow includes a web socket server, Watson Assistant Service, Watson Studio & user defined functions which tie them together to enable exchange of information.
- Please review steps 1 to 10 under the Architecture diagram to understand the flow of events using Node-RED.

- Double click on the
conversationnode.Edit conversation nodeprompt will open. - Enter the
Workspace IDthat we noted in Configure Watson Assistant Application. - Add username & password from Watson Assistant & click
Done.


The websocket URL is ws://<NODERED_BASE_URL>/ws/Robot_webpage where the NODERED_BASE_URL is the marked portion of the URL in the above image.
An example websocket URL for a Node-RED app with name myApp - ws://myApp.mybluemix.net/ws/ws-robosocket where myApp.mybluemix.net is the NODERED_BASE_URL.
The NODERED_BASE_URL can have an additional region information say eu-gb for UK region and NODERED_BASE_URL could be myApp.eu-gb.mybluemix.net.
Sign up for IBM's Watson Studio. By creating a project in Watson Studio a free tier Object Storage service will be created in your IBM Cloud account. Choose the storage type as Object Storage (Swift API) for this code pattern.
- Open IBM Watson Studio.
- Click on
Create notebookto create a notebook. - Select the
From URLtab. - Enter a name for the notebook.
- Optionally, enter a description for the notebook.
- Enter this Notebook URL: https://github.com/IBM/watson-nao-robot/blob/master/Notebook/Robo_Notebook.ipynb
- Select the free Anaconda runtime.
- Click the
Createbutton.

Use Find and Add Data (look for the 10/01 icon)
and its Files tab. From there you can click
browse and add data files from your computer.
Note: The data file in the
datadirectory -Data.csvhas been downloaded from https://www.ibm.com/communities/analytics/watson-analytics-blog/retail-sales-marketing-profit-cost/. Change the file name fromWA_Retail-SalesMarketing_-ProfitCost.csvtoData.csvbefore reading it in Watson Studio. There are spaces in the column names which needs to be replaced with "_" before reading the file in Watson Studio. Ex :- Product line has to be Product_line. Please visit the site for the terms and conditions for usage of the data.

Select the cell below 2. Read the Data & convert it into Dataframe section in the notebook.
Use Find and Add Data (look for the 10/01 icon) and its Files tab. You should see the file names uploaded earlier. Make sure your active cell is the empty one created earlier. Select Insert to code (below your file name). Click Insert pandas DataFrame from drop down menu.

In the cell below 7. Expose integration point with a websocket client , update the websocket url noted in section 5 in the start_websocket_listener function.

When a notebook is executed, what is actually happening is that each code cell in the notebook is executed, in order, from top to bottom.
Each code cell is selectable and is preceded by a tag in the left margin. The tag
format is In [x]:. Depending on the state of the notebook, the x can be:
- A blank, this indicates that the cell has never been executed.
- A number, this number represents the relative order this code step was executed.
- A
*, this indicates that the cell is currently executing.
There are several ways to execute the code cells in your notebook:
- One cell at a time.
- Select the cell, and then press the
Playbutton in the toolbar.
- Select the cell, and then press the
- Batch mode, in sequential order.
- From the
Cellmenu bar, there are several options available. For example, you canRun Allcells in your notebook, or you canRun All Below, that will start executing from the first cell under the currently selected cell, and then continue executing all cells that follow.
- From the
The results from Watson Studio are sent to Node-RED flow which is relayed to NAO Robot.
The sample response for the question is given below.
  **User**: What is the highest profit of Capri Italy in 2007?

  **NAO response**: The highest profit of Capri Italy in 2007 is 310000.
Open the NAO robot project (WatsonNaoRobot.pml) file under choregraphe/watson_nao_robot folder with the Choregraphe.
Connect to the NAO robot using the Connection/Connect to menu from Choregraphe.
- Select the
behavior.xarfile in the project folder structure in the top left pane. - Double click the
WatsonSTT Python Scriptbox in the choregraphe canvas pane. - Update the Watson Speech to Text credentials in the
authvariable in the Python code inside thePython Scriptbox as shown below.

- Select the behavior.xar file in the project folder structure in the top left pane.
- Double click the
PostToNode-RED Python Scriptbox in the choregraphe canvas pane. - Update the Node-RED URL in the
urlvariable in the Python code inside thePython Scriptbox as shown below.

Save the changes to the NAO robot project (WatsonNaoRobot.pml).
- Select
Connectionfrom Choregraphe Menu and clickUpload to the robot and Playsub menu to transfer behavior files to the NAO Robot and activate this code on the Robot. - Press the front tactile head sensor of the NAO robot and ask your question related to the dataset analysis and insights.
![]()


