DOCUMENTATION https://generator.nftchef.dev/
Please check the discussions for similar issues or open a new discussion.
- Twitter: https://twitter.com/nftchef
- Discord genkihagata#3074
Eth address: 0xeB23ecf1fa9911fca08ecAbe83d426b6bd525bB0
This repository is a hard-fork from the original Hashlips generator (c.2021) and makes a couple of fundamental changes to how layers are expected to be named and organized. Please read this README's Nesting Structure section and the related Advanced options for a better understanding of how things should be named and organized.
- Chance of "NONE" or skipping a trait
- Controlling layer order (z-index)
- Flagging Incompatible layers
- Forced Combinations
- Output Files as JPEG
- Attribute Display Types and Overrides
- Trait Value Overrides
- Provenance Hash Generation
- UTIL: Remove traits from Metadata
- Randomly Insert Rare items - Replace Util
This branch of the Hashlips generator builds on the example (v.1.0.6) and allows you to nest sub-folders within your top layer folders, and, optionally gives you a configuration option to overwrite the trait_type that is written to the metadata from those layers.
The following example (included in this repository) uses multiple layer_configurations in config.js to generate male and female characters, as follows.
const layerConfigurations = [
  {
    growEditionSizeTo: 2,
    layersOrder: [
      { name: "Background" },
      { name: "Female Hair", trait: "Hair" },
    ],
  },
  {
    growEditionSizeTo: 5,
    layersOrder: [
      { name: "Background" },
      { name: "Eyeball" },
      { name: "Male Hair", trait: "Hair" },
    ],
  },
];
The Hair layers, exist as their own layers in the layers directory and use the trait key/property to overwrite the output metadata to always look like, the following, regardless of layer folder it is using–so both Male and Female art have a Hair trait.
    {
        "trait_type": "Hair",
        "value": "Rainbow Ombre"
}In this modified repository, nesting subdirectories is supported and each directory can have it's own rarity weight WITH nested weights inside for individual PNG's.

For the example above, Female Hair can be read as:
Female Hair layer is required from config -> Randomly select either
commonorrarewith a respective chance of70% / 30%. If Common is chosen, randomly pick between Dark Long (20% chance) or Dark Short (20%)
Additionally, png files that ommit a rarity weight will be included always and are considered "required".
This means, that if you need multiple images to construct a single "trait", e.g., lines layer and fill layer, you could do the following:
HAIR
|-- Special Hair#10
|----- 1-line-layer.png
|----- 2-fill-layer.png
Where the containing folder will define the traits rarity and in the event that it is selected as part of the randomization, BOTH nested images will be included in the final result, in alphabetical oder–hence the 1, 2, numbering.
If you want to have a layer ignored in the DNA uniqueness check, you can set bypassDNA: true in the options object. This has the effect of making sure the rest of the traits are unique while not considering the Background Layers as traits, for example. The layers are included in the final image.
layersOrder: [
      { name: "Background" },
      { name: "Background" ,
        options: {
          bypassDNA: false;
        }
},In some projects, you may define a root folder in layersOrder only as a starting point in the branching structure and not want to use that folders name as the trait_value in the attributes. Rather, nested, weighted subfolders should be the trait_type for example:
layers/Headware
├── Cap#10
│   ├── cap a#6.png
│   └── cap b#6.png
└── Hair#10\
    ├── hair a#6.png
    └── hair b#6.png
Rather than the attribute data always listing Headware as the type, you can use Cap or Hair instead.
Set useRootTraitTypetofalse` in config.js to use parent folder names instead of the root.
🧪 BETA FEATURE
In the case that your folder names need to include number or anything else that you do not want in the final metadata, you can clean up the trait_type by passing in the trait option to the sublayerOptions object where the nested folder lives. For example, if we are using a subfolder named 1-SubAccessory and want to rename it to Backpack Accessory, pass the following configuration
    layersOrder: [
      {
        name: "Back Accessory",
        sublayerOptions: {
          "1-SubAccessory": { trait: "Backpack Accessory" },
        },
      },
{ name: "Head" },By default, nested folders will inherit blend and opacity settings from the root-level layer defined in layersOrder. When you need to overwrite that on a sublayer-basis (by name of the nested folder, not by filename), you can specify a sublayerOptions object.
layersOrder: [
      { name: "Clothes" },
      {
        name: "Bases",
        blend: "destination-over", // optional
        sublayerOptions: { Hands: { blend: "source-over" } },
      },
      { name: "Holdableitems" },
],When combining multiple sublayer options, remember that each Sublayer is an object that accepts key:value pairs for each valid option above.
For example, a single layer may have multiple sublayer options in the following format.
sublayerOptions: {
  Hands: {
    trait: 'New trait name',
    blend: 'source-over',
    opacity: 0.9,
  },
  Face: {
    trait: 'the face',
    blend: 'source-over',
    opacity: 0.9,
  }
}
In the example above: The intended stacking order is Base > Clothes > Hand > holdableItem, because Hands are a nested subfolder of Bases, this can be tricky. By defining blend: destination-over for the Base, and then source-over for the Hands, the stacking order can be controlled to draw the Base under the clothes and then the Hand above the clothes.
Name + Number prefix and reset for configuration sets
If you are using the generator with multiple layerConfiguration objects to generate different species/genders/types, it is possible to add a name prefix and a reset counter for the name, so the token names start at 1 for each type.
for example, if you are creating multiple animals, and each animal should start with Animal #1, but the token numbers should increment as normal, you can use the following namePrefix and resetNameIndex properties to acheive this.
    growEditionSizeTo: 10,
    namePrefix: "Lion",
    resetNameIndex: true, // this will start the Lion count at #1 instead of #6
    layersOrder: [
      { name: "Background" },
      { name: "Eyeball" },
      { name: "Male Hair", trait: "Hair" },
    ],
You may choose to omit the resetNameIndex or set it to false if you would instead like each layer set to use the token (_edition) number in the name–it does this by default.
If you would like any given layer or sublayer to have a chance at rolling NONE, you can do this by adding a blank PNG to the folder, and giving it the name of NONE + the weight you would like to use for it's chance of being chosen–identical to any other layer.
NONE#20.png
By using this feature, the trait will not be included in the metadata. For example, rather than having trait_type: 'Hat', value: 'NONE" in the metadata, it will be skipped.
If you need to change the name from "NONE" to something else, you can change the following in config.js
// if you use an empty/transparent file, set the name here.
const emptyLayerName = "NONE";Generally, layer order is defined by using layersOrder in config.js. However, when using nested folders, layer order defaults to alphanumerec sorting (0-9,a-z)
To manually define stacking order for sublayers (nested folders) use the z#, (z followed by a positive or negative number, followed bu a , commma) prefix for folder names and/or file names.
Example folders
|- z-1,folder
|-normal folder/
|-z1,foldername
|-z2,foldername/
|-- z-2,image-that-needs-to-go-under-everything.png
Folders and files without a z#, prefix default to a z-index of 0
If a file has a z#, prefix, and it's parent folder(s) does as well, the files z-index will be used, allowing you to overwrite and define an individual's layer order.
Layer order z-indexes are "global" meaning the index is relative to ALL OTHER z-indices defined in every folder/file
👉 For edge cases only Nested Folders should always be used first and can solve 90% of "if this, then not that" use cases.
To flag certain images that should never be used with another image, for this, you can use the incompatible configuration in config.js
To set incompatible items, in the incompatible object, use the layer/images cleanName (the name without rarity weight, or .png extension) as a key, and create an array of incompatible layer names (again, clean names). Layers that have space or hyphens in their names should be wrapped in quotes
const incompatible = {
  Red: ["Dark Long"],
  "Name with spaces": ["buzz","rare-Pink-Pompadour" ]
  // directory incompatible with directory example
  White: ["rare-Pink-Pompadour"],
};[Array] that it lists.

When you need to force/require two images to work together that are in different root-layer-folders (the layer config), you can use the forcedCombinations object in config.js.
const forcedCombinations = {
  floral: ["MetallicShades", "Golden Sakura"],
};
Using the clean Name (file name without weight and .png extension), specify the key (if names have spaces, use quotes "file name" :)
Then, create an array of names that should be required.
Note: the layer order matters here. The key (name on the left) should be a file withing a layer that comes first in the layersOrder configuration, then, files that are required (in the array), should be files in layers afterward.
set debugLogging = true in config to check whether files are being set and picked for the forced combinations. You should see output that looks like the following if it is wokring:
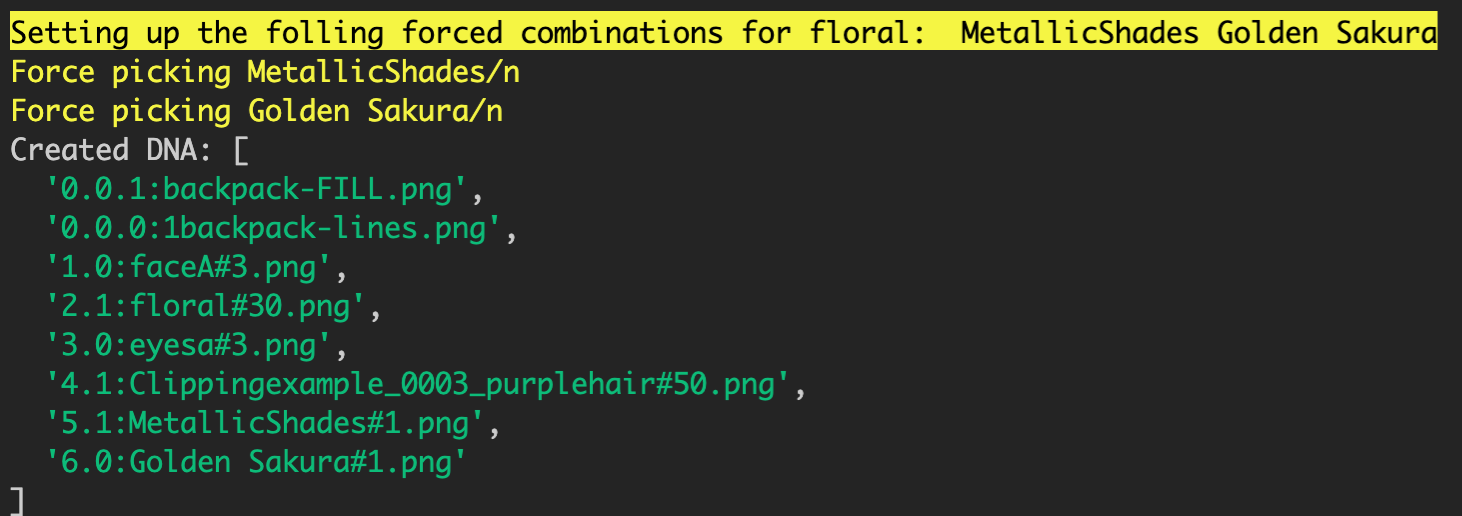
If not, double check your file names, layer ordering, and quotation marks.
If you're working with higher res, it's recommended for your storage-costs-sake to output the image to jpeg, to enable this, set outputJPEG in config.js to true.
const outputJPEG = true; // if false, the generator outputs png'sIf you need to add randomized values for traits and different display types supported by OpenSea, this branch re-purposes the extraAttributes configuration for that purpose.
in config.js
const extraAttributes = () => ([
  {
    // Optionally, if you need to overwrite one of your layers attributes.
    // You can include the same name as the layer, here, and it will overwrite
    //
    "trait_type": "Bottom lid",
    value:` Bottom lid # ${Math.random() * 100}`,
    },
  {
    display_type: "boost_number",
    trait_type: "Aqua Power",
    value: Math.random() * 100,
  },
  {
    display_type: "boost_number",
    trait_type: "Mana",
    value: Math.floor(Math.random() * 100),
  },
You are free to define extra traits that you want each generated image to include in it's metadata, e.g., health.
Be sure to pass in a randomization function here, otherwise every json file will result in the same value passed here.
This also supports overwriting a trait normally assigned by the layer Name/folder and file name. If you'd like to overwrite it with some other value, adding the same trait in extraMetadata will overwrite the default trait/value in the generated metadata.
🧪 BETA FEATURE
When you need to override the trait_value generated in the metadata.
By default trait values come from the file name or subfolder that is chosen (the last one in a nested structure with a weight delimiter).
Because many options require the filenames to be unique, there may be a situation where you need to overwrite the default value. To do this, set the overrides in config.js
/**
 * In the event that a filename cannot be the trait value name, for example when
 * multiple items should have the same value, specify
 * clean-filename: trait-value override pairs. Wrap filenames with spaces in quotes.
 */
const traitValueOverrides = {
  Helmet: "Space Helmet",
  "gold chain": "GOLDEN NECKLACE",
};If you need to generate a provenance hash (and, yes, you should, read about it here ), make sure the following in config.js is set to true
//IF you need a provenance hash, turn this on
const hashImages = true;
Then…
After generating images and data, each metadata file will include an imageHash property, which is a Keccak256 hash of the output image.
run the following util
node utils/provenance.js
The Provenance information is saved to the build directory in _prevenance.json. This file contains the final hash as well as the (long) concatednated hash string.
*Note, if you regenerate the images, You will also need to regenerate this hash.
If you need to remove a trait from the generated attributes for ALL the generated metadata .json files, you can use the removeTrait util command.
node utils/removeTrait.js "Trait Name"
If you would like to print additional logging, use the -d flag
node utils/removeTrait.js "Background" -d
If you would like to manually add 'hand drawn' or unique versions into the pool of generated items, this utility takes a source folder (of your new artwork) and inserts it into the build directory, assigning them to random id's.
- create a source directory with an images and json folder (any name, you will specify later)
- Name images sequentially from 1.png/jpeg (order does not matter) and place in the images folder.
- Put matching, sequential json files in the json folder
example:
├── ultraRares
│   ├── images
│   │   ├── 1.png
│   │   └── 2.png
│   └── json
│       ├── 1.json
│       └── 2.json
You must have matching json files for each of your images.
Because this script randomizes which tokens to replace/place, it is important to update the metadata properly with the resulting tokenId #.
Everywhere you need the edition number in the metadata should use the ## identifier.
"edition": "##",Don't forget the image URI!
  "name": "## super rare sunburn ",
  "image": "ipfs://NewUriToReplace/##.png",
  "edition": "##",
if you need #num with the # in the name for example, use a different symbol other than ##. see the --replacementSymbol flag below
Run the script with the following command, passing in the source directory name, (relateive to the current working dir)
node utils/replace.js [Source Directory]example
node utils/replace.js ./ultraRaresOutputs command help.
-d outputs additional logging information
If you need the output data to have #12 for example, with the leading #, the default ## in the metadata is a problem. use this flag in combination with a different symbol in the metadata json files to replace the passed in symbol with the appropriate edition number
node index.js ./ultraRares -r '@@'
This will replace all instances of @@ with the item number
-i Change the default object identifier/location for the edition/id number. defaults to "edition". This is used when the metadata object does not have "edition" in the top level, but may have it nested in "properties", for example, in which case you can use the following to locate the proper item in _metadata.json
node utils/replace.js ./ultraRares -i properties.edition
build directory to be complete (after generation)
🧪 BETA FEATURE
If you are building for Solana, all the image generation options in config are available and are the same.
Configure the solona_config.js file located in the Solana/ folder.
Here, enter in all the necessary information for your collection.
You can run the generator AND output Solana data by running the following command from your terminal
yarn generate:solana
If you are using npm,
npm run generate:solana
After running, your Solana ready files will be in build/solana
If you need to convert existing images/json to solana metadata standards, you can run the util by itself with,
node utils/metaplex.js
🧪 BETA FEATURE: Work in progress
If you are generating for Cardano, you can generate and output cardano formatted data at the same time, or run the util script separately after generation (or to an existing collection with proper data)
First, edit the cardano_config.js file in the Cardano/ folder with your information.
Then, to generate images and cardano data at once, run:
yarn generate:cardano
or if you're using npm
npm run generate:cardano
If you have an existing set of generated images and data, and you have a configured Cardano/cardano_config.js file, you can run the cardano conversion script with:
node utils/cardano.js
This tool currently does not support gif layers or outputting gifs. If you want to GIF generative tool, check out Jalagar's GIF Engine. It supports most of the same functionality as this repo (if-then, z-index, layering, Tezos, Solana, legendary replace). If you have any questions or issues, please create a issue/discussion on Jalagar's repo.
For example, if you are using a Backgrounds layer and would prefer to remove that as a trait from the generated json,
First, generate the images and json as usual, then, running the remove trait util
node utils/removeTrait.js "Background"
Will remove the background trait from all metadata files.
extraMetadatain prior version of this repo/branch,extraMetadatawas used for attributes, it has been renamedextraAttributes
This is fork/combination of the original hashlips generator, for basic configuration Check the Basic Configuration readme


