
Deep Learning Gateway on Raspberry Pi And Other Edge Devices
![]()
- One-time donation via PayPal.
- One-time donation via crypto-currencies.
- Become a backer or sponsor on Open Collective.
Introduction
This project turns edge devices such as Raspberry Pi into an intelligent gateway with deep learning running on it. No internet connection is required, everything is done locally on the edge device itself. Further, multiple edge devices can create a distributed AIoT network.
At DT42, we believe that bringing deep learning to edge devices is the trend towards the future. It not only saves costs of data transmission and storage but also makes devices able to respond according to the events shown in the images or videos without connecting to the cloud.
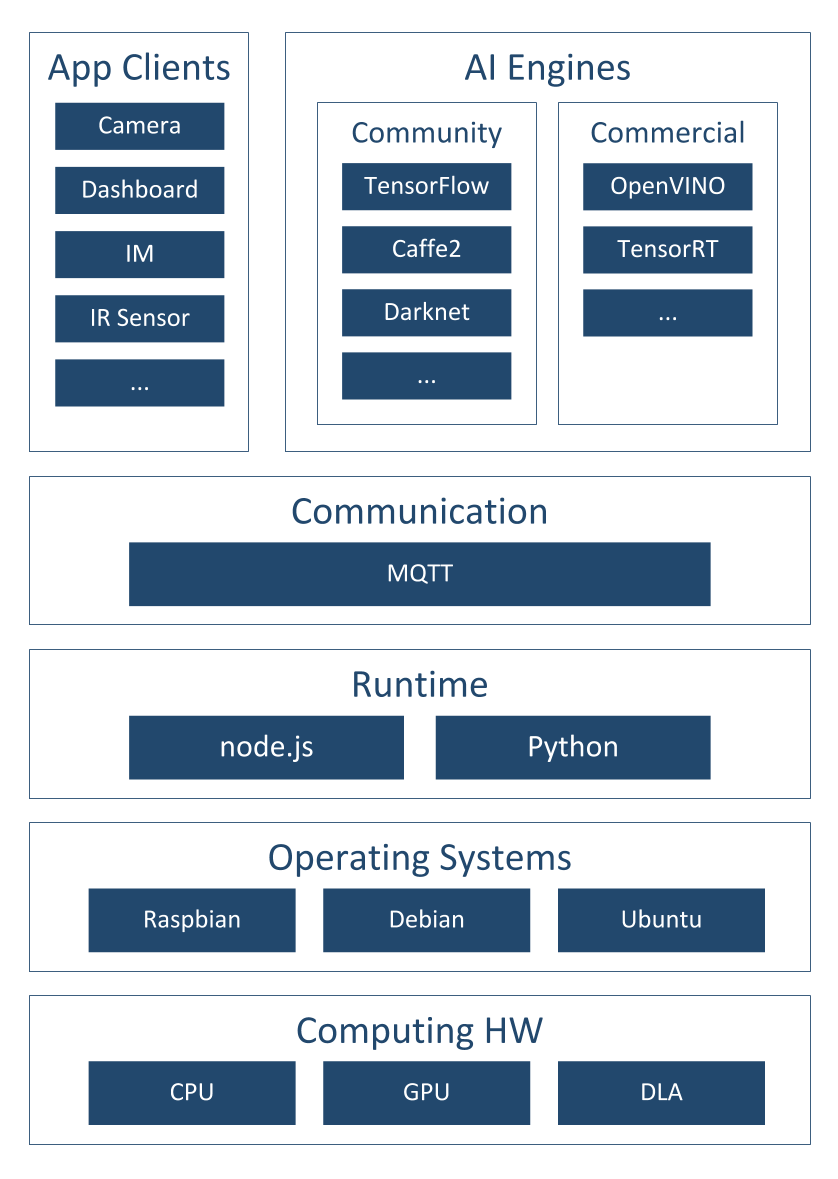
Figure 1: BerryNet architecture
Figure 1 shows the software architecture of the project, we use Node.js/Python, MQTT and an AI engine to analyze images or video frames with deep learning. So far, there are two default types of AI engines, the classification engine (with Inception v3 [1] model) and the object detection engine (with TinyYOLO [2] model or MobileNet SSD [3] model). Figure 2 shows the differences between classification and object detection.

Figure 2: Classification vs detection
One of the application of this intelligent gateway is to use the camera to monitor the place you care about. For example, Figure 3 shows the analyzed results from the camera hosted in the DT42 office. The frames were captured by the IP camera and they were submitted into the AI engine. The output from the AI engine will be shown in the dashboard. We are working on the Email and IM notification so you can get a notification when there is a dog coming into the meeting area with the next release.

Figure 3: Object detection result example
To bring easy and flexible edge AI experience to user, we keep expending support of the AI engines and the reference HWs.
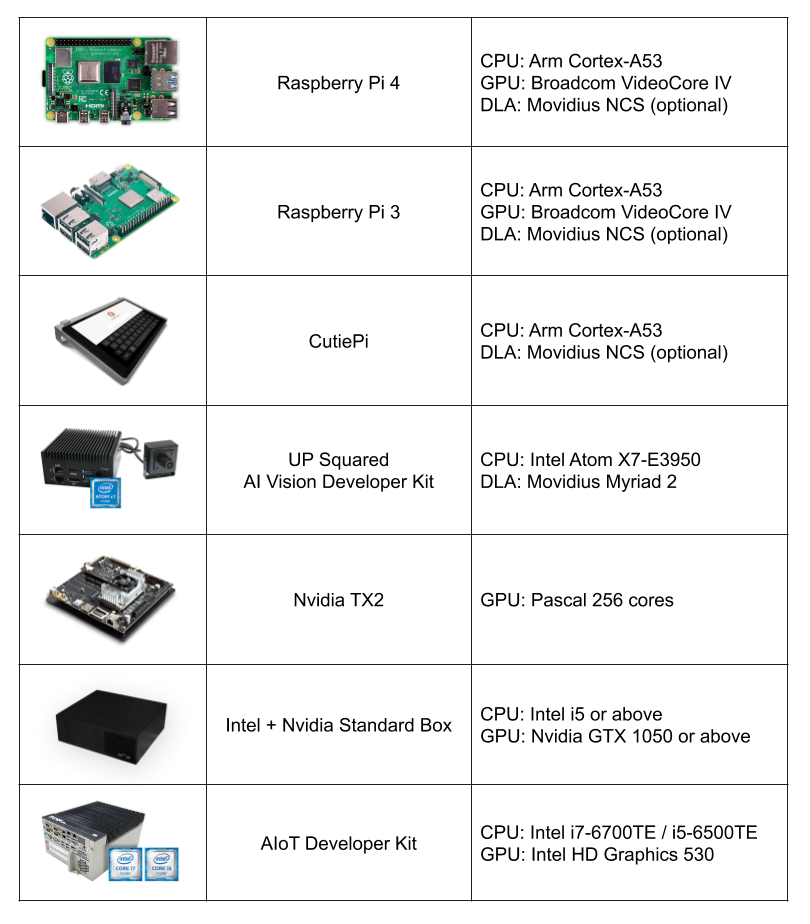
Figure 4: Reference hardwares
Installation
You can install BerryNet by using pre-built image or from source. Please refer to the installation guide for the details.
We are pushing BerryNet into Debian repository, so you will be able to install by only typing one command in the future.
Here is the quick steps to install from source:
$ git clone https://github.com/DT42/BerryNet.git
$ cd BerryNet
$ ./configure
Start and Stop BerryNet
BerryNet performs an AIoT application by connecting independent components together. Component types include but not limited to AI engine, I/O processor, data processor (algorithm), or data collector.
We recommend to manage BerryNet componetns by supervisor, but you can also run BerryNet components manually. You can manage BerryNet via supervisorctl:
```
# Check status of BerryNet components
$ sudo supervisorctl status all

# Stop Camera client
$ sudo supervisorctl stop camera

# Restart all components
$ sudo supervisorctl restart all

# Show last stderr logs of camera client
$ sudo supervisorctl tail camera stderr
```
For more possibilities of supervisorctl, please refer to the official tutorial.
The default application has three components:
- Camera client to provide input images
- Object detection engine to find type and position of the detected objects in an image
- Dashboard to display the detection results
You will learn how to configure or change the components in the Configuration section.
Dashboard: Freeboard
Open Freeboard on RPi (with touch screen)
Freeboard is a web-based dashboard. Here are the steps to show the detection result image and text on Freeboard:
- 1: Enter
http://127.0.0.1:8080in browser's URL bar, and press enter - 2: Download the Freeboard configuration for default application,
dashboard-tflitedetector.json - 2: Click
LOAD FREEBOARD, and select the newly downloadeddashboard-tflitedetector.json - 3: Wait for seconds, you should see the inference result image and text on Freeboard
Open Freeboard on another computer
Assuming that you have two devices:
- Device A with IP
192.168.1.42, BerryNet default application runs on it - Device B with IP
192.168.1.43, you want to open Freeboard and see the detection result on it
Here are the steps:
- 1: Enter
http://192.168.1.42:8080in browser's URL bar, and press enter - 2: Download the Freeboard configuration for default application,
dashboard-tflitedetector.json - 3: Replace all the
localhostto192.168.1.42indashboard-tflitedetector.json - 2: Click
LOAD FREEBOARD, and select the newly downloadeddashboard-tflitedetector.json - 3: Wait for seconds, you should see the inference result image and text on Freeboard
For more details about dashboard configuration (e.g. how to add widgets), please refer to Freeboard project.
Enable Data Collector
You might want to store the snapshot and inference results for data analysis.
To run BerryNet data collector manually, you can run the command below:
$ bn_data_collector --topic-config <topic-config-filepath> --data-dirpath <result-dirpath>
The topic config indicates what MQTT topic the data collector will listen, and what handler will be triggered. Here is a topic config example:
{
    "berrynet/engine/tflitedetector/result": "self.update"
}
The inference result image and text will be saved into the indicated result directory.
Configuration
The default supervisor config is at /etc/supervisor/conf.d/berrynet-tflite.conf. To write your own supervisor config, you can refer to here for more example supervisor configs of BerryNet
Camera Client
BerryNet camera client can run in two modes: stream or file. In stream mode, local camera (e.g. USB camera and RPi camera) and IP camera can be supported, and input frame rate (FPS) can be changed on demand (default is 1). In file mode, user can indicate filepath as input source.
To run camera client in stream mode:
$ bn_camera --fps 5
To run camera client in file mode:
$ bn_camera --mode file --filepath <image-filepath>
Use Your Data To Train
The original instruction of retraining YOLOv2 model see github repository of darknet
In the current of BerryNet, TinyYolo is used instead of YOLOv2. The major differences are:
- Create file yolo-obj.cfg with the same content as in
tiny-yolo.cfg - Download pre-trained weights of darknet reference model,
darknet.weights.12, for the convolutional layers (6.1MB) https://drive.google.com/drive/folders/0B-oZJEwmkAObMzAtc2QzZDhyVGM?usp=sharing
The rest parts are the same as retraining YOLO.
If you use LabelMe to annotate data, utils/xmlTotxt.py can help convert the xml format to the text format that darknet uses.
Discussion
Please refer to the Slack or Telegram Group for questions, suggestions, or any idea discussion.


![dependabot[bot] avatar](https://avatars.githubusercontent.com/in/29110?v=4 "dependabot[bot]")


